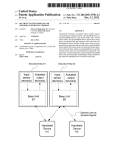
1
NETGEAR ReadyNAS
Duo User Guide
NETGEAR, Inc.
4500 Great America Parkway
Santa Clara, CA 95054 USA
202-10366-01
v1.1
April 2008
© 2008 by NETGEAR, Inc. All rights reserved.
Technical Support
Registration on the website or over the phone is required before you can use our telephone support service. The phone
numbers for worldwide regional customer support centers are on the Warranty and Support Information card that came
with your product.
Go to http://kbserver.netgear.com for product updates and Web support.
Trademarks
NETGEAR, the NETGEAR logo, ReadyNAS, X-RAID, FrontView, RAIDar, RAIDiator, Network Storage Processor,
and NSP are trademarks or registered trademarks of NETGEAR, Inc. Microsoft, Windows, Windows NT and Vista are
registered trademarks of Microsoft Corporation. Other brand and product names are registered trademarks or trademarks
of their respective holders.
Statement of Conditions
In the interest of improving internal design, operational function, and/or reliability, NETGEAR reserves the right to
make changes to the products described in this document without notice.
NETGEAR does not assume any liability that may occur due to the use or application of the product(s) or circuit
layout(s) described herein.
Certificate of the Manufacturer/Importer
It is hereby certified that the ReadyNAS Duo has been suppressed in accordance with the conditions set out in the
BMPT-AmtsblVfg 243/1991 and Vfg 46/1992. The operation of some equipment (for example, test transmitters) in
accordance with the regulations may, however, be subject to certain restrictions. Please refer to the notes in the operating
instructions.
The Federal Office for Telecommunications Approvals has been notified of the placing of this equipment on the market
and has been granted the right to test the series for compliance with the regulations.
Bestätigung des Herstellers/Importeurs
Es wird hiermit bestätigt, daß dasReadyNAS Duo gemäß der im BMPT-AmtsblVfg 243/1991 und Vfg 46/1992
aufgeführten Bestimmungen entstört ist. Das vorschriftsmäßige Betreiben einiger Geräte (z.B. Testsender) kann jedoch
gewissen Beschränkungen unterliegen. Lesen Sie dazu bitte die Anmerkungen in der Betriebsanleitung.
Das Bundesamt für Zulassungen in der Telekommunikation wurde davon unterrichtet, daß dieses Gerät auf den Markt
gebracht wurde und es ist berechtigt, die Serie auf die Erfüllung der Vorschriften hin zu überprüfen.
Voluntary Control Council for Interference (VCCI) Statement
This equipment is in the Class B category (information equipment to be used in a residential area or an adjacent area
thereto) and conforms to the standards set by the Voluntary Control Council for Interference by Data Processing
Equipment and Electronic Office Machines aimed at preventing radio interference in such residential areas. When used
near a radio or TV receiver, it may become the cause of radio interference. Read instructions for correct handling.
ii
v1.1, April 2008
Product and Publication Details
Model Number:
Publication Date:
April 2008
Product Family:
Network Storage
Product Name:
ReadyNAS Duo
Home or Business Product:
Home
Language:
English
Publication Part Number:
202-10366-01
Publication Version Number:
1.1
iii
v1.1, April 2008
iv
v1.1, April 2008
Contents
NETGEAR ReadyNAS Duo User Guide
About This Manual
Conventions, Formats, and Scope .................................................................................... x
How to Use This Manual .................................................................................................. xi
How to Print This Manual ................................................................................................. xi
Revision History ................................................................................................................xii
Chapter 1
Configuring Your ReadyNAS Duo
Setting Up Your Network Connection .............................................................................1-2
Ethernet Interface Settings .......................................................................................1-2
Global Network Settings ...........................................................................................1-4
Setting Up Security .........................................................................................................1-6
Admin Password ......................................................................................................1-6
Setting Up User and Group Accounts ......................................................................1-7
Selecting Services for Share Access ............................................................................ 1-11
Standard File Protocols .......................................................................................... 1-11
Streaming Services ................................................................................................1-13
Discovery Services .................................................................................................1-15
Installed AddOns ....................................................................................................1-15
Understanding Volume Management ...........................................................................1-20
Volume Management for X-RAID ...........................................................................1-20
USB Storage ..........................................................................................................1-22
Managing Your Shares .................................................................................................1-24
Adding Shares ........................................................................................................1-24
Managing Shares ...................................................................................................1-25
USB Shares ...........................................................................................................1-31
Configuring Backup Jobs ..............................................................................................1-32
Adding a New Backup Job .....................................................................................1-33
Viewing the Backup Schedule ................................................................................1-38
v
v1.1, April 2008
NETGEAR ReadyNAS Duo User Guide
Programming the Backup Button ...........................................................................1-39
Viewing the Backup Log .........................................................................................1-39
Editing a Backup Job .............................................................................................1-40
Setting Up Printers .......................................................................................................1-40
Print Shares over CIFS/SMB .................................................................................1-40
IPP Printing ............................................................................................................1-41
Managing Print Queues .........................................................................................1-41
Managing Your ReadyNAS Duo System ......................................................................1-42
Clock ......................................................................................................................1-42
Alerts ......................................................................................................................1-43
Performance ...........................................................................................................1-45
Language ...............................................................................................................1-48
Updating ReadyNAS Duo ......................................................................................1-49
Power Management ...............................................................................................1-51
Shutdown ...............................................................................................................1-53
Chapter 2
Accessing Shares from Your Operating System
Windows .........................................................................................................................2-1
MAC OS X ......................................................................................................................2-2
AFP over Bonjour .....................................................................................................2-3
AFP over AppleTalk ..................................................................................................2-4
MAC OS 9 ......................................................................................................................2-6
Linux/Unix .......................................................................................................................2-7
Web Browser ..................................................................................................................2-8
FTP/FTPS ..................................................................................................................... 2-11
Rsync ............................................................................................................................2-12
Networked DVD Players and UPnP AV Media Adapters ..............................................2-13
Chapter 3
Maintenance and Administration
Viewing System Status ...................................................................................................3-1
Health .......................................................................................................................3-1
Logs .........................................................................................................................3-2
Replacing a Failed Disk ..................................................................................................3-3
Ordering a Replacement Disk ..................................................................................3-3
Replacing a Failed Disk on the ReadyNAS Duo ......................................................3-3
vi
Contents
v1.1, April 2008
NETGEAR ReadyNAS Duo User Guide
Resynchronizing the Volume ..........................................................................................3-5
Resetting Your System (System Switch) ........................................................................3-5
Changing User Passwords .............................................................................................3-6
Appendix A
ReadyNAS Duo Glossary
Appendix B
General Glossary
Index
Contents
vii
v1.1, April 2008
NETGEAR ReadyNAS Duo User Guide
viii
Contents
v1.1, April 2008
About This Manual
Congratulations on your purchase of a ReadyNAS™ Duo from NETGEAR, Inc. If you have not
already done so, please read the printed Installation Guide provided with your product and the
ReadyNAS Setup Manual on the Installation CD.
The ReadyNAS Setup Manual takes you step-by-step through the Setup Wizard and quickly
prepares the ReadyNAS Duo for your network. The NETGEAR® ReadyNAS Duo User Guide
explains each of the available options in detail, including many of the advanced options not
described during the Setup Wizard process. The manual includes:
Chapter 1, “Configuring Your ReadyNAS Duo,” describes all the menus and tabs available in the
FrontView Advanced Control mode.
Chapter 2, “Accessing Shares from Your Operating System.” If you have already configured the
ReadyNAS Duo and you need help in accessing the shares on the ReadyNAS Duo, skip to this
chapter.
Chapter 3, “Maintenance and Administration”:
•
If a disk fails, learn about the proper procedure for replacing the failed disk in “Replacing a
Failed Disk.”
•
If you need to reinstall the firmware or reset the system back to the factory default
configuration, see “Resetting Your System (System Switch)” for an explanation of both.
•
“Changing User Passwords” covers users other than administrators can access FrontView to
change their password.
Appendix A, “ReadyNAS Duo Glossary,” covers questions on what constitutes a valid input for
hostname, workgroup, or password.
Appendix B, “General Glossary,” provides definitions for some of the technical terminologies
used in this document.
ix
v1.1, April 2008
NETGEAR ReadyNAS Duo User Guide
Conventions, Formats, and Scope
The conventions, formats, and scope of this manual are described in the following paragraphs:
•
•
Typographical Conventions. This manual uses the following typographical conventions:
Italic
Emphasis, books, CDs, file and server names, extensions
Bold
User input, IP addresses, GUI screen text
Fixed
Command prompts, CLI text, code
italic
URL links
Formats. This manual uses the following formats to highlight special messages:
Note: This format is used to highlight information of importance or special interest.
Tip: This format is used to highlight a procedure that will save time or resources.
Warning: Ignoring this type of note might result in a malfunction or damage to the
equipment.
Danger: This is a safety warning. Failure to take heed of this notice might result in
personal injury or death.
•
Scope. This manual is written for the ReadyNAS Duo according to these specifications:
Product Version
1.1
Manual Publication Date
April 2008
x
About This Manual
v1.1, April 2008
NETGEAR ReadyNAS Duo User Guide
How to Use This Manual
The HTML version of this manual includes the following:
•
Buttons,
at a time.
and
, for browsing forward or backward through the manual one page
•
A
button that displays the table of contents and a
button that displays an index.
Double-click on a link in the table of contents or index to navigate directly to where the topic
is described in the manual.
•
A
model.
•
Links to PDF versions of the full manual and individual chapters.
button to access the full NETGEAR, Inc. online knowledge base for the product
How to Print This Manual
To print this manual, you can choose one of the following options, according to your needs.
•
Printing a page from HTML. Each page in the HTML version of the manual is dedicated to
a major topic. Select File > Print from the browser menu to print the page contents.
•
Printing from PDF. Your computer must have the free Adobe Acrobat Reader installed for
you to view and print PDF files. The Acrobat Reader is available on the Adobe website at
http://www.adobe.com.
– Printing a PDF chapter. Use the PDF of This Chapter link at the top left of any page.
–
•
Click the PDF of This Chapter link at the top left of any page in the chapter you want
to print. The PDF version of the chapter you were viewing opens in a browser
window.
•
Click the print icon in the upper left corner of your browser window.
Printing a PDF version of the complete manual. Use the Complete PDF Manual link
at the top left of any page.
•
Click the Complete PDF Manual link at the top left of any page in the manual. The
PDF version of the complete manual opens in a browser window.
About This Manual
xi
v1.1, April 2008
NETGEAR ReadyNAS Duo User Guide
•
Click the print icon in the upper left corner of your browser window.
Tip: If your printer supports printing two pages on a single sheet of paper, you can
save paper and printer ink by selecting this feature.
Revision History
Part Number
Version
Date
Number
Description
202-10336-01
1.0
Feb. 2008
First publication
202-103336-01 1.1
April 2008
Documentation modifications
xii
About This Manual
v1.1, April 2008
Chapter 1
Configuring Your ReadyNAS Duo
The Advanced Control mode shows all of the settings available in the Setup Wizard plus some
more advanced features. The basic network settings and other, optional, more advanced features
are included in this chapter.
Figure 1-1
When you first switch to this mode, you see the menus on the left that allow you to quickly jump to
the screen you want.
As you click the menu buttons, you notice a similar theme across all screens. At the top right
corner is the command bar that typically provides options to return to the Home screen, refresh the
browser window, display Help where available, or to log out of this session. For security reasons,
Logout acts only as a reminder to close the current browser session, which is necessary to securely
log out.
,.
Figure 1-2
1-1
v1.1, April 2008
NETGEAR ReadyNAS Duo User Guide
Toward the bottom left, there are two buttons that allow you to switch back and forth between the
Setup Wizard mode and the Advanced Control mode. At the bottom of the screen is the status bar
including the date button on the left which, which clicked, links you to the Clock screen. The
status lights to the right give a quick glimpse of the system device status.
Figure 1-3
Move the mouse pointer over the status light to display device information, or click a status light to
display the status in more detail. Above the Status Lights is the Apply button. Use this to save any
changes on the current screen.
You can access your Network settings by selecting Network from the main menu. From the
Network menu, you can then navigate to your basic network settings screens such as Interfaces,
Global Settings, WINS and DHCP.
Setting Up Your Network Connection
This section allows you to refine your local network interface settings as well as your global
settings that allow access to your workgroup and share folders.
Ethernet Interface Settings
Select Network > Interfaces, and then select the Ethernet tab. From this screen you can specify
your network interface-specific settings.
In the Standard Setting section, you can specify the IP address, network mask, speed/duplex
mode, and MTU settings. In most networks where a DHCP server is enabled, you can simply
specify the Use values from a DHCP server option to automatically set the IP address and
network mask.
1-2
Configuring Your ReadyNAS Duo
v1.1, April 2008
NETGEAR ReadyNAS Duo User Guide
Figure 1-4
•
•
IP Assignment. Select either Use values from a DHCP server or Use values below.
–
If you elect to assign the IP address using Use values from a DHCP server, NETGEAR
advises that you set the lease time on the DHCP server/router to a value of at least a day.
Otherwise, you might notice that the ReadyNAS Duo IP address changes even when
ReadyNAS Duo has been powered down for only a few minutes. Most DHCP servers
allow you to assign a static IP address for specified MAC addresses. If you have this
option, this would be a good way to ensure your ReadyNAS Duo maintains the same IP
address even in DHCP mode.
–
If you assign a static IP address by selecting Use values below, be aware that the browser
will lose connection to the ReadyNAS Duo device after the IP address has been changed.
To reconnect after assigning a static IP address, open RAIDar and click Rescan to locate
the device, and then reconnect.
Speed/Duplex Mode. If you have a managed switch that works best if the devices are forced
to a particular speed or duplex mode, you can select the setting you want. NETGEAR advises
that you keep the setting in an Auto-negotiation mode otherwise.
Figure 1-5
Configuring Your ReadyNAS Duo
1-3
v1.1, April 2008
NETGEAR ReadyNAS Duo User Guide
•
MTU. In some network environments, changing the default MTU value can fix throughput
problems. NETGEAR advises that you leave the default setting otherwise.
Figure 1-6
In the Performance Setting area, the Enable jumbo frames option allows you to optimize the
ReadyNAS Duo for large data transfers such as multiple streams of video playback. Select this
option if your NIC and your gigabit switch support jumbo frames.
Note: The ReadyNAS Duo supports a 7936 byte frame size, so for optimal performance,
a switch capable of this frame size or larger should also be used.
Global Network Settings
It is important that all of your Network settings are correctly specified. When you first install the
ReadyNAS Duo, the default settings are used. However, you can customize some of these settings;
for example, you could change your Workgroup name.
• Hostname
The Hostname you specify is used to advertise the ReadyNAS Duo on your network. You can
use the hostname to address the ReadyNAS Duo in place of the IP address when accessing the
ReadyNAS Duo from Windows, or over OS X using SMB. This is also the name that appears
in the RAIDar scan list.
The default hostname is nas- followed by the last three bytes of your primary MAC address.
•
Default Gateway
The Default Gateway specifies the IP address of the system where your network traffic is
routed if the destination is outside your subnet. In most homes and smaller offices, this is the
IP address of the router connected to the cable modem or your DSL service.
If you selected the DHCP option in the Ethernet or Wireless tab, the Default Gateway field is
automatically populated with the setting from your DHCP server. If you selected the Static
option, you can manually specify the IP addresses of the default gateway server here.
1-4
Configuring Your ReadyNAS Duo
v1.1, April 2008
NETGEAR ReadyNAS Duo User Guide
•
Workgroup
The Workgroup is the file location name where your ReadyNAS Duo share folders reside. The
default name is NETGEAR. This name is broadcast on your Network. This name can be
changed to a name that is more familiar and recognizable. Just enter a new name and click
Apply.
Figure 1-7
•
DNS Settings
The DNS area allows you to specify up to three Domain Name Service servers for hostname
resolution. The DNS service translates host names into IP addresses.
If you selected the DHCP option in the Ethernet or Wireless tab, the Domain Name Server
fields are automatically populated with the DNS settings from your DHCP server. If you
selected the Static option, you can manually specify the IP addresses of the DNS servers and
the domain name here.
Configuring Your ReadyNAS Duo
1-5
v1.1, April 2008
NETGEAR ReadyNAS Duo User Guide
Setting Up Security
The Security tab allows you to set the administrator password, administer security, and set up the
password recovery feature on the ReadyNAS Duo. You will also be able to set up your User and
Group Accounts.
Admin Password
The Admin Password tab allows you to change the administrator user password. The administrator
user is the only user that can access FrontView, and this user has administrative privileges when
accessing shares. Be sure to set a password different from the default password, and make sure that
this password is kept in a safe place. Anyone who obtains this password can effectively change or
erase the data on the ReadyNAS Duo.
Figure 1-8
As a safeguard, you are requested to enter a password recovery question, the expected answer, and
an e-mail address. If, in the future, you forget the password, you can go to
https://<ReadyNAS ip_address>/password_recovery. Successfully answering the questions there
resets the Admin Password, and that new password is sent to the e-mail address you enter on this
screen.
1-6
Configuring Your ReadyNAS Duo
v1.1, April 2008
NETGEAR ReadyNAS Duo User Guide
Figure 1-9
Setting Up User and Group Accounts
In the User & Group Accounts security mode, the Accounts tab screen allows you to manage
user and group accounts on the ReadyNAS Duo.
Managing Users
To manage user accounts:
1. Select Manage Users from the drop-down menu.
2. Click the Add User tab to add a new user. You can add up to five users at a time. For each
user, add the following information:
• User name,
• E-mail address
• User ID
• Select a group from the Group pull-down menu.
• Password
• Disk quota.
3. Click Apply to save your settings.
Figure 1-10
Configuring Your ReadyNAS Duo
1-7
v1.1, April 2008
NETGEAR ReadyNAS Duo User Guide
Only the user name field is required; however, you should specify a user e-mail address if you
intend to set up disk quotas. Without an e-mail address, the user will not be warned when disk
usage approaches the specified disk quota limit. If you do not wish to assign a disk quota, enter 0.
If you wish to add a large number of users, select Import user list from the pull-down menu.
Figure 1-11
Here, you can upload a CSV (Comma Separated Value) formatted file containing the user account
information. The format of the file is:
name1,password1,group1,email1,uid1,quota1
name2,password2,group2,email2,uid2,quota2
name3,password3,group3,email3,uid3,quota3
:
Please note the following:
•
Spaces around commas are ignored.
•
The name and password fields are required.
•
If a listed group account does not exist, it is automatically created.
•
Group and quota are set to the defaults if not specified.
•
E-mail notification is not sent to the user if the field is omitted or left blank.
•
UID is automatically generated if not specified.
•
Empty fields are replaced with account defaults.
Examples of acceptable formats are as follows (note that you can omit follow-on commas and
fields if you wish to accept the system defaults for those fields, or you can leave the fields empty):
fred,hello123
In this example, user fred has a password set to hello123, belongs to the default group, receives no
e-mail notification, has a UID assigned automatically, and has a default quota.
barney,23stone,,[email protected]
In this example, user barney has a password set to 23stone, belongs to the default group, receives
e-mail notification sent to [email protected], has a UID assigned automatically, and has a
default quota.
1-8
Configuring Your ReadyNAS Duo
v1.1, April 2008
NETGEAR ReadyNAS Duo User Guide
wilma,imhiswif,ourgroup,[email protected],225,50
In this example, user wilma has a password imhiswif, belongs to the group ourgroup, receives email notification sent to [email protected], has a UID set to 225, and a quota set to 50 MB.
Managing Groups
To add a new group:
1. Select Manage Groups from the drop-down menu in the upper right corner.
2. Select the Add Group tab if it is not already selected. You can add up to five groups at a time.
If you expect to have just one big set of users for one group, you can forego adding a new
group and accept the default users group.
3. Click Apply to save your settings.
If you want, a user can belong to multiple groups. Once you have created user accounts, you can
specify secondary groups that the user can belong to. This allows for finer-grain settings for share
access. For instance, you can have user Smithy in the General group also belong to the Finance
group so Smithy can access shares restricted to only the Finance Group.
When adding a new group, you can specify the amount of disk space you wish to allocate that
group by setting a disk quota. A value of 0 denotes no limit. You can also set the Group ID, or
GID, of the group that you are adding. You can leave this field blank and let the system
automatically assign this value unless you wish to match your GID to your NFS clients.
Figure 1-12
After adding your groups, you can view or change your groups by clicking the alphabetical index
tab, or click All to list all groups.
Configuring Your ReadyNAS Duo
1-9
v1.1, April 2008
NETGEAR ReadyNAS Duo User Guide
If you wish to add a large number of groups, select Import group list from the pull-down menu.
Figure 1-13
You can upload a CSV (Comma Separated Value) formatted file containing the group account
information. The format of the file is:
name1,gid1,quota1,member11:member12:member13
name2,gid2,quota2,member21:member22:member23
name3,gid3,quota3,member31:member32:member33
:
Please note the following:
•
Spaces around commas are ignored.
•
The name field is required.
•
Quota is set to default if not specified.
•
GID is automatically generated if not specified.
•
Empty fields are replaced with account defaults.
•
Group members are optional.
Examples of acceptable formats are as follows (note that you can omit follow-on commas and
fields if you wish to accept the system defaults for those fields, or you can leave the fields empty):
flintstones
In this example, the group flintstones is created with an automatically assigned GID and
default quota.
rubble,1007,5000,barney:betty
In this example, the group rubble has a GID of 1007, a quota of 5000 MB, with members
barney and betty.
1-10
Configuring Your ReadyNAS Duo
v1.1, April 2008
NETGEAR ReadyNAS Duo User Guide
Setting Accounts Preferences
You can set various account defaults by selecting Preferences option from the pull-down menu.
Figure 1-14
Selecting Services for Share Access
The Services screen allows you to manage various services for share access. This in effect controls
the type of clients you wish to allow access to the ReadyNAS Duo. Four types of services are
available: Standard File Protocols, Streaming Services, Discovery Services and Installed AddOns.
These different services are explained in the following sections.
Standard File Protocols
The standard file protocols are common file-sharing services that allow your workstation clients to
transfer files to and from the ReadyNAS Duo using built-in file manager-over-network file
protocols supported by the client operating system. The available services are:
•
CIFS (Common Internet File Service). Sometimes referred to as SMB. This protocol is used
mainly by Microsoft Windows clients, and sometimes by Mac OS X clients. Under Windows,
when you click on My Network Places Network Neighborhood, you are going across CIFS.
This service is enabled by default and cannot be disabled.
•
NFS (Network File Service). NFS is used by Linux and Unix clients. Mac OS 9/X users can
access NFS shares as well through console shell access. The ReadyNAS Duo supports NFS v3
over UDP and TCP.
•
AFP (Apple File Protocol). Mac OS 9 and OS X works best using this protocol as it handles
an extensive character set. However, in mixed PC and Mac environments, it is advisable to use
CIFS/SMB, unless enhanced character set support is necessary on the Mac.The ReadyNAS
Duo supports AFP 3.1.
Configuring Your ReadyNAS Duo
1-11
v1.1, April 2008
NETGEAR ReadyNAS Duo User Guide
•
FTP (File Transfer Protocol). Widely used in public file upload and download sites.
ReadyNAS Duo supports anonymous or user access for FTP clients, regardless of the security
mode selected. If you wish, you can elect to set up port forwarding to nonstandard ports for
better security when accessing files over the Internet.
•
HTTP (Hypertext Transfer Protocol). Used by Web browsers. ReadyNAS Duo supports
HTTP file manager, allowing Web browsers to read and write to shares using the Web browser.
This service can be disabled in lieu of HTTPS to allow for a more secure transmission of
passwords and data. With the option to redirect default Web access to a specified share, you
can transparently force access to http://readynas_ip to http://readynas_ip/share. This is
useful if you do not want to expose your default share listing page to outsiders. All you need in
the target share is an index file such as index.htm or index.html. You have the option of
enabling or disabling login authentication to this share.
•
HTTPS (HTTP with SSL encryption). This service is enabled by default and cannot be
disabled. Access to FrontView is strictly through HTTPS for this reason. If you want remote
Web access to FrontView or your HTTPS shares, you can specify a nonstandard port (default
is 443) that you can forward on your router for better security. You can also regenerate the SSL
key based on the hostname or IP address that users will use to address the ReadyNAS Duo.
This allows you to bypass the default dummy certificate warnings whenever users access the
ReadyNAS Duo over HTTPS.
•
Rsync. An extremely popular and efficient form of incremental backup made popular in the
Linux platform but now available for various other Unix systems as well as Windows and
Mac. Enabling rsync service on the ReadyNAS Duo allows clients to use rsync to initiate
backups to and from the ReadyNAS Duo.
1-12
Configuring Your ReadyNAS Duo
v1.1, April 2008
NETGEAR ReadyNAS Duo User Guide
Figure 1-15
Streaming Services
The built-in streaming services on the ReadyNAS Duo allow you to stream multi-media content
directly from the ReadyNAS Duo, without the need to have your PC or Mac powered on.
Configuring Your ReadyNAS Duo
1-13
v1.1, April 2008
NETGEAR ReadyNAS Duo User Guide
Figure 1-16
•
SlimServer provides music streaming to the popular Squeezebox music players from Slim
Devices. You can click the http setup link for more detailed configuration options.
•
iTunes Streaming Server enables iTunes clients to stream media files straight from the
ReadyNAS Duo. You can click the http setup link for more detailed configuration options.
•
UPnP AV provides media streaming service to stand-alone networked home media adapters
and networked DVD players that support the UPnP AV protocol or are Digital Living Network
Alliance (DLNA) standard compliant. The ReadyNAS Duo comes with a reserved media
share that is advertised and recognized by the players. Simply copy your media files to the
Videos, Music, and Pictures folders in that share to display them on your player. If you wish,
you can specify a different media path where your files reside.
1-14
Configuring Your ReadyNAS Duo
v1.1, April 2008
NETGEAR ReadyNAS Duo User Guide
•
Home Media Streaming Server provides streaming of videos, music, and pictures to popular
networked DVD players. The streaming players often utilize the streaming client developed by
Syabas. Similar to UPnP AV, this service is used to stream videos, music, and pictures from the
reserved media share to these adapters. If you wish to change the location where the media
files are stored, you can specify a different share and folder path. Note that this path is shared
between the UPnP AV and this service.
Discovery Services
•
Bonjour service provides a simple way of discovering various services on the ReadyNAS
Duo. Bonjour currently provides an easy way to connect to FrontView, IPP printing, and AFP
services. OS X has built-in Bonjour support, and you can download Bonjour for Windows
from Apple’s website.
•
UPnP provides a means for UPnP-enabled clients to discover the ReadyNAS Duo on your
LAN.
Figure 1-17
Installed AddOns
Two add-ons allow you to download files unattended using the Bit Torrent technology and share
your photos on the ReadyNAS photo-share site.
•
Bit Torrent. The ReadyNAS Duo enables peer-to-peer file sharing and allows the ReadyNAS
Duo to queue and index torrent download files.
•
ReadyNAS Photos. The ReadyNAS Duo allows you to share photos with select users on the
Internet. You must install ReadyNAS Photos software which is available on the ReadyNAS
site. Simply click Install ReadyNAS Photos and follow the on-screen prompts. Once you have
Configuring Your ReadyNAS Duo
1-15
v1.1, April 2008
NETGEAR ReadyNAS Duo User Guide
enabled this feature and downloaded the software, you will be able to share photos located in
your Pictures folder.
To download ReadyNAS Photos software:
1. Click Install ReadyNAS Photos. The ReadyNAS Photos Installers screen displays.
Figure 1-18
2. Select the install version that is appropriate for your operating system. When the installation
has completed, the ReadyNAS Photos icon
will be installed on your desktop.
3. Create a ReadyNAS Photos profile. You will need the User ID and Password that you selected
to log in to ReadyNAS Photos.
Figure 1-19
1-16
Configuring Your ReadyNAS Duo
v1.1, April 2008
NETGEAR ReadyNAS Duo User Guide
4. When the ReadyNAS Photos login screen displays, enter your User ID and Password and click
the arrow.
Figure 1-20
5. A screen similar to the one below will display. Connect ReadyNAS Photos to your ReadyNAS
Duo by clicking Connect.
Figure 1-21
Configuring Your ReadyNAS Duo
1-17
v1.1, April 2008
NETGEAR ReadyNAS Duo User Guide
6. The Add New Album screen displays. Click on the Click here to add album link to add your
first album. To add subsequent albums, select Import Albums from the menu bar.
Hi Smithy
Figure 1-22
7. From the Import Albums screen select the Photo Albums you want to add from the Bookmarks
pull-down menu. Highlight the album you want to add and click ADD, and then click START.
The new album will display.
Figure 1-23
1-18
Configuring Your ReadyNAS Duo
v1.1, April 2008
NETGEAR ReadyNAS Duo User Guide
8. Double-click on the album image to open the album. You can rotate or delete any photos prior
to sharing your photos. You can also select a specific photos to share by moving each photo
thumbnail into the Selection Tray.
Figure 1-24
9. After you have corrected your photos or selected certain photos to share, select Share from the
menu. The Share Dialog will display.
a. Enter the email address or User ID of each buddy.
b. Select either the Share this Album radio button or the Share Items in Selection Tray to
determine which photos to share.
c. From the pull-down menu, select the photo album name (if you are sharing an album) or,
if you are sending select photos from the selection tray, then you can create a specific
name.
d. Enter a message to accompany to the photos.
Configuring Your ReadyNAS Duo
1-19
v1.1, April 2008
NETGEAR ReadyNAS Duo User Guide
Figure 1-25
10. Click Share. An email will be sent to your share buddy; you will also be notified by email that
the shared photos have been sent.
Understanding Volume Management
The ReadyNAS Duo uses X-RAID, an NETGEAR-patented expandable RAID technology. Some
benefits of X-RAID technology are:
•
One-volume technology, but supports volume expansion, either by with the addition of more
disks or the replacement of an existing disk with larger capacity disks.
•
You can start out with one disk, and add an additional more disk when you need it.
•
Volume management is automatic. Add a second disk, and it becomes a mirror to the first—the
expansion occurring while redundancy is maintained.
Volume Management for X-RAID
The X-RAID technology offers a simplified approach to volume management. X-RAID works on
the premise that what most people want to do with their data volume over time is either adding
redundancy or expanding it without the headaches usually associated with doing that. By using
simple rules, X-RAID is able to hide all the complexities yet provide volume management features
previously available only in enterprise-level storage solutions.
•
X-RAID Redundancy Overhead. To maintain redundancy from disk failure, X-RAID
requires a one-disk overhead. In a two-disk X-RAID volume, the usable capacity is one disk.
1-20
Configuring Your ReadyNAS Duo
v1.1, April 2008
NETGEAR ReadyNAS Duo User Guide
•
X-RAID has One Data Volume. X-RAID devices have only one data volume. This volume
encompasses one to two disks, utilizing the capacity of the smallest disk from each disk. For
instance, if you had one 80 GB disk and one 250 GB disk, only 80 GB from is used in the
volume. (The leftover space on the 250 GB disk is reclaimed only when the 80 GB disk is
replaced with a 250 GB or greater capacity disk. See “Replacing Your Disk for More
Capacity” on page 1-21.”)
Figure 1-26
Adding a Second Disk for Redundancy
A one-disk X-RAID device has no redundancy and provides no protection from a disk failure.
However, if and when you feel the need for redundancy, simply power down the device, add a new
disk with at least the capacity of the first disk, and power on. Depending on the size of the disk,
within a few hours, your data volume will be fully redundant. The process occurs in the
background, so access to the ReadyNAS Duo is not interrupted.
After you receive your e-mail, the ReadyNAS Duo will have been expanded with the capacity
from your new disk(s).
Replacing Your Disk for More Capacity
A year or so down the line when you find the need more disk space, and 600 GB disks are
available at an attractive price, you can expand your volume capacity by replacing the existing
disks. Keep in mind that you must power down several times to replace out your old disks.
Configuring Your ReadyNAS Duo
1-21
v1.1, April 2008
NETGEAR ReadyNAS Duo User Guide
First, power down the ReadyNAS Duo, replace the first disk with the large-capacity disk, and then
reboot. If your ReadyNAS Duo supports hot-swapping, you can hot-swap the disk without
powering down. The ReadyNAS Duo will detect that a new disk was put in place and
resynchronizes the disk with data from the removed disk. This process takes several hours,
depending on disk capacity. The disk is initialized and scanned for bad sectors first before the
rsync process is started. The total time from the start of initialization to the end of
resynchronization can be around 5 hours or more, depending on disk capacity. You will be notified
by e-mail upon completion.
USB Storage
The USB tab displays the USB disk and flash devices connected to the ReadyNAS Duo, and offers
various options for these devices. A flash device appears as USB_FLASH_1 and a disk device
appears as USB_HDD_1. If you have multiple devices, they appear appended by an increasing
device number; for example, USB_HDD_2. If the device contains multiple partitions, the
partitions are listed beneath the main device entry.
Figure 1-27
Partitions on the storage devices must be one of the following file system formats:
•
FAT32
•
NTFS
•
Ext2
•
Ext3
1-22
Configuring Your ReadyNAS Duo
v1.1, April 2008
NETGEAR ReadyNAS Duo User Guide
To the right of the access icons are command options for the device. The following commands are
available:
Disconnect
This option prepares the USB partition for disconnection by correctly unmounting the file
system. In most cases, you can safely disconnect the device without first unmounting;
however, the Disconnect command ensures that any data still in the write cache is
written out to the disks and that the file system is properly closed. The Disconnect option
unmounts all partitions on the device. Once disconnected, physically remove and reconnect to the ReadyNAS Duo to regain access the USB device,.
Locate
In cases where you attach multiple storage devices and wish to determine which device
corresponds to the device listing, the Locate command causes the device LED to blink, if
present.
Format FAT32
This option formats the device as a FAT32 file system. FAT32 format is easily
recognizable by most newer Windows, Linux, and Unix operating systems.
Format EXT3
This option formats the device as an EXT3 file system. Select this option if you will be
accessing the USB device mainly from Linux systems or ReadyNAS Duo devices. The
advantage of EXT3 over FAT32 is that file ownership and mode information can be
retained using this format, whereas this capability is not there with FAT32. Although not
natively present in the base operating system, Ext3 support for Windows and OS X can
be added. The installation images can be downloaded from the Web.
When the USB device is unmounted, you have the option of renaming it. The next time the same
device is connected, it will use the new name rather than the default USB_FLASH_n or
USB_HDD_n naming scheme.
The USB storage shares are listed in the Share screen, and access restrictions can be specified
there. The share names reflect the USB device names.
USB Flash Device Option
Toward the lower portion of the USB Storage screen is the USB Flash Device Option section (see
Figure 1-27 on page 1-22). There, you can elect to copy the content of a USB flash device
automatically on connection to a specified share. Files are copied into a unique timestamp folder to
prevent overwriting previous contents. This is useful for uploading pictures from digital cameras
and music from MP3 players without needing to power on a PC.
In User security mode, an additional option to set the ownership of the copied files is available.
Configuring Your ReadyNAS Duo
1-23
v1.1, April 2008
NETGEAR ReadyNAS Duo User Guide
Managing Your Shares
The Shares menu provides all the options pertaining to share services for the ReadyNAS Duo
device. This entails share management (including data and print shares), volume management, and
share service management.
Figure 1-28
Adding Shares
To add a share:
1. From the main menu, select Volumes > Volume Settings. If more than one volume is
configured, click on the volume for which you want to add the share.
1-24
Configuring Your ReadyNAS Duo
v1.1, April 2008
NETGEAR ReadyNAS Duo User Guide
2. Then select Shares > Add Shares. Deselect the Public Access checkbox if you want to enable
user authentication for access to this share using CIFS and/or AFP protocols.
Figure 1-29
3. Click Apply.
Managing Shares
Once you have added shares, you can manually fine-tune share access by selecting Share List. This
screen has two views, one for Share Security mode and one for User and Domain mode. They are
similar except for the password and disk quota prompts which appear only in Share mode.
Figure 1-30
If you want to delete a share, select the check box on the far right of the share listing and click
Delete.
The columns to the left of the Delete check box represent the services that are currently available.
The access icons in those columns summarize the status of the service and the access rights to the
Configuring Your ReadyNAS Duo
1-25
v1.1, April 2008
NETGEAR ReadyNAS Duo User Guide
share for each of the services. Move the mouse pointer over the access icons to view the access
settings.
Figure 1-31
The settings are as follows:
•
Disabled. Access to this share is disabled.
•
Read-only Access. Access to this share is read-only.
•
Read/Write Access. Access to this share is read/write.
•
Read Access with exceptions. Either (1) access to this share is read-only and allowed only for
specified hosts, (2) access is read-only except for one or more users or groups that are granted
read/write permission, or (3) access is disabled except for one or more users or groups that are
granted read-only privilege.
•
Write Access with exceptions – Either (1) access to this share is read/write and allowed only
for specified hosts, (2) access is read/write except for one or more users or groups that are
restricted to read-only access, or (3) access is disabled except for one or more users or groups
that are granted read/write privilege.
You can click on the access icons to display the Share Options screen, where you can set the access
rules for each file protocol. Keep in mind that access options differ between protocols.
1-26
Configuring Your ReadyNAS Duo
v1.1, April 2008
NETGEAR ReadyNAS Duo User Guide
Setting Share Access
From the Share List screen, click the CIFS link
adjacent to the Share whose share access you
want to change. In the following example, we selected the Children share; the CIFS (Windows)
share options screen looks like the following:
Figure 1-32
To set share access:
1. Select the Default Access pull-down menu at the top, select the access to be granted.
2. Select the Hosts allowed access check box and specify one or more hosts that you wish to
restrict access to in the adjacent field.
For example, select read-only for Default Access and list the hosts to whom you wish to allow
access. Access from all other hosts will be denied. To allow only host 192.168.2.101 read-only
access to the share, specify the following:
•
Default: Read-only
•
Hosts allowed access: 192.168.2.101
Multiple hosts can be separated with commas (see Appendix B, “General Glossary” for
information about valid host formats.) For example, if you wish to limit share access to particular
hosts, you can enter host IP addresses or valid DNS hostnames in the Host allowed access field. In
addition, you can enter a range of hosts using common IP range expressions such as:
192.168.2., 192.168.2.0/255.255.255.0, 192.168.2.0/24
These designations all allow hosts with IP addresses 192.168.2.1 through 192.168.2.254.
Toward the bottom of the CIFS screen are the Share Display Option, Recycle Bin, and Advanced
CIFS Permissions. Refer to the descriptions for these options in the sections that follow.
Configuring Your ReadyNAS Duo
1-27
v1.1, April 2008
NETGEAR ReadyNAS Duo User Guide
Share Access Restriction. If you wish to limit share access to particular users and/or groups,
you can enter their names in the Read-only users, Read-only groups, Write-enabled users, and
Write-enabled group fields. The names must be valid accounts, either on the ReadyNAS Duo or
on the domain controller.
For instance, if you wish to allow read-only access to all and read/write access only user fred and
group engr, you would set the following:
•
Default: Read-only
•
Write-enabled users: fred
•
Write-enabled groups: engr
If you wish to limit this access only to hosts 192.168.2.101 and 192.168.2.102, set the following:
•
Default: Read-only
•
Hosts allowed access: 192.168.2.101, 192.168.2.102
•
Write-enabled users: fred
•
Write-enabled groups: engr
If you wish to specify some users and groups for read-only access and some for read/write access,
and disallow all other users and groups, enter the following:
•
Default: Disabled
•
Hosts allowed access: 192.168.2.101, 192.168.2.102
•
Read-only users: mary, joe
•
Read-only groups: marketing, finance
•
Write-enabled users: fred
•
Write-enabled groups: engr
Note that access control differs slightly from service to service.
Share Display Option. Restricting access to a share does not prevent users from seeing the
share in the browse list. In certain instances, you might not want this, such as for backup shares
that you might want to prevent users from seeing.
To hide a share, select the Hide this share… check box. Users who have access to this share must
specify the path explicitly. For example, to access a hidden share, enter \\host\share in the
Windows Explorer address bar.
1-28
Configuring Your ReadyNAS Duo
v1.1, April 2008
NETGEAR ReadyNAS Duo User Guide
Figure 1-33
Recycle Bin. The ReadyNAS Duo can have a Recycle Bin for each share for Windows users.
The Enable Recycle Bin option is shown at the bottom of the CIFS screen.
When this check box is selected, whenever you delete a file, the file gets inserted into the Recycle
Bin folder in the share rather than being permanently deleted. This allows for a grace period during
which users can restore deleted files.
Figure 1-34
You can specify how long to keep the files in the Recycle Bin and how large the Recycle Bin can
get before files get permanently erased.
Advanced CIFS Permission. The Advanced CIFS Permission section offers options for
setting the default permission of new files and folders created through CIFS. The default
permission of newly created files is read/write for the owner and owner’s group and read-only for
Configuring Your ReadyNAS Duo
1-29
v1.1, April 2008
NETGEAR ReadyNAS Duo User Guide
others (that is, everyone). Permission for newly created folders is read/write for everyone. If the
default does not satisfy your security requirement, you can change it here.
Opportunistic locking (often referred to as oplocks) enhances CIFS performance by allowing files
residing on the NAS to be cached locally on the Windows client, thus eliminating network latency
when the files are constantly accessed.
Figure 1-35
Advanced Options
The Advanced Options tab offers advanced low-level file manipulation options that can affect
remote file access through all file protocol interfaces. Care should be taken before you use these
options as anything that changes ownership and permissions might not be easily reversible.
1-30
Configuring Your ReadyNAS Duo
v1.1, April 2008
NETGEAR ReadyNAS Duo User Guide
Figure 1-36
Advanced Share Permission. The Advanced Share Permission section offers the options to
override the default ownership and permission of the share folder on the embedded file system and
to permeate these settings to all files and folders residing on the selected share. The Set ownership
and permission for existing files and folders option performs a one-time change. Depending on
the size of the share, this can take a while to finish.
You can also grant rename and delete privilege to non-owners of the files option. In a collaborative
environment, you might want to enable this option. In a more security-conscious environment, you
might want to disable this option.
USB Shares
USB storage devices are shared using the name of the device appended with the partition number.
You can change the base device name in Volumes > USB Storage, if you want. The ReadyNAS
Duo attempts to remember the name as long as there is a unique ID associated with the USB
device so that the next time the device is connected, the same share name(s) will be available.
Share access restrictions are not saved across disconnects, however.
Configuring Your ReadyNAS Duo
1-31
v1.1, April 2008
NETGEAR ReadyNAS Duo User Guide
Figure 1-37
Note: Although access authorization is based on user login in non-Share mode, files
saved on the USB device, regardless of the user account, are with UID 0. This is to
allow easy sharing of the USB device with other ReadyNAS Duo and PC systems.
Configuring Backup Jobs
The Backup Manager integrated with the ReadyNAS Duo allows the ReadyNAS Duo to act as a
powerful backup appliance. Backup tasks can be controlled directly from the ReadyNAS Duo
without the need for a client-based backup application.
With the flexibility to support incremental backups over CIFS/SMB, NFS, and rsync protocols,
and full backups over FTP and HTTP protocols, the ReadyNAS Duo can act as a simple central
repository for both home and office environments. And with multiple ReadyNAS Duo systems,
you can set up one ReadyNAS Duo to back up another directly.
1-32
Configuring Your ReadyNAS Duo
v1.1, April 2008
NETGEAR ReadyNAS Duo User Guide
Adding a New Backup Job
To create a new backup job, select Add a New Backup Job. A 4-step procedure screen for
creating a job displays.
Figure 1-38
Step 1 – Select Backup Source
The backup source can be located remotely, or it can be a public or a private home share, or all
home shares on the ReadyNAS Duo.
A USB device appears as a share, so if you want to back up a USB device, select a share name. If
you want to back up data from a remote source, select from one of the following:
•
Windows/NAS (Timestamp). Select this if you wish to back up a share from a Windows PC.
Incremental backups use timestamps to determine whether files should be backed up.
•
Windows/NAS (Archive Bit). Select this if you wish to back up a share from a Windows PC.
Incremental backups use the archive bit of files, similar to Windows, to determine whether
they should be backed up.
•
Website. Select this if you wish to back up a website or a website directory. The backed up
files include files in the default index file and all associated files, as well as all index file links
to web page image files.
•
FTP site. Select this if you wish to back up an FTP site or a path from that site.
•
NFS server. Select this option if you wish to back up from a Linux or UNIX server across
NFS. Mac OS X users can also use this option by setting up a NFS share from the console
terminal.
Configuring Your ReadyNAS Duo
1-33
v1.1, April 2008
NETGEAR ReadyNAS Duo User Guide
•
Rsync server. Select this if you wish to perform backups from a rsync server. Rsync was
originally available for Linux and other flavors of UNIX, but has lately become popular under
Windows and Mac for its efficient use of incremental file transfers. This is the preferred
backup method between two ReadyNAS Duo devices.
Once you have selected a backup source, you can enter the path from that source. If you selected a
ReadyNAS Duo share, you can either leave the path blank to backup the entire share, or enter a
folder path. Note that you should use forward slashes (/), in place of backslashes (\).
If you selected a remote source, each remote protocol uses a slightly different notation for the path.
If the path field is empty, selecting the remote source in the pull-down menu shows an example
format of the path. Following are some examples:
•
Examples of an FTP path:
ftp://myserver/mypath/mydir
ftp://myserver/mypath/mydir/myfile
•
Examples of a website path:
http://www.mywebsite.com
http://192.168.0.101/mypath/mydir
•
Examples of a Windows or remote NAS path:
//myserver/myshare
//myserver/myshare/myfolder
//192.168.0.101/myshare/myfolder
•
Examples of an NFS path:
myserver:/mypath
192.168.0.101:/mypath/myfolder
•
Examples of a Rsync path:
myserver::mymodule/mypath
192.168.0.101::mymodule/mypath
•
Examples of a local path:
myfolder
media/Videos
My Folder
1-34
Configuring Your ReadyNAS Duo
v1.1, April 2008
NETGEAR ReadyNAS Duo User Guide
My Documents/My Pictures
With a remote source, you might need to enter a login and password to access the share. If you are
accessing a password-protected share on a remote ReadyNAS Duo server configured for Share
security mode, enter the name of the share name for login.
To make sure that you have proper access to the backup source, click Test Connection before
continuing.
Step 2 – Select Backup Destination
The Step 2 process is almost identical to Step 1 except that you are now specifying the backup
destination. If you selected a remote backup source, you need to select a public or a private home
share on the ReadyNAS Duo (either the source or destination must be local to the ReadyNAS
Duo). If you selected a ReadyNAS Duo share for the source, you can either enter another local
ReadyNAS Duo share for the destination, or you can specify a remote backup destination.
Figure 1-39
The remote backup destination can be a Windows PC/ReadyNAS Duo system, an NFS server, or a
rsync server. Note that you can select rsync for a remote ReadyNAS Duo if it is configured to
serve data over rsync.
Step 3 – Choose Backup Schedule
You can select a backup schedule as frequently as once every 4 hours daily or just once a week.
The backup schedule is offset by 5 minutes from the hour to allow you to schedule snapshots on
the hour (snapshots are almost instantaneous) and perform backups of those snapshots (see “USB
Storage” on page 1-22 to set up a snapshot schedule).
Configuring Your ReadyNAS Duo
1-35
v1.1, April 2008
NETGEAR ReadyNAS Duo User Guide
If you wish, you can elect not to schedule the backup job so that you can invoke it manually
instead by clearing (deselecting) the Perform backup every... check box. (You might want to do
this if your ReadyNAS Duo has a backup button.)
Figure 1-40
Step 4 – Choose Backup Options
In this last step, you can set up how you want backups to be performed. To set up a backup
schedule:
1. Schedule a full backup. Select when you want full backups to be performed. You can elect to
do this just the first time, every week, every 2 weeks, every 3 weeks, every 4 weeks, or every
time this backup job is invoked.
The first full backup is performed at the next scheduled occurrence of the backup depending
on the schedule you specify, and the next full backup is performed at the weekly interval you
choose calculated from this first backup. Incremental backup is performed between the full
backup cycles.
Backups of a Web or FTP site only have the option to do a full backup every time.
2. Send a backup log. Backup logs can be sent to the users on the Alert contact list when the
backup is complete. It is a good idea to select this option to make sure that files are backed up
1-36
Configuring Your ReadyNAS Duo
v1.1, April 2008
NETGEAR ReadyNAS Duo User Guide
as expected. You can elect to send only errors encountered during backup, full backup logs
consisting of file listings (can be large), or status and errors (status refers to completion status).
Note: Backup log e-mails are restricted to approximately 10K lines. To view the full
backup log (regardless of length), select Status > Logs and click the Download
All Logs link.
3. Remove files from backup destination. Select if you want to erase the destination path
contents before the backup is performed. Be careful not to reverse your backup source and
destination as doing so can delete your source files for good. It is safer to not select this option
unless your device is running low on space. Do experiment with a test share to make sure you
understand this option.
4. Remove deleted files on backup target for rsync. By default, files deleted in the backup
source will not get deleted in the backup destination. With rsync, you have the option of
simulating mirror mode by removing files in the backup destination deleted from the backup
source since the last backup. Select this option if you wish to do this. Experiment with a test
share to make sure that you understand this option.
5. Change ownership of backup files. The Backup Manager attempts to maintain original file
ownership whenever possible; however, this might cause problems in Share Security mode
when backup files are accessed. To work around this, you have the option of automatically
changing the ownership of the backed-up files to match the ownership of the share. This
allows anyone who can access the backup share to have full access to the backed-up files.
6. Click Apply to save your settings.
Before trusting your backup job to a schedule, it is a good practice to manually perform the backup
to make sure that access to the remote backup source or destination is granted, and that the backup
job can be done within the backup frequency you selected. This can be done after you save the
backup job.
Configuring Your ReadyNAS Duo
1-37
v1.1, April 2008
NETGEAR ReadyNAS Duo User Guide
Viewing the Backup Schedule
After saving the backup job, a new job appears in the Backup Schedule section of the Backup Jobs
screen.
Figure 1-41
A summary of the backup jobs that have been scheduled are shown; jobs are numbered beginning
at 001.
To manage your backup jobs:
1. Click the Job number icon to modify the selected backup job.
2. Enable or disable job scheduling by selecting/clearing the Enable check box. Disabling the
job does not delete the job, but removes it from the automatic scheduling queue.
3. Click Delete to permanently remove the job.
4. Click Go to manually start the backup job. The status changes when the backup starts, when
an error is encountered, or when the job has finished.
5. Select the View Log link to check a detailed status of the backup.
6. click Clear Logs to refresh and clear the current log detail.
1-38
Configuring Your ReadyNAS Duo
v1.1, April 2008
NETGEAR ReadyNAS Duo User Guide
Programming the Backup Button
On ReadyNAS Duo systems that have the Backup Button feature, you can program the button to
execute one or more pre-defined backup jobs.
Figure 1-42
Simply select the backup jobs in the order that you want them run and click Apply. Pressing the
Backup Button once starts the job(s).
Viewing the Backup Log
You can view the backup log while the job is in progress or after it has finished.
Figure 1-43
The log format might differ depending on the backup source and destination type that was
selected, but you can see when the job was started and finished, and whether it was completed
successfully or with errors.
Configuring Your ReadyNAS Duo
1-39
v1.1, April 2008
NETGEAR ReadyNAS Duo User Guide
Editing a Backup Job
To edit a backup job, you can either click the 3-digit job number button in the Backup Jobs screen,
or you can click the Edit Backup Job link while viewing that job log. You can then make
appropriate changes or adjustments to the job.
Setting Up Printers
The ReadyNAS Duo device supports automatic recognition of USB printers. If you have not
already done so, you can connect a printer now, wait a few seconds, and click Refresh to display
detected printers. The print share name automatically reflects the manufacturer and model of your
printer and is listed in the USB Printers section of the Print Queue service screen.
Figure 1-44
Print Shares over CIFS/SMB
The ReadyNAS Duo can act as a print server for up to two USB printers for your Windows or Mac
clients.
To set up a printer in Windows:
1. Click Browse in RAIDar or simply enter \\hostname in the Windows Explorer address bar to
list all data and printer shares on the ReadyNAS Duo.
2. Double-click the printer icon to assign a Windows driver.
1-40
Configuring Your ReadyNAS Duo
v1.1, April 2008
NETGEAR ReadyNAS Duo User Guide
.
Figure 1-45
IPP Printing
The ReadyNAS Duo also supports the IETF standard Internet Printing Protocol (IPP) over HTTP.
Any client supporting IPP printing (IPP is available natively on the latest Windows XP OS and OS
X) can now use this protocol to utilize printers connected to the ReadyNAS Duo. The simplest
way to utilize IPP printing is to use Bonjour to discover and set up the print queue. Bonjour is built
into OS X and can be installed on Windows computers (Bonjour for Windows is available for
download from the Apple website at http://www.apple.com/macosx/features/bonjour/).
Managing Print Queues
From time to time, printers might run out of ink or paper, or simply jam up, forcing you to deal
with the print jobs stuck in a queue. The ReadyNAS Duo has a built-in print queue management to
handle this. Simply select the USB Printers tab or click Refresh to display the printers and the jobs
queued up for any “stuck” printers.
Figure 1-46
Select the radio button next to the print job and click Delete Print Job to remove a job (or all jobs)
from the print queue.
Configuring Your ReadyNAS Duo
1-41
v1.1, April 2008
NETGEAR ReadyNAS Duo User Guide
Managing Your ReadyNAS Duo System
To set up and manage your ReadyNAS Duo effectively, make sure that you review the settings in
the following sections, and implement any necessary modifications or updates.
Clock
An accurate time setting on the Clock screen is required to ensure proper file timestamps. You can
access the Clock screen by selecting System > Clock from the main menu.
System Time
The Select Timezone section and the Select Current Time section of the Clock screen allow you to
set the Timezone, and the Date and Time.
Figure 1-47
1-42
Configuring Your ReadyNAS Duo
v1.1, April 2008
NETGEAR ReadyNAS Duo User Guide
NTP Option
You can elect to synchronize the system time on the device with a remote NTP (Network Time
Protocol) server. You can elect to keep the default servers or enter up to two NTP servers closer to
your locale. You can find an available public NTP servers by searching the Web.
Alerts
In the event of a device or an enclosure failure, a quota violation, low-disk space warning, and
other system events requiring your attention, e-mail alerts are sent. The Alerts screen is accessed
by selecting System > Alerts from the main menu.
Alerts Contacts
The Contacts tab allows you to specify up to three e-mail addresses where system alerts will be
sent. The ReadyNAS Duo device has a robust system monitoring feature and sends e-mail alerts if
something appears to be wrong or when a device has failed. Make sure to enter a primary e-mail
address and a backup one if possible.
Figure 1-48
Some e-mail addresses can be tied to a mobile phone. This is a great way to monitor the device
when you are away from your desk.
Configuring Your ReadyNAS Duo
1-43
v1.1, April 2008
NETGEAR ReadyNAS Duo User Guide
Alerts Settings
This ReadyNAS Duo device has been preconfigured with mandatory and optional alerts for
various system device warnings and failures. The Settings tab allows you to control the settings for
the optional alerts.
Figure 1-49
NETGEAR strongly recommends that you keep all alerts enabled; however, you might choose to
disable an alert if you are aware of a problem and wish to temporarily disable it.
At the bottom of the screen in the Other Alert Settings section, there are a couple of additional
options of note. Selecting the Power-off NAS when a disk fails or no longer responds option
gracefully powers off the ReadyNAS Duo if a disk failure or a disk remove event is detected.
Selecting the Power-off NAS when disk temperature exceeds safe level gracefully powers off
the ReadyNAS Duo when the disk temperature exceeds the nominal range.
SMTP
The ReadyNAS Duo device has a built-in e-mail message transfer agent (MTA) that is set up to
send alert e-mail messages from the device. Some corporate environments, however, might have a
firewall that blocks untrusted MTAs from sending out messages.
1-44
Configuring Your ReadyNAS Duo
v1.1, April 2008
NETGEAR ReadyNAS Duo User Guide
If you were unable to receive the test message from the Alerts Settings tab, it might have been
blocked by the firewall. In that case, specify an appropriate SMTP server in this tab.
Figure 1-50
Internet Service Providers (ISPs) for home might also block untrusted MTAs. Furthermore, they
might allow you to specify their SMTP server but requires that you enter a user login and password
to send out e-mail—this is common with most DSL services. If this is the case, simply enter the
user name and password in the fields provided.
Performance
If you wish to tweak the system performance, select Performance from the main menu. Note that
some of the settings suggest that you utilize an Uninterruptible Power Supply (UPS) before
enabling that option:
•
NETGEAR recommends that you select the Disable full data journaling only if the NAS has
UPS protection. Without battery backup, there is a small chance that parity written to a disk in
a RAID set might become out of sync with the data disks if a power failure suddenly occurs,
possibly causing incorrect data to be recovered if one disk fails. Without full data journaling,
disk write performance increases substantially.
Configuring Your ReadyNAS Duo
1-45
v1.1, April 2008
NETGEAR ReadyNAS Duo User Guide
Figure 1-51
•
Select Disable journaling if you understand the consequences of this action, and you do not
mind a long file system check (only after unexpected power failures). File system journaling
allows disk checks of only a few seconds verses possibly an hour or longer without journaling.
Disabling journaling improves disk write performance slightly.
Note: You can buy a UPS with USB monitoring at a very reasonable cost. By safely
allowing the performance options to be checked, you can effectively double
your write performance and provide uninterrupted service of your ReadyNAS
Duo for a very low price.
•
The Optimize for OS X option provides the best performance in Mac OS X environments
when connected to the ReadyNAS Duo through the SMB/CIFS protocol. This option,
however, introduces compatibility issues with Windows NT 4.0; do not enable this option if
this device will be accessed by Windows NT 4.0 clients.
•
The Enable fast CIFS writes option allows for fast write performance by enabling aggressive
write-back caching over CIFS. Do not enable this option in multi-user application
environments such as Quick Books where synchronized writes are necessary to keep files in
sync.
•
The Force CIFS filename case-sensitivity option provides substantial performance
improvement when you access CIFS shares when many files are being copied; however,
before enabling this option, understand the ramifications.
1-46
Configuring Your ReadyNAS Duo
v1.1, April 2008
NETGEAR ReadyNAS Duo User Guide
•
–
Since Windows runs in case-insensitive mode, one side-effect of enabling this option is
that two file names with different cases (for example, ABC and abc) appear as two files
but, when you open one file, the other file might actually open.
–
Another effect of this option is that, in Explorer, you now need to enter the exact case for
search strings for the Find option (that is, searching for “abc” no longer returns file
“ABC”).
–
Some Windows applications that assume case-insensitive operations (for example,
BackupExec) may have problems. Do not enable this option if you have clients accessing
the NAS running Windows NT/95 or earlier.
The Enable fast USB disk writes option speeds up USB write access by allowing access to
the USB device in asynchronous mode. If you enable this option, do not remove the USB
device without properly unmounting it. Failure to do so can compromise data integrity on the
device.
Adding a UPS for Performance
Adding a UPS to the NAS is an easy way to protect against power failures, but as mentioned in
“Performance” on page 1-45, a UPS can also safely allow for a more aggressive performance
setting. Simply connect the NAS power cable to the UPS, and connect the UPS USB monitoring
cable between the UPS and the NAS. The UPS is detected automatically and shows up in the
Status bar. You can move the mouse pointer over the UPS LED icon to display the current UPS
information and battery life.
Note: Note that alert notification and automatic system optimization is available only
with UPS that utilizes a USB monitoring interface.
You are notified by e-mail whenever the status of the UPS changes; for example, when a power
failure forces the UPS to be in battery mode or when the battery is low. When the battery is low,
the NAS device automatically shuts down safely.
Make sure to adjust the optimization settings in the Performance screen if you wish to take
advantage of the available options.
Configuring Your ReadyNAS Duo
1-47
v1.1, April 2008
NETGEAR ReadyNAS Duo User Guide
Language
The Language Setting screen offers the option of setting the ReadyNAS Duo device to the
appropriate character set for file names.
Figure 1-52
For example, selecting Japanese allows you to share files with Japanese names in Windows
Explorer.
Figure 1-53
It is best to select the appropriate language based on the region where the device will be operated.
1-48
Configuring Your ReadyNAS Duo
v1.1, April 2008
NETGEAR ReadyNAS Duo User Guide
Note: This option does not set the web browser language display—browser settings must
be done using the browser language option.
If you wish, you can select the Allow Unicode for user, group and share names check box to
allow for greater flexibility in non-English speaking regions. This option, once selected, cannot be
reversed.
Note: HTTP and WebDAV access do not work with Unicode user names. Other
restrictions might exist.
If your FTP client uses different character encoding from the NAS character encoding specified in
Unicode, the NAS FTP server will convert it if you select the Enable character encoding
conversion for FTP clients check box.
Updating ReadyNAS Duo
The ReadyNAS Duo device offers the option of upgrading the operating firmware either
automatically using the Remote Update option or by manually loading an update image
downloaded from the NETGEAR Support website.
Remote Update
The preferred and quicker method if the ReadyNAS Duo has Internet access is the Remote update
option. Select Update from the main menu and then select the Remote tab. Click Check for
Updates to check for updates on the NETGEAR update server.
Figure 1-54
Configuring Your ReadyNAS Duo
1-49
v1.1, April 2008
NETGEAR ReadyNAS Duo User Guide
If you wish to continue, click Perform System Update. After the update image has been
downloaded, you will be asked to reboot the system. The update process updates only the firmware
image and does not modify your data volume. However, it is always a good idea to back up your
important data whenever you perform an update.
Figure 1-55
Local Update
When the ReadyNAS Duo device is not connected to the Internet, or Internet access is blocked,
you can download an update file from the Support site and upload that file to the ReadyNAS Duo
by selecting the Local update tab. The update file can be a RAIDiator firmware image or an add-on
package.
Figure 1-56
Click Browse to select the update file and then click Upload and verify image. The process takes
several minutes after which you are requested to reboot the system and proceed with the upgrade.
Warning: Do not click the browser Refresh button during the update process.
1-50
Configuring Your ReadyNAS Duo
v1.1, April 2008
NETGEAR ReadyNAS Duo User Guide
Settings
If you do have a reliable Internet connection, you can enable the automatic update check and
download options in the Settings tab.
Figure 1-57
If you select the Automatically check for updates check box, the ReadyNAS Duo does not
download the actual firmware update, but notifies you when an update is available. If you select
the Download updates automatically check box, the update image is downloaded, and you are
notified by e-mail to reboot the device to perform the update.
Factory Default
The Factory Default tab allows you to reset the ReadyNAS Duo device back to its factory default
state. Choose this option carefully as All Data Will Be Lost unless you back up any data that you
wish to keep prior to clicking Perform Factory Default.
Figure 1-58
If you select this option, you are asked to confirm the command by typing: FACTORY.
Warning: Resetting to Factory Default erases everything, including data shares,
volume(s), user and group accounts, and configuration information. There is
no way to recover after you confirm this command.
Power Management
The ReadyNAS Duo offers a couple of power management options to reduce system power
consumption, both while the system is in use and when it is not in use.
Configuring Your ReadyNAS Duo
1-51
v1.1, April 2008
NETGEAR ReadyNAS Duo User Guide
Disk Spin-Down Option
You can elect to spin down your ReadyNAS Duo disks after a specified time of inactivity. The
disks will spin up as needed. To enable spin-down mode, select the Enable disk spin-down
after... check box, and specify the minutes of inactivity before spin up.
Figure 1-59
Note: Enabling disk spin-down disables journal mode. Once enabled, if you decide to
disable disk spin-down, you need to manually re-enable journal mode if desired.
NETGEAR recommends UPS if you utilize this option.
Power Timer
The ReadyNAS Duo can be scheduled to power off and power back on (on certain models)
automatically (see Figure 1-59). Select the Enable power timer check box and enter the action
1-52
Configuring Your ReadyNAS Duo
v1.1, April 2008
NETGEAR ReadyNAS Duo User Guide
and time. (The Power ON option is available on the ReadyNAS Duo NV through an add-on
package.)1 The Power ON option does not appear if the ReadyNAS Duo hardware does not
support this feature.
Note: When the ReadyNAS Duo is powered off, any file transfers and backup jobs are
interrupted, and backup jobs scheduled during the power off state do not run.
UPS Configuration
If this device is not connection to a UPS device, you may ele4ct to enable a UPS connection to
another NAS device. Select the Enable UPS attached to another NAS check box and enter the IP
Address in the Remote IP field. NETGEAR recommends that you enable this feature if you have
enabled the Disk Spin-Down option.
If you use this option, the ReadyNAS Duo is shut down automatically when a battery-low
condition is detected on a UPS connected to another ReadyNAS Duo. This is useful when a UPS is
shared by multiple ReadyNAS Duo units, even though only one ReadyNAS Duo is monitoring the
battery status.
As an option, the ReadyNAS Duo can remotely monitor the UPS when connected to a PC running
Network UPS Tools (NUT). For more information about NUT, see
http://www.networkupstools.org.
Shutdown
The Shutdown Options screen offers the option to either power off or reboot the ReadyNAS Duo
device. You also have the option of performing either a full file system check or a quota check on
the next boot. Both these options can take several minutes to several hours depending on the size
of your volume and the number of files in the volume. You do not need to select these options
unless you suspect there might be data or quota integrity problems.
1. Please refer to the Release Notes for RAIDiator 3 on the NETGEAR Support site for more information.
Configuring Your ReadyNAS Duo
1-53
v1.1, April 2008
NETGEAR ReadyNAS Duo User Guide
Figure 1-60
When you reboot or shut down the ReadyNAS Duo, you must close the browser window and use
RAIDar to reconnect to FrontView.
1-54
Configuring Your ReadyNAS Duo
v1.1, April 2008
Chapter 2
Accessing Shares from Your Operating System
This chapter presents examples of how shares on the ReadyNAS Duo device can be accessed by
the various operating systems. If you have problems accessing your shares, make sure to enable
the corresponding service by selecting Shares > Share Listing screen. Also make sure that the
default access of the share is set to Read-only or Read/write.
Windows
To see a share listing in Windows, either click Browse in RAIDar or enter //<hostname> or
//<ip_address> in the Explorer address bar. Hostname is the NAS hostname assigned in Network >
Global Settings. The default hostname is set to nas- followed by the last three hex bytes of the
device MAC address.
Figure 2-1
To access the share in Windows, specify the hostname followed by the share name in the Explorer
address bar, for example: //<hostname>/backup, as follows:
2-1
v1.1, April 2008
NETGEAR ReadyNAS Duo User Guide
Figure 2-2
MAC OS X
To access the same share over AFP with OS X, select Network from the Finder Go > Network
menu.
Figure 2-3
From here, there are two ways to access your AFP share, depending on how you have chosen to
advertise your AFP share.
2-2
Accessing Shares from Your Operating System
v1.1, April 2008
NETGEAR ReadyNAS Duo User Guide
AFP over Bonjour
To access the AFP share advertised over Bonjour on Mac OS X, select Network from the Finder
Go menu to see a listing of available networks.
Figure 2-4
Open the My Network folder to display the ReadyNAS Duo hostname.
Figure 2-5
In Share security mode, select the Guest radio button to access the shares and click Connect. In
User or Domain security mode, enter the user name and password you wish to use to connect to the
ReadyNAS Duo.
Accessing Shares from Your Operating System
v1.1, April 2008
2-3
NETGEAR ReadyNAS Duo User Guide
Figure 2-6
From the Volumes field, select the share you want to access and click OK.
AFP over AppleTalk
If you chose to advertise your AFP service over AppleTalk, a listing of available networks is
displayed.
Figure 2-7
Open the My Network folder to display the ReadyNAS Duo hostname. Select the one that has the
hostname only. You are prompted with a connection box.
2-4
Accessing Shares from Your Operating System
v1.1, April 2008
NETGEAR ReadyNAS Duo User Guide
Figure 2-8
Select Guest and click Connect. Then, select the share you want to connect to and click OK.
Figure 2-9
In Share security mode, you need to specify only the user name and password—if you have set up
a password for your share. If you have not set up a user name, enter the share name in place of the
user name. In User or Domain security mode, enter the user name and password you wish to use to
connect to the ReadyNAS Duo.
You should see the same file listing as you would in Windows Explorer.
Accessing Shares from Your Operating System
v1.1, April 2008
2-5
NETGEAR ReadyNAS Duo User Guide
MAC OS 9
To access the same share under Mac OS 9, select Connect to Server from the Finder menu, choose
the NAS device entry from the AppleTalk section, and click Connect.
Figure 2-10
When you are prompted to log in, enter the share name and password if the ReadyNAS Duo is
configured for Share security mode, otherwise enter a valid user account and password
otherwise, and click Connect.
Figure 2-11
If no share password is set in Share mode, you can select the Guest radio button and leave the
password field blank. If your login is successful, are given a listing of one or more shares. Select
the share you wish to connect to and click OK.
2-6
Accessing Shares from Your Operating System
v1.1, April 2008
NETGEAR ReadyNAS Duo User Guide
Figure 2-12
You should see the same files in the share that you do in Windows Explorer.
Figure 2-13
Linux/Unix
To access this share from a Linux or Unix client, you will need to mount the share over NFS by
entering:
mount <ipaddr>:/<backup /backup>
where backup is the share name. Running the ls command in the mounted path displays the share
content.
Accessing Shares from Your Operating System
v1.1, April 2008
2-7
NETGEAR ReadyNAS Duo User Guide
Figure 2-14
Note: The ReadyNAS Duo does not support NIS as it is unable to correlate NIS
information with CIFS logins. In mixed environments where you want CIFS and
NFS integration, you can set the security to User mode and manually specify the
UID and GID of the user and group accounts to match your NIS or other Linux/
Unix server settings. The ReadyNAS Duo can import a comma-delimited file
containing the user and group information to coordinate Linux/Unix login settings
(see “Managing Users” on page 1-7 for more information).
Web Browser
To access the same share using a Web browser, enter http://<ipaddr> in the browser address bar.
You can use https if you want a secure encrypted connection. You will be prompted to log in.
Figure 2-15
2-8
Accessing Shares from Your Operating System
v1.1, April 2008
NETGEAR ReadyNAS Duo User Guide
If the ReadyNAS Duo is in Share security mode, enter the share name and share password.
Otherwise, log in with a valid user name and password if the ReadyNAS Duo is in User or Domain
mode.
Figure 2-16
If the Share access is read-only, only the file manager displays.
Figure 2-17
If the Share is also writable, the file manager displays options for creating, modifying, and deleting
files, as follows.
Accessing Shares from Your Operating System
v1.1, April 2008
2-9
NETGEAR ReadyNAS Duo User Guide
Figure 2-18
One useful application for a Web share is to set up an internal company website. You can copy
HTML files to the Web share using Windows, Mac, NFS, or HTTP. When you set HTTP access to
read-only, html files, including index.htm and index.html, can be viewed using any web browser.
Note: Files created under the Web file manager can be deleted only under this file
manager. The only exception is for the admin user; the admin user can change or
delete any files created through the web.
Files not created from this file manager can be modified within the file manager
but cannot be deleted here.
2-10
Accessing Shares from Your Operating System
v1.1, April 2008
NETGEAR ReadyNAS Duo User Guide
FTP/FTPS
To access the share via FTP in Share security mode, log in as “anonymous” and use your e-mail
address for the password.
Figure 2-19
.
Note: Enabling FTP access in Share mode opens up the share to anyone on your network
who has an FTP client. NETGEAR recommends that you enable FTP access only
to shares you are comfortable making public on your network.
Warning: Disk usage using FTP in Share mode does not count towards the share disk
quota, so carefully choose how you advertise an FTP share.
For better security, use an FTPS (FTP-SSL) client to connect to the ReadyNAS Duo FTP service.
With FTPS, both the password and data are encrypted.
Accessing Shares from Your Operating System
v1.1, April 2008
2-11
NETGEAR ReadyNAS Duo User Guide
Rsync
Access to the share through rsync is identical regardless of the security mode. If you specified a
user or password in the rsync share access tab, you will need to specify this when accessing the
rsync share. Unlike other protocols, rsync uses arbitrary user name and password that is specific
only for rsync access. The user account you specify does not need to exist on the ReadyNAS Duo
or a domain controller.
Figure 2-20
Here is an example of a way for a Linux client to list the content of a ReadyNAS Duo rsync share
with no user name and password defined:
# rsync <ipaddr>::backup
To recursively copy the content of a share to /tmp:
# rsync -a <ipaddr>::backup /tmp
To do the same except with a login user and password hello, enter:
# rsync -a user@<ipaddr>::backup /tmp
Password: *****
Note: The ReadyNAS Duo does not support Rsync over SSH.
2-12
Accessing Shares from Your Operating System
v1.1, April 2008
NETGEAR ReadyNAS Duo User Guide
Networked DVD Players and UPnP AV Media Adapters
Networked DVD players and UPnP AV Media adapters detect the ReadyNAS Duo if either the
Home Media Streaming Server or the UPnP AV services are enabled. The content of the Streaming
Services media share on the ReadyNAS Duo is available to these players for playback.1 Multiple
players can be connected to the ReadyNAS Duo and can play the media files concurrently.
Make sure that you enable the appropriate service in the Services tab before invoking the service.
Figure 2-21
Consult the Device Compatibility list for information about which DVD players and media
adapters work with the ReadyNAS Duo.
1. Consult the player manual for information on the file formats that it supports.
Accessing Shares from Your Operating System
v1.1, April 2008
2-13
NETGEAR ReadyNAS Duo User Guide
2-14
Accessing Shares from Your Operating System
v1.1, April 2008
Chapter 3
Maintenance and Administration
Viewing System Status
The Status menu contains links to the Health screen and Logs screen that provide system status
information.
Health
The Health screen displays the status of each disk, and the fan, temperature, and UPS status in
detail. When available, normal expected values are provided.
Figure 3-1
For each disk, you can click SMART+ (Self-Monitoring, Analysis and Reporting Technology) to
display the content of the internal disk log.
3-1
v1.1, April 2008
NETGEAR ReadyNAS Duo User Guide
Figure 3-2
To recalibrate the fan, click Recalibrate.
Logs
Select Status > Logs to access the Clear Logs screen. The Clear Logs screen provides information
about the status of management tasks, including a timestamp.
Figure 3-3
The Download All Logs link is available in case you need to analyze low-level log information. If
you click this link, a zip of all the logs is provided.
3-2
Maintenance and Administration
v1.1, April 2008
NETGEAR ReadyNAS Duo User Guide
Replacing a Failed Disk
When a disk fails in your ReadyNAS Duo device, you are notified of the failure by e-mail. The
failed disk location can be seen in the FrontView status bar at the bottom by selecting Status >
Health.
Figure 3-4
On the front of the ReadyNAS Duo device, a failed disk is identified by an amber LED. The left
most LED is disk channel 1; the next one is disk channel 2. Take note of the failed channel.
Ordering a Replacement Disk
On the main menu, select Status > Health. Take note of the disk vendor and model utilized on your
ReadyNAS Duo system. It is best to replace a failed disk with the same disk model. Contact the
disk vendor, and arrange to have the disk replaced if the disk is still under warranty. A disk RMA
from the vendor requires that you provide the serial number of the disk. To locate the serial
number, open the case and take out the failed disk (see the following sections for replacement
instructions for your disk model).
If the disk is no longer under warranty, you can obtain a disk of the same capacity or larger from
your ReadyNAS Duo retailer.
Replacing a Failed Disk on the ReadyNAS Duo
When a Disk Status LED blinks slowly, it is an indication of a failed disk. The ReadyNAS Duo
supports hotswap bays, so there is no need to power down the device.
Maintenance and Administration
3-3
v1.1, April 2008
NETGEAR ReadyNAS Duo User Guide
To replace the disk:
1. Open the disk tray door.
2. Press the button under the failed disk. The latch pops out.
Figure 3-5
3. Pull out the disk tray and remove the screws.
4. Replace the failed disk, reassemble, and slide the disk tray back in. Make sure that the hard
disk connectors are facing away from you when you reassemble the disk.
3-4
Maintenance and Administration
v1.1, April 2008
NETGEAR ReadyNAS Duo User Guide
Figure 3-6
The ReadyNAS Duo system performs RAID synchronization in the background, and notifies
you by e-mail when synchronization is complete.
Resynchronizing the Volume
If you had to power off to replace the failed disk, turn on the power on the ReadyNAS Duo.
The RAID volume automatically resynchronizes with the new disk in the background. The process
takes several hours depending on disk size. During the resync process, the ReadyNAS Duo can be
used as normal, although access will be slower until the volume is finished resynchronizing.
You will be notified by e-mail when the resync process is complete.
Resetting Your System (System Switch)
Refer to the Installation Guide included in the shipping box (a PDF of the Installation Guide is
also on your Installation CD) for the location of the System Reset switch on the back of the
ReadyNAS Duo.
The System Reset switch allows you to perform two functions:
Maintenance and Administration
3-5
v1.1, April 2008
NETGEAR ReadyNAS Duo User Guide
1. Reinstall the ReadyNAS Duo firmware.
2. Reset the ReadyNAS Duo back to the factory default settings.
Typically, you should not need to resort to options (1) and (2) unless you exhausted all other means
of recovering your system. You might want to reinstall the ReadyNAS Duo firmware as a first
step, if the ReadyNAS Duo had been working normally but a configuration change makes it
inaccessible. If this does not work or you wish to set the ReadyNAS Duo back to a factory default
state, you can do so following these instructions below:
• To re-install the ReadyNAS Duo firmware: Use a paper clip to depress the switch while the
system is off. Continue to depress the reset switch while powering on the system for
approximately 5 seconds until the disk LEDs flash once to signify that the command has been
accepted. The firmware installation takes several minutes to complete. The Status LED in the
front will be solid green when the process is complete. The installation does not affect the data
on the ReadyNAS Duo.
Warning: Make sure that you do not continue to press the reset switch after the
LEDS flash once, otherwise a Factory Default will occur that erases your
data. (see below)
•
To set the ReadyNAS Duo device to Factory Default: Use the same process, except you
must hold the System Reset switch for 30 seconds after powering on the system. You will see
the disk LEDs flash for a second time to signify that the command has been accepted.
Warning: This process reinstalls the firmware and resets all disk configurations,
wiping out any data you might have on the NAS.
Changing User Passwords
There are two ways in which user passwords can be changed in the User security mode. The first
way is for the administrator to change the passwords by selecting Security > User & Group
Accounts and then selecting Manage Users from the pull-down menu. The other and preferred
way is to allow users to change their own passwords. This relieves the administrator from this task
and encourages users to change their passwords on a more regular basis for enhanced security.
Users can use the Web browser and their existing password to log in to https://<ip_addr>/ to
access the Web share listing page. Then select the Password tab, and follow the prompts to set a
new password
3-6
Maintenance and Administration
v1.1, April 2008
NETGEAR ReadyNAS Duo User Guide
.
Figure 3-7
Maintenance and Administration
3-7
v1.1, April 2008
NETGEAR ReadyNAS Duo User Guide
3-8
Maintenance and Administration
v1.1, April 2008
Appendix A
ReadyNAS Duo Glossary
Domain or Workgroup Name
A valid domain or workgroup name must conform to the following restrictions:
•
Name must consist only of characters a–z, A–Z, 0–9, and the symbols _ (underscore), (hyphen), and . (period).
•
Name must start with a letter.
•
Name length must be 15 characters or less.
Host
A valid IP address or a host name.
Host Name
A valid host name must conform to the following restrictions:
•
Name must consist only of characters a–z, A–Z, 0–9, and the symbols - (hyphen) and .
(period).
•
Name must start with a letter.
•
A short host name length must be 15 characters or less.
•
A fully-qualified domain name (FQDN) must have no more than 63 characters in each section
separated by . (period), and cannot end with a - (hyphen). Example of a valid FQDN:
firstpart.secondpart.thirdpart.com.
ReadyNAS Duo Host Name
A valid host name except the first part or short host name must be 15 characters or less due to the
NetBIOS name length restriction.
Host Expression
A valid host expression is either a valid host or the common IP expression form specifying a range
of addresses in a network, for example:
ReadyNAS Duo Glossary
A-1
v1.1, April 2008
NETGEAR ReadyNAS Duo User Guide
•
192.168.2.
•
192.168.2.0/255.255.255.0
•
192.168.2.0/24
Share Name
•
Name must consist only of characters a–z, A–Z, 0–9, and the symbols - (hyphen) and .
(period).
•
Name cannot be an existing user name.
•
Name cannot end in -snap.
•
Name cannot be any one of the following reserved names:
bin boot cdrom dev etc floppy frontview home initrd lib lost+found mnt
opt proc root sbin tmp usr var admin administrator images language
quota.user quota.group shares global homes printers diag c d e f g h i
j
•
Share name can contain Unicode characters if this option is specified in the Language tab.
Share Password
•
The password can be any character except for ' (single quote).
•
Share passwords are limited to 8 characters.
User or Group Name
•
Name must only consist of characters a–z, A–Z, 0–9, and the symbols _ (underscore), (hyphen), @, and . (period).
•
Name cannot be an existing share name.
•
Name can contain Unicode characters if this option is specified in the Language tab.
User Password
•
The password can be any character except for ' (single quote).
A-2
ReadyNAS Duo Glossary
v1.1, April 2008
Appendix B
General Glossary
AFP
AppleTalk Filing Protocol\ is the standard way Mac OS 9 and earlier versions share
files across the network.
CIFS
Common Internet File System, a standard protocol that Windows users use to share
files across the network. Mac OS X also has the capability to share files using CIFS.
FTP
File Transfer Protocol, a common protocol adopted by many OS to enable remote file
download and upload for public sharing.
HTTP
Hypertext Transfer Protocol, the protocol Web browsers use to connect to Web
servers for file access, typically Web pages.
HTTPS
HTTP with SSL encryption is used where secure Web access is desired.
NFS
Network File System, a common way Unix and Linux systems share files by making
remote file systems appear to reside locally.
Quota
Amount of volume space allocated to a particular user or group account, or to a
particular share. The user, group, or share with a set quota cannot exceed disk usage
beyond this limit. Quota is typically specified to ensure that no one user, group, or
share abuses the available storage space.
RAID
Redundant Array of Independent Disks. Basically it is a method of storing data on
multiple disks in a way that if one disk fails, data can still be accessed from the other
disks. A RAID level selects how data will be kept redundant, the most popular of
which are levels 0, 1, and 5. Contrary to the RAID acronym, RAID level 0 does not
provide any redundancy. For more information, see Appendix A, “ReadyNAS Duo
Glossary.”.
Share
A folder on a NAS volume that can be shared among different network file services
such as CIFS for Windows, AFP (AppleTalk File Protocol) for Macs, NFS for Unix/
Linux, FTP, and HTTP. Access to the share can be customized on a user or group or
host-level basis.
Snapshot
An instantaneous, non-changing, read-only image of a volume. Snapshots are useful
for backups.While a snapshot is being taken, the original volume can continue to
operate normally. Snapshots can also be utilized as a temporary backup in case of
viruses. Files can be restored from the snapshot volume if current files are corrupted.
Volume
A file system built on top of a RAID set. This file system consists of shares that are
made available through various network file services.
X-RAID
NETGEAR patent-pending Expandable RAID technology.
General Glossary
B-1
v1.1, April 2008
NETGEAR ReadyNAS Duo User Guide
B-2
General Glossary
v1.1, April 2008
Index
A
Backup Log 1-39
accessing shares
FTP/FTPS 2-11
Linux/Unix 2-7
MAC OS X 2-2
over MAC OS 9 2-6
Rsync 2-12
Web browser 2-8
Windows 2-1
Backup Manager 1-32
account preferences
settings 1-11
Bonjour
1-15
AFP 2-3
C
CIFS 1-11
CIFS permission 1-28
admin user
password, setting of 1-6
Clock
NTP 1-43
setting time 1-42
Advanced Control 1-2
Comma Separated Value. See CSV
Advanced Options 1-30
Common Internet File Service. See CIFS.
AFP 1-11
over AppleTalk 2-4
over Bonjour 2-3
share 2-2
CSV 1-8
format of 1-10
alerts
general settings 1-44
setting contacts 1-43
Apple File Protocol. See AFP.
D
Default Gateway 1-4
DHCP 1-6
settings 1-2
AppleTalk
AFP 2-4
Digital Living Network. See DLNA.
B
discovery services
Bonjour 1-15
Backup Button
programming 1-39
Disk Spin-Down 1-52
Backup Jobs
adding new 1-33
configuring 1-32
editing 1-40
options 1-36
scheduling 1-35, 1-38
Discovery Services 1-11
UPnP 1-15
DLNA 1-14
DNS Settings 1-5
DVD Players
networked 2-13
Index-1
v1.1, April 2008
NETGEAR ReadyNAS Duo User Guide
E
I
EXT3 1-23
import users
user accounts 1-8
F
increasing capacity
replacing disks 1-21
Factory Default Settings 1-51
Factory Default settings
how to 3-6
failed disk
ordering replacement disks 3-3
replacing on NV+ 3-3
replacing, how to 3-3
FAT32 1-23
File Transfer Protocol. See FTP.
firmware reinstall 3-6
Installed AddOns 1-11
IP address
setting 1-3
static, setting 1-3
iTunes Streaming Server 1-14
J
jumbo frames
performance settings 1-4
frame size 1-4
FrontView
accessing 1-1
L
FTP 1-12
backup jobs 1-33
Language
settings 1-48
Unicode 1-49
FTP/FTPS
accessing shares 2-11
Linux/Unix
accessing shares 2-7
Logs 3-2
G
group
accounts, setting up 1-7
groups
managing 1-9
H
health
status of ReadyNAS 3-1
M
MAC address
host name use 1-4
MAC OS 9
accessing shares 2-6
MAC OS X
accessing shares 2-2
menu buttons 1-1
Home Media Streaming Server 1-15
MTU 1-4
Hostname 1-4
default 1-4
setting 1-4
multi-media 1-14
SlimServer 1-14
streaming services 1-13
HTTP 1-12
HTTPS
with SSL encryption 1-12
Hypertext Transfer Protocol. See HTTP.
N
Network File Service. See NFS.
networking
Index-2
v1.1, April 2008
NETGEAR ReadyNAS Duo User Guide
NFS 1-11
Rsync 1-12
accessing shares 2-12
server, backup jobs 1-34
NFS server
backup jobs 1-33
S
DVD players 2-13
UPnP AV Media Adapters 2-13
NTP
clock 1-43
NV+
replacing disk 3-3
P
password
changing 3-6
recovery of 1-6
setting admin user 1-6
performance
fine-tuning 1-45
settings, jumbo frames 1-4
Power Management 1-51
Power Timer 1-52
print queues
managing 1-41
Printers
setting up 1-40
USB 1-40
Printing
CIFS/SMB 1-40
IPP 1-41
R
ReadyNAS
configuring 1-1
health 3-1
updating 1-49
viewing Logs 3-2
replacement disks
ordering 3-3
Setup Wizard 1-2
shares
access restriction, domain mode 1-28
adding 1-24
advanced CIFS permission 1-28
display option, domain mode 1-28
fine-tuning 1-25
managing 1-24, 1-25
selecting services 1-11
setting share access, in share mode 1-27
Shutdown 1-53
SlimServer 1-14
SMART+Self-Monitoring, Analysis and Reporting
Technology. See SMART+.
SMB 1-11
SMTP 1-44
Snapshots 1-22
Speed/Duplex Mode 1-3
Squeezebox 1-14
Standard File Protocols 1-11
streaming services 1-11
Home Media Streaming Server 1-15
iTunes Stream Server 1-14
multi-media 1-13
SlimServer 1-14
UPnP AV 1-14
Support 1-ii
system switch
resetting system 3-5
U
replacing disks
increasing capacity 1-21
Unicode 1-49
HTTP 1-49
WebDAV 1-49
resetting system
system switch 3-5
updating
remote method 1-49
resynchronizing volume 3-5
Index-3
v1.1, April 2008
NETGEAR ReadyNAS Duo User Guide
updating ReadyNAS 1-49
UPnP 1-15
UPnP AV 1-14
UPnP AV Media Adapters
networked 2-13
UPS
configuration of 1-53
performance, adding 1-47
USB 1-23
flash device 1-23
formats, EXT3 1-23
formats, FAT32 1-23
shares 1-31
storage 1-22
USB storage
partitions 1-22
user accounts
import users 1-8
managing 1-7
setting up 1-7
V
Volume Management 1-20
X-RAID 1-20
W
Web browser
accessing shares 2-8
Windows
accessing shares 2-1
X
X-RAID
adding a second disk 1-21
adding more disks 1-21
redundancy overhead 1-20
volume management 1-20
Index-4
v1.1, April 2008
NETGEAR ReadyNAS Duo User Guide
Index-5
v1.1, April 2008
NETGEAR ReadyNAS Duo User Guide
Index-6
v1.1, April 2008
NETGEAR ReadyNAS Duo User Guide
Index-7
v1.1, April 2008
NETGEAR ReadyNAS Duo User Guide
Index-8
v1.1, April 2008