1
_____________________________________
c360 Import Manager User Guide
Microsoft Dynamics CRM 4.0 compatible
_____________________________________
Table of Contents
Introduction ...................................................................................................................................................................... 3 Features ........................................................................................................................................................................ 3 Installation and Setup ....................................................................................................................................................... 4 Requirements................................................................................................................................................................ 5 Short Version................................................................................................................................................................. 5 Detailed Version............................................................................................................................................................ 5 License......................................................................................................................................................................... 17 Creating a Server............................................................................................................................................................. 17 Creating a User................................................................................................................................................................ 19 Simple Import.................................................................................................................................................................. 24 Text Source.................................................................................................................................................................. 24 ODBC Source ............................................................................................................................................................... 42 FAQ and Common Errors ................................................................................................................................................ 52 Installation and Setup ................................................................................................................................................. 52 Appendix A ‐ Installing SQL ............................................................................................................................................. 54 Introduction
ImportManager 2008 is a powerful tool that allows mass manipulation of data inside Microsoft
Dynamics CRM, with unprecedented control during both import, deletion and updating of data.
With the new intuitive Office 2007 User Interface it is easy to set up complex data manipulation
tasks in just a few short steps.
ImportManager 2007 can do much more than just import data to Microsoft Dynamics CRM.
Complex matching is possible without any prior SQL knowledge. There’s easy drag and drop
mapping of fields. With the new dynamic fields, it is possible to change data on the fly.
Furthermore it is possible to delete data as opposed to import or update data.
ImportManager 2008 has a new client-server architecture that enables one ImportManager 2008
installation to connect to several different CRM Servers. It is then possible to log into the
ImportManager 2008 Server from a client and control it according to ones user privileges.
In addition ImportManager 2007 can be scheduled to run tasks automatically on a regular basis,
ideal for larger imports or conservation of system resources during office hours. A feature that
enables you to make sure your CRM database is always updated with the latest information from
all external sources.
ImportManager 2008 works with Excel, Access, SQL, ERP Systems, Text Files, other CRM
Systems, any ODBC system and thus just about anything you can imagine.
Features
Feature Comparison Table (click to view full screen image).
Installation and Setup
The installation guide comes in two versions, a short version that simply describes the three
overall steps you need to go through to install ImportManager 2008 and an in depth detailed
version with screen shots and step by step guidance through the entire process.
Before you commence with the actual installation, make sure you meet the requirements
described in the "Requirements" chapter following this chapter.
Finally, if you want to be able to import more than 10 lines at a time, make sure you have a license
and refer to the final chapter in this section on how to deploy this license.
Requirements
ImportManager 2008 requires a Windows Server 2003 OS with .NET 2.0 installed.
Furthermore it is important that there’s a SQL Installation present on the server and that the user
has administrative rights to this installation.
Refer to Appendix A for information on how to install a SQL instance.
Short Version
If you know what you’re doing and just need an overall explanation of how to install
ImportManager 2008, the short version is for you.
1. Unzip and run setup.exe to install ImportManager 2008. When prompted to open a SQL
connection, make sure you do so with a user with the appropriate administrator permissions.
2. Edit the "web.config" file, found in the installation root (C:\program files\crm
extensions\importmanager 2008\web.config). Locate line 22 and change the value of
ConnectionString, the part that says “Source=” to correspond with your choice of database
(selected during installation).
3. Open a browser to http:/localhost:5544/ and follow the instructions (download client and start
with the provided login and password information from browser).
Detailed Version
If you’ve experienced problems or errors when following the short version or if you want more
detail, this version is for you. Screenshots and detailed explanations will describe exactly how you
install ImportManager 2008 in depth.
Start by unzipping the program to a location of your choice and then run “ImportManager
2008.MSI”.
1. Installer Startup.
The installer is started. Simply wait.
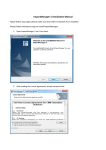
2. Warning.
As ImportManager 2008 needs a SQL installation, you need to make sure one is present on
your system. In most cases some sort of SQL instance will be installed on your PC, but if none
is present, follow the steps under requirements on how to install SQL Express 2005, which can
be downloaded free of charge from Microsoft.
Click “OK”.
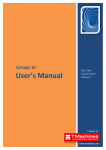
3. Welcome.
In the welcome screen simply click “Next”.
4. End-User License Agreement.
Read the EULA by scrolling down.
After reading and agreeing to the EULA, click the “I accept the terms in the license agreement”
radio button.
Click “Next”.
5. Destination Folder.
ImportManager 2008 will as a default install to “C:\Program Files\CRM
Extensions\ImportManager 2008\”. We recommend that you do not change this folder.
Nevertheless, should you choose to do so, simply click the “Change” button.
Click “Next”.
6. Database Server.
You now need to choose a database server for ImportManager 2008 to use. This server must
be created prior to the installation of ImportManager 2008, as otherwise it will fail to show up in
the drop down list here.
When choosing connection method, it is imperative that you only choose “Windows
authentication credentials of current user” if the current user has administrative rights on the
chosen server! Otherwise choose “Server authentication using the Login ID and password
below” and then provide a login ID and password for a user with the necessary administrative
permissions for the chosen SQL Server.
7. Ready to Install.
The installation is now ready to run, as all the necessary information has been gathered.
Click “Install”.
8. Installing.
Simply wait while the installation progresses.
9. Completed.
The installation has been completed.
Click “Finish”.
10. Edit web.config.
You need to edit the web.config file found in the root of the ImportManaegr 2008 installation (usually
C:\Program Files\CRM Extensions\ImportManager 2008\web.config).
Locate the “add” tag (usually on line 22) and inside the “connectionString” value, locate the part that say
“Source=.;”. Change the dot to your database name, unless you simply run on the local database, which
is the same. E.g. .\IM2008 would be the same as local\IM2008
11. Connect.
Open a browser to the address http://localhost:5544/ and it should look something along the lines of the
screen to the right. In the “Links” section to the right, click the “Import Manager 2008 Client” link.
12. File Download - Security Warning.
When asked what to do with the ImportManagerClientSetup.msi file, choose “Run”.
Alternatively you can Download the file to a local destination and run it from there.
13. IE - Security Warning.
Most likely you will receive a second security warning, where you should simply confirm that you
want to run the MSI file.
Click “Run”.
14. Welcome.
At the welcome screen simply click “Next”.
15. Select Installation Folder.
We recommend that you keep the default destination folder, as seen in the screen below, but it
is possible to change this location by clicking “Browse”. The ImportManager 2008 Client takes
up only very little space, but if the amount of space concerns you, click “Disk Cost”. Choose
whether to install the client for everyone or just the current user profile.
Click “Next”.
16. Confirm.
Now the installer has gathered all the necessary information to install the Import Manager 2008
Client.
Simply click “Next”.
17. Installing.
Please wait while the installer progresses through the installation.
18. Complete.
The installation has been completed.
Click “Close”.
19. Locate login information.
In the browser you opened in section 10 to the address http://localhost:5544/ the information
necessary to start up ImportManager 2008 was provided as seen in the screen below. Use this
information in the next step.
20. Start ImportManager 2008.
To start ImportManager 2008 click the “Start” button, select “All Programs” and then “CRM Extensions”
followed by the “ImportManager 2008” folder and finally “ImportManager 2008”.
21. Login.
The login window as seen in the screen below will pop up after a short time. Use the information
provided by the browser as depicted in step 18. To log into ImportManager 2008.
22. Starting up/connecting.
Everything will be greyed out for a spell and unless something went wrong you will be logged
into ImportManager 2008 as shown in the screen in step 23.
23. Finished.
ImportManager 2008 has now been started and should look like the screen below, ready to start
importing.
License
<Under Construction>
Creating a Server
ImportManager 2008 uses a client-server architecture and therefore the first thing you need to do,
is to create a server.
1. Create Server.
Click "Administration" in the top bar menu and select "Add Server".
2. Choose Server Type.
Select a server type, give the server a name and optionally, give the server a short description.
3. Connection Information.
Enter the CRM server URL, as well as administrative credentials for this CRM server
(Username, Password and Domain name).
4. Choose licensing method.
If you have a license, choose the "Full version mode" (see the license chapter for more
information on this) and if not, choose the "Evaluation mode".
Click "Next".
5. Finished.
ImportManager 2008 recaps the choices you've made for the new server and if you're satisfied,
click "Create" and the server will be created. Alternatively you can click "Cancel" and start over.
Creating a User
As an administrator, it is possible to add users and setup which servers they can connect to.
Follow the procedure below to add a user and set him up to use a server.
1. Add User.
Select "Administration" from the top bar and select "Add User".
2. User Details.
Fill in the necessary information for the new user as illustrated in the screen below.
3. Save User.
The user is created, but as seen in the screen below, the user still isn't associated with a server.
4. Associating Server.
Click the "Servers" button in the bottom left corner. In the "Servers" tree structure right click "Users" an
select "Associate user" and then the new user.
5. User Associated.
When clicking "Users" in the bottom left corner and then selecting the new user, it is now possible to se
that the user has been associated with a server.
6. Log In.
Close down ImportManager 2008 and start it up again.
This time try to log in with your newly created user account.
7. Check.
As seen on the screen below, only the servers associated with the user is visible.
Simple Import
The Simple Import guides covers a simple bare bones import when using either a text file or a
SQL (ODBC) data source.
Text Source
Follow the guide in this chapter step by step if you want to setup a simple import from a text file.
This guide will not cover dynamic fields, transformations and deletions and will only skip over
match criteria lightly.
Setting up the Data Source:
1. Upload File.
Right click "Data Files" in the tree menu to the left and select "Upload New".
2. Browse to the file.
In the browser that pops up, browse to the location of your data file and select it.
Remember that the file should be in text format.
The tree will update, to show you that a file has been uploaded and if you right click the file, it is possibl
it or delete it.
3. New Data Source.
Right click "Data Source" and select "New".
4. Data Source.
Give the Data Source a name and select the "Text file Datasource" from the list.
Click "Create".
5. Text File Settings.
Make sure that the settings for the chosen file are correct. You can select a file under the file
name drop down menu, select whether this file has a header row or not, choose the Separator,
if there's any quotation and finally what encoding the file uses.
The Separator is used to separate columns inside the text file, where a new line separates
rows. The quotation is sometimes used for text strings. What encoding your file uses, is
usually determined by your location.
Click "OK".
6. Done.
The Data Source has now been created. If you select it in the tree, by expanding "Data Sources" and s
the particular data source, you can view and change settings.
Setting up the Package:
7. New Package.
Right click "Package" in the left tree menu and select "New".
8. Overview.
Give the new package a name and a small description.
Select the amount of information you wish to log during an import by checking the corresponding radio
button.
You can also select whether you want the import to run with a single or multiple threads, the latter being
faster on computers with multiple cores.
9. Data Sources.
Click Data Sources.
Notice that the Data Source created previously is listed here, so we don't need to create one.
If there are more than one Data Source in the list, the selected Data Source will be blue as opposed to
white.
Setup Import Rule:
10. Import Rules.
Create an Import Rule for our package.
Give the rule a name and select an entity type to import into.
Finally select the Data Source created earlier and click "Add".
11. Overview.
A pop up window will provide you with some basic information about the Contact, with default actions,
which you can change to suit your needs.
12. Matching.
It's possible to change settings for the Data Source here, as well as create Dynamic Fields, but for this
simple import we will go straight to matching. Click the "Matching" icon in the menu bar in the top.
13. Add Filter.
Right click "Criteria" and select "And".
14. Add Conditions.
Right click the newly created filter and select "Add Condition...".
Select an "Attribute", a "Condition" and a "Datasource" to match and click "OK". For our example we
used the "First Name" attribute from the contact entity, the "Equal" condition and "First" from the data
source as seen in the screen below.
Repeat this procedure, but this time map "Last Name" to "Last" as seen below.
You've now created a match criterion that states: if first name and last name match the record, there is
match.
15. Field Mapping.
In the field mappings window you will have to columns of fields. On the left side the fields found in the
data source and on the right, the fields found in the chosen CRM entity.
It is now a simple task to drag the fields on the right to their corresponding field on the left to create field
mappings like seen in the screen below.
16. Run Import.
Click the "Run" tab in the top followed by the "Save & Run" button and the following screen will be
visible.
After a while you should get something along the lines of the screen below. If the imports are a little
slow to start, it is usually because IM2008 needs to start up MS CRM first.
17. Done.
Once the import is done and you've closed down the window you can see the jobs under a particular pa
the package as seen in the screen below.
ODBC Source
Follow the guide in this chapter step by step if you want to setup a simple import from a text file.
This guide will not cover dynamic fields, transformations and deletions and will only skip over
match criteria lightly.
Setting up the Data Source:
1. New Data Source.
Right click "Data Sources" under the server in the tree structure in the left side and select "New" as see
screen below.
2. Data Source Selection.
Select ODBC Datasource from the list, give your source a name and click "Create".
3. ODBC Settings.
You need to give ImportManager 2008 a connection string to the ODBC Source to which you
want to connect.
In our example we wish to connect to a SQL Server 2005 Database and so we need the
following connection string:
Driver={SQL Native
Client};Server=myServerAddress;Database=myDataBase;Uid=myUsername;Pwd=myPassword;
After we change it to correspond with the database used in our example it looks like this:
Driver={SQL Native Client};Server=.;Database=Contacts;Uid=ImportUser;Pwd=Password#1;
Note that the User ID (Uid) and Password (Pwd) used here, is for a user created by a SQL
script when ImportManager 2008 is installed and thus they shouldn't be changed unless you've
specifically overridden this script and created a different user!
We need a SQL statement that collects the data we need. In our example the following
statement will do:
SELECT * FROM Contacts
As seen in the screen above, it is then possible to do a test to see if the connection string and
the SQL statement are correct. This will, provided they are correct, result in the following two
messages.
To finish, simply click "OK".
You can find alternative connection strings to suit your setup on the following homepage:
www.connectionstrings.com
Setting up the Package:
4. Create Package.
Right click "Package" in the tree structure in the left side and select "New" as seen in the screen below.
5. Package Overview.
Give the new package a name and description.
Setup Import Rule:
6. Create Rule.
Click Import Rules in the top menu and give your new rule a name. Select the data source created
earlier and an appropriate CRM entity type to import into.
Click "Add".
7. Rule Overview.
The Import Rule window will pop up. Here you may change actions though the default actions are fine
for most purposes, including ours.
8. Matching.
Click the Matching tab to see the matching window.
Right click "Criteria" and select "And".
Right click the newly created filter and select "Add Condition...".
Select an "Attribute", a "Condition" and a "Datasource" to match and click "OK". For our example we
used the "Email Address 1" attribute from the contact entity, the "Equal" condition and finally the "Email
from the data source.
9. Field Mappings.
Click the "Mapping" icon in the top menu to see the "Field Mappings" window. In the left column you
will find the fields found in your data source and in the right column, the fields found in your CRM
Entity.
Drag and drop each of the data source fields to the corresponding CRM entity field on the right.
10. Save & Run.
Click the "Run" tab and then "Save & Run" to save and run your rule.
11. Finished.
Once the import is done and you've closed down the window you can see the jobs under a particular pa
selecting the package as seen in the screen below.
FAQ and Common Errors
In this chapter you will find a mixture of frequently asked questions and common errors. These
have been divided into sub chapters, to allow you to identify locate your problem or question in a
fast and efficient manner.
Installation and Setup
Here you will find a list of common errors pertaining to the installation and setup of
ImportManager 2008.
1. Login failed.
The error seen in the screen below is encountered when either your login or your password or
both are incorrect when trying to log in (as seen in step 22).
2. Unable to connect to remote server.
This error message will likely pop up
when the wrong port number is
provided during login.
3. The remote name could not be resolved: ‘local.
This error message will show when the wrong server name is provided – in this case the name
“local”.
4. Client found response content type of ‘text/html’, but expected ‘text/xml’.
The request failed with an empty response.
As the server provided has been provided without a port number, the connection cannot be
established. This happens when you omit 5544 from http://localhost:5544/
5. Error 27502.
This error window will be encountered, when the SQL Database ImportManager needs, isn’t
present!
This can happen if the login information provided during installation was for a user with
insufficient permissions to the database. You need to reinstall ImportManager and be sure to
provide a SQL login with administrative permissions to the database!
Alternatively you can run a SQL script, provided from CRM Extensions.
Appendix A - Installing SQL
SQL Express 2005 can be downloaded from Microsoft using the following link:
http://www.microsoft.com/downloads/details.aspx?familyid=220549b5-0b07-4448-8848dcc397514b41&displaylang=en
Simply run the .exe file and follow the instructions.
Alternatively you can run the installer from a command console like this:
sqlexpr32.exe /qn addlocal=all instancename="SQLExpressIM2008" SECURITYMODE=SQL
SAPWD=Password#1 SQLAUTOSTART=1
This will install a SQL Express instance named “SQLExpressIM2008”, which you can log into (see
step 6 in the detailed version for installing ImportManager 2008) using the login “sa” and the
password “Password#1”.
Your index page goes here...
In MS-Word, select INDEX AND CONTENTS from the INSERT menu.
Select INDEX and click OK.