Transcript
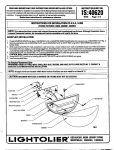
INSTR.UCTION.SHEET
@.
FOR ASSEMBLY
INSTRUCTIONS
lc-
AND
_
IS:4120AZ
INSTALLATION
R0391
READ AND
UNDERSTAND
THESE
INSTRUCTIONS
BEFORE
INSTALLING
FIXTURE.
This fixture is intended for .instsllation
in accordance with the National Electrical Code and local regulations.
To assure full compliance
with local codes and regulations, check with your local electrical inspector bsfore
~ installation. To prevent electrical shock, turn off electricity at fuse box before proceeding.
Retain these instructions for maintenance
reference.
1. Thread
FIXTURE SCREWS
CROSSBAR
Secure
3.
Support BACKPLATE and make connections
Black fixture lead or fixture lead without tracer mark to
black supply lead; white fixture lead or fixture lead with tracer mark to white supply lead; fixture ground
lead (uninsulated
wire) to supply ground lead. or other grounding terminal in OUTLET BOX. Uae WIRE
NUTS (local hardware item). Place connections
in OUTLET BOX.’
4.
Position
BACKPLATE
BOX with OUTLET
over FIXTURE SCREWS’ and secure with
Lamp with the correct lamp type.
MAXIMUM WAlTAGE
CAUTION:
MARKED
Slide one SPACER over each of the (2) SUPPORT STUDS.
7.
Place protective
9.
screen
BOX SCREWS.
BRIDGE
KNOBS.
ON FIXTURE MUST NOT BE EXCEEDED.
6.
~ 8.
,’---
to OUTLET
CROSSbAR.
2.
:5.
UNIVERSAL
into UNIVERSAL
on top of SPACERS.
Position SCALINI STACKED GLASS ASSEMBLY over the SUPPORT STUDS so the (2) rear SUPPORT
STUDS slide up through (2) holes in the GLASS ASSEMBLY.
Secure GLASS ASSEMBLY by threading
, SUPPORT STUDS. Do not overtighten.
the (2) GLASS FASTENERS
into the ends of each of the (2) rear
10. ”Slide END CAP up over SACKPlATE so BOSSES on the inside of the END CAP fit into SLOT in the
bottom of the BACKPIATE. Secure by threeding HOLDER KNOBS through the holes in side of END CAP
11. To relamp fixture, remove the (2) GIASS FASTENERS and remove SCALINI GLASS ASSEMBLY. Lift
protective screen and relamp with recommended lamp. Replace protective screen, SCALINI GLASS
ASSEMBLY and GLASS FASTENERS.
J,. ..,-.
,,-
,,
,,
‘
,. .
.’