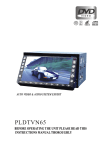
1
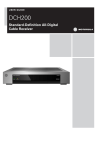
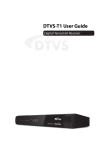
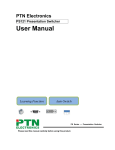
The product is manufactured in accordance with
the international standard.
JX-DVD400 DVD Micro Hi-Fi Component System
Operating Instructions
Please read this manual thoroughly before making connections and plugging in the player and retain this manual for future reference.
JX-DVD400
A slight difference may exist between the printed pattern and the actual product.
Attention for parents:
In order to avoid the situation that you forget the parental lock code and
can not enter into the operation of parental lock setting, here we offer you the
super secret code: 1369 . You may use this code to enter into the operation of
parental setting. To prevent the young children from knowing this secret code,
please tear the note from this user's manual and keep in secret place. Thanks.
SAFETY PRECAUCTION
WARING: Due to the mains switch was located at the rear panel, the apparatus must be
located in the open area without any obstructions to access the mains switch.
The lighting flash with arrowhead symbol, within an equilateral triangle, is intended
to alert the user to the presence of uninsulated dangerous voltage within the product s
enclosure that may be of sufficient magnitude to constitute a risk of electric shock to
persons.
The exclamation point within an equilateral triangle is intended to alert the user to the
presence of important operating and maintenance (servicing) instructions in the
literature accompanying the appliance.
WARNING:
TO REDUCE THE RISK OF ELECTRIC SHOCK, DO NOT EXPOSE THE APPLIANCE
TO RAIN OR MOISTURE. DANGEROUS HIGH VOLTAGES ARE PRESENT INSIDE THE
ENCLOSURE. DO NOT OPEN THE CABINET.
CAUTION:
When replacing the direct plug-in power supply or a separable, cord-connected power supply, the
replacement must be the exact duplicate, or one that has been recommended by the manufacture.
CAUTION:
TO PREVENT ELECTRIC SHOCK, MATCH THE WIDE BLADE OF THE PLUG TO WIDE
SLOT, AND FULLY INSERT.
This DVD player employs a laser system.
Use of controls, adjustments or the performance of procedures other than those specified may result
in herein hazardous radiation exposure.
To prevent direct exposure to laser beam, do not open the enclose.
DO NOT STARE INTO BEAM.
FCC NOTICE:
This equipment has been tested and proved to comply to the limits for a Class B digital device, pursuant
to part 15of the FCC Rule. These limits are designed provide reasonable protection against harmful
interference in a residential installation.This equipment generates, uses, and can radiate radio frequency
energy and, if not installed and used in accordance with the instructions, may cause harmful interference
to radio communications.
However, there is no guarantee that interference will not occur in a particular installation. If this equipment
does cause harmful interference to radio or television reception, which can be determined by turning the
equipment off and on, the user is encouraged to try to correct the interference by one or more of the
following measures:
-Reorient or relocate the receiving antenna.
-Increase the separation between the equipment and receiver.
-Connect the equipment into an outlet on a circuit different from that to which the receiver is connected.
-Consult the dealer or an experienced radio/TV technician for help.
WARNING:
Changes or modifications made to this equipment, not expressly approved by our company, or parties
authorized by our company ,could void the user s authority to operate the equipment.
IMPORTANT SAFETY INSTRUCTIONS
CAUTION: PLEASE READ THESE INSTRUCTIONS AND KEEP THESE INSTRUCTIONS
FOR FUTURE REFERENCE. PLEASE HEED ALL WARNINGS AND FOLLOW ALL
INSTRUCTIONS.
This set has been designed and manufactured to assure personal safety. Improper use can result in electric
shock or fire hazard. The safeguards incorporated in the unit will protect you if you observe the following
procedures for installation , use and servicing. This unit is fully transistorized and does not contain any
parts that can be repaired by the user.
DO NOT REMOVE THE CABINET COVER, OR YOU MAY BE EXPOSED TO
DANGEROUS VOLTAGE. REFER SERVICING TO QUALIFIED SERVICE PERSONNEL
ONLY.
1.Read this manual
After unpacking this product, read these instructions
carefully, and follow all the instructions.
2.Power Sources
This product should be operated only from the type of
power source indicated on the marking label. If you are
not sure of the type of power supply to your home, consult
your product dealer or local power
company. For products intended to operate from battery
power, or other sources, refer to the operating instructions.
3.Grounding or Polarization
Do not defeat the safety purpose of the polarizedor
grounding-type plug. A polarized plug has two blades
with one wider than the other. A grounding type plug
has two blades and a third grounding prong.
The wide blade and the third prong are provided for your
safety. If the provided plug does not fit into your outlet,
consult and electrician for replacement of the obsolete
outlet.
4.Ventilation
Do not block any ventilation openings. Install in accordance
with the manufacturers instructions.
The openings should never be blocked by placing the
product on a bed, sofa ,rug or other.
5.Heat
Do not install any heat sources such as radiators, heat
registers, stoves, or other products(including amplifiers)
that produce heat.
6.Water and Moisture
Do not use this apparatus near water, for example, near a
bath tub, wash bowl, kitchen sink, laundry tub,swimming
pool or in a wet basement and such like.
7.Cleaning
Unplug this product from the wall outlet before cleaning .
Do not use liquid cleaners or aerosol cleaners. Clean only
with a dry cloth.
8.Power-cord Protection
Protect the power cord from being walked on or pinched
Particularly at plug, convenience receptacles, and the
point where they exit from the apparatus.
9.Overloading
Do not overload wall outlets; extension cords, or integral
convenience receptacles as this can result in a risk of fire
or electric shock.
10.Lightning
Unplug this apparatus during lighting storms, or when
unused for long periods of time. This will prevent damage
to the product due to lightning and power-line surges.
11.Object and Liquid Entry
Never push objects of any kind into this product through
openings as they may touch dangerous voltage points or
short-out parts that could result in a fire or electric shock.
Never spill liquid of any kind on the product.
12.Attachment
Only use attachments/accessories specified by the
manufacturer.
13.Accessories
Use only with the cart, stand, tripod, bracket, or table
specified by the manufacturer, or sold with the apparatus.
When a cart is used, be caution when moving the cart
apparatus combination to avoid injury from tipping over.
14.Disc Tray
Keep your fingers well away the disc tray as it is closing.
Neglecting to this may cause serious personal injury.
15.Burden
Do not place a heavy object on or step on the product.
The object may fall, causing serious personal injury and
serious damage to the product.
16.Disc
Do not use a cracked, deformed, or repaired disc. These
discs are easily broken and may cause serious personal
injury and product malfunction.
17.Damage Requiring Service
Unplug this product from the wall outlet and refer servicing to qualified service personnel under the following
conditions:
a)When the power-supply cord or plug is damaged.
b)If liquid has been spilled, or objects have fallen into
the product.
c)If the product has been exposed to rain or water.
d)If the product does not operate normally by following
the operating instructions. Adjust only those controls
that are covered by the operating instructions as an
importer adjustment of other controls may result in
damage and will often require extensive work by a
qualified technician to restore the product to its normal
operation.
e)If the product has been dropped or damaged in any
way.
f)When the product exhibits a distinct change in
performance-- this indicates a need for service.
18.Servicing
Refer all servicing to qualified service personnel.
Servicing is required when the apparatus has been damaged
in any way, such as power-supply cord or plug is damaged,
liquids has been spilled or objects have fallen into the
apparatus, the apparatus has been exposed to rain or
moisture, does not operate normally, or has been dropped.
19.Replacement Parts
When replacement parts are required, be sure the service
technician has used replacement parts specified by the
manufacturer or have the same characteristics as the
original part. Unauthorized substitutions may result in
fire, electric shock, or other hazards.
20.Safety Check
Upon completion of any service or repairs to this product,
ask the service technician to perform safety checks to
determine that the product is in proper operating condition.
Notes on Handling
* When shipping the DVD player, the original shipping
carton and packing materials come in handy. For maximum
protection, repack the unit as it was originally packed
at the factory.
* Do not use volatile liquids, such as insect spray, near
the DVD player. Do not leave rubber or plastic products
in contact with the DVD player for a long time. They
will leave marks on the finish.
* The top and rear panel of the DVD player may become
warm after a long period of use. This is not a malfunction.
* When the DVD player is not in use, be sure to remove
the disc and turn off the power.
* If you do not use the DVD player for a long period,
the unit may not function properly in the future. Turn on
and use the DVD player occasionally.
Notes on Position
* When you place this DVD player near a TV, radio, or
VCR, the playback picture may become poor and the
sound may be distorted . In this case, place the DVD
player away from the TV, radio, or VCR.
Notes on Cleaning
Use a soft, dry cloth for cleaning.
* For stubborn dirt, soak the cloth in a weak detergent
solution, wring well and wipe. Use a dry cloth to wipe
it dry.
* Do not use any type of solvent, such as thinner or
benzine, as they may damage the surface of the DVD
player. If you use a chemical saturated cloth to clean
the unit, follow that product s instructions.
To Obtain a Clear Picture
The DVD player is a high technology, precision device.
If the optical pick-up lens and disc drive parts are dirty
or worn down, the picture quality becomes poor. To
obtain a clear picture, we recommend regular inspection
and maintenance(cleaning or parts replacement)every
1,000 hours of use depending on the operating environment. For details , contact your nearest dealer.
Notes on Moisture Condensation
Moisture condensation damages the DVD player.
please read the following carefully.
Moisture condensation occurs, for example, when you
pour a cold drink into a glass on a warm day. Drops of
water form on the outside of the glass. In the same way,
moisture may condense on the optical pick-up lens inside
this unit, one of the most crucial internal parts of the
DVD player.
Moisture condensation occurs during the following
cases:
*When you bring the DVD player directly from a cold
place to a warm place.
*When you use the DVD player in a room where you just
turned on the heater, or a place where the cold wind from
the air conditioner directly hits the unit.
*In summer, when you use the DVD player in a hot and
humid place just after you move the unit from an air
conditioned room.
*When you use the DVD player in a humid place.
Do not use the DVD player when moisture condensation
may occur:
*If you use the DVD player in such a situation, it may
damage discs and internal parts. Remove the disc,
connect the power cord of the player to the wall outlet,
turn on the DVD player, and leave it for two or three
hours. After two or three hours, the DVD player will
have warmed up and evaporated any moisture. Keep
the DVD player connected to the wall outlet and moisture
condensation will seldom occur.
Table Of Contents
1. Safety Instruction
2. Packing List
3. Explanation of Safety Symbols
4. User Interface
4.1 Front Panel
4.2 Rear Panel
4.3 Connection With Speaker
4.4 Remote Control
4.5 Vacuum Fluorescent Display
5. Playable Discs for the Player
6. Preparation Before Playing
6.1 Accessories
6.2 Battery Installation for Remote Control
6.3 System Connection
7. Function Buttons
7.1 Function Buttons on the Front Panel
7.2 Function Buttons on the Remote Control
8. The Function of the Player
8.1 Use KARAOKE Function
8.2 Playback On MP3/WMA Discs
8.3 How to View the Digital Album of Picture CD
8.4 The Radio Function
1
3
3
4
4
5
6
7
8
9
11
11
12
12
16
16
19
23
23
24
25
27
9. System Setup
9.1 Setup Menu
9.2 General Setup Page
9.3 Video Setup Page
9.4 Audio Setup Page
9.5 Password Setup Page
10. Intelligent Screensaver and Standby Function
11. Malfunction & Troubleshooting
12. Technical Specification
29
29
29
30
32
34
35
35
37
1.Safety Instruction
1
2
2.Packing List
1.DVD Player
2.Speaker
3.Remote Control
4.Operating Instruction Manual
5.AV Connecting Line
6.Connection Lines of Speaker
7.FM/AM antenna
8.Battery
1 Piece
2 Pieces
1 Piece
1 Piece
1 Piece
2 Pieces
2 Pieces
1 Pair
3.Explantion of Safety Symbols
This symbol reminds the users to avoid the electric shock.
This symbol reminds the users that important explanations are attached to the product.
In order to avoid electric shock, do not open the top cover! No
parts of the machine can be repaired by the uses and the repair
work shall be only limited to qualified repaired.
3
4.User Interface
4.1Front Panel:
1
10
2
3
4
5
6
7
8
11
12
13
14
15
16
17
18
9
19
20
4
1.VFD Display Screen
2.Play Button
3.Pause Button
4.Fast Reverse/Tunning Down Button
5.Fast Forward/Tunning Up Button
6.Standby Button
7.Tone Button
8.Audio Button
9.Phones Jack
10.Remote Control Sensor
11.Open/CloseButton
12.Stop Button
13.Next Button
14.Previous Button
15.Volume Multi Control Knob
16.AM/FM Switch Button
17.DVD/Tuner Switch Button
18.Disc Tray
19.MIC Volume Control
20.MIC Jack
4.2 Rear Panel:
1
2
5
6
3
2
1.Power Switch
2.Video Output Port
3.Audio L/R Output Ports
4.Coaxial Output Port
5.FM Antenna Connecting Terminal
6.AM Antenna Ramp
7.YUV(Y,Pb/Cb,Pr/Cr) Output Ports
8.Optical Output Port
9.AC 110-240V Power Cord
10.Speaker R Channel Output Ramp
11.Speaker L Channel Output Ramp
4
7
8
9
10
11
5
4.3Connection with speaker:
6
4.4Remote Control:
1
22
2
3
23
24
4
25
5
6
7
8
9
26
27
28
29
10
30
31
11
12
13
14
15
16
17
18
19
20
21
32
33
34
35
36
37
38
39
40
41
1.Power on/Standby Button
2.PS(progressive) Button
3.Recall Button
4.Numeric Buttons
5.Stop Button
6.Zoom Button
7.Play Button
8.Pause Button
9.Up Button
10.Left Button
11.Down Button
12.MENU(PBC) Button
13.Volume Control(-)
14.Previous Button
15.Next Button
16.Title Button
17.Slow Button
18.Return Button
19.Subtitle Button
20.DVD/Tuner Switch Button
21.AUTO Button
22.Open/Close Button
23.Mute Button
24.OSD Button
25.Clear Button
26.Search Button
27.3D Button
28.Audio Button
29.Setup Button
30.Right Button
31.Enter Button
32.Tone Button
33.Volume Control(+)
34.Fast Forward Button
35.Fast Reverse Button
36.A-B Button
37.Repeat Button
38.Progame Button
39.Angle Button
40.AM/FM Switch Button
41.Memory Button
7
4.5Vacuum Fluorescent Display
8
1.Disc Format Display
5.Spectrum Display
2.Menu Display
6.Radio Frequency Unit Display
3.NTSC Display
7.Time/Frequency Display
4.Band Display
8.Chapter/Track Display
9.PAL Display
10.Pause Display
11.Channel Indicator
12.Play Display
13.Disc Repeat Display
14.Track Repeat Display
5. Playable discs for the Player
Disc Type
Dimensions
Symbol
9
* The user is advised to safeguard the intellectual property and use original discs. For those faults
resulting from the use of pirated or poor quality discs, we'll not undertake to offer the replacement
or guarantee.
10
6.Preparation Before Playing
6.1 Accessories(Please check whether all the following accessories are available after unpacking.)
Instruction
Manual
Audio/Video Cord
A Pair of Batteries
Remote Control
One FM Antenna and
One AM Antenna
Speaker Connection Cord
11
6.2 Battery Installation for Remote
Control
Open the battery compartment lid and insert a pair of AAA
batteries with correct polarity as indicated. Please point at the
remote sensor on the player while using the remote control.
6.3 System Connection
1.Turn off the power before connection.
2.Turn on the power after finishing connection.
*Audio/Video cord must be connected according to the color:
Yellow plug----Video terminal(Yellow)
White plug----Left Audio terminal(White)
Red plug----Right Audio terminal(Red)
* Wires must be properly connected and plugs fully inserted.
Connetct with TV
1.Normal TV Connection
Connect the player and the appropriate port of TV set with
video/audio wire, as indicated in the diagram on the right.
12
2.Connect with YUV (Y Pb/Cb Pr/Cr)
Terminal
Connect the Y, Pb/Cb, Pr/Cr outputs from the player to the
corresponding YUV inputs of TV with video cables(not provied)
and then make the audio connections with audio cables the
player and TV as indicated in the diagram on the right.
To get a better picture on the Progressive Scan TV, adjust the
TV settings to Progressive Scan Video Input Mode. Press
the PS button on the remote control after the DVD player has
read the disc so that the player switches into the Progressive
Scan Video Output Mode.
*When connecting to a normal TV, don t put the DVD player in
progressive scan mode, there will be no picture display and
may cause damage to your TV.
13
If your player has the "SCART AV OUT" connector, please connect with your TV as below:
(This content is optional)
SCART TV IN
TV
SCARTAVOUT
A/V EUROCONNECTOR CABLE
* After connect "Scart AV out" on the player with "Scart TV in" on the TV set, set up the play mode as
"RGB"state, then it will out put normally.
14
Connetct with AV Power Amplifier
1. Connecting to a stereo power amplifier
Make the audio connections with audio cables between
the player and the stereo power amplifier as indicated
in the diagram on the right.
2. Connect with digital audio optical fiber or coaxial
Terminal.
Connect the OPTICAL type DIGITAL AUDIO output from
the player to the corresponding input of power amplifier with
an optical cable(not provided) and then connect the video
cable between player and TV.
Alternatively ,connect the COAXIAL type DIGITAL AUDIO
output from the player to corresponding input of power amplifier
with an coaxial cable(not provided) and then connect the
video cable between player and TV.
Please refer to 9.4 Audio Setup Page for the detail setting.
15
7.Function Buttons
7.1 Function Buttons on the Front Panel
This section instructs you the basics on how to operate
the player.
After connection, you must make the following preparations
before operation of this player.
* Turn on the TV and select Video Input.
* Connect the power wires of the player to the socket.
(the functions list below also corresponds to the button
functions of the remote control)
7.1.1 Power
Press the button to switch the unit ON/OFF.(the button is
located at the rear panel)
7.1.2 Standby
Press the button for the first time and the player will be in
standby state and reduce the power consumption. Press this
button again and the player will recover operation.
7.1.3 Play
Press the button to close the disc tray and start playback.
7.1.4 PAUSE
Press the PAUSE button to pause playback(still mode).
But on the remote control ,you press the button once,the player
will be in pause state; you press the button twice, the picture
will advances frame by frame. To resume normal playback,
press the PLAY button.
16
7.1.5 Stop
Press the button to STOP at the location where you want to
interrupt playback. The DVD player will memorize the location
where playback is stopped and resume playback from the same
location when the PLAY button is pressed.
Press the STOP button twice, the DVD player will STOP
playback and will not memorize the location where the playback
is stopped.
7.1.6 Open/Close
Press the button to eject or close the disc tray.
7.1.7 Fast Forward and Fast Reverse
Press
during playback for fast forward and
for
fast reverse. Each time you press the
or
button,
the playback speed changes.
7.1.8 Previous/Next
Normally DVD discs are divided into titles ,and the titles are
sub-divided into chapters.VCDs, SVCDs, CDs are divided
into tracks. You can press the
or
button to skip to
the chapter or track you want.
7.1.9 Tone
Press the button , TREBLE/BASS/VOLUME
will be displayed on the TV. Press volume control
+ on the remote control or revolve clockwise VOLUME
multi control knob on the panel to increase TREBLE/BASS
/ VOLUME. Press volume control - on the remote control
or revolve counterclockwise VOLUME multi control knob
to decrease TREBLE/BASS/VOLUM.
17
7.1.10 Audio(L/R)
Press this button to choose different dubbing , left and right
channel outputs (DVD has 8 languages and Super VCD has
4 languages. This function requires the support from disc.)
7.1.11 DVD/Tuner
Press the button to switch the DVD playing state and the radio
mode.
7.1.12 FM/AM
Press the button to switch the unit FM/AM for selecting
different band.
7.1.13 Volume Multi Control
Turn the knob to adjust the volume of the phones and the
speakers.
7.1.14 Phones Jack
In order not to disturb other people when enjoying the music,
you can connect the earphone to PHONES jack. Volume control
knob will increase and decrease volume while the speaker
has no sound output.
7.1.15 Mic Jack
After connected the microphone to MIC jack, you may begin
to Karaoke.
7.1.16 MIC Volume
The knob to control the MIC volume.
18
7.2 Function Buttons on the Remote
Control
7.2.1 PS
The PS button allows you to change between PROGRESSIVE
or INTERLACE(ordinary TV) modes.
(Always put the player in the INTERLACE mode when using an
ordinary TV set not capable of accepting the Progressive Scan
video signal. Otherwise ,there will be no display on TV and may
cause damage to your TV.)
7.2.2 Recall
Pressing the button will return all settings back to the factory
default setting.
7.2.3 OSD
Press the button to display the information of the disc during
playback..
7.2.4 MUTE
During playback, the MUTE button is used to activate the
mute function. It turns off the playback sound immediately.
To resume normal sound level, press the MUTE button
again.
7.2.5 Numeric Keys (0-9, +10)
During playback you can locate a title by entering the title
number or locate a specific chapter or track directly in combination
with the SEARCH button.
7.2.6 Clear
When you input numbers from NUMERIC KEYS, you can
press CLEAR button to clear the numbers entered.
19
7.2.7 Zoom
Successively pressing the ZOOM button to get different zoomed
picture. In the state of zoom play, pressing the direction buttons
can shift the pictures accordingly.
Note: There may be zoom level differences among different types
of discs.
7.2.8 3D
Press the button to enjoy from a variety of surround sound
effects. If the sound quality becomes distorted during playback,
adjust the 3D mode to OFF.
7.2.9 Search
To locate the desired title and chapter on a DVD disc, press the
SEARCH button and search the desired title time and chapter
time.
7.2.10 Setup
Press the button to enter the SETUP menu. The SETUP menu
allows you to change system settings. To exit the SETUP menu
press the SETUP button again.
7.2.11 Arrow Keys(up, down, right, left)
The ARROW KEYS allow you to navigate the cursor in the
SETUP menu and the interactive selection menu of a DVD
disc. Once the desired selection is highlighted ,press the ENTER
button to change to that setting.
7.2.12 Enter
As described in 7.2.11, the ENTER button is used to confirm
the setting highlighted by the cursor.
20
7.2.13 MENU
During DVD playback, you can return to the interactive selection
menu by pressing the MENU button.(the function applies to
discs that contain a menu)
During SVCD and VCD 2.0 playback the MENU button is
used to switch the PBC mode ON/OFF.
7.2.14 Volume Control (+) / (-)
Press "+" button to increase the phones and the speaker
volume, and press "-" to decrease the volume.
7.2.15 Title
Press this button to enter the appointed title. (Only applicable
to the DVD discs with this function.)
7.2.16 Slow Motion
To play slow-motion during playback press the SLOW
button. Each time you press the SLOW button,the slowmotion speed changes.
7.2.17 Repeat
During DVD playback, continuously press this button
to choose among repeat play of current chapter,title,or
disc. During SVCD,VCD or CD playback, continusly
press the button to choose between repeat play of current
track or disc.
7.2.18 A-B Repeat
Press A-B repeat at the beginning of the segment(point A) you
want to play repeatedly. Press A-B repeat again at the end of
the segment (point B). The DVD player will automatically
return to point A and starts repeat playback of the selected
segment(A-B).
21
7.2.19 Subtitle
Press this button to display different subtitles available on
the DVD or SVCD discs.(DVD discs can contain up to 32
different kinds of captions and SVCDs up to 4)
7.2.20 Return
Pressing the button will return you to the main menu.
7.2.21 Angle
Press the button while playing a scene recorded with multiple
angles. This allows you change the camera angle of the scene
you are watching. When playing multiple angle scenes, the
angle icon will appear on the TV screen.
Note: This operation is only available with DVD discs with
this function . (Requires the support from discs.)
7.2.22 Program
Press PROG button and enter numbers into the corresponding
Interface. Press START to perform the programming
play function. If you don't want a programming play, just
enter into the programming menu and move the highlighted
bar to the STOP column. Then cancel the programming play
by making confirming and choose the EXIT column.
7.2.23 Auto
In tuner state, you press the button, the player will search
the different frequency automatically. When find the
radio program, the player will automatically save the radio
Program.
7.2.24 Memory
Press the button to save the position of radio program. (please refer
to 8.4.2)
22
8. The Functions of the Player
8.1 Use KARAOKE Function
8.1.1 Connect with Microphone
Turn the MIC VOLUME knobs on the front panel to the
minimum and then connect microphones to MIC jacks.
8.1.2 Start KARAOKE
(1) Turn MIC VOLUME knob to adjust the volume of
microphone.
(2) You may press numeric keys on the remote control to
select the track you want when it is playing a karaoke disc.
8.1.3 Special KARAOKE Functions
Press AUDIO button on the remote control and choose from
the following:
[STEREO] [MONO LEFT] [MONO RIGHT]
[MIX-MONO] [PARTNER LEFT] [PARTNER RIGHT]
Cancel Original Sound
You may press the AUDIO button and choose [MONO
LEFT] or [MONO RIGHT] to cancel original sound when
you are enjoying Karaoke. You can also cancel original
Sound by choosing different audio output mode.
The Operation Of Auto Replace Karaoke And Auto
Follow KARAOKE
Choose [PARTNER LEFT] or [PARTNER RIGHT] to enable
23
auto replace karaoke (When person is singing, the player
doesn't sing; vice versa) or auto follow karaoke (when person
is singing, the player is singing; vice versa).
This function doesn't apply to DVD and SVCD discs.
Microphone Feedback handling:
*Take the microphone far away from TV set or SPEAKER.
*Turn down the volume of TV set or SPEAKER.
*Turn down the volume of microphone.
8.2 Playback on MP3/WMA Discs
MP3 / WMA discs may have a directory structure similar
to the diagram illustrated to the right.
In the directory list, press the ARROW buttons to highlight
the desired folder and then press ENTER button to go down
1 level into the sub directory. Press the ARROW buttons
to choose the desired track and then press ENTER or PLAY
to start playback. If you want to return to an upper level
directory, press the arrow buttons to choose the
icon
or press
button.
Press the PROG button to switch between the FILELIST and
FOLDER play mode.
Note: Filelist: Sequentially display the tracks in the
folder or entile disc.
Folder: Display the folders in the whole disc by
the directory structure.
24
8.3 How to View the Digital Album of a
Picture CD
8.3.1 Show a Picture
A Picture CD disc may have a directory structure similar to
the picture illustrated to the right.
In the directory list, press the ARROW buttons to choose the
folder and then press ENTER to go down 1 level into the sub
directory. Choose the desired picture and press the ENTER or
PLAY button to display picture. If you want to return to an
upper lever directory, use the ARROW button to navigate to
the
icon.
If you want to enter the FILE LIST mode, press the PROG
button and all the pictures will be displayed. If you want to
enter the FOLDER play mode, press the PROG button
again.
Note:The desired picture can be directly chosen and displayed
with numeric buttons and the ENTER button.
8.3.2 Multi Pictures Browsing
In PLAY mode, press STOP button to enter into picture
browsing with 12 pictures displayed at one time as shown
in the illustration on the right. Use arrow buttons to move
cursor to select your choice of picture to be shown and
confirm by pressing ENTER button.
The uses of icons on TV screen are:
Slide Show
Menu
PREV NEXT
25
PREV or NEXT--Turn to previous or next page of picture
for browsing.
Slide Show--show pictures at random.
Menu--Display the menu page for the functional buttons
as shown in Picture 1 and Picture 2. Press EXIT button to
exit from this menu.
Press MENU/PBC button on the remote control to return
to the menu interface.
Remote Key Function
Program
Transition Effect
Stop
Thumbnail Mode
Next Picture
Previous Picture
PLAY
Picture Mode
Invert
Mirror Continue
PICTURE 1
Remote Key Function
Contrarotate
Rotate Clockwise
Zoom
Switch Zoom Mode
Zoom IN
Zoom Out
Pan IN Zoom Mode
Exit Menu
PICTURE 2
26
8.4 The Radio Function
The system can save 60 preset radio programs(40 FM
radio programs and 20 AM radio programs.)
8.4.1 Automatically Tune and Save Radio Programs
Switch on the unit, and shift the unit to radio mode by
pressing DVD/TUNER button in the remote control or
front panel.
Choose AM or FM bands by pressing FM/AM button on
the remote control or the front panel.
Press the AUTO button in the remote control will search
automatically, displaying the changing frequency. When
finding the radio program, the unit will automatically
save the radio program.
8.4.2 Tune and Save Radio Program Manually
Adjust the radio frequency and choose the desired radio
program through pressing
and
button upward or
downward in the remote control or panel.
After the adjustment, press MEM button and VFD will
display SAVE XX. Press
and
button to choose
saving position of radio program and then press ENTER
button.
Note: press
or
continuously, it will search for
radio program forwards or backwards automatically,
until it finds one radio program.
27
8.4.3 Listen to the Preset Radio Program
Choose Program in Sequence: choose the saved radio
program by pressing
and
button in the remote
control or front panel.
Choose Program by Searching Frequency: Directly
press the Numeric Button in the remote control to choose
the desired frequency, and then press the ENTER to listen
to the program of chosen frequency. For example, if you
want to listen to FM 106.9MHz, you can enter 1069 and
then press ENTER button.
Choose the Program directly by Inputting Numbers:
Press the SETUP button in the remote control and VFD
will display LOAD XX , then enter the number and press
ENTER button, you can listen to the pre-saved radio
program. For example, if you want to listen to the program
saved in the 25th position, you ll press the SETUP
button in the remote control, enter the number 2 and 5
after VFD displays LOAD XX , and then press ENTER
button.
Note:1.The quantity of inputted numbers shall not exceed
the quantity of preset radio programs, otherwise it will
be of no effect.
2.Please choose the appropriate volume by adjusting the
Volume multi control knob in the front panel or pressing
Volume button in the remote control.
28
9. System setup
When the DVD player is turned on for the first time, it is
recommended to setup the players settings, to maximize
your entertainment comfort, with the AV equipment it is
connected to.
9.1 Setup Menu
* Press the SETUP button on the remote control to enter
the General Setup Page .
* Press the ARROW buttons on the remote control to navigate
and press the ENTER button to choose selection.
To exit the setup menu ,you can select
in the menu
bar or pressing SETUP. By pressing the left ARROW button,
you can go back to the upper level menu.
9.2 General Setup Page
General setup page is shown in the picture to the right:
9.2.1OSD Lang
You can select the language of the setup menu displayed.
9.2.2Captions
You can turn the hidden caption function ON/OFF.
General Setup Page
OSD Lang
Captions
Screen Saver
Disc Menu
Default
ENG
On
On
ENG
Go To General Set Up Page
29
9.2.3Screen Saver
To activate the screen saver function set the screen saver
setting to the ON position. It will enter screen saver
automatically after the picture becomes static or stopped
playback for several minutes.
9.2.4 Disc Menu
This allows you to select different languages in the interactive
selection menu.(function must be supported by disc)
9.2.5 Default
Select this option to reset the settings of the DVD player
to its default factory settings.
General Setup Page
OSD Lang
Captions
Screen Saver
Disc Menu
Default
ENG
On
On
ENG
Prefered Menu Language
9.3 Video Setup Page
9.3.1. TV Type
Inside VIDEO SETUP PAGE navigate to TV TYPE and
press ENTER. Select the TV type according to the TV
system of your TV.
PAL: To play a PAL or NTSC disc with mandatory PAL
signal output. Connect a PAL TV to view the picture.
AUTO: The DVD player automatically identifies PAL or
NTSC video system of a disc. Connect a multi-system TV
(PAL/NTSC compatible) to view the picture.
NTSC: To play a NTSC disc. Connect a NTSC TV to view
the picture.
30
Video Setup Page
TV Type
Auto
TV Display PS
Component
Quality
Go To Video Setup Page
English
French
Chinese
Japanese
German
9.3.2. TV Display
Inside VIDEO SETUP PAGE navigate to TV DISPLAY
and press ENTER. Here you can select the TV shape of
the display. Normal/PS(pan scan) and Norma/LB(letter
box) should be selected when connected to a standard
4:3 TV. Wide Screen should be selected when connected
to a 16:9 wide screen TV.
(During playback of a wide screen recorded DVD disc
the TV screen will be not fully filled, regardless of the
TV display setting when connected to a standard 4:3 TV,
with the top and bottom of the screen left black.)
9.3.3.Component
Inside VIDEO SETUP PAGE navigate to COMPONENT
a n d p r e s s E N T E R . Yo u c a n s e t t h e Y U V o u t p u t t o
PROGRESSIVE or INTERLACE.
P-SCAN:When connected to a progressive scan compatible
TV using component out connections, select P-SCAN.
INTERLACE: When connected to a standard TV using
S-Video or RCA connections, select INTERLACE.
If you select SCART connection, you should set up the play
mode as RGB state, then it will output nomally.
Note: If TV screen has no output after selecting
P-SCAN , you can press SETUP key once, then press
RECALL or PS key to recovery, or you can switch off
the power supply, reset the player, and then press
RECALL or PS key.
31
9.3.4. Quality
Inside VIDEO SETUP PAGE navigate to QUALITY and
press ENTER.Adjust the brightness, contrast, chrominance,
and saturation of the picture using the arrow buttons to your
liking.
Video Quality Setup
Brightness
00
Contrast
00
Hue
00
Saturation
00
Brightness
9.4 Audio Setup Page
Press the SETUP button and navigate to AUDIO SETUP
and press ENTER, a setup screen similar to the diagram
in the right will appear.
9.4.1. Speaker Setup
* Downmix
LT/RT means audio signal output through left track
and right track. Stereo means stereo signal output.
9.4.2.SPDIF Setup
* SPDIF Output
Inside AUDIO SETUP PAGE navigate to SPDIF SETUP
and press ENTER.
SPDIF/RAW: Select this option when connected to an
amplifier equipped with a Dolby Digital, DTS, MPEG,
1 or 2 decoder using the Optical or Coaxial Output from
the player.
32
Audio Setup Page
Speaker Setup
SPDIF Setup
Dolby Digital Setup
Equalizer
Go To Audio Setup Page
SPDIF/PCM:Select this option when connected to a 2
channel digital stereo amplifier using the Optical or Coaxial
Output from the player.The DVD player will output sound
in a 2-channel format.
*LPCM Out
When SPDIF output is set to SPDIF-PCM state, the
maximum sampling frequency of optical fiber or coaxial
terminal output signal can be achieved.
Note: Users can set it according to the maximum sampling
frequency that the power amplifier can handle.
9.4.3.Dolby Digital Setup
*Dynamic
Inside AUDIO SETUP PAGE navigate to DYNAMIC and
press ENTER. Adjusting this control can gain different signal
compression effects. You can adjust the linear compression
ration higher or lower during playback of Dolby Digital
recorded discs. The level of Dynamic Range Reduction may
need to be different depending on the DVD disc.
9.4.4. Equalizer Setup
Inside AUDIO SETUP PAGE navigate to EQUALIZER and
press ENTER. A setup screen similar to the diagram in the
right will appear. The equalizer page is used to switch BASS
and TREBLE BOOST ON/OFF.
Equalizer Page
Bass Boost
Off
Super Bass
Off
Treble Boost
Off
On
Off
Bass Boost
33
9.5 Password Setup Page
9.5.1. Password
Select Change in the Password Setup Page and a setup
screen similar to the diagram in the right will appear.
Press the number buttons to create a personal password
in NEW PASSWORD and repeat that in CONFIRM
PWD, then press ENTER.
9.5.2. Parental
DVD discs equipped with the parental lock function are
rated according to their content. The contents allowed by
a parental lock level and the way a DVD disc can be controlled
may vary from disc to disc.
DVD disc may or may not respond to the parental lock settings.
This is not a defect in the DVD player. Make sure this function
works with your DVD disc.
To change this parental lock levels navigate to parental
within the Password Setup Page and press ENTER .
If you have set a password in the Password option, you
have to input the password before setting the age control.
34
Old Password
New Password
Confirm PWD
10. INTELLIGENT SCREENSAVER
AND STANDBY FUNCTION
With the same function of screen protection and stand-by
function as computer, it will automatically enter into screen
protection after three minutes in stop or no disc state, so as
to protect your TV screen. In stand-by state, pressing Stand-by
key on the front panel or the remote controller can activate the
the player back to normal working state.
11. MALFUNCTION &
TROUBLESHOOTING
Before taking your player for warranty service in case
having trouble in operating it, try following troubleshooting
suggestions first.
35
No sound:
* Ensure that the player is connected properly
with other systems, such as power amplifier
or TV set.
* Ensure that TV set or power amplifier is
working properly.
* Check if MUTE button of the unit or TV
set is pressed.
* Examine whether the volume of TV set or
player is adjusted to minimum.
No picture:
* Ensure that the player is connected firmly
with the other systems, such as TV set.
* Ensure that the TV set is in normal working
state.
* Check whether the player is in stand-by
state.
* Set the video output as interlace scan when
the player is connected to a normal TV set.
Microphone has no sound
* Adjust volume of the microphone properly.
Disc not playing
* Ensure that the disc is placed correctly.
(The label side is facing up.)
* Ensure that the disc is clean.
36
Remote control does not work.
* Remove the obstacles between the player
and the remote control.
* Point the remote control at the sensor on
the front panel of the player.
* Check whether the batteries have adequate
power.
No display or partial display:
* Check whether the disc is scratched and
clean.
* As the player is controlled by microcomputer,
when there is a trouble, please turn off the
power and turn on the player again after
several seconds. If no error display, the
player can be normally used again.
No output after turning on:
* Ensure that the interval between continuous
turning-on is not too short.
* Turn on the player again 10 seconds after
it is turned off.
The screen doesn't light, no output
* The player may have entered stand-by state,
press STANDBY on the front panel or the remote
controller to activate it.
* Turn on again 10 seconds after the power supply
is switched off.
12. TECHNICAL SPECIFICATIONS
Video system
AUTO/NTSC/PAL
Audio response
20Hz~20kHz 1dB
Audio SNR
DVD
Part
85dB
Audio output
(analog audio)
Output level:1~2V
Audio output
(digital audio)
Output level:0.5Vp-p
Output Video output
S-Video output
YUV(Y, Cb,
Cr) output
Output level:1Vp-p
load impedance: 75
unbalanced negative
Output level: brightness (Y) 0.7Vp-p, chrominance(C):0.88Vp-p
load impedance: 75
Output level: 700 140mVp-p
37
Frequency Response
20Hz-20kHz 3dB
SNR
71dB(Broad Band),
Harmonic Distortion
of main Channel
AV
Part
2
Load Impedance
6
Earphone Output
38
1%(1KHz)
Output Power of main
Channel
Tone Adjust Scop
76dB(A Weight)
15W
Bass: 100Hz 8dB
50mW/32
Treble: 10KHz
8dB
Frequency Range
Intermediate Frequency
Radio
Sensitivity
FM:10.7MHz
FM:10
V
AM
65dB V/m
FM:60dB AM:45dB
Stereo Separation
25dB
Power Consumption
~110V-240V
AM:530~1710KHz
AM:450KHz
Signal-Noise Ratio
Power
Universal
FM:87.5~108.0MHz
60/50Hz
60W
Dimension
486(L)
Gross Weight
9.0Kg
365(W)
288(H)mm
39
DOLBY:
* Producing under the authorization of Dolby laboratory. The symbol of "Dolby" ,
" Dolby " and double D are registered trademarks of Dolby laboratory. It is a secret
product and cannot be issued. C Dolby laboratory:1992-1997. All rights reserved.
MACROVISION :
* This product incorporates copyright protection technology that is protected by
method of claims of certain U.S. patents and other intellectual property rights owned
by Macrovison Corporation and other rights owners. Use of this copyright protection
technology must be authorized by Macrovison Corporation, and is intended for home
and other limited viewing uses only unless otherwise authorized by Macrovision
Corporation. Reverse engineering or disassembly is prohibit.
40