1
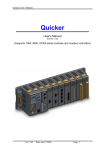
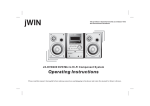
IP-8000SF
IP Network Audio & PA System Software
Instruction Manual
Specifications Change without Pre-Notice.
USER MANUAL
Table of Content
Part I: Introduction ......................................................................................................................... 2 1.1 Product Overview ................................................................................................. 2 1.2 Detailed features and functionalities ..................................................................... 2 1.3 Diagram of the topology of system ....................................................................... 4 Part II: Installing The System ....................................................................................................... 5 2.1 System Software Installation* ............................................................................... 5 2.1.1. Server Software Installation .............................................................................. 5 2.1.2 Workstation Software Installation ...................................................................... 8 Part III: Server Software Operation ............................................................................................. 9 3.1 Basic Operation .................................................................................................... 9 3.2 Software Configuration*........................................................................................ 9 3.3 General Operation .............................................................................................. 13 Part IV: Workstation Software Operation ................................................................................. 17 4.1 Basic Operation .................................................................................................. 17 4.2 Software Configuration*...................................................................................... 17 4.3 General Operation ........................................................................................... 18 Part V: MP3 Programming Tools ............................................................................................... 19 5.1 General Operation .............................................................................................. 19 Part VI: Hardware Installation and Operation .......................................................................... 20 6.1 Main control room equipment installation ........................................................... 20 6.2 Terminal installation ............................................................................................ 20 *
Mandatory for installer only, can be skipped by end user.
-1-
USER MANUAL
Part I: Introduction
1.1 Product Overview
The IP Network Public Address System, powered by Ethernet technology, the world’s most widely used
networking technology, encapsulates audio signal into TCP/IP datagram and transports it over computer
networks. The solution completely resolves the problems of the legacy public address systems such as bad
sound quality, difficulty in maintenance, shortage of mutual communication, etc. In addition to the major
features it delivers, it is also very easy to install –the system can be set up into fully functioning within one
minute by merely plugging the terminals into network jacks.
The system not only carries out basis functions like class bell, multicasting by zones, speech, but also
features advanced functions such as AOD (Audio on Demand).
The system supports CD quality playback (44.1k, 16 bit, stereo). The quality is sufficient for listening
comprehension exercises in foreign language study or examination. Students can take great advantage of
the crystal-clear sound.
1.2 Detailed features and functionalities
- Covering all the basic functions provided by legacy broadcasting systems.
Automated class bell, music playback, speech, notification broadcasting and radio program forwarding.
- Ethernet infrastructure
Taking advantage of the ubiquity of the Ethernet, cost-effective and high quality guaranteed.
- Online speech
Sending the speech to the broadcasting system by any online PC (must be on the campus network). The
speech can be broadcasted or multicasted to designated zones.
- AOD (Audio On Demand)
The operator can play any programs stored on the audio server by controlling the broadcasting terminal
using remote.
- Multiple media sources
Cassettes, CD, radio, Microphones… programs from various sources can be input directly into the audio
server. With real-time compression and fast forwarding, the programs can be heard from any corner across
the campus in no time.
- Customized playlist
Each terminal has its uniquely assigned IP address, making it possible that it can individually receive the
-2-
USER MANUAL
programs preconfigured on the audio server. Operators can save programs on the server and setup the
playlist, then the program can be play back automatically at the preset time and in the order of the playlist.
- Multcasting
The system allows for multicasting service, with which programs can be delivered to designated groups
manually divided by the operator. The volume and the on-playing program on the terminal can be remotely
controlled by the operation platform installed on the server-side.
-3-
USER MANUAL
1.3 Diagram of the of system application
-4-
USER MANUAL
Part II: Installation of the System
2.1 System Software Installation*
The software application of IP Network Public Address System consists of server software and workstation
software. The server software will automatically run demo version with three (3) preset users should no
softdog is detected; it will become a full version when softdog is plugged in.
Softdog (Drive-free)
2.1.1. Server Software Installation
Caveat: Running firewall software may affect the normal operation of IP Network Public Address System.
Please make sure the firewall software is disabled prior to installing/executing the software (including
Windows Firewall).
1) Brief installation procedure
z Install the Windows XP (Server or Professional version recommended) on the computer to be
installed with the server software.
If it needs to use Windows 7 operating system to run normally, please set up [compatibility] options
according to the following steps.
-5-
USER MANUAL
Step1. Click the right mouse button in the server icon;
Step2. Selected hook according to the above
z
z
Ensure that the soundcard and network card are installed and functional on the computer to be
installed with the server software.
In the TCP/IP properties of the network card setting, assign static IP (e.g., 192.168.0.6), mask
255.255.255.0, and gateway (e.g., 192.168.0.1).
Note: Server must use static IP address, DHCP is not available to the server software.
-6-
USER MANUAL
z
Insert the system installation CD-ROM.
z
Keep clicking “Next” through the installation until it is completed. The shortcut icon will be created
on the desktop.
z
Go back to CD:\ folder. Copy “MP3 Files(Demo)”, and paste the content in the folder to the local
harddisk (e.g., D:\ MP3 Files)
Take the CD-ROM our. The installation for the server software is now completed. Please refer to
Part III for server software configuration procedure.
z
execute CD:\Setup\Setup…exe.
-7-
USER MANUAL
2.1.2 Workstation Software Installation
1) Brief installation procedure
z Check whether the workstation computer has Windows2000/XP properly installed. The workstation
software does NOT support Windows98/Me.
z Ensure that the workstation computer has sound card and network card properly installed.
z DHCP can be configured for TCP/IP properties in network card setting.
z
Insert the system installation CD-ROM. execute CD:\Setup\Setup…exe, then click on “Next” to the
next screen. Uncheck “Digital IP Network Public Address System Server” and leave the “Digital IP
Network Public Address System Workstation” checked. Keep clicking “Next” until the installation is
completed. The shortcut icon will be created on the desktop. Please refer to Part IV for workstation
software configuration procedure.
-8-
USER MANUAL
Part III: Server Software Operation
3.1 Basic Operation
System server is the core of the Digital IP Network Public Address System.
Main operation window
3.2 Software Configuration*
Normally the software configuration is only required to be done once after the initial server installation to set
the proper parameters and does not need to be reconfigured during the normal operation. The following
steps reflect a typical configuration procedure done by the installer. The system administrator can also refer
to these steps for reference.
1)Select “Program Management” window, which is shown in the figure below. Click on “folder” button to
pop out the dialog box. Then specify the path to the folder where all the media are stored (e.g., D:\mp3 files,
which has been created in section 2.1).
Then press “Search” button. The system will establish the media list automatically.
-9-
USER MANUAL
2) Select “Terminal Setting” window, as shown in the figure below. Specify the actual number of terminals,
then press “update” button. The software will restart.
After the software restarts, go back to the “Terminal Setting”, and double-click any line to pop up the “Edit”
dialog box. Name the terminal according to its location or role.
About "Audio Rcv" set of important note:
This system software by default,use [multicast] way send audio to the terminal, but the multicast way
can`t through when meeting the following two network situations .
A. LAN environment,the server and terminal is not in the same network segment (and the core switch
- 10 -
USER MANUAL
banned the multicast way through)
B. WAN environment
If the terminal in this two situations, please choose [unicast] way, or terminal can't broadcast voice.
3) In the right area of the “Terminal Setting” window is the “Group” box where groups can be added,
renamed or deleted.
To assign certain terminals to specific group, select them from the “default group” and drag them to the
desired group (e.g. Office)
4) Select “Basic Setting” window as shown in the following figure.
Sniffers: Assign a terminal as the monitor to monitor the system operation in the “Running Status” window.
Timing automatically switches computer: to automatically turn off the computer at night and turn on in the
morning.
- 11 -
USER MANUAL
Workstation Account is to manage the accounts for the users who will use the workstation. User needs valid
account and password to log on to the server with the workstation.
- 12 -
USER MANUAL
3.3 General Operation
The digital IP Network Public Address System performs the following major functionalities in its
day-to-day use.
Timing ring (Managed by Server)―― The most basic functionality. It allows the music or bell to be played
automatically at specified time, for instance, playing morning calls every weekday at 6:30 AM.
Timing program (Managed by workstation)―― Activated and specified by the workstation, automatically
and in turn play multiple selected audio files at assigned time. This functionality is similar to the timing school
bell, except timing school bell is managed by the server, whereas this is managed by the remote
workstation.
Timing broadcast―― Automatically turn on the machine at scheduled time and capture /stream the audio
to the network. Best for broadcasting live programs from external source such as news in the radio.
Live broadcast―― Stream the audio program or live speech/announcement to specified location.
Audio On Demand (AOD)―― Select and play audio files stored on the server via the remote control and its
LCD. Every terminal can play separate audio file without interfering on another.
Running Status―― The running status of all the online terminals and ongoing tasks can be displayed in
the system and also be modified or adjusted.
1) Timing ring (Manage by Server)
Click on “Timing ring” and a window looks like the figure below is presented. Press “New scheme” to create a
new scheme, such as “day light saving time”. To make the scheme current, press “Exec scheme”.
On the right side of the window, press “Add Task” to pop up a dialog as shown in the following figure. Check
all the desired target terminals; name the task, set the time, and assign the audio file for the task.
- 13 -
USER MANUAL
Click on “Time Setting” to pop up the dialog box. The duration can be left unspecified. In this case, the
playing length in time will be the length of the audio file per se. Otherwise, if the duration specified is longer
than the actual length of the audio file, the file will be replayed over and over until the specified duration is
reached. If the duration specified is shorter than the actual audio file, the playing will be stopped once the
time is up. The stop date can also be left unspecified.
2) Timing program (Manage by workstation)
It is supported to check any Program Timer tasks on the server; however, the major work regarding setting
and editing tasks should be performed on the workstation. On the server, click on “Timing program” to open
the corresponding window, which can be seen in the following figure. To check the detailed information,
double-click on any line. Like the School Bell Timer, the Program Timer can also run automatically at the
scheduled time. It can also be manually triggered if needed.
- 14 -
USER MANUAL
3) Timing broadcast
Automatically turn on the machine (or start the task) at scheduled time and capture /stream the audio to the
network. Best for broadcasting live programs from external source such as news in the radio. The
parameters for the soundcard and recording (such as the source, volume, etc) should be configured under
the “Live broadcast” window which will be detailed in the following section. The operation process is similar
to that for the School Bell Timer
4) Live broadcast
This functionality allows the user to capture the live sound with the soundcard and stream it to the network in
real-time. The soundcard performs A/D transferring. A variety of sources are supported, such as the
microphone, cassette, CD, etc.
Procedure of Live broadcast(Support five soundcard broadcast simultaneous)
a). Specify the recording device.
The soundcard has the ability to mix audio from multiple channels (MIC, Line-in) into one output channel;
it can also accept only one channel. Specifying the recording device is actually to specify the input
(Stereo Mixer or single input channel)
Usually, Stereo Mix is recommended to allow all the input signals to be transmitted to the terminals. Note:
Different soundcards have different terms for “Stereo Mix”. For example, while most of the integrated
soundcards use “Stereo Mix” denote the function, the Creative’s SB-Live soundcard uses “The sound
you can hear” to indicate the same function.
- 15 -
USER MANUAL
The recording volume shouldn’t be set too loud for recording to prevent the sound distortion. It is
recommended to set it to the middle position.
b). Specify the targeted terminals, and then press “Start broadcast”.
5) Audio On Demand (AOD)
The audio files users can order are stored on the hard drive of the server. The menu that can be seen in the
“Program Management” is also the one that will be displayed on the terminals LCD. Users can either
manage these audio files on the server with the “Program Management”, or add or delete files from the
workstation. Please refer to Part VI for terminal operation.
6) Running Status
The “Running Status” window lists all the online terminals and their current states. To see the detail for any
specific terminal (except for the terminal with ongoing AOD task, which can not be monitored), double-click
the line where it is in. To monitor the sound being played by any specific terminal, single-click the line where
it is in and then press “Monitor Terminal”.
- 16 -
USER MANUAL
Part IV: Workstation Software Operation
4.1 Basic Operation
Users use workstation software to remotely log on the server via IP network (LAN, WAN) and manage the
server. Workstation software is mostly used by users to perform real-time capturing, produce the audio files
and schedule tasks. The figure below is the screenshot of the workstation software.
4.2 Software Configuration*
The workstation configuration is easier compared to that of the server. Basically, user only needs to
configure the server’s IP address on the workstation. Procedure:
After executing the workstation software, user is prompted with a log in window that looks like the left figure
below. Click on server address and then input the server’s IP address (e.g., 192.168.0.6) in the textbox
preceded by “server IP address” radio button. Also fill out the username and password textboxes (default
username/password is admin/admin). After all the fields are filled out, press Login button. If all the
information is correct, the workstation will now sign in the server.
- 17 -
USER MANUAL
4.3 General Operation
1) Running Status
The “Running Status” window lists all the online terminals and their current states.
2) Live broadcast
The process of this functionality is similar to that for the server. For details, please refer to Section 3.3 in
Part III. Only the different part is detailed hereunder.
Advanced Options: Since workstation can be used on both LAN and WAN, and normally LAN provides
much more sufficient bandwidth than WAN does, for the workstation to perform better on the WAN, user
can set the Advanced Options according to the specific network environment.
3) Timing progame
Program Timer enables automatic playback of multiple selected audio files at assigned time.
First, press “Add Task” button to activate the task wizard. Fill in the basic information at the first step,
then click “Next”. In the next window, specify targeted terminals, then click “Next”. In the last window,
specify the program playlist for this task. To complete, press “Finish” button.
4) Program Management
The Program Management on the workstation is to remotely manage the media stored on the server. As
with the server, user can also use workstation to create folder, add, rename or delete audio files. To
upload files to the server, click on “Upload” button. To download to the workstation, click “Download”.
- 18 -
USER MANUAL
Part V: MP3 Programming Tools
MP3 Programming Tools can be used to produce user’s own programs.
5.1 General Operation
1) Format Transform
To convert WAV format or MP3 files with other bit rate to standard 128kbps MP3.
2) Real-time Record
To convert audio from analog source (for instance, cassette) directly to MP3 in real-time.
3) Capture track(CD Ripper)
To extract raw digital audio from a compact disk and save in WAVE format file.
4)File Split
To segment the audio file into peaces or tailor the length of it.
5) File Merge
To combine multiple MP3 files with same sampling frequency and bit rate into a single file.
- 19 -
USER MANUAL
Part VI: Hardware Installation and Operation
6.1 Main control room equipment installation
Main control room is the center of the broadcasting system, particularly the system server may need 24-hour
continuous operation, the design must conform to the following several principles:
1. In order to minimize the interference system, main control room should choose to stay away from
electromagnetic waves;
2. Main control room power supply into line with the standard requirements of a good grounding to earth,
grounding resistance should be less than 4 ohms;
3. Main control room should be chosen to the second floor or above floors;
4. Main control room suggested the installation of air-conditioning (temperature of 18-28 ° C, relative
humidity of 40% -70%);
5. Recommendations main control room installed anti-static floor;
6. Main control room of decorative materials should use non-burning material or difficult combustion
materials;
Control room sample
6.2
IP Network Audio AdapterTerminal installation
According to different applications, the IP digital network audio terminals into a variety of models, mixed use
in engineering. Please refer to the "Terminal Instruction Manual".
Technical Support Contact:
Guangzhou CMX Audio Co., Limited
Website: www.cmxaudio.com, E-mail: [email protected]
- 20 -