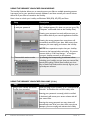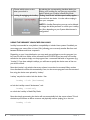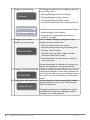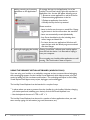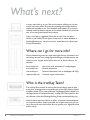
1
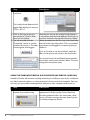
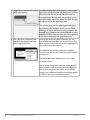
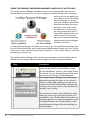
User Guide
IronKey Enterprise
Secure Flash Drive
IRONKEY ENTERPRISE USER GUIDE
PAGE Thank you for your interest in IronKey.
IronKey is committed to creating and developing
the best security technologies and making them
simple-to-use, affordable, and available to everyone. Years of research and millions of dollars of
development have gone into bringing this technology to you in the IronKey.
For a quick product overview, you can also view
our online demos at https://www.ironkey.com/demo.
We are very open to user feedback and would
greatly appreciate hearing about your comments,
suggestions, and experiences with the IronKey.
Standard Feedback: [email protected]
Anonymous Feedback: https://www.ironkey.com/feedback
User Forum:
https://forum.ironkey.com
IRONKEY ENTERPRISE USER GUIDE
PAGE CONTENTS
What is it?
Meet the IronKey Enterprise
Core Components
Device Diagrams
Technical & Security Notes
IronKey Device Security
How Does it Work?
Product Walkthrough
Activation and Initialization
Using the IronKey Unlocker on Windows
Using the IronKey Unlocker on a Mac
Using the IronKey Unlocker on Linux
Using the IronKey Control Panel
Using the IronKey Virtual Keyboard
Using the Onboard Firefox & Secure Sessions Service
Using the IronKey Password Manager
Using the Secure Backup Software
Using RSA SecurIDTM on your IronKey
Importing a Digital Certificate into the IronKey
Using my.ironkey.com
Using Your IronKey in Read-Only Mode
Using the IronKey Malware Scanner
Product Specifications
What’s Next?
Where can I go for more Information?
Who is the IronKey Team?
Contact Information
IRONKEY ENTERPRISE USER GUIDE
3
3
3
5
6
6
8
8
8
10
10
11
13
15
16
18
20
21
22
24
26
27
29
30
30
30
31
PAGE What is it?
Meet the IronKey
The IronKey Enterprise Secure Flash Drive, designed to be the world’s
most secure USB flash drive, protects your data, passwords, and Internet
privacy with some of today’s most advanced security technologies. Your
IronKey includes a suite of security software and online services, many of
which are described in this User’s Guide. Depending on how your System Administrator has configured your IronKey, some of these features
may not be included on your IronKey.
Core Features
Hardware-Encrypted Flash Drive
Your IronKey can safely store 1, 2, 4 or 8 gigabytes of documents, applications, files and other data. The IronKey Cryptochip inside the IronKey
protects your data to the same level as highly classified government information and cannot be disabled or accidently turned off.
Self-Destruct Sequence
If the IronKey Cryptochip detects any physical tampering by a hacker, it
will self-destruct. Similarly, after too many consecutive invalid password
attempts your IronKey will self-destruct using flash-trash technology.
Anti-Malware Protection
Your IronKey helps protect you from many of the latest malware threats
targeting USB flash drives. It will prevent autorun execution of unapproved programs, can be unlocked in a Read-Only Mode, and can scan and
clean malware from your IronKey with the IronKey Malware Scanner.
IRONKEY ENTERPRISE USER GUIDE
PAGE Simple Device Management
Your IronKey includes the IronKey Control Panel, a central launchpad for
launching your applications, editing your preferences, and safely locking
your IronKey.
Portable & Cross-Platform Data Access
The IronKey Unlocker allows you to access your encrypted files on Windows 2000, XP, Vista, Mac OS X and numerous distributions of Linux.
Secure Local Backup & Data Recovery
Securely back up the data on your IronKey using IronKey’s Secure Backup
software. It allows you to recover your data to a new IronKey in case your
IronKey is ever lost or stolen, or synchronize data between IronKeys.
Stealth Browsing Technology
Surf the Web safely and privately through almost any network, even across
unsecured wireless hotspots, with IronKey’s Secure Sessions Service. It
can be easily toggled through the onboard Mozilla Firefox web browser.
Self-Learning Password Management
Securely store and backup all your online passwords as you go with the
IronKey Password Manager. It allows you to automatically log into your
online accounts to avoid keylogging spyware and phishing attacks.
Online Security Vault
If your IronKey is ever lost or stolen, you can easily restore your online
passwords from an encrypted online backup.
Waterproof & Tamper-Resistent
The IronKey was designed to survive the extremes. The IronKey’s rugged
metal casing is injected with an epoxy compound that makes it not only
tamper-resistent, but waterproof to military specifications (MIL-STD-810F).
IRONKEY ENTERPRISE USER GUIDE
PAGE Device Diagrams
The IronKey has been designed from the ground up with security in mind.
A combination of advanced security technologies are used to ensure
maximum protection of your data. Additionally, the IronKey has been
designed to be physically secure, to prevent hardware-level attacks and
tampering, as well as to make the device rugged and long-lasting. You can
rest assured that your data is secured when you carry an IronKey.
Rugged metal case
filled solid with epoxy
Metal Cap
Multi-color LED
Drilled hole for
keyring/lanyard
USB 2.0
Connector
Area to engrave
your name/code
Stamped unique
serial number
This IronKey Cryptochip is hardened against physical attacks such as power attacks and bus sniffing. It is physically impossible to tamper with its
protected data or reset the password counter. If the Cryptochip detects
a physical attack from a hacker, it will destroy the encryption keys, making
the stored encrypted files inaccessible.
The World’s Most Secure Flash Drive
TM
FAST
Transfers data up to 8 times
faster than ordinary flash drives
SAFE
IronKey Cryptochip with
military-grade cryptography
RUGGED
Waterproof & tamperproof metal casing
RELIABLE
Stores data up to 10 times
longer than ordinary flash drives
SMART
“Flash-Trash” technology
for complete data erasure
INCLUDES
Up to 8 gigabytes
of secure storage
IRONKEY ENTERPRISE USER GUIDE
PAGE Technical & Security Notes
We are endeavoring to be very open about the security architecture and
technology that we use in designing and building the IronKey devices and
online services. There is no hocus-pocus or handwaving here. We use
established cryptographic algorithms, we develop threat models, and we
perform security analyses (internal and third party) of our systems all the
way through design, development and deployment. Your IronKey is FIPS
140-2 Level 2 validated (Certificate #938).
IRONKEY DEVICE SECURITY
Data Encryption Keys
» AES keys generated by onboard Random Number Generator (FIPS 186-2)
» AES keys generated by user at initialization time and encrypted
» AES keys never leave the hardware and are not stored in NAND flash
Self-Destruct Data Protection
» Secure volume does not mount until password is verified in hardware
» Password try-counter implemented in tamper-resistent hardware
» Once password try-count is exceeded, all data is erased by hardware
Additional Security Features
» USB command channel encryption to protect device communications
» Firmware and software securely updateable over the Internet
» Updates verified by digital signatures in hardware
Physically Secure
» Solid, rugged metal case
» Encryption keys stored in the tamper-resistent IronKey Cryptochip
» All chips are protected by epoxy-based potting compound
» Exceeds military waterproof standards (MIL-STD-810F)
Device Password Protection
The device password is hashed using salted SHA-256 before being transmitted to the IronKey Secure Flash Drive over a secure and unique USB
channel. It is stored in an extremely inaccessible location in the protected
hardware. The hashed password is validated in hardware (there is no “getPassword” function that can retrieve the hashed password), and only after
the password is validated is the AES encryption key unlocked. The password try-counter is also implemented in hardware to prevent memory
rewind attacks. Typing your password incorrectly too many times initiates a patent-pending “flash-trash” self-destruct sequence, which is run in
hardware rather than using software, ensuring the ultimate protection for
your data.
IRONKEY ENTERPRISE USER GUIDE
PAGE Password Manager Protection
The IronKey Password Manager and my.ironkey.com work together, giving
you the ability to back up your online passwords to your Online Security
Vault. First, you must unlock your IronKey device, which requires twofactor authentication. Your passwords are securely stored in a hidden
hardware-encrypted area inside the device (not in the file system), being
first locally encrypted with 256-bit AES, using randomly generated keys
encrypted with a SHA-256 hash of your device password. All of this data
is then doubly encrypted with 128-bit AES hardware encryption. This is
the strongest password protection we have ever seen in the industry.
When you back up your passwords online, IronKey performs a complicated public key cryptography handshake with IronKey’s services using RSA
2048-bit keys. After successful authentication, your encrypted block of
password data is securely transmitted over SSL to your encrypted Online
Security Vault.
Making Tor Faster and More Secure
IronKey has extended the public Tor network with its own, high-performance servers. This improves the overall security in at least two ways:
Since IronKey controls the “exit-node” in your encrypted Tor
circuit, we can ensure that no one is injecting unwanted or
malicious content into your online communications, such as
advertisements or spyware.You are not assured this level of
security with other publicly-run exit-nodes.
IronKey can also make sure that no exit-node is redirecting
your web traffic by providing addition DNS protections. This
anti-pharming measure can also help mitigate phishing attacks
and other online threats.
Find lots more technical
information at
https://learn.ironkey.com.
IRONKEY ENTERPRISE USER GUIDE
PAGE How does it work?
Product Walkthrough
Your IronKey Enterprise Secure Flash Drive consists of the following components:
» IronKey Unlocker (Windows, Mac and Linux)
» IronKey Control Panel (Windows only)
» IronKey Virtual Keyboard (Windows only)
» Mozilla Firefox & IronKey’s Secure Sessions Service (Windows only)
» IronKey Password Manager (Windows XP & Vista only)
» IronKey Secure Backup (Windows only)
» RSA SecurID (Windows only)
» my.ironkey.com (Windows only)
NOTE: Some of these components may not be available, depending on how your System Admin configured your IronKey.
Standard Usage Requires:
» Windows 2000 (SP4), XP (SP2), Vista, Mac 10.4+ or Linux (2.6+) computer
» A USB 2.0 port for high-speed data transfer
» An Internet connection for the online services
» An email from your System Admin with an Activation Code
Activation and Initialization (Windows only)
When you open the package, you will find one IronKey Secure Flash Drive, one lanyard with
keyring, and a Quick Start Guide. Your IronKey can only be setup on a Windows computer.
Below is a brief description of the standard way of setting up an IronKey:
Step
1 Plug the IronKey into your
Windows computer’s USB port.
2 The “Activate Your IronKey”
screen will appear.
Description
Your IronKey needs to be activated on a Windows
2000, XP or Vista computer. To use the full speed of
the IronKey, plug it into a USB 2.0 port.
The IronKey autoruns as a virtual CD-ROM.
This screen may not appear if your computer does not
allow devices to auto-run. You can start it manually by
double-clicking on the IronKey icon in “My Computer”
and running “IronKey.exe”.
IRONKEY ENTERPRISE USER GUIDE
PAGE 3 Retrieve the email with your
Your System Admin has setup your IronKey ahead of
Activation Code. Copy and paste time to abide by your organization’s security standards.
it into the IronKey window.
You will receive an email with an Activation Code that
is needed to use your IronKey.
Enter your email address and your Activation Code
into the fields provided on the IronKey window. Click
‘Continue’ when you are ready.
4 Create
a device
password
and a
nickname
for your
IronKey.
5
6
7
8
If your IronKey cannot connect to the Internet, click
“Edit Proxy Settings...” to adjust its network settings.
Since you can have multiple IronKeys associated with
one IronKey account, the nickname helps you distinguish between different IronKey devices.
The threat of brute-force password attacks is removed
by the IronKey’s self-destruct feature. Your password
is case-sensitive and must match your organization’s
password policy.
Back up your password to your
If enabled, you have the option to back up your passonline IronKey account
word online to your my.ironkey.com account. That way,
if you ever forget your password, your System Admin
can email you a reminder.
The IronKey will initialize.
During this process, it will generate the AES encryption
keys, create the file system for the secure volume, and
copy over secure applications and files to the secure
volume.
Set up your personalized login in- If enabled, you continue the setup process online.
formation for your my.ironkey.com my.ironkey.com is a secure site where you can manaccount by clicking the ‘Login to
age your IronKey account and devices. Accessing
my.ironkey.com’ button.
my.ironkey.com requires two-factor authentication (your
IronKey and your password).
Follow the onscreen directions to Depending on your organization’s settings, you will cresetup your my.ironkey.com account. ate a unique username, password, confirm your email
address for out-of-band authentication, and answer
Secret Questions for supplemental authentication.
9 You may need to respond to a
confirmation email by entering
the confirmation code online.
You will also select a Secret Image that you will see
whenever you log in, as well as a Secret Phrase that is
used as an anti-phishing measure when communicating
with you via email.
IronKey must verify your email address because it is
used with important services related to your online
account.
At this point, your IronKey is ready to protect your data, identity, and online privacy.
IRONKEY ENTERPRISE USER GUIDE
PAGE Using the IronKey UNLOCKER on Windows
The IronKey Unlocker allows you to securely access your files on multiple operating systems.
It prompts you for your password, securely validates it, and then mounts your secure volume
where all of your files are stored on the IronKey.
Here is how to unlock your IronKey on Windows 2000 (SP4), XP (SP2), and Vista:
1
Step
Plug in your IronKey and unlock
it with your password.
Description
When you plug your IronKey in, the “Unlock Your IronKey” window appears (if it does not, you can go to “My
Computer” and double-click on the IronKey drive).
Entering your password correctly will mount your secure volume with all your secure applications and files.
Entering the wrong password too many times will
permanently erase all of your data. After every three
attempts, you must unplug and reinsert the IronKey.
2
Choose which action to take
when you unlock it.
NOTE: Some operations require that your IronKey
connect to the Internet before unlocking. If it cannot
connect, click on “Edit Proxy Settings...” to configure
how your IronKey connects to the Internet.
By selecting the corresponding checkboxes before
unlocking your IronKey, you can view your secure files,
launch the IronKey Control Panel, unlock your IronKey in Read-Only Mode, and/or securely log into your
my.ironkey.com account.
Using the IronKey UNLOCKER on a Mac (10.4+)
1
Step
Plug in your IronKey and unlock
it with your password.
Description
When you plug in your IronKey, go to “IronKey:Mac:IK
Unlocker” and double-click on the IronKey drive.
Entering your password correctly (which is verified
in hardware) will mount your secure volume with all
your secure files.
Entering the wrong password too many times will
permanently erase all of your data. After every three
attempts, you must unplug and reinsert the IronKey.
IRONKEY ENTERPRISE USER GUIDE
PAGE 10
2
Choose which action to take
when you unlock it.
By selecting the corresponding checkbox before unlocking your IronKey, you can view your secure files
and/or unlock your IronKey in Read-Only Mode.
Locking & unplugging the IronKey Clicking “Lock Drive” will exit open IronKey applications and lock the device. It is then safe to unplug it
from your computer.
3
NOTE: In IronKey Enterprise, you may not be allowed
to change the device password or unlock your IronKey
on a Mac, depending on your System Administrator’s
configuration.
Using the IronKey UNLOCKER on LINUX
IronKey has extended its core platform compatibility to include Linux systems. If enabled, you
can manage your secure files on Linux (2.6+), allowing you to securely transfer files from and
between Windows and Linux computers.
Depending on your Linux distribution, you may need root privileges to use the program ‘ironkey’ found in the Linux folder of the mounted virtual CD-ROM. If you have only one IronKey
attached to the system, simply run the program from a command shell with no arguments (e.g.
“ironkey”). If you have multiple IronKeys, you will have to specify the device name of the one
you wish to unlock.
Note that ‘ironkey’ only unlocks the secure volume; it must then be mounted. Many modern
Linux distributions will do this automatically; if not, run the mount program from the command
line, using the device name printed by ‘ironkey’.
‘ironkey’ may also be used to lock the device. Use:
ironkey --lock [devicename]
to lock the IronKey named “devicename”, and:
ironkey --read-only
to unlock the IronKey in Read-Only Mode.
Note that simply unmounting the device will not automatically lock the secure volume. To lock
the device you will have to either unmount and physically remove (unplug) it, or else run:
ironkey --lock
IRONKEY ENTERPRISE USER GUIDE
PAGE 11
Please note the following important details for using your IronKey on Linux:
1. Kernel Version must be 2.6 or higher
If you compile your own kernel, you must include the following in it:
» DeviceDrivers->SCSIDeviceSupport-><*>SCSICDROMSupport
» DeviceDrivers-><*> Support for Host-side USB
» DeviceDrivers-><*> USB device filesystem
» DeviceDrivers-><*> EHCI HCD (USB 2.0) support
» DeviceDrivers-><*> UHCI HCD (most Intel and VIA) support
» DeviceDrivers-><*> USB Mass Storage Support
The kernels that are included by default in most major distributions already have these features,
so if you are using the default kernel that comes with a supported distribution you do not need
to take any other action.
Also, on 64-bit linux systems the 32-bit libraries will have to be installed in order to run the
ironkey program.
2. Mounting problems
Make sure you have permissions to mount external SCSI & USB devices
» Some distributions do not mount automatically and require the following command to
be run:
mount /dev/<name of the device> /media/<name of the mounted
device>
» The name of the mounted device varies depending on the distribution. The names of
the IronKey devices can be discovered by running:
ironkey --show
3. Permissions
You must have permissions to mount external/usb/flash devices
» You must have permissions to run executables off the IronKey CD-ROM in order to
launch the IronKey Unlocker
» You may need root user permissions
4. Supported distributions
Not all distributions of Linux are supported. Please visit https://support.ironkey.com/linux for the
latest list of supported distributions.
5.The IronKey Unlocker for Linux only supports x86 systems at this time.
NOTE: In IronKey Enterprise, you may not be allowed to change the device password or unlock your IronKey on a Mac, depending on your System Administrator’s configuration.
See https://support.ironkey.com/linux for more information.
IRONKEY ENTERPRISE USER GUIDE
PAGE 12
Using the IronKey Control Panel (Windows Only)
The IronKey Control Panel is a central
location for:
» Launching secure applications
» Securely logging into my.ironkey.com
» Configuring your IronKey settings
» Updating your device
» Changing your IronKey password
» Editing Password Manager data
» Safely locking your device
» Getting online help
Most of the Control Panel’s options
are located in the “Settings” menu.
1
2
Step
Creating, editing, deleting secure
files
Updating device firmware/software
Description
When you click on “Secure Files” in the IronKey
Control Panel, Windows Explorer will open directly to
your secure volume.
All files on your IronKey are strongly encrypted with
military-grade AES encryption. Encrypting files is
as simple as moving them into the secure volume.
Dragging files onto your desktop will decrypt them
on-the-fly in hardware. The IronKey gives you the
convenience of working as you normally would with
a regular flash drive, while at the same time providing
strong and “always-on” security.
The IronKey can securely update its software and
firmware through signed updates that are verified in
hardware. This allows users to keep their devices upto-date and protect themselves from future malware
and online threats.
To check for available updates, click the “Check for Updates” button. If an update is available, you can choose
to download and install it by clicking the “Download
Update” button.
IRONKEY ENTERPRISE USER GUIDE
PAGE 13
3
Configuring device settings
The Settings menu allows you to configure preferences
to your liking, such as:
» Enabling/Disabling the Password Manager
» Enabling/Disabling the Secure Sessions
» Configuring Password Manager options
» Select which web browser your IronKey should use
As well as some important drive maintenance features:
» Reformatting your secure volume
» Restoring your IronKey applications if they are
4
Configure your IronKey’s
network and proxy settings
erased or corrupted
Click on Network Settings to configure how your
IronKey connects to the Internet:
» Direct Connection: Does not use a proxy
» Use System Settings: import the proxy settings from
Windows’ Internet Options
» Use WPAD:
Enter the URL to where your Web
Proxy Auto-Detect file is located
» Manual Proxy: Enter the URL and port number for
your proxy server
5
6
If proxy authentication is required, you can enter your
username and password in the appropriate fields.
Creating a Lost & Found Message If editing is enabled, this feature allows you to create a
message that will appear on the IronKey Unlocker window. In the event that you lose your IronKey, someone
can return it to you if you provide your contact information.
Changing your device password
You can change your device password, and, if enabled,
optionally back it up online to your Online Security
Vault at my.ironkey.com.
Changing your password on a regular basis is a good
security practice. However, be especially careful to
remember your IronKey password.
IRONKEY ENTERPRISE USER GUIDE
PAGE 14
7
Adding, renaming, and removing
applications to the Applications
List
To manage the items in the Application List of the
IronKey Control Panel, simply right-click anywhere in
Application List. A menu will appear allowing you to:
1. Browse to a new application to add it to the list
2. Rename existing applications in the list
3. Delete an application from the list
4. Modify the way the list is presented
Please note that:
» Items in the list are shortcuts to actual files.
Managing the items in the list will not alter the actual file.
» Items are automatically sorted alphabetically
» Any file can be added to the list, including documents, images, and batch files
» For items that are not applications, Windows will
8
open the item with the default program associated
with that filetype
Locking & unplugging the IronKey Clicking “Lock Drive” will exit open IronKey applications and lock the device. It is then safe to unplug it
from your computer.
Do not unplug your IronKey while applications are still
running. This could result in data corruption.
Using The IRONKEY VIRTUAL KEYBOARD (Windows Only)
If you are using your IronKey on an unfamiliar computer and are concerned about keylogging
and screenlogging spyware, use the IronKey Virtual Keyboard, which helps protects your passwords by letting you click out letters and numbers. The underlying techniques in the IronKey
Virtual Keyboard will bypass many trojans, keyloggers, and screenloggers.
The IronKey Virtual Keyboard can be launched in a couple of ways:
» In places where you enter a password into the IronKey (e.g. the IronKey Unlocker, changing
your device password, initializing your device), click on the Virtual Keyboard icon
» Use the keyboard shortcut of
CTRL + ALT + V
The IronKey Virtual Keyboard can be used in a number of other applications when you need
extra security typing out information (e.g. email, documents, etc.).
IRONKEY ENTERPRISE USER GUIDE
PAGE 15
Step
1 Click the IronKey Virtual Keyboard icon.
Description
The IronKey Virtual Keyboard will
appear. Alternatively, you can press
CTRL + ALT + V
2 Click on the keys to type out
your password. Click on ‘Enter’
when you are finished.
3 You can optionally click the
“Randomize” button to randomize where the keys are. This helps
protect against screenloggers.
Note that you can use the IronKey Virtual Keyboard
in conjunction with the actual keyboard if you wish, so
that some characters are typed and some are clicked.
Notice that when you click on a key in the Virtual Keyboard, all of the keys will go blank. This is a protection
that prevents screenloggers from capturing what you
clicked on.
If you do not wish to use this protection, simple disable it in the options menu next to the close button.
You can also have the Virtual Keyboard automatically
launch when it encounters password fields. This too is
configured in the options menu.
Using The Onboard FIREFOX & Secure Sessions Service (windows)
If enabled, a Firefox web browser is already onboard your IronKey, so none of your cookies, history files, bookmarks, add-ons or online passwords is stored on the local computer. Now you
can carry your personalized web experience with you to other computers without worry.
Step
1 Launch the onboard Firefox web
browser for portable surfing
IRONKEY ENTERPRISE USER GUIDE
Description
If enabled, clicking on the Mozilla Firefox icon in the
Applications list of the IronKey Control Panel will
launch the onboard Firefox. You cannot have a local
version of Firefox running at the same time; if you do,
you will be prompted to close it.
PAGE 16
2 Toggle Secure Sessions for secure If enabled, clicking the IronKey button on the bottom
and private surfing
right of the onboard Firefox will silently turn IronKey’s
Secure Sessions Service on/off. This will create an
encrypted tunnel directly from your IronKey, out to a
secured IronKey web server, where it is then decrypted and sent out to the destination site.
3 Using the Secure Sessions Tools:
Network Map, Bandwidth Meter,
and Changing Identities
This security gives you anti-phishing and anti-pharming protection (for example, we do our own DNS
checking), as well as enhanced privacy protection (for
example your IP address will not be available to other
websites and ISPs). You can check this out by going to
a site such as whatismyip.com or ipchicken.com.
At any point while using Secure Sessions, you can
launch additional tools form the IronKey System Tray
Menu that show you more information regarding your
web traffic and current session.
The Network Map will show all of your available
“circuits” and where in the world your traffic will be
coming from.
The Bandwidth Meter will show you your current
bandwidth metrics.
You can easily change your apparent online “identity”,
which creates a new random circuit and changes the
path of your encrypted web traffic. As you will be
coming from a different IP address, it will likely appear
to websites that you are a different person.
IRONKEY ENTERPRISE USER GUIDE
PAGE 17
Using The IronKey Password Manager (Windows XP & Vista Only)
The IronKey Password Manager, if enabled, connects to the onboard Firefox browser, or to
Internet Explorer (versions 6 or 7) on your computer, automatically filling in your saved passwords so you can log directly into
your online accounts. The IronKey
Password Manager can securely
store your sensitive online identity
information, including usernames,
passwords, credit card numbers
and addresses. It can even generate strong passwords for you, so
that you can really lock down your
online accounts. Not having to
type out your passwords provides
added protection from keyloggers
and other crimeware.
IronKey’s Password Manager also allows you to back up your encrypted Password Manger data
to your Online Security Vault, synchronize password data between IronKeys, or, if your IronKey
is ever lost or stolen, securely restore all your passwords to a new IronKey. Only you can access
and decrypt your passwords.
The IronKey Password Manager does not store your passwords in a file on the file system of
the flash drive, so malware will not be able to simple copy off your password database.
Step
1 Adding Portable Bookmarks
2 Adding online accounts
Description
To make a bookmark work in both the onboard
Firefox and the local PC’s Internet Explorer, simply
click the ‘Add Website” button on the IronKey Toolbar.
This will add it to your Portable Bookmarks list, which
you can access by clicking “Portable Bookmarks”.
The IronKey Password Manager uses a self-learning
approach to capturing your logins to your online accounts. To store a login, simply log into a site as you
normally would. The IronKey Password Manager will
prompt you to ask if you want to store this password
securely on your IronKey.
The next time you return to that website, you will be
asked if you want to log in with that username, or, if
you added it to your Portable Bookmark list when you
created the login, you can select the website from your
Portable Bookmarks in the IronKey Toolbar and the
IronKey Password Manager will automatically log you
into that website.
IRONKEY ENTERPRISE USER GUIDE
PAGE 18
3 Editing/deleting logins and Portable Bookmarks
You can manage your Password Manager accounts
from within the IronKey Control Panel. Each website
will have a set-able name, a URL, a username (logins
only), and a password (logins only).
Your passwords are not shown unless you click the
“Show” checkbox.
4 Backing Up and Restoring Password Manager Data
You can securely back up your encrypted Password
Manager data to your Online Security Vault. Simply
click the corresponding buttons from within the IronKey Control Panel. This procedure will back up your
Portable Bookmarks, logins, and Form Filler data.
Synchronizing IronKeys (or setting up Master-Slave
relationships) is easy since you can restore password
backups to your other IronKeys.
5 Using the Form Filler
6 Generating strong and random
passwords
7 Automatically logging into online
accounts
You can have the IronKey Password Manager automatically fill in your webform data, such as names, phone
numbers, addresses, credit card data and email addresses.
First, set up this information by clicking on the “Settings” button in the IronKey Toolbar. Then, to fill a
webform, simply click the “Form Filler” button.
You can use the Password Generator (located within
the IronKey Control Panel) to create long, random
passwords. Then, you can have the IronKey Password
Manager remember then for you. Simply copy and
paste them into a webform when logging into an online
account.
When you add a login to your Portable Bookmarks,
that login will appear not only in your Portable Bookmarks list, but also in the IronKey System Tray Menu.
Simply right-click on the IronKey icon in the System
Tray, and then click on the Secure Login. The onboard
Firefox web browser will launch and automatically log
you into the account.
Safely logging into your online accounts has never been
easier.
IRONKEY ENTERPRISE USER GUIDE
PAGE 19
Using The Secure Backup
Software (Windows only)
If your IronKey is lost or stolen, you
have peace of mind knowing that your
confidential information cannot be seen
by anyone but you. And getting your
data back is simple with IronKey’s Secure Backup software, which, if enabled,
securely restores your data to a new
IronKey.
Back up your data on a regular basis.
Step
1 Backing up your IronKey
2 Restoring encrypted backups
IRONKEY ENTERPRISE USER GUIDE
Description
You can create an encrypted backup of a single
file or your entire IronKey to your local computer. Click on the “Secure Backup” button in the
IronKey Control Panel, select a destination folder,
and select which files to back up. It’s that simple.
If you ever lose your IronKey, you can restore
your data from an encrypted backup. Open the
Secure Backup client, select the location on your
local computer where the backup is located, and
select which files/folders to restore. If the data is
coming from a different IronKey, you will have to
supply the device password for that IronKey.
PAGE 20
Using RSA SecurID on your IRONKEY (WINdows Only)
If enabled, your IronKey can provide additional strong
authentication capabilities by generating RSA SecurID
one-time passwords. Your System Administrator will
need to provide a file to import your token(s) and
will likely be the one importing your tokens.
Step
1 Open the RSA SecurID application
Description
Click on the icon in the IronKey Control Panel’s
application list.
2 Import a .stdid file. This may be done
by your System Admin for you.
1.
2.
3.
4.
Click the ‘Options...’ button
Click the ‘Add’ button
Browse on your computer to the .stdid file
A password may be required to unlock the file
Your token(s) will then be added.
3 If you prefer, rename your tokens
Click the Rename button to create a name for
the selected token.
4 In the Options window you can also
Be careful when deleting tokens, as this operation
delete tokens by clicking the ‘Delete’ or cannot be undone.
‘Delete All’ button.
5 To generate a one-time password,
select a token from the dropdown list.
If a PIN is required, enter the PIN into
the space provided and press ‘Enter’
You can optionally save a PIN for each
token.
Periodically a new one-time password
will be generated. To copy your password to the clipboard, click ‘Copy’.
IRONKEY ENTERPRISE USER GUIDE
PAGE 21
IMPORTING a Digital Certificate into the Ironkey (Windows Only)
The IronKey Cryptochip includes a limited amount of extremely secure hardware storage space,
which can be used for storing the private key associated with a digital certificate. This provides
you with additional strong authentication capabilities. For example, you could store a self-signed
certificate used for internal systems that will allow you to automatically log in when using the
IronKey’s onboard Firefox web browser.
The import process uses IronKey’s PKCS#11 interface and requires Mozilla Firefox. Note that
there is only space for one additional private key in the IronKey Cryptochip, though that key
will receive the security benefits of the Cryptochip’s tamperproof hardware and self-destruct
mechanisms.
Step
1 Open the onboard Firefox
Description
Click on the icon in the IronKey Control Panel’s application list on your user’s device.
2 Open Firefox’s Options menu 1. Click the ‘Tools’ in the menu bar
to the Encryption tab.
2. Click on ‘Options...’
3. Click the ‘Advanced’ icon
4. Click on the ‘Encryption’ tab
3 Click the ‘View Certificates’
button.
This will open the Firefox
Certificate Manager
IRONKEY ENTERPRISE USER GUIDE
PAGE 22
4 Note that IronKey’s certificate
is available here. Now you can
add your own.
Click the ‘Import’ button.
5 Browse to the PKCS#12-for- You will be prompted for the location of the PKCS#12mat certificate file and open it. format certificate file (file extension will be .p12 in UNIX/
Linux, .pfx in Windows).
6 A window will appear asking you to confirm where to
store the certificate.
Choose “IronKey PKCS#11”
7 Enter the password that was
used to protect the certificate.
If no password was used, simply leave the text field blank.
8 Your certificate is now stored
securely in the IronKey
Cryptochip and is available
for use in the onboard Mozilla
Firefox.
IRONKEY ENTERPRISE USER GUIDE
PAGE 23
Using my.ironkey.com (Windows OnlY)
NOTE: Depending on how your System Administrator has configured your IronKey, you many not have
an online IronKey account, and this section may not apply to you.
Your IronKey supports advanced cryptographic authentication using strong PKI key pairs generated in the IronKey Cryptochip. When you log into my.ironkey.com from your device, it uses
these unique keys as your digital identity credentials. This locks down your account so that you
must have both your IronKey and your password in order to gain access. In other words, only
you can access your online IronKey account, even if someone stole your IronKey or your password.
Step
1 Securely logging into your account
2 Marking IronKeys as lost
3 Recovering device passwords
4 Deleting your Password Manager
backup data.
IRONKEY ENTERPRISE USER GUIDE
Description
If enabled, you can securely log into your
my.ironkey.com by clicking the “my.ironkey.com” button in the IronKey Control Panel. This will initiate
a complex PKI handshake, thus logging you in with
strong, multi-factor authentication.
If you ever lose your IronKey, you can log into
Safe Mode by going to https://my.ironkey.com, logging in the account credentials you created when
you activated your account. This will allow you
to mark an IronKey as lost or recover a forgotten
device password. This depends on how your System Administrator has configured your IronKey.
Ask your System Administrator for information.
If you ever lose your IronKey, you can rest assured that no one will ever get your data. As an
additional precaution, you can mark an IronKey as
lost from within my.ironkey.com, which will prevent
that device from ever accessing your account. If
you find your IronKey later, you can also mark it
as found again.
People sometimes forget passwords. IronKey
gives you the option to back up your device password to your Online Security Vault at my.ironkey.
com. That way, you can log into Safe Mode or with
another IronKey and recover the password, or
have your System Administrator email you help.
If you wish to delete your encrypted Password
Manager data that you backed up to your Online
Security Vault, simply click the “Delete Password
Manager Data” button.
PAGE 24
5 Monitoring account activities
6 Enabling Account Alerts for real-time
account monitoring
7 Changing account credentials
The Account Dashboard shows you the recent
activities on your account, such as logins, failed
password attempts, and when your device password has been recovered.
You can enable a number of Account Alerts for
additional insight into what activities are occurring on your my.ironkey.com account. An email will
be sent to you with details on the security event,
such as the time and IP address of the event.
All emails regarding your account will have part of
your Secret Phrase in the subject line for additional anti-phishing protection.
You can change your password, Secret Questions,
Secret Image and Phrase, as well as your email addresses from within my.ironkey.com as often as you
wish to ensure that no one else may access your
account.
Creating a secondary email address gives you a
fail-safe in case your primary email address is no
longer available.
In the event that you ever lose your IronKey or forget your IronKey device password, you can
still access the site in Safe Mode: a restricted mode with limited functionality. This is useful for
marking your IronKey as lost, or recovering a forgotten password.
Step
1 Go to https://my.ironkey.com
2 Enter your email address (or username) and your online account password. Click “Submit”
3 An email will be sent to you with a
Login Code.
4 You are now logged into Safe Mode.
IRONKEY ENTERPRISE USER GUIDE
Description
Here you will log into Safe Mode without your
IronKey.
Your Secret Image will be displayed so that you
know you are at the correct site.
Do not enter your device password in this screen.
If you have forgotten your online account password, click the “Reset Password” link.
Copy and paste that login code into the page that
asks for it.
Depending on the configuration of your account,
you may need to answer your Secret Questions.
If you had forgotten your device password and
have backed it up to your Online Security Vault,
you can recover it now.
PAGE 25
Using your IronKey in Read-Only Mode (Windows, Mac, Linux)
You can unlock your IronKey in a read-only state such that files on your IronKey cannot be edited. An example of when this is useful is when you want to access a file on your IronKey while
using an untrusted or unknown computer. If you unlock your IronKey in Read-Only Mode, you
need not fear that malware on that machine will infect your IronKey or modify your files.
When you unlock your IronKey in Read-Only Mode, you will remain in Read-Only Mode until
you lock your IronKey.
Note that some features are not available in Read-Only Mode because they require modifying
files on your IronKey. Examples of unavailable features include the onboard Firefox, reformatting, updating and restoring applications and files to your IronKey, and using the Applications List.
On Windows and Mac OS X Computers:
Step
1 When unlocking your IronKey, select
the “Unlock IronKey in Read-Only
Mode” checkbox
Description
2 You will see a message in the IronKey
Control Panel that confirms you are in
Read-Only Mode.
On Linux Computers:
Step
1 To unlock your IronKey in Read-Only
Mode on Linux, use:
Description
ironkey --read-only
2 To return to a normal state where you ironkey --lock
can edit files again, lock your IronKey
IRONKEY ENTERPRISE USER GUIDE
PAGE 26
Using the IronKey Malware Scanner (Windows Only)
Normal flash drives can inadvertently spread malware from one computer to another. Your
IronKey, however, includes built-in anti-malware features, including:
» A read-only virtual CD from which the most important IronKey files run
» Autorun protection from worms and viruses that spread just by plugging in a USB drive
» A Read-Only Mode for the IronKey Secure Drive
» Cryptographic operations in IronKey hardware completely protected from malware
» And, if enabled by your System Administrator, the IronKey Malware Scanner.
The IronKey Malware Scanner is a self-cleaning technology that helps
keep your IronKey secure by detecting and removing malware that gets
on your IronKey from an infected file or machine. It is powered by
the McAfee® Anti-Virus and Anti-Malware signature database, which is
constantly updated to combat the latest malware threats. It works by
first checking for the latest updates, scanning your IronKey, and reporting and cleaning any malware that is found.
Keeping your IronKey Malware Scanner Up to Date
It is important to keep your IronKey Malware Scanner up to date to protect against the latest
malware threats. As long as you have an Internet connection, the IronKey Malware Scanner will
update itself before each scan. The date it was last updated is displayed onscreen.
Your first update may take a long time to download, depending on your Internet connection. If
your IronKey Malware Scanner becomes too far out of date, it will need to download a large file
to bring it back up to date.
Step
1 If enabled, the IronKey Malware Scanner runs automatically when you
unlock your IronKey.
You can bring the IronKey Malware
Scanner to the foreground at any time
by clicking on the IronKey Malware
Scanner system tray icon.
2 The IronKey Malware Scanner will
automatically check for updates.
This is an important step in ensuring
your are protect from the latest malware threats.
IRONKEY ENTERPRISE USER GUIDE
Description
The IronKey Malware Scanner is a feature that is
configured by your System Administrator.
Checking for updates requires an Internet connection. Make sure there is at least 135 MB of
free space on your IronKey for downloading and
storing the latest malware signature files.
Your first update may take a long time to download, depending on your Internet connection.
PAGE 27
3 The IronKey Malware Scanner will automatically scan your IronKey, including
onboard files (compressed and uncompressed files) and any running system
processes.
4 The IronKey Malware Scanner will
report and clean any malware that is
found.
5 You can also scan your computer
drives by selecting the drive you would
like to scan from the IronKey Malware
Scanner system tray menu.
A window opens in the background that shows
you the scanning progress.
NOTE: The IronKey Malware Scanner does not
scan your IronKey when in Read-Only Mode.
If an infection is found, the file will automatically
be clean. A window will also appear with a report
of the event.
NOTE: The IronKey Malware Scanner is not
a replacement for Anti-Virus or Anti-Spyware
software on your computer; it is not designed to
clean your registry or do real-time malware prevention. It is designed specifically for scanning and
cleaning your IronKey.
A popular use for the IronKey Malware Scanner is to use it in Read-Only Mode to detect if
malware on a computer you suspect is infected. The IronKey provides a secure, convenient and
portable way of detecting malware, making it a valuable addition to your security toolbelt.
IRONKEY ENTERPRISE USER GUIDE
PAGE 28
Product Specifications
CAPACITY*
1GB, 2GB, 4GB, 8GB
SPEED*
Up to 30 MB per second read speed
Up to 20 MB per second write speed
DIMENSIONS
75mm X 19mm X 9mm
WEIGHT
0.8 oz
WATERPROOF
MIL-STD-810F
OPERATING TEMPERATURE
-40 C, +85 C
OPERATING SHOCK
16G rms
ENCRYPTION
Hardware: 128-bit AES (CBC-Mode)
Hashing: 256-bit SHA
PKI: 2048-bit RSA
FIPS CERTIFICATIONS
FIPS 140-2 Level 2 (Certificate Number 938)
FIPS 186-2 (Certificate Numbers 305 and 380)
FIPS 197 (Certificate Numbers 655 and 689)
Designed and Assembled in the U.S.A.
IronKey devices do not require any
software or drivers to be installed.
HARDWARE
USB 2.0 High-Speed & USB 1.1
OS COMPATIBILITY
Windows 2000 (SP4), XP (SP2), Vista
IronKey Unlocker for Linux (2.6+, x86)
IronKey Unlocker for Mac (10.4+, PPC and Intel)
* Speeds tested with 4GB device in a laboratory environment with Iometer software. Actual speeds may vary.
Advertised capacity is approximate and not all of it will be available for storage. Some space is required for onboard software.
IRONKEY ENTERPRISE USER GUIDE
PAGE 29
What’s next?
In many ways, that’s up to you. We are focused on building not only the
world’s most secure flash drive, but also enabling technologies that are
simple and enjoyable to use. Your feedback really matters to us, and we
carefully review all feature requests and customer feedback for prioritization of our next great features and products.
Have a cool idea or suggestion? Please let us know. You can open a
thread on the IronKey Forum (forum.ironkey.com) or submit feedback to
[email protected]. Let us know if you would like to be a beta tester
of new functionality.
Where can I go for more info?
We are endeavoring to be very open about the security architecture and
technology that we use in designing and building the IronKey devices and
online services. A great deal of information can be found online on our
websites:
forum.ironkey.com
www.ironkey.com
learn.ironkey.com support.ironkey.com
User forum with thousands of “IronKeyologists”
General Information
Technical Information, such as whitepapers & FAQs
Customer support information
Who is the IronKey Team?
The IronKey Team consists of security, fraud, and industry experts with
many years of background at companies such as Visa, RSA Security, PayPal,
Authenex, Nokia, Cisco, Lexar, Netscape, Tumbleweed,Valicert, Apple, and
the Department of Homeland Security. IronKey CEO Dave Jevans is also
the chairman of the Anti-Phishing Working Group (www.antiphishing.org).
We have spent years and millions of dollars of research and development
to create the IronKey. Simple, accessible, and of great value, now you can
carry the world’s most secure flash drive to protect your digital life online
and on-the-go.
IRONKEY ENTERPRISE USER GUIDE
PAGE 30
Contact Information
Product Feedback
[email protected] Feature Requests
[email protected]
IronKey Online Support
https://my.ironkey.com
For support, please contact your
https://learn.ironkey.com
Helpdesk or System Admin
https://support.ironkey.com
https://forum.ironkey.com
Note: IronKey is not liable for technical or editorial errors and/or omissions contained herein; nor for incidental or consequential damages resulting from the furnishing or use of this material. The information provided
herein is subject to change without notice.
The information contained in this document represents the current view of IronKey on the issue discussed as of the date of publication. IronKey cannot guarantee the accuracy of any information presented after the date of publication. This document is for information purposes only. IronKey makes
no warranties, expressed or implied, in this document. IronKey and the IronKey logo are trademarks of IronKey, Inc. in the United States and other
countries. All other trademarks are the properties of their respective owners. © 2008 IronKey, Inc. All rights reserved. IK0010883
IRONKEY ENTERPRISE USER GUIDE
PAGE 31