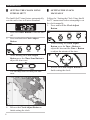
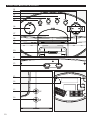
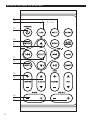
1
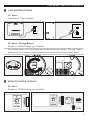
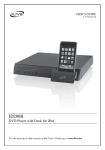
USER’S GUIDE
V:2316-0218-09
IC609
Intelli Set™ Clock Radio with Dock for iPod
██ Contents
WARNINGS AND PRECAUTIONS
2
IMPORTANT SAFETY INSTRUCTIONS
2
»» quick start
3
Playing a Docked iPod................................................................................3
Tuning the AM/FM radio.............................................................................3
General product Information
4
In the box..........................................................................................................4
Features.............................................................................................................4
powering the unit & remote
5
unit Power Options......................................................................................5
remote power options...............................................................................5
OPERATIONS
6
Setting the clock Using Intelli Set™...............................................6
Setting the clock Manually.................................................................6
Setting the Alarm........................................................................................7
Using the Daylight Savings Time feature.......................................7
Docking an iPod to the Unit....................................................................8
Playing a Docked iPod................................................................................8
Tuning the AM/FM radio.............................................................................9
Saving an AM or FM station as a Preset.............................................9
Using the auxiliary input........................................................................9
UNIT CONTROLS & Features
10
unit CONTROL GLOSSARY
11
remote CONTROLS & Features
12
remote control GLOSSARY
13
Remote CONTROLS & Features
14
Remote & LCD CONTROL GLOSSARY
15
COMPANY INFORMATION
16
Green initiative...........................................................................................16
International support............................................................................16
Service information..................................................................................16
For the most up-to-date version of this User’s Guide, go to www.iLive.net
Warnings and precautions
- CAUTION: USE OF ANY CONTROLS, ADJUSTMENTS, OR PROCEDURES OTHER THAN THOSE
SPECIFIED HEREIN MAY RESULT IN HAZARDOUS RADIATION EXPOSURE.
- CAUTION: DANGER OF EXPLOSION IF BATTERY IS INCORRECTLY REPLACED. REPLACE ONLY WITH
THE SAME OR EQUIVALENT TYPE.
- TO PREVENT FIRE OR SHOCK HAZARD, DO NOT USE THIS PLUG WITH AN EXTENSION CORD,
RECEPTACLE OR OTHER OUTLET UNLESS THE BLADES CAN BE FULLY INSERTED TO PREVENT
BLADE EXPOSURE.
- WARNING: TO REDUCE THE RISK OF FIRE OR ELECTRIC SHOCK, DO NOT EXPOSE THIS APPLIANCE
TO RAIN OR MOISTURE.
- WARNING: THE BATTERIES SHALL NOT BE EXPOSED TO EXCESSIVE HEAT SUCH AS SUNSHINE, FIRE
OR THE LIKE.
The lightning flash with arrowhead
symbol, within an equilateral triangle, is
intended to alert the user to the presence
of uninsulated "dangerous voltage"
within the product's enclosure that may
be of sufficient magnitude to constitute
a risk of electric shock to persons.
WARNING: TO REDUCE THE RISK
OF ELECTRIC SHOCK, DO NOT
REMOVE COVER (OR BACK).
NO USER-SERVICEABLE PARTS
INSIDE. REFER SERVICING TO
QUALIFIED SERVICE PERSONNEL.
The exclamation point within an
equilateral triangle is intended to
alert the user to the presence of
important operating and maintenance
(servicing) instructions in the literature
accompanying the appliance.
Important Safety Instructions
1.
2.
3.
4.
5.
6.
7.
Read these instructions.
Keep these instructions.
Heed all warnings.
Follow all instructions.
Do not use this apparatus near water.
Clean only with dry cloth.
Do not block any ventilation openings. Install in
accordance with the manufacturer's instructions.
8. Do not install near any heat sources such as radiators,
heat registers, stoves, or other apparatus (including
amplifiers) that produce heat.
9. Do not defeat the safety purpose of the polarized or
grounding-type plug. A polarized plug has two blades
with one wider than the other. A grounding type plug
has two blades and a third grounding prong. The wide
blade or the third prong are provided for your safety. If
the provided plug does not fit into your outlet, consult
an electrician for replacement of the obsolete outlet.
10.Protect the power cord from being walked on or pinch
particularly at plugs, convenience receptacles, and the
point where they exit from the apparatus.
11. Only use attachments/accessories specified by the
manufacturer.
12.Use only with the cart, stand,
tripod, bracket, or table specified
by the manufacturer, or sold with
the apparatus. When a cart is used,
use caution when moving the cart/
apparatus combination to avoid
S3125A
injury from tip-over.
13. Unplug this apparatus during lightening storms or
when unused for long periods of time.
14.Refer all servicing to qualified service personnel.
Servicing is required when the apparatus has been
damaged in any way, such as power-supply cord or
plug is damaged, liquid has been spilled or objects
have fallen into the apparatus, the apparatus has been
exposed to rain or moisture, does not operate normally,
or has been dropped.
15.This appliance shall not be exposed to dripping or
splashing water and that no object filled with liquid
such as vases shall be placed on the apparatus.
16.CAUTION: Visible and Invisible Laser Radiation
when open and interlock defeated.
DO NOT STARE INTO BEAM.
17.Rating label is located at the bottom of enclosure.
18."CAUTION" mark is also located at the bottom of
enclosure.
quick start
1. Plug the IC609 into an AC outlet.
The Intelli Set™ time feature automatically sets the unit’s time to Eastern Standard.
2. Press the Power Button to turn the unit off.
3. Press and hold the Clock Adjust Button.
4. While holding the Clock Adjust Button press the Time Zone Button to adjust the
time zone to your current Time Zone.
Use the map on page 6 to find your time zone.
5. Release the Clock Adjust Button to finish setting the clock.
██ Playing a Docked iPod
██ Tuning the AM/FM radio
Connect the correct docking bracket onto the
Dock for iPod, and dock the iPod.
1. Press the Power Button to turn the unit
on.
2. Press the Source Button to select AM
or FM radio modes.
1. Press the Power Button to turn the unit
on.
2. Press the Source Button to switch the
unit to iPod mode.
3. Press the Tune + or Tune - Buttons to
tune the AM or FM radio.
Extend the FM wire antenna to improve
FM reception.
An AM antenna is built into the unit.
Adjust the position of the unit to
improve AM reception.
3. Press the Play/Pause Button to begin
playing the docked iPod through the
speakers of the unit.
3
General product Information
██ In the box
IC609 - Intelli Set™ Clock Radio with
Dock for iPod
Remote Control
Docking Brackets for iPod (4)
User’s Guide & Warranty
• The apparatus shall not be exposed to dripping or splashing and that no
objects filled with liquids, such as vases, shall be placed on apparatus.
L’appareil ne doit pas être exposé aux écoulements ou aux éclaboussures et aucun objet ne contenant de liquide, tel qu’un vase, ne doit être
placé sur l’objet.
• Main plug is used as disconnect device and it should remain readily
operable during intended use. In order to disconnect the apparatus from
the mains completely, the mains plug should be disconnected form the
mains socket outlet completely.
La prise du secteur ne doit pas être obstruée ou doit être facilement
accessible pendant son utilisation. Pour être complètement déconnecté
de l’alimentation d’entrée, la prise doit être débranchée du secteur.
• Battery shall not be exposed to excessive heat such as sunshine, fire
or the like.
Les piles ne doivent pas être exposées à de forte chaleur, tel qu’à la
lumière du soleil, au feu ou autres choses de semblable.
• Caution marking is located at the bottom of apparatus.
Les précautions d’emploi sont inscrites en bas de l’appareil.
• The marking information is located at the bottom of apparatus.
Les marquages sont inscrits en bas de l’appareil.
██ Features
Dock plays and charges iPod
Intelli Set™ auto clock set
AM/FM radio with digital tuning
Auxiliary input for iPod shuffle and
other audio devices
Dual alarm with gradual wake
Remote
Station memory presets (20 AM, 20
FM)
Preset EQ settings
Last station memory
Mute function
Volume & function last user setting
Stereo headphone jack
Digital clock
Wake to iPod, radio, or buzzer
NOTE: This equipment has been tested and found to comply with the
limits for a Class B digital device, pursuant to Part 15 of the FCC Rules.
These limits are designed to provide reasonable protection against harmful
interference in a residential installation. This equipment generates, uses,
and can radiate radio frequency energy and, if not installed and used in
accordance with the instructions, may cause harmful interference to radio
communications. However, there is no guarantee that interference will not
occur in a particular installation. If this equipment does cause harmful
interference to radio or television reception, which can be determined by
turning the equipment off and on, the user is encouraged to try to correct
the interference by one or more of the following measures:
Snooze & sleep function
• Reorient or relocate the receiving antenna.
• Increase the separation between the equipment and receiver.
• Connect the equipment into an outlet on a circuit different from that to
which the receiver is connected.
• Consult the dealer or an experienced radio/TV technician for help.
Display dimmer control
Battery backup
Time zone button
Daylight savings time switch
0.8” LCD display with white backlight
Two integrated speakers
AC power: AC cord built-in
4
powering the unit & remote
██ unit Power Options
AC Power
Attached AC Cord (included)
DC Power - Backup Battery
Requires 1 CR2025 battery (pre-installed)
LIT
HIU
CR M B
2 AT
3V 025 TE
RY
The backup battery is for saving the time during brief power outages. The unit cannot
preform any of its normal functions when powered off of the backup battery alone.
██ remote power options
DC Power
IU
CR M B
2 AT
3V 025 TE
RY
LI
TH
LI
TE
T
BA
M 25
IU 20
TH CR 3V
RY
PUSH
OPEN
LI
TH
IU
CR M B
2 AT
3V 025 TE
RY
CR2025
PUSH
Y
ER
TT
BA 5
M 202
HIU CR 3V
LIT
CR2025
OPEN
Requires 1 CR2025 battery (pre-installed)
OPEN
OPEN
PUSH
PUSH
5
OPERATIONS
██ Setting the clock Using
Intelli Set™
██ Setting the clock
Manually
The Intelli Set™ time feature automatically
sets the unit’s time to Eastern Standard.
Follow the “Setting the Clock Using Intelli
Set™” instructions before attempting to set
the clock manually.
1. Press and hold the Clock Adjust
Button.
1. Press the Power Button to turn the unit
off.
2. Press and hold the Clock Adjust
Button.
2. While holding the Clock Adjust
Button press the Tune - Button to
adjust the hour and the Tune + Button
to adjust the minute of the time.
3. While holding the Clock Adjust
Button press the Time Zone Button to
adjust the time zone.
Use the map below to find your time
zone.
HST
AKST
YST
PST
MST
CST
EST
AST
4. Release the Clock Adjust Button to
finish setting the clock.
6
3. Release the Clock Adjust Button to
finish setting the clock.
OPERATIONS
██ Setting the Alarm
1. Press and hold the Alarm 1 or Alarm 2
Button.
2. While holding the Alarm 1 or Alarm
2 Button press the Tune - Button to
adjust the hour and the Tune + Button
to adjust the minute of the alarm.
3. While holding the Alarm 1 or Alarm
2 Button press the Source Button to
adjust the alarm source.
Buzz- Wake to Buzzer.
Tune FM- Wake to FM radio.
Tune AM- Wake to AM radio.
iPod- Wake to a docked iPod.
LCD Display After Alarms are Set
The above image shows alarm 1 set to sound
to the buzzer, and alarm 2 set to sound to a
docked iPod.
LCD Display During Setting of Alarm
The above image shows alarm 2 is being set
to sound to the AM radio. The time will blink
during the setting of the alarm.
4. Release the Alarm 1 or Alarm 2
Button to finish setting the alarm.
To cancel the alarm, press and hold the
Alarm 1 or Alarm 2 Button, and press the
Source Button repeatedly until the alarm
source icon on the display disappears.
██ Using the Daylight Savings Time
feature
The Daylight Savings Time Feature is meant to be
activated in the Spring at the time of the Summer
Solstice, and deactivated in the Autumn at the time of
the Winter Solstice.
1. At the time of the Summer Solstice, press the
Power Button to turn the unit off.
DST Activated
The DST should be activated
during the Summer Solstice.
2. Press and hold the Clock Adjust Button.
3. While holding the Clock Adjust Button, press
the Daylight Savings Time Button to activate the
Daylight Savings Time Feature.
4. At the time of the Winter Solstice, repeat steps 1-3
to deactivate the Daylight Savings Time Feature.
DST Deactivated
The DST should be deactivated
during the Winter Solstice.
7
OPERATIONS
██ Docking an iPod to the Unit
1. Locate the numbered bracket that fits
the iPod model that will be docked.
Each included bracket has a number
on it, indicating which iPod model that
bracket is compatible with. See the
separate bracket chart page to identify
which bracket is needed.
██ Playing a Docked iPod
Follow the directions for Docking an iPod to
the Unit.
1. Press the Source Button to switch the
unit to iPod mode.
2. Press the Play/Pause Button to begin
playing the docked iPod through the
speakers of the unit.
2. Snap the bracket into place over the
iPod connector in the dock.
3. Connect the iPod to the iPod connector
inside the dock.
When the unit is plugged in, it will
charge the docked iPod.
8
3. Press the Rewind and Fast Forward
Buttons to skip between tracks on a
docked iPod.
Press and hold the Rewind and Fast
Forward Buttons to search through
individual songs on a docked iPod.
4. Press the Play/Pause Button to pause
an iPod during play.
OPERATIONS
██ Tuning the AM/FM radio
1. Press the Power Button to turn the unit
on.
██ Using the auxiliary input
1. Press the Source Button to switch to
Aux Mode.
2. Press the Source Button to select AM
or FM radio modes.
3. Press the Tune + or Tune - Buttons to
tune the AM or FM radio.
Extend the FM wire antenna to improve
FM reception.
An AM antenna is built into the unit.
Adjust the position of the unit to
improve AM reception.
2. Connect an MP3 Player or other audio
source to the Auxiliary Input.
Connecting an audio source to the
Auxiliary Input requires a cord with a
3.5 mm mini-phono plug.
██ Saving an AM or FM station
as a Preset
Follow the directions for Tuning the AM/
FM Radio.
1. After tuning the AM or FM radio to
the desired station, press the Memory
Button.
3. Use the connected device’s controls
to play, pause, stop, and skip between
tracks on the connected device.
Preset numbers will blink on the LCD
display.
2. Press the Tune + or Tune - Buttons
to select a preset number to save the
current radio station to.
3. Press the Memory Button to save the
current radio station to the selected
preset number.
4. Press the Preset + and Preset - Buttons
to cycle through the saved presets.
9
UNIT CONTROLS & Features
01
02
03
04
05
06
07
08
09
10
11
12
13
14
15
16
10
unit CONTROL GLOSSARY
01. Memory/DST Button
Press the Memory Button to save an
AM or FM radio station as a preset.
Press the DST Button to activate or
deactivate Daylight Savings Time.
02. Preset +/Alarm 2 Button
Press the Preset + Button to cycle
through AM and FM radio presets.
Press and hold the Alarm 2 Button to
set alarm 2.
03. Preset -/Alarm 1 Button
Press the Preset - Button to cycle
through AM and FM radio presets.
Press and hold the Alarm 1 Button to
set alarm 1.
04. Clock Adjust/Source Button
Press and hold the Clock Adjust Button
to set the time on the unit.
Press the Source Button to switch
between iPod, Aux, AM, FM, and Off
modes.
05. Power/Alarm Off Button
Press the Power Button to turn the unit
on and off.
Press the Alarm Off Button to turn the
alarm off after it sounds.
08. Rewind/Tune - Button
Fast Forward/Tune + Button
Press the Rewind/Tune- Button or Fast
Forward/Tune + Button to skip from
one track to the next on a docked iPod.
Press and hold the Rewind/TuneButton or Fast Forward/Tune + Button
to search through an individual track on
a docked iPod.
Press the Rewind/Tune- Button or Fast
Forward/Tune + Button to tune the AM
or FM radio.
09. Play/Pause Button
Press the Play/Pause Button to play or
pause a docked iPod.
10. Dock for iPod
11. Dimmer Button
Press the Dimmer Button to adjust the
brightness of the LCD display, or to turn
the display off.
12. Time Zone Button
Press the Time Zone Button to adjust
the Time Zone of the unit.
13. Backup Battery Compartment
Requires 1 CR2025 battery (preinstalled)
06. Volume Button
Press the Volume Button to adjust the
volume of the unit.
14. Reset Button
Press the Reset Button using a paper
clip or like object to restore the unit to
the manufacturer’s default settings.
07. Snooze Button
Press the Snooze Button to delay the
alarm for an additional 9 minutes after
it sounds.
15. Auxiliary Input
Use the Auxiliary Input to connect an
MP3 player or other audio source to the
unit.
16. Headphone Jack
Use the Headphone Jack to connect a
set of headphones or earbuds to the unit.
11
remote CONTROLS & Features
17
18
19
20
21
22
23
24
25
26
27
12
remote control GLOSSARY
17. Mute Button
Press the Mute Button to mute the unit’s
volume.
26. Bass Buttons
Press the Bass Buttons to adjust the
levels of bass on the unit.
18. Display Button
Press the Display Button to view the set
alarm times.
27. Treble Buttons
Press the Treble Buttons to adjust the
level of treble on the unit.
19. Power Button
Press the Power Button to turn the unit
off and on.
20. Repeat Button
Press the Repeat Button once to repeat
the current track on a docked iPod.
Press the Repeat Button twice to repeat
an entire album or playlist on a docked
iPod.
21. M+/M- Button
Press the M+/M- Button to cycle
through menu items on a docked iPod.
Press the M+/M- Button to cycle
through preset AM and FM radio
stations.
22. Select Button
Press the Select Button to make
selections in the menus of a docked
iPod.
23. Shuffle Button
Press the Shuffle Button to activate the
shuffle feature on a docked iPod.
24. Chapter Buttons
Press the Chapter Buttons to cycle
through chapters on a docked iPod.
25. Album Buttons
Press the Album Buttons to cycle
through albums on a docked iPod.
13
Remote CONTROLS & Features
28
29
30
31
32
33
34
35
36
14
Remote & LCD CONTROL GLOSSARY
32. Memory Button
Press the Memory Button save an AM
or FM radio station as a preset.
28. Source Button
Press the Source Button to switch
between iPod, Aux, AM, and FM
modes.
33. Play/Pause Button
Press the Play/Pause Button to play or
pause a docked iPod.
29. Menu Button
Press the Menu Button to move to the
previous menu on a docked iPod.
30. Sleep/Snooze Button
Press the Sleep Button consecutively
to set the sleep timer between 1 and 90
minutes.
34. Dimmer Button
Press the Dimmer Button to adjust the
brightness of the LCD display.
35. Playlist Buttons
Press the Playlist Buttons to cycle
through playlists on a docked iPod.
Press the Snooze Button to delay the
alarm for an additional 9 minutes after it 36. Volume Buttons
has sounded.
Press the Volume Buttons to adjust the
volume of the unit.
31. Skip -/Skip+ Button
Press the Skip-/Skip+ Button to skip
through tracks on a docked iPod.
Press and hold the Skip-/Skip+ Button
to search through an individual track on
a docked iPod.
Press the Skip-/Skip+ Button to tune the
AM or FM radio.
Daylight Savings
Time
Modes
Memory
Time Zones
Alarm 1 and 2
15
COMPANY INFORMATION
██ Green initiative
Environmental Commitment to ‘Protect for Today and Sustain for Tomorrow’
2009 marks the official launch of DPI, Inc.’s corporate campaign for a greener and
cleaner world. DPI and its four brands, iLive, WeatherX, Capri, and GPX, are building
upon environmental initiatives introduced at all of their facilities to help formulate and
sustain significant and important conservation efforts within its manufacturing and
marketing communities. In addition to targeting and selecting energy efficient product
features, and structuring ‘green office’ procedures, other initial program efforts include:
•
•
•
•
Reduction of all packaging sizes
Recyclable plastics for clamshell packages, with a plan to
eventually replace plastic with recyclable paper
Recycled fiber board in place of the polyfoam in packing boxes
Recycled plastics in place of the virgin material in product construction
██ international support
To download this User’s Guide in English, Spanish, or French, visit the support section
at www.ilive.net.
Para transferir esta guía de usuario en inglés, español, o francés, visite la sección de la
ayuda en www.ilive.net.
Pour télécharger ce guide de l’utilisateur en anglais, espagnol, ou français, visitez la
section de soutien chez www.ilive.net.
██ Service information
Address: 2116 Carr Street, St. Louis MO, 63106
Phone: 1-314-621-2881
Fax: 1-314-588-1805
Email: [email protected]
Parts Email: [email protected]
Website: www.ilive.net
© 2009 Digital Products International (DPI, Inc.) | All other trademarks appearing herein are the property of their
respective owners. Specifications are subject to change without notice