1
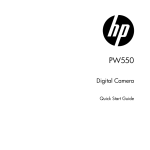
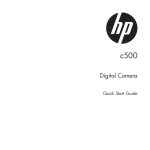
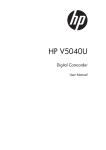
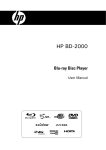
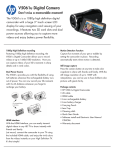
HP V5061u / V5061Au
Digital Camcorder
Quick Start Guide
For more details about the camcorder operation and troubleshooting,
please read the User Manual located on the CDROM disc included
with your camcorder or visit http://www.hp.com/support and
download it for the camcorder support page.
1 Getting Started
1.1 Charging the Battery
It is recommended that the NP-40 Lithium Battery be fully charged
before use. First, connect the external battery charger to the AC
power source (wall outlet or power strip). Next, plug the battery into
the external charger as illustrated below. The battery may take up to
2 1/2 hours to charge. When the light on the charger turns green,
remove the battery and use when ready.
Note:
Do not leave the battery in the charger for extended periods of time after
it has been fully charged.
3
1.2 Loading the Battery
Please use only the battery provided or recommended by the
manufacturer or dealer.
Note:
Incorrectly inserting the batteries could result in non-repairable damage.
1.
Open battery cover.
4
2.
Insert the battery according to the illustration. The
electrode is inside of the camcorder.
* DO NOT use NiMH AA batteries.
3.
Close the battery cover.
5
1.3 Inserting SD Card
1.
Open the Insert an SD card and make sure facing the
touching face downward.
Note:
Please be careful to insert the SD card(s) as illustrated above so that
damage to the SD card(s) and camcorder does not occur.
To avoid damaging photos and video files, do not remove or insert the
SD card while the camcorder is powered on.
6
1.4 Exterior Views
Front View
Right View
Top View
Bottom View
Left View
Rear View
Front View
Right view
7
1.5 Buttons & Functions
Description
Button
Function
Press the power button to turn
the Digital Camcorder ON/OFF.
Opening and closing the LCD
panel will also power ON/OFF as
well.
Power
button
Press the button to display the
main menu.
Menu button
There are three operating
modes for the Digital
Camcorder: Video mode, Photo
mode, and Audio mode. Press
the Mode switch to cycle through
the different modes.
MODE
button
SET button
Confirmation for various setting
of functions
4-Way
Direction
button
Press the 4-Way Direction
Button UP to change the flash
options: off, auto, fill-in in Photo
mode Press DOWN to delete a
photo or video in Playback
mode. You can pull in the
focusing distance to 10 cm.
(Normal focus range: 0.8M ~
infinity) Press RIGHT and LEFT
to make adjustments to the
Exposure Value (EV)
compensation.
8
Description
Button
Function
This Digital Camcorder has 4X
Digital zoom (in Video mode of
HD1080p resolution only has 2X
digital zoom).
Zoom toggle
Move the Zoom toggle to the
right ( ) to zoom in, or move to
the left (
) to zoom out.
Shutter
button
Press the button to capture a
photo.
Recording
button
Press the button to record a
video in Video mode and
activate audio recording in Audio
mode.
Playback
button
Press the Playback button to
enter Playback mode and
playback the last file recorded.
The Macro function is used to
capture Photos and Videos at
very close distances. Rotate the
lens ring to select Macro mode
( ) to focus on objects about
20 cm (8 inches) from the
camcorder.The icon "
" will
be displayed on the LCD screen
when the Macro mode is
Macro mode
selector
selected.Normal mode ( ) is
used to focus on objects more
than 1.2 m (4 feet) away.
9
1.6 Adjusting LCD Display
To begin capturing photos and videos, open the LCD display panel
as illustrated below.
10
1.7 Initial Settings Before Use
1.7.1
Setting Date and Time
1.
The initial power up of this camcorder should display the
Date and Time setup menu as shown below.
2.
Touch the desired field on the LCD panel or press
LEFT/RIGHT on the 4-Way Direction button to navigate
through the date and time field.
3.
Touch the up/down icons on the LCD panel or press the
4-Way Direction Button Up/Down to adjust the value.
Press the Set
button or touch the Return icon (
) to
store the value you have changed.
11
1.8 Using the Touch Screen
1.8.1
Single Touch
Single touch to activate hotkeys on LCD screen.
Example, in Video/Photo Mode:
1.
Touch the
2.
Touch the
zoom out.
3.
Touch the
mode.
1.8.2
icon to enter the Setup menu.
icon to zoom in and touch the
icon to
icon to set the camcorder in playback
Slide
41B
While in Playback mode, touch and slide right or left to view the
previous or next Video/Photo.
12
1.8.3
Rotate
42B
While in Playback mode, touch the photo and slide in a half circle
motion (as illustrated below) to rotate 90 with each motion.
13
2 Modes
2.1 Video Mode
1.
By default, this camcorder will power up to Video mode
. If the camcorder is not in Video mode, press the
until this mode is selected.
button to start or stop video recording.
2.
Press the
3.
The Digital Camcorder will store the movie clip
automatically on the SD card when the recording stopped.
Video mode Indicator
14
The following table describes all the icons that are displayed when
the Digital Camcorder is in Video mode (
).
1
Video mode
2
Motion Detection mode
3
Night mode indicator
4
1.0
Exposure Compensation indicator
5
Artistic Effect indicator
6
Metering mode
7
Memory Status indicator
: SD card 1 indicator
: SD card 2 indicator
INT
INT : Internal memory indicator (displayed
when there is no SD card in camcorder)
15
8
Backlight indicator
9
Macro Focus indicator
10
White Balance indicator
11
Battery status indicator
12
00:00:00
Remaining recording time indicator
13
Histogram indicator
14
Enter Playback mode touch icon
15
Zoom ratio bar indicator
16
Enter Menu touch icon
17
Assist LED light button (On, Off)
18
Resolution indicator
19
Burst mode
16
2.2 Photo Mode
1.
Power up the camcorder and press the
select Photo mode
.
2.
Press the Shutter button to capture a photo.
Photo Mode
Indicator
17
button to
The following table describes all the icons that are displayed when
the Digital Camcorder is in Photo mode ( ).
1
Photo mode indicator
2
Night mode indicator
3
1.0
EV Compensation indicator
4
Artistic Effect indicator
5
Metering mode
6
Memory Status indicator
: SD card 1 indicator
: SD card 2 indicator
INT : Internal memory indicator (displayed
when there is no SD card in camcorder)
INT
7
Backlight indicator
8
Macro Focus indicator
18
9
White Balance indicator
10
Battery status indicator
11
0000
Shots remaining, indicates the remaining
shots available.
12
Histogram indicator
13
Enter Playback mode touch icon
14
Zoom ratio bar indicator
15
Enter Menu touch icon
16
A
Flash mode selection (off, auto, fill-in)
17
Resolution indicator
18
Burst mode
19
2S
Self-timer indicator
19
2.3 Audio Mode
1.
Power up the camcorder and press the
Audio Mode
is selected.
2.
Press the
until the
button to start or stop audio recording.
Audio Mode
20
The following table describes all the icons that are shown when the
Digital Camcorder is in Audio mode ( ).
1
Audio mode
2
Memory Status indicator
: SD card 1 indicator
: SD card 2 indicator
INT : Internal memory indicator (displayed
when there is no SD card in camcorder)
INT
3
4
Battery status indicator
00:00:00
Remaining recording time indicator
5
Enter Playback mode touch icon
6
Enter Menu touch icon
BB2323 23BB23
21
2.4 Video Playback Mode
Please refer to the following table regarding the description of each
icon and symbol in video playback.
1
2
Playback mode icon
000-0000
Folder and file number
3
File Protect indicator
4
Memory Status indicator
: SD card 1 indicator
: SD card 2 indicator
INT : Internal memory indicator
(displayed when there is no SD card
in camcorder)
INT
5
6
7
Battery status indicator
00:00:00/00:00:00
Playback progress length / file total
length
Sound volume touch icons
22
8
Return touch icon
9
Fast forward Playback touch icon
10
/
Playback/Pause touch icon
11
Fast Rewind Playback touch icon
12
Enter Menu touch icon
13
Resolution indicator
14
S
Slow Motion Playback touch icon
23
2.5 Photo Playback Mode
Please refer to the following table for descriptions of the icons and
symbols in photo playback.
1
2
Playback mode icon
S
DPOF (Digital Print Order Format) indicator
3
File Protect indicator
4
Memory Status indicator
: SD card 1 indicator
: SD card 2 indicator
INT : Internal memory indicator (displayed
when there is no SD card in camcorder)
INT
5
White Balance indicator
6
Battery status indicator
7
000-0000
Folder and file number
24
8
Return touch icon
9
Magnification indicator touch icon
10
Minification indicator touch icon
11
Enter Menu touch icon
12
Resolution indicator
25
2.6 Audio Playback Mode
Please refer to the following table regarding the description of each
icon and symbol in audio playback.
1
Playback mode icon
2
File Protect indicator
3
Battery status indicator
4
INT
Memory Status indicator
: SD card 1 indicator
: SD card 2 indicator
INT : Internal memory indicator
(displayed when there is no SD card
in camcorder)
5
000-0000
6
00:00:00/00:00:00
Folder and file number
Playback progress length / file total
length
7
Return touch icon
8
Fast forward Playback touch icon
26
9
/
Playback/Pause touch icon
10
Fast Rewind Playback touch icon
11
Enter Menu touch icon
12
Sound (Volume adjustment) touch
icon
27
3
Getting Help
Should you have a technical support question or your HP Digital
Camcorder requires service within the warranty period, please
contact the original point of purchase if necessary, issue a Return
Material Authorization (RMA) number in order to replace your HP
Branded Product. For warranty claims, you will be required to
provide a copy of your original dated sales receipt as proof of
purchase and the issued RMA number. You will be responsible for
shipping charges when shipping the product to the service center.
The service agent will provide you with an address and you will also
be responsible for any shipping charges to the warranty service
center. Once your product is received by this service center, a
replacement unit will be shipped back to you, typically within 5
business days.
E-mail Support:
Language
Address
English
[email protected]
Deutsch (German)
[email protected]
Español (Spanish)
[email protected]
Français (French)
[email protected]
Italiano (Italian)
[email protected]
Nederlansk (Dutch)
[email protected]
Nihongo (Japanese)
[email protected]
Português (Portuguese)
[email protected]
한국어 (Korean)
[email protected]
漢語 (Chinese Traditional)
[email protected]
28
Phone Support:
Country
North America
United States
Canada
Europe, Middle East, Africa
Belgium
(België/Belgique/Belgien)
France (France)
Germany (Deutschland)
Ireland (Éire)
Italy (Italia)
Spain (España)
Asia Pacific
Japan (日本国)
Hong Kong
Phone number
Hours of support
1-866-694-7633
1-866-694-7633
M-F 9-6 PST
M-F 9-6 PST
+ 32 2700 1724
9 :00 – 17:00 CET
+ 33 171230454
+ 49
6950073896
+ 353
1850882016
+ 39 269682189
+ 34 914533458
+ (81) 3 5816-4111
+ (852) 232 98
102
9 :00 – 17:00 CET
9 :00 – 17:00 CET
9 :00 – 17:00 CET
9 :00 – 17:00 CET
9 :00 – 17:00 CET
9:00 - 17:00 (GMT +9)
9:00 - 17:00 (GMT +8)
Latin America
Argentina
Brazil
Chile
Colombia
México (Mexico City)
México (Guadalajara)
México (Monterrey)
Peru
Venezuela
+54 11
60912399
+55 11
55046633
+56 2 5814977
+57 1 5082325
+52 55
12048185
+52 33
10313872
+52 81
11072639
+51 1 7056232
+58 212
3354574
29
M-F 9:00-18:00 PST
M-F 9:00-18:00 PST
M-F 9:00-18:00 PST
M-F 9:00-18:00 PST
M-F 9:00-18:00 PST
M-F 9:00-18:00 PST
M-F 9:00-18:00 PST
M-F 9:00-18:00 PST
M-F 9:00-18:00 PST
Web Site:
Language
Available in 31
languages based on
country.
Address
http://www.hp.com/support
30
31
P/N: 7525C00148A