1
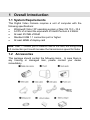
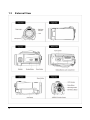
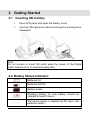
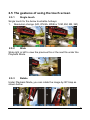
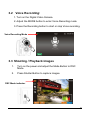
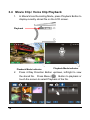
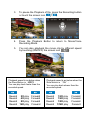
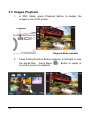
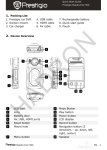
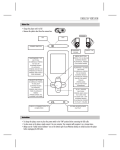
1 Overall Introduction 1.1 System Requirements This Digital Video Camera requires a unit of computer with the following specifications: Windows® Vista / XP operating system or Mac OS 10.3 ~10.4 A CPU of at least the equivalent of Intel® Pentium 4 2.8GHz At least 512 MB of RAM Standard USB 1.1 connection port or higher At least 64MB of display card Note: USB 1.1 allows you to transmit files to the host, but using USB 2.0 connection port could increase the transmission speed far faster. 1.2 Accessories This package should contain the following items. In case there is any missing or damaged item, please contact your dealer immediately. 1 1.3 2 External View 2 Getting Started 2.1 Inserting SD Card(s) 1. Open LCD panel and open the battery cover. 2. Insert an SD card and make sure facing the touching face downward. Note: Do not remove or insert SD cards when the power of the Digital Video Camera is on to avoid damaging files. 2.2 Battery Status Indicator: Batteries full Batteries half full Battery empty Charging battery (A new battery should be charged at least 2 hours.) The device power is supplied by DC input. (No batteries inside.) 3 2.3 Charging the Battery You can use the charger attached to charge the lithium battery. 2.4 Insert batteries according to the illustration. 4 2.5 The gestures of using the touch screen 2.5.1 Single touch Single touch for the below touchable hotkeys: 1. Resolution change (HD, WVGA, WEB or 12M, 8M, 5M, 3M) 2.5.2 Slide Slide right or left to view the previous file or the next file under the Playback Mode. 2.5.3 Rotate Under Playback Mode, you can rotate the image by 90°/step as shown below. 5 2.6 Buttons & Functions Description Button Function Power Button Press the button to turn ON/OFF the Digital Video Camera. Menu Button Press the button to display the main OSD menu. MODE Button There are three operating modes for the Digital Video Camera: DV Mode, DSC Mode, and Voice Recording Mode. Press the Mode button to change to different modes. 4-Way Direction Button Press the 4-Way Direction Button UP to turn on/off the flash light: off, auto, fill-in; press DOWN to delete the file when it’s in Playback mode. This Digital Video Camera is 3X Digital zoom( For 720p & below) Zoom button Shutter button Press the Zoom button Right (T) to pull in the distance of the subject, or press the button Left (W) to move away the distance from the object Press the button to take images. Recording button Press the button to record movie clip and activate voice recording Macro button Macro function allows you to shoot image of an object at very close distance. In the Macro Mode, you can pull in the focusing distance to 20 cm. (Normal focus range: 1.2m ~ infinity) The icon will be displayed on the LCD screen when the Macro mode is selected. Playback Button 6 Press the Playback button to enter Playback mode and playback the last file. 2.7 About LED Indicators Below table describes the meaning of the camera LED indicators: Indicator Color Definition Power Green Turning power on. Red blinking Flash is charging. Recording Red blinking Recording Self-timer Red blinking Start of Self-timer. 2.8 Initial settings before use Setting Date and Time 1. Turn on the Digital Video Camera to set up the date and time for the first time. Set the date and time by moving up/down button or touch the screen to select. 2. Press the 4-Way Direction Button left/right to highlight each column. Then press up/down or touch the screen to select the column. 3. Press the 4-Way Direction Button Up/Down to adjust the value. Press Menu ( ) Button to store the value you change or touch the screen to adjust the Year, Date and Time before pressing the Return Button ( ) to store the value and leave the setting. 7 3 Using the Camera 3.1 Shooting a Movie Clip 1. DV mode is the default setting after you power on the Digital Video Camera. 2. Press the Recording button to start or stop moving recording. 3. The Digital Video Camera will store the Movie clip automatically. DV Mode Indicator 4. LCD screen ratio will be different depending on the setting of Movie Clip resolution. Please refer to the table shown below: Video Resolution Preview 16:9 ratio HD (1280 x 720) WVGA (848x480) 4:3 ratio WEB (320 x 240) 8 3.2 Voice Recording: 1. Turn on the Digital Video Camera. 2. Adjust the MODE button to enter Voice Recording mode 3. Press the Recording button to start or stop Voice recording. Voice Recording Mode 3.3 Shooting / Playback images 1. Turn on the power and adjust the Mode Button to DSC Mode. 2. Press Shutter Button to capture images. DSC Mode indicator 9 3.4 Movie Clip / Voice Clip Playback 1. In Movie/Voice Recording Mode, press Playback Button to display recently stored file on the LCD screen. Playback Playback Mode indicator 2. Playback Mode indicator Press 4-Way Direction Button up/down, left/right to view the stored file. Press Menu ( ) Button to playback or touch the screen to select Playback of the file. 10 3. To pause the Playback of file, press the Recording button or touch the screen icon ( ). 4. Press the Playback Button to return to Movie/Voice Recording Mode. 5. You can also playback the movie clip by different speed by touching (ON/OFF) the screen icon ( ). Playback speed is as below when the Slow Motion is “OFF”: You can play back faster than the recorded speed. Playback speed is as below when the Slow Motion is “ON”: You can play back slower than the recorded speed. Rewind Rewind Rewind Rewind Rewind Rewind Rewind Rewind 2X play 4X play 8X play 16X play Forward Forward Forward Forward 1/2X play 1/4X play 1/8X play 1/16X play Forward Forward Forward Forward 11 3.5 Images Playback 1. In DSC Mode, press Playback Button to display the images on the LCD screen. Playback Playback Mode Indicator 2. Press 4-Way Direction Button up/down, or left/right to view the stored files. Press Menu ( touch the screen to playback. 12 ) Button to replay or