1
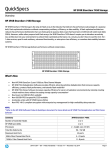
HP 3PAR VMware ESX Implementation
Guide
Abstract
This implementation guide provides information for establishing communications between an HP 3PAR StoreServ Storage and
a VMware ESX host. General information is also provided on the basic steps required to allocate storage on the HP 3PAR
StoreServ Storage that can then be accessed by the ESX host.
HP Part Number: QL226-97063
Published: September 2013
© Copyright 2013 Hewlett-Packard Development Company, L.P.
Confidential computer software. Valid license from HP required for possession, use or copying. Consistent with FAR 12.211 and 12.212, Commercial
Computer Software, Computer Software Documentation, and Technical Data for Commercial Items are licensed to the U.S. Government under
vendor's standard commercial license.
The information contained herein is subject to change without notice. The only warranties for HP products and services are set forth in the express
warranty statements accompanying such products and services. Nothing herein should be construed as constituting an additional warranty. HP shall
not be liable for technical or editorial errors or omissions contained herein.
Acknowledgments
Java and Oracle are registered trademarks of Oracle and/or its affiliates.
Windows® is a U.S. registered trademark of Microsoft Corporation.
Contents
1 Introduction...............................................................................................6
Supported Configurations..........................................................................................................6
HP 3PAR OS Upgrade Considerations.........................................................................................7
Audience.................................................................................................................................7
2 Configuring the HP 3PAR StoreServ Storage for Fibre Channel..........................8
Configuring the HP 3PAR StoreServ Storage Running HP 3PAR OS 3.1.x or OS 2.3.x.........................8
Setting Up the Ports..............................................................................................................8
Creating the Host Definition..................................................................................................9
Configuring the HP 3PAR StoreServ Storage Running HP 3PAR OS 2.2.x........................................10
Setting Up the Ports............................................................................................................11
Creating the Host Definition................................................................................................12
Setting Up and Zoning the Fabric.............................................................................................12
HP 3PAR Coexistence.........................................................................................................13
Configuration Guidelines for Fabric Vendors..........................................................................13
Target Port Limits and Specifications.....................................................................................14
HP 3PAR Priority Optimization.............................................................................................15
Persistent Ports...................................................................................................................15
Persistent Ports Setup and Connectivity Guidelines.............................................................16
Persistent Ports Limitations...............................................................................................17
Unsupported Configurations...........................................................................................17
3 Configuring the HP 3PAR StoreServ Storage for iSCSI....................................18
Software iSCSI Support...........................................................................................................18
Setting Up the Ports for an iSCSI Connection.........................................................................18
Creating the iSCSI Host Definition on an HP 3PAR StoreServ Storage Running HP 3PAR OS 3.1.x
and OS 2.3.x....................................................................................................................19
Creating the iSCSI Host Definition on an HP 3PAR StoreServ Storage Running HP 3PAR OS
2.2.x................................................................................................................................20
Setting Up and Configuring CHAP Authentication..................................................................21
Hardware iSCSI Support..........................................................................................................25
Target Port Limits and Specifications..........................................................................................30
HP 3PAR Priority Optimization..................................................................................................30
4 Configuring the HP 3PAR StoreServ Storage for FCoE....................................31
Setting Up the FCoE Switch, FCoE Initiator, and FCoE target ports.................................................31
Creating the Host Definition.....................................................................................................33
Target Port Limits and Specifications..........................................................................................34
HP 3PAR Priority Optimization..................................................................................................34
5 Configuring the Host for a Fibre Channel Connection....................................35
Installing the HBA and Drivers..................................................................................................35
Installing Virtual Machine Guest Operating System.....................................................................36
Multipath Failover Considerations and I/O Load Balancing..........................................................37
Configuring Round Robin Multipathing on ESX 4.x or later for Fibre Channel.............................39
Configuring ESX/ESXi Multipathing for Round Robin via SATP PSP............................................40
ESX/ESXi 4.0 GA - 4.0 Ux.............................................................................................42
ESX/ESXi 4.1 GA - 4.1 Ux..............................................................................................43
ESXi 5.x.......................................................................................................................43
SATP Info Commands.........................................................................................................44
Default SATP Rules and Their Current Default PSP...............................................................44
SATP Custom Rules and Associated Defined Parameters......................................................45
Show Device Information................................................................................................45
Contents
3
Script Alternative for Path Policy Changes on Storage Devices without a Host Reboot..............46
Performance Considerations for Multiple Host Configurations........................................................47
ESX/ESXi Handling SCSI Queue Full and Busy Messages from the HP 3PAR StoreServ Storage
Array...............................................................................................................................47
VMware ESX Releases through ESX 3.5 Update 3.............................................................47
VMware ESX Release 3.5 Update 4 through ESX 4.x and ESXi 5.0......................................48
VMware ESXi Release 5.1...............................................................................................48
Follow-up Actions/Recommendations for ESX 3.5 Update 3 and Earlier....................................49
Recommendations for ESX Hosts Attached to a Storage Port on the HP 3PAR StoreServ
Storage........................................................................................................................49
Modifying the Tuneable Parameters for Queue Depth Throttling in ESX 3.x............................49
ESX/ESXi 4.1, ESXi 5.x Additional Feature Considerations............................................................51
Storage I/O Control...........................................................................................................51
vStorage APIs for Array Integration (VAAI).............................................................................51
HP 3PAR VAAI Plugin 1.1.1 for ESXi 4.1.................................................................................52
HP 3PAR VAAI Plugin 2.2.0 for ESXi 5.x...............................................................................52
UNMAP (Space Reclaim) Storage Hardware Support for ESXi 5.x............................................53
Out-of-Space Condition for ESX 4.1 and ESXi 5.x...................................................................53
Additional New Primitives Support on ESXi 5.x......................................................................55
VAAI and New Feature Support Table..................................................................................55
VAAI Plugin Verification......................................................................................................56
VMware All Paths Down.....................................................................................................58
6 Configuring the Host as an FCoE Initiator Connecting to a FC target or an FCoE
Target........................................................................................................59
Configuring the FCoE Switch....................................................................................................59
Using system BIOS to configure FCoE........................................................................................59
Configuring an HP 3PAR StoreServ Storage Port for a FCoE Host Connection..................................62
Configuring Initiator FCoE to FC Target.....................................................................................62
Configuring Initiator FCoE to Target FCoE..................................................................................63
7 Configuring the Host for an iSCSI Connection..............................................65
Setting Up the Switch, iSCSI Initiator, and iSCSI target ports.........................................................65
Installing iSCSI on VMware ESX...............................................................................................65
Installing Virtual Machine Guest Operating System.....................................................................67
Creating a VMkernel Port........................................................................................................67
Configuring a Service Console Connection for the iSCSI Storage..................................................70
Configuring the VMware iSCSI Initiator.....................................................................................72
iSCSI Failover Considerations and Multipath Load Balancing........................................................76
Performance Considerations for Multiple Host Configurations........................................................76
ESX/ESXi Additional Feature Considerations..............................................................................77
8 Allocating Storage for Access by the ESX Host.............................................78
Creating Storage On the HP 3PAR StoreServ Storage..................................................................78
Creating Virtual Volumes for HP 3PAR OS 2.2.4 and Later......................................................78
Creating Virtual Volumes for HP 3PAR OS 2.2.3 or Earlier.......................................................79
Exporting LUNs to an ESX Host.................................................................................................79
Creating a VLUN for Export................................................................................................80
Discovering LUNs on VMware ESX Hosts...................................................................................81
Removing Volumes..................................................................................................................81
Host and Storage Usage.........................................................................................................82
Eventlog and Host Log Messages.........................................................................................82
9 Booting the VMware ESX Host from the HP 3PAR StoreServ Storage................84
10 Support and Other Resources...................................................................85
Contacting HP........................................................................................................................85
4
Contents
HP 3PAR documentation..........................................................................................................85
Typographic conventions.........................................................................................................88
HP 3PAR branding information.................................................................................................88
11 Documentation feedback..........................................................................89
Contents
5
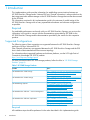
1 Introduction
This implementation guide provides information for establishing communications between an
HP 3PAR StoreServ Storage and a VMware ESX host. General information is also provided on the
basic steps required to allocate storage on the HP 3PAR StoreServ Storage that can then be accessed
by the ESX host.
The information contained in this implementation guide is the outcome of careful testing of the
HP 3PAR StoreServ Storage with as many representative hardware and software configurations
as possible.
Required
For predictable performance and results with your HP 3PAR StoreServ Storage, you must use the
information in this guide in concert with the documentation set provided by HP 3PAR for the
HP 3PAR StoreServ Storage and the documentation provided by the vendor for their respective
products.
Supported Configurations
The following types of host connections are supported between the HP 3PAR StoreServ Storage
and hosts running a VMware ESX OS:
Fibre Channel connections are supported between the HP 3PAR StoreServ Storage and the ESX
host in both a fabric-attached and direct-connect topology.
For information about supported hardware and software platforms, see the HP Single Point of
Connectivity Knowledge (HP SPOCK) website:
http://www.hp.com/storage/spock
For more information about HP 3PAR storage products, follow the links in “HP 3PAR Storage
Products” (page 6).
Table 1 HP 3PAR Storage Products
Product
See...
HP 3PAR StoreServ 7000 Storage
http://h20000.www2.hp.com/bizsupport/TechSupport/
Home.jsp?lang=en&cc=us&prodTypeId=12169&
prodSeriesId=5335712&lang=en&cc=us
HP 3PAR StoreServ 10000 Storage
http://h20000.www2.hp.com/bizsupport/TechSupport/
Home.jsp?lang=en&cc=us&prodTypeId=12169&
prodSeriesId=5157544&lang=en&cc=us
HP 3PAR Storage Systems
http://h20180.www2.hp.com/apps/Nav?
h_pagetype=s-001&h_lang=en&h_cc=us&
h_product=5044012&h_client=S-A-R163-1&
h_page=hpcom&lang=en&cc=us
HP 3PAR StoreServ Software — Device Management
http://h20180.www2.hp.com/apps/Nav?
h_pagetype=s-001&h_lang=en&h_cc=us&
h_product=5046476&h_client=S-A-R163-1&
h_page=hpcom&lang=en&cc=us
HP 3PAR StoreServ Software—Replication
http://h20180.www2.hp.com/apps/Nav?
h_pagetype=s-001&h_lang=en&h_cc=us&
h_product=5053605&h_client=S-A-R163-1&
h_page=hpcom&lang=en&cc=us
Required
All installation steps should be performed in the order described in this implementation guide.
6
Introduction
HP 3PAR OS Upgrade Considerations
For information about planning an online HP 3PAR Operating System (HP 3PAR OS) upgrade, see
the HP 3PAR Operating System Upgrade Pre-Planning Guide, which is available on the HP Business
Support Center (BSC) website:
http://www.hp.com/go/bsc
For complete details about supported host configurations and interoperability, consult the HP
SPOCK website:
http://www.hp.com/storage/spock
Audience
This implementation guide is intended for system and storage administrators who perform and
manage the system configurations and resource allocation for the HP 3PAR StoreServ Storage.
This guide provides basic information that is required to establish communications between the
HP 3PAR StoreServ Storage and the VMware ESX host and to allocate the required storage for a
given configuration. However, the appropriate HP documentation must be consulted in conjunction
with the ESX host and host bus adapter (HBA) vendor documentation for specific details and
procedures.
NOTE: This implementation guide is not intended to reproduce or replace any third-party product
documentation. For details about devices such as hosts, HBAs, fabric switches, and non-HP 3PAR
software management tools, consult the appropriate third-party documentation.
HP 3PAR OS Upgrade Considerations
7
2 Configuring the HP 3PAR StoreServ Storage for Fibre
Channel
This chapter explains how to establish a Fibre Channel connection between the HP 3PAR StoreServ
Storage and a VMware ESX host and covers HP 3PAR OS 3.1.x, OS 2.3.x, and 2.2.x versions.
For information on setting up the physical connection for a particular HP 3PAR StoreServ Storage,
see the appropriate HP 3PAR installation manual.
Configuring the HP 3PAR StoreServ Storage Running HP 3PAR OS 3.1.x
or OS 2.3.x
This section describes how to connect the HP 3PAR StoreServ Storage to an ESX host over a Fibre
Channel network when running HP 3PAR OS 3.1.x or OS 2.3.x.
By default, the QLogic, Emulex, and Brocade drivers for the VMware ESX host support failover.
For failover support using the QLogic, Emulex, or Brocade driver, virtual volumes should be
simultaneously exported down multiple paths to the host. To do this, create a host definition on the
HP 3PAR StoreServ Storage that includes the WWNs of multiple HBA ports on the host and then
export the VLUNs to that host definition. If each ESX host within a cluster has its own host definition,
the VLUNs must be exported to multiple host definitions.
Required
The following setup must be completed before connecting the HP 3PAR StoreServ Storage port to
a device.
NOTE: When deploying HP Virtual Connect direct-attach FC storage for HP 3PAR storage systems,
where the HP 3PAR StoreServ Storage ports are cabled directly to the uplink ports on the HP Virtual
Connect FlexFabric 10 Gb/24-port Module for c-Class BladeSystem, follow the steps for configuring
the HP 3PAR StoreServ Storage ports for a fabric connection.
For more information about HP Virtual Connect, HP Virtual Connect interconnect modules, and the
HP Virtual Connect direct-attach feature, see HP Virtual Connect documentation and the HP SAN
Design Reference Guide. This documentation is available on the HP BSC website:
http://www.hp.com/go/bsc
Setting Up the Ports
Before connecting the HP 3PAR StoreServ Storage to a host, the connection type and mode must
be specified. To set up the HP 3PAR StoreServ Storage ports for a direct or fabric connection,
complete the following steps for each port.
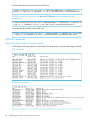
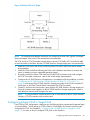
1. To determine if a port has already been configured in host mode, issue the HP 3PAR OS CLI
showport -par command. A host port is essentially a target mode port where the initiator
or host can log in to the HP 3PAR StoreServ Storage.
# showport -par
N:S:P Connmode ConnType
2:0:1 disk
loop
auto
2:0:2 disk
loop
auto
2:4:1 disk
loop
auto
2:4:2 disk
loop
auto
3:0:1 disk
loop
auto
3:0:2 disk
loop
auto
3:4:1 disk
loop
auto
3:4:2 disk
loop
auto
8
CfgRate MaxRate
4Gbps disabled
4Gbps disabled
4Gbps disabled
4Gbps disabled
4Gbps disabled
4Gbps disabled
4Gbps disabled
4Gbps disabled
Configuring the HP 3PAR StoreServ Storage for Fibre Channel
Class2 UniqNodeWwn
disabled disabled
disabled disabled
disabled disabled
disabled disabled
disabled disabled
disabled disabled
disabled disabled
disabled disabled
VCN IntCoal
enabled
enabled
enabled
enabled
enabled
enabled
enabled
enabled
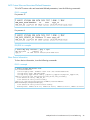
2.
If the port has not been configured, take the port offline before configuring it for the ESX host
by issuing the following HP 3PAR OS CLI command:
controlport offline [node:slot:port]
CAUTION: Before taking a port offline in preparation for a direct or fabric connection, you
should verify that the port has not been previously defined and that it is not already connected
to a host as this would interrupt the existing host connection.
If an HP 3PAR StoreServ Storage port is already configured for a direct or fabric connection,
you can ignore this step, as you do not have to take the port offline.
3.
To configure the port for the host, issue the following command, with the appropriate option
for the -ct parameter:
controlport config host -ct [loop | point] [node:slot:port]
For a direct connection:
Use the -ct loop parameter to specify a direct connection.
For a fabric connection:
Use the -ct point parameter to specify a fabric connection.
4.
Issue the controlport rst command to reset and register the new port definitions.
The following example shows how to set up a fabric connected port.
% controlport offline 1:5:1
% controlport config host -ct point 1:5:1
% controlport rst 1:5:1
Creating the Host Definition
Before connecting the ESX host to the HP 3PAR StoreServ Storage, a host definition needs to be
created that specifies a valid host persona for each HP 3PAR StoreServ Storage port that is to be
connected to a host HBA port through a fabric or direct connection. ESX/ESXi uses the generic
legacy host persona of 6 for HP 3PAR OS 3.1.1 or earlier.
As of HP 3PAR OS 3.1.2, a second host persona 11 (VMware), which enables asymmetric logical
unit access (ALUA) is available. Host persona 11 (VMware) is recommended for new ESX/ESXi
installations and is required for ESX/ESXi hosts configured as part of a HP 3PAR Peer Persistence
configuration. For ESX/ESXi with HP 3PAR Remote Copy, refer to the Remote Copy Users Guide
for the appropriate host persona to use in specific Remote Copy configurations.
NOTE: When changing an existing host persona from 6 to 11, a host reboot is required tor the
change to take effect. This is an offline process. See “Configuring ESX/ESXi Multipathing for Round
Robin via SATP PSP” (page 40) for the detailed procedure, as the host persona change should
coincide with changing the SATP rules on the host as well.
For both host persona 6 and persona 11, see the appropriate chapters in this guide for iSCSI,
Fibre Channel, or FCoE setup considerations.
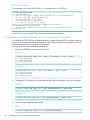
1. To display available host personas, issue the following command:
# showhost -listpersona
Configuring the HP 3PAR StoreServ Storage Running HP 3PAR OS 3.1.x or OS 2.3.x
9
2.
To create host definitions, issue the createhost command with the -persona option to
specify the persona and the host name.
For HP 3PAR OS 3.1.1 or earlier:
# createhost -persona 6 ESXserver1 10000000C9724AB2 10000000C97244FE
For HP 3PAR OS 3.1.2:
# createhost -persona 11 ESXserver1 10000000C9724AB2 10000000C97244FE
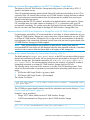
3.
To verify that the host has been created, issue the showhost command.
For HP 3PAR OS 3.1.1 or earlier, using persona 6:
# showhost
Id Name
Persona
0 ESXserver1 Generic-legacy
-WWN/iSCSI_Name10000000C9724AB2
Port
--- 10000000C97244FE ---
For HP 3PAR OS 3.1.2, using persona 11:
# showhost
Id Name
Persona
0 ESXserver2 VMware
-WWN/iSCSI_Name100000051EC33E00
Port
--- 100000051EC33E01 ---
Use showhost -persona to show the persona name and Id relationship.
# showhost -persona
Id Name
Persona_Id
0 ESXserver1
6
1 Esxserver2
11
Persona_Name
Generic-legacy
VMware
Persona_Caps
-SubLun, ALUA
NOTE: If the persona is not correctly set, then use the sethost -persona <host
number> <hostname> command to correct the issue, where host number is 6 (for HP 3PAR
OS 3.1.1 or earlier) or 11 (for HP 3PAR OS 3.1.2).
A reboot of the ESX host is required if host persona is changed to 11.
NOTE: See the HP 3PAR Command Line Interface Reference or the HP 3PAR Management Console
Users Guide for complete details on using the controlport, createhost, and showhost
commands.
These documents are available on the HP BSC website:
http://www.hp.com/go/bsc
Configuring the HP 3PAR StoreServ Storage Running HP 3PAR OS 2.2.x
This section describes the steps that are required to connect the HP 3PAR StoreServ Storage to an
ESX host over a Fibre Channel network and to create the host definitions when running HP 3PAR
OS 2.2.x.
10
Configuring the HP 3PAR StoreServ Storage for Fibre Channel
NOTE: For configurations that are intended to have more than one host type (for example, an
ESX host and a Windows host) connected to a shared HP 3PAR StoreServ Storage HBA port via
fabric connections, see to the Heterogeneous Host Support Guide on the HP BSC website for the
required HP 3PAR StoreServ Storage port settings and interoperability considerations:
http://www.hp.com/go/bsc
NOTE: By default, the VMware ESX host supports failover. For failover support, VVs should be
simultaneously exported down multiple paths to the host. To do this, create a host definition on the
HP 3PAR StoreServ Storage that includes the WWNs of multiple HBA ports on the hostand then
export the VLUNs to that host definition.
Required
The following setup must be completed before connecting the HP 3PAR StoreServ Storage port to
a device.
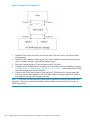
Setting Up the Ports
Before connecting the HP 3PAR StoreServ Storage to a host, the HP 3PAR StoreServ Storage port
persona must be specified. To set up the HP 3PAR StoreServ Storage ports for a direct or fabric
connection, issue the appropriate set of HP 3PAR OS CLI controlport commands for each port.
For direct connections, use persona 1 with VCN disabled.
# controlport persona 1 <node:slot:port>
# controlport vcn disable -f <node:slot:port>
Verify port persona 1, connection type loop, using the HP 3PAR OS CLI showport -par command.
For a fabric connection, use persona 7 with VCN disabled.
# controlport persona 7 <node:slot:port>
# controlport vcn disable -f <node:slot:port>
Verify port persona 7, connection type point, using the HP 3PAR OS CLI showport -par
command.
Configuring the HP 3PAR StoreServ Storage Running HP 3PAR OS 2.2.x
11
Creating the Host Definition
Before connecting the ESX host to the HP 3PAR StoreServ Storage, create a host definition for each
HP 3PAR StoreServ Storage that is to be connected to a host HBA port through a fabric or a direct
connection.
1. To create host definitions, issue the HP 3PAR OS CLI createhost command with the
appropriate host name. For example:
# createhost ESXserver1 10000000C9724AB2 10000000C97244FE
2.
To verify that the host has been created, issue the HP 3PAR OS CLI showhost command.
# showhost -persona
Id Name
-WWN/iSCSI_Name- Port
0 ESXserver1
10000000C9724AB2 --10000000C97244FE ---
3.
(Optional) You can create a host set using createhostset, which allows the addition of
multiple host names as a host definition set. A host set gives the convenience of exporting
storage volume to hosts which are in a cluster. The same storage volumes need to be exported
individually to each of the hosts, or they can be exported to a host set, which in turn will be
exported to each of the hosts defined in the host set.
# createhostset ESXCluster
# createhost -add ESXCluster ESXserver1
# createhost -add ESXCluster ESXserver2
# showhostset
Id Name
Members
0 ESXCluster ESXServer1 ESXServer2
NOTE: See the HP 3PAR Command Line Interface Reference or the HP 3PAR Management
Console Users Guide for complete details on using the controlport, createhost, and
showhost commands.
These documents are available on the HP BSC website:
http://www.hp.com/go/bsc
Setting Up and Zoning the Fabric
NOTE: This section does not apply when deploying HP Virtual Connect direct-attach FC storage
for HP 3PAR storage systems, where the HP 3PAR StoreServ Storage ports are cabled directly to
the uplink ports on the HP Virtual Connect FlexFabric 10 Gb/24-port Module for c-Class
BladeSystem. Zoning is automatically configured based on the Virtual Connect SAN Fabric and
server profile definitions.
For more information about HP Virtual Connect, HP Virtual Connect interconnect modules, and the
HP Virtual Connect direct-attach feature, see HP Virtual Connect documentation and the HP SAN
Design Reference Guide. This documentation is available on the HP BSC website:
http://www.hp.com/go/bsc
Fabric zoning controls which Fibre Channel end-devices have access to each other on the fabric.
Zoning also isolates the hostand HP 3PAR StoreServ Storage ports from Registered State Change
Notifications (RSCNs) that are irrelevant to these ports.
12
Configuring the HP 3PAR StoreServ Storage for Fibre Channel
You can set up fabric zoning by associating the device World Wide Names (WWNs) or the switch
ports with specified zones in the fabric. Although you can use either the WWN method or the port
zoning method with the HP 3PAR StoreServ Storage, the WWN zoning method is recommended
because the zone survives the changes of switch ports when cables are moved around on a fabric.
Required
Employ fabric zoning, using the methods provided by the switch vendor, to create relationships
between hostHBA ports and storage server ports before connecting the host HBA ports or HP 3PAR
StoreServ Storage ports to the fabric(s).
Fibre Channel switch vendors support the zoning of the fabric end-devices in different zoning
configurations. There are advantages and disadvantages with each zoning configuration. Choose
a zoning configuration based on your needs.
The HP 3PAR arrays support the following zoning configurations:
•
One initiator to one target per zone
•
One initiator to multiple targets per zone (zoning by HBA). This zoning configuration is
recommended for the HP 3PAR StoreServ Storage. Zoning by HBA is required for coexistence
with other HP Storage arrays.
NOTE: For high availability/clustered environments that require multiple initiators to access
the same set of target ports, HP recommends that separate zones be created for each initiator
with the same set of target ports.
NOTE: The storage targets in the zone can be from the same HP 3PAR StoreServ Storage,
multiple HP 3PAR StoreServ Storages , or a mixture of HP 3PAR and other HP storage systems.
For more information about using one initiator to multiple targets per zone, see Zoning by HBA in
the Best Practices chapter of the HP SAN Design Reference Guide. This document is available on
the HP BSC website:
http://www.hp.com/go/bsc
If you use an unsupported zoning configuration and an issue occurs, HP may require that you
implement one of the supported zoning configurations as part of the troubleshooting or corrective
action.
After configuring zoning and connecting each host HBA port and HP 3PAR StoreServ Storage port
to the fabric(s), verify the switch and zone configurations using the HP 3PAR OS CLI showhost
command, to ensure that each initiator is zoned with the correct target(s).
HP 3PAR Coexistence
The HP 3PAR StoreServ Storage array can coexist with other HP array families.
For supported HP arrays combinations and rules, see the HP SAN Design Reference Guide, available
on the HP BSC website:
http://www.hp.com/go/bsc
Configuration Guidelines for Fabric Vendors
Use the following fabric vendor guidelines before configuring ports on fabric(s) to which the
HP 3PAR StoreServ Storage connects.
•
Brocade switch ports that connect to a host HBA port or to an HP 3PAR StoreServ Storage
port should be set to their default mode. On Brocade 3xxx switches running Brocade firmware
Setting Up and Zoning the Fabric
13
3.0.2 or later, verify that each switch port is in the correct mode using the Brocade telnet
interface and the portcfgshow command, as follows:
brocade2_1:admin> portcfgshow
Ports
0 1 2 3
4 5 6 7
-----------------+--+--+--+--+----+--+--+-Speed
AN AN AN AN
AN AN AN AN
Trunk Port
ON ON ON ON
ON ON ON ON
Locked L_Port
.. .. .. ..
.. .. .. ..
Locked G_Port
.. .. .. ..
.. .. .. ..
Disabled E_Port
.. .. .. ..
.. .. .. ..
where AN:AutoNegotiate, ..:OFF, ??:INVALID.
The following fill-word modes are supported on a Brocade 8 G/s switch running FOS firmware
6.3.1a and later:
admin>portcfgfillword
Usage: portCfgFillWord PortNumber Mode [Passive]
Mode: 0/-idle-idle
- IDLE in Link Init, IDLE as fill word (default)
1/-arbff-arbff - ARBFF in Link Init, ARBFF as fill word
2/-idle-arbff - IDLE in Link Init, ARBFF as fill word (SW)
3/-aa-then-ia - If ARBFF/ARBFF failed, then do IDLE/ARBFF
HP recommends that you set the fill word to mode 3 (aa-then-ia), which is the preferred
mode using the portcfgfillword command. If the fill word is not correctly set, er_bad_os
counters (invalid ordered set) will increase when you use the portstatsshow command
while connected to 8 G HBA ports, as they need the ARBFF-ARBFF fill word. Mode 3 will
also work correctly for lower-speed HBAs, such as 4 Gb/2 Gb HBAs. For more information,
see the Fabric OS command Reference Manual supporting FOS 6.3.1a and the FOS release
notes.
In addition, some HP switches, such as the HP SN8000B 8-slot SAN backbone director switch,
the HP SN8000B 4-slot SAN director switch, the HP SN6000B 16 Gb FC switch, or the HP
SN3000B 16 Gb FC switch automatically select the proper fill-word mode 3 as the default
setting.
•
McDATA switch or director ports should be in their default modes as G or GX-port (depending
on the switch model), with their speed setting permitting them to autonegotiate.
•
Cisco switch ports that connect to HP 3PAR StoreServ Storage ports or host HBA ports should
be set to AdminMode = FX and AdminSpeed = auto port, with the speed set to auto negotiate.
•
QLogic switch ports should be set to port type GL-port and port speed auto-detect. QLogic
switch ports that connect to the HP 3PAR StoreServ Storage should be set to I/O Stream Guard
disable or auto, but never enable.
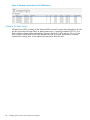
Target Port Limits and Specifications
To avoid overwhelming a target port and ensure continuous I/O operations, observe the following
limitations on a target port:
14
•
Maximum of 32 host ports per HP 3PAR StoreServ Storage port, with a maximum total of
1,024 host ports per HP 3PAR StoreServ Storage.
•
I/O queue depth on each HP 3PAR StoreServ Storage HBA model, as follows:
◦
QLogic 2G: 497
◦
LSI 2G: 510
◦
Emulex 4G: 959
Configuring the HP 3PAR StoreServ Storage for Fibre Channel
◦
HP 3PAR HBA 4G: 1638
◦
HP 3PAR HBA 8G: 3276 (HP 3PAR StoreServ 10000 and HP 3PAR StoreServ 7000
systems only)
•
The I/O queues are shared among the connected host HBA ports on a first-come, first-served
basis.
•
When all queues are in use and a host HBA port tries to initiate I/O, it receives a target queue
full response from the HP 3PAR StoreServ Storage port. This condition can result in erratic I/O
performance on each host. If this condition occurs, each host should be throttled so that it
cannot overrun the HP 3PAR StoreServ Storage port's queues when all hosts are delivering
their maximum number of I/O requests.
NOTE: When host ports can access multiple targets on fabric zones, the assigned target
number assigned by the host driver for each discovered target can change when the host is
booted and some targets are not present in the zone. This situation may change the device
node access point for devices during a host reboot. This issue can occur with any
fabric-connected storage, and is not specific to the HP 3PAR StoreServ Storage.
HP 3PAR Priority Optimization
The HP 3PAR Priority Optimization feature introduced in HP 3PAR OS versions 3.1.2.MU2 is a
more efficient and dynamic solution for managing server workloads and can be utilized as an
alternative to setting host I/O throttles. Using this feature, a storage administrator is able to share
storage resources more effectively by enforcing quality of service limits on the array. No special
settings are needed on the host side to obtain the benefit of Priority Optimization although certain
per target or per adapter throttle settings may need to be adjusted in rare cases. For complete
details of how to use Priority Optimization (Quality of Service) on HP 3PAR arrays, please read
the HP 3PAR Priority Optimization technical white paper available at http://www.hp.com/go/
bsc.
Persistent Ports
NOTE:
The Persistent Ports feature is supported only on HP 3PAR OS 3.1.2.
The Persistent Ports (or virtual ports) feature minimizes I/O disruption during an HP 3PAR Storage
online upgrade or node-down event. Currently, persistent ports are supported only with Fibre
Channel connections. Persistent Ports allows a Fibre Channel HP 3PAR Storage port to assume the
identity (port WWN) of a failed port while retaining its own identity. The solution uses the NPIV
feature for Fibre Channel. This feature does not work in direct-connect mode and is supported only
on Fibre Channel target ports that connect to Fibre Channel fabric and are in point-to-point mode
where both the active and partner ports share the same fabric.
Each Fibre Channel port has a partner port automatically assigned by the system. Where a given
physical port assumes the identity of its partner port, the assumed port is designated as a persistent
port. Array port failover and failback with Persistent Ports is transparent to most host-based
multipathing software which, in most cases, can keep all its I/O paths active.
The Persistent Ports feature is activated by default during node-down events (online upgrade or
node reboot). Port shutdown or reset events do not trigger this feature. Persistent Ports is enabled
by default starting with the HP 3PAR OS 3.1.2 software.
In the event that an HP 3PAR Storage node is downed during an online upgrade or node-down
event, the Fibre Channel target ports fail over to their partner ports. For example, in a two-node
HP 3PAR Storage array configuration, if ports 0:1:1, 0:5:1 and 1:1:1, 1:5:1 are connected to
the fabric, then if node 0 goes down, ports 0:1:1, 0:5:1 fail over to ports 1:1:1, 1:5:1 and become
active while ports 1:1:1, 1:5:1 remain active.
Setting Up and Zoning the Fabric
15
In HP 3PAR Storage arrays with more than two nodes, failover behavior occurs on node pairs;
that is, if node 0 goes down, ports on node 0 fail over to node 1, if node 2 goes down, ports on
node 2 fail over to node 3, and so on. Conversely, when node 1 goes down, ports on node 1 fail
over to node 0, and when node 3 goes down, ports on node 3 fail over to node 2. When the
downed node is up again, the failed-over ports automatically fail back to their original ports.
During the failover and failback process, a short pause in I/O could be experienced by the host.
Persistent Ports Setup and Connectivity Guidelines
For Persistent Ports to function properly, specific cabling setup and connectivity guidelines that
need to be followed can be found in the HP 3PAR Command Line Interface Administrator’s Manual,
“Using Persistent Ports for Nondisruptive Online Software Upgrades.” See this document for other
information about Persistent Ports as well.
The fabric switch ports connecting to the HP 3PAR array ports must support NPIV and have the
feature enabled in order for Persistent Ports to work.
The showport command output includes Partner and FailoverState columns that display
the partner port <node>:<slot>:<port> information and failover state information, respectively.
FailoverState values represent the failover state of the two ports listed in the N:S:P and
Partner columns. The FailoverState value can be one of the following:
•
none: No failover in operation
•
failover_pending: In the process of failing over to partner
•
failed_over: Failed over to partner
•
active: The partner port is failed over to this port
•
active_down: The partner port is failed over to this port, but this port is down
•
failback_pending: In the process of failing back from partner
Use the showport HP 3PAR CLI commands to get the state of the persistent ports. In the output of
the showport command shown below, under the Partner column, port 1:1:1 is the partner port
that 0:1:1 would fail over to and 0:1:1 is the partner port to which 1:1:1 would fail over. When
Persistent Ports is not active, the FailoverState for the ports would indicate none.
# showport
N:S:P Mode
Partner Failover
0:0:1 initiator
0:1:1 target
1:1:1
none
State
State
ready
----Node_WWN----
- Port_WWN/HW_Addr- Type
Protocol Label
50002ACFF70185E1
50002ACFF70185E1
disk
SAS
-
ready
2FF70002AC0185E1
2FF70002AC0185E1
host
FC
-
When a node is down during an online upgrade or node reboot, from the output of the showport
command, the FailoverState column would show that Persistent Ports is active. In the example
below, node 1 has gone down, Persistent Ports for 1:1:1 has become active on port 0:1:1, and
all filesystem I/O for port 1:1:1 is physically served by port 0:1:1.
# showport
N:S:P Mode
Partner Failover
0:0:1 initiator
0:1:1 target
1:1:1
active
16
State
State
ready
----Node_WWN----
- Port_WWN/HW_Addr- Type
Protocol Label
50002ACFF70185E1
50002ACFF70185E1
disk
SAS
-
ready
2FF70002AC0185E1
2FF70002AC0185E1
host
FC
-
Configuring the HP 3PAR StoreServ Storage for Fibre Channel
Before Persistent Ports is active, the output of the showhost command displays as follows:
# showhost
Id Name
1 server1
Persona
Generic
---------------WWN/iSCSI_Name--------------5001438009AE770E
5001438009AE770C
5001438009AE770E
5001438009AE770C
Port
0:1:1
0:1:1
1:1:1
1:1:1
When Persistent Ports is active, the output of the showhost command, under the Port column,
shows both the physical port and the physical port where Persistent Ports is active. In the example
below, port 0:1:1, logged in from each of the host HBA ports, appears twice, once for the physical
port and once again for the persistent port that is active on the physical port.
# showhost
Id Name
1 server1
Persona
Generic
---------------WWN/iSCSI_Name--------------5001438009AE770E
5001438009AE770C
5001438009AE770E
5001438009AE770C
Port
0:1:1
0:1:1
0:1:1
0:1:1
After the controller node has been successfully rebooted, the FailoverState for the ports changes
back to none, as shown in the following example:
After the node has been successfully rebooted, the node entry of node 0 reappears in the GUI and
I/O is still in progress.
Manually, you can perform failover and failback using the controlport failover <N:S:P>
and controlport failback <N:S:P> command options.
Persistent Ports Limitations
Persistent Ports Technical White Paper
To learn more about Persistent Ports, refer to the following White Paper:
http://h20195.www2.hp.com/V2/GetPDF.aspx/4AA4-4545ENW.pdf
Unsupported Configurations
The Persistent Ports feature is not supported with iSCSI and FCoE.
Setting Up and Zoning the Fabric
17
3 Configuring the HP 3PAR StoreServ Storage for iSCSI
This chapter explains how to establish an iSCSI connection between the HP 3PAR StoreServ Storage
and the VMware ESX host. If you are running specific CNA cards, a software or hardware iSCSI
initiator can be used. For details about hardware iSCSI configuration, see “Hardware iSCSI
Support” (page 25).
Software iSCSI Support
Setting Up the Ports for an iSCSI Connection
To establish an iSCSI connection between the HP 3PAR StoreServ Storage and the ESX host, you
need to set up each HP 3PAR StoreServ Storage iSCSI target port that will be connected to an
iSCSI initiator as described in the following steps.
1. A 10 Gb iSCSI connection, which is supported in the HP 3PAR StoreServ 10000 Storage and
the HP 3PAR StoreServ 7000 Storage, requires a one-time configuration using the
controlport command.
Issue the showport and showport -i commands to check the current CNA configuration.
For example:
# showport
N:S:P
Mode
State ----Node_WWN---- -Port_WWN/HW_Addr- Type Protocol
0:1:1 suspended config_wait
- cna
1:1:1 suspended config_wait
- cna
# showport -i
N:S:P Brand Model
0:1:1 QLOGIC QLE8242
1:1:1 QLOGIC QLE8242
2.
Rev Firmware
58 0.0.0.0
58 0.0.0.0
Serial
HWType
PCGLT0ARC1K3SK CNA
PCGLT0ARC1K3SK CNA
If State=config_wait or Firmware=0.0.0.0, use the controlport config iscsi
<n:s:p> command to configure, and then use the showport and showport -i commands
to verify the configuration setting.
For example:
# controlport config iscsi 0:1:1
# controlport config iscsi 1:1:1
# showport
N:S:P
Mode
State ----Node_WWN---- -Port_WWN/HW_Addr- Type Protocol
...
0:1:1
target
ready
2C27D7521F3E iscsi
iSCSI
...
1:1:1
target
ready
2C27D7521F3A iscsi
iSCSI
# showport -i
...
N:S:P Brand Model
...
0:1:1 QLOGIC QLE8242
1:1:1 QLOGIC QLE8242
18
Rev Firmware
58
58
Serial
HWType
4.8.76.48015 PCGLT0ARC1K3SK CNA
4.8.76.48015 PCGLT0ARC1K3SK CNA
Configuring the HP 3PAR StoreServ Storage for iSCSI
3.
Issue the HP 3PAR OS CLI showport -iscsi command to check the current settings of the
iSCSI ports:
# showport -iscsi
N:S:P State
IPAddr
iSNS_Port
0:1:1 offline 0.0.0.0
3205
1:1:1 offline 0.0.0.0
3205
0:1:1 offline 0.0.0.0
3205
1:1:1 offline 0.0.0.0
3205
4.
Netmask Gateway TPGT
MTU
Rate
DHCP iSNS_Prim iSNS_Sec
0.0.0.0 0.0.0.0
11
1500 n/a
0 0.0.0.0 0.0.0.0.0
0.0.0.0 0.0.0.0
12
1500 n/a
0 0.0.0.0 0.0.0.0.0
0.0.0.0 0.0.0.0
111
1500 n/a
0 0.0.0.0 0.0.0.0.0
0.0.0.0 0.0.0.0
112
1500 n/a
0 0.0.0.0 0.0.0.0.0
Issue the HP 3PAR OS CLI controliscsiport command to set up the IP address and
netmask address of the iSCSI target ports.
#
#
#
#
controliscsiport
controliscsiport
controliscsiport
controliscsiport
addr
addr
addr
addr
10.1.1.100
10.1.1.102
10.1.1.101
10.1.1.103
255.255.255.0
255.255.255.0
255.255.255.0
255.255.255.0
-f
-f
-f
-f
0:1:1
0:1:1
0:1:2
0:1:2
NOTE: Make sure the IP switch ports where the HP 3PAR StoreServ Storage iSCSI target
port(s) and iSCSI initiator host are connected are able to communicate with each other by
using the vmkping command on the ESX host. (The VMware ESX host iSCSI initiator must be
configured to perform this operation in accordance with “Configuring the Host for an iSCSI
Connection” (page 65).)
To verify that the ESX host can see the HP 3PAR StoreServ Storage, use the vmkpingcommand:
# vmkping 10.1.1.100
To verify that the HP 3PAR StoreServ Storage can see the ESX host, issue the following
command:
# controliscsiport ping 10.1.1.10 0:1:1
NOTE: A maximum of 64 host iSCSI initiator ports can be connected to any one HP 3PAR
StoreServ Storage target port.
NOTE: When the host initiator port and the HP 3PAR OS target port are in different IP
subnets, the gateway address for the HP 3PAR OS port should be configured in order to avoid
unexpected behavior.
Creating the iSCSI Host Definition on an HP 3PAR StoreServ Storage Running HP 3PAR
OS 3.1.x and OS 2.3.x
Create a host definition that ties all of the connections from a single host to a host name. Prior to
creating a host definition using the following steps, the HP 3PAR StoreServ Storage iSCSI target
ports must have been set up and an iSCSI connection/session must be established. The iSCSI
connection/session is established by following the steps in “Setting Up the Ports for an iSCSI
Connection” (page 18) and the steps in “Configuring the Host for an iSCSI Connection” (page 65)
through “Configuring the VMware iSCSI Initiator” (page 72) (ESX host setup).
Software iSCSI Support
19
ESX/ESXi uses the generic legacy host persona of 6 for HP 3PAR OS 3.1.1 or earlier. As of HP
3PAR OS 3.1.2, a second host persona 11 (VMware), which enables asymmetric logical unit
access (ALUA) is available. Host persona 11 (VMware) is recommended for new ESX/ESXi
installations and is required for ESX/ESXi hosts configured as part of a HP 3PAR Peer Persistence
configuration. For ESX/ESXi with HP 3PAR Remote Copy, refer to the Remote Copy Users Guide
for the appropriate host persona to use in specific Remote Copy configurations.
The following example of host definition creation depicts a VMware iSCSI initiator
iqn.1998-01.com.vmware:sqahpbc02icm5-40e25c56 on an ESX host (the only iSCSI
initiator for this server in this case) connecting through a VLAN to a pair of HP 3PAR StoreServ
Storage iSCSI ports. The host definition is given the name ESX1 and the host persona is set to 6
(Generic-legacy).
1. Issue the HP 3PAR OS CLI showhost command to verify that the host iSCSI initiators are
connected to the HP 3PAR StoreServ Storage iSCSI target ports.
# showhost
Id Name Persona ----------------WWN/iSCSI_Name---------------- Port
-- -- iqn.1998-01.com.vmware:sqahpbc02icm5-40e25c56 0:1:2
-- -- iqn.1998-01.com.vmware:sqahpbc02icm5-40e25c56 1:1:2
-- -- iqn.1998-01.com.vmware:dl360g8-02-42b20fff
0:1:2
-- -- iqn.1998-01.com.vmware:dl360g8-02-42b20fff
1:1:2
2.
Issue the HP 3PAR OS CLI createhost command to create the appropriate host definition
entry.
# createhost -iscsi -persona
6 ESX1 iqn.1998-01.com.vmware:sqahpbc02icm5-40e25c56
or:
# createhost -iscsi -persona 11 ESX2 iqn.1998-01.com.vmware:dl360g8-02-42b20fff
3.
Issue the HP 3PAR OS CLI showhost command to verify that the host entry has been created.
# showhost
Id Name Persona ----------------WWN/iSCSI_Name---------------- Port
0 ESX1 Generic-legacy
iqn.1998-01.com.vmware:sqahpbc02icm5-40e25c56 0:1:2
iqn.1998-01.com.vmware:sqahpbc02icm5-40e25c56 1:1:2
1 ESX2 VMware
4.
iqn.1998-01.com.vmware:dl360g8-02-42b20fff
iqn.1998-01.com.vmware:dl360g8-02-42b20fff
0:1:2
1:1:2
To test the connection, create some temporary virtual volumes and export the VLUNs to the
host.
NOTE: See “Allocating Storage for Access by the ESX Host” (page 78) for complete details
on creating, exporting and discovering storage for an iSCSI connection.
5.
On the ESX iSCSI initiator host, perform a rescan and verify that the disks have been
discovered.
Creating the iSCSI Host Definition on an HP 3PAR StoreServ Storage Running HP 3PAR
OS 2.2.x
Create a host definition that ties all of the connections from a single host to a host name. Prior to
creating a host definition using the following steps, the HP 3PAR StoreServ Storage iSCSI target
20
Configuring the HP 3PAR StoreServ Storage for iSCSI
ports must have been set up and an iSCSI connection/session must be established. The iSCSI
connection/session is established by following the steps in “Setting Up the Ports for an iSCSI
Connection” (page 18) and the steps in “Configuring the Host for an iSCSI Connection” (page 65)
through section “Configuring the VMware iSCSI Initiator” (page 72) (ESX host setup).
The following example of host definition creation depicts a VMware iSCSI initiator
iqn.1998-01.com.vmware:sqahpbc02icm5-40e25c56on an ESX host (the only iSCSI
initiator for this server in this case) connecting through a VLAN to a pair of HP 3PAR StoreServ
Storage iSCSI ports. The host definition is given the name ESX1.
1. Issue the HP 3PAR OS CLI showhost command to verify that the host iSCSI initiators are
connected to the HP 3PAR StoreServ Storage iSCSI target ports.
# showhost
Id Name Persona ----------------WWN/iSCSI_Name---------------- Port
-- -iqn.1998-01.com.vmware:sqahpbc02icm5-40e25c56 0:1:2
-- -iqn.1998-01.com.vmware:sqahpbc02icm5-40e25c56 1:1:2
2.
Issue the HP 3PAR OS CLI createhost command to create the appropriate host entry.
# createhost -iscsi ESX1 iqn.1998-01.com.vmware:sqahpbc02icm5-40e25c56
3.
Issue the HP 3PAR OS CLI showhost command to verify that the host entry has been created.
# showhost
Id Name ----------------WWN/iSCSI_Name---------------- Port
0 ESX1 iqn.1998-01.com.vmware:sqahpbc02icm5-40e25c56 0:1:2
iqn.1998-01.com.vmware:sqahpbc02icm5-40e25c56 1:1:2
4.
To test the connection, create some temporary virtual volumes and export the VLUNs to the
host.
NOTE: See “Allocating Storage for Access by the ESX Host” (page 78) for complete details
on creating, exporting and discovering storage for an iSCSI connection.
5.
On the ESX iSCSI initiator host, perform a rescan and verify that the disks have been
discovered.
Setting Up and Configuring CHAP Authentication
Enabling Host CHAP is an option that can be set up at the ESX system administrator's discretion.
The following example outlines the procedures for host (initiator) CHAP which is available as of
ESX 3.x. As of ESX 4.0, mutual (bidirectional, initiator-target) CHAP is also available.
NOTE:
1.
CHAP is available in ESX 3.x, also in ESX 4.x and ESX 5.x.
Issue the HP 3PAR OS CLI showhost command to verify that a host definition has been
created on HP 3PAR StoreServ Storage for the ESX host that will have CHAP enabled.
# showhost
Id Name
0 ESX1
----------------WWN/iSCSI_Name---------------- Port
iqn.1998-01.com.vmware:hpdl380-01-11a38a59
0:1:2
iqn.1998-01.com.vmware:hpdl380-01-11a38a59
1:1:2
Software iSCSI Support
21
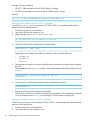
The following example uses the CHAP secret (CHAP password) host_secret3 for the ESX
host. Be aware that the CHAP secret must be at least 12 characters long.
2.
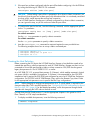
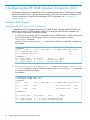
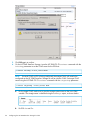
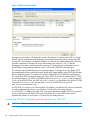
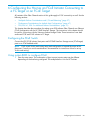
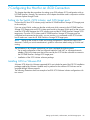
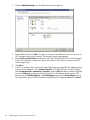
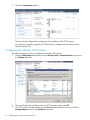
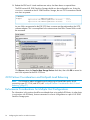
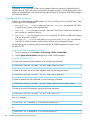
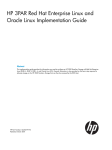
On the ESX host’s VI/vSphere client, open the Storage Adapters tab, then select the iSCSI
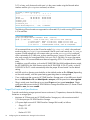
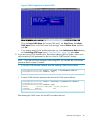
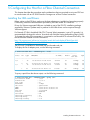
Software Adapter, and select the Properties link. Then, on the General tab, click CHAP.
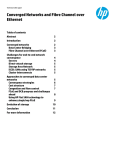
For ESX 3.5, select the CHAP Authentication tab, and then select the Use the following CHAP
credentials radio button.
Figure 1 CHAP Authentication in ESX 3.5
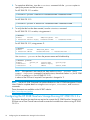
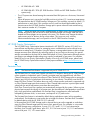
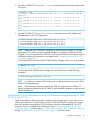
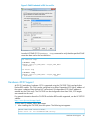
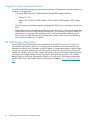
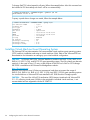
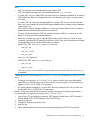
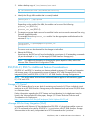
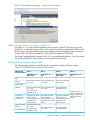
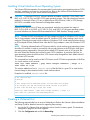
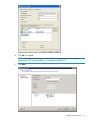
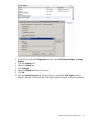
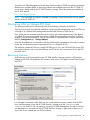
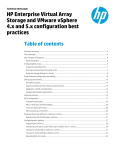
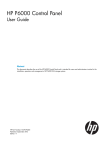
For ESX/ESXi 4.x or ESX/ESXi 5.x, select the Use initiator name check box.
22
Configuring the HP 3PAR StoreServ Storage for iSCSI
Figure 2 CHAP Credentials in ESX/ESXi 4.x or ESX/ESXi 5.x
3.
4.
Enter the CHAP Secret (must be at least 12 characters long). Use the same secret that you
enter on the storage side.
Click OK when you are done. A warning screen appears indicating that a reboot of the ESX
host is required.
NOTE: A server reboot is required for ESX 3.5. For ESX 4.x and ESXi 5.x, a rescan of the
HBA should pick up the changes.
Software iSCSI Support
23
5.
6.
Click OK again to confirm.
On the HP 3PAR StoreServ Storage, issue the HP 3PAR OS CLI sethost command with the
initchap parameter to set the CHAP secret for the ESX host.
# sethost initchap -f host_secret3 ESX1
NOTE: If mutual CHAP on ESX is being configured, then target CHAP will need to be
configured on the HP 3PAR StoreServ Storage as well as initiator CHAP. Set target CHAP
secret using the HP 3PAR OS CLI sethost command with the targetchap parameter.
# sethost targetchap -f host_secret3 ESX1
24
a.
For the target CHAP, make sure to give the storage system name as the Name field
variable. The storage name is obtained using the showsys output, as shown below.
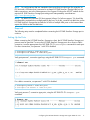
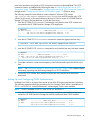
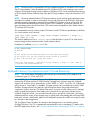
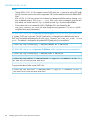
b.
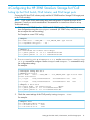
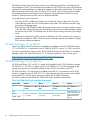
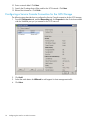
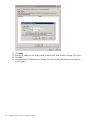
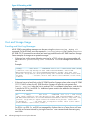
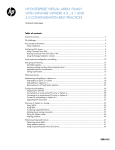
For ESX 4.x and 5.x:
Configuring the HP 3PAR StoreServ Storage for iSCSI
Figure 3 CHAP Credentials in ESX 4.x and 5.x
Issue the HP 3PAR OS CLI showhost -chap command to verify that the specified CHAP
secret has been set for the host definition.
For Initiator chap
# showhost -chap
Id Name -Initiator_CHAP_Name- -Target_CHAP_Name0 ESX1 ESX1 -For mutual chap
# showhost -chap
Id Name -Initiator_CHAP_Name- -Target_CHAP_Name0 ESX1 ESX1
s331
Hardware iSCSI Support
At ESX 5.0 and above, hardware iSCSI is supported using the CN1100E CNA card and other
Emulex BE3 models. This CNA can be configured using either Dependent iSCSI (the IP address of
the system is obtained from the host NIC connections) or Independent iSCSI (the IP address is
entered into the CNA card). The CN1100E can be configured to boot from SAN; SCSI targets
are entered into the card.
For general information about the CN1100E and other BE3 models supported, see the HP SPOCK
website:
http://www.hp.com/storage/spock
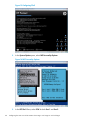
To set a static IP address, follow these steps:
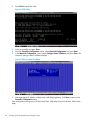
1. After installing the CN1100E, boot the system. The following text appears :
Emulex 10Gb iSCSI Initiator BIOS..
Press <Ctrl> <S> for iSCSISelect(TM) Utility
Hardware iSCSI Support
25
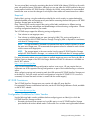
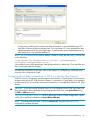
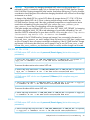
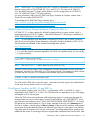
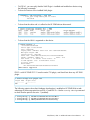
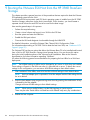
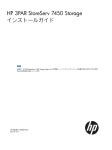
2.
Press Ctrl+S to enter the utility.
Figure 4 iSCSI Utility
3.
4.
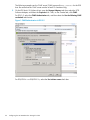
5.
Select a controller and press Enter.
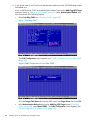
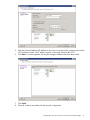
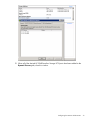
From the Controller Configuration screen, select Network Configuration and press Enter.
In the Network Configuration screen, select Configure Static IP Address and press Enter. The
screen for setting a static IP address displays.
Figure 5 Setting a Static IP Address
6.
After entering the IP address, subnet mask, and default gateway, click Save to return to the
Controller Configuration menu.
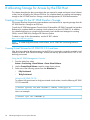
If the configuration being set up will be booted from SAN rather than from the host, follow these
steps.
26
Configuring the HP 3PAR StoreServ Storage for iSCSI
1.
After entering the iSCSI Initiator Configuration screen, which will be the first screen displayed,
obtain the IQN for the card and create a host definition on the HP 3PAR StoreServ Storage.
For example:
# createhost –iscsi –persona 11 Esx50Sys1 iqn.1990-07.com.emulex:a0-b3-cc-1c-94-e1
2.
3.
4.
5.
6.
7.
Assign a VLUN to this host definition to be used as the SAN boot LUN.
From the Controller Configuration menu, select Controller Properties.
In the properties screen, verify that boot support is enabled. If it is not, scroll to Boot Support
and enable it, then save and exit this screen.
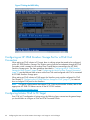
from the Controller Configuration menu, select iSCSI Target Configuration.
In the iSCSI Target Configuration menu, select Add New iSCSI Target and press Enter.
Fill in the information for the first iSCSI target. Make sure Boot Target is set to Yes.
Figure 6 Adding an iSCSI Target
8. After the information is filled in, click Ping to verify connectivity.
9. After a successful ping, click Save/Login.
10. After both controllers have been configured, issue the showiscsisession command to
display the iSCSI sessions on the HP 3PAR StoreServ Storage and the host. If everything is
configured correctly, the displays should appear as follows:
root@jnodec103140:S99814# showiscsisession
0:2:1
10.101.0.100
21
15
1 iqn.1990-07.com.emulex:a0-b3-cc-1c-94-e1
2012-09-24 09:57:58 PDT
1:2:1
10.101.1.100 121
15
1 iqn.1990-07.com.emulex:a0-b3-cc-1c-94-e1
2012-09-24 09:57:58 PDT
root@jnodec103140:S99814# showhost -d Esx50Sys1
1 Esx50Sys1
VMware iqn.1990-07.com.emulex:a0-b3-cc-1c-94-e1 0:2:1 10.101.0.100
1 Esx509Sys1 VMware iqn.1990-07.com.emulex:a0-b3-cc-1c-94-e1 1:2:1 10.101.1.100
Hardware iSCSI Support
27
11. If you do not want to use CHAP as an authentication method, exit the CN1100E setup screens
and reboot now.
If you would like to use CHAP as an authentication method, return to the Add/Ping iSCSI Target
screen as shown in “Adding an iSCSI Target” (page 27), select Authentication Method, and
then choose one of the following options:
•
Select One-Way CHAP (see “One-Way CHAP” (page 28)).
Figure 7 One-Way CHAP
The CHAP Configuration screen appears (see “CHAP Configuration for One-Way CHAP”
(page 28)).
Figure 8 CHAP Configuration for One-Way CHAP
Fill in the Target CHAP Name (the initiator IQN name) and Target Secret, then click OK.
•
28
In the Authentication Method setting on the Add-Ping iSCSI Target screen (“One-Way
CHAP” (page 28)), select Mutual CHAP. The CHAP Configuration screen appears (see
“CHAP Configuration for Mutual CHAP” (page 29)).
Configuring the HP 3PAR StoreServ Storage for iSCSI
Figure 9 CHAP Configuration for Mutual CHAP
Fill in the Target CHAP Name (the initiator IQN name), the Target Secret, the Initiator
CHAP Name (which is the DNS name of the storage), and an Initiator Secret, and then
click OK.
•
If you want to remove CHAP authentication later on, in the Authentication Method setting
on the Add-Ping iSCSI Target screen (“One-Way CHAP” (page 28)), select None.
12. If you have set up CHAP authentication, then before rebooting the host system, make sure to
set the matching CHAP parameters for the host in the HP 3PAR StoreServ Storage.
NOTE: If you do not want to configure CHAP using BIOS, you can alter the iSCSI initiator
properties after the system is booted.
•
If one-way CHAP has been selected, enter the matching CHAP secret as follows:
root@jnodec103140:S99814# sethost initchap -f aaaaaabbbbbb EsxHost1
root@jnodec103140:S99814# showhost -chap
•
If mutual CHAP has been selected, enter the mutual CHAP secret as follows:
root@jnodec103140:S99814# sethost targetchap -f bbbbbbcccccc EsxHost1
root@jnodec103140:S99814#
root@jnodec103140:S99814# showhost -chap
Id Name
-Initiator_CHAP_Name- -Target_CHAP_Name1 EsxHost1
EsxHost1
S814
root@jnodec103140:S99814#
After entering the CHAP secret, exit the BIOS and reboot the host.
Hardware iSCSI Support
29
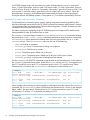
Target Port Limits and Specifications
To avoid overwhelming a target port and ensure continuous I/O operations, observe the following
limitations on a target port:
•
I/O queue depth on each HP 3PAR StoreServ Storage HBA model, as follows:
◦
QLogic 1G: 512
◦
QLogic 10G: 2048 (HP 3PAR StoreServ 10000 and HP 3PAR StoreServ 7000 systems
only)
•
The I/O queues are shared among the connected host HBA ports on a first-come, first-served
basis.
•
When all queues are in use and a host HBA port tries to initiate I/O, it receives a target queue
full response from the HP 3PAR StoreServ Storage port. This condition can result in erratic I/O
performance on each host. If this condition occurs, each host should be throttled so that it
cannot overrun the HP 3PAR StoreServ Storage port's queues when all hosts are delivering
their maximum number of I/O requests.
HP 3PAR Priority Optimization
The HP 3PAR Priority Optimization feature introduced in HP 3PAR OS versions 3.1.2.MU2 is a
more efficient and dynamic solution for managing server workloads and can be utilized as an
alternative to setting host I/O throttles. Using this feature, a storage administrator is able to share
storage resources more effectively by enforcing quality of service limits on the array. No special
settings are needed on the host side to obtain the benefit of Priority Optimization although certain
per target or per adapter throttle settings may need to be adjusted in rare cases. For complete
details of how to use Priority Optimization (Quality of Service) on HP 3PAR arrays, please read
the HP 3PAR Priority Optimization technical white paper available at http://www.hp.com/go/
bsc.
30
Configuring the HP 3PAR StoreServ Storage for iSCSI
4 Configuring the HP 3PAR StoreServ Storage for FCoE
Setting Up the FCoE Switch, FCoE Initiator, and FCoE target ports
Connect the ESX host FCoE initiator port(s) and the HP 3PAR StoreServ Storage FCoE target ports
to the FCoE switch(es).
NOTE: FCoE switch VLANs and routing setup and configuration is beyond the scope of this
document. Consult your switch manufacturer's documentation for instructions of how to set up
VLANs and routing.
1.
CNA ports on HP 3PAR StoreServ 10000 and HP 3PAR StoreServ 7000 arrays require a one
time configuration using the controlport command. (HP 3PAR T-class, and F-class arrays
do not require this one-time setting.)
For Example on a new FCoE config:
# showport
N:S:P Mode State ----Node_WWN---- -Port_WWN/HW_Addr- Type Protocol
0:3:1 suspended config_wait - - cna 0:3:2 suspended config_wait - - cna -
# showport -i
N:S:P Brand Model Rev Firmware Serial HWType
0:3:1 QLOGIC QLE8242 58 0.0.0.0 PCGLT0ARC1K3U4 CNA
0:3:2 QLOGIC QLE8242 58 0.0.0.0 PCGLT0ARC1K3U4 CNA
2.
If State=config_wait or Firmware=0.0.0.0, use the controlport config fcoe
<n:s:p> command to configure. Use the showport and showport -i commands to verify
the configuration setting.
For example:
# controlport config fcoe 0:3:1
# controlport config fcoe 0:3:2
# showport 0:3:1 0:3:2
N:S:P
Mode
State ----Node_WWN---- -Port_WWN/HW_Addr- Type Protocol Label
Partner FailoverState
0:3:1 target
ready 2FF70002AC000121
20310002AC000121 host
FCoE
0:3:2 target
ready 2FF70002AC000121
20320002AC000121 free
FCoE
# showport -i 0:3:1 0:3:2
N:S:P Brand Model
Rev Firmware Serial
HWType
0:3:1 QLOGIC QLE8242 58 4.11.122 PCGLT0ARC1K3U4 CNA
0:3:2 QLOGIC QLE8242 58 4.11.122 PCGLT0ARC1K3U4 CNA
3.
Check the current settings of the FCoE ports by issuing showport -fcoe.
For example:
# showport -fcoe
N:S:P ENode_MAC_Address PFC_Mask
0:3:1 00-02-AC-07-01-21
0x08
0:3:2 00-02-AC-06-01-21
0x00
Setting Up the FCoE Switch, FCoE Initiator, and FCoE target ports
31
NOTE: If changing the config from iSCSI to FCoE, follow the steps below.
1. Issue the showportcommand.
# showport
0:3:1
target
0:3:2
target
2.
ready
ready
-
000E1E05BEE6 iscsi
000E1E05BEE2 iscsi
iSCSI
iSCSI
-
-
Turn off the iSCSI ports:
# controlport offline 0:3:1
# controlport offline 0:3:2
showport
0:3:1 target offline - 000E1E05BEE2 iscsi iSCSI0:3:2 target offline 000E1E05BEE2 iscsi iSCSI
3.
Change the topology to FCoE:
# controlport config fcoe 0:3:1
# controlport config fcoe 0:3:2
controlport rst 0:3:1
controlport rst 0:3:2
0:3:1 target offline - 000E1E05BEE2 iscsi iSCSI0:3:2 target offline 000E1E05BEE2 iscsi iSCSI
showport
0:3:1
target
ready 2FF70002AC000121
20310002AC000121 host
FCoE
0:3:2
target
ready 2FF70002AC000121
20320002AC000121 free
FCoE
-
4.
Check the current settings of the FCoE ports by issuing showport -fcoe.
For example:
# showport -fcoe
N:S:P ENode_MAC_Address PFC_Mask
0:3:1 00-02-AC-07-01-21
0x08
0:3:2 00-02-AC-06-01-21
0x00
32
Configuring the HP 3PAR StoreServ Storage for FCoE
-
Creating the Host Definition
Before connecting the ESX host to the HP 3PAR StoreServ Storage, a host definition needs to be
created that specifies a valid host persona (host mode) for each HP 3PAR StoreServ Storage port
that is to be connected to a host HBA port through a fabric or direct connection.
•
ESX/ESXi uses the generic legacy host persona of 6 for HP 3PAR OS 3.1.1 or earlier.
•
As of HP 3PAR OS 3.1.2, a second host persona 11 (VMware), which enables asymmetric
logical unit access (ALUA) is available.
•
◦
Host persona 11 (VMware) is recommended for new ESX/ESXi installations and is required
for ESX/ESXi hosts configured as part of a HP 3PAR Peer Persistence configuration.
◦
Host persona 11 (VMware) is required for FCoE end-to-end (FCoE target) configurations.
For ESX/ESXi with HP 3PAR Remote Copy, refer to the Remote Copy Users Guide for the
appropriate host persona to use in specific Remote Copy configurations.
NOTE: When changing an existing host persona from 6 to 11, a host reboot is required tor the
change to take effect. This is an offline process. See “Configuring ESX/ESXi Multipathing for Round
Robin via SATP PSP” (page 40) for the detailed procedure, as the host persona change should
coincide with changing the SATP rules on the host as well.
For both host persona 6 and persona 11, see the appropriate chapters in this guide for host server
FCoE setup considerations.
1. To display available host personas, issue the following command:
# showhost -listpersona
2.
To create host definitions, issue the createhost command with the -persona option to
specify the persona and the host name.
For HP 3PAR OS 3.1.1 or earlier:
# createhost -persona 6 ESXserver1 10000000C9724AB2 10000000C97244FE
For HP 3PAR OS 3.1.2:
# createhost -persona 11 ESXserver1 10000000C9724AB2 10000000C97244FE
3.
To verify that the host has been created, issue the showhost command.
For HP 3PAR OS 3.1.1 or earlier, using persona 6:
# showhost
Id Name
Persona
0 ESXserver1 Generic-legacy
-WWN/iSCSI_Name10000000C9724AB2
Port
--- 10000000C97244FE ---
For HP 3PAR OS 3.1.2, using persona 11:
# showhost
Id Name
Persona
0 ESXserver2 VMware
-WWN/iSCSI_Name100000051EC33E00
Port
--- 100000051EC33E01 ---
Creating the Host Definition
33
Use showhost -persona to show the persona name and Id relationship.
# showhost -persona
Id Name
Persona_Id
0 ESXserver1
6
1 Esxserver2
11
Persona_Name
Generic-legacy
VMware
Persona_Caps
-SubLun, ALUA
NOTE: If the persona is not correctly set, then use the sethost -persona <host
number> <hostname> command to correct the issue, where host number is 6 (for HP 3PAR
OS 3.1.1 or earlier) or 11 (for HP 3PAR OS 3.1.2).
A reboot of the ESX host is required if host persona is changed to 11.
NOTE: See the HP 3PAR Command Line Interface Reference or the HP 3PAR Management Console
Users Guide for complete details on using the controlport, createhost, and showhost
commands.
These documents are available on the HP BSC website:
http://www.hp.com/go/bsc
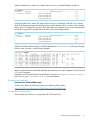
Target Port Limits and Specifications
To avoid overwhelming a target port and ensure continuous I/O operations, observe the following
limitations on a target port:
•
I/O queue depth on each HP 3PAR StoreServ Storage HBA model, as follows:
◦
QLogic CNA: 1748 (HP 3PAR StoreServ 10000 and HP 3PAR StoreServ 7000 systems
only)
•
The I/O queues are shared among the connected host HBA ports on a first-come, first-served
basis.
•
When all queues are in use and a host HBA port tries to initiate I/O, it receives a target queue
full response from the HP 3PAR StoreServ Storage port. This condition can result in erratic I/O
performance on each host. If this condition occurs, each host should be throttled so that it
cannot overrun the HP 3PAR StoreServ Storage port's queues when all hosts are delivering
their maximum number of I/O requests.
NOTE: When host ports can access multiple targets on fabric zones, the assigned target number
assigned by the host driver for each discovered target can change when the host is booted and
some targets are not present in the zone. This situation may change the device node access point
for devices during a host reboot. This issue can occur with any fabric-connected storage, and is
not specific to the HP 3PAR StoreServ Storage.
HP 3PAR Priority Optimization
The HP 3PAR Priority Optimization feature introduced in HP 3PAR OS versions 3.1.2.MU2 is a
more efficient and dynamic solution for managing server workloads and can be utilized as an
alternative to setting host I/O throttles. Using this feature, a storage administrator is able to share
storage resources more effectively by enforcing quality of service limits on the array. No special
settings are needed on the host side to obtain the benefit of Priority Optimization although certain
per target or per adapter throttle settings may need to be adjusted in rare cases. For complete
details of how to use Priority Optimization (Quality of Service) on HP 3PAR arrays, please read
the HP 3PAR Priority Optimization technical white paper available at http://www.hp.com/go/
bsc.
34
Configuring the HP 3PAR StoreServ Storage for FCoE
5 Configuring the Host for a Fibre Channel Connection
This chapter describes the procedures and considerations that are required to set up an ESX host
to communicate with an HP 3PAR StoreServ Storage over a Fibre Channel connection.
Installing the HBA and Drivers
Before setting up the ESX host, make sure the host adapters are installed and operating properly.
If necessary, consult the documentation provided by the HBA vendor for instructions.
Drivers for VMware supported HBAs are included as part of the ESX OS installation package
supplied by VMware. Updates and/or patches for the HBA drivers can be acquired through
VMware support.
For Brocade FC HBA, the default Path TOV (Time-out Value) parameter is set to 30 seconds. It is
recommended to change this value to 14 seconds with VMware Native Multipathing Plugin (NMP).
To change the value of this parameter, it is required to use Brocade BCU command line utility. See
the see VMware website for more information:
http://kb.vmware.com/selfservice/microsites/search.do?cmd=displayKC&docType=kc&
docTypeID=DT_KB_1_1&externalId=2001842
The BCU tool is available for download from the Brocade web site.
To display the list of adapter ports, run the following command
# esxcli brocade bcu --command="port --list"
--------------------------------------------------------------------------Port#
FN
Type
PWWN/MAC
FC Addr/
Media
State
Eth dev
--------------------------------------------------------------------------1/0
fc
10:00:00:05:1e:dc:f3:2f
091e00
sw
Linkup
1/1
Spd
8G
0
-
fc
fc
10:00:00:05:1e:dc:f3:2f
10:00:00:05:1e:dc:f3:30
091e00
673000
sw
sw
Linkup
Linkup
8G
8G
1
fc
10:00:00:05:1e:dc:f3:30
673000
sw
Linkup
8G
To query a port# from the above output, run the following command:
# esxcli brocade bcu --command="vhba --query 1/0"
PCI Function Index
: 1/0/0
Firmware Ver
: 3.0.0.0
Port type
: FC
Bandwidth
: 8 Gbps
IOC state
: operational
PWWN
: 10:00:00:05:1e:dc:f3:2f
NWWN
: 20:00:00:05:1e:dc:f3:2f
Path TOV
: 30 seconds
Portlog
: Enabled
IO Profile
: Off
Interrupt coalescing
: on
Interrupt delay
: 0 us
Interrupt latency
: 0 us
Installing the HBA and Drivers
35
To change Path TOV value (repeat for all ports) follow the example below. Also this command can
be included in ESX host startup such that it will be run automatically.
# esxcli brocade bcu --command="fcpim --pathtov 1/0 14"
path timeout is set to 14
To query a port# after a change was made, follow the example below:
# esxcli brocade bcu --command="vhba --query 1/0"
PCI Function Index
: 1/0/0
Firmware Ver
: 3.0.0.0
Port type
: FC
Bandwidth
: 8 Gbps
IOC state
: operational
PWWN
: 10:00:00:05:1e:dc:f3:2f
NWWN
: 20:00:00:05:1e:dc:f3:2f
Path TOV
: 14 seconds
Portlog
: Enabled
IO Profile
: Off
Interrupt coalescing
: on
Interrupt delay
: 0 us
Interrupt latency
: 0 us
Installing Virtual Machine Guest Operating System
The VMware ESX host documentation lists recommended virtual machine guest operating systems
(GOS) and their installation and setup as virtual machines (VMs). Refer to the VMware ESX host
documentation for information on setting up your virtual machine configuration.
CAUTION: In VMware KB 51306, VMware identifies a problem with RHEL 5 (GA), RHEL 4 U4,
RHEL 4 U3, SLES 10 (GA), and SLES 9 SP3 guest operating systems. Their file systems may become
read-only in the event of busy I/O retry or path failover of the ESX host’s SAN or iSCSI storage.
KB 51306 is available on the VMware Knowledge Base website:
http://kb.vmware.com
Because of this known issue, HP does not recommend, and does not support the usage of
RHEL 5 (GA), RHEL 4 U4, RHEL 4 U3, SLES 10 (GA), and SLES 9 SP3 as guest operating systems
for virtual machines on VMware ESX hosts attached to HP 3PAR StoreServ Storage systems.
CAUTION: The use of the N-Port ID Virtualization (NPIV) feature introduced with VMware ESX
3.5 - 5.0, allowing virtual ports/WWNs to be assigned to individual virtual machines, is not
recommended and not supported with the HP 3PAR OS.
36
Configuring the Host for a Fibre Channel Connection
NOTE: VMware and HP recommend the LSI logic adapter emulation for Windows 2003 Servers.
The LSI Logic adapter is also the default option for Windows 2003 when creating a new virtual
machine. HP testing has noted a high incidence of Windows 2003 virtual machine failures during
an ESX multipath failover/failback event when the BUS Logic adapter is used with Windows 2003
VMs.
NOTE: HP testing indicates that the SCSI timeout value for virtual machine guest operating systems
should be 60 seconds in order to successfully ride out path failovers at the ESX layer. Most guest
operating systems supported by VMware have a default SCSI timeout value of 60 seconds, but
this value should be checked and verified for each GOS installation. In particular, Red Hat 4.x
guest operating systems should have their SCSI timeout value changed from their default value of
30 seconds to 60 seconds.
This command line can be used to set the SCSI timeout on all SCSI devices presented to a Red Hat
4.x virtual machine to 60 seconds:
find /sys -name timeout | grep "host.*target.*timeout" | xargs -n 1
echo "echo 60 >"|sh
This must be added as a line in /etc/rc.local of the Red Hat 4.x guest OS in order for the
timeout change to be maintained with a virtual machine reboot.
Example of a modified /etc/rc.local file:
# cat /etc/rc.local
#!/bin/sh
#
# This script will be executed *after* all the other init scripts.
# You can put your own initialization stuff in here if you don't
# want to do the full Sys V style init stuff.
find /sys -name timeout | grep "host.*target.*timeout" | xargs -n 1 echo "echo 60
>"|shtouch /var/lock/subsys/local
Multipath Failover Considerations and I/O Load Balancing
NOTE: This section about multipathing and configuring to Round Robin policy applies to all
connectivity types: FC, FCoE, and iSCSI.
VMware ESX 3.0 - 3.5 includes failover with multipath support to maintain a constant connection
between the ESX host and the HP 3PAR StoreServ Storage array. VMware terms this multipath
support with a choice of two "path policies" called "FIXED" or "MRU". As of ESX 4.0, a third path
policy choice of "round robin" is available. The path policies can be modified on a per-HP 3PAR
StoreServ Storage-volume (LUN) basis by right-clicking the device listing and selecting the
"properties" function from the VI/vSphere client menu. A pop-up window allows you to 'manage
paths' whereby the properties of the paths to the volume that was previously selected can be
modified. Using this control, you can select the path policy, and specify which path is the active
preferred path to a volume on the storage array, or which path is the standby path within the FIXED
path policy scheme. Additionally, paths can be disabled to prevent any traffic over a specific path
to a volume on the storage array.
The VI/vSphere client GUI allows for settings to be changed only on a volume-by-volume
(LUN-by-LUN) basis. The GUI is appropriate and preferred for use in managing I/O paths within
the FIXED path policy scheme. See “Configuring Round Robin Multipathing on ESX 4.x or later for
Multipath Failover Considerations and I/O Load Balancing
37
Fibre Channel” (page 39) for procedures on implementing and configuring the round-robin path
policy on ESX/ESXi 4.0 and later with an HP 3PAR StoreServ Storage.
•
A path policy of "round-robin" is the preferred multipath implementation for ESX/ESXi 4.0
and later. For procedures on implementing and configuring the round-robin path policy on
ESX/ESXi 4.0 and later with an HP 3PAR StoreServ Storage, see “Configuring Round Robin
Multipathing on ESX 4.x or later for Fibre Channel” (page 39).
•
A path policy of "fixed" and the preferred/active paths manually set to balance I/O load
evenly across all paths is the preferred multipath implementation for ESX 3.0 - 3.5.
◦
In the event the active path is detected as having failed or has been disabled either at
the fabric switch, or on the storage array, all ESX host I/O to the storage array continues
by failing over to a 'standby' path. When the ESX host detects that the preferred path
has been recovered or is enabled, I/O from the ESX host then resumes on the preferred
path -- assuming a preferred path policy had previously been set to that path.
◦
I/O from the ESX host should be manually distributed or balanced when two or more
paths exist to more than one HP 3PAR StoreServ Storage volume on the storage array.
Manually balancing the loads across available paths may improve I/O performance.
This path load balancing to the storage array is dependant on the number of I/Os that
are targeted for specific volumes on the storage array. Tuning I/Os to specific volumes
on specific paths to the storage array varies from configuration to configuration and is
totally dependant on the workload from the ESX host and the virtual machines to the
devices on the storage array.
The following vSphere client screen shot depicts a LUN with five I/O paths in a FIXED I/O policy
scheme. The path marked Active (I/O) with the '*' in the Preferred column is the path chosen as
preferred, and is the path to which all I/O is currently assigned for the given LUN. The other paths
listed are active, but in 'standby' mode. The paths in active 'standby' will not be used for I/O
traffic for this LUN unless the preferred path fails.
38
Configuring the Host for a Fibre Channel Connection
•
A path policy of MRU (most recently used) does not maintain or reinstate balancing of I/O
load after a failover/failback multipath event. This could leave I/O in an unplanned for and
unbalanced state which may yield significant I/O performance issues. Implementation of an
MRU path policy is not recommended by HP.
NOTE: If I/O is active to a LUN and an attempt is made to modify the path policy, a failure can
occur, indicating:
"error during the configuration of the host: sysinfoException;
Status=Busy: Message=Unable to Set".
If this problem occurs while attempting to change the path policy, reduce the I/Os to that LUN and
then try making the desired changes.
For additional information on this topic, refer to the chapter on "Multipathing" contained in the
VMware SAN Configuration Guide.
Configuring Round Robin Multipathing on ESX 4.x or later for Fibre Channel
With ESX version 4.0 and later, VMware supports a round-robin I/O path policy for active/active
storage arrays such as HP 3PAR StoreServ Storage. A round-robin I/O path policy is the preferred
configuration for ESX 4.0 and later; however, this path policy is not enabled by default for HP 3PAR
devices.
CAUTION: If you are running Windows Server 2012 or Windows Server 2008 VM Cluster with
RDM shared LUNs, then individually change these specific RDM LUNs from Round Robin policy
to FIXED or MRU path policy.
“LUN Set to Round Robin” (page 40), which is output from a Fibre Channel configuration, shows
a LUN with a path that has been set to Round Robin (VMware).
NOTE: Note that each path status is shown as Active (I/O). The path status for an iSCSI
configuration would be the same.
Multipath Failover Considerations and I/O Load Balancing
39
Figure 10 LUN Set to Round Robin
Managing a round robin I/O path policy scheme through the VI/vSphere client GUI for a large
network can be cumbersome and challenging to maintain because the policy must be specified
for each LUN individually and updated whenever new devices are added. Alternatively, VMware
provides a mechanism whereby the server administrator can use esxcli, vCLI, or vSphere
Management Assistant (vMA) commands to manage I/O path policy for storage devices on a
per-host basis using parameters defined within a set of native ESX/ESXi storage plugins.
The VMware native multipathing has two important plugins: a Storage Array Type Plugin (SATP)
that handles path failover and monitors path health, and a path-selection plugin (PSP) that chooses
the best path and routes I/O requests for a specific logical device (PSP defines the path policy).
The correct ESX/ESXi host Storage Array Type Plugin (SATP) to be used is related to the HP 3PAR
array host persona in use. When HP 3PAR host persona 6/Generic-legacy is the host persona
in use with an ESX/ESXi host, the SATP VMW_SATP_DEFAULT_AA should be used. When HP 3PAR
host persona 11/VMware is the host persona in use with an ESX/ESXi host, the SATP
VMW_SATP_ALUA should be used.
For ESX/ESXi 4.0 versions (4.0 GA through all 4.0 updates), the default SATP rules must be edited
in order to automatically achieve a round robin I/O path policy for storage devices.
As of ESX/ESXi 4.1, additional custom SATP rules can be created that target SATP/PSP to specific
vendors while leaving the default SATP rules unmodified. The custom SATP can be used to
automatically achieve a round robin I/O path policy for storage devices.
Configuring ESX/ESXi Multipathing for Round Robin via SATP PSP
CAUTION:
40
VMware specifically warns not to directly edit the esx.conf file.
Configuring the Host for a Fibre Channel Connection
NOTE:
•
SATP rule changes cannot be affected through vSphere GUI.
•
SATP rule changes through esxcli commands populate the esx.conf file.
•
A custom SATP rule is an added SATP rule that modifies or redefines parameters of an existing
SATP default rule, defines the targeted devices to be affected, and is given a unique custom
rule name.
•
A custom SATP rule cannot be changed/edited. A custom SATP rule must be removed and
then a new one created with the desired changes added to affect a change in the parameters
of the custom rule.
•
SATP and PSP creation, changes, additions, or removals will take effect for any new devices
presented afterward without the need for server reboot.
•
The host must be rebooted for SATP rule creation, changes, additions, or removals to take
effect on existing, previously presented devices.
•
Path policy changes done on an individual device basis, either done via vCenter or esxcli
command, supersede the PSP path policy defined in a SATP rule, and such path policy changes
to individual devices are maintained through host reboots.
•
Valid PSP for SATP VMW_SATP_DEFAULT_AA rules are:
◦
VMW_PSP_RR
◦
VMW_PSP_FIXED
◦
VMW_PSP_MRU
VMW_PSP_RR is preferred.
•
Valid PSP for SATP VMW_SATP_ALUA rules are:
◦
VMW_PSP_RR
◦
VMW_PSP_MRU
VMW_PSP_FIXED is not a valid PSP to be defined within an ALUA SATP rule. VMW_PSP_RR
is preferred.
Changing from HP 3PAR host persona 6/Generic-legacy to host persona 11/VMware or vice
versa:
•
A change from persona 6 to 11, or from 11 to 6, requires that the array ports affected be
taken offline, or that the host for which the persona is being changed is not connected (not
logged in). This is an HP 3PAR OS requirement.
•
For existing devices targeted in a custom SATP rule to be claimed by the rule, the host must
be rebooted. This is an ESX/ESXi OS requirement.
Because of the items required for this persona change listed above, the following procedure is
recommended for changing from persona 6 to 11, or from 11 to 6:
1. Stop all host I/O and apply the necessary SATP changes (create custom SATP rule and/or
modify default SATP rule PSP defaults) to the ESX/ESXi host.
2. Shut down the host.
3. Change the host persona on the array.
4. Boot the host.
5. Verify that the target devices have been claimed properly by the SATP rule as desired.
Multipath Failover Considerations and I/O Load Balancing
41
ESX/ESXi 4.0 GA - 4.0 Ux
NOTE:
•
Though ESX 4.0 GA - 4.0 Ux supports custom SATP rules, the -P options for setting PSP (path
policy) within the custom rule are not supported. PSP must be defined within the default SATP
rules.
•
ESX 4.0 GA - 4.0 Ux has a known issue wherein no attempt should be made to change iops
from its default value of 1000 (iops = 1000). If the iops value is changed, upon the next
host reboot, an invalid value for iops is picked up and iops are then unpredictable.
•
If the custom rule is not created for ALUA, 3PARdata VV’s are claimed by the
VMW_SATP_DEFAULT_AA SATP rule even though the array persona is 11/VMware (ALUA
compliant array port presentation).
HP 3PAR SATP rules for use with persona 6/Generic-legacy (Active-Active array port presentation)
A “custom” SATP rule is not used. The PSP (path policy) is changed on the default active-active
SATP rule. The default multipath policy for VMW_SATP_DEFAULT_AA is VMW_PSP_FIXED (Fixed
path). The default is changed to the preferred PSP (path policy) of round-robin.
# esxcli nmp satp setdefaultpsp -s VMW_SATP_DEFAULT_AA -P VMW_PSP_RR
HP 3PAR SATP rules for use with persona 11/VMware (ALUA compliant array port presentation)
# esxcli nmp satp setdefaultpsp -s VMW_SATP_ALUA -P VMW_PSP_RR
# esxcli nmp satp addrule -s "VMW_SATP_ALUA" -c "tpgs_on" -V "3PARdata" -M "VV" -e
"HP 3PAR Custom iSCSI/FC/FCoE ALUA Rule"
To remove the above ALUA custom SATP rule:
# esxcli nmp satp deleterule -s "VMW_SATP_ALUA" -c "tpgs_on" -V "3PARdata" -M "VV" -e
"HP 3PAR Custom iSCSI/FC/FCoE ALUA Rule"
42
Configuring the Host for a Fibre Channel Connection
CAUTION: The procedure for changing the default SATP rules to use the round robin I/O
multipathing policy is intended to apply only to VMware hosts using HP 3PAR StoreServ Storage
LUNs. If the host is sharing storage from other vendors, then before making any I/O policy changes,
consideration should be given to the effect that changing the default rules will have on the storage
environment as a whole.
A change of the default PSP for a given SATP affects all storage devices (FC, FCoE, iSCSI) that
use the same default SATP rule. If a host is sharing multiple storage vendors together with an
HP 3PAR StoreServ Storage, and if the other connected storage does not support active/active
round robin multipathing using the same SATP rule, such as VMW_SATP_DEFAULT_AA or
VMW_DEFAULT_ALUA, then its multipathing will be also be affected.
If the other storage uses a different SATP of its own, then SATP VMW_SATP_DEFAULT_AA mapping
should be changed to VMW_PSP_RR to take advantage of round-robin multipathing. You can
check the SATP-PSP relationship of a given device for ESX 4.0 by using the esxcli nmp device
list or esxcli nmp device list -d <device id> command.
For example, If the HP 3PAR StoreServ Storage and storage X are connected to the same host
using VMW_SATP_DEFAULT_AA, and if storage X does not have its own SATP, then it might cause
an issue if storage X does not support round-robin multipathing. If the HP 3PAR StoreServ Storage
and storage Y are sharing the same host, and if storage Y has its own SATP VMW_SATP_Y and
HP uses VMW_SATP_DEFAULT_AA, then there will be no conflict, and the change can be made.
ESX/ESXi 4.1 GA - 4.1 Ux
HP 3PAR custom SATP rule for use with persona 6/Generic-legacy (Active-Active array port
presentation)
# esxcli nmp satp addrule -s "VMW_SATP_DEFAULT_AA" -P "VMW_PSP_RR" -O iops=100 -c
"tpgs_off" -V "3PARdata" -M "VV" -e "HP 3PAR Custom iSCSI/FC/FCoE Rule"
To remove the above active-active custom SATP rule:
# esxcli nmp satp deleterule -s "VMW_SATP_DEFAULT_AA" -P "VMW_PSP_RR" -O iops=100 -c
"tpgs_off" -V "3PARdata" -M "VV" -e "HP 3PAR Custom iSCSI/FC/FCoE Rule"
HP 3PAR custom SATP rule for use with persona 11/VMware (ALUA compliant array port
presentation)
# esxcli nmp satp addrule -s "VMW_SATP_ALUA" -P "VMW_PSP_RR" -O iops=100 -c "tpgs_on"
-V "3PARdata" -M "VV" -e "HP 3PAR Custom iSCSI/FC/FCoE ALUA Rule"
To remove the above ALUA custom SATP rule:
# esxcli nmp satp deleterule -s "VMW_SATP_ALUA" -P "VMW_PSP_RR" -O iops=100 -c "tpgs_on"
-V "3PARdata" -M "VV" -e "HP 3PAR Custom iSCSI/FC/FCoE ALUA Rule"
ESXi 5.x
HP 3PAR custom SATP rule for use with persona 6/Generic-legacy (Active-Active array port
presentation)
# esxcli storage nmp satp rule add -s "VMW_SATP_DEFAULT_AA" -P "VMW_PSP_RR" -O iops=100
–c "tpgs_off" -V "3PARdata" -M "VV" -e "HP 3PAR Custom iSCSI/FC/FCoE Rule"
Multipath Failover Considerations and I/O Load Balancing
43
To remove the above Active-Active custom SATP rule:
# esxcli storage nmp satp rule remove -s "VMW_SATP_DEFAULT_AA" -P "VMW_PSP_RR" -O
iops=100 –c "tpgs_off" -V "3PARdata" -M "VV" -e "HP 3PAR Custom iSCSI/FC/FCoE Rule"
HP 3PAR custom SATP rule for use with persona 11/VMware (ALUA compliant array port
presentation)
# esxcli storage nmp satp rule add -s "VMW_SATP_ALUA" -P "VMW_PSP_RR" -O iops=100 -c
"tpgs_on" -V "3PARdata" -M "VV" -e "HP 3PAR Custom iSCSI/FC/FCoE ALUA Rule"
To remove the above ALUA custom SATP rule:
# esxcli storage nmp satp rule remove -s "VMW_SATP_ALUA" -P "VMW_PSP_RR" -O iops=100
-c "tpgs_on" -V "3PARdata" -M "VV" -e "HP 3PAR Custom iSCSI/FC/FCoE ALUA Rule"
SATP Info Commands
Default SATP Rules and Their Current Default PSP
To list default SATP rules and their current default PSP (path policy), issue the following commands:
ESXi 5.x example
ESX/ESXi 4.x example
44
Configuring the Host for a Fibre Channel Connection
SATP Custom Rules and Associated Defined Parameters
To list SATP custom rules and associated defined parameters, issue the following commands:
ESXi 5.x example
For persona 11:
For persona 6:
ESX/ESXi 4.x example
# esxcli nmp satp listrules | grep -i 3par
VMW_SATP_ALUA
3PARdata VV
tpgs_on
HP 3PAR Custom iSCSI/FC/FCoE ALUA Rule
Show Device Information
To show device information, issue the following commands:
ESXi 5.x example
# esxcli storage nmp device list
naa.50002ac0000a0124
Device Display Name: 3PARdata iSCSI Disk (naa.50002ac0000a0124)
Storage Array Type: VMW_SATP_ALUA
Storage Array Type Device Config: {implicit_support=on;explicit_support=on;
explicit_allow=on;alua_followover=on;{TPG_id=256,TPG_state=AO}}
Path Selection Policy: VMW_PSP_RR
Path Selection Policy Device Config:
{policy=rr,iops=100,bytes=10485760,useANO=0;lastPathIndex=1:
NumIOsPending=0,numBytesPending=0}
Path Selection Policy Device Custom Config:
Working Paths: vmhba3:C0:T1:L73, vmhba2:C0:T0:L73, vmhba2:C0:T1:L73, vmhba3:C0:T0:L73
Multipath Failover Considerations and I/O Load Balancing
45
ESX/ESXi 4.x example
The command is the same for ESX/ESXi 4.x. The output shown is for ESX 4.0:
# esxcli nmp device list
naa.50002ac000b40125
Device Display Name: 3PARdata Fibre Channel Disk (naa.50002ac000b40125)
Storage Array Type: VMW_SATP_DEFAULT_AA
Storage Array Type Device Config:
Path Selection Policy: VMW_PSP_RR
Path Selection Policy Device Config:
{policy=rr,iops=1000,bytes=10485760,useANO=0;lastPathIndex=3:
NumIOsPending=0,numBytesPending=0}
Working Paths: vmhba5:C0:T0:L25, vmhba5:C0:T1:L25, vmhba4:C0:T0:L25,
vmhba4:C0:T1:L25
For ESX 4.1, the iops will be 100 for the device list output shown above.
Script Alternative for Path Policy Changes on Storage Devices without a Host Reboot
If a reboot of the ESX/ESXi host to affect path policy changes through SATP on a large number of
existing, previously presented storage devices is not desirable, the path policy changes on a batch
of LUNs can be made by scripting esxcli commands.
Create a script that uses the following commands:
1. List all the HP 3PAR devices present on the host:
ESXi 5.x
# esxcli storage nmp device list | grep -i naa.50002ac | grep -v Device
naa.50002ac0005800ac
naa.50002ac003b800ac
naa.50002ac0039300ac
ESX/ESXi 4.x
# esxcli nmp device list | grep -i naa.50002ac | grep -v Device
naa.50002ac0005800ac
naa.50002ac003b800ac
naa.50002ac0039300ac
2.
Change the I/O path policy to round robin for each device identified in the previous output:
ESXi 5.x
# esxcli storage nmp device set -d naa.50002ac0005800ac -P VMW_PSP_RR
ESX/ESXi 4.x
# esxcli nmp device setpolicy -d naa.50002ac0005800ac -P VMW_PSP_RR
3.
Verify that the change has been made.
ESXi 5.x
# esxcli storage nmp device list -d naa.50002ac0005800ac
46
Configuring the Host for a Fibre Channel Connection
ESX/ESXi 4.x
# esxcli nmp device list -d naa.50002ac0005800ac
NOTE:
occur:
If I/O is active to a LUN and an attempt is made to modify the path policy, a failure can
error during the configuration of the host: sysinfoException;
Status=Busy: Message=Unable to Set
If this problem occurs during an attempt to change the path policy, reduce the I/Os to that LUN
and then try making the desired changes.
Performance Considerations for Multiple Host Configurations
The information in this section should be considered when using multiple ESX hosts, (or other hosts
in conjunction with ESX hosts), that are connected in a fan-in configuration to a pair of HP 3PAR
StoreServ Storage ports.
NOTE: For ESX 4.0 systems, HP recommends changing the ESX Scsi.ConflictRetries from its
default value of 80 to a value of 200 when connected to an HP 3PAR StoreServ Storage running
HP 3PAR OS version 2.2.4 or earlier. This change lengthens the time allowed for I/O retries due
to ESX SCSI-2 reservation conflicts on VMFS LUNs caused by delayed processing of SCSI-2
reservation commands on the HP 3PAR StoreServ Storage, thereby helping to avoid VM I/O failure.
You can change this value using the VMware ESX VI/vSphere client: In the ESX host, select the
Configuration tab, select Advanced Settings for software, select Scsi, scroll to Scsi.ConflictRetries,
and change the value in the field. Click OK to complete the change. A reboot is not required for
the change to take effect.
This does not have to be done for ESX 4.1 or ESXi 5.x systems.
ESX/ESXi Handling SCSI Queue Full and Busy Messages from the HP 3PAR StoreServ
Storage Array
VMware ESX Releases through ESX 3.5 Update 3
The default behavior of an ESX 3.5 update 3 and older servers to Queue Full and Busy SCSI
messages from the HP 3PAR StoreServ Storage is to treat them as valid commands and to continue
sending data. When continued outstanding commands are being sent to an HP 3PAR StoreServ
Storage port, the port cannot recover and stops responding for attached hosts.
This type of action is critical where QLogic HBAs are used on the HP 3PAR StoreServ Storage
because, when the storage port stops responding, the QLogic driver on the HP 3PAR StoreServ
Storage has to issue a reset of the affected port.
The time in which the HP 3PAR StoreServ Storage port is at full capacity and the reset time of the
port does not trigger a failover in the ESX host, since the ESX host never detects the port going
away. This results in a virtual machine crash. There are two solutions:
•
Upgrade to ESX 3.5 Update 4 or later.
•
Control the IO that each array port receives by manipulating the HBA queue depth (see
“Modifying the Tuneable Parameters for Queue Depth Throttling in ESX 3.x” (page 49)).
Performance Considerations for Multiple Host Configurations
47
VMware ESX Release 3.5 Update 4 through ESX 4.x and ESXi 5.0
As of VMware ESX release 3.5 update 4, and including ESX 4.0 GA and ESX 4.1 (with all ESX
4.x updates) , and ESXi 5.0 (with all updates), an algorithm has been added that allows ESX to
respond to Queue Full and Busy SCSI messages from the storage array. The Queue Full or Busy
response by ESX is to back off of I/O for a period of time, thus helping to prevent overdriving of
the HP 3PAR StoreServ Storage ports. This feature should be enabled as part of an ESX - HP 3PAR
StoreServ Storage deployment.
The Queue Full and Busy LUN-throttling algorithm is disabled by default. To enable the algorithm,
complete the following steps:
1. From the VI/vSphere client, select the ESX host. In the Configuration tab, select Advanced
Settings for software, and then select Disk.
2. Scroll to find and adjust the following HP-recommended settings:
QFullSampleSize = 32
QFullThreshold = 4
With the algorithm enabled, no additional I/O throttling scheme on ESX 3.5 update 4 and newer
ESX release is necessary. Consult the additional information regarding the ESX Queue Full/Busy
response algorithm found in KB 1008113, which is available on the VMware Knowledge Base
website:
http://kb.vmware.com
VMware ESXi Release 5.1
The Advanced Settings parameters QFullSampleSize and QFullSampleSize are required to enable
the adaptive queue-depth algorithm.
In ESXi releases earlier than ESXi 5.1, these parameters are set globally; that is, they are set on
all devices seen by the ESXi host. In VMware ESXi 5.1, however, these parameters are set in a
more granular fashion, on a per-device basis.
VMware patch ESXi510-201212001, dated 12/20/2012 (KB 2035775), restores the ability to
set the values of these parameters globally. The patch is available on the VMware Knowledge
Base website:
http://kb.vmware.com
To set the parameters globally, install the patch and follow the instructions in “VMware ESX Release
3.5 Update 4 through ESX 4.x and ESXi 5.0” (page 48).
You can also use the esxcli command to set these values on a per-device basis. If both options
(the esxcli and the advanced parameters) are used, the per-device values take precedence.
To set QFullSampleSize and QFullThreshold on a per-device level, issue the following
esxcli command:
# esxcli storage core device set --device
device_name -q Q -s S
The settings do not require a reboot to take effect and are persistent across reboots.
You can retrieve the values for a device by using the corresponding list command:
# esxcli storage core device list
The command supports an optional --device parameter:
#
esxcli storage core device list --device device_name
48
Configuring the Host for a Fibre Channel Connection
Follow-up Actions/Recommendations for ESX 3.5 Update 3 and Earlier
The behavior of the HP 3PAR StoreServ Storage port being overrun is limited only to ESX 3.5
update 3 and earlier servers.
Other HP-supported operating systems handle Queue Full notifications by backing off on I/O for
a period of time. HP currently does not have any HP 3PAR StoreServ Storage firmware to address
this issue but there are recommendations that can help prevent this problem from occurring as
detailed in the following sections.
Considering that the ESX 3.5 update 3 and older server default behavior with regard to “Queue
Full” messages does not initiate a pause or throttling of I/O, it is important to plan your ESX
environments accordingly. This involves tuning the work load of the total number of ESX hosts so
they do not overrun the Queue Depth of the target HP 3PAR StoreServ Storage HBA Ports.
Recommendations for ESX Hosts Attached to a Storage Port on the HP 3PAR StoreServ Storage
For performance and stability, HP recommends that no more than 16 hosts be attached to any one
2 Gbps HP 3PAR StoreServ Storage port, and no more than 32 hosts attached to any one 4 Gbps
or 8 Gbps HP 3PAR StoreServ Storage port. This is due to the HP recommendation to throttle the
total aggregate of the outstanding commands from all hosts to be less than the queue depth of the
HP 3PAR StoreServ Storage port and throughput.
NOTE: These recommendations are guidelines for best practice. Adding more than the
recommended ESX hosts should only be attempted when the total expected workload is calculated
and shown not to overrun either the queue depth or throughput of the storage port.
Modifying the Tuneable Parameters for Queue Depth Throttling in ESX 3.x
The default settings for target port queue depth on the ESX host can be modified to ensure
that the total workload of all servers will not overrun the total queue depth of the target HP 3PAR
StoreServ Storage port. The method endorsed by HP is to limit the queue depth on a
per-target basis. This recommendation comes from the simplicity in limiting the number of
outstanding commands on a target (HP 3PAR StoreServ Storage port) per ESX host.
The following values can be set on the instances of an HBA in an ESX operating system. These
values limit the total number of outstanding commands that the operating system routes to one
target.
1. ESX Emulex HBA Target Throttle = tgt_queue_depth
2. ESX QLogic HBA Target Throttle = ql2xmaxdepth
The formula is as follows:
(3PAR port queue depth) / (total number of ESX severs attached) = recommended target
port queue depth.
The HP 3PAR port queue depth limitations used for the calculations are from the listings in “Target
Port Limits and Specifications” (page 14).
Example 1 (set up as follows):
•
QLogic 2G FC HBAs installed on the HP 3PAR StoreServ Storage
•
16 ESX hosts attached to a QLogic port on the HP 3PAR StoreServ Storage
Formula:
497 / 16 = 31.xxx (recommended max target port queue depth = 31)
Performance Considerations for Multiple Host Configurations
49
Example 2 (set up as follows):
•
LSI 2G FC HBA installed on the HP 3PAR StoreServ Storage
•
12 ESX hosts attached to a LSI port on the HP 3PAR StoreServ Storage
Formula:
510 / 12 = 42.xxx (recommended max target port queue depth = 42)
Setting tgt_queue_depth for Emulex in ESX 3.x (example)
To set the tgt_queue_depth for an Emulex FC HBA in ESX 3.x to something other than the
default requires a multistep process:
1. Shut down all of the virtual machines.
2. Log into the ESX service console as root.
3. Make a backup copy of /etc/vmware/esx.conf.
cp /etc/vmware/esx.conf /etc/vmware/esx.conf.orig
4.
Identify the Emulex HBA module that is currently loaded.
vmkload_mod –l | grep –i lpfc
Depending on the module of the HBA, the module can be one of the following:
5.
•
lpfcdd_7xx
•
lpfcdd_732
•
lpfc_740
The target queue depth can now be modified via the command line using VMware supplied
binaries.
The example shows the lpfc_740 module. Use the appropriate module based on the outcome
of Step 4.
esxcfg-module –s “lpfc_tgt_queue_depth=31” lpfc_740
esxcfg-boot –b
6.
You can check to see that the change has been implemented as follows:
esxcfg-module -q
7.
Reboot the ESX host for the changes to take effect.
Upon bootup, the ESX host will now be throttled to a maximum of 31 outstanding commands
(as in the example shown in Step 5) to the target HP 3PAR StoreServ Storage port).
Setting ql2xmaxdepth for QLogic in ESX 3.x (example)
To set the ql2xmaxdepth for an QLogic FC HBA in ESX 3.x to something other than the default
requires a multi step process.
1. Shut down all of the virtual machines.
2. Log into the ESX service console as root.
50
Configuring the Host for a Fibre Channel Connection
3.
Make a backup copy of /etc/vmware/esx.conf.
cp /etc/vmware/esx.conf /etc/vmware/esx.conf.orig
4.
Identify the QLogic HBA module that is currently loaded.
vmkload_mod -l | grep qla2300
Depending on the model of the HBA, the module can be one of the following:
qla2300_707 (ESX 3.0.x)
qla2300_707_vmw (ESX 3.5)
5.
The target port queue depth can now be modified via the service console command line using
VMware supplied binaries.
The example shows the qla2300_707 module. Use the appropriate module based on the
outcome of Step 4.
esxcfg-module -s ql2xmaxqdepth=42 qla2300_707
esxcfg-boot –b
The server must now be rebooted for the changes to take effect.
6.
Reboot the ESX host.
Upon boot up, the ESX host will now be throttled to a maximum of 42 outstanding commands
(as per the example in Step 5) to the target (HP 3PAR StoreServ Storage port).
NOTE: For additional information on changing the queue depth for HBAs, refer to the
VMware Fibre Channel SAN Configuration Guide.
ESX/ESXi 4.1, ESXi 5.x Additional Feature Considerations
ESX/ESXi 4.1 and ESXi 5.x introduce new features related to storage I/O control and integration
with storage arrays. HP recommends the usage of features SIOC and vStorage APIs for Array
Integration (VAAI) with ESX/ESXi 4.1, ESXi 5.x - HP 3PAR StoreServ Storage configurations.
NOTE: This section about VAAI and new additional features applies to all connectivity types:
FC, FCoE and iSCSI.
Storage I/O Control
The SIOC feature allows for a new level of monitoring and control of I/O from individual virtual
machines to an HP 3PAR StoreServ Storage array at the datastore level and across ESX/ESXi hosts
in a VMware cluster.
Further information regarding the SIOC feature and considerations for its deployment may be
found in the VMware technical white paper, Storage I/O Control Technical Overview and
Considerations for Deployment:
http://www.vmware.com/files/pdf/techpaper/VMW-vSphere41-SIOC.pdf
vStorage APIs for Array Integration (VAAI)
In partnership with VMware, HP has developed an ESX/ESXi 4.1 plugin that enables a new set
of SCSI commands to be used by ESX/ESXi 4.1 in conjunction with HP 3PAR StoreServ Storage.
VMware refers to this newly incorporated set of SCSI commands as the "primitives".
ESX/ESXi 4.1, ESXi 5.x Additional Feature Considerations
51
ESX extensions that make use of these primitives are collectively referred to as vStorage APIs for
Array Integration (VAAI). The VMware primitives enable an ESX/ESXi host to convey virtual machine
operations to storage hardware at a meta level instead of at the traditional data level. This reduces
operational latency and traffic on the FC fabric/iSCSI network. Some of these primitives enable
the storage hardware to participate in block allocation and de-allocation functions for virtual
machines. These primitives are also known as hardware offloads.
A brief description of the "primitives":
•
Full Copy (XCOPY) enables the storage array to make full copies of data within the array
without having to have the ESX host read and write the data. This offloads some data copy
processes to the storage array.
•
Block Zeroing (WRITE-SAME) enables the storage array to zero-out a large number of blocks
within the array without having to have the ESX host write the zeros as data and helps expedite
the provisioning of VMs. This offloads some of the file space zeroing functions to the storage
array.
•
Hardware Assisted Locking (ATS) provides an alternative to SCSI reservations as a means to
protect the metadata for VMFS cluster file systems and helps improve the scalability of large
ESX host farms sharing a datastore.
HP 3PAR VAAI Plugin 1.1.1 for ESXi 4.1
Support for VMware VAAI functionality is available via installation of the HP 3PAR VAAI Plugin
1.1.1 on ESX/ESXi 4.1 in combination with HP 3PAR HP 3PAR OS version 2.3.1 MU2 (minimum).
For further information on VMware VAAI, the HP 3PAR VAAI Plugin for ESX/ESXi 4.1 installation
package, and the HP 3PAR VAAI Plug-in 1.1.1 for VMware vSphere 4.1 User's Guide, go to:
https://h20392.www2.hp.com/portal/swdepot/displayProductInfo.do?
productNumber=HP3PARVAAI&jumpid=reg_r1002_usen
HP 3PAR VAAI Plugin 2.2.0 for ESXi 5.x
HP 3PAR VAAI Plugin 2.2.0 on ESXi 5.x needs to be installed if the HP 3PAR StoreServ Storage
HP 3PAR OS is 2.3.1 MU2 or a higher version of HP 3PAR OS 2.3.1, to take advantage of the
storage array primitives or hardware offloads (mainly XCOPY, Write-Same, and ATS).
HP 3PAR VAAI Plug 2.2.0 should not be installed on the ESXi 5.x if connected to an HP 3PAR
StoreServ Storage running HP 3PAR OS 3.1.1 or later, because the VAAI primitives are handled
by the default T10 VMware plugin and do not require the HP 3PAR VAAI plugin.
The following table summarizes the HP 3PAR VAAI Plugin installation requirements.
Table 2 HP 3PAR VAAI Plugin Installation Requirements
VMware ESX
ESX 4.1
ESX 4.1
Features/Primitives
HP 3PAR OS 2.3.1 MU2 HP 3PAR OS 3.1.1 or
or later
later
ESXi 5.x
HP 3PAR OS 2.3.1 MU2 HP 3PAR OS 3.1.1 or
or later
later
ATS
XCOPY
Needs HP 3PAR VAAI
1.1.1 plugin
Needs HP 3PAR VAAI Needs HP 3PAR VAAI
1.1.1 plugin
2.2.0 plugin
WRITE_SAME
52
Configuring the Host for a Fibre Channel Connection
ESXi 5.x
Supported. Does not
require HP 3PAR VAAI
plugin (supported by
Standard T10 ESX
plugin).
NOTE: VAAI Plugin 2.2.0 is required if the ESXi 5.x server is connected to two or more arrays
that are running a mix of OS HP 3PAR OS 2.3.1.x and OS 3.1.x. For LUNs on HP 3PAR OS
3.1.x, the default VMware T10 plugin will be effective, and for storage LUNs on HP 3PAR OS
2.3.x, HP 3PAR VAAI Plugin 2.2.0 will be effective.
For more information, refer to the HP 3PAR VAAI Plug-in Software for VMware vSphere User's
Guide (HP part number QL226-96072).
To download the HP 3PAR VAAI Plugin software, go to:
https://h20392.www2.hp.com/portal/swdepot/displayProductInfo.do?
productNumber=HP3PARVAAI&jumpid=reg_r1002_usen
UNMAP (Space Reclaim) Storage Hardware Support for ESXi 5.x
HP 3PAR OS 3.1.1 or later supports the UNMAP storage primitive for space reclaim, which is
supported starting with ESXi 5.0 update 1 with default VMware T10 VAAI plugin. Installation of
the HP 3PAR VAAI plugin is not required.
NOTE: To avoid possible issues described in VMware KB 2007427 and 2014849, automatic
VAAI Thin Provisioning Block Space Reclamation (UNMAP) should be disabled on ESXi 5.0 GA.
The KB articles are available on the VMware Knowledge Base website:
http://kb.vmware.com
ESXi 5.0 update 1 and later includes an updated version of vmkfstools that provides an option
[-y] to send the UNMAP command regardless of the ESXi host’s global setting. You can use the
[-y] option as follows:
# cd /vmfs/volumes/<volune-name>
vmkfstools -y <percentage of deleted block to reclaim>
NOTE:
The vmkfstools -y option does not work in ESXi 5.0 GA.
UNMAP will also free up space if files are deleted on UNMAP-supported VMs such as Red Hat
Enterprise 6, provided it is a RDM LUN on a TPVV storage volume-—for example, for RDM volumes
on a Red Hat VM using the ext4 filesystem and mounted using the discard option.
# mount —t ext4 —o discard /dev/sda2 /mnt
This will cause the RH6 VM to issue the UNMAP command and cause space to be released back
on the array for any deletes in that ext4 file system.
Out-of-Space Condition for ESX 4.1 and ESXi 5.x
The out-of-space condition, aka "VM STUN", is implemented in ESX 4.1 and ESXi 5.x and is
supported as of HP 3PAR OS 2.3.1 MU2. This OS feature has no dependency on the VAAI plugin
and applies to TPVV volume types.
When the TPVV volume cannot allocate additional storage space or cannot grow because the
storage system has run out of disk space, it sends Check condition with "DATA PROTECT" sense
key hard error and additional sense "SPACE ALLOCATION FAILED WRITE PROTECT". As a result,
ESX pauses the VM and displays an 'Out of Space' message to the user in the Summary tab of
the VM on vSphere, with the options of Retry or Cancel. In the pause-VM condition, read requests
and rewrites to the allocated LUN blocks are allowed, but writing to a new space is not allowed.
Ping, telnet and ssh requests to the VM are not honored. The storage administrator needs to add
additional disk space or use storage vMotion to migrate other unaffected VMs from the LUN. After
ESX/ESXi 4.1, ESXi 5.x Additional Feature Considerations
53
additional disk space is added, use the Retry option on the warning message to bring the VM
back to the read-write state. If you select the Cancel option, the VM is rebooted.
In the following example, an HP 3PAR StoreServ Storage TPVV volume was created with a warning
limit of 60%, as shown in the showvv -alert command.
When the warning limit is reached, the HP 3PAR StoreServ Storage sends a soft threshold error
asc/q: 0x38/0x7 and ESX continues to write.
InServ debug log:
1 Debug Host error undefined Port 1:5:2 -- SCSI status 0x02 (Check
condition) Host:sqa-dl380g5-14-esx5 (WWN 2101001B32A4BA98) LUN:22 LUN
WWN:50002ac00264011c VV:0 CDB:280000AB082000000800 (Read10) Skey:0x06 (Unit attention)
asc/q:0x38/07 (Thin provisioning soft threshold reached) VVstat:0x00 (TE_PASS
-- Success) after 0.000s (Abort source unknown) toterr:74882, lunerr:2
# showalert
Id:
193
State:
New
Message Code: 0x0270001
Time:
2011-07-13 16:12:15 PDT
Severity:
Informational
Type:
TP VV allocation size warning
Message:
Thin provisioned VV nospace1 has reached allocation
warning of 60G (60% of 100G)
When the HP 3PAR StoreServ Storage runs out of disk space, a hard permanent error asc/q:
0x27/0x7 is sent. Use showspace, showvv -r, and showalert to see the warning and space
usage. The ESX responds by stunning the VM.
InServ debug log:
1 Debug Host error undefined Port 1:5:2 -- SCSI status 0x02 (Check
condition) Host:sqa-dl380g5-14-esx5 (WWN 2101001B32A4BA98) LUN:22 LUN
WWN:50002ac00264011c VV:612 CDB:2A00005D6CC800040000 (Write10) Skey:0x07 (Data protect)
asc/q:0x27/07 (Space allocation failed write protect) VVstat:0x41 (VV_ADM_NO_R5
-- No space left on snap data volume) after 0.302s (Abort source unknown)
toterr:74886, lunerr:3
The following figure shows the VM warning displayed on the vSphere with the Retry and Cancel
options.
54
Configuring the Host for a Fibre Channel Connection
Figure 11 Virtual Machine Message — Retry and Cancel options
Additional New Primitives Support on ESXi 5.x
HP 3PAR OS 3.1.1 or later supports additional new primitives, called TP LUN Reporting, where
the ESXi 5.x is notified that a given LUN is a thin provisioning LUN by enabling the TPE bits of the
READ Capacity (16) and enables the host to use features such as sending the UNMAP command
to these LUNs. The TPE bit is enabled for TPVVs and R/W snapshot of TPVV base.
The Quota Exceeded Behavior present in ESXi 5.x is accomplished through the "Thin Provisioning
Soft Threshold Reached" check condition, providing alerts and warnings.
VAAI and New Feature Support Table
The following table summarizes the VAAI plugin requirements and New Primitives support.
Table 3 HP 3PAR VAAI Plugin Installation Requirements
VMware ESX
ESX 4.1
Features/Primitives
HP 3PAR OS 2.3.1
MU2 or later
ESX 4.1
ESXi 5.x
ESXi 5.x
HP 3PAR OS 3.1.1 or
later
HP 3PAR OS 2.3.1
MU2 or later
HP 3PAR OS 3.1.1 or
later
ATS
XCOPY
Needs HP 3PAR VAAI Needs HP 3PAR VAAI
1.1.1 plugin
1.1.1 plugin
Needs HP 3PAR VAAI
2.2.0 plugin
Not supported by ESX Not supported by ESX
4.1 or later
4.1 or later
Not supported by
HP 3PAR OS 2.3.1
WRITE_SAME
UNMAP
Not supported by
HP 3PAR OS 2.3.1
Out-of-space
condition (aka
“VM STUN”)
Supported. HP 3PAR
VAAI 1.1 plugin
recommended, but not
required for this
specific feature.
Quota Exceeded
Behavior
Not supported by ESX
4.1 or later
Not supported by ESX
4.1 or later
Not supported by
HP 3PAR OS 2.3.1
TP LUN Reporting
Supported. HP 3PAR
VAAI 1.1 plugin
recommended, but not
required for this specific
feature.
Supported. HP 3PAR
VAAI 1.1 plugin
recommended, but not
required for this
specific feature.
Supported. Does not
require HP 3PAR VAAI
plugin (supported by
Standard T10 ESX
plugin).
Not supported by
HP 3PAR OS 2.3.1
ESX/ESXi 4.1, ESXi 5.x Additional Feature Considerations
55
VAAI Plugin Verification
NOTE: VAAI Plugin 2.2.0 must be installed if an ESXi 5.x server is connected to two or more
arrays that are running a mix of HP 3PAR OS 2.3.x and 3.1.x. For LUNs from HP 3PAR OS 3.1.x,
the default VMware T10 plugin will be effective, and for storage LUNs from HP 3PAR OS 2.3.x,
HP 3PAR VAAI Plugin 2.2.0 will be effective.
To verify that VAAI 2.2.0 is installed on ESXi 5.x and enabled for HP 3PARdata vendor, use the
following commands (only contents that are applicable to vendor HP 3PARdata are shown in the
output):
•
To show that the plugin has been installed:
# esxcli storage core plugin
Plugin name
----------------3PAR_vaaip_InServ
list
Plugin class
-----------VAAI
The vSphere shows that hardware acceleration is supported on the HP 3PAR devices.
•
To show the version of the plugin:
To show that the plugin is active in the claimrule, which runs for each of the devices
discovered:
•
To show that the VAAI is enabled for the HP 3PAR data device:
# esxcfg-scsidevs -l
naa.50002ac0002200d7
Device Type: Direct-Access
Size: 51200 MB
Display Name: 3PARdata Fibre Channel Disk (naa.50002ac0002200d7)
Multipath Plugin: NMP
Console Device: /vmfs/devices/disks/naa.50002ac0002200d7
Devfs Path: /vmfs/devices/disks/naa.50002ac0002200d7
Vendor: 3PARdata Model: VV
Revis: 0000
SCSI Level: 5 Is Pseudo: false Status: on
Is RDM Capable: true Is Removable: false
Is Local: false Is SSD: false
Other Names:
vml.020022000050002ac0002200d7565620202020
VAAI Status: supported
56
Configuring the Host for a Fibre Channel Connection
•
On ESX 4.1, you can verify that the VAAI Plugin is installed and enabled on devices using
the following commands:
•
To show the version of the installed VAAI plugin:
# esxupdate --vib-view query | grep 3par
cross_3par-vaaip-inserv_410.1.1-230815
installed
•
To show that the claim rule is in effect for the HP 3PAR devices discovered:
•
To show that the VAAI is supported on the device:
# esxcfg-scsidevs -l
naa.50002ac003da00eb
Device Type: Direct-Access
Size: 512000 MB
Display Name: 3PARdata iSCSI Disk (naa.50002ac003da00eb)
Multipath Plugin: NMP
Console Device: /dev/sdx
Devfs Path: /vmfs/devices/disks/naa.50002ac003da00eb
Vendor: 3PARdata Model: VV
Revis: 3110
SCSI Level: 5 Is Pseudo: false Status: on
Is RDM Capable: true Is Removable: false
Is Local: false
Other Names:
vml.020001000050002ac003da00eb565620202020
VAAI Status: supported
ESXi 5.x with HP 3PAR OS 3.1.1 uses the native T10 plugin, and should not show any HP 3PAR
plugin.
# esxcli storage core plugin list
Plugin name Plugin class
----------- -----------NMP
MP
The following outputs shows that Hardware Acceleration is enabled on HP 3PAR LUNs to take
advantage of the storage primitives on ESX 4.1 and ESXi 5.x. Use the esxcfg-advcfg command
to check that the options are set to 1 (enabled):
# esxcfg-advcfg -g /DataMover/HardwareAcceleratedMove
# esxcfg-advcfg -g /DataMover/HardwareAcceleratedInit
# esxcfg-advcfg -g /VMFS3/HardwareAcceleratedLocking
ESX/ESXi 4.1, ESXi 5.x Additional Feature Considerations
57
Figure 12 Hardware Acceleration for HP 3PAR devices
VMware All Paths Down
All Paths Down (APD), a feature of the VMware ESXi host used in cases where all paths to the VM
go down because of storage failure or administrative error, is properly handled in ESX 5.1 as a
result of feature enhancement performed by VMware. Previously, in ESX versions 5.0 or 4.1, the
host would try continuously to revive the storage links and, as a result, performance would be
impacted for working VMs. A host reboot was required to clear this error.
58
Configuring the Host for a Fibre Channel Connection
6 Configuring the Host as an FCoE Initiator Connecting to
a FC target or an FCoE Target
All contents of the Fibre Channel section of this guide apply to FCoE connectivity as well. See the
following sections:
•
“Multipath Failover Considerations and I/O Load Balancing” (page 37)
•
“Performance Considerations for Multiple Host Configurations” (page 47)
•
“ESX/ESXi 4.1, ESXi 5.x Additional Feature Considerations” (page 51)
This chapter describes the procedures for setting up an ESX software Fibre Channel over Ethernet
(FCoE) configuration with an HP 3PAR StoreServ Storage. The instructions in this chapter should
be used in conjunction with the VMware vSphere Storage Guide. These instructions cover both
end-to-end FCoE and FCoE initiator to FC target.
Configuring the FCoE Switch
Connect the ESX (FCoE Initiator) host ports and HP 3PAR StoreServ Storage server (FCoE target)
ports to an FCoE-enabled switch.
NOTE: FCoE switch VLANs and routing setup and configuration is beyond the scope of this
document. Consult your switch manufacturer's documentation for instructions of how to set up
VLANs and routing.
Using system BIOS to configure FCoE
1.
Enter the setup menu. The combination of keys to press to enter setup may be different
depending on the host being configured. The example below is for an HP ProLiant:
Configuring the FCoE Switch
59
Figure 13 Configuring FCoE
2.
In the System Options pane, select NIC Personality Options.
Figure 14 NIC Personality Options
3.
60
In the PCI Slot 2 Pane, select FCoE for both Port 1 and Port 2.
Configuring the Host as an FCoE Initiator Connecting to a FC target or an FCoE Target
Figure 15 Configuring the PCI Slots
4.
PCI Slot 2 Port 1 and Port 2 now display FCoE.
Figure 16 PCI Slot 1 and Slot 2 Configured for FCoE
5.
Save the changes and exit the BIOS.
Using system BIOS to configure FCoE
61
Figure 17 Exiting the BIOS Utility
Configuring an HP 3PAR StoreServ Storage Port for a FCoE Host
Connection
When setting up FCoE initiator to FC target, there is nothing unique that needs to be configured
on the HP 3PAR StoreServ Storage. The initiator coming from the host adapters through the FCoE
Forwarder switch is treated as just another Fibre Channel device connecting to the HP 3PAR
StoreServ Storage ports. The same guidelines described in “Configuring the HP 3PAR StoreServ
Storage for Fibre Channel” (page 8) and “Configuring the Host for a Fibre Channel Connection”
(page 35) must be followed when a server with a host CNA card configured with FCoE is connected
to HP 3PAR StoreServ Storage ports.
When setting up FCoE initiator to FCoE target, the StoreServ ports must be configured for FCoE.
See Chapter 4, “Configuring the HP 3PAR StoreServ Storage for FCoE” (page 31), for notes on
how to configure FCoE ports on the StoreServ.
NOTE: For specific configurations that support FCoE CNAs and forwarder switches, refer to the
appropriate HP 3PAR OS release version on the HP SPOCK website:
http://www.hp.com/storage/spock
Configuring Initiator FCoE to FC Target
If an FCoE to FC configuration is being set up, the following figure summarizes the general steps
you should follow to configure a CNA and FCoE Forwarder Switch.
62
Configuring the Host as an FCoE Initiator Connecting to a FC target or an FCoE Target
Figure 18 Initiator FCoE to FC Target
NOTE: For complete and detailed instructions for configuring a server with a given Converged
Network Adapter, refer to the CNA manufacturer documentation.
The FCoE switch or FCoE forwarder must be able to convert FCoE traffic to FC and also be able
to trunk this traffic to the fabric that the HP 3PAR StoreServ Storage target ports are connected to.
1.
2.
3.
4.
5.
Install the CNA card in the server just like any other PCIe card - refer to the server vendor
documentation.
Install the CNA card driver following the CNA card installation instructions (it assumes the
server is already running a supported operating system).
Physically connect the server CNA card ports to the FCoE Forwarder switch and configure
the FCoE Forwarder switch ports - refer to the switch vendor documentation.
Configure the HP 3PAR StoreServ Storage ports in accordance with the guidelines in section
“Configuring the HP 3PAR StoreServ Storage Running HP 3PAR OS 3.1.x or OS 2.3.x”
(page 8) and connect the HP 3PAR StoreServ Storage port either to the FCoE Forwarder FC
switch ports or the Fibre Channel fabric connected to the FCoE Forwarder.
Create FC zones for the host initiator’s ports and the HP 3PAR StoreServ Storage target port.
Once the initiators have logged in to the HP 3PAR StoreServ Storage target ports, create a
host definition and provision storage to the host.
NOTE:
It is not possible to connect a server with a CNA directly to the HP 3PAR StoreServ
Storage. A FCoE Forwarder switch must be used.
Configuring Initiator FCoE to Target FCoE
If an FCoE to FCoE configuration is being set up, the following figure summarizes the general steps
you should follow . When setting up FCoE initiator to FCoE target, the StoreServ ports must be
configured for FCoE. See Chapter 4, “Configuring the HP 3PAR StoreServ Storage for FCoE”
(page 31), for notes on how to configure FCoE ports on the StoreServ.
Configuring Initiator FCoE to Target FCoE
63
Figure 19 Initiator FCoE to Target FCoE
1.
2.
3.
4.
5.
Install the CNA card in the server just like any other PCIe card - refer to the server vendor
documentation.
Install the CNA card driver following the CNA card installation instructions (it assumes the
server is already running a supported operating system).
Physically connect the server CNA card ports to the FCoE fabric.
Configure the HP 3PAR StoreServ Storage ports in accordance with the guidelines in section
“Configuring the HP 3PAR StoreServ Storage for FCoE” (page 31) and connect the HP 3PAR
StoreServ Storage ports to the FCoE fabric.
Create VLANs for the host initiator’s ports and the HP 3PAR StoreServ Storage target port.
Once the initiators have logged in to the HP 3PAR StoreServ Storage target ports, create a
host definition and provision storage to the host.
NOTE: FCoE switch VLANs and routing setup and configuration are beyond the scope of this
document. Consult your switch manufacturer's documentation for instructions of how to set up
VLANs and routing
64
Configuring the Host as an FCoE Initiator Connecting to a FC target or an FCoE Target
7 Configuring the Host for an iSCSI Connection
This chapter describes the procedures for setting up an ESX software iSCSI configuration with an
HP 3PAR StoreServ Storage. The instructions in this chapter should be used in conjunction with the
VMware vSphere Storage Guide.
Setting Up the Switch, iSCSI Initiator, and iSCSI target ports
Connect the ESX host iSCSI initiator port(s) and the HP 3PAR StoreServ Storage iSCSI target ports
to the switch(es).
If you are using VLANs, make sure that the switch ports which connect to the HP 3PAR StoreServ
Storage iSCSI target ports and iSCSI initiator ports reside in the same VLANs and/or that you can
route the iSCSI traffic between the iSCSI initiator ports and the HP 3PAR StoreServ Storage iSCSI
target ports. Once the iSCSI initiator and HP 3PAR StoreServ Storage iSCSI target ports are
configured and connected to the switch, you can use the ping command on the iSCSI initiator
host to make sure it sees the HP 3PAR StoreServ Storage iSCSI target ports.
NOTE: Setting up the switch for VLAN and routing configuration is beyond the scope of this
document. Consult your switch manufacturer's guide for instructions about setting up VLANs and
routing.
The procedures in this chapter assume that you have completed the following tasks:
•
Set up and configuration of the host Network Interface Card (NIC) or converged network
adapter (CNA) as Initiator port that will be used by the iSCSI Initiator software to connect to
the HP 3PAR StoreServ Storage iSCSI target ports.
•
Installation of the iSCSI initiator software package.
Installing iSCSI on VMware ESX
Software iSCSI drivers for VMware supported NICs are included as part of the ESX OS installation
package supplied by VMware. Updates and/or patches for the software iSCSI drivers can be
acquired through VMware support.
The following illustration shows an example of an ESX iSCSI Software initiator configuration with
two servers:
Setting Up the Switch, iSCSI Initiator, and iSCSI target ports
65
NOTE: When multiple teamed NICs are configured, all HP 3PAR StoreServ Storage iSCSI ports
and ESX iSCSI NICs must be in the same VLAN of the IP switch.
NOTE:
66
NIC teaming is not supported in ESXi 5.x
Configuring the Host for an iSCSI Connection
Installing Virtual Machine Guest Operating System
The VMware ESX documentation lists recommended virtual machine guest operating systems (GOS)
and their installation and setup as virtual machines. Refer to the VMware ESX documentation for
information on setting up your virtual machine configuration.
CAUTION: In VMware KB 51306, VMware identifies a problem with RHEL 5 (GA), RHEL 4 U4,
RHEL 4 U3, SLES 10 (GA), and SLES 9 SP3 guest operating systems. Their file systems may become
read-only in the event of busy I/O retry or path failover of the ESX host’s SAN or iSCSI storage.
KB 51306 is available on the VMware Knowledge Base website:
http://kb.vmware.com
Because of this known issue, HP does not recommend, and does not support the usage of
RHEL 5 (GA), RHEL 4 U4, RHEL 4 U3, SLES 10 (GA), and SLES 9 SP3 as guest operating systems
for virtual machines on VMware ESX hosts attached to HP 3PAR StoreServ Storage systems.
NOTE: VMware and HP recommend the LSI logic adapter emulation for Windows 2003 Servers.
The LSI Logic adapter is also the default option for Windows 2003 when creating a new virtual
machine. HP testing has noted a high incidence of Windows 2003 virtual machine failures during
an ESX multipath failover/failback event when the BUS Logic adapter is used with Windows 2003
VMs.
NOTE: HP testing indicates that the SCSI timeout value for virtual machine guest operating systems
should be 60 seconds in order to successfully ride out path failovers at the ESX layer. Most guest
operating systems supported by VMware have a default SCSI timeout value of 60 seconds, but
this value should be checked and verified for each GOS installation. In particular, Red Hat 4.x
guest operating systems should have their SCSI timeout value changed from their default value of
30 seconds to 60 seconds.
This command line can be used to set the SCSI timeout on all SCSI devices presented to a Red Hat
4.x virtual machine to 60 seconds:
find /sys -name timeout | grep "host.*target.*timeout" | xargs -n 1
echo "echo 60 >"|sh
This must be added as a line in /etc/rc.local of the Red Hat 4.x guest OS in order for the
timeout change to be maintained with a virtual machine reboot.
Example of a modified /etc/rc.local file:
# cat /etc/rc.local
#!/bin/sh
#
# This script will be executed *after* all the other init scripts.
# You can put your own initialization stuff in here if you don't
# want to do the full Sys V style init stuff.
find /sys -name timeout | grep "host.*target.*timeout" | xargs -n 1
echo "echo 60 >"|shtouch /var/lock/subsys/local
Creating a VMkernel Port
The following steps describe how to set up a VMkernel port. Refer to the VMware vSphere Installation
and Setup Guide for detailed instructions regarding these settings.
1. Log into the VI/vSphere client and select the server from the inventory panel. The hardware
configuration page for this server appears.
2. Click the Configuration tab and click Networking.
Installing Virtual Machine Guest Operating System
67
3.
Click the Add Networking Link. The Add Network wizard appears.
4.
Select VMkernel and click Next. This lets you connect to the VMkernel which runs services for
iSCSI storage to the physical network. The Network Access page appears.
Select Create a Virtual Switch and select the NICs that will be used for iSCSI. (In this example,
2 NICs are selected to configure an active/active teamed NICs that will connect to the HP
3PAR storage array.)
Click Next.
In ESX 4.x, configure Active/Active NIC teaming by bringing up all of the NIC adapters being
used as "Active Adapters" in the vSwitch Properties. For each ESX host, use the VI/vSphere
client Configuration tab→Networking→Properties, click the Edit radio button, and then highlight
and use the Move Up radio button to bring each of the NIC adapters being used for NIC
teaming from the Standby Adapters or Unused Adapters section to the Active Adapters section.
5.
6.
7.
The screen below shows that this has been completed for NIC adapters vmnic1 and vmnic2.
68
Configuring the Host for an iSCSI Connection
8.
Click OK to complete.
NOTE: HP recommends an Active/Active NIC Teaming configuration for best failover
performance. NIC Teaming however, is not supported with ESXi 5.x.
9.
Click Next.
Creating a VMkernel Port
69
10. Enter a network label. Click Next.
11. Specify the IP settings that will be used for the iSCSI network. Click Next.
12. Review the information. Click Finish .
Configuring a Service Console Connection for the iSCSI Storage
The following steps describe how to configure the Service Console connection for the iSCSI storage.
1. From the Configuration tab, and the Networking tab, click Properties for the vSwitch associated
with the VMkernel port you just created for the iSCSI network.
2.
3.
4.
70
Click Add.
Select the radio button for VMkernel to add support for host management traffic.
Click Next.
Configuring the Host for an iSCSI Connection
5.
6.
Enter the Network Label and IP address for the Service console used to communicate with the
iSCSI software initiator. The IP address must be in the same subnet as the iSCSI.
Click Next. A window appears showing the changes/additions that have been made.
7.
8.
Click Finish.
Close all windows associated with the network configuration.
Configuring a Service Console Connection for the iSCSI Storage
71
9.
Check the Configuration display.
The new network configuration is displayed with the addition of the iSCSI network.
You should now be able to ping the HP 3PAR StoreServ Storage ports that were previously
defined from the COS.
Configuring the VMware iSCSI Initiator
The following steps show how to configure the VMware iSCSI initiator.
1. With the Configuration tab selected, click the Security Profile→Firewall Properties option from
the Software menu box.
2.
3.
72
Open up the ports that will be used for the iSCSI connection, then click OK.
The iSCSI software initiator needs to be enabled before the ESX host can use it. Click the
Storage Adapters option in the Hardware menu box.
Configuring the Host for an iSCSI Connection
4.
In the ESX host, select the Configuration tab. Then select iSCSI Software Adapter in Storage
Adapter.
5. Click the Properties tab.
6. Select the General tab.
7. Click Configure...
8. Select the Enabled check box for the status.
9. Click OK.
10. Click the Dynamic Discovery tab. Dynamic discovery enables the Send Targets discovery
method, where the initiator sends the Send Targets request to discover and log into the targets.
Configuring the VMware iSCSI Initiator
73
11.
12.
13.
14.
74
Click Add....
Enter the IP address of one of the previously defined HP 3PAR StoreServ Storage iSCSI ports.
Click OK.
Add additional HP 3PAR StoreServ Storage iSCSI ports if they exist and have been defined
on the system.
Configuring the Host for an iSCSI Connection
15. When all of the desired HP 3PAR StoreServ Storage iSCSI ports have been added to the
Dynamic Discovery tab, close this window.
Configuring the VMware iSCSI Initiator
75
16. Reboot the ESX host. If virtual machines are active, shut them down or suspend them.
The ESX host and HP 3PAR StoreServ Storage should now be configured for use. Using the
showhost command on the HP 3PAR StoreServ Storage, the new iSCSI connections should
now show as present.
# showhost
Id Name
--
----------------WWN/iSCSI_Name---------------- Port
iqn.1998-01.com.vmware:hpdl380-01-11a38a59
0:1:2
iqn.1998-01.com.vmware:hpdl380-01-11a38a59
1:1:2
As new LUNs are exported to the ESX iSCSI host, a rescan must be performed on the iSCSI
software adapter. This is accomplished in the same manner that Fiber Channel LUNs would
be rescanned.
Click Rescan, select the Scan for New Storage Devices check box, then click OK to rescan for
new LUNs exported to the ESX iSCSI host.
iSCSI Failover Considerations and Multipath Load Balancing
NOTE: For information about multipathing and configuring to Round Robin policy for all
connectivity types (FC, FCoE, and iSCSI, see “Multipath Failover Considerations and I/O Load
Balancing” (page 37).
Performance Considerations for Multiple Host Configurations
The information in this section should be considered when using multiple ESX hosts, (or other hosts
in conjunction with ESX hosts), that are connected in a fan-in configuration to a pair of HP 3PAR
StoreServ Storage ports.
76
Configuring the Host for an iSCSI Connection
NOTE: If you are running W2K8 VM Cluster with RDM-shared LUNs, then individually change
these specific RDM LUNs from Round Robin policy to Fixed Path policy.
NOTE: HP recommends changing the ESX Scsi.ConflictRetries from its default value of 80 to a
value of 200 when connected to an HP 3PAR StoreServ Storage running HP 3PAR OS version
2.2.4 or prior. This change lengthens the time allowed for I/O retries due to ESX SCSI-2 reservation
conflicts on VMFS LUNs caused by delayed processing of SCSI-2 reservation commands on the
HP 3PAR StoreServ Storage, thereby helping to avoid VM I/O failure.
You can change this value using the VMware ESX VI/vSphere client: In the ESX host, select the
Configuration tab, select Advanced Settings for software, select Scsi, scroll to Scsi.ConflictRetries,
and change the value in the field. Click OK to complete the change. A reboot is not required for
the change to take effect.
ESX/ESXi Additional Feature Considerations
To install the VAAI plugin and to take advantage of new ESX/ESXi and HP 3PAR StoreServ Storage
features, see “ESX/ESXi 4.1, ESXi 5.x Additional Feature Considerations” (page 51).
ESX/ESXi Additional Feature Considerations
77
8 Allocating Storage for Access by the ESX Host
This chapter describes the basic procedures that are required to create and export virtual volumes
so they can be utilized by the VMware ESX host. For complete details on creating and managing
storage on the HP 3PAR StoreServ Storage, consult the appropriate HP 3PAR documentation.
Creating Storage On the HP 3PAR StoreServ Storage
This section describes the general recommendations and restrictions for exporting storage from the
HP 3PAR StoreServ Storage to an ESX host.
Consult the HP 3PAR Management Console Users Guide and the HP 3PAR Command Line Interface
Reference for complete details on creating virtual volumes for a given HP 3PAR OS. In addition,
for a detailed discussion on using thinly-provisioned virtual volumes and strategies for creating
VLUNs, consult 3PAR Utility Storage with VMware vSphere.
To obtain a copy of this documentation, see the HP BSC website:
http://www.hp.com/go/bsc
NOTE: To create thinly-provisioned virtual volumes, an HP 3PAR Thin Provisioning license is
required.
Creating Virtual Volumes for HP 3PAR OS 2.2.4 and Later
After devising a plan for allocating space for the ESX host, you need to create the required virtual
volumes on the HP 3PAR StoreServ Storage. Volumes can be fully provisioned from a CPG or can
be thinly provisioned.
Using the HP 3PAR Management Console:
1.
From the Menu bar, select:
Actions→Provisioning→Virtual Volume→Create Virtual Volumes
2.
3.
Use the Create Virtual Volume wizard to create a base volume.
Select one of the following options from the Allocation list:
•
Fully Provisioned
•
Thinly Provisioned
Using the HP 3PAR OS CLI:
To create a fully-provisioned or thinly-provisioned virtual volume, issue the following HP 3PAR
OS CLI command:
# createvv [options] <usr_CPG> <VV_name> [.<index>] <size>[g|G|t|T]
Here is an example:
# createvv -tpvv -cnt 5 TESTLUNs 5g
78
Allocating Storage for Access by the ESX Host
Creating Virtual Volumes for HP 3PAR OS 2.2.3 or Earlier
When running HP 3PAR OS 2.2.3 or earlier, the createaldvv command can be used to create
virtual volumes on the HP 3PAR StoreServ Storage that can then be exported and discovered by
the ESX host. Here is the general form of the command:
# createaldvv [options] <vvname>[.<index>] <size>[g|G|t|T]
Here is an example:
# createaldvv -cnt 5 TESTLUNs 5G
This will create five virtual volumes of 5 Gb each in size, fully provisioned from PDs.
NOTE: To create a fully-provisioned or thinly-provisioned virtual volume, consult the HP 3PAR
Command Line Interface Reference, which is available on the HP BSC website:
http://www.hp.com/go/bsc
Exporting LUNs to an ESX Host
This section explains how to export virtual volumes created on the HP 3PAR StoreServ Storage as
VLUNs for the ESX host.
When exporting VLUNs to the VMware ESX host, you should observer the following guidelines:
•
New VLUNs that are exported while the host is running will not be registered until a Bus Rescan
is initiated. This may be performed from the VI/vSphere client Management Interface. Some
versions of ESX will automatically scan for newly exported LUNs.
•
Disks can be added to a virtual machine with the virtual machine powered up. However, to
remove a disk, the virtual machine must be powered off. This is a limitation of ESX.
•
The maximum number of LUNs on a single ESX HBA port is 256, and 256 total LUNs on the
ESX host. Internal devices, such as local hard drives and CD drives, are counted as a LUN in
the ESX host LUN count.
•
VLUNs can be created with any LUN number in the range from 0 to 255 (VMware ESX
limitation).
•
iSCSI LUNs and FC LUNs are treated as any other LUN on the ESX host. No special
requirements or procedures are needed to use iSCSI LUNs. HP does not recommend or support
same storage LUN being exported on different protocol interfaces, such as exporting to FC
interface on one host and iSCSI on another host, because the timing and error recovery of
the protocols would be different.
•
The ESX limitation for the largest LUN that can be utilized by the ESX host is 2047 GB. For
ESXi 5.x, the maximum LUN size is 16 T or 16384 GB.
•
Sparse LUN numbering (meaning that LUN numbers can be skipped), is supported by VMware
ESX host. A LUN 0 is not required.
For failover support using the QLogic or Emulex drivers, virtual volumes should be exported down
multiple paths to the host simultaneously. To facilitate this task, create a host definition on the
HP 3PAR StoreServ Storage that includes the WWNs of multiple HBA ports on the host and export
the VLUNs to that host definition.
It has been noted by HP that provisioning several VMs to a smaller number of large LUNs, versus
a single VM per single LUN, provides better overall results. Further examination and explanation
of this recommendation is outlined in the document 3PAR Utility Storage with VMware vSphere,
which is available on the HP BSC website:
Exporting LUNs to an ESX Host
79
http://www.hp.com/go/bsc
Concerning TPVVs, ESX VMFS-3 does not write data to the entire volume at initialization and it
can be used with TPVVs without any configuration changes to VMFS. A further examination of this
subject, recommendations, and limitations are explored in the HP document 3PAR Utility Storage
with VMware vSphere.
Creating a VLUN for Export
Creation of a VLUN template enables export of a VV as a VLUN to one or more ESX hosts. There
are four types of VLUN templates:
•
port presents - created when only the node:slot:port are specified. The VLUN
is visible to any initiator on the specified port.
•
host set - created when a host set is specified. The VLUN is visible to the initiators of
any host that is a member of the set.
•
host sees - created when the hostname is specified. The VLUN is visible to the initiators
with any of the host’s WWNs.
•
matched set - created when both hostname and node:slot:port are specified.
The VLUN is visible to initiators with the host’s WWNs only on the specified port.
You have the option of exporting the LUNs through the HP 3PAR Management Console or the
HP 3PAR OS CLI.
Using the HP 3PAR Management Console
1.
2.
From the Menu bar, select Actions→Provisioning→VLUN→Create VLUN.
Use the Export Virtual Volume dialog box to create a VLUN template.
Using the HP 3PAR OS CLI
To create a port presents VLUN template, issue the following command:
# createvlun [options] <VV_name | VV_set> <LUN> <node:slot:port
To create a host sees or host set VLUN template, issue the following command:
# createvlun [options] <VV_name | VV_set> <LUN> <host_name/set>
To create a matched set VLUN template, issue the following command:
# createvlun [options] <VV_name | VV_set> <LUN> <node:slot:port>/<host_name>
To create a host set VLUN template, issue the following command:
# createvlun [options] <VV_name | VV_set> <LUN> <host_set>
Here is an example:
# createvlun -cnt 5 TESTLUNs.0 0 hostname/hostdefinition
or:
# createvlun -cnt 5 TESTVLUN.0 0 set:hostsetdefination
80
Allocating Storage for Access by the ESX Host
Consult the HP 3PAR Management Console Users Guide and the HP 3PAR Command Line Interface
Reference for complete details on exporting volumes and available options for the HP 3PAR OS
version that is being used on the HP 3PAR StoreServ Storage. These documents are available on
the HP BSC website:
http://www.hp.com/go/bsc
NOTE: The commands and options available for creating a virtual volume may vary for earlier
versions of the HP 3PAR OS.
Discovering LUNs on VMware ESX Hosts
This section provides tips for discovering LUNs that are being utilized by the ESX host.
Once the host is built, the preferred method for configuring and managing the use of the ESX host
is through a VI/vSphere client Management Interface and VMware vCenter Server.
New VLUNs that are exported while the host is running will not be registered until a Bus Rescan
is initiated. This may be performed from the VI/vSphere client Management Interface. If failover
support is utilized (recommended), view all LUNs and their respective paths using the menu from
the ESX (Configuration tab →Storage Adapter).
Disks can be added to a virtual machine with the virtual machine powered up. However, to remove
a disk, the virtual machine must be powered off. This is a limitation of ESX.
The maximum number of LUNs on a single ESX HBA port is 256, and 256 total LUNs on the ESX
host. Internal devices, such as local hard drives and CD drives, are counted as a LUN in the ESX
host LUN count.
Removing Volumes
After removing a VLUN exported from the HP 3PAR StoreServ Storage, perform a ESX host bus
adapter rescan. ESX will update the disk inventory upon rescan. This applies to both Fibre Channel
and iSCSI.
It is advisable to remove the disk/LUN from the virtual machine inventory, detach from the ESX
host, and then remove it from the HP 3PAR StoreServ Storage using the removevlun and
removevv HP 3PAR OS CLI commands or using the HP 3PAR Management Console. If a LUN is
not detached but is removed from the HP 3PAR StoreServ Storage, it appears as a device in an
error state, and is cleared after an ESX host reboot.
Discovering LUNs on VMware ESX Hosts
81
Figure 20 Detaching a LUN
Host and Storage Usage
Eventlog and Host Log Messages
All HP 3PAR system debug messages can be seen using the showeventlog -debug cli
command. On the ESX host, errors are reported in /var/log/vmkernel files. Use the showalert
HP 3PAR OS CLI command to see alerts and warnings posted from the HP 3PAR StoreServ Storage.
Some examples of storage server posted messages:
•
If the user has set the space allocation warning for a TPVV volume, the system eventlog will
show the Thin provisioning soft threshold reached message when the limit is
hit.
Example:
1 Debug
Host error
undefined Port 1:5:2 -- SCSI status 0x02 (Check
condition) Host:sqa-dl380g5-14-esx5 (WWN 2101001B32A4BA98) LUN:22 LUN
WWN:50002ac00264011c VV:0 CDB:280000AB082000000800 (Read10) Skey:0x06 (Unit
attention) asc/q:0x38/07 (Thin provisioning soft threshold reached) VVstat:0x00
(TE_PASS
-- Success) after 0.000s (Abort source unknown) toterr:74882,
lunerr:2
•
If the user has set a hard limit on the HP 3PAR StoreServ Storage volume when using HP 3PAR
OS 2.3.1 MU2 or later, the HP 3PAR StoreServ Storage will post the write protect error
(ASC/Q: 0x27/0x7) when the limit is reached. This is considered a hard error, and the VM
is stunned in ESX 4.x and ESXi 5.x. Additional space needs to be added to the storage to
clear the error condition.
PDT
1 Debug
Host error
undefined Port 1:5:2 -- SCSI status
0x02 (Check condition) Host:sqa-dl380g5-14-esx5 (WWN 2101001B32A4BA98) LUN:22
LUN WWN:50002ac00264011c VV:612 CDB:2A00005D6CC800040000 (Write10) Skey:0x07 (Data
protect) asc/q:0x27/07 (Space allocation failed write protect) VVstat:0x41
(VV_ADM_NO_R5
-- No space left on snap data volume) after 0.302s (Abort
source unknown) toterr:74886, lunerr:3
For ESX 4.x or ESXi 5.x, an ESX host managed by vSphere client or vCenter Server will scan
for LUNs at 5-minute intervals by issuing the REPORT LUN command and discovering any
new LUNs.
82
Allocating Storage for Access by the ESX Host
At an interval of every 5 minutes, an ESX host such as ESXi 5.x sends REPORT LUN commands
and discovers any new LUNs.
On ESXi 5.x, the following vmkernel log message is not harmful and can be ignored:
34:41.371Z cpu0:7701)WARNING: ScsiDeviceIO: 6227: The
device naa.50002ac00026011b does not permit the system to change the sitpua bit
to 1.
For ESXi 5.x, the Virtual Disk max disk can be only 2 TB, even though the physical LUN seen
on the system is 16 TB.
Host and Storage Usage
83
9 Booting the VMware ESX Host from the HP 3PAR StoreServ
Storage
This chapter provides a general overview of the procedures that are required to boot the VMware
ESX operating system from the SAN.
In a boot-from-SAN environment, each ESX host’s operating system is installed on a the HP 3PAR
StoreServ Storage, rather than on the host’s internal disk. In this situation, you should create a
separate virtual volume for each ESX host to be used for the boot image.
Here are the general steps in this process:
•
Perform the required zoning
•
Create a virtual volume and export it as a VLUN to the ESX host
•
Boot the system and enter the HBA bios
•
Enable the HBA port to boot
•
Discover the LUN and designate it as bootable through the HBA BIOS
For detailed information, consult the VMware Fibre Channel SAN Configuration Guide.
For information about setting a CN1100E CNA to boot the host from SAN, see “Hardware iSCSI
Support” (page 25).
The VMware ESX host has an option that allows the VMware Base OS to be installed and booted
from a SAN or HP 3PAR StoreServ Storage virtual storage device. You can choose this option
during the initial installation phase of the VMware Server Installation. Refer to the VMware
documentation for further information regarding 'SANboot'.
HP makes the following general recommendations for preparing the host HBAs for a SAN boot
deployment:
NOTE: The NVRAM settings on HBAs can be changed by any server in which they are installed.
These settings will persist in the HBA even after it is removed from a server. To obtain the correct
settings for this configuration, you must return all NVRAM settings to their default values.
1.
After installation of the HBAs, reset all of the HBA NVRAM settings to their default values.
NOTE: Each host adapter port is reported as a host bus adapter and the HBA settings should
be set to default.
2.
Enter the host adapter setup program during server boot by pressing the combination of keys
indicated by the host adapter.
Change and save all HBA settings to their default settings.
NOTE:
When using a McDATA fabric, set the HBA topology to 'point to point’.
There may be other vendor HBAs not listed here with different setup entry key combinations.
3.
84
Reboot the host computer.
Booting the VMware ESX Host from the HP 3PAR StoreServ Storage
10 Support and Other Resources
Contacting HP
For worldwide technical support information, see the HP support website:
http://www.hp.com/support
Before contacting HP, collect the following information:
•
Product model names and numbers
•
Technical support registration number (if applicable)
•
Product serial numbers
•
Error messages
•
Operating system type and revision level
•
Detailed questions
Specify the type of support you are requesting:
HP 3PAR storage system
Support request
HP 3PAR StoreServ 7200, 7400, and 7450 Storage
systems
StoreServ 7000 Storage
HP 3PAR StoreServ 10000 Storage systems
3PAR or 3PAR Storage
HP 3PAR T-Class storage systems
HP 3PAR F-Class storage systems
HP 3PAR documentation
For information about:
See:
Supported hardware and software platforms
The Single Point of Connectivity Knowledge for HP
Storage Products (SPOCK) website:
http://www.hp.com/storage/spock
Locating HP 3PAR documents
The HP 3PAR StoreServ Storage site:
http://www.hp.com/go/3par
To access HP 3PAR documents, click the Support link for
your product.
HP 3PAR storage system software
Storage concepts and terminology
HP 3PAR StoreServ Storage Concepts Guide
Using the HP 3PAR Management Console (GUI) to configure HP 3PAR Management Console User's Guide
and administer HP 3PAR storage systems
Using the HP 3PAR CLI to configure and administer storage
systems
HP 3PAR Command Line Interface Administrator’s
Manual
CLI commands
HP 3PAR Command Line Interface Reference
Analyzing system performance
HP 3PAR System Reporter Software User's Guide
Installing and maintaining the Host Explorer agent in order
to manage host configuration and connectivity information
HP 3PAR Host Explorer User’s Guide
Creating applications compliant with the Common Information HP 3PAR CIM API Programming Reference
Model (CIM) to manage HP 3PAR storage systems
Contacting HP
85
For information about:
See:
Migrating data from one HP 3PAR storage system to another HP 3PAR-to-3PAR Storage Peer Motion Guide
86
Configuring the Secure Service Custodian server in order to
monitor and control HP 3PAR storage systems
HP 3PAR Secure Service Custodian Configuration Utility
Reference
Using the CLI to configure and manage HP 3PAR Remote
Copy
HP 3PAR Remote Copy Software User’s Guide
Updating HP 3PAR operating systems
HP 3PAR Upgrade Pre-Planning Guide
Identifying storage system components, troubleshooting
information, and detailed alert information
HP 3PAR F-Class, T-Class, and StoreServ 10000 Storage
Troubleshooting Guide
Installing, configuring, and maintaining the HP 3PAR Policy
Server
HP 3PAR Policy Server Installation and Setup Guide
Support and Other Resources
HP 3PAR Policy Server Administration Guide
For information about:
See:
Planning for HP 3PAR storage system setup
Hardware specifications, installation considerations, power requirements, networking options, and cabling information
for HP 3PAR storage systems
HP 3PAR 7200, 7400, and 7450 storage systems
HP 3PAR StoreServ 7000 Storage Site Planning Manual
HP 3PAR StoreServ 7450 Storage Site Planning Manual
HP 3PAR 10000 storage systems
HP 3PAR StoreServ 10000 Storage Physical Planning
Manual
HP 3PAR StoreServ 10000 Storage Third-Party Rack
Physical Planning Manual
Installing and maintaining HP 3PAR 7200, 7400, and 7450 storage systems
Installing 7200, 7400, and 7450 storage systems and
initializing the Service Processor
HP 3PAR StoreServ 7000 Storage Installation Guide
HP 3PAR StoreServ 7450 Storage Installation Guide
HP 3PAR StoreServ 7000 Storage SmartStart Software
User’s Guide
Maintaining, servicing, and upgrading 7200, 7400, and
7450 storage systems
HP 3PAR StoreServ 7000 Storage Service Guide
Troubleshooting 7200, 7400, and 7450 storage systems
HP 3PAR StoreServ 7000 Storage Troubleshooting Guide
HP 3PAR StoreServ 7450 Storage Service Guide
HP 3PAR StoreServ 7450 Storage Troubleshooting Guide
Maintaining the Service Processor
HP 3PAR Service Processor Software User Guide
HP 3PAR Service Processor Onsite Customer Care
(SPOCC) User's Guide
HP 3PAR host application solutions
Backing up Oracle databases and using backups for disaster HP 3PAR Recovery Manager Software for Oracle User's
recovery
Guide
Backing up Exchange databases and using backups for
disaster recovery
HP 3PAR Recovery Manager Software for Microsoft
Exchange 2007 and 2010 User's Guide
Backing up SQL databases and using backups for disaster
recovery
HP 3PAR Recovery Manager Software for Microsoft SQL
Server User’s Guide
Backing up VMware databases and using backups for
disaster recovery
HP 3PAR Management Plug-in and Recovery Manager
Software for VMware vSphere User's Guide
Installing and using the HP 3PAR VSS (Volume Shadow Copy HP 3PAR VSS Provider Software for Microsoft Windows
Service) Provider software for Microsoft Windows
User's Guide
Best practices for setting up the Storage Replication Adapter HP 3PAR Storage Replication Adapter for VMware
for VMware vCenter
vCenter Site Recovery Manager Implementation Guide
Troubleshooting the Storage Replication Adapter for VMware HP 3PAR Storage Replication Adapter for VMware
vCenter Site Recovery Manager
vCenter Site Recovery Manager Troubleshooting Guide
Installing and using vSphere Storage APIs for Array
Integration (VAAI) plug-in software for VMware vSphere
HP 3PAR VAAI Plug-in Software for VMware vSphere
User's Guide
HP 3PAR documentation
87
Typographic conventions
Table 4 Document conventions
Convention
Element
Bold text
• Keys that you press
• Text you typed into a GUI element, such as a text box
• GUI elements that you click or select, such as menu items, buttons,
and so on
Monospace text
• File and directory names
• System output
• Code
• Commands, their arguments, and argument values
<Monospace text in angle brackets> • Code variables
• Command variables
Bold monospace text
• Commands you enter into a command line interface
• System output emphasized for scannability
WARNING! Indicates that failure to follow directions could result in bodily harm or death, or in
irreversible damage to data or to the operating system.
CAUTION:
NOTE:
Indicates that failure to follow directions could result in damage to equipment or data.
Provides additional information.
Required
Indicates that a procedure must be followed as directed in order to achieve a functional and
supported implementation based on testing at HP.
HP 3PAR branding information
88
•
The server previously referred to as the "InServ" is now referred to as the "HP 3PAR StoreServ
Storage system."
•
The operating system previously referred to as the "InForm OS" is now referred to as the "HP
3PAR OS."
•
The user interface previously referred to as the "InForm Management Console (IMC)" is now
referred to as the "HP 3PAR Management Console."
•
All products previously referred to as “3PAR” products are now referred to as "HP 3PAR"
products.
Support and Other Resources
11 Documentation feedback
HP is committed to providing documentation that meets your needs. To help us improve the
documentation, send any errors, suggestions, or comments to Documentation Feedback
([email protected]). Include the document title and part number, version number, or the URL
when submitting your feedback.
89