1
Service Processor (GSP or MP) User Guide
HP Part Number: A5201-90017-ed2
Published: October 2009
Edition: 2nd Edition
© Copyright 2004-2009
Legal Notices
The information contained herein is subject to change without notice. The only warranties for HP products and services are set forth in the express
warranty statements accompanying such products and services. Nothing herein should be construed as constituting an additional warranty. HP
shall not be liable for technical or editorial errors or omissions contained herein.
Printed in U.S.A.
Intel, Pentium, Intel Inside, Itanium, and the Intel Inside logo are trademarks or registered trademarks of Intel Corporation or its subsidiaries in
the United States and other countries.
Linux is a U.S. registered trademark of Linus Torvalds.
Table of Contents
About This Document.........................................................................................................7
Intended Audience.................................................................................................................................7
Publishing History..................................................................................................................................7
Document Organization.........................................................................................................................7
Typographic Conventions......................................................................................................................8
HP-UX Release Name and Release Identifier.........................................................................................8
Related Documents.................................................................................................................................9
HP Encourages Your Comments............................................................................................................9
1 Overview of the Service Processor.............................................................................11
Introduction to Service Processor Interfaces........................................................................................11
Service Processor (MP or GSP) Features...............................................................................................11
Service Processor Accounts and Access Levels....................................................................................13
2 Using the Service Processor........................................................................................15
Accessing and Using the Service Processor..........................................................................................15
Using Service Processor Menus............................................................................................................17
Navigating through Service Processor Menus................................................................................18
nPartition Console Features..................................................................................................................20
nPartition Console Access versus Direct OS Login.........................................................................21
Network Configuration for a Service Processor...................................................................................21
Viewing Console Logs..........................................................................................................................23
Viewing Chassis Codes or Event Logs.................................................................................................24
Virtual Front Panel (VFP) nPartition Views..........................................................................................25
A MP Commands............................................................................................................27
Command Reference: Service Processor (MP or GSP) Commands......................................................27
B Extensible Firmware Interface (EFI).............................................................................29
EFI System Boot Environment..............................................................................................................29
Command Reference: EFI Shell Commands.........................................................................................30
C Boot Console Handler (BCH).....................................................................................35
Boot Console Handler (BCH) System Boot Environment....................................................................35
Command Reference: BCH Menu Commands.....................................................................................36
Table of Contents
3
List of Figures
2-1
2-2
B-1
C-1
4
Overview of Service Processor (MP or GSP) Menus.....................................................................18
Navigating through Service Processor (MP or GSP) Menus........................................................20
Accessing the EFI Environment for an nPartition.........................................................................30
Accessing the BCH Interface for an nPartition..............................................................................36
List of Figures
List of Tables
1
2
2-1
2-2
A-1
B-1
C-1
Publishing History Details..............................................................................................................7
HP-UX 11i Releases.........................................................................................................................8
Default Configuration for Service Processor Customer LAN (All nPartition Servers)................22
Default Configuration for Service Processor Private LAN (HP Superdome Servers Only).........22
Service Processor (MP or GSP) Command Reference...................................................................27
EFI Shell Command Reference......................................................................................................31
Boot Console Handler (BCH) Command Reference.....................................................................37
5
List of Examples
2-1
6
Overview of a Service Processor Login Session............................................................................16
List of Examples
About This Document
This book describes procedures, concepts, and principles for using the management processor
(GSP or MP) on HP servers that support nPartitions.
This preface has the following sections:
Intended Audience
This document is for customers using the management processor (MP) on the HP servers that
support nPartitions, including the following servers: rp7400, rp7420, rx7620, rp8400, rp8420,
rx8620, and HP Superdome server.
Publishing History
The publishing history below identifies the edition dates of this manual. Updates are made to
this publication on an unscheduled, as needed, basis.
Table 1 Publishing History Details
Document
Manufacturing Part
Number
Operating Systems
Supported
Supported Product Versions
Publication Date
A5201–90017
HP-UX, Windows, Linux,
OpenVMS
rp7400, rp7420, rx7620, rp8400, rp8420,
rx8620, Superdome
October 2004
A5201-90017-ed2
HP-UX, Windows, Linux,
OpenVMS
rp7400, rp7420, rx7620, rp8400, rp8420,
rx8620, Superdome
October 2009
Document Organization
This guide is divided into the following chapters.
Chapter 1
Overview of the Service Processor Use this chapter to learn about the features and
specifications of the Service Processor.
Chapter 2
Using the Service Processor Use this chapter to learn how to access and use the
Service Processor.
Appendix A
MP Commands This appendix provides the MP commands available for thr
Service Processor.
Appendix B
Extensible Firmware Interface This appendix provides information about the
Extensible Firmware Interface (EFI) environment.
Appendix C
Boot Console Handler This appendix provides information about the Boot Console
Handler (BCH) environment.
Intended Audience
7
Typographic Conventions
This document uses the following conventions.
WARNING!
A warning lists requirements that you must meet to avoid personal injury.
CAUTION: A caution provides information required to avoid losing data or avoid losing system
functionality.
NOTE: A note highlights useful information such as restrictions, recommendations, or important
details about HP product features.
Book Title
The title of a book. On the Web and on the Instant Information CD, it may
be a hot link to the book itself.
KeyCap
The name of a keyboard key or graphical interface item (such as buttons,
tabs, and menu items). Note that Return and Enter both refer to the same
key.
Emphasis
Text that is emphasized.
Bold
Text that is strongly emphasized.
Bold
The defined use of an important word or phrase.
ComputerOut
Text displayed by the computer.
UserInput
Commands and other text that you enter.
Command
A command name or qualified command phrase.
Option
An available option.
Screen Output
Example of computer screen output.
[]
The contents are optional in formats and command descriptions. If the
contents are a list separated by |, you must select one of the items.
{}
The contents are required in formats and command descriptions. If the
contents are a list separated by |, you must select one of the items.
...
The preceding element may be repeated an arbitrary number of times.
|
Separates items in a list of choices.
HP-UX Release Name and Release Identifier
Each HP-UX 11i release has an associated release name and release identifier. The uname(1)
command with the -r option returns the release identifier. Table 2 shows the releases available
for HP-UX 11i.
Table 2 HP-UX 11i Releases
8
Release Identifier
Release Name
Supported Processor Architecture
B.11.11
HP-UX 11i v1
PA-RISC
B.11.20
HP-UX 11i v1.5
Intel® Itanium®
B.11.22
HP-UX 11i v1.6
Intel Itanium
B.11.23
HP-UX 11i v2.0
Intel Itanium
Related Documents
You can find other information on HP server hardware management, Microsoft® Windows®,
and diagnostic support tools in the following publications.
Website for HP Technical Documentation:
Server Hardware Information:
http://hp.com
http://hp.com/hpux/hw/
Windows Operating System Information You can find information about administration of the
Microsoft Windows operating system at the following websites, among others:
• http://hp.com/windows_nt/
• http://www.microsoft.com/technet/
Diagnostics and Event Monitoring: Hardware Support Tools Complete information about HP’s
hardware support tools, including online and offline diagnostics and event monitoring tools, is
at the http://hp.com/hpux/diag/ website. This site has manuals, tutorials, FAQs, and other
reference material.
Web Site for HP Technical Support:
http://us-support2.external.hp.com/
Books about HP-UX Published by Prentice Hall The http://www.hp.com/hpbooks/ Web
site lists the HP books that Prentice Hall currently publishes, such as HP-UX books including:
• HP-UX 11i System Administration Handbook
http://www.hp.com/hpbooks/prentice/ptr_0130600814.html
• HP-UX Virtual Partitions
http://www.hp.com/hpbooks/prentice/ptr_0130352128.html
HP Books are available worldwide through bookstores, online booksellers, and office and
computer stores.
HP Encourages Your Comments
HP encourages your comments concerning this document. We are committed to providing
documentation that meets your needs. Send errors, suggestions for improvement, or compliments
to:
http://hp.com/en/feedback.html (web) or
http://[email protected] (email address)
Include the document title, manufacturing part number, and any comment, error found, or
suggestion for improvement you have concerning this document.
Related Documents
9
10
1 Overview of the Service Processor
This chapter provides an introduction to the service processor on HP cell-based servers.
Introduction to Service Processor Interfaces
The service processor (MP or GSP) utility hardware is an independent support system for
nPartition servers. It provides a way for you to connect to a server complex and perform
administration or monitoring tasks for the server hardware and its nPartitions.
The main features of the service processor include:
•
•
•
•
•
Command Menu
nPartition Consoles
Console Logs
Chassis Code Viewer (on HP 9000 servers with HP PA-8700 processors) or Event Log Viewer
(on servers based on the HP sx1000 chipset)
Virtual Front Panels (live displays of nPartition and cell states)
These features are described in more detail in “Service Processor (MP or GSP) Features” (page 11).
The service processor is available when the cabinet has standby power even if the main (48-volt)
cabinet power switch is turned off.
Access to the service processor is restricted by user accounts. Each user account is password
protected and provides a specific level of access to the server complex and service processor
commands.
Multiple users can independently interact with the service processor because each service
processor login session is private. However, some output is mirrored: the Command menu and
each nPartition console permit one interactive user at a time and mirrors output to all users
accessing those features. Likewise, the service processor mirrors live chassis codes to all users
accessing the Live Chassis Logs feature (or the Live Events feature).
Up to 32 users can simultaneously login to the service processor through the network (customer
LAN) interface, and they can independently manage nPartitions or view the server complex
hardware states.
Two additional service processor login sessions can be supported by the local and remote serial
ports. These allow for serial port terminal access (through the local RS-232 port) and external
modem access (through the remote RS-232 port).
In addition to providing enhanced features necessary for managing a multiple-nPartition server,
the service processor (MP or GSP) on nPartition servers is similar to the service processor on
other HP servers.
For example, the service processor manages the complex profile, which defines nPartition
configurations as well as complex-wide settings for the server.
The service processor also controls power, reset, and TOC capabilities; displays and records
system events (or chassis codes); and can display detailed information about the various internal
subsystems.
Service Processor (MP or GSP) Features
The following list describes the primary features available through the service processor on
nPartition-capable HP servers.
Command Menu
The Command menu provides commands for system
service, status, and access configuration tasks.
To enter the Command menu, enter CM at the service
processor Main menu. To exit the service processor
Introduction to Service Processor Interfaces
11
Command menu, enter MA or enter ^b (Control-b) to return
to the service processor Main menu.
See “MP Commands” (page 27) for details.
Service processor commands are restricted based on the
three levels of access: Administrator, Operator, and Single
Partition User. See “Service Processor Accounts and Access
Levels” (page 13) for details.
Consoles
Each nPartition in a server complex has its own console.
Enter CO at the service processor Main menu to access the
nPartition consoles. To exit the console, enter ^b
(Control-b).
See “nPartition Console Features” (page 20) for details.
Console output for each nPartition is reflected to all users
currently accessing the nPartition console.
One console user can have interactive access to each
nPartition console, and all other users of the console have
read-only access. To gain write access for a console, enter
^e cf (Control-e c f).
Each nPartition console provides access to:
•
The nPartition system boot environment: either BCH
or EFI.
The BCH or EFI system boot environment is available
when the nPartition is active but has not yet loaded
or booted an operating system.
—
—
•
The Boot Console Handler (BCH) environment
is provided on HP 9000 servers only (PA-RISC
servers).
The Extensible Firmware Interface (EFI) is
provided on HP Integrity servers only (Intel®
Itanium®-based servers).
HP-UX console for the nPartition.
The nPartition console provides console login access
to HP-UX and serves as /dev/console for the
nPartition.
Console Logs
Enter CL from the service processor Main menu to access
the console logs menu. To exit the console log, enter ^b
(Control-b).
Each nPartition has its own console log, which stores a
history of console output for the nPartition, including boot
output, system boot environment (BCH or EFI) activity,
and any HP-UX console login activity.
See “Viewing Console Logs” (page 23) for details.
The console log provides a limited history; it is a circular
log file that overwrites the oldest information with the
most recent.
All console activity is recorded in the console log regardless
of whether any service processor users are connected to
the console.
12
Overview of the Service Processor
Chassis Logs and Event Logs
On both HP 9000 systems and HP Integrity systems, you
can view real-time (live) system events and can view prior
events that have been stored in a log history. Use the SL
(“show logs”) option from the service processor Main Menu
to view events/chassis codes.
• On nPartition-capable HP 9000 servers with
HP PA-8700 processors, SL provides the Chassis Log
Viewer. The chassis log viewer includes options for
viewing activity (level 1 and greater) logs, error (level
2 and greater) logs, and live logs (which optionally
may be filtered by cell, nPartition, or alert level).
• On nPartition-capable servers based on the HP sx1000
chipset, SL provides the Event Log Viewer. The event
log viewer includes options for viewing: forward
progress (level 1 and greater) logs, system event (level
2 and greater) logs, and live logs (which optionally
may be filtered by cell, nPartition, or alert level).
See “Viewing Chassis Codes or Event Logs” (page 24) for
details.
Virtual Front Panel (VFP) for an
nPartition
The Virtual Front Panel (VFP) for each nPartition displays
real-time boot activity and details about all cells assigned
to the nPartition. The VFP display automatically updates
as cell and nPartition status changes. A system-wide VFP
also is provided.
Enter VFP at the Main menu to access the View Front Panel
menu. To exit a Virtual Front Panel, enter ^b (Control-b).
See “Virtual Front Panel (VFP) nPartition Views” (page 25)
for details.
Service Processor Accounts and Access Levels
To access the service processor interface for a server complex, you must have a user account that
enables you to login to the service processor.
Each server complex has its own set of service processor user accounts, which are defined for
the server complex, and may differ from accounts on other complexes.
Service processor user accounts have a specific login name, password, and access level.
The three user account access levels are:
Administrator Account
Provides access to all commands and to all nPartition
consoles and Virtual Front Panels.
Can manage user accounts (using the Command menu SO
command) and can reconfigure various service processor
settings.
Operator Account
Provides access to a subset of commands and to all
nPartition consoles and Virtual Front Panels.
Single Partition User Account
Provides access to a restricted subset of commands and
provides access to the nPartition console for a single
nPartition. However, it allows the user to view the Virtual
Front Panel for any nPartition.
Can only execute commands that affect the assigned
nPartition.
Service Processor Accounts and Access Levels
13
Cannot execute commands that could potentially affect
multiple nPartitions or affect the service processor
configuration.
Each user account can either permit repeated login sessions
(for a “multiple use” account), or restrict the account to
only log in once (for “single use” accounts).
14
Overview of the Service Processor
2 Using the Service Processor
Accessing and Using the Service Processor
This section describes how to login to the service processor (MP or GSP) for an nPartition server
complex.
You can connect to the service processor for a server complex by using the following methods:
•
Connecting through the customer LAN port by using telnet if login access through the
customer LAN is enabled for the service processor.
On HP Superdome servers, the customer LAN hardware is labeled “Customer LAN”. On
HP rp8400 servers, it is “GSP LAN”. On HP rp7405/rp7410 servers, it is the only LAN port
on the core I/O.
Use telnet to open a connection with the service processor, and log in by entering the
account name and corresponding password.
•
Connecting through the local RS-232 port using a direct serial cable connection.
On HP Superdome servers, the local RS-232 port is labeled “Local RS-232”. On HP rp8400
servers, it is the “Local Console” port. On HP rp7405/rp7410 servers, it is the 9-pin D-shaped
connector (DB9) labeled “Console”.
•
Connecting through the remote RS-232 port using external model (dial-up) access if remote
modem access is configured.
On HP Superdome servers, the remote RS-232 port is labeled “Remote RS-232”. On HP
rp8400 servers, it is the “Remote Console” port. On HP rp7405/rp7410 servers, it is the DB9
connector labeled “Remote”.
Accessing and Using the Service Processor
15
Example 2-1 Overview of a Service Processor Login Session
The following output shows a sample login session for a server with the service processor
hostname of “hpsys-s”.
> telnet hpsys-s
Trying...
Connected to hpsys-s.rsn.hp.com.
Escape character is ’^]’.
Local flow control off
MP login: Username
MP password:
Welcome to the
S Class 16K-A
Management Processor
(c) Copyright 1995-2001 Hewlett-Packard Co., All Rights Reserved.
Version 0.23
MP MAIN MENU:
CO:
VFP:
CM:
CL:
SL:
HE:
X:
Consoles
Virtual Front Panel
Command Menu
Console Logs
Show chassis Logs
Help
Exit Connection
MP>
Procedure 2-1 Logging in to a Service Processor
This procedure connects to and logs in to the service processor (MP or GSP) for a server complex
by using telnet to access the customer LAN.
If connecting through the local RS-232 port, skip Step 1 (instead establish a direct-cable connection)
and begin with Step 2.
1.
Use the telnet command on a remote system to connect to the service processor for the
server complex.
You can connect directly from the command line, for example:
telnet sdome-g
or run telnet first, and then issue the open command (for example, open sdome-g) at
the telnet> prompt.
All telnet commands and escape options are supported while you are connected to the
service processor.
2.
Login using your service processor user account name and password.
GSP login:Username
GSP password:Password
16
Using the Service Processor
3.
Use the service processor menus and commands as needed and log out when done.
To log out, select the Exit Connection menu item from the Main menu (enter X at the GSP>
prompt or MP> prompt).
You also can terminate a login session by issuing the telnet escape key sequence ^] (enter:
Control-right bracket) and entering close at the telnet> prompt.
NOTE: If possible, you should log off of any consoles and menus before terminating your
telnet session.
If accessing an OS on an nPartition, log out of the OS before exiting the console and service
processor sessions. If you do not log off, an open OS login session remains available to any
other service processor users.
Using Service Processor Menus
The service processor (MP or GSP) has a set of menus that give you access to various commands,
consoles, log files, and other features.
See “Navigating through Service Processor Menus” (page 18) for details on using these menus.
The following menus are available from the service processor Main menu:
•
•
•
•
•
•
Console Menu—Provides access to nPartition consoles for the server.
Virtual Front Panel Menu—Provides a Virtual Front Panel for each nPartition (or for the
entire server complex).
Command Menu—Includes service, status, system access, and other commands.
Console Log Viewer Menu—Allows access to the console logs for nPartitions.
Chassis or Event Log Viewer Menu—Allows access to the server chassis code logs (on HP
9000 servers with HP PA-8700 processors) or event logs (on servers based on the HP sx1000
chipset). Chassis logs and event logs are functionally equivalent. They record system activities,
however, the event logs are more descriptive.
Help Menu—Provides online help on a variety of service processor topics and on all service
processor Command menu commands.
These menus provide a central point for managing an nPartition server complex outside of an
operating system.
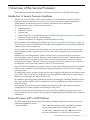
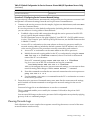
The service processor menus provide many tools and details not available elsewhere. More
administration features also are available from the nPartition system boot environments (BCH
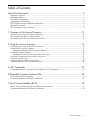
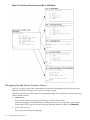
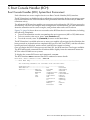
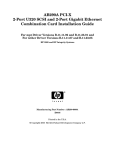
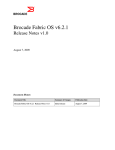
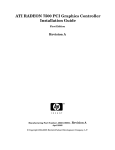
or EFI), the nPartition tools, and various operating system commands. Figure 2-1 shows the
Service Processor menus.
Using Service Processor Menus
17
Figure 2-1 Overview of Service Processor (MP or GSP) Menus
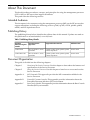
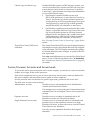
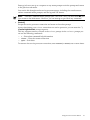
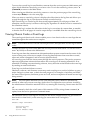
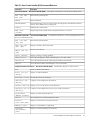
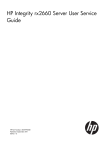
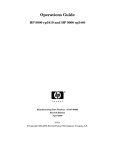
Navigating through Service Processor Menus
Figure 2-2 (page 20) shows the commands and options for returning to the service processor
Main menu and for ending a service processor login session.
The following list also includes tips for navigating through service processor menus and using
various menu features:
•
Control-b
Exit current console, console log, chassis log, or Virtual Front Panel.
When accessing the Command menu, an nPartition console, any log files, or any Virtual
Front Panel (VFP), you can exit and return to the Main menu by typing ^b (Control-b).
•
Q (or lower-case q)
Exit or cancel current menu prompt.
18
Using the Service Processor
Enter Q (or lower-case q) as a response to any menu prompt to exit the prompt and return
to the previous sub-menu.
You can do this throughout the service processor menus, including the console menus,
various command menu prompts, and the log and VFP menus.
NOTE: From the Command menu prompt (GSP:CM> or MP:CM>) you must enter MA (not
Q) to return to the Main menu. However, you can enter Q or q to cancel any command.
•
Control-]
Escape the service processor connection and return to the telnet prompt.
At any time during your telnet connection to a service processor, you can enter the ^]
(Control-right bracket) escape sequence.
This key sequence returns you back to the telnet prompt. At the telnet> prompt you
can use the following commands:
— ? – Print telnet command help information
— close – Close the current connection
— quit – Exit telnet
To return to the service processor connection, enter return (or enter) one or more times.
Using Service Processor Menus
19
Figure 2-2 Navigating through Service Processor (MP or GSP) Menus
nPartition Console Features
The service processor Console menu provides access to all nPartition consoles within the server
complex.
Enter CO from the service processor Main menu to access an nPartition console. To exit the
nPartition console, enter ^b (Control-b) to return to the Main menu.
Each nPartition in a complex has a single console. However, multiple connections to the console
are supported, allowing multiple users to simultaneously view the console output. Only one
connection per console permits write-access.
To gain console write access to an nPartition console, enter ^ecf (Control-e c f).
20
Using the Service Processor
Each nPartition console can display a variety of information about the nPartition, including:
•
•
Partition startup, shutdown, and reset output.
The system boot environment: either Boot Console Handler (BCH, on HP 9000 servers) or
Extensible Firmware Interface (EFI, on HP Integrity servers).
The system boot environment is available when the nPartition has not yet booted an operating
system and has completed Power-On Self Tests (POST) and completed nPartition rendezvous
to become active.
•
The HP-UX login prompt and “console shell access”.
CAUTION: When you use an nPartition console connection to login to an operating system
running on the nPartition, logout from the operating system when you have finished using it
before you enter ^B (Control-b) to disconnect from the nPartition console.
If you fail to logout from the operating system console session, then any other service processor
user who has permission to access the nPartition could connect to the nPartition console and use
the open login session.
Disconnecting from an nPartition console does not close any open operating system login sessions.
nPartition Console Access versus Direct OS Login
You may need to consider the following factors when deciding whether to interact with an
nPartition through the service processor console interface or a direct operating system (OS) login
session.
•
•
Whether you want to log your activity to the console log for the nPartition (all console activity
is stored at least temporarily).
Whether the OS is installed, booted, and properly configured on the nPartition.
If the OS is not installed on an nPartition, you should access the nPartition console (through
the service processor) in order to install and configure the OS.
You should use the network to login to the OS running on an nPartition when you do not need
to use service processor features and do not want to record a log of your activity.
Before an OS has booted, the service processor nPartition consoles are the primary method of
interacting with an nPartition.
After an nPartition has booted the OS, you should be able to connect to the nPartition by using
telnet, rlogin, or ssh to remotely login to HP-UX or Linux or by using remote desktop for
a remote Windows session.
Network Configuration for a Service Processor
This section describes how to list and configure the network settings for service processor (MP
or GSP) hardware. These settings are used for connections to the service processor and are not
used for HP-UX networking.
Details on configuring service processor networking are given in the procedure “Configuring
Service Processor Network Settings” (page 23).
The service processor utility hardware on HP Superdome servers has two network connections:
the customer LAN and private LAN.
The service processor on other (non-Superdome) nPartition-capable servers does not have a
private LAN; only a customer LAN connection is provided.
Features of service processor LANs are provided in the following list.
•
Customer LAN for Service Processor The customer LAN is the connection for login access
to the service processor menus, consoles, commands, and other features.
All HP nPartition servers have a customer LAN.
Network Configuration for a Service Processor
21
On HP Superdome servers, the customer LAN port is labeled “Customer LAN”. On HP
rp8400 servers, it is “GSP LAN”. On HP rp7405/rp7410 servers, it is the only LAN connection
on each core I/O board.
•
Private LAN for Service Processor (Superdome Only) The private LAN connects to the
Superdome service support processor (SSP) workstation, also called the service management
station (SMS).
Only Superdome servers have a private LAN. Do not use the private LAN on the HP sx1000
chipset-based Superdome servers.
To configure service processor network settings, you can use the LC command from the Command
menu.
To list the current service processor network configuration use the LS command.
The following examples show service processor LAN status for several HP nPartition servers.
Default Service Processor Network Settings Table 2-1 and Table 2-2 list the default customer
LAN and private LAN network settings for nPartition servers. Only Superdome servers have a
private LAN.
Table 2-1 Default Configuration for Service Processor Customer LAN (All nPartition Servers)
Customer LAN IP Address
192.168.1.1
Customer LAN Host Name
gsp0
Customer LAN Subnet Mask
255.255.255.0
Customer LAN Gateway
192.168.1.1
Table 2-2 Default Configuration for Service Processor Private LAN (HP Superdome Servers Only)
22
Private LAN IP Address
192.168.2.10
Private LAN Host Name
priv-00
Using the Service Processor
Table 2-2 Default Configuration for Service Processor Private LAN (HP Superdome Servers Only)
(continued)
Private LAN Subnet Mask
255.255.255.0
Private LAN Gateway
192.168.2.10
Procedure 2-2 Configuring Service Processor Network Settings
This procedure (Command menu, LC command) configures the service processor customer LAN
and private LAN network settings from the service processor Command menu.
1.
Connect to the service processor for the complex, login as an administrator, and enter CM to
access the Command menu.
If a service processor is at the default configuration (including default network settings),
you can connect to it using either of these methods:
•
Establish a direct serial cable connection through the service processor local RS-232
port, a 9-pin D-shaped connector (DB9).
On HP Superdome servers, this port is labeled “Local RS-232”. On HP rp8400 servers,
it is the “Local Console” port. On HP rp7405/rp7410 servers, use the DB9 connector that
is labeled “Console”.
•
Access a PC or workstation on the same subnet as the service processor, modify its
network routing tables to include the default customer LAN IP address, and telnet
to the service processor. The procedure to modify networking and connect is:
1. Access a PC or workstation on the same subnet as the service processor.
2. Modify the network routing tables for the PC or workstation by using the route
add 192.168.1.1 ClientName command, where ClientName is the network
name of the PC or workstation.
From a PC command prompt: route add 192.168.1.1 ClientName
Log in as root on an HP-UX workstation and use this command:
/usr/sbin/route add 192.168.1.1 ClientName
After you reconfigure the service processor network settings, you can remove these
network routing table changes with the route delete... command.
3.
4.
2.
Enter this command to confirm the new network connection to the service processor:
ping 198.168.1.1 -n 2
Use the telnet 192.168.1.1 command from the PC or workstation to connect
to the service processor.
From the service processor Command menu, enter LS to list the current network settings,
and if needed use the LC command to reconfigure the network settings for the service
processor.
You must be logged in as an administrator to use the LC command.
The LC command enables you to modify the customer LAN and/or the private LAN
configuration.
You can cancel all changes to the service processor LAN configuration at any time by replying
Q to any of the LC command prompts.
Viewing Console Logs
Each nPartition in a server complex has a separate console log that stores a record of the most
recent nPartition console activity.
Viewing Console Logs
23
To access the console log for an nPartition, enter CL from the service processor Main menu and
select which nPartition console log you want to view. To exit the console log viewer, enter ^b
(Control-b) to return to the Main menu.
When viewing an nPartition console log, enter P to view the previous page of the console log,
or enter N (or Enter) to view the next page.
When you enter a console log viewer it displays the oldest data in the log first and allows you
to page through the log to view the more recently recorded activity.
Each console log is a circular log file that records approximately 30 to 40 pages of data. All
nPartition console activity is written to this log file, regardless of whether a user is connected to
the nPartition console.
As a console log is written the oldest data in the log is overwritten by current data, as needed,
so that the last 30 to 40 pages of console output always is available from the console log viewer.
Viewing Chassis Codes or Event Logs
The event log and chassis code viewers enable you to view chassis codes or event logs that are
issued throughout the entire server complex.
NOTE:
codes.
On HP 9000 servers with HP PA-8700 processors, the equivalent of event logs is chassis
To enter the event log viewer enter SL at the service processor Main menu. To exit the viewer,
enter ^b (Ctrl-B) to return to the Main menu.
Event logs are data that communicate information about system events from the source of the
event to other parts of the server complex. Event log data indicates what event has occurred,
when and where it happened, and its severity (the alert level).
All event logs pass from the event source through the service processor. The service processor
takes any appropriate action and then reflects the event logs to all running nPartitions. If an
nPartition is running event monitoring software, it may also take action based on the event logs
by sending an email notification.
Event logs can indicate failures or errors.
Hardware, software, and firmware events may emit event logs as a result of a failure or error, a
major change in system state, or basic forward progress. For example: a fan failure, an HPMC,
the start of a boot process, hardware power on or off, and test completion all result in event logs
being emitted.
NOTE: The front panel attention LED for each nPartition server cabinet is automatically
turned on when one or more event logs of alert level 2 or higher have not yet been viewed by
the administrator. When this attention LED is on, entering the chassis log viewer turns the LED
off.
You can remotely check the on/off status of this attention LED by using the PS command, G
option, from the service processor Command menu.
On nPartition servers, event logs are recorded in the server complex activity log (for events of
alert level 0 or alert level 1) or the error log (for events alert level 2 or higher).
GSP> SL
Chassis Logs available:
(A)ctivity Log
(E)rror Log
(L)ive Chassis Logs
24
Using the Service Processor
(C)lear All Chassis Logs
(Q)uit
GSP:VW> L
Entering Live Log display
A)lert filter
C)ell filter
P)artition filter
U)nfiltered
V)iew format selection
^B to Quit
Current filter: ALERTS only
Log Viewing Options: Activity, Error, and Live Chassis Logs
Enter the chassis log viewer by entering SL at the service processor (MP or GSP) Main menu,
and select from these viewers:
• Activity Log Viewer Allows you to browse recorded event logs of alert level 0 or 1.
•
Error Log Viewer
•
Live Chassis Logs Viewer
Allows you to browse recorded event logs of alert level 2 or higher.
Displays event logs in real time as they are emitted.
By default, the live event log viewer has the Alert filter enabled, which causes it to display
only the events of alert level 3 or higher.
To view all event logs in real-time, enter U for the Unfiltered option.
You can also filter the live codes by cell (C) or nPartition (P). Cell filter: displays event logs
emitted by a specific cell in the server complex. Partition filter: displays event logs emitted
by hardware assigned to a specific nPartition.
When viewing event log logs, enter V to change the display format. The viewers can show event
logs in text format (T), keyword format (K), or raw hex format (R).
Virtual Front Panel (VFP) nPartition Views
The Virtual Front Panel (VFP) provides ways to monitor the boot or run the status of each cell
in an nPartition and of the nPartition itself. The VFP provides information that is typically
displayed on the LCD of a non-partitionable server.
The VFP presents a real-time display of activity on the selected nPartition(s) and it automatically
updates when the cell and nPartition status change.
To access the VFP feature, enter VFP from the service processor Main menu. To exit the VFP,
enter ^b (Control-b) to return to the Main menu.
When you access a Virtual Front Panel, you can either select the nPartition whose VFP you want
to view or select the system VFP to view summary information for all nPartitions in the server
complex.
E indicates error since last boot
Partition 0 state
-----------------Cell(s) Booting:
710 Logs
#
0
1
2
Cell state
---------Early CPU selftest
Early CPU selftest
Memory discovery
Activity
--------
Activity
-------Cell firmware test
Processor test
Physical memory test
232
230
242
Logs
Logs
Logs
GSP:VFP (^B to Quit) >
Virtual Front Panel (VFP) nPartition Views
25
26
A MP Commands
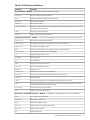
Command Reference: Service Processor (MP or GSP) Commands
Table A-1 lists the commands available from the service processor command menu (the MP:CM>
or GSP:CM> prompt).
The following categories of commands are available:
• “Service Commands — Service Processor (MP or GSP)” (page 27).
• “Status Commands — Service Processor (MP or GSP)” (page 27).
• “System and Access Configuration Commands — Service Processor (MP or GSP)” (page 28).
Some commands are restricted to users with Operator or Administrator authority. Also note that
the available set of commands may differ depending on the utility revision level and server
hardware model.
For details on these commands, use the help (HE: Help) feature at the service processor Main
menu. Enter the command name at the MP:HELP or GSP:HELP prompt for syntax, restrictions,
and other information.
Table A-1 Service Processor (MP or GSP) Command Reference
Command
Description
Service Commands — Service Processor (MP or GSP)
nPartition management.
Commands for general server complex administration and
BO
Boot an nPartition past Boot is Blocked (BIB)
DF
Display FRU information of an entity
MA
Return to the Main menu
MR
Modem reset
PCIOLAD
Activate/deactivate a PCI card
PE
Power entities on or off
RE
Reset entity
RR
Reset an nPartition for reconfiguration; the nPartition remains inactive, in the shutdown
for reconfig state
RS
Reset an nPartition
TC
Send a TOC signal to an nPartition
TE
Broadcast a message to all users of the MP Command Handler
VM
Margin the voltage in a cabinet
WHO
Display a list of MP connected users
Status Commands — Service Processor (MP or GSP)
Commands for displaying hardware and nPartition information.
CP
Display nPartition cell assignments
HE
Display the list of available commands
IO
Display IO chassis/cell connectivity
LS
Display LAN connected console status
MS
Display the status of the modem
PS
Display detailed power and hardware configuration status
SYSREV
Display revisions of all firmware entities in the complex
Command Reference: Service Processor (MP or GSP) Commands
27
Table A-1 Service Processor (MP or GSP) Command Reference (continued)
Command
Description
System and Access Configuration Commands — Service Processor (MP or GSP)
complex accounts, security, and nPartition configuration
28
Commands for managing server
PARPERM
Restrict/unrestrict nPartition Reconfiguration Privilege
PD
Modify default nPartition for this login session
RL
Rekey Complex Profile locks
SA
Display and set (enable/disable) MP remote access methods
SO
Configure security options and access control (user accounts and passwords)
XD
MP diagnostics and reset
MP Commands
B Extensible Firmware Interface (EFI)
EFI System Boot Environment
On HP Integrity servers the system boot environment is provided by the Extensible Firmware
Interface (EFI).
EFI is available through an nPartition console interface before an operating system has booted
and after the cells have booted and performed nPartition rendezvous (to make the nPartition
active).
The EFI environment enables you to manage and configure the operating system boot process
for an nPartition. You also can configure some settings for the local nPartition, get information
about the nPartition and its server complex, and perform other tasks such as reboot.
The EFI boot environment has two main components:
• EFI Boot Manager — A menu-driven interface that enables to you configure and select boot
options. From the EFI Boot Manager you can load an operating system, reset the nPartition,
and configure various system boot and console options.
• EFI Shell — A command-line system boot interface that you can enter by selecting the EFI
Shell option from the EFI Boot Manager Menu.
Enter exit to leave the EFI Shell interface and return to the EFI Boot Manager Menu.
The EFI Shell provides much of the same functionality as the Boot Console Handler (BCH)
interface on HP 9000 systems (PA-RISC systems).
For details on using the EFI Shell use the help command.
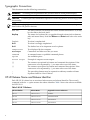
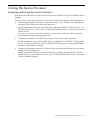
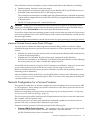
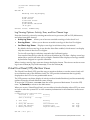
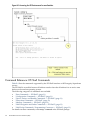
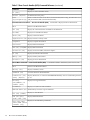
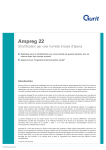
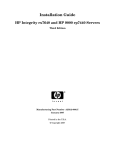
Figure B-1 (page 30) shows how to access and use the EFI system boot environment for the
nPartition, including the following commands:
• To access an nPartition console, enter CO from the service processor (MP or GSP) Main menu.
• To force console write access, enter ^ecf (Control-e c f).
• To exit the console, enter ^b (Control-b) to return to the Main menu.
EFI System Boot Environment
29
Figure B-1 Accessing the EFI Environment for an nPartition
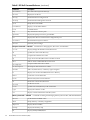
Command Reference: EFI Shell Commands
Table B-1 lists the commands supported by the EFI Shell interface on HP Integrity Superdome
servers.
The EFI Shell is accessible from an nPartition console when the nPartition is in an active state
but has not booted an operating system.
The following categories of commands are available:
• “Boot Commands — EFI Shell” (page 31)
• “Configuration Commands — EFI Shell” (page 31)
• “Device, Driver, and Handle Commands — EFI Shell” (page 31)
• “Filesystem Commands — EFI Shell” (page 32)
• “Memory Commands — EFI Shell” (page 32)
• “Shell Navigation and Other Commands — EFI Shell” (page 33)
• “Shell Script Commands / Programming Constructs — EFI Shell” (page 33)
For details on these commands, enter help command at the EFI shell prompt.
30
Extensible Firmware Interface (EFI)
Table B-1 EFI Shell Command Reference
Command
Description
Boot Commands — EFI Shell
Commands related to nPartition booting
autoboot
Set/view autoboot timeout variable
bcfg
Display/modify the driver/boot configuration
boottest
Set/view BootTest bits
lanboot
Boot over the LAN
reconfigreset
Reset the system (nPartition) for reconfiguration; the nPartition remains inactive in the
'shutdown for reconfig' state
reset
Reset the system (nPartition)
search
Connect drivers for bootable devices
Configuration Commands — EFI Shell
Commands for changing and retrieving system (nPartition) information
acpiconfig
Set/view ACPI configuration mode
cellconfig
Deconfigure/reconfigure cells (set cell use-on-next-boot values)
cpuconfig
Deconfigure/reconfigure CPUs
date
Display the current date or set the date of the system (nPartition)
dimmconfig
Deconfigure/reconfigure memory (DIMMs)
err
Display/change the error level
errdump
View/clear logs
fru
View FRU data
info
Display hardware information
monarch
Set/view a monarch processor
palproc
Make a PAL call
romdrivers
Enable/disable PCI expansion ROM drivers
rootcell
Set/view preferred root cells (set nPartition core cell choices)
salproc
Make a SAL call
tftp
Performs TFTP operation to a bootp/DHCP enabled Unix boot server
time
Display the current time or set the time of the system (nPartition). EFI time is set and
presented in GMT (Greenwich mean time)
variable
Save/restore specific EFI variables
ver
Display the version information
Device, Driver, and Handle Commands — EFI Shell
Commands for managing devices, drivers, and handles
baud
View serial port com settings
connect
Bind a driver to a device
dblk
Hex dump of BlkIo devices
devices
Display devices managed by EFI drivers
devtree
Display tree of devices
dh
Dump handle info
Command Reference: EFI Shell Commands
31
Table B-1 EFI Shell Command Reference (continued)
Command
Description
disconnect
Disconnect driver(s) from device(s)
drivers
Display list of drivers
drvcfg
Invoke the Driver Config Protocol
drvdiag
Invoke the Driver Diagnostics Protocol
guid
Dump known GUID IDs
lanaddress
Display core I/O MAC address
load
Load EFI drivers
map
Map shortname to device path
openinfo
Display the open protocols for given handle
pci
Display PCI devices or PCI function configuration space
reconnect
Reconnect driver(s) from a device
unload
Unload a protocol image
Filesystem Commands — EFI Shell
attrib
Display/change the attributes of files/directories
cd
Update/view the current directory
comp
Compare the contents of two files
cp
Copy one or more files/directories to another location
edit
Edit an ASCII or UNICODE file in full screen
eficompress
Compress infile and write to outfile
efidecompress
Decompress infile and write to outfile
hexedit
Edit a file, block device, or memory region using hex
ls
Display a list of files and subdirectories in a directory
mkdir
Create one or more directories
mount
Mount a filesystem on a block device
rm
Delete one or more files/directories
setsize
Set the size of a file
touch
Update time of file/directory with current time
type
Display the contents of a file
vol
Display volume information of the file system
Memory Commands — EFI Shell
32
Commands for managing files, directories, and attributes
Commands for listing and managing memory, EFI variables, and NVRAM details
default
Set the default NVRAM values
dmem
Dump memory or memory mapped IO
dmpstore
Display all EFI variables
memmap
Display the memory map
mm
Display/modify MEM/IO/PCI
Extensible Firmware Interface (EFI)
Table B-1 EFI Shell Command Reference (continued)
Command
Description
pdt
View/clear partition or cell PDT
Shell Navigation and Other Commands — EFI Shell
Commands for basic EFI Shell navigation and customization
alias
Set/get alias settings
cls
Clear the standard output with an optional background color
exit
Exit EFI Shell environment
getmtc
Display current monotonic counter value
help or ?
Display help
mode
Display the mode of the console output device
set
Set/Get environment variable
xchar
Turn on/off extended character features
Shell Script Commands / Programming Constructs — EFI Shell
EFI shell-script commands
echo
Echo message to stdout or toggle script echo
else
Script-only: Use with IF THEN
endfor
Script-only: Delimiter for FOR loop construct
endif
Script-only: Delimiter for IF THEN construct
for
Script-only: Loop construct
goto
Script-only: Jump to label location in script
if
Script-only: IF THEN construct
input
Take user input and place in efi variable
pause
Script-only: Prompt to quit or continue.
stall
Stall the processor for some microseconds
Command Reference: EFI Shell Commands
33
34
C Boot Console Handler (BCH)
Boot Console Handler (BCH) System Boot Environment
Each nPartition in a server complex has its own Boot Console Handler (BCH) interface.
The BCH interface is available through an nPartition console interface before an operating system
has booted and after the cells have booted and performed nPartition rendezvous (to make the
nPartition active).
The nPartition BCH interface enables you to manage and configure the HP-UX boot process for
an nPartition. You also can configure some settings for the local nPartition, get some information
about the nPartition and its server complex, and perform other tasks such as reboot.
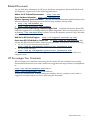
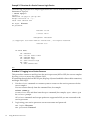
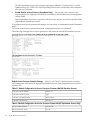
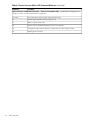
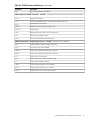
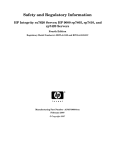
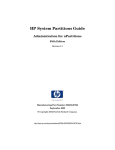
Figure C-1 (page 36) shows how to access and use the BCH interface for an nPartition, including
the following commands:
• To access an nPartition console, enter CO from the service processor (MP or GSP) Main menu.
• To force console write access, enter ^ecf (Control-e c f).
• To exit the console, enter ^b (Control-b) to return to the Main Menu.
The BCH interface is available after one or more core-capable cells assigned to the nPartition has
been powered on; its hardware has completed all Power-On Self Tests (POST); and the cells have
booted past boot-is-blocked, rendezvoused, and BCH has started executing.
Once you begin the HP-UX boot process and load ISL, the BCH interface is no longer available.
The BCH menus and commands for nPartitions differ slightly from the commands menus for
BCH on other HP 9000 server systems.
To display the current BCH menu and commands, enter DI.
The BCH interface HELP command lists BCH command or menu details.
Main Menu: Enter command or menu > HELP MA
---- Main Menu Help ---------------------------------------------------------The following submenus are available from the main menu:
COnfiguration------------------------------------BootID
INformation-----------------------ALL
BootTimer
SERvice-------------BAttery
BootINfo
CEllConfig
CLEARPIM
CAche
COreCell
MemRead
ChipRevisions CPUConfig
PDT
ComplexID
DataPrefetch
PIM
FabricInfo
DEfault
SCSI
FRU
FastBoot
FwrVersion
KGMemory
IO
PathFlag
LanAddress
PD
MEmory
ResTart
PRocessor
TIme
...
Boot Console Handler (BCH) System Boot Environment
35
Figure C-1 Accessing the BCH Interface for an nPartition
Command Reference: BCH Menu Commands
Table C-1 lists the commands available from the Boot Console Handler (BCH) menus for an
nPartition.
The BCH Menu is accessible from an nPartition console when the nPartition is in an active state
but has not booted an operating system.
The following categories of commands are available:
• “General Commands — Boot Console Handler (BCH)” (page 37).
• “Main Menu Commands — Boot Console Handler (BCH)” (page 37).
• “Configuration Menu Commands — Boot Console Handler (BCH)” (page 37).
• “Information Menu Commands — Boot Console Handler (BCH)” (page 38).
• “Service Menu Commands — Boot Console Handler (BCH)” (page 38).
For details on these commands, use the help (HE) command. At any BCH menu enter the HE
command for details about the specified command, or enter HE for general help.
36
Boot Console Handler (BCH)
Table C-1 Boot Console Handler (BCH) Command Reference
Command
Description
General Commands — Boot Console Handler (BCH)
These BCH commands are available from all BCH menus.
BOot [PRI| HAA|
ALT| path]
Boot from the specified path.
REBOOT
Restart nPartition.
RECONFIGRESET
Reset the nPartition to allow Complex Profile reconfiguration; the nPartition remains
inactive, in the shutdown for reconfig state.
DIsplay
Redisplay the current menu.
HElp [menu
|command]
Display help for the current menu or the specified menu or command.
Main Menu Commands — Boot Console Handler (BCH)
and access other BCH menus.
Commands to find devices, set boot paths (PRI,HAA, ALT),
BOot [PRI |HAA
|ALT| path]
Boot from the specified path.
PAth [PRI |HAA
|ALT] [path]
Display or modify a device boot path.
SEArch [ALL |cell
|path]
Search for boot devices.
ScRoll [ON|OFF]
Display or change scrolling capability.
COnfiguration
Access the Configuration Menu, which displays or sets boot values.
INformation
Access the information menu, which displays hardware information.
SERvice
Access the Service Menu, which displays service commands.
Configuration Menu Commands — Boot Console Handler (BCH)
Commands to display or set boot values.
MAin
Return to the BCH Main Menu.
BootID [cell [proc
[bootid]]]
Display or set Boot Identifier.
BootTimer [0-200]
Seconds allowed for boot attempt.
CEllConfig [cell]
[ON|OFF]
Configure or deconfigure the specified cell.
COreCell [choice cell] Display or set core cell choices for the nPartition.
CPUconfig [cell [cpu Configure or deconfigure the processor (cpu) on the specified cell.
[ON|OFF]]]
DataPrefetch
[ENABLE |DISABLE]
Display or set data prefetch behavior.
DEfault
Set the nPartition to predefined (default) values.
FastBoot
[test][RUN |SKIP]
Display or set boot tests execution (self tests).
KGMemory [value]
Display or set KGMemory requirement.
PathFlags
[PRI|HAA|ALT]
[value]
Display or set boot path flags (boot actions).
Command Reference: BCH Menu Commands
37
Table C-1 Boot Console Handler (BCH) Command Reference (continued)
Command
Description
PD [name]
Display or set the nPartition name.
ResTart [ON|OFF]
Set nPartition restart policy.
Read or set the real time clock, the local nPartition date/time setting. The BCH time is set
TIme
[cn:yr:mo:dy:hr:mn:[ss]] and presented in GMT (Greenwich mean time).
Information Menu Commands — Boot Console Handler (BCH)
Commands to display hardware information.
MAin
Return to the BCH Main Menu.
ALL [cell]
Display all of the information available for the nPartition.
BootINfo
Display boot-related information.
CAche [cell]
Display cache information.
ChipRevisions [cell] Display revisions of major VLSI.
ComplexID
Display Complex information.
FabricInfo
Display Fabric information.
FRU [cell] [CPU|MEM] Display FRU information
FwrVersion [cell]
Display versions for PDC, ICM, and complex.
IO [cell]
Display I/O interface information.
MEmory [cell]
Display memory information.
PRocessor [cell]
Display processor information
Service Menu Commands — Boot Console Handler (BCH)
Commands related to nPartition system service tasks.
MAin
Return to the BCH Main Menu.
BAttery [cell]
Display cell battery status.
CLEARPIM [cell]
Clear the nPartition NVM PIM data.
DimmDealloc [cell]
[dimm] [ON|OFF]
Display, deallocate, or re-allocate the DIMM identified by dimm in cell number specified
by cell.
ErrorLog
[cell][MEMORY |IO
|FABRIC |CELL]
Display error log information.
LanAddress
Display Core I/O LAN station address.
MemRead address [len] Read memory locations scope of nPartition.
PDT [cell] [CLEAR]
Display or clear the PDT.
PIM [cell [proc]]
[HPMC |LPMC |TOC]
Display PIM information.
Display or set SCSI device parameters.
SCSI [path [INIT
|RATE |TERM |WIDTH
|DEFAULT [id]]]
38
Boot Console Handler (BCH)