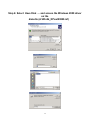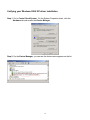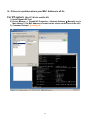
1
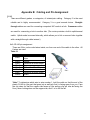
GE 2000-N User Manual
(64 bit Gigabit Ethernet PCI Adapter)
1
Copyright
The contents of this publication may not be reproduced in any part or as a whole, stored,
transcribed in an information retrieval system, translated into any language, or transmitted in
any form or by any means, mechanical, magnetic, electronic, optical, photocopying, manual, or
otherwise, without the prior written permission.
Trademarks
All products, company, brand names are trademarks or registered trademarks of their respective
companies.
They are used for identification purpose only. Specifications are subject to be
changed without prior notice.
Copyright© 2004, GigaFast Inc., All Right Reserved
2
FCC Interference Statement
This equipment has been tested and found to comply with the limits for a Class B digital device
pursuant to Part 15 of the FCC Rules. These limits are designed to provide reasonable
protection against radio interference in a commercial environment. This equipment can generate,
use and radiate radio frequency energy and, if not installed and used in accordance with the
instructions in this manual, may cause harmful interference to radio communications. Operation
of this equipment in a residential area is likely to cause interference, in which case the user, at
his own expense, will be required to take whatever measures are necessary to correct the
interference.
CE Declaration of Conformity
This equipment complies with the requirements relating to electromagnetic compatibility, EN
55022/A1 Class B, and EN 50082-1. This meets the essential protection requirements of the
European Council Directive 89/336/EEC on the approximation of the laws of the member states
relation to electromagnetic compatibility.
3
Table of Content:
Chapter 1 ............................................................................................................... 5
Introduction ............................................................................................................................5
Features ...................................................................................................................................5
Package Content ...................................................................................................................6
Requirements .........................................................................................................................6
Wire Diagram ..........................................................................................................................7
Chapter 2 ............................................................................................................... 8
Hardware Installation ...........................................................................................................8
Install on Microsoft Win 95 / 98 / ME................................................................................9
Install on Microsoft Win NT 4.0 .......................................................................................10
Install on Microsoft Win 2000/ XP ...................................................................................11
Installation on Netware 5...................................................................................................16
Installation on Linux...........................................................................................................16
Aftermath...............................................................................................................................18
Appendix A: Frequently Asked Questions (FAQ)............................................ 19
Appendix B: Cabling and Pin Assignment ........................................................... 24
Appendix C: Technical Information....................................................................... 26
4
Chapter 1
Introduction
Congratulations on the purchase of this 64 bit PCI Gigabit Ethernet adapter. High speed
broadband internet is commonly used these days. It’s almost a must have product in homes
and offices. No matter if you have a high speed broadband internet connection or a simple
peer-to-peer connectivity; this product will help you through these simple tasks. Installation only
takes few minutes! GE 2000-N is also compatible with most of the popular operating systems.
Read on this manual for further information on this 64 bit Gigabit PCI Ethernet adapter.
Features
•
•
•
•
•
•
•
•
•
•
•
Complies with IEEE 802.3 10BASE-T standard
Complies with IEEE 802.3u 100BASE-TX standard
Complies with IEEE 802.3ab 1000BASE-T standard
Complies with PCI specifications
Supports 64bit bus master for high throughput and low CPU utilization
Supports both half and full duplex operation
Supports 10/100/1000Mbps auto-sensing capability
Rich diagnostic LED mounted on bracket for easily viewing and troubleshooting
Plug and Play Installation
Network drivers on the diskette for Windows 95, 98, NT4.0, 2000, XP, ME, Netware 5,
and Linux Kernel 2.2x, 2.4xdriver
FCC, CE class B certification
5
Package Content
•
•
(1) One Gigabit PCI Ethernet Adapter
(1) Driver Floppy OR Driver/Compact Disc With User manual included
Requirements
•
•
•
•
A running operating system
A motherboard that has an open 64bit PCI slot available
A Pentium 1 equivalent or higher processor/IBM compatible personal computers
A working Ethernet cable
6
Wire Diagram
This is a sample of how the card should be placed on your PC case.
The Ethernet cable goes into the port shown in the picture after the hardware is placed
into the PCI slot on your motherboard.
Ethernet Adapter to Network:
The ‘Ethernet Adapter to Network’ simply shows how a user can use the GE 2000-N to connect
to his/her modem/router/switch. One Ethernet cable goes from the computer (connected with
the GE 2000-N) and out to your modem/router/switch.
Ethernet Adapter to another Ethernet Adapter (Peer 2 Peer):
The bottom one shows how the connection works when a user wishes to do a peer to peer
connection in the network. Simply have both sides connected with an CAT5 crossover cable
and setup both computers with IP addresses in your TCP/IP properties For more information on
how to setup a Peer to Peer connection please read our FAQ guide.
7
Chapter 2
Hardware Installation
This section describes the installation of the GE 2000-N card into a
personal computer (PC). To install the card, you need:
• the GE 2000-N card
• a PC with an available PCI slot
• screwdrivers to open the PC and secure the GE 2000-N card
• a Category 5 twisted-pair RJ-45 cable
• a wrist strap
• a blank, formatted floppy disk
Installing the card consists of one optional and three required
stages: Copying the Driver to a Floppy Disk (optional), Inserting
the Card, Connecting the Network, and Installing the Driver. If the
PC into which you are installing the GE 2000-N card is
equipped with a CD-ROM, you may skip the first stage and begin
with stage II.
Inserting the Card
The second stage in the installation sequence is inserting the card
into the PC. For this stage you will need the GE 2000-N card and the
screwdrivers. Unplug the PC before opening it to avoid electrocution.
Be sure to ground yourself before handling the GigMAC
card to avoid ElectroStatic Discharge (ESD) damage to the card.
1. Shutdown the PC, and disconnect the power cord.
2. Open the chassis of the PC.
3. Choose an unused PCI slot and remove its metal bracket by
loosening the screw on the inside. You will no longer need this
metal bracket as the GE 2000-N card has its own. You will need
the screw, however.
4. Remove the GE 2000-N card from the ESD-safe packaging.
Warning: Static charge from your body can permanently damage
the GE 2000-N card. Do not handle the card without first
electrically grounding yourself via wrist strap or by touching a
large piece of metal.
8
5. Insert the GE 2000-N card into the empty PCI slot in the PC.
Orient the card so that the RJ-45 connector points out of the
computer
Warning: The card may fit backwards (with the RJ-45 pointing
in) into the PCI slot. Starting the computer with the card
inserted backwards may damage the card and/or the PC.
6. When you are certain the card is oriented correctly, press
firmly on the card to ensure that it is completely seated in the
PCI slot. Secure the GE 2000-N card using the screw from step
3.
7. Close the computer, and reconnect the power cord.
Connecting the Network
The third stage in the installation sequence is connecting the GigMAC
demo card to the network. In this stage, you will need only the
twisted-pair Category 5 network cable.
After you have inserted the card and closed the PC, connect one end
of the twisted-pair cable to the RJ-45 connector on the GigMAC demo
card, and the other end to another PC or a network hub or switch
When connecting the card to another PC, the cable
will need to be crossover, meaning that pins 1 and 2 must be
swapped with pins 3 and 6, respectively, between the two ends of
the cable. A crossover cable should not be used when connecting
the GE 2000-N card to a network hub or switch. The difference
between a crossover and non-crossover (“straight”) cable is shown
The next time you turn on the PC, one of the two green link lights
on the GE 2000-N card should become illuminated almost immediately.
This signifies that the card has established link with the device at the
other end of the cable and is ready to send and receive
data.
Install on Microsoft Win 95 / 98 / ME
1. Ask you to select which driver you want to install, select "Driver
from disk provided by hardware manufacturer".
2. Insert the GE 2000-N driver disk into drive A and specify
the setup file pathname
A:\WIN98 (for Windows 98 SE) or
A:\WINME (for Windows ME)or
9
A:\WIN95 (for Windows 95 osr2) .
3. Win98 SE/Win ME/Win95 osr2 will appear some messages to insert
Win98 SE/Win ME/Win95 osr2 system disk to complete setup step.
4. Win98 SE/Win ME/Win95 osr2 will finish the other installation procedure
automatically, then you restart the system.
Install on Microsoft Win NT 4.0
1. In the Main group of NT, select the "Control Panel" icon.
2. In the Control Panel window, choose the "Network" icon.
3. In the Network Settings dialog box, choose the "Add Adapter" button.
4. The Add Network Adapter dialog box appears.
5. In the list of network cards, select "<other> Requires disk from
6. manufacturer", and then press <Enter> button.
7. Insert the Realtek driver disk in drive A, enter drive and pathname
8. A:\Winnt (for NT 4.0) which is the path where the
9. setup file OEMSETUP.INF is located, and then choose the OK button.
10. Restarting your system you will acquire network service.
10
Install on Microsoft Win 2000/ XP
Step 1: After booting the Windows 2000, go to Control Panel and
access
Add/Remove Hardware.
Click Next.
Step 2: Select Add/Troubleshoot a device.
Click Next.
Step 3: Select Add a new device.
11
Click Next.
Step 4: Select Yes, search for new hardware.
Click Next.
Step 5: Your system is now detecting for the presence of new
hardware.
12
Step 6: Select Have Disk …. and access the Windows 2000 driver
on the
diskette (A:\Win2k_XP\net83820.inf)
13
Step 7: The correct device name appears on the list.
Click Next.
Click Next to finish driver installation.
14
Verifying your Windows 2000/ XP driver installation
Step 1: Go to Control Panel/System. On the System Properties sheet, click the
Hardware tab and access the Device Manager.
Step 2: On the Device Manager, you can see the device name appears on the list.
15
Installation on Netware 5
NETWARE Driver Installation
Follow this sequence for installation under NETWARE.
Install the NIC into a PCI slot of a NetWare server and note the slot number for driver
configuration later (slots are generally numbered top/front to bottom/back of the
machine). It is recommended that NetWare 5.1 with Support Pack 1 or later be installed.
To install the driver, copy the dp83820.lan & dp83820.ldi files onto a floppy disk.
Load NWConfig.nlm and follow the 'Driver Options->Configure Network drivers->Select a
driver' options on the UI. Follow on-screen directions to point to the drivers installed on
floppy (A:). Put the slot number and the number of Tx, and Rx Descriptors as required.
Alternately, driver can be loaded from the command line (e.g. load a:\dp83820.lan) &
passing the required parameters. This will display the available slot options for the NIC.
The DP83820.LAN may also be configured at OS install time and can be used in
conjunction with the auto-detect feature on NetWare Install.
The different options for speed and duplex mode can be configured using NWConfig at
install
time or Inetcfg later.
HOT PLUG
Use NcmCon.nlm from Novell & refer to the System vendor's documentation for the
systems which support hot-plug functionality.
Installation on Linux
LINUX Driver Installation
Follow this sequence for installation under LINUX.
1. To freshly make the driver
go to the /nsc directory
and execute "make"
2. To remove the binaries
execute "make clean"
3. If the machine on which the testing is done is an SMP
machine, please include the flag -D__SMP__ in the
16
CFLAGS of the Makefile.
4. After the dpm.o ( The driver module ) is made, to load the
driver execute the command "insmod dpm". We can uload
the driver by doing
"rmmod dpm".
5. After loading the driver, get the interface name( eg:
eth0, eth1 etc) for the device. The last line in the
messages listed will indicate the name of the interface
for the driver. If the message is not coming on
the console, we can see the messages in the kernel buffer by executing
"dmesg" on the command line. The last line in that will
indicate the interface name
6. To configure IP for the interface.
ifconfig <interface-name> <ip-addr>
eg: ifconfig eth0 10.10.10.1
To shutdown the interface.
ifconfig <interface-name> down
eg: ifconfig eth0 down
Please note that it may appear to hang on doing an "ifconfig", but it is
just momentary and it will soon come out of that. The link
becomes active only after about 20 seconds since the
"ifconfig".
7. Now we are all set to go with the driver.
8. To make the driver load when the system boots up, the
following lines needs to be put in any of the startup scripts
like /etc/rc.d/rc.local
or /etc/rc.d/init.d/network
/sbin/insmod /working/oct1/dpm.o
/sbin/ifconfig <interface-name> <ip-addr>
9. The tunable parameters of the driver like the Receive and
Transmit buffers are put in the file nsm.h under the heading
"Tunable parameters". Right now the value of RX_QUEUE_SZ
is 100, on a high end system putting a value of
200 for RX_QUEUE_SZ can give better performance.
10.To try jumbo frames, the mtu size can be
increased using the ifconfig utility, as
follows
17
ifconfig <interface-name> mtu <mtu-size>
eg: ifconfig eth0 mtu 3000
The BUF_SIZE_MAX value in nsm.h (Tunable parameter) should be changed to
4096.
<mtu-size> can be increased upto 4000 bytes for sane operation.
Aftermath
Once you have successfully installed the GE 2000-N NIC you can now try to browse the internet
by having an Ethernet cable connected to the NIC (computer) to your internet service provider
(modem). Some people might have trouble connecting to the internet right after the installation
of the card. That is because the computer requires a reboot or the user might need to
disconnect the power off the modem for few minutes so the ISP can do a refresh on the user’s
account. Again, the FAQ guide explains some of the most commonly asked questions. Please
take advantage of our guide and if you need further assistance, please contact our tech support
line or write us an e-mail regard the problem.
Technical Support E-Mail: [email protected]
Technical Support Number: 1(888)-443-6788
Thank you for choosing GigaFast
18
Appendix A: Frequently Asked Questions (FAQ)
Q: How do I check to see if the network card was installed properly?
A: If the card was installed properly, it should be listed under device manager as: DP83820
Gigabit Network Controller. To get to device manager (For most Microsoft Windows
Operating Systems)
1.
2.
3.
4.
Start > Settings > Control Panel > System
Go to ‘Device Manager’
Go to ‘Network Adapters’
Go to “Proprieties”Æ device status should display” This device is working properly”
To check and see if there is a WAN (Wide Area Network) connection going through the network:
* connect your network card to your Network. (Modem/Router/Switch)
(For Windows 95, Windows 98, and Windows ME)
1.
2.
3.
4.
Start > Run
Type in ‘winipcfg’
Scroll down the list of network adapters and high-light the Gigabit Network card
If an IP address is listed (besides 169.xx.xx.xx) then it should be getting a connection
through your ISP (Internet Service Provider)
5. If the IP doesn’t seem to appear or wrong, then click on ‘Release’ and then ‘Renew’ after.
A new IP should be listed after the process is finished.
(For Windows 2000 and up)
1.
2.
3.
4.
Start > Run
Type in cmd (or command)
A Dos Prompt Window should pop up
Type in ‘ipconfig /all’
That should give you a status of your IP’s. If no IP’s were provided or listed, try to release and
renew your network adapter. To do so:
At the Dos Prompt:
1. Type: ipconfig /release (this should take a few moments and it releases your IP)
2. Type: ipconfig /renew (this should take a few moments and it refreshes your IP)
3. To use the ping command in MS-DOS Prompt
Click on Start > Run type in Command and hit enter.
19
You should be in MS-DOS prompt, enter the word ping, and a space and then the IP address
that you assigned to the network card. Hit the Enter key on your keyboard.
If you get replies when pinging, most-likely card is working properly.
Q: What should I do when the computer does not detect the network interface
card?
A: Try the following steps:
1. Check to see if the card is installed properly on the motherboard, make sure the PCI
connecter is all the way into the PCI slot.
2. Turn on the computer and Windows should detect the card.
3. If not go to system properties, than to device manager.
4. Check under device manager check to see if the NIC was installed properly with no symbols
next to it.
5. If you see the network card there just simply go into the property and reinstall or install the
driver for the network adapter.
6. If you did not see anything under device manager, turn the computer off and try to place the
network card into a different slot. Repeat steps 2-4.
Q: During installation there is a prompt for Windows Operating System CD and
you don’t have the Windows CD, what is the solution to that?
A: You can manually put in these paths below. Often some system files are stored under these
folders:
c:\windows\options\install
c:\windows\options\cabs
c:\windows\system
20
Q: I have specified the location and Windows still can’t find the driver under those
folders, what now?
A: If the location was specified and still can’t find the driver, please go to our website and
download the latest driver: www.gigafast.comwww.gigafast.com
Q: The card was installed successfully and during boot up the computer prompted
an error message and won’t go into Windows.
A: Please remove the driver disk from the drive that you have previously inserted during
installation. If that still does not help try removing the card from the PCI slot and start again. IF
this error continues to occur please call our technical support for further assistance.
Q: After I have installed the card successfully, the light in the back of the network
card does not light up.
A: Check your CAT5/RJ45 Ethernet cable and make sure its working. The light will only lit
when the cable is plugged into the card. The ACT stands for Activity and the Link is for it to
determine if there is a hard connection going through the card.
Q: What is an IRQ conflict?
A: An IRQ error occurs when one device is sharing the same source with another device on the
motherboard. To prevent this, put the network card into another PCI slot and see if that
resolves the problem.
*Note* Most of the motherboards have a built in integrated NIC. Sometimes it might have
conflicts with a third party network card. If that is the case, please disable the on-board NIC
under BIOS (Basic Input Output System). To find out how to get into the BIOS please refer to
your motherboard’s user manual.
Q: How do I change the TX rate on my GE 2000-N?
A: Go to ‘Device Manager’, double right click on the dialog. Click on the advanced tab and
from there you should be able to change the TX rate of the network card. Remember to click
‘Apply’ after to save the changes.
21
Q: Can I directly connect my GE 2000-N to another network adapter on a different
computer to do a pier to pier connection?
A: To accomplish this, you have to set up a static IP address on each computer. A CAT5/RJ45
crossover cable should be connected in between of the computers. To set up a static IP
address:
1. Go to TCP/IP protocols under Local Area Connections and click on ‘properties’
2. ‘Obtain an IP address automatically’ should be bubbled in by default. Bubble ‘Specify an
IP address’ and put in 192.168.0.1 for the first computer and 192.168.0.2 for the second
vise versa
3. Mask addresses should be 255.255.255.0 on all systems within the network
4. After the changes have made, make sure you do a ping test to see if the computers are
communicating with each other.
Q: Is there a way to boost the speed of my Ethernet card so my internet
connection can download/upload faster?
A: It is not the network card that determines how much bandwidth you receive or send.
Whether, it is the ISP’s decision that is within your area.
22
Q.: If there is a problem where your MAC Address is all 0’s
For NT system: (Win NT, Win 2k and Win XP)
1) Install Gigabit NIC first
2) Device Manage-- > Gigabit NIC Properties -->Network Address Æ Manually key in
Mac Address ( The Mac Address is located on the sticker on the back of the unit)
3) Command Prompt > ipconfig / all
http://www.realtek.com.tw/downloads/downloads1-3.aspx?series=16&Software=True
23
Appendix B: Cabling and Pin Assignment
RJ-45
There are different grades, or categories, of twisted-pair cabling. Category 5 is the most
reliable and is highly recommended.
Category 3 is a good second choice.
Straight-
through cables are used for connecting computers’ NIC cards to a hub. Crossover cables
are used for connecting a hub to another hub. (The router provides a built-in uplink/normal
switch. Uplink mode is crossed internally, which allows you to link or connect hubs together
with a straight-through cable instead.)
A-1-1 RJ-45 pin assignment
There are 8 thin, color-coded wires inside, run from one end of the cable to the other. All
8 wires are used.
Table 0-1
Wire 1
Wire 2
Wire 3
Wire 4
Wire 5
Wire 6
Wire 7
Wire 8
RJ-45 Color Chart
White with an Orange
stripe
Orange
White with a Green Stripe
Blue
White with a Blue Stripe
Green
White with a Brown Stripe
Brown
Pin 1
*Note* To determine which wire is wire number 1, hold the cable so that the end of the
plastic RJ-45 tip (the part that goes into a wall jack first) is facing away from you. Face
the clip down so that the copper side faces up (the springy clip will now be facing the
floor), when looking down on the copper side, wire 1 is on the far left.
24
Connection between NIC card and Hub
In a straight-through cable, wire 1, 2, 3, and 6 at one end of the cable are the same as
wires 1, 2, 3, and 6 at the other end. The straight through cable is used to connect the
NIC card and the hub.
Table 0-2
Wire
1
2
3
6
Straight Through Cabling
Becomes
1
2
3
6
Connection between Hub and Hub
In a crossover cable, the orders of the wires change from one end to the other. Wire 1 becomes 3, and 2
becomes 6. The crossover cable is used in connecting hubs directly.
Table 0-3
Crossover Cabling
Wire
1
2
3
6
Becomes
3
6
1
2
25
Appendix C: Technical Information
Standards:
Connector:
Cable Connection:
Compliant with IEEE802.3 10 Base-T / IEEE802.3u 100 Base- TX /
IEEE 802.3 ab 1000 Base-T
Single Shielded RJ-45 connector
10Base-T: UTP CAT.3,4,5
100Base-TX: UTP CAT.5
1000Base-T: UTP CAT.5
Transfer Rate:
Full/Half duplex (10/100 Mbps)
Full-duplex only (1000 Mbps)
LED Indicators:
LNK/ACT/FUDUP (Link/ Activity/ Full Duplex),
Bus Interface (PCI)
Operating
Temperature:
Humidity:
Certifications:
Driver Support:
Warranty:
64-Bit
0。 – 50。C
10% - 90%
FCC Class B / CE Mark
Windows 95/ 98/ ME/ NT4.0/ 2000/ XP , Netware 5.X, Novell
Netware Server 5, Linux 2.2.X and 2.4.X
One Year & Free Technical Support (US Only)
26