1
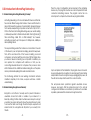
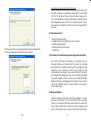
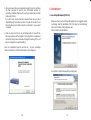
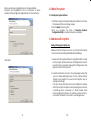
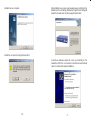
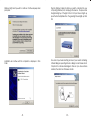
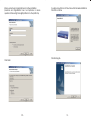
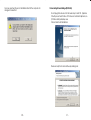
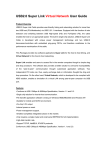
HomePlug USB Adapter/
HomePlug Ethernet Bridge
(PE901-UI/PE902-EB)
User Manual
4.0 Troubleshooting
Problem:
After I connected two HomePlug Adapters and set-up everything
correctly, I still can’t connect!
Possible Cause :
Not under the same IP Network. Signals interrupted by UPS device.
Solution :
Make sure you are under the same IP Network, then try to Ping the
other end. Make sure you are not connecting your unit to an
extension cord.
Problem :
After I plugged the USB side of the adapter into the USB socket, no
installation was prompted.
Possible Cause :
Running XP. Setting error on Auto-detect hardware.
Solution :
No solution as of this time. Please check equipment and cable.
For a more updated troubleshooting guide, please visit
http://www.gigafast.com
Table of Contents
0.0 Introduction to HomePlug networking
0.1 Powerline Networking Concepts ............................... 2
0.2 Encryption and Security ........................................... 2
0.3 Basic Requirements ................................................. 3
0.4 Feature developments ............................................. 3
0.5 Node and Bridge ..................................................... 3
1.0 Installation
1.1 PE901-UI (USB) 2K/XP/98/ME ...................................... 5
1.2 PE902-EB (Ethernet) 2K/XP/ME/98 ............................ 11
2.0 Basic Encryption
2.1 Software Installation ................................................ 15
3.0 Advanced Encryption ...........................................................15
4.0 Trouble-shooting .................................................................. 20
Ver 0.1 3/25/02
-20-
-1-
0.0 Introduction to HomePlug Networking
0.1 Understanding HomePlug Networking Concept
This is the end of configuration and ends setup for this HomePlug
device only. This program must be run on all computers that have
connected HomePlug devices. This program cannot be run
remotely. Each computer must have its own program installed.
HomePlug networking, not to be confused with Power over Ethernet,
has a whole different usage and features. Power over Ethernet is a
device that serves the purpose of a Hub or Switch, drawing its power
from nearby unsuspecting computers connected to it by a Cat. 5.
On the other hand, HomePlug Networking uses your current existing
or featured power line to transfer network data. One might ask, isn’t
there something called X10 or HPNA already? Yes, however,
HomePlug can reach up to the speed of 14Mbps! Also, 24Mbps is
already being tested.
The way HomePlug works is that a device is connected at one end
of the house to your computer and wall plug, where it draws power.
Then, at the second section of the house or building, a second
computer is connected with the same steps. It’s that simple! Now
you have a network connecting two computers. In addition, you
can replace the computers with switches so that you are
connecting networks instead of computers. The process is done
within minutes with no additional cables running all over the place
and no painful cable pulling in the walls or behind closets.
The technology behind the real working mechanism remains
classified. Hopefully in the future, everyone will have a better
understanding.
0.2 Understanding Encryption and Security
Encryption is a method of security used to prevent intruders or
unwanted access from within or outside of your network. It is
basically a string of letters and/or numbers used as keys to encrypt
your data. Any person will need to know the encryption key in order
to access the data. Even though the data may be exposed to all
environments, the encryption will still protect your security from
threats.
-2-
Upon completion of the installation, this program does not need to
be run again unless the encryption is to be changed. The HomePlug
adapter will not lose its encryption key by unplugging the power, so
the unit can be setup and moved to the correct location.
This will provide basic protection against unwanted access.
However, any person that has physical access to the unit just
configured can still take over a network. If you think such a scenario
is possible, please read the advanced encryption section.
-19-
HomePlug Encryption and Protection Schemes
The HomePlug device uses encryption to block outside access. The
key is set by using the configuration software that can be loaded
from the CD. By default, the protection is enabled. However, it is
recommended that you change the default encryption key. All your
HomePlug devices must use the same encryption key in order for
the network to work. Make sure that all devices are loaded with the
same key.
0.3 Basic Requirements
After the encryption is successfully applied, the program will search
for other HomePlug devices with the same encryption.
- At least 2 Units of HomePlug
- Available Ethernet port or USB port for each computer
- Available empty power slot
- Standard home power line wiring
- CD-ROM drive
0.4 Limitations of Current HomePlug technology and whats ahead.
The current technology and firmware of HomePlug have the
following limitations as of Spring, 2002. The range of a HomePlug
device reaches up to 900 feet under the same power grid or power
transformer. The connection cannot pass through any UPS
(Uninterruptible Power Supply). There is also a limitation to number of
HomePlug Ethernet Bridges. Because of how IP Packets and buffer
zones were designed, there can only be 2 HomePlug Ethernet
Bridges on the same HomePlug network at all times. However, there
can be an unlimited number of nodes present on the network,
technically speaking.
0.5 Nodes and Bridges
What is the difference between a Node and a Bridge? A node is
any device that resides or is connected directly onto an existing
network. A computer with a Network card connected to a switch is a
node. A Mac connected to a hub is also a node. A bridge is used
when connecting one type or group of networks with another type
-18-
-3-
or group of networks. Because connecting every computer from
one network together with the other network would result in cables
everywhere. Instead, a bridge is brought in to have 1 connection
between the networks instead of 20. The bridge in HomePlug
terms functions like a concentration device that connects
multiple computers onto the HomePlug network using 1
HomePlug device.
At this point, your computer will searching for any connected
HomePlug adapters. If you are searching for HomePlug Ethernet
Bridge, it will find the closest one to the system.
How do I know if I require a Node or a Bridge? How do I tell which
one I currently have. The Bridge function only works with Ethernet
HomePlug models because USB devices can't be shared yet. The
default connection type for Ethernet adapters is Bridge. The only
way to turn it off is to install the utility that comes with the unit. That
will turn the Bridge into a node.
It is possible to have both Nodes and Bridges on a network as long
as there is only a maximum of 2 Bridge. It is also okay to have USB
Nodes on the same network as Ethernet Nodes.
-4-
This indicates that the closest HomePlug devices has been located
and the encryption is ready to be applied. Insert the correct
encryption here and click Next.
-17-
3. After you have entered your desired encryption key, the software
will then proceed to search your immediate network for
HomePlug adapters that have the same encryption key and will
make a list of them.
If you don't see any devices listed, please make sure you have
applied the right encryption on them. You will not be able to see
the HomePlug device that is directly connected to your current
computer.
1.0 Installation
1.1 HomePlug USB Adapter (PE901-UI)
Make sure that your HomePlug USB Adapter is not plugged before
continuing. Insert the installation CD. If CD does not automatically
load, run (CD Drive Letter):\usb\setup.exe
Click on Next to start installation.
4. After you have more than one HomePlug units on and with the
same encryption, exit the program. The encryption is now applied
and will not reset unless manually changed. Powering off the unit
will not change the encryption setting.
Now, the installation program will start up. All your HomePlug
devices should be connected and ready to be configured.
Accept terms and Continue with by clicking next.
-16-
-5-
Enter a username and organization and continue installation.
(Username and Organization have no importance in device
operation. Window might look slightly different on other platforms).
2.0 Basic Encryption
2.1 Installing Encryption Software
1. Install the encryption software (Rev(Revision) 6) that is found on the
CD provided with the HomePlug package.
2. Run the Setup for the encryption.
3.After you complete the setup, a Powerline Network
Configuration Utility icon will be placed on your desktop.
3.0 Advanced Encryption
Adding/Changing Encryption Key
Make sure that the software is run from a computer that is directly
connected to the HomePlug USB Adapter/Ethernet Bridge.
1. Double click the Powerline Network Configuration Utility Icon and
run the program. At this point all your HomePlug devices need to
be reset before proceeding. Unplug all HomePlug devices and
plug them back in after 5 seconds.
Click install.
2. Follow the instructions on-screen. The setup program will prompt
you for a Password/Encryption Key. Choose a phrase without
symbols or punctuation to be used as the Encryption key. For
example 'HomePlug2'.
(If an error came before this menu, then most likely the computer
which the encryption software is currently running does not have
a HomePlug device connected to it. Please double check
before restarting the software. The software must be run from a
computer that is directly connected to a HomePlug device.)
-6-
-15-
Installation is now complete.
After installation is successful, a window will pop up prompting for the
installation of the HomePlug USB Adapter. Plug in the HomePlug USB
Adapter to the wall outlet, and then plug in the USB cable.
Restart the computer for changes to take effect.
Found New Hardware wizard will come up prompting for the
installation of Rd5130. Use the search for best driver automatically
option. Continue with hardware installation.
-14-
-7-
Windows might ask if you wish to continue. Continue anyway when
prompted.
Plug the Ethernet cable into either your switch or directly into your
computer’s Ethernet port, and plug in the device. The power and
link light will light up. If the light on the Cat. 5 port does not light up,
press the Normal/Uplink button. The green light should light up. Click
OK.
Installation will continue until the completion is displayed. Click
Finish.
Now look at your network setting and see if your current HomePlug
Ethernet Bridge is operating in Node or Bridge mode. Please refer to
Chapter 0.5 on Nodes and Bridges to find out. If you have a Node
situation, then click Yes. Otherwise click No.
-8-
-13-
Enter a username and organization and continue installation.
(Username and Organization have no importance in device
operation. Window might look slightly different on other platforms).
You will be brought back to this window after hardware installation.
Click OK to continue.
Click Finish again.
Click Install.
-12-
-9-
You have reached the end of installation. Restart the computer for
changes to take effect.
1.2 HomePlug Ethernet Bridge (PE902-EB)
Do not plug in the device onto the network yet. Insert CD. (Replace
CD with your actual CD drive. If CD does not automatically load, run
(CD Drive Letter):\usb\setup.exe
Click on Next to start installation.
Please accept forms and continue by clicking next.
-10-
-11-