1
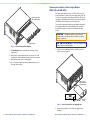
Removing and Installing a Power Supply Module
(DMS 1600 and DMS 3600)
Align the board edges
with the plastic guides.
D
S 44
DV
I
DM
UT
S
C
TP
I-D
D
OU
DV
S 44
B
UT
S
C
S
C
TP
I-D
D
OU
DV
S 44
A
DV
I
I
DM
UT
TP
I-D
OU
LY
DV
D
DV
DM
B
PP
A
WER
B
SU
T PO
AN
ND
DU
RE
C
TS
D
PU
I-D
IN
A
D
DV
S 44
B
TP
1-8
I-D
OU
DV
C
B
I-D
LY
IN
PP
9 - 16
DV
A
17 - 24
, CA
EIM
I
C
A
WER
SU
Y PO
AR
B
A
IM
PR
D
25 - 32
X.
A MA
1.2
/60
REDUNDANT
Hz
V
50
40
0-2
C
IN
DV
B
ATTENTION: The DMS matrix switchers use double pole/
neutral fusing. Power must be disconnected before servicing
internal components.
A
X.
A MA
Hz
1.2
/60
50
IN
V
40
0-2
10
TS
PU
I-D
PRIMARY
RESET
DISCONNECT BOTH POWER
CORDS BEFORE SERVICING
REMOTE
LINK
LAN
ACT
TRI-LEVEL BI-LEVEL
RS-232/RS-422
10
H
ITC E
SW NC
RE
FE
The two power supply modules (primary power supply and redundant
power supply) are identical and hot-swappable; you do not need to
power down the switcher to install or remove either power supply
module.
B
TS
AH
S
UT
D
IN
DV
A
PU
AN
DV
DM
C
TS
PU
I-D
Each power supply module has a two-color LED, visible on the rear
panel, that indicates the status of the power supply outputs. If the LED
is lit green, the power supply is operating normally. If the LED is lit red,
the supply has failed and should be replaced at the earliest opportunity.
LEDs with identical meanings are also on the front panel.
RE
Knurled Knobs
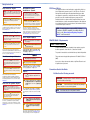
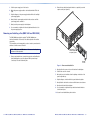
Figure 14. Remove and Install an I/O Board
7. For an I/O board, align the board with the left and right chassis
guides (above).
NOTE: DMS 2000 and DMS 3200 — The power supplies are fixed
in place and are not field replaceable.
1. Rotate the left and right knurled knobs to completely loosen the
captive screws (see figure 15).
8. Gently slide the board or blank panel into the enclosure. For an I/O
board, slide the board toward the front panel until it meets resistance.
9. Gently seat the board or panel in the backplane.
10.Use a screwdriver to tighten the left and right knurled knobs to lock
the board or panel in place.
D
I
S 44
DV
DM
S
UT
C
TP
I-D
D
OU
I
DV
S 44
DV
DM
B
S
UT
C
S
UT
C
S
UT
C
TP
I-D
D
OU
I
DV
S 44
B
TP
I-D
D
OU
I
DV
D
S 44
B
TP
I-D
D
I-D
DV
DM
A
OU
LY
PP
DV
C
TS
PU
IN
DV
DM
A
A
WER
B
SU
T PO
AN
DV
ND
DU
RE
B
C
TS
D
PU
I-D
IN
A
DV
A
B
C
TS
D
PU
I-D
IN
1-8
9 - 16
DV
A
A
B
C
TS
LY
PU
, CA
EIM
AH
AN
I-D
PP
IN
WER
DV
SU
Y PO
AR
B
IM
17 - 24
PR
A
25 - 32
X.
A MA
1.2
REDUNDANT
Hz
/60
V
50
40
0-2
PRIMARY
RESET
DISCONNECT BOTH POWER
CORDS BEFORE SERVICING
REMOTE
LINK
LAN
ACT
TRI-LEVEL BI-LEVEL
RS-232/RS-422
10
Align the power
supply edges with
the plastic guides.
X.
A MA
Hz
1.2
/60
V
50
40
0-2
H
ITC E
SW NC
RE
FE
10
RE
Power
LED
Knurled
Knobs
Figure 15. Remove and Install a Power Supply Module
2. Gently pull on the handle to loosen the power supply from the
backplane.
30
DMS 1600, DMS 2000, DMS 3200, DMS 3600 • Maintenance and Modifications
DMS 1600, DMS 2000, DMS 3200, DMS 3600 • Maintenance and Modifications
31