Transcript
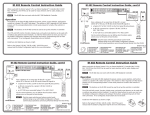
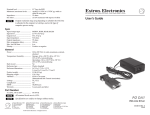
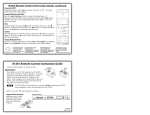
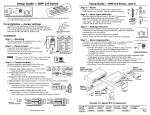
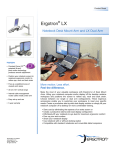
PMK 250 Projector Mount Kit Instruction Card
Part #70-526-02 and 70-526-03
The PMK 250 Low Profile Projector Mount Kit is an above-projector mounting kit that can hold up to two quarter-rack width
products, or one product and one power supply.
Each kit consists of a steel mounting bracket that is
available in black (part #70-526-02) or white (part
#70-526-03), a square U-bolt with a mounting brace
plate, and an assortment of adhesive-backed cover sheets
(in black or white) in four different sizes to cover the
bottom opening of the bracket.
Rubber Pad
Projector Mount Kit
The bracket attaches to a 1" to 2" diameter projector
mounting pole. Its low, 2-inch height allows it to be
mounted in tight spaces between the projector and the
ceiling, while its depth of 8.75" enables it to
accommodate a variety of device sizes.
Plastic Tie
Mount products on the PMK 250 bracket as follows:
Remove the front panel from the PMK 250, using an
Extron Tweeker (provided) or other small Philips
screwdriver. (Retain the four screws to reattach the
plate when finished.)
2.
Cover Sheet
Remove the protective backing from the self-adhesive rubber pad,
and place the pad on the PMK 250 mount plate, centering it between
the two holes (see drawing at right).
3.
Front Plate
Extron
Power Supply
Mounting to the Projector Pole
1.
Mounted
Extron Product
U-bolt
Extron
PMK 250
PMK 250 with an Extron product
and power supply mounted
Remove any rubber feet from the bottom of the device(s) to be mounted.
4.
Secure a device to one side of the mounting bracket, using two of the supplied 4-40 x 3/16 screws in opposite (diagonal) corners.
5.
If a power supply is connected to the device, use the two included tie wraps to strap the power supply to the bracket; or attach a
second device, as described in step 4.
6.
Place the bracket around the projector ceiling mounting pole as shown at right.
7.
Insert the two legs of the square U-bolt through the slotted holes on the back side of
the bracket mount plate, place them around the ceiling pole, then insert the two legs
through the round holes on the backing brace.
•
For a typical (1.5" to 2.0" diameter) pole — You can use the supplied square
U-bolt, which fits a typical ceiling pole.
•
For a smaller pole — Locally obtain a square U-bolt that fits your ceiling pole.
The slotted holes on the bracket can accomodate a square U-bolt for pole sizes
from 1.0" to 2.0" in diameter.
8.
Move the PMK 250 up to the desired location on the ceiling pole, as close to the
ceiling as desired.
9.
Secure the back brace to the square U-bolt using the included hex nuts, washers, and
lock washers. Tighten the hex nuts securely.
CAUTION
Be sure to tighten the hex nuts securely enough that the PMK 250 does not
slide down the ceiling pole. A socket wrench is recommended to tighten the
hex nuts.
Rubber Pad
Mounting Plate
on Bracket
Ceiling Pole
Backing Brace
U-bolt
Attaching the square U-bolt
10. Secure the front panel to the mounting tray with four of the included #6 screws.
11. If desired, choose one of the four sizes of self-adhesive cover sheets, and apply it to the underside of the mounting tray.
www.extron.com
Extron Electronics, USA
Extron Electronics, Europe
Extron Electronics, Asia
Extron Electronics, Japan
1230 South Lewis Street
Anaheim, CA 92805
USA
714.491.1500
Fax 714.491.1517
Beeldschermweg 6C
3821 AH Amersfoort
The Netherlands
+31.33.453.4040
Fax +31.33.453.4050
135 Joo Seng Road, #04-01
PM Industrial Building
Singapore 368363
+65.6383.4400
Fax +65.6383.4664
Kyodo Building
16 Ichibancho
Chiyoda-ku, Tokyo 102-0082 Japan
+81.3.3511.7655
Fax +81.3.3511.7656
68-1124-01, Rev. A
08 05