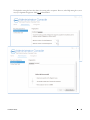
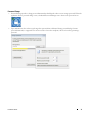
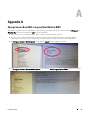
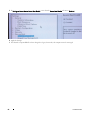
1
Dell Data Protection | Encryption Personal Edition Installation Guide ____________________ © 2014 Dell Inc. Registered trademarks and trademarks used in the DDP|E, DDP|ST, and DDP|CE suite of documents: Dell™ and the Dell logo, Dell Precision™, OptiPlex™, ControlVault™, Latitude™, XPS®, and KACE™ are trademarks of Dell Inc. Intel®, Pentium®, Intel Core Inside Duo®, Itanium®, and Xeon® are registered trademarks of Intel Corporation in the U.S. and other countries. Adobe®, Acrobat®, and Flash® are registered trademarks of Adobe Systems Incorporated. Authen Tec® and Eikon® are registered trademarks of Authen Tec. AMD® is a registered trademark of Advanced Micro Devices, Inc. Microsoft®, Windows®, and Windows Server®, Internet Explorer®, MS-DOS®, Windows Vista®, MSN®, ActiveX®, Active Directory®, Access®, ActiveSync®, BitLocker®, BitLocker To Go®, Excel®, HyperV®, Silverlight®, Outlook®, PowerPoint®, OneDrive®, SQL Server®, and Visual C++® are either trademarks or registered trademarks of Microsoft Corporation in the United States and/or other countries. VMware® is a registered trademark or trademark of VMware, Inc. in the United States or other countries. Box® is a registered trademark of Box. DropboxSM is a service mark of Dropbox, Inc. Google™, Android™, Google™ Chrome™, Gmail™, YouTube®, and Google™ Play are either trademarks or registered trademarks of Google Inc. in the United States and other countries. Apple®, Aperture®, App StoreSM, Apple Remote Desktop™, Apple TV®, Boot Camp™, FileVault™, iCloud®SM, iPad®, iPhone®, iPhoto®, iTunes Music Store®, Macintosh®, Safari®, and Siri® are either servicemarks, trademarks, or registered trademarks of Apple, Inc. in the United States and/or other countries. GO ID®, RSA®, and SecurID® are registered trademarks of EMC Corporation. EnCase™ and Guidance Software® are either trademarks or registered trademarks of Guidance Software. Entrust® is a registered trademark of Entrust®, Inc. in the United States and other countries. InstallShield® is a registered trademark of Flexera Software in the United States, China, European Community, Hong Kong, Japan, Taiwan, and United Kingdom. Micron® and RealSSD® are registered trademarks of Micron Technology, Inc. in the United States and other countries. Mozilla® Firefox® is a registered trademark of Mozilla Foundation in the United States and/or other countries. iOS® is a trademark or registered trademark of Cisco Systems, Inc. in the United States and certain other countries and is used under license. Oracle® and Java® are registered trademarks of Oracle and/or its affiliates. Other names may be trademarks of their respective owners. SAMSUNG™ is a trademark of SAMSUNG in the United States or other countries. Seagate® is a registered trademark of Seagate Technology LLC in the United States and/or other countries. Travelstar® is a registered trademark of HGST, Inc. in the United States and other countries. UNIX® is a registered trademark of The Open Group. VALIDITY™ is a trademark of Validity Sensors, Inc. in the United States and other countries. VeriSign® and other related marks are the trademarks or registered trademarks of VeriSign, Inc. or its affiliates or subsidiaries in the U.S. and other countries and licensed to Symantec Corporation. KVM on IP® is a registered trademark of Video Products. Yahoo!® is a registered trademark of Yahoo! Inc. This product uses parts of the 7-Zip program. The source code can be found at www.7-zip.org. Licensing is under the GNU LGPL license + unRAR restrictions (www.7-zip.org/license.txt). 2014-08 Protected by one or more U.S. Patents, including: Number 7665125; Number 7437752; and Number 7665118. Information in this document is subject to change without notice. Contents 1 Overview Personal Edition Security Tools . 2 Requirements . . . . . . . . . . . . . . . . . . . . . . . . . . . . . . . . . . . . . . . . . . . . . . . . . 7 . . . . . . . . . . . . . . . . . . . . . . . . . . . . . . . . . . . . . . . . . . . . . . . . . . 7 . . . . . . . . . . . . . . . . . . . . . . . . . . . . . . . . . . . . . . . . . . . . . . . Interoperability . 10 . . . . . . . . . . . . . . . . . . . . . . . . . . . . . . . . . . . . . . . . . . . . . . . . 13 Pre-Installation Configuration to Enable HCA Upgrade Legacy HCA Computers . Requirements . . . . . . . . . . . . . . . . . . . . . . . 15 . . . . . . . . . . . . . . . . . . . . . . . . . . . . . . . . . . . . . . . . . . . . . . . 15 . . . . . . . . . . . . . . . . . . . . . . . . . . . . . . . . . . . . HCA Pre-Installation BIOS Configuration . . . . . . . . . . . . . . . . . . . . . . . . . . . . . . . . . . . Reset System Password (legacy HCA only) Installation Tasks . . . . . . . . . . . . . . . . . . . . . . . . . . . . . . . . . . . . . . . . . . . . . . . . . . . . . . . . . . . . . . . . . . . . . . . . . . . . . . . Install Personal Edition . . . . . . . . . . . . . . . . . . . . . . . . . . . . . . . . . . . . . . . . . . . . . Choose an Installation Method . . . . . . . . . . . . . . . . . . . . . . . . . . . . . . . . . . . . . . Configuration Tasks for Administrators . . . . . . . . . . . . . . . . . . . . . . . . . . . . Configure Features in the Security Tools Administrator Console . 17 19 21 21 31 . . . . . . . . . . . . . . . . . . . . . . . . . . . . . . . . . . . 33 . . . . . . . . . . . . . . . . . . . . . . . . . . . . . . . . . . . . . . . . 44 . . . . . . . . . . . . . . . . . . . . . . . . . . . . . . . . . . . . . . . . . . . . . 45 Configuration Tasks for End Users . . . . . . . . . . . . . . . . . . . . . . . . . . . . . . . . Configure Features in the Security Tools Security Console . Installation Guide 17 31 Personal Edition Setup Wizard . View Current Settings 15 . . . . . . . . . . . . . . . . . . . . . . Configure Authentication for Users . 6 15 . . . . . . . . . . . . . . . . . . . . . . . . . . . . . . . . . . . . . . . Upgrade Legacy HCA Computers . 5 9 . . . . . . . . . . . . . . . . . . . . . . . . . . . . . . . . . . . . . . . . . . . . Hardware Requirements 4 9 . . . . . . . . . . . . . . . . . . . . . . . . . . . . . . . . . . . . . . . . . . . . . . . . . Client Prerequisites 3 7 . . . . . . . . . . . . . . . . . . . . . . . . . . . . . . . . . . . . . . . . . . . . . . . . . . . . . . . . . . . . . . . . . . . . . . . . . . . . . 47 47 3 7 Use the Security Tools Authentication Applications . Credentials . . . . . . . . . . . . . . . . . . . . . . . . . . . . . . . . . . . . . . . . . . . . . . . . . . . . . . . . . . . . . . . . . . . . . . . . . . . . . . . . . . . . . . . . . . . . . . . . . 57 . . . . . . . . . . . . . . . . . . . . . . . . . . . . . . . . . . . . . . . . . . . . . . . 61 Password Manager . . . . . . . . . . . . . . . . . . . . . . . . . . . . . . . . . . . . . . . . . . . . . . . Icon Context Menu . . . . . . . . . . . . . . . . . . . . . . . . . . . . . . . . . 63 67 Web Domain Support . . . . . . . . . . . . . . . . . . . . . . . . . . . . . . . . . . . . . . . . . . . Logging on to Trained Logon Screens . 67 . . . . . . . . . . . . . . . . . . . . . . . . . . . . . . . . . . 68 . . . . . . . . . . . . . . . . . . . . . . . . . . . . . . . . . . . 69 Use Old Password . . . . . . . . . . . . . . . . . . . . . . . . . . . . . . . . . . . . . . . . . . . . . 70 Password Change . . . . . . . . . . . . . . . . . . . . . . . . . . . . . . . . . . . . . . . . . . . . . 71 Filling in with Windows Credentials . Password Manager Page . Settings Page . . . . . . . . . . . . . . . . . . . . . . . . . . . . . . . . . . . . . . . . 72 . . . . . . . . . . . . . . . . . . . . . . . . . . . . . . . . . . . . . . . . . . . . . . . 74 Turning off Password Manager . . . . . . . . . . . . . . . . . . . . . . . . . . . . . . . . . . . . . . Decryption and Uninstallation Tasks Best Practices . . . . . . . . . . . . . . . . . . . . . . . . . . . . . . . . . . . . . . . . . . . . . . . . . . . . . . . . . . . . . . . . . . . . . . . . . . . . . . . Create an Encryption Removal Agent Log File (Optional) Uninstallation Process . 76 . . . . . . . . . . . . . . . . . . . . . . . . . . . . . . . . . . . . . . . . Uninstall Dell Data Protection Installer . . . . . . . . . . . . . . . . . . . . . . . . . . . . . . . . . . . . . . . . . . . . . . . . . . . . . . . . . . . . . . . . . 78 . . . . . . . . . . . . . . . . . . . . . . . . . . . . . . . . . . . . . . . . . . . . . . . Troubleshooting Recovery. 79 79 79 . . . . . . . . . . . . . . . . . . . . . . . . . . . . . . . . . 79 . . . . . . . . . . . . . . . . . . . . . . . . . . . . . . . . . . . . . . . . 80 Recover User Access to a Computer Equipped with an HCA Card (v8.3 or later) Security Tools . 78 78 . . . . . . . . . . . . . . . . . . . . . . . . . . . . . . . . . . . . . . . . . . . . . . . . Recover Data Using Current Computer . 76 . . . . . . . . . . . . . . . . . . . . . . . . . . . . . . . . . . . . . . . . . . . . . . . . . . . . . . . . . . . . . . . . . . . . . . . . . . . . . Prerequisites 75 . . . . . . . . . . . . . . . . . . . . . . . . . . . . . . . . . . . . . . . . . . . . Uninstall DDP | Security Tools Authentication Personal Edition 75 75 Uninstall DDP | Client Security Framework . Data Recovery 74 . . . . . . . . . . . . . . . . . . . . . . . . . . . Uninstall DDP | Encryption . . . . . . . . . . . . 80 . . . . . . . . . . . . . . . . . . . . . . . . . . . . . . . . . . . . . . . . . . . . . . . . . 82 Self-Recovery, OS Logon 4 63 . . . . . . . . . . . . . . . . . . . . . . . . . . . . . . . . . . . . . . . . . . . . Website and Application Logon Training 9 55 55 Backup and Restore Restore Data . 55 . . . . . . . . . . . . . . . . . . . . . . . . . . . . . . . . . . . . . . . . . . . . . Enrollment Status 8 . . . . . . . . . . . . . . . . . . . . . . . . . . . . . . . . . . . . . . . . . . . . . . . . . . . . . . . . . . 82 Installation Guide 10 About Personal Edition Policies and Templates Policies . . . . . . . . . . . . . . . . . . . . . . . . . . . . . . . . . . . . . . . . . . . . . . . . . . . . . . . . . . . . . . . . . . . . . . . . . . Template Descriptions . . . . . . . . . . . . . . . . . . . . . . . . . . . . . . . . . . . . . . . . . . . . . 85 85 93 Appendix A . . . . . . . . . . . . . . . . . . . . . . . . . . . . . . . . . . . . . . . . . . . . . . . . . . . . . . . . . . . . . . . . . . . . 97 Change Secure Boot/UEFI to Legacy Boot Mode in BIOS . . . . . . . . . . . . . . . . . . . . . . . . . . . 97 Glossary . . . . . . . . . . . . . . . . . . . . . . . . . . . . . . . . . . . . . . . . . . . . . . . . . . . . . . . . . . . . . . . . . . . . . . 99 Installation Guide 5 6 Installation Guide Overview 1 This guide assumes that Security Tools will be installed with Personal Edition. Personal Edition The purpose of Personal Edition is to protect data on your computer, even if the computer is lost or stolen. To ensure the security of your confidential data, the Shield for Windows encrypts the data on your Windows computer. You can always access the data when logged into the computer, but unauthorized users will not have access to this protected data. Data always remains encrypted on the drive, but because encryption is transparent, there is no need to change the way you work with applications and data. Normally, the Shield for Windows decrypts data as you work with it. Occasionally, a software application may try to access a file at the same moment that the Shield for Windows is encrypting or decrypting it. If this happens, after a second or two, the Shield for Windows displays a dialog that gives you the option of waiting or canceling the encryption/decryption. If you choose to wait, the Shield for Windows releases the file as soon as it is finished (generally within a few seconds). Security Tools Security Tools is an end-to-end security solution designed to provide advanced authentication support. Security Tools provides authentication support for Windows Passwords, Fingerprints, and Smart Cards, as well as Self Enrollment and One-Step Logon (Single Sign-On [SSO]). The Administrator Console is available to users with Administrator privileges and is used to configure the software for all users of the computer. The Administrator Console is used to set up authentication policies, manage users, and configure advanced settings as well as settings specific to supported credentials for Windows logon. The Security Console is the centralized user interface for all end users of the computer. The Security Console is used to set up and manage user’s credentials, view the enrollment status of their credentials, backup and restore program data as well as Password Manager logons and credentials for Windows. The Security Console provides a wizard-driven user interface to enable users to configure their credentials and self-recovery questions. Proceed to Requirements. Installation Guide 7 8 Installation Guide 2 Requirements • The user account performing the installation and activation must be a local or domain Admin user. • Internet connectivity is required to activate. • To successfully install, Dell Data Protection | Personal Edition requires an entitlement. The entitlement is supplied when you purchase DDP|PE. Depending on how you purchase Personal Edition, you may need to manually install the entitlement. If so, follow the simple instructions that accompany the entitlement. If Personal Edition is installed using Dell Digital Delivery, the entitlement installation is taken care of by the Dell Digital Delivery service. • If your computer comes equipped with a Dell Data Protection | Hardware Crypto Accelerator (HCA), you must first set up the Trusted Platform Module (TPM), and if setting up a computer using legacy HCA, create a system password. Follow the instructions detailed in Pre-Installation Configuration to Enable HCA prior to client installation. • The features available as of v8.3 with HCA are supported on legacy BIOS non-UEFI computers. If running Windows 8 or Windows 8.1, follow the instructions detailed in Appendix A prior to client installation. • Windows 8.1 should not be installed on drive 1 on HCA-enabled computers. This operating system configuration is not supported because Windows 8.1 creates a recovery partition drive 0 which in turn, breaks Preboot Authentication. Instead, either install Windows 8.1 on the drive configured as drive 0, or restore Windows 8.1 as an image to any of the drives. • Non-UEFI computers can have up to four primary partitions. When the PBA is installed on a client computer, it needs to create and use one of the four partitions for the startup partition, also called the Preboot Authentication (PBA) partition. If all four partitions are already in use on a client computer, then the HCA card will fail to activate on it. • Before configuring Preboot Authentication (PBA) on a computer equipped with an HCA card, ensure that the computer has a network connection to the DDP Server. • HCA features for v8.3 and later do not support RAID configuration. Legacy HCA features (pre-v8.3) can be configured using RAID. Client Prerequisites The installer installs these components if not already installed on the computer. Prerequisites • Microsoft Visual C++ 2012 Update 3 or later Redistributable Package (x86 and x64) • Microsoft SQL Server Compact 3.5 SP2 (x86 and x64) • Microsoft .NET Framework v4.0 BEST PRACTICE: Potential installation problems can be avoided if Microsoft .NET Framework is installed on the target computer prior to client installation. Installation Guide 9 Hardware Requirements The following table details supported hardware. Windows Hardware • Intel Pentium-class or AMD processor • 512 MB-1GB RAM • +-110 MB of free disk space plus •250 MB free space in Preboot Authentication partition Optional Embedded Hardware • Trusted Platform Module (TPM) chipset with TCG Software Stack (TSS) version 1.2.1.42 NOTE: TSS is a component that interfaces with the Trusted Platform Module (TPM). To find the TSS version, go to (default location) C:\Program Files\Dell\Dell Data Protection\Drivers\TSS\bin > tcsd_win32.exe. Right-click the file and select Properties. Verify the file version on the Details tab. • Dell Data Protection | Hardware Crypto Accelerator NOTE: Enterprise PBA is supported on Microsoft Windows 7, Microsoft Windows 8, and Microsoft Windows 8.1 on Dell X5 and X4 computers, model numbers listed below. Legacy PBA is not supported on Microsoft Windows 8 or Microsoft Windows 8.1. Legacy DDP|HCA is supported on Microsoft Windows 7 only, on Dell X4 computers, model numbers listed below. Model Name 10 Enterprise PBA Legacy PBA Latitude E6420 ATG Latitude E6420 XFR Latitude XT3 Latitude E6430u Latitude E6530 Latitude E6230 Latitude E6330 Latitude E6430s Latitude E6430 Latitude E6430 ATG Latitude E5430 Latitude E5530 Latitude E7240 Latitude E7440 Latitude E6440 Latitude E6540 Precision M4600 Precision M6600 Precision M4700 Precision M6700 Installation Guide Windows Hardware Precision M4800 Precision M6800 Precision T3600 Precision T3610 Precision T5600 Precision T5610 Precision T7600 Precision T7610 Precision T1650 Precision T1700 OptiPlex 9010 AIO OptiPlex 9010 OptiPlex 7010 OptiPlex 7020 OptiPlex XE2 OptiPlex 9020 AIO OptiPlex 9020 OptiPlex 9020 Micro OptiPlex 9030 AIO Authentication Hardware Support The following table details supported authentication hardware. Fingerprint Readers • Validity VFS495 in Secure Mode • Broadcom Control Vault Swipe Reader • UPEK TCS1 FIPS 201 Secure Reader 1.6.3.379 • Authentec Eikon and Eikon To Go USB Readers Smart Cards NOTE: Smart cards, including contactless cards, can be used for Windows logon but not Preboot Authentication. • PKCS #11 Smart Cards using the ActivIdentity client NOTE: The ActivIdentity client is not pre-loaded and must be installed separately. • Common Access Cards (CAC) NOTE: With CACs that have more than one certificate, at logon, the user selects the correct certificate from a list. • CSP Cards Contactless Cards • Contactless Cards using Contactless Card Readers built-in to specified Dell laptops Installation Guide 11 Operating Systems The following table details supported operating systems. NOTE: The Encryption client does not support dual boot configurations as it is possible to encrypt system files of the other operating system, which would interfere with its operation. XP Mode is not compatible with the Encryption client, it is designed to run Microsoft Windows 7 or later natively. Windows Operating Systems (32- and 64-bit) • Microsoft Windows XP SP3 - Professional Edition NOTE: Software encryption only is supported on Microsoft Windows XP SP3. • Microsoft Windows 7 SP0-SP1 - Enterprise - Professional • Microsoft Windows 8 - Enterprise - Pro • Microsoft Windows 8.1-Windows 8.1 Update 1 - Enterprise Edition - Pro Edition Operating Systems for External Media Edition (EME) The following table details the operating systems supported when accessing media protected by EME. NOTE: To host External Media Shield (EMS), removable storage must have approximately 55MB available plus open space on the media that is equal to the largest file to be encrypted. Operating Systems Supported to Access EMS-Protected Media (32- and 64-bit) • Microsoft Windows XP SP3 - Professional Edition - Home Edition - Media Center Edition NOTE: Software encryption only is supported on Microsoft Windows XP SP3. • Microsoft Windows 7 SP0-SP1 - Enterprise - Professional - Ultimate - Home Premium • Microsoft Windows 8 - Enterprise - Pro - Windows 8 (Consumer) 12 Installation Guide Operating Systems Supported to Access EMS-Protected Media (32- and 64-bit) • Microsoft Windows 8.1- Windows 8.1 Update 1 - Enterprise Edition - Pro Edition Language Support The Encryption client and Security Tools are Multilingual User Interface (MUI) compliant and support the following languages. Language Support • EN - English • JA - Japanese • ES - Spanish • KO - Korean • FR - French • PT-BR - Portuguese, Brazilian • IT - Italian • PT-PT - Portuguese, Portugal (Iberian) • DE - German Interoperability Deprovision and Uninstall Dell Data Protection | Access If DDP|A is installed now or has been installed in the past on your computer, before installing Personal Edition or Security Tools, you must deprovision the DDP|A-managed hardware and then uninstall DDP|A. If DDP|A has not been used, you may simply uninstall DDP|A and restart the installation process. Deprovisioning DDP|A-managed hardware includes the fingerprint reader, smart card reader, BIOS passwords, TPM, and the Self-Encrypting Drive. Installation Guide 13 NOTE: If running DDP|E encryption products, stop or pause an encryption sweep. If running Microsoft BitLocker, suspend the encryption policy. Once DDP|A is uninstalled and Microsoft BitLocker policy is unsuspended, initialize the TPM by following the instructions located at http://technet.microsoft.com/en-us/library/cc753140.aspx. Deprovision DDP|A-Managed Hardware 1 Launch DDP|A and click the Advanced tab. 2 Select Reset System. This will require that you enter any provisioned credentials to verify your identity. After DDP|A verifies the credentials, DDP|A will perform the following actions: • Remove all provisioned credentials from Dell ControlVault (if present) • Remove Dell ControlVault owner password (if present) • Remove all provisioned fingerprints from integrated fingerprint reader (if present) • Remove all BIOS passwords (BIOS System, BIOS Admin, and HDD passwords) • Clear the Trusted Platform Module • Remove the DDP|A Credential Provider Once the computer is deprovisioned, DDP|A reboots the computer to restore the Windows default credential provider. Uninstall DDP|A Once the authentication hardware is deprovisioned, uninstall DDP|A. 1 Launch DDP|A and perform a Reset System. This will remove all DDP|A managed credentials and passwords and will clear the Trusted Platform Module (TPM). 2 Click Uninstall to launch the installer. 3 When the uninstall finishes, click Yes to restart. NOTE: If using a self-encrypting drive, removing DDP|A will also unlock the SED and remove the Preboot Authentication. Initialize the TPM 1. Follow the instructions located at http://technet.microsoft.com/en-us/library/cc753140.aspx. Proceed to Pre-Installation Configuration to Enable HCA or if you do not intend to use HCA policies, proceed to Installation Tasks. 14 Installation Guide Pre-Installation Configuration to Enable HCA 3 If the computer targeted for encryption is equipped with an HCA card and you intend to use HCA policies, you must first set up and activate the TPM. Follow the instructions in this section to configure HCA prior to Personal Edition installation. NOTE: The features available as of v8.3 with Enterprise PBA are supported on legacy BIOS non-UEFI computers. If running Windows 8 or Windows 8.1, follow the instructions detailed in Appendix A prior to performing these steps. Upgrade Legacy HCA Computers Requirements • Computers running legacy HCA BIOS must upgrade to an enterprise BIOS to access the newest HCA features, such as enhanced Preboot Authentication. • The computer must have at least one partition free to accommodate the Preboot Authentication (PBA) partition. Upgrade Legacy HCA Computers Find your computer’s model number in the table below. If your legacy HCA computer’s BIOS version is older than the one listed below for your computer model, follow these steps to upgrade the BIOS: 1 Disable HCA policies and apply the policy change. 2 Wait for hard drives to be decrypted. 3 Uninstall the Encryption client and Security Tools (if needed). 4 Upgrade the BIOS. TIP: a Close all applications. b Go to support.dell.com. c In General support > Select a product, click Laptops if Latitude or Desktops & All-in-Ones if Precision or Optiplex. d Select your model. The following computers need the updated BIOS versions to run the newest HCA features: Installation Guide Computer BIOS Needed Latitude E6440 A05 Latitude E6540 A08 Latitude E7240 A08 Latitude E7440 A08 Precision M4800 A07 Precision M6800 A07 Optiplex 7010 A16 Optiplex 9020 A05 15 Computer BIOS Needed Optiplex 9020 AIO A06 Optiplex XE2 A05 Precision T1700 A06 e Select Get drivers and downloads in the left menu. f Click View All Drivers. g Scroll down to Refine your results and expand the BIOS drop-down. Download and install the updated BIOS, following the prompts in the BIOS installer package. The following example displays a Latitude E7440. 5 Install the product using the DDPSetup.exe file. Using DDPSetup.exe installs Personal Edition and Security Tools. 6 Re-apply HCA policies and apply the change. 16 Installation Guide HCA Pre-Installation BIOS Configuration If the following hardware and BIOS instructions are not completed, are inaccurate or are otherwise not met, Personal Edition ignores HCA policies and software encryption is implemented. 1 Boot into the BIOS Configuration: — Press F2 or F12 continuously during boot until a message in the upper right screen says something similar to “preparing to enter setup” (F2) or “preparing one-time boot menu” (F12).Enter BIOS Administrator password if prompted. NOTE: Typically, you will not see this prompt if this is a new computer, since BIOS password has not yet been configured. 2 If the computer is equipped with legacy HCA, follow this step. Otherwise, skip to Step 4. Define the BIOS Administrator Password if not already configured: — Under Settings, click the + (plus) sign next to Security, and then click Admin Password. This step must be completed before you can create a System (Preboot) password. — Enter your new Admin password information and click Apply. 3 If the computer is equipped with legacy HCA, follow this step. Otherwise, skip to Step 4. Define a System (Preboot) Password if not already configured: — Click System Password in the same menu. — Enter your new System Password information and click Apply. IMPORTANT: Before performing Step 4 and 5, understand that you should never clear TPM or HCA ownership after HCA policies have been implemented. If you ignore the BIOS warning and clear the TPM or HCA after HCA policies have been implemented, you will lose access to the encrypted hard drive and must complete a recovery process to regain access. 4 Clear and activate the TPM: — Click TPM Security in the same menu. — Select the option for Clear and click Apply. — Select the option for Activate and click Apply. 5 Clear HCA ownership: — Click Dell Encryption in the same menu. — Select the Clear Owner check box. — Click Yes at the warning dialog and then click Apply. — Click Exit. NOTE: If the check box is grayed out, it is Owned. If the HCA ownership will not clear, select Load Default and then Exit. 6 If the computer is equipped with legacy HCA, enter the System (Preboot) Password: — After exiting the BIOS configuration you will be prompted for the System (Preboot) Password defined in Step 3. — HCA pre-installation configuration is complete. 7 Log in to Windows: — Log in with local or domain Admin credentials when the computer boots to Windows. Reset System Password (legacy HCA only) If the computer is equipped with legacy HCA and you forget your system password, log in with the BIOS Admin password and assign a new system password as described in HCA Pre-Installation BIOS Configuration. If the BIOS password is also unknown, you must contact Dell support to reset the passwords (refer to your Welcome Letter for contact information). Proceed to Installation Tasks. Installation Guide 17 18 Installation Guide Installation Tasks 4 • To install and activate Personal Edition, you must be a local or domain Admin user. • If upgrading, Dell recommends upgrading when no encryption sweep is running. Performing an upgrade during an encryption sweep may prevent the client from restarting normally after the installation finishes. If this occurs, a computer restart corrects the issue. • If running Windows 8.1 and installing Security Tools, you will be securing access to this computer using advanced authentication credentials that are managed and enrolled using Dell Data Protection | Security Tools. DDP|ST is now the primary manager of your authentication credentials for Windows Sign-in, including Windows password, fingerprints, and smart cards. Picture password, PIN, and fingerprint credentials enrolled using the Microsoft Operating System will not be recognized at Windows Sign-in. To continue using the Microsoft Operating System to manage your credentials, uninstall DDP|ST. • Dell recommends that you do not change the authentication method after HCA policy has been set to True. If you must switch to a different authentication method, you must either: • Remove all the users from the PBA, and then re-enroll the users. or • • Set the HCA policy to False, change the authentication method, and then reset the HCA policy to True. To use smart cards with Windows authentication, the following registry value must be set on the client computer: Once the client is installed, create the following Windows Registry entry on the computer targeted for smart card usage. 1 Click All Programs > Run from the Windows Start menu. 2 Enter regedit in the Open: field. 3 Go to HKLM\SOFTWARE\DigitalPersona\Policies\Default\SmartCards. 4 Right-click in the right pane and select New > DWORD Value. 5 Name the key MSSmartcardSupport. 6 Double-click the key to open it. 7 Enter 1 in the Value Data: field. 8 Select Hexadecimal in the Base section. 9 Click OK to save and close the key. 10 Close the Registry Editor. NOTE: Smart card usage with PBA is not supported in Personal Edition. Installation Guide 19 Best Practices Dell recommends that IT best practices are followed during the deployment of Personal Edition. We recommend at least the following: 1 Create a Windows Password - It is highly recommended that a Windows password be created (if one does not already exist) to protect access to your encrypted data. Creating a password for your computer prevents others from logging on to your user account without your password. a Go to the Windows Control Panel (Start > Control Panel). b Click the User Accounts icon. c Click Create a password for your account. d Enter a new password and re-enter the password. e Optionally enter a password hint. f Click Create Password. g Restart your computer. 2 Back up any important data. 3 To reduce encryption time, run the Windows Disk Cleanup Wizard to remove temporary files and any other unnecessary data. 4 Turn off sleep mode to prevent an unattended computer from going to sleep. Encryption cannot occur on a sleeping computer. 5 In environments where systems are installed with images, it is strongly recommended to install the Encryption client after image installation. If it is necessary to incorporate the Encryption client in an image, it should be done in an unencrypted state. Should you have questions or concerns, contact Dell Pro Support. 20 Installation Guide Install Personal Edition You can install Personal Edition using the master installer (highly recommended), or alone by extracting the child installer out of the master installer. Either way, Personal Edition can be installed by user interface, command line or scripts, and using any push technology available to your organization. To successfully install, Dell Data Protection | Personal Edition requires an entitlement. The entitlement is supplied when you purchase DDP|PE. Depending on how you purchase Personal Edition, you may need to manually install the entitlement. If so, follow the simple instructions that accompany the entitlement. If Personal Edition is installed using Dell Digital Delivery, the entitlement installation is taken care of by the Dell Digital Delivery service. The user must have administrator privileges on the local computer to install, to decrypt, and to uninstall Personal Edition. Choose an Installation Method There are two methods to install the client, select one of the following: • Install Personal Edition Using the Master Installer - HIGHLY RECOMMENDED • Install Personal Edition Individually Using the Child Installers Install Personal Edition Using the Master Installer - HIGHLY RECOMMENDED To install Personal Edition, the installer must find the appropriate entitlement on the computer. If the appropriate entitlement is not found, Personal Edition cannot be installed. • The Dell Data Protection Installer is commonly known as the Master Installer, as it installs multiple clients and drivers. • The master installer does not support upgrades from pre-v8.0 components. For upgrade needs, extract the appropriate child installer from the master installer. • If installing using the master installer user interface, Personal Edition can be installed on one computer at a time. • If installing using the master installer command line, Personal Edition can be installed using scripts or any push technology available to your organization. Select one method: • Installation Using the Master Installer User Interface • Installation Using the Master Installer Command Line Installation Using the Master Installer User Interface 1 Install the entitlement if needed. 2 Locate DDPSetup.exe in the Dell installation media. Copy it to the local computer. 3 Double-click DDPSetup.exe to launch the installer. Installation Guide 21 Dialogs display that alert you to the status of the installing the prerequisites. This may take several minutes. 4 Click Next when the Welcome screen displays. 5 Read the license agreement, agree to the terms, and click Next. 6 Click Next to install Personal Edition in the default location of C:\Program Files\Dell\Dell Data Protection\. 7 Dell Data Protection | Security Tools is installed by default and cannot be deselected. This is listed as Dell Data Protection | Security Framework in the installer. Drivers are installed by default and cannot be deselected. Drivers installs smart card, fingerprint reader, and other necessary drivers. If needed, select the check box for Dell Data Protection | Encryption to install the Encryption client for Windows computers. 22 Installation Guide 8 Click Next Installation Guide 23 9 Click Install to begin the installation. A status window displays. This may take several minutes. 24 Installation Guide 10 Select Yes, I want to restart my computer now and click Finish when the InstallShield Wizard Complete screen displays. 11 Once the computer restarts, authenticate to Windows. Installation of Personal Edition + Security Tools is complete. The Security Tools Administrator Console launches immediately after restart and authentication. The rest of this section explains how to install Personal Edition + Security Tools using the master installer command line and may be skipped. Proceed to Configure Features in the Security Tools Administrator Console. Installation Using the Master Installer Command Line Before beginning, install the entitlement on the target computer if needed. For a command line installation, the switches must be specified first. Switches The following table details the switches available for the installation. Installation Guide Switch Meaning -y -gm2 Pass data to the self-extractor /S Silent mode /z Pass data to the InstallScript system variable CMDLINE 25 Parameters The following table details the parameters available for the installation. Parameters InstallPath=path to alternate installation location. FEATURES=PE Example Command Line Installation Although the reboot is suppressed in these examples, an eventual reboot is required. Encryption cannot begin until the computer has rebooted. Be sure to enclose a value that contains one or more special characters, such as a blank space, in escaped quotation marks. Command lines are case-sensitive. See Configuration Tasks for Administrators, Configuration Tasks for End Users, and Use the Security Tools Authentication Applications to learn how to use the features of Security Tools. • The following example installs Personal Edition and Security Tools (silent installation, no reboot, and installed in the default location of C:\Program Files\Dell\Dell Data Protection). DDPSetup.exe -y -gm2 /S /z"\"FEATURES=PE\"" • The following example installs Personal Edition and Security Tools (silent installation, no reboot, and installed in an alternate location of C:\Program Files\Dell\My_New_Folder). DDPSetup.exe -y -gm2 /S /z"\"FEATURES=PE, InstallPath=C:\Program Files\Dell\My_New_Folder\"" Once the computer is restarted, authenticate to Windows. Installation of Personal Edition + Security Tools is complete. The Setup Wizard launches immediately after restart and authentication. The rest of this section explains how to install Personal Edition using the child installers and may be skipped. Proceed to Configure Features in the Security Tools Administrator Console. Install Personal Edition Individually Using the Child Installers To install Personal Edition using the child installers, the child executable files must first be extracted from the master installer. Extract the Child Installers 1 From the Dell installation media, copy the master installer’s DDPSetup.exe file to the local computer. 2 Open a command prompt in the same location as the DDPSetup.exe file and enter: DDPSetup.exe /z"\"EXTRACT_INSTALLERS=C:\extracted\"" 26 Installation Guide The extracted child installers are located at C:\extracted\. Command Line Installation For a command line installation, the switches must be specified first. The /v switch is required, and takes an argument. Other parameters go inside an argument that is passed to the /v switch. Switches The following table details the switches available for the installation. Switch Meaning /v Pass variables to the .msi inside the executable files /a Administrative installation /s Silent mode Parameters The following table details the parameters available for the installation. Log File Parameters /lv* [fullpath]Install.log REBOOT=ReallySuppress HIDEOVERLAYICONS=1 Installation Guide 27 Display Options The following table details the display options that can be specified at the end of the argument passed to the /v switch, to achieve your expected behavior. Option Meaning /q No Progress dialog, restarts itself after process completion /qb Progress dialog with Cancel button, prompts for restart /qb- Progress dialog with Cancel button, restarts itself after process completion /qb! Progress dialog without Cancel button, prompts for restart /qb!- Progress dialog without Cancel button, restarts itself after process completion /qn No user interface NOTE: Do not use both /q and /qn in the same command line. Only use ! and - after /qb. Example Command Line Installation Although the reboot is suppressed in these examples, an eventual reboot is required. Encryption cannot begin until the computer has rebooted. Be sure to enclose a value that contains one or more special characters, such as a blank space, in escaped quotation marks. See Configuration Tasks for Administrators, Configuration Tasks for End Users, and Use the Security Tools Authentication Applications to learn how to use the features of Security Tools. NOTE: Drivers are needed for Security Tools Advanced Authentication if installing on Dell hardware or installing the Encryption client. These are the drivers for the various smart cards and fingerprint readers for which Dell supplies drivers. These drivers include the software stack that are required for the HCA, including the HCA driver and the Trusted Software Stack (TSS) for TPM. Drivers - C:\extracted\Drivers • The following example installs the drivers (silent installation, no reboot, and installed at the specified location). setup.exe /S /z"\"InstallPath=<c:\location>, SUPPRESSREBOOT=1\"" Then: Security Tools - Client Security Framework - C:\extracted\Security Tools • The following example installs the Security Framework (silent installation, no reboot, log file at the specified location, and is installed in the default location of C:\Program Files\Dell\Dell Data Protection). EMAgent_XXbit_setup.exe /s /v"/norestart /l*v FrameworkInstall.log /qn" NOTE: This client is required for Security Tools Advanced Authentication in v8.x. Then: Security Tools Advanced Authentication Client - C:\extracted\Security Tools\Authentication • The following example installs Security Tools (silent installation, no reboot, log file at the specified location, installed in the default location of C:\Program Files\Dell\Dell Data Protection). DP_XXbit_setup.exe /s /v"/norestart /l*v DPinstall.log /qn" 28 Installation Guide Then: Dell ControlVault - C:\extracted\UshCvReset (Dell ControlVault Software Update) Child Installer • The following example installs Dell ControlVault software driver and firmware updates used by Security Tools (silent installation, no reboot, log file at the specified location, installed in the default location of C:\Program Files\Dell\Dell Data Protection). If the target computer is not equipped with Dell ControlVault, installing this software is not harmful and will have no effect. Dell_CV_SW_Update_xXX.exe /s /v"/norestart /l*v CVinstall.log /qn" Then: Encryption Client - C:\extracted\Encryption • The following example installs Personal Edition, Encrypt for Sharing, CREDActivate, hides the overlay icons, no dialogue, no progress bar, log file at the specified location, and suppresses restart. DDPE_XXbit_setup.exe /s /v"HIDEOVERLAYICONS=1 REBOOT=ReallySuppress /l*v Shieldinstall.log /qn" Once the computer is restarted, authenticate to Windows. Installation of Personal Edition + Security Tools is complete. The Setup Wizard launches immediately after restart and authentication. Proceed to Configure Features in the Security Tools Administrator Console. Installation Guide 29 30 Installation Guide Configuration Tasks for Administrators 5 Configure Features in the Security Tools Administrator Console To begin using the features of Security Tools, they must first be configured. • Launch the Administrator Console from the Desktop shortcut. NOTE: If logged in as a regular user (using a standard Windows account), the Administrator Console requires UAC elevation to launch. • Before beginning configuration tasks, you must create a password to be used with Security Tools. This password will be needed any time you log on to the Administrator Console. The password must be 8-32 characters that includes at least one letter, one number, and one special character. The backup location must be a network drive or on removable media. This file contains the recovery keys that are needed for a recovery operation. Dell Support will need access to this file to help you recover data if a recovery operation is needed. When finished, click OK. Installation Guide 31 • To change your password, from the Home tab, click Administrator Settings. • To navigate through the Administrator Console, you can either select items from the top menu “tabs” or click the “tiles” in the body of the page. Either method takes you to the same page. 32 Installation Guide Configure Authentication for Users 1 Click the Authentication tab. 2 Click Preboot Authentication to configure Preboot Authentication. For preboot authentication, the computer must be equipped with an HCA card, running an enterprise BIOS, and running Personal Edition v8.3 or later. a This page is visible only if PBA is present on the computer. Change or confirm the following values. Logon Policies Non-Cached User Login Attempts Allowed - How many times an unknown user can attempt to log in (a user that has not logged in to the computer before [no credentials have been cached]). Cached User Login Attempts Allowed - How many times can a known user can attempt to log in. Question/Answer Attempts Allowed - Number of times the user can attempt to enter the correct answer. Enable Crypto Erase Password - Select to enable. Installation Guide 33 Enter the Crypto Erase Password - A word or code of up to 100 characters used as a failsafe security mechanism. Entering this word or code in the user name or password field during PBA authentication wipes the device permanently. Not entering text in this field results in no crypto erase password being available in case of emergency. Click Apply when finished. b This page is visible only if PBA is present on the computer. Change or confirm the following values. Custom Logon Preboot Title Text - This text displays on the top of the PBA screen. Not entering text in this field results in no title being displayed. Text does not wrap, so entering more than 17 characters may result in the text being cut off. Support Information Text - This text displays on the PBA support information screen. Dell recommends that you customize the message to include specific instructions about how to contact the Help Desk or Security Administrator. Not entering text in this field results in no support contact information being available for the user. Text wrapping occurs at the word level, not the character level. For instance, if you have a single word that is more than approximately 50 characters in length, it will not wrap and no scroll bar will be present, therefore the text will be cut off. 34 Installation Guide Legal Notice Text - This text displays before being allowed to log on to the device. For example: “By clicking OK, you agree to abide by the acceptable computer use policy.” Not entering text in this field results in no text or OK/Cancel buttons being displayed. Text wrapping occurs at the word level, not the character level. For instance, if you have a single word that is more than approximately 50 characters in length, it will not wrap and no scroll bar will be present, therefore the text will be cut off. Click Apply when finished. 3 Click Users to manage users and user status. Installation Guide 35 a New Windows users are automatically added when they log on to Windows or enroll credentials. Click Add to add an existing Windows user. When the Select Users dialog displays, select the Object Type and Location. Enter the object name and click Check Names. Click OK when finished. Select a User and click Enroll to launch the Attended Enrollment Wizard. On the Choose Credentials page, select which credentials are to be enrolled for the selected user. Click Delete to remove the Windows user from accessing the Security Console enrollment options. 36 Installation Guide 4 Click Authentication Policy to define how users login. a The Logon Policy allows you to configure how Administrators and Users log in to the Windows operating system and system hardware. Double-click one of the logon options or click Add to specify combinations of credentials to use for logon. The Session Policy allows you to configure how Administrators and Users access password protected software applications and Internet logins. Grace Period Feature The Grace Period feature provides a means for you to specify a future date when a configured Logon Policy will be enforced. This feature allows you to configure a Logon Policy in advance of the date when it will be enforced, leaving a specified amount of time for the user to enroll the credentials required by the policy. By default, the policy is enforced immediately and the text link “This policy will be enforced immediately.” is displayed on the Logon Policy page. Clicking the linked text opens a dialog where you can specify when users affected by this Logon Policy must enroll their credentials. To change from the default of Immediately, click the drop-down menu and select On a specific date. Then either enter a date or click the arrow to the right of the date to select one from a calendar. Enforcement of the policy begins at approximately 12:01 AM on the date selected. Users are reminded to enroll the credentials required by the policy at their next logon (by default). Additional options can be selected from the Remind users list. NOTE: The reminder that is displayed to the user is slightly different, depending on whether the user is at the Windows Logon screen or within a Windows session when the reminder is triggered. Installation Guide 37 Functionality During the Grace Period During a specified Grace Period, after every log on, the Additional Credentials notification displays when the user has not yet enrolled the minimum credentials required to satisfy a changed logon policy. The message content is: Additional credentials are available for enrollment. If additional credentials are available, but are not required, the message displays only once after the policy has been changed. Clicking the notification has the following results, depending on the context: • If no credentials have been enrolled, the Setup wizard displays, allowing Administrative Users to configure computer-related settings, and offering users the ability to enroll the most common credentials. • After initial credential enrollment, clicking the notification displays the Setup wizard within the Security Console. Functionality After Grace Period Expires In all cases, once the Grace Period has expired, users cannot log on without having enrolled the credentials required by the Logon Policy. If a user attempts to log on with a credential or credential combination that does not satisfy the Logon Policy, the Setup wizard displays on top of the Windows Logon screen. • If the user successfully enrolls the required credentials, they are logged into Windows. • If a user does not successfully enroll the required credentials, or cancels the wizard, they are returned to the Windows Logon screen. 38 Installation Guide 5 Click Credentials to define credential restrictions. a Click Recovery Questions. Select at least three pre-defined Recovery Questions to be presented to users during Recovery Question Setup in the Security Console. You can also define whether a user is allowed to type their own passphrase. Additionally, you can add up to three custom questions to the list that the user selects from. You can choose to prohibit use of Recovery Questions for Windows logon by deselecting the check box at the bottom of the page. This setting prevents the user from logging in without a helpdesk call in the event that they lose or forget their logon credential. Recovery questions apply to preboot and operating system logon. Installation Guide 39 Click Apply when finished. b Click Fingerprints. From the Enrollment tab, set the minimum and maximum number of fingers to enroll. Click Clear all data to clear all fingerprint data from Reader. Click Apply when finished. From the Sensitivity tab, adjust the False Acceptance Rate (FAR) if desired. The False Accept Rate is the probability of receiving a false acceptance decision when comparing fingerprints scanned from different fingers. For example, if you select Medium-High, on average, one false acceptance will occur when a fingerprint is compared against one hundred thousand fingerprints scanned from different fingers. 40 Installation Guide The higher the setting, the lower the chance of receiving a false acceptance. However, at the High setting, the system may reject legitimate fingerprints. Click Apply when finished. Installation Guide 41 6 Click Advanced to modify advanced end user options. a Under Self-Enrollment, you can optionally allow users to self-enroll credentials or optionally allow users to modify their enrolled credentials. Allow users to enroll their credentials themselves - The default for this setting is selected. Users are permitted to enroll credentials without intervention by an Administrator. When deselected, credentials must be enrolled through the Attended Enrollment Wizard, which can be launched by selecting a user and clicking Enroll on the Users page of the Administrator Console. Allow users to modify their enrolled credentials - The default for this setting is selected. Users are permitted to modify or delete their enrolled credentials without intervention by an Administrator. When deselected, credentials cannot be modified or deleted by a regular user, but must be modified or deleted through the Attended Enrollment Wizard, which can be launched by selecting a user and clicking Enroll on the Users page of the Administrator Console. NOTE: This setting cannot be selected unless the Allow users to enroll their credentials themselves setting is also selected. Under One-Step Logon, optionally enable single sign-on for PBA, if applicable. 42 Installation Guide Click Apply when finished. 7 Close the Administrator Console. 8 A computer shutdown is required to complete the activation process. When prompted, click Shutdown. Turn the computer back on after a complete power-down. Users will now log in through the PBA using their Windows password. Installation Guide 43 Personal Edition Setup Wizard 1 The Security Tools PBA interface displays. Log on with your Windows username and password. You will be seamlessly passed through to Windows. 2 A dialog displays that states that an application needs elevated privileges to launch. Click Yes to launch the Personal Edition Setup Wizard. If the dialog does not display, open the Encryption Console from the DDP icon in the system tray to launch to Personal Edition Setup Wizard. 3 This Setup Wizard helps you use encryption to protect the information on this computer. 4 Read the Welcome screen and click Next. 5 Enter your Preboot Authentication (PBA) System Password, if prompted. This screen displays only if legacy HCA is detected in your computer. 6 Select a policy template. The policy template establishes the default policy settings. You can easily apply a different policy template or customize the selected template in the Local Management Console once initial configuration is complete. If your computer comes equipped with an HCA card and you choose to enable HCA policies, all SDE policies are ignored. Likewise, if you enable SDE policies and later decide to enable HCA policies, SDE issues a decryption policy before HCA policies are implemented. HCA and SDE cannot coexist on the same computer. Click Next. 7 Read and acknowledge the Windows password warning. If you wish to create a Windows password now, see Best Practices. 8 Create a 9-32 character Encryption Administrator Password (EAP) and confirm. The password should contain alphabetic, numeric, and special characters. Record and save this password in a safe place. Click Next. 9 Click Browse to choose a network drive or removable storage to back up your encryption keys (which are wrapped in an application named LSARecovery_[hostname].exe). In the event of certain computer failures, these keys are used to recover your data. In addition, future policy changes sometimes require that your encryption keys get backed up again. If the network drive or removable storage is available, backing up of your encryption keys is done in the background. However, if the location is not available (such as the original removable storage device not being inserted into the computer), policy changes will not take effect until the encryption keys are manually backed up. NOTE: To learn how to manually back up encryption keys, click “? > Help” in the upper right corner of the Local Management Console or click Start > All Programs > Dell > Dell Data Protection > Encryption > Encryption Help. Click Next. 10 On the Confirm Encryption Settings screen, a list of Encryption Settings display. Review the items and when satisfied with the settings, click Confirm. Configuration of the computer begins. A status bar informs you of the progress of configuration. 11 Click Finish to complete the configuration and launch the Local Management Console. Encryption takes place in the background. You can keep the Local Management Console open or you can close the window. Either way, encryption of files progresses. You can continue to use your computer as usual while it is encrypting. NOTE: To learn how to use Personal Edition, click “? > Help” in the upper right corner of the Local Management Console or click Start > All Programs > Dell > Dell Data Protection > Encryption > Encryption Help. 44 Installation Guide View Current Settings Current settings are the encryption policies in effect for the current logged on user. Current settings include policy template overrides made. To access current settings: 1 Click the Advanced tab. 2 Click Reporting in the main menu. 3 Click Current Settings. Installation Guide 45 46 Installation Guide Configuration Tasks for End Users 6 Configure Features in the Security Tools Security Console • The Security Console provides users with an easy way to enroll their authentication credentials, manage their logons to websites, programs and network resources, backup and restore program data, and to monitor encryption status. The Security Console contains three tabs: Setup, Authentication, and Encryption. 1 Launch the Security Console from the Start Menu or the System Tray. Installation Guide 47 2 When the Security Console launches, the Setup tab displays. The user clicks Setup to launch the Security Tools Setup Wizard. 3 The user clicks Next at the Welcome page. 48 Installation Guide 4 Verify Your Identity The user enters their Windows password to verify their identity and clicks Next. 5 Recovery Questions Security Tools provides a question and answer-based method for users to access their Windows account if other credentials are unavailable (for example, if they forgot their password). The user selects pre-defined questions from the drop-down menu and then enters and confirms their answers. The user may also click Skip recovery questions setup to bypass this page at this time. The user clicks Next when finished. NOTE: Once Recovery Questions have been set up, this page no longer displays the Recovery Questions. Instead, it links to the Re-enroll Recovery Questions page and Delete Recovery Questions page. Installation Guide 49 6 Choose Credentials On the Choose Credentials page, the user can select which additional credentials to enroll at this time.By default, all credentials permitted by the Administrator and supported by the computer’s hardware and software are listed on this page. Disconnected peripherals are not displayed until they are reconnected. The user clicks Next to continue to enroll the selected credentials. NOTE: Credentials may be enrolled at any time by re-launching the Setup Wizard. 50 Installation Guide 7 Enroll Credentials During the process of enrolling the credentials selected in the previous step, a series of pages are presented to the user to enroll their credentials. The actual pages shown will vary, depending on the credentials selected by the user. a Fingerprint Enrollment The user enrolls their fingerprint credential on the Choose Credentials page. The user clicks the desired finger to enroll and clicks Save. The user may also click Skip fingerprint enrollment to bypass this page at this time. NOTE: The minimum and maximum number fingerprints to enroll is Administrator configured. Installation Guide 51 The number of swipes needed to complete fingerprint enrollment depends on the quality of the fingerprint scan. The user clicks Save when finished with each finger. To delete an enrolled fingerprint, click the highlighted fingerprint. A confirmation dialog displays, which ensures that the user intends to delete the fingerprint. The user clicks Save when finished. 52 Installation Guide b Card Enrollment To set up a built-in contactless card, place the card very close to the reader. Once the contactless card communicates with the reader, the user is prompted to verify their identity. The user enters their Windows password and clicks Authenticate. The user is prompted to Save the credential information after authentication of the card. Installation Guide 53 c Enrollment summary A summary of the credentials enrolled is shown after enrollment of required credentials is complete. The user clicks Finish to close the wizard. 8 The Encryption tab displays the protection status of the computer. Once provisioned (encrypted), the status updates to Protected. 54 Installation Guide Use the Security Tools Authentication Applications 7 The Security Console provides access to three applications through the tiles located on the Authentication tab. The applications are: • Credentials • Backup and Restore • Password Manager Credentials The Credentials application provides a way to enroll end user credentials. By default, end users enroll and modify their own credentials. However, Administrators may limit the ability of the end user to enroll or manage credentials. Enrollment Status The Enrollment Status page is the default page shown when you click the Credentials tile. This page displays a list of all supported credentials and specifies their status: Required, Optional, or Disabled. End users can access details about each credential by clicking the credential in the status list or through the navigation on the left menu. Installation Guide 55 However, if the Administrator has prohibited end users from enrolling their credentials, the navigation to the end users’ credentials is hidden. The following message displays on the page: No credentials allowed for setup. Please contact your administrator. If the Administrator has prohibited modification of credentials, the following message displays: <type of credential> No credentials allowed for modification. Please contact your system administrator. The end user clicks OK to dismiss the dialog. 56 Installation Guide Windows Password The Windows Password page allows end users to easily change their Windows password from within the Security Console. Password changes are effective immediately after clicking Change. IMPORTANT: End users should be instructed to change their Windows password only in the Security Console, rather than in Windows. If the Windows password is changed outside of the Security Console, a password mismatch will occur, requiring a recovery operation. Recovery Questions The Recovery Questions page is as described in the Security Tools Setup Wizard. See Recovery Questions. Fingerprints Fingerprint enrollment is as described in the Security Tools Setup wizard. See Fingerprint Enrollment. Cards Card enrollment is as described in the Setup Wizard. See Card Enrollment. Backup and Restore The Backup and Restore Wizard helps end users securely back up passwords managed by Password Manager. This data can be restored on any computer protected by Password Manager. 1 Click the Backup and Restore tile on the Authentication page. 2 Click either Back up data or Restore data to launch the Backup and Restore Wizard. Installation Guide 57 3 End users can also view a text log of backup and restore operations performed on this computer by clicking View Backup and Restore log at the bottom of the Backup and Restore page. NOTE: The data backed up does not include Windows or PBA logon credentials or credential-specific information, such as the end user's fingerprints. Back up Data 1 Click Back up data to launch the Backup and Restore Wizard. The first page of the wizard allows the end user to select the application data to back up. By default, Password Manager is selected. 58 Installation Guide 2 The end user clicks Next. 3 On the second page of the wizard, the end user types the location and name of the file to be created or navigates to the desired location by clicking Browse. If the end user attempts to back up the data to the same drive as the original data, a warning displays a recommendation to back up the data to portable storage or a network drive. 4 The end user clicks Next. 5 On the third page of the wizard, the end user must enter and confirm a password to protect the data in the backup file. Installation Guide 59 6 The end user clicks Next. 7 The final page of the wizard informs the end user that the backup has been completed and lists the applications that have had their data backed up. The end user clicks View Details to view a text log of the backup operations performed. 8 The end user clicks Finish to close the dialog. 60 Installation Guide Restore Data 1 Click Restore data to launch the Backup and Restore Wizard and to restore the data that was previously backed up using Back up Data. 2 The end user enters the name and location of the backup file or clicks Browse to navigate to the file and then enters the password for the file. The end user clicks Next. 3 On the next page of the wizard, the end user is asked to select the data to restore. By default, all data that is managed is restored. The end user can deselect specific applications that they do not want to have restored at this time. The end user clicks Next. 4 The final page of the wizard informs the end user that the restore has been completed, and lists the applications that have had their data restored. The end user clicks View Details to view a text log of the backup operations performed. Installation Guide 61 5 The end user clicks Finish to close the dialog. 62 Installation Guide Password Manager • Due to the ever changing structure of web logon screens, the software may not be able to support all websites at all times. • On Dell Venue tablets, touch capability for Password Manager icons is not available. • If running on Firefox or Chrome, you must install and register the Password Manager extension. For instructions on installing extensions: • • in Mozilla Firefox, see https://support.mozilla.org/. • in Google Chrome, see https://support.google.com/chrome/. Use of Password Manager icons (both pre-train and train icons) in Mozilla Firefox and Google Chrome differs from their use in Microsoft Internet Explorer: • Double-click functionality on Password Manager icons is not available. • The default action is not shown in bold in the drop-down context menu. • The Icon settings context menu option is not available. • If a page has multiple logon forms, you may see more than one Password Manager icon. Password Manager allows an end user to automatically fill in and submit data required to log on to websites, Windows applications, and network resources. Password Manager also provides the capability for an end user to change their logon passwords through the application, ensuring that logon passwords maintained by Password Manager are kept in sync with those of the targeted resource. Website and Application Logon Training • To train new website and application logons, an end user launches the logon screen (a web page or program) to train. An icon displays when the software detects the logon screen. Alternatively, the end user can click Add Logon and then navigate to the web page or program logon screen. Installation Guide 63 • The Password Manager icon in the upper left area of a screen indicates that this screen can be trained with the software. • To start training a logon screen, an end user can perform any of the following actions: • 64 a Scan enrolled credentials. An end user with an enrolled fingerprint or contactless smart card can touch the fingerprint reader with an enrolled fingerprint or present an enrolled card to the card reader. b Double-click the active area of the Password Manager icon (arrow) or click the active area and select the appropriate item from the context menu. c Press the Password Manager hot key combination (user configurable). The default is Ctrl+Win+H. After performing one of the above-listed actions, the Add Logon to Password Manager dialog displays. Installation Guide Add Logon • The end user adds their logon information for the website or program in the Add Logon dialog. • The end user can add or subtract logon fields or edit the field labels through the More fields button. • For password fields, a password strength indicator is shown below the password field in the dialog. The indicator bar changes from red (weak) to yellow (medium) to green (strong). To accommodate color blindness, the length of the strength bar grows as the password becomes stronger. A message is shown to alert the end user of the password strength. Because this is training an existing logon, the end user can only create a stronger password by going to the change password screen of the website or application. NOTE: If there are several editable fields on the logon screen, the software may not choose the desired editable fields automatically. To specify which fields to include, the end user can click the More fields button. The More Fields dialog box is displayed and the end user can specify the desired fields. When the end user navigates to a field in the More Fields dialog, the corresponding field on the logon screen is highlighted. Installation Guide 65 • An end user can edit field labels by clicking on the item in the fields list. • For logon to applications, Submit changes. A drop-down list of available options displays. • When saving the entered logon data, the end user is required to authenticate according to the Session Authentication policy in force. • The Add logon dialog box can also be launched by clicking the Password Manager icon on the white arrow of the blue circle and selecting the first menu item. 66 Installation Guide Icon Context Menu The context menu displays the following options: • Add <domain> to Password Manager - launches the Add logon dialog. • Open Password Manager - launches the Password Manager page in the Security Console. • Icon Settings - Allows the end user to configure the display of the Password Manager icon on trainable logon pages. NOTE: The Exclude this screen option is not reversible for the specific logon screen for the current user. The Prompt to add or Do not prompt to add options can be changed on the Settings page of the Password Manager application. • Once trained, the web or application logon displays in Password Manager. Web Domain Support • If an end user has trained a logon screen for a specific web domain but then wants to access his account on that web domain from a different logon screen, the end user can navigate to the new logon screen. The end user is then prompted to use an existing logon or to add a new one to Password Manager. • If the end user clicks Use logon, they are logged on to the previously created account. The next time the end user tries to access that account from the new logon screen, they can access without the prompt. • If the end user clicks Add logon, the Add logon dialog is shown. Installation Guide 67 Logging on to Trained Logon Screens • If the end user directly navigates to a web or application logon, the application detects whether this screen was trained and shows the Password Manager icon in the upper left corner of the screen. • The first three times the end user accesses a trained logon, an information balloon is shown to guide the end user. • To start the logon process, an end user can perform any of the following actions: a Scan enrolled credentials. An end user with an enrolled fingerprint or contactless smart card can touch the fingerprint reader with an enrolled fingerprint or present an enrolled card to the card reader. b Double-click the active area of the Password Manager icon (arrow), or click the active area and select the appropriate item from the context menu. c Press the Password Manager hot key combination (user configurable, the default is Ctrl+Win+H). • The end user must authenticate according to the Session Logon authentication policy in force. Upon a successful authentication, the logon data is filled in on the logon screen. The end user is prompted to choose the account to use if more than one logon for the logon screen exists. • Additional options are available through the context menu upon successful authentication. Fill in logon data - If the end user selects Fill in logon data or double-clicks the active area of the icon, the logon data populates the logon screen. Using the context menu or pressing the Password Manager hot key combination (default is Ctrl+Win+H) are the only actions available to fill in logon data if password is the only authentication credential available (no Fingerprint, no Contactless or Smart card). Edit logon - Clicking the Edit Logon menu item opens the Edit Logon dialog. The caption is Edit Logon. The text is the same as in the Add Logon dialog. Add logon - opens the Add logon dialog. 68 Installation Guide Open Password Manager - The Security Console is opened to the Password Manager page. Filling in with Windows Credentials • The application allows the end user to use their Windows credentials for web and application logon. Instead of typing the username and password, the end user can choose their Windows credentials from the drop-down menus available in the Add Logon and Edit Logon dialogs. For the username, the end user can choose between the following types: • Windows User Name • Windows User Principal Name • Windows Domain\User Name • Windows Domain For the password, the end user can use their Windows password. All options above are hard-coded and cannot be modified. Installation Guide 69 Use Old Password • It is possible that an end user may modify a password in Password Manager and then have the password rejected by the application. In this case, the application allows the end user to use a previous password (a password previously entered for this logon page) instead of the most recent one. • If the end user selects Use previous password, then after authentication, the end user is prompted to choose an old password from the Password Manager list. The list includes seven passwords and can be deleted permanently by clicking Clear list. 70 Installation Guide Password Change • Password Manager provides a change password functionality that helps the end user create stronger passwords. When the application detects a password change screen, a dedicated Password Manager icon is shown on the password screen. • Upon authentication, the end user can change their password from a dedicated change password dialog. Generate password functionality is supported. The end user can also choose the complexity criteria to be used in generating a password. Installation Guide 71 Password Manager Page • The Password Manager page allows an end user to launch their trained logons and to add, remove, and edit logon data. Until the end user has created a logon, instructional text is shown on the user interface to help the end user understand the password management functionality offered by the program. After the end user has created a logon, the regular user interface displays. 72 Installation Guide • Logons are grouped by domain. If an end user has multiple logons for the same web domain, the logons will be listed, indented, under their domain. • If the end user clicks the Manage command next to a logon, a drop-down menu shows a subset of the following commands, depending on whether a domain or a logon is selected. Open (default - also triggered if the end user double-clicks the logon) Edit Add Delete • The logons show a password strength indicator bar for each account added. The indicator bar changes from red (weak) to yellow (medium) to green (strong). To accommodate color blindness, the length of the strength bar grows as the password is stronger. Installation Guide 73 • If the end user clicks the Add category, the Add Category dialog displays. Settings Page • On the Settings page, the end user can configure the following: • The display of the Password Manager icon on the logon screens that can be trained for automatic data fill in. • The key combination that can be pressed to display the Logons menu. The default key combination is “Ctl+Alt+H”. Turning off Password Manager To turn off Password Manager, follow these steps: 1 Close the web browser, if it is open. 2 On the Security Console Authentication page, click Password Manager then Settings. 3 Clear the check box next to Prompt to add logons for logon screens. 4 Click Apply. 74 Installation Guide Decryption and Uninstallation Tasks 8 The user performing decryption and uninstallation must be a local or domain Admin user. When using System Data Encryption (SDE), User, or Common encryption, file decryption optionally occurs at uninstallation if you choose to install the Encryption Removal Agent, enabling you to decide whether or not to decrypt files. When using HCA encryption, all HCA-encrypted drives must be decrypted prior to uninstallation. The Encryption Removal Agent will not decrypt HCA encrypted drives. To decrypt HCA drives, apply a policy of Hardware Crypto Accelerator (HCA) = False. To decrypt secondary HCA drives, from the Home tab, click Decrypt Disk. Once complete, initiate the uninstall process. Best Practices 1 Back up all data. 2 To reduce decryption time, run the Windows Disk Cleanup Wizard to remove temporary files and any other unnecessary data. 3 Disable UAC. UAC may prevent uninstallation of Personal Edition. 4 Plan to decrypt overnight, if possible. 5 Turn off sleep mode to prevent an unattended computer from going to sleep. Decryption cannot occur on a sleeping computer. 6 Shut down all processes and applications to minimize decryption failures because of locked files. 7 Restart and authenticate to Windows. 8 Create an Encryption Removal Agent Log File (optional). 9 Uninstall using the process in the following section. 10 IMPORTANT - Periodically check the Encryption Removal Agent in the Services Panel if decrypting SDE, User, or Common encrypted files. If the Encryption Removal Agent Service exists, then decryption is still in progress. See Check Encryption Removal Agent Status for more information. Create an Encryption Removal Agent Log File (Optional) Before beginning the uninstall process, you can optionally create an Encryption Removal Agent log file. This log file is useful for troubleshooting an uninstall/decryption operation. If you do not intend to decrypt files during the uninstall process, you do not need to create an Encryption Removal Agent log file. Create the following Windows Registry entry on the computer targeted for decryption to create an Encryption Removal Agent log file. 1 Click All Programs > Run from the Windows Start menu. 2 Enter regedit in the Open: field. 3 Go to HKLM\Software\Credant\DecryptionAgent. 4 Right-click in the right pane and select New > DWORD Value. Installation Guide 75 5 Name the key LogVerbosity. 6 Double-click the key to open it. 7 Enter 0, 1, 2, 3, or 5 in the Value Data: field. LogVerbosity 0: no logging LogVerbosity 1: logs errors that prevent the Service from running LogVerbosity 2: logs errors that prevent complete data decryption (recommended logging level) LogVerbosity 3: logs information about all decrypting volumes and files LogVerbosity 5: logs debugging information 8 Select Hexadecimal in the Base section. 9 Click OK to save and close the key. 10 Close the Registry Editor. The log file path is C:\ProgramData\Dell\Dell Data Protection. The Encryption Removal Agent log file is not created until after the Encryption Removal Agent Service runs, which does not happen until the computer is restarted. Once the computer is successfully uninstalled and fully decrypted, the log file is permanently deleted. Uninstallation Process The user performing decryption and uninstallation must be a local or domain Admin user. To uninstall, each product must be uninstalled separately, in a specific order. 1 Extract the child installers by running the extract command: DDPSetup.exe /z"\"EXTRACT_INSTALLERS=C:\extracted\"" 2 Once complete, go to C:\extracted\ to obtain each client installed on the computer. 3 Uninstall the clients in this order: DDP | Encryption (DDPE_xxbit_setup.exe) DDP | Client Security Framework (EMAgent_xxbit_setup.exe) DDP | Security Tools Authentication (DP_xxbit_setup.exe) 4 Once all clients are uninstalled, run the master installer DDPSetup.exe to uninstall the master installer. Uninstall DDP | Encryption 1 Go to Uninstall a Program in the Windows Control Panel (Start > Control Panel > Programs and Features > Uninstall a Program.). 2 Highlight DDP | Encryption and left-click Change to launch the Personal Edition Setup Wizard. 3 Read the Welcome screen and click Next. 76 Installation Guide 4 At the Encryption Removal Agent Installation screen, select either: NOTE: The second option is enabled by default. If you wish to decrypt files, be sure you change the selection to option one. • Encryption Removal Agent - Import Keys from a File For SDE, User, or Common encryption, this option decrypts encrypted files and uninstalls Personal Edition. This is the recommended selection. • Do not install Encryption Removal Agent This option uninstalls Personal Edition but does not decrypt encrypted files. This option should be used only for troubleshooting purposes, as directed by Dell Pro Support. Click Next. 5 In the Backup File text box, enter the path to the network drive or removable storage location of the backup file or click ... to browse to the location. The format of the file is LSARecovery_[hostname].exe. In the Password text box, enter your Encryption Administrator Password (this is the password that was set up in the Setup Wizard when you installed the software). Click Next. 6 At the Dell DecryptionAgent Service Logon As screen there are two options. Select Local System Account. Click Finish. 7 At the Remove the Program screen, click Remove. 8 At the Configuration Complete screen, click Finish. 9 Restart your computer and log in to Windows. Decryption is in progress. Personal Edition will be uninstalled as soon as files are decrypted. The decryption process could take several hours, depending on the number of drives being decrypted and the amount of data on those drives. To check the decryption process, see Check Encryption Removal Agent Status. Check Encryption Removal Agent Status When the Encryption Removal Agent runs, its status displays in the description of the Windows Service panel (Start > Run... > services.msc > OK) as follows: Waiting for Deactivation – DDP|E is still installed, is still configured, or both. Decryption does not start until DDP|E is uninstalled. Initial sweep – The Service is making an initial sweep, calculating the number of encrypted files and bytes. The initial sweep occurs one time. Decryption sweep – The Service is decrypting files and possibly requesting to decrypt locked files. Decrypt on Reboot (partial) – The decryption sweep is complete and some locked files (but not all) are to be decrypted on the next restart. Decrypt on Reboot – The decryption sweep is complete and all locked files are to be decrypted on the next restart. All files could not be decrypted – The decryption sweep is complete, but all files could not be decrypted. This status means one of the following occurred: • The locked files could not be scheduled for decryption because they were too big, or an error occurred while making the request to unlock them. • An input/output error occurred while decrypting files. • The files could not be decrypted by policy. • The files are marked as should be encrypted. Installation Guide 77 • An error occurred during the decryption sweep. In all cases, a log file is created (if logging is configured) when LogVerbosity=2 (or higher) is set. To troubleshoot, set the log verbosity to 2 and restart the Encryption Removal Agent Service to force another decryption sweep. Complete – The decryption sweep is complete. The Service, the executable, the driver, and the driver executable are all scheduled for deletion on the next restart. Periodically refresh the Service (highlight the Service > right-click > Refresh) to update its status. Uninstall DDP | Client Security Framework 1 Go to Uninstall a Program in the Windows Control Panel (Start > Control Panel > Programs and Features > Uninstall a Program.). 2 Highlight DDP | Client Security Framework and left-click Change to launch the Setup Wizard. 3 Read the Welcome screen and click Next. 4 Follow the prompts to uninstall and click Finish. 5 Restart your computer and log in to Windows. Client Security Framework is uninstalled. Uninstall DDP | Security Tools Authentication 1 Go to Uninstall a Program in the Windows Control Panel (Start > Control Panel > Programs and Features > Uninstall a Program.). 2 Highlight DDP | Security Tools Authentication and left-click Change to launch the Setup Wizard. 3 Read the Welcome screen and click Next. 4 Enter the Administrator Password. 5 Follow the prompts to uninstall and click Finish. 6 Restart your computer and log in to Windows. Security Tools Authentication is uninstalled. Uninstall Dell Data Protection Installer 1 Go to Uninstall a Program in the Windows Control Panel (Start > Control Panel > Programs and Features > Uninstall a Program.). 2 Highlight Dell Data Protection Installer and left-click Change to launch the Setup Wizard. 3 Read the Welcome screen and click Next. 4 Follow the prompts to uninstall and click Finish. 5 Restart your computer and log in to Windows. Dell Data Protection Installer is uninstalled. 78 Installation Guide Data Recovery 9 Personal Edition Situations such as operating system failure or hardware failure may cause encrypted data to become inaccessible. Data recovery allows you to regain access to encrypted data on computers encrypted by Personal Edition. There are two data recovery methods: • Recover Data Using Current Computer - If the target computer is still bootable, data recovery can be accomplished in-place. • Recover Data using the Recovery .ISO Image (or a Slaved Drive) - If the target computer is not bootable, data recovery must be accomplished on the computer booted into the pre-installed environment or a slaved drive. Recovery instructions are located in the Dell installation media in the Windows Recovery Kit folder. If you do not have access to this folder, contact Dell Pro Support for recovery options. Prerequisites • The recovery program must be run with Administrative rights on the drive that it is recovering. In Windows XP, the user account that the recovery program is run under must at least be a member of the Administrator Group. In Windows 7, Windows 8, and Windows 8.1, the recovery program must be “Run as Administrator” to have access to perform the recovery operation. Recover Data Using Current Computer 1 Locate the recovery program named LSARecovery_[hostname].exe. This file was stored on a network drive or removable storage when you went through the Setup Wizard while installing the software. 2 Copy the recovery program to the target computer (the computer to recover data) and right-click the file and select Run as Administrator to launch it. 3 A dialog displays asking you to select the scenario that best describes your problem: • My system fails to boot and displays a message asking me to perform SDE recovery. • My system does not allow me to access encrypted data, edit policies, or is being reinstalled. • I want to decrypt my HCA encrypted drive. • I want to restore access to my HCA encrypted drive. Select the second option and click Next. NOTE: If you need to recover data due to options 1, 3, or 4, contact Dell Pro Support (refer to your Welcome Letter for contact information). 4 Click Next at the Backup\Recovery Information screen. 5 Select the disk to recover and click Next. Installation Guide 79 6 Enter the password associated with this file. 7 A dialog displays notifying you which disk is being recovered. Click Recover. 8 A dialog displays notifying you that recovery was completed successfully. Click Finish. 9 Restart the computer when prompted and re-authenticate to Windows. Data recovery is complete and you may use your computer as usual. If recovery fails, refer to Troubleshooting Recovery for assistance. Troubleshooting Recovery Check the Recovery Log File The recovery log file is located in C:\ProgramData\Dell\Dell Data Protection\Encryption\LSARecovery.log Reset TPM Security (HCA) If there is a problem with the TPM, recovery can fail. When this occurs, you need to reset TPM ownership. TPM security must also be reset when a computer’s motherboard is replaced. See HCA Pre-Installation BIOS Configuration for instructions. Recover User Access to a Computer Equipped with an HCA Card (v8.3 or later) Self-Recovery, PBA This workflow enables end users to log on with provisioned recovery questions. Once the end user's recovery questions have been set up, then the option to use the recovery questions for PBA self-recovery is available. 1 At the PBA login screen, the end user enters their user name and clicks the gear in lower left. 80 Installation Guide 2 The end user selects Forgot Password. 3 The end user enters the correct answers to the recovery questions and clicks Finish. Installation Guide 81 Security Tools Self-Recovery, OS Logon This workflow enables an end user to log on with provisioned recovery questions. Once the user's Recovery Questions have been set up, and if the Allow recovery questions for Windows logon setting is selected on the Recovery Questions page in the Security Tools Administrator Console, then the option to use the recovery questions for Windows logon is available from the Windows Start screen. 1 The end user clicks Can't access your account? to use the Recovery Questions. 82 Installation Guide 2 Clicking the link displays the questions selected by the end user during their initial setup in the Security Console. The end user enters the answers and clicks OK. Installation Guide 83 3 Upon successful entry of the answers to the questions, the end user is in Access Recovery mode. The following options are available to end users: • Change their Windows password • Re-enroll their credentials • Go directly into Windows The end user selects one option and clicks Next. NOTE: If none of the options are selected within the Windows timeout period, the end user is automatically logged into Windows without further action. 84 Installation Guide About Personal Edition Policies and Templates 10 A word about types of encryption: SDE is designed to encrypt the operating system and program files. In order to accomplish this purpose, SDE must be able to open its key while the operating system is booting without intervention of a password by the user. Its intent is to prevent alteration or offline attacks on the operating system by an attacker. SDE is not intended for user data. Common and User key encryption are intended for sensitive user data because they require a user password in order to unlock encryption keys. Tooltips display when you hover your mouse over a policy in the Personal Edition Local Management Console. Policies Policy Aggress Protect for All Fixed Drives and Ext Drives PCI Reg Data Breach Reg Basic Protect for All Fixed Drives and Ext Drives (Def) HIPAA Reg Basic Basic Basic Protect Protect Protect for All for Sys for Ext Fixed Drive Drives Drives Only Enc Dis Description Fixed Storage Policies SDE Encryption Enabled SDE Encryption Algorithm SDE Encryption Rules True AES256 False This policy is the “master policy” for all other System Data Encryption (SDE) policies. If this policy is False, no SDE encryption takes place, regardless of other policy values. A True value means that all data not encrypted by other Intelligent Encryption policies will be encrypted per the SDE Encryption Rules policy. Changing the value of this policy requires a reboot. AES 256, AES 128, 3DES Encryption rules to be used to encrypt/not encrypt certain drives, directories, and folders. SDE Encryption Rules may be changed. However, these defaults have been tested extensively. Removing these exclusions may result in Windows issues, particularly after applying patch updates. Contact Customer Support for guidance if you are unsure about changing the default values. Installation Guide 85 Policy Aggress Protect for All Fixed Drives and Ext Drives PCI Reg Data Breach Reg HIPAA Reg Basic Protect for All Fixed Drives and Ext Drives (Def) Basic Basic Basic Protect Protect Protect for All for Sys for Ext Fixed Drive Drives Drives Only Enc Dis Description Hardware Crypto Accelerator This policy is the “master policy” for all other Hardware Crypto Accelerator (HCA) policies. If this policy is False, no HCA encryption takes place, regardless of other policy values. HCA policies can only be used on computers equipped with a Hardware Crypto Accelerator. Hardware Crypto Accelerator False Volumes Targeted for Encryption All Fixed Volumes All Fixed Volumes or System Volume Only Specify which volume(s) to target for encryption. Forensic Meta Data Available on HCA Encrypted Drive False True or False When True, forensics meta data is included on the drive to facilitate forensics. Meta data included: • Machine ID (MCID) of the current machine • Device ID (DCID/SCID) of the current client installation When False, forensics meta data is not included on the drive. Switching from False to True will re-sweep, based on the HCA policies to add forensics. Allow User Approval of Secondary Drive Encryption False True allows users to decide if additional drives are encrypted. Encryption Algorithm AES256 Policy Aggress Protect for All Fixed Drives and Ext Drives PCI Reg Data Breach Reg HIPAA Reg Basic Protect for All Fixed Drives and Ext Drives (Def) AES 256 or AES 128 Basic Basic Protect Protect Basic Protect for All for Sys Fixed Drive for Ext Drives Drives Only Enc Dis Description General Settings Policies Encryption Enabled True False String - maximum of 100 entries of 500 characters each (up to a maximum of 2048 characters) A list of folders on endpoint drives to be encrypted or excluded from encryption, which can then be accessed by all managed users who have access to the endpoint. The available drive letters are: #: Refers to all drives f#: Refers to all fixed (non-removable) drives r#: Refers to all removable drives (before implementing EMS, verify that any r# encryption rules only specify what you are certain you wish to exclude, such as an iPod) Important: Overriding directory protection can result in an unbootable computer and/or require reformatting drives. If the same folder is specified in both this policy and the User Encrypted Folders policy, this policy prevails. Common Encrypted Folders Common Encryption Algorithm 86 This policy is the “master policy” for all General Settings policies. A False value means that no encryption takes place, regardless of other policy values. A True value means that all encryption policies are enabled. Changing the value of this policy triggers a new sweep to encrypt/decrypt files. AES256 AES 256, Rijndael 256, AES 128, Rijndael 128, 3DES System paging files are encrypted using AES 128. Installation Guide Application Data Encryption List Application Data Encryption Key Encrypt Outlook Personal Folders Encrypt Temp Files Installation Guide True True winword.exe excel.exe powerpnt.exe msaccess.exe winproj.exe outlook.exe acrobat.exe visio.exe mspub.exe notepad.exe wordpad.exe winzip.exe winrar.exe onenote.exe onenotem.exe String - maximum of 100 entries of 500 characters each We do not recommend adding explorer.exe or iexplorer.exe to the ADE list, as unexpected or unintended results may occur. However, explorer.exe is the process used to create a new Notepad file on the desktop using the right-click menu. Setting encryption by file extension, instead of the ADE list, provides more comprehensive coverage. List process names of applications (without paths) whose new files you want encrypted, separated by carriage returns. Do not use wildcards. We strongly recommend not listing applications or installers that write system-critical files. Doing so could result in encryption of important system files, which could make a Windows endpoint unbootable. Common process names: Outlook: outlook.exe Word: winword.exe FrontPage: frontpg.exe PowerPoint: powerpnt.exe Access: msaccess.exe WordPad: wordpad.exe Microsoft Paint: mspaint.exe Excel: excel.exe The following hard-coded system and installer process names are ignored if specified in this policy: hotfix.exe update.exe setup.exe msiexec.exe wuauclt.exe wmiprvse.exe migrate.exe unregmp2.exe ikernel.exe wssetup.exe svchost.exe Common Common, User, User Roaming Choose a key to indicate who should be able to access files encrypted by Application Data Encryption List, and where. Common if you want these files to be accessible to all managed users on the endpoint where they were created (the same level of access as Common Encrypted Folders), and encrypted with the Common Encryption Algorithm. User if you want these files to be accessible only to the user who created them, only on the endpoint where they were created (the same level of access as User Encrypted Folders), and encrypted with the User Encryption Algorithm. User Roaming if you want these files to be accessible only to the user who created them, on any encrypted Windows endpoint, and encrypted with the User Encryption Algorithm. Changes to this policy do not affect files already encrypted because of this policy. False True encrypts Outlook Personal Folders. False True encrypts the paths listed in the environment variables TEMP and TMP with the User Data Encryption Key. To reduce encryption sweep time, the client clears the contents of the TEMP and TMP folders for initial encryption, as well as updates to this policy. However, if you use a third-party application that requires the file structure within the \temp directory to be preserved, you should prevent this deletion. To disable temporary file deletion, create DeleteTempFiles (REG_DWORD) and set its value to 0 in the registry at HKLM\SOFTWARE\Dell\CMGShield. 87 Encrypt Temp Internet Files True True encrypts the path listed in the environment variable CSIDL_INTERNET_CACHE with the User Data Encryption Key. To reduce encryption sweep time, the client clears the contents of CSIDL_INTERNET_CACHE for initial encryption, as well as updates to this policy. This policy is applicable when using Microsoft Internet Explorer only. False Encrypt User Profile Docs True False True encrypts: • The users profile (C:\Users\jsmith) on Windows 7 with the User Data Encryption Key • \Users\Public on Windows 7 with the Common Encryption Key Encrypt Windows Paging File True False True encrypts the Windows paging file. A change to this policy requires a reboot. String - maximum of 100 entries of 500 characters each (up to a maximum of 2048 characters) When a Service is managed by this policy, the Service is started only after the user is logged in and the client is unlocked. This policy also ensures that the Service managed by this policy is stopped before the client is locked during logoff. This policy can also prevent a user logoff if a Service is unresponsive. Syntax is one Service name per line. Spaces in the Service name are supported. Wildcards are not supported. Managed Services will not be started if an unmanaged user logs on. Managed Services Secure Three Post-Encrypt Pass ion Cleanup Overwrite Prevent Unsecured Hibernation Workstation Scan Priority User Encrypted Folders 88 Single Pass Overwrite True Secure Windows Hibernation File False True High No Overwrite, Single-pass Overwrite, Three-pass Overwrite, Seven-pass Overwrite Once folders specified via other policies in this category have been encrypted, this policy determines what happens to the unencrypted residue of the original files: • No Overwrite deletes it. This value yields the fastest encryption processing. No • Single-pass Overwrite overwrites it with random data. Overwrite • Three-pass Overwrite overwrites it with a standard pattern of 1s and 0s, then with its complement, and then with random data. • Seven-pass Overwrite overwrites it with a standard pattern of 1s and 0s, then with its complement, and then with random data five times. This value makes it most difficult to recover the original files from memory, and yields the most secure encryption processing. False Norm True True False When enabled, the client will not allow computer hibernation if the client is unable to encrypt the hibernation data. False When enabled, the hibernation file will be encrypted only when the computer enters hibernation. The client will disengage protection when the computer comes out of hibernation, providing protection without impacting users or applications while the computer is in use. Highest, High, Normal, Low, Lowest Specifies the relative Windows priority of encrypted folder scanning. String - maximum of 100 entries of 500 characters each (up to a maximum of 2048 characters) A list of folders on the endpoint hard drive to be encrypted with the User Data Encryption Key or excluded from encryption. This policy applies to all drives classified by Windows as Hard Disk Drives. You cannot use this policy to encrypt drives or external media whose type displays as Removable Disk, use EMS Encrypt External Media instead. Installation Guide User Encryption Algorithm User Data Encryption Key Policy AES 256, Rijndael 256, AES 128, Rijndael 128, 3DES Encryption algorithm used to encrypt data at the individual user level. You can specify different values for different users of the same endpoint. AES256 User Aggress Protect for All Fixed Drives and Ext Drives Common PCI Reg Data Breach Reg User HIPAA Reg Common Basic Protect for All Fixed Drives and Ext Drives (Def) Basic Basic Basic Protect Protect Protect for All for Sys Ext Fixed Drive for Drives Drives Only User Common, User, User Roaming Choose a key to indicate who should be able to access files encrypted by the following policies, and where: • User Encrypted Folders • Encrypt Outlook Personal folders • Encrypt Temporary Files (\Documents and Settings\username\Local Settings\Temp only) • Encrypt Temporary Internet Files • Encrypt User Profile Documents Select: • Common if you want User Encrypted Files/Folders to be accessible by all managed users on the endpoint where they were created (the same level of access as Common Encrypted Folders), and encrypted with the Common Encryption Algorithm. • User if you want these files to be accessible only to the user who created them, only on the endpoint where they were created (the same level of access as User Encrypted Folders), and encrypted with the User Encryption Algorithm. • User Roaming if you want these files to be accessible only to the user who created them, on any encrypted Windows endpoint, and encrypted with the User Encryption Algorithm. If you elect to incorporate an encryption policy to encrypt entire disk partitions, it is recommended to use the default SDE encryption policy, rather than Common or User. This ensures that any operating system files that are encrypted are accessible during states when the managed user is not logged in. Enc Dis Description Removable Storage Policies EMS Encrypt External Media True EMS Exclude CD/DVD Encryption EMS Access to unShielded Media EMS Encryption Algorithm Installation Guide False True False Block Read only Full Access AES256 Read only False This policy is the “master policy” for all Removable Storage policies. A False value means that no encryption of removable storage takes place, regardless of other policy values. A True value means that all Removable Storage encryption policies are enabled. True False encrypts CD/DVD devices. Full Access Block, Read Only, Full Access Note that this policy interacts with the Port Control System Storage Class: External Drive Control policy. If you intend to set this policy to Full Access, ensure that Storage Class: External Drive Control is not set to Read Only or Blocked. When this policy is set to Block Access, you have no access to removable storage unless it is encrypted. Choosing either Read-Only or Full Access allows you to decide what removable storage to encrypt. If you choose not to encrypt removable storage and this policy is set to Full Access, you have full read/write access to removable storage. If you choose not to encrypt removable storage and this policy is set to Read-Only, you cannot read or delete existing files on the unencrypted removable storage, but the client will not allow any files to be edited on, or added to, the removable storage unless it is encrypted. AES 256, Rijndael 256, AES 128, Rijndael 128, 3DES 89 EMS Scan External Media True True allows EMS to scan removable storage every time removable storage is inserted. When this policy is False and the EMS Encrypt External Media policy is True, EMS only encrypts new and changed files. A scan occurs at every insertion so that EMS can catch any files added to the removable storage without authenticating. You can add files to the removable storage if you decline to authenticate, but you cannot access encrypted data. The files added will not be encrypted in this case, so the next time you authenticate to the removable media to work with encrypted data, EMS scans it and encrypts any files that may have been added without encryption. False EMS Access Encrypted Data on unShielded Device True True allows the user to access encrypted data on removable storage whether the endpoint is encrypted or not. EMS Alpha Characters Required in Password True True requires one or more letters in the password. EMS Mixed Case Required in Password True EMS Number of Characters. Required in Password EMS Numeric Characters Required in Password EMS Password Attempts Allowed EMS Special Characters Required in Password 8 6 True 2 90 True requires one or more numeric characters in the password. 3 True 4 False 20 1-10 Number of times the user can attempt to enter the correct password. 3 True True requires one or more special characters in the password. 0-5000 seconds Number of seconds the user must wait between the first and second rounds of access code entry attempts. 30 30 1-40 characters Minimum number of characters required in the password. 8 False EMS Cooldown Time Delay EMS Cooldown Time Increment True requires at least one uppercase and one lowercase letter in the password. False 10 30 10 0-5000 seconds Incremental time to add to the previous cooldown time after each unsuccessful round of access code entry attempts. Installation Guide EMS Encryption Rules Encryption rules to be used to encrypt/not encrypt certain drives, directories, and folders. A total of 2048 characters are allowed. “Space” and “Enter” characters used to add lines between rows count as characters used. Any rules exceeding the 2048 limit are ignored. Storage devices which incorporate multi-interface connections, such as Firewire, USB, eSATA, etc. may require the use of both EMS and encryption rules to encrypt the endpoint. This is necessary due to differences in how the Windows operating system handles storage devices based on interface type. To ensure encrypting an iPod via EMS does not make the device unusable, use the following rules: -R#:\Calendars -R#:\Contacts -R#:\iPod_Control -R#:\Notes -R#:\Photos You can also force encryption of specific file types in the directories above. Adding the following rules will ensure that ppt, pptx, doc, docx, xls, and xlsx files are encrypted in the directories excluded from encryption via the previous rules: ^R#:\Calendars;ppt.doc.xls.pptx.docx.xlsx ^R#:\Contacts;ppt.doc.xls.pptx.docx.xlsx ^R#:\iPod_Control;ppt.doc.xls.pptx.docx.xlsx ^R#:\Notes;ppt.doc.xls.pptx.docx.xlsx ^R#:\Photos;ppt.doc.xls.pptx.docx.xlsx Replacing these five rules with the following rule will force encryption of ppt, pptx, doc, docx, xls, and xlsx files in any directory on the iPod, including Calendars, Contacts, iPod_Control, Notes, and Photos: ^R#:\;ppt.doc.xls.pptx.docx.xlsx These rules disable or enable encryption for these folders and file types for all removable devices - not just an iPod. Use care when defining rules to exclude an iPod from encryption. These rules have been tested against the following iPods: iPod Video 30gb fifth generation iPod Nano 2gb second generation iPod Mini 4gb second generation We do not recommend the use of the iPod Shuffle, as unexpected results may occur. As iPods change, this information could also change, so caution is advised when allowing the use of iPods on EMS-enabled computers. Because folder names on iPods are dependent on the model of the iPod, we recommend creating an exclusion encryption policy which covers all folder names, across all iPod models. EMS Block Access to UnShieldabl e Media False Block access to any removable storage that is less than 17 MB and thus has insufficient storage capacity to host a Removable Media Shield (such as a 1.44MB floppy disk). All access is blocked if Encrypt External Media and this policy are both True. If Encrypt External Media is True, but this policy is False, data can be read from the unencryptable removable storage, but write access to the media is blocked. If Encrypt External Media is False, then this policy has no effect and access to unencryptable removable storage is not impacted. Enc Dis Description Policy True Aggress Protect for All Fixed Drives and Ext Drives PCI Reg Data Breach Reg HIPAA Reg Basic Protect for All Fixed Drives and Ext Drives (Def) Basic Basic Protect Protect Basic Protect for All for Sys Fixed Drive for Ext Drives Drives Only Port Control Policies Port Control System Disabled Enable or Disable all Port Control System policies. If this policy is set to Disable, no Port Control System policies are applied, regardless of other Port Control System policies. Note: PCS policies require a reboot before the policy takes effect. Port: Express Card Slot Enabled Enable, Disable, or Bypass ports exposed through the Express Card Slot. Installation Guide 91 Port: USB Enabled Enable, Disable, or Bypass port access to external USB ports. Note: USB port-level blocking and HID class-level blocking is only honored if we can identify the computer chassis as a laptop/notebook form-factor. We rely on the computer's BIOS for the identification of the chassis. Port: eSATA Enabled Enable, Disable, or Bypass port access to external SATA ports. Port: PCMCIA Enabled Enable, Disable, or Bypass port access to PCMCIA ports. Port: Firewire (1394) Enabled Enable, Disable, or Bypass port access to external Firewire (1394) ports. Port: SD Enabled Enable, Disable, or Bypass port access to SD card ports. Port: Memory Transfer Device (MTD) Enabled Enable, Disable, or Bypass access to Memory Transfer Device (MTD) ports. Class: Storage Enabled PARENT to the next 3 policies. Set this policy to Enabled to use the next 3 Subclass Storage polices. Setting this policy to Disabled disables all 3 Subclass Storage policies - no matter what their value. CHILD of Class: Storage. Class: Storage must be set to Enabled to use this policy. Subclass Storage: External Drive Control Subclass Storage: Optical Drive Control Subclass Storage: Floppy Drive Control 92 Blocked Read Only Blocked Read Only UDF Only Read Only Full Access Full Access Full Access Read Only UDF Only Read Only Full Access This policy interacts with the Removable Storage - EMS Access to unShielded Media policy. If you intend to have Full Access to media, also set this policy to Full Access to ensure that the media is not set to read only and the port is not blocked. Full Access: External Drive port does not have read/write data restrictions applied Read Only: Allows read capability. Write data is disabled Blocked: Port is blocked from read/write capability This policy is endpoint-based and cannot be overridden by user policy. Full Access CHILD of Class: Storage. Class: Storage must be set to Enabled to use this policy. Full Access: Optical Drive port does not have read/write data restrictions applied UDF Only: Blocks all data writes that are not in the UDF format (CD/DVD burning, ISO burning). Read data is enabled. Read Only: Allows read capability. Write data is disabled Blocked: Port is blocked from read/write capability This policy is endpoint-based and cannot be overridden by user policy. Universal Disk Format (UDF) is an implementation of the specification known as ISO/IEC 13346 and ECMA-167 and is an open vendor-neutral file system for computer data storage for a broad range of media. To encrypt data written to CD/DVD media: Set EMS Encrypt External Media = True, EMS Exclude CD/DVD Encryption = False, and Storage Class: Optical Drive Control = UDF Only. Full Access CHILD of Class: Storage. Class: Storage must be set to Enabled to use this policy. Full Access: Floppy Drive port does not have read/write data restrictions applied Read Only: Allows read capability. Write data is disabled Blocked: Port is blocked from read/write capability This policy is endpoint-based and cannot be overridden by user policy. Installation Guide Enabled PARENT to the next policy. Set this policy to Enabled to use the Subclass Windows Portable Device (WPD): Storage policy. Setting this policy to Disabled disables the Subclass Windows Portable Device (WPD): Storage policy - no matter what its value. Control access to all Windows Portable Devices. Enabled CHILD of Class: Windows Portable Device (WPD) Class: Windows Portable Device (WPD) must be set to Enabled to use this policy. Full Access: Port does not have read/write data restrictions applied. Read Only: Allows read capability. Write data is disabled. Blocked: Port is blocked from read/write capability. Class: Human Interface Device (HID) Enabled Control access to all Human Interface Devices (keyboards, mice). Note: USB port-level blocking and HID class-level blocking is only honored if we can identify the computer chassis as a laptop/notebook form-factor. We rely on the computer's BIOS for the identification of the chassis. Class: Other Enabled Control access to all devices not covered by other Classes. Class: Windows Portable Device (WPD) Subclass Windows Portable Device (WPD): Storage Policy Aggress Protect for All Fixed Drives and Ext Drives PCI Reg Data Breach Reg HIPAA Reg Basic Protect for All Fixed Drives and Ext Drives (Def) Basic Basic Basic Protect Protect Protect for All for Sys Ext Fixed Drive for Drives Drives Only Enc Dis Description User Experience Control Policies Suppress File Contention Notification Allow Encryption Processing Only When Screen is Locked This policy controls whether users see notification pop-ups if an application attempts to access a file while the client is processing it. False False User-Optional False True, False, User-Optional When True, there will be no encryption or decryption of data while the user is actively working. The client will only process data when the screen is locked. User-Optional adds an option to the system tray icon allowing the user to turn this feature on or off. When False, encryption processing will occur any time, even while the user is working. Enabling this option will significantly extend the amount of time it takes to complete encryption or decryption. Template Descriptions Aggressive Protection for All Fixed Drives and External Drives This policy template is designed for organizations with a primary goal of enforcing strong security and risk avoidance across the entire enterprise. It is best used when security is significantly more important than usability and the need for less secure policy exceptions for specific users, groups or devices is minimal. This policy template: • is a highly restricted configuration, providing greater protection. • provides protection of the System Drive and all Fixed Drives. • provides Hardware Crypto Accelerator encryption (when a compatible Hardware Crypto Accelerator is detected on the client computer). • encrypts all data on Removable Storage devices, and prevents the use of non-encrypted Removable Storage devices. • provides read-only optical drive control. Installation Guide 93 PCI Regulation Targeted Payment Card Industry Data Security Standard (PCI DSS) is a multi-faceted security standard that includes requirements for security management, policies, procedures, network architecture, software design, and other critical protective measures. This comprehensive standard is intended to set the guidelines for organizations to proactively protect customer account data. This policy template: • provides protection of the System Drive and all Fixed Drives. • provides Hardware Crypto Accelerator encryption (when a compatible Hardware Crypto Accelerator is detected on the client computer). • prompts users to encrypt Removable Storage devices. • provides the ability to write only UDF CD/DVDs. Port control configuration allows read access to all optical drives. Data Breach Regulation Targeted The Sarbanes-Oxley Act requires adequate controls for financial information. Because much of this information resides in electronic format, encryption is a key control point when this data is stored or transferred. The Gramm-Leach-Bliley (GLB) Act (also known as the Financial Services Modernization Act) guidelines do not require encryption. However, the Federal Financial Institutions Examination Council (FFIEC) recommends that, “Financial institutions should employ encryption to mitigate the risk of disclosure or alteration of sensitive information in storage and transit.” California Senate Bill 1386 (California's Database Security Breach Notification Act) aims to protect California residents from identity theft by requiring organizations that have had computer security breaches to notify all affected individuals. The only way an organization can avoid notifying customers is to be able to prove all personal information was encrypted prior to a security breach. This policy template: • provides protection of the System Drive and all Fixed Drives. • provides Hardware Crypto Accelerator encryption (when a compatible Hardware Crypto Accelerator is detected on the client computer). • prompts users to encrypt Removable Storage devices. • provides the ability to write only UDF CD/DVDs. Port control configuration allows read access to all optical drives. HIPAA Regulation Targeted The Health Insurance Portability and Accountability Act (HIPAA) mandates that healthcare organizations implement a number of technical safeguards to protect the confidentiality and integrity of all individually identifiable health information. This policy template: • provides protection of the System Drive and all Fixed Drives. • provides Hardware Crypto Accelerator encryption (when a compatible Hardware Crypto Accelerator is detected on the client computer). • prompts users to encrypt Removable Storage devices. • provides the ability to write only UDF CD/DVDs. Port control configuration allows read access to all optical drives. Basic Protection for All Fixed Drives and External Drives (Default) This policy template provides the recommended configuration, which provides a high level of protection without significantly impacting system usability. 94 Installation Guide This policy template: • provides protection of the System Drive and all Fixed Drives. • provides Hardware Crypto Accelerator encryption (when a compatible Hardware Crypto Accelerator is detected on the client computer). • prompts users to encrypt Removable Storage devices. • provides the ability to write only UDF CD/DVDs. Port control configuration allows read access to all optical drives. Basic Protection for All Fixed Drives This policy template: • provides protection of the System Drive and all Fixed Drives. • provides Hardware Crypto Accelerator encryption (when a compatible Hardware Crypto Accelerator is detected on the client computer). • provides the ability to write CD/DVDs in any supported format. Port control configuration allows read access to all optical drives. This policy template does not: • provide encryption for Removable Storage devices. Basic Protection for System Drive Only This policy template: • provides protection of the System Drive, typically the C: drive, where the operating system is loaded. • provides Hardware Crypto Accelerator encryption (when a compatible Hardware Crypto Accelerator is detected on the client computer). • provides the ability to write CD/DVDs in any supported format. Port control configuration allows read access to all optical drives. This policy template does not: • provide encryption for Removable Storage devices. Basic Protection for External Drives This policy template: • provides protection of Removable Storage devices. • provides the ability to write only UDF CD/DVDs. Port control configuration allows read access to all optical drives. This policy template does not: • provide protection for the System Drive (typically the C: drive, where the operating system is loaded) or other Fixed Drives. Encryption Disabled This policy template does not provide encryption protection. Take additional measures to safeguard devices from loss and theft when using this template. This template is useful for organizations that prefer to start with no active encryption to transition into security. As the organization becomes comfortable with their deployment, encryption can be enabled slowly by adjusting individual policies or by applying stronger templates for portions of or for the entire organization. Installation Guide 95 96 Installation Guide Appendix A A Change Secure Boot/UEFI to Legacy Boot Mode in BIOS The features available as of v8.3 with HCA are supported on legacy BIOS non-UEFI systems. If running Windows 8 or Windows 8.1, follow these instructions prior to client installation. 1 Turn on the power to your Dell computer. If the computer is already running, reboot it. 2 Press F2 or F12 continuously during boot until a message in the upper right screen says something similar to “preparing to enter setup” (F2) or “preparing one-time boot menu” (F12). This launches the system BIOS. 3 In Settings > General > Boot Sequence, ensure that the Legacy Boot List Option is selected. 4 In Settings > General > Advanced Boot Options, ensure that the Enable Legacy Option ROMs check box is selected. Installation Guide 97 5 In Settings > Secure Boot > Secure Boot Enable, ensure that the Secure Boot Enable selection is Disabled. 6 Apply the changes. 7 Now that the computer BIOS has been changed to a legacy boot mode, the computer must be re-imaged. 98 Installation Guide Glossary Common Encryption – The Common key makes files accessible to all managed users on the device where they were created. Encryption Administrator Password (EAP) – The EAP is an administrative password that is unique to each computer. Most configuration changes made in the Local Management Console require this password. This password is also the same password that is required if you have to use your LSARecovery_[hostname].exe file to recover your data. Record and save this password in a safe place. Encryption Keys – The “Common” key makes files accessible to all managed users on the device where they were created. The “User” key makes files accessible only to the user who created them, only on the device where they were created. The “User Roaming” key makes files accessible only to the user who created them, on any Shielded Windows device. Hardware Crypto Accelerator (HCA) – HCA cards enable hardware-based encryption and provide advanced security. During setup, the HCA card is locked to the motherboard, and a unique key is created, encrypted, signed, and stored. Thereafter, access to your encrypted data is allowed only on that specific computer and only with the correct user authentication. Personal Edition v8.3 or later offers HCA with Preboot Authentication (PBA), which uses a separate preboot partition to allow for encryption of the Master Boot Record. When HCA policies are in play, System Data Encryption (SDE) policies are ignored. Note that Personal Edition does not support smart card or biometric technology for PBA. Legacy HCA (legacy PBA) – Computers equipped with legacy HCA use a BIOS password to emulate preboot authentication. The BIOS of most of these computers can be upgraded to take advantage of the newest HCA features used by DDP|E v8.3 and later. If the BIOS cannot be upgraded, DDP|E can be installed and run, but the computer will not have access to the newest features of HCA. See Also Hardware Crypto Accelerator (HCA). Preboot Authentication (PBA) – Preboot Authentication (PBA) serves as an extension of the BIOS or boot firmware and guarantees a secure, tamper-proof environment external to the operating system as a trusted authentication layer. The PBA prevents anything being read from the hard disk, such as the operating system, until the user has confirmed they have the correct credentials. Single Sign-On (SSO) – SSO simplifies the logon process when multi-factor authentication is enabled at both preboot and Windows logon. If enabled, authentication is required at preboot only, and users are automatically logged on to Windows. If not enabled, authentication may be required multiple times. System Data Encryption (SDE) – SDE policies encrypt the System Drive, the Fixed Drives, or both - depending on the policy template chosen. SDE policies do not encrypt the files needed by the operating system to start the boot process. SDE policies do not require preboot authentication or interfere with the Master Boot Record in any way. When the computer starts, the encrypted files are available before user login (to enable patch management, SMS, backup and recovery tools). SDE is designed to encrypt the operating system and program files. In order to accomplish this purpose, SDE must be able to open its key while the operating system is booting, without intervention of a password by the user. Its intent is to prevent alteration or offline attacks on the operating system by an attacker. SDE is not intended for user data. Common and User key encryption are intended for sensitive user data because they require a user password in order to unlock encryption keys. Installation Guide 99 Trusted Platform Module (TPM) – This Trusted Computing Group specification deals with the storage of encryption keys, platform integrity, authentication of hardware devices and other security functions. It is also used as the general name of implementations of that specification, as in “TPM chip” or “TPM Security Device”. User Encryption – The User key makes files accessible only to the user who created them, only on the device where they were created. 100 Installation Guide 0XXXXXA0X