Transcript
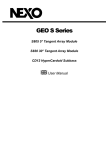
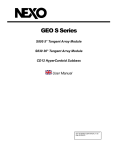
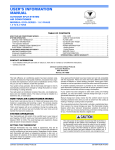
PREPARATIONS BEFORE USING
ENGLISH
PORTABLE COMPACT DISC PLAYER
MODEL: CD145
Battery Installation
LOCATION OF CONTROLS
1.
2.
3.
4.
5.
6.
SKIP / SEARCH DOWN BUTTON
SKIP / SEARCH UP BUTTON
MODE BUTTON
PROG (PROGRAM) BUTTON
LCD DISPLAY
PLAY / PAUSE BUTTON (POWER ON)
7.
8.
9.
10.
11.
12.
13.
STOP BUTTON (POWER OFF)
VOLUME DN BUTTON
VOLUME UP BUTTON
OPEN BUTTON
PHONE JACK
DC JACK
BATTERY COMPARTMENT
13
1. Open the Battery Compartment cover.
2. Insert 2 batteries (LR6, “AA” size, or equivalent)
with the correct polarity, as indicated.
(Alkaline batteries are recommended.)
3. Close the cover properly.
In order to operate the player on batteries, the optional AC/DC adaptor ( Not included )
must be disconnected from the DC 4.5V jack (12).
AC/DC Adapter (Optional)
Before connection, make sure the adapter’s AC input voltage corresponds to your local AC
outlet voltage,and that its DC output can deliver 4.5V with at least 500mA of current.
1. Connect the adapter’s DC output plug
(note polarity) into the unit’s DC 4.5V
Jack (12). Once done, connect the AC/DC adapter ( Not included ) to a power outlet.
DISC PLAYING
This CD player is designed to play both 8cm (3.15”) and 12cm (4.7”) compact discs.
Getting Start
12
11
1. Insert the headphone/earphone plug in the PHONE JACK(11).
2. Push the open Button (10) to open the door, then put a disc into the CD compartment
with the label side facing up.
3. Push the disc gently down on the center hub until it clicks.
To remove the disc, pick up the disc by holding the edge, while pressing gently on the hub.
once.
4. Close the door and press the Play/Pause Button
5. The Display will show the total number of tracks on the disc, then begin to play the first
track.
General Operation
Play/Pause Button
1
5
2 3 4
6 7
8 10
9
— Press once to start playback in the original order.
Press again to stop the disc play temporarily.
— Press once to stop playback.
Press again to turn off power
— Press once to skip to next track
or back to
.
previous track
— Press continuiously to search forward
or
backward
.
Stop Button
Skip / Search Buttons
CAUTION
USE OF CONTROLS OR ADJUSTMENTS OR PERFORMANCE OF PROCEDURES
OTHER THAN THOSE SPECIFIED HERE MAY RESULT IN HAZARDOUS EXPOSURE
TO RADIATION.
NO ADJUSTMENT OR REPAIRS SHOULD BE PERFORMED BY ANYONE OTHER THAN
QUALIFIED SERVICE PERSONNEL.
INSTRUCTION MANUAL
— 1 —
Automatic Turn off (Auto Power Off)
If the player in STOP mode for 30 seconds, it will turn off automatically.
Various Playing Modes
MODE Button (3) — There are three kinds of functions :
LOW BATTERY ALERT
When the low battery indicator
batteries.
appears on the display, please prepare to replace the
Cleaning the Lens
During PLAY mode
• Press the MODE button twice to play the entire disc repeatedly.
• The repeat indicator REPEAT ALL will appear on the display.
From time to time, clean the cabinet with a soft dry cloth. For more stubborn stains, slightly
moisten the cloth with water or a mild detergent solution. Never use benzene, alcohol or
other solvents as they may damage the finish of the cabinet.
NOTE -
SPECIFICATIONS
B. Intro Scan
In STOP mode
• Press the MODE button three times.
• The INTRO indicator will appear on the display.
• Press the PLAY button to play the first 10 seconds of each track on the disc.
NOTE -
To cancel INTRO SCAN simply press the MODE button until the INTRO indicator
disappears.
If the lens becomes dusty, clean it with a camera lens blower. Be careful not to scratch the
surface of the lens.
Output Power
Freq. Response
Power Source
:
:
:
Dimensions
:
20mW (32 )
100 ~ 20000 Hz
2 xUM-3 or “AA” size batteries ( not included )
4.5V(@ 500mA)AC-DC adaptor ( Not included)
142mm(W) x 155mm(D) x 26mm(H)
** Should you experience difficulties in the use of this player please refer to the
following chart before contacting your dealer or the place of purchase.
Trouble shooting Guide
Program Play
1. Press the PROG button, PROG No. 01 appears.
* The PGM and Track No. 00 start flashing on the display.
2. Press
or
to select the desired track.
3. Press the PROG button to enter the track into memory. The program number will be
increment one step.
4. Repeat step 2 and 3 to program the order of more tracks. up to 20 tracks can be programmed
into memory.
5. Press
to start the program playback.
6. To stop the PROG play, press the STOP button once.
7. To play the PROG play in step 6, press PROG button and
button.
8. To check the PROG memory, in PROG play mode, press the
or
button.
9. To erase the program memory, OPEN the player’s CD door or turn off its power.
— 4 —
Points to check
Problem
Player fails to function
•
•
•
•
•
•
No sound from Earphones
• Earphones' plug is not firmly inserted into the Phones
jack(11).
No sound when played through
an external amplifier
• The connection to the amp, or its setting is incorrect.
• Power to an external amplifier is not switched on.
Intermittent Sound
•
•
•
•
•
** For improvement purposes, specification and design are subject to change without
notice. **
To cancel RANDOM PLAY simply press the MODE button until the RANDOM
indicator disappears.
— 3 —
Cleaning the Disc
Cleaning the Cabinet
C. Random Play
In STOP mode
• Press the MODE button four times.
• The RANDOM indicator will appear on the display.
• Press the PLAY button, all the tracks on a disc to be played in a random sequence.
NOTE -
TROUBLE SHOOTING GUIDE
When a disc becomes dirty, clean it with a cleaning cloth. Wipe the disc from the center out.
Note - Do not use solvents such as benzine, thinner, commercially available cleaners or
anti-static spray intended for analogue discs.
MAINTENANCE
A. Repeat Play
During PLAY mode
• Press the MODE button once to play single track repeatedly.
• The repeat indicator REPEAT 1 will appear on the display.
To cancel the REPEAT function, simply press the MODE button until the REPEAT
indicator disappears.
— 2 —
The disc may be inserted upside down.
The disc not mounted correctly on the hub.
The disc is dirty or may be incorrect or defective.
The pick up lens is dirty.
The player’s lid not closed.
Moisture condensation, Allow the player to warm up
to room temperature for 60 minutes.
• AC Power to the AC/DC adapter is switched off.
• Auto power off has occurred, press PLAY button to
restore power (see Auto Power Off in the text).
• Weak batteries.
Dirty or defective disc.
Dirty pickup lens.
The player is subject to excessive vibration or shock.
Low battery power.
Poor Earphone connection.
— 5 —