1
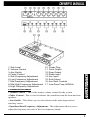
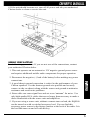
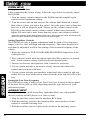
INTRODUCTION
The Clarion EQS560 is a full-featured five-band stereo equalizer specifically
designed for the mobile environment. Although it is housed in a one-half DIN
enclosure, the EQS560 provides a number of exceptional features in its
compact size, such as:
• Five equalization bands (at 45Hz, 100Hz, 700Hz, 2kHz and 15kHz),
adjustable from -12 to +12dB
• Low-pass crossover filter with selectable frequency control 60Hz or 90Hz
• Three stereo RCA outputs to drive front, rear and subwoofer audio systems
• Auxiliary stereo RCA inputs with adjustable gain control
• Separate controls for master system volume, subwoofer volume, front/rear
fader and selection of main or auxiliary inputs
• Gold-plated RCAconnectors to ensure best signal transfer
For optimum performance, the EQS560 should be installed by an authorized
Clarion dealer.
ABOUT THE MANUAL AND WARRANTY
To start enjoying your new Clarion EQS560, please read the instructions listed
in this manual. Keep all instructions for future reference. Please fill out and
send in the enclosed warranty card to protect your purchase and aid in warranty
service. Also, save your original sales receipt as proof of purchase.
TABLE OF CONTENTS
Description • • • • • • • • • • • • • • • • • • • • • • • • • • • • • • • • • • • • 2
Control Glossary • • • • • • • • • • • • • • • • • • • • • • • • • • • • • • • • • 3
Applications • • • • • • • • • • • • • • • • • • • • • • • • • • • • • • • • • • • 4
Mounting Precautions • • • • • • • • • • • • • • • • • • • • • • • • • • • • • 4
Wiring Precautions • • • • • • • • • • • • • • • • • • • • • • • • • • • • • • • 5
System Set-Up • • • • • • • • • • • • • • • • • • • • • • • • • • • • • • • • • • 6
Auxiliary Input • • • • • • • • • • • • • • • • • • • • • • • • • • • • • • • • • • 6
Troubleshooting • • • • • • • • • • • • • • • • • • • • • • • • • • • • • • • • • 7
Product Specs • • • • • • • • • • • • • • • • • • • • • • • • • • • • • • • • • • 7
DESCRIPTION
The Clarion EQS560 is a five-band stereo equalizer. Each frequency band is
individually adjustable to meet individual listening preferences.
The EQS560 also features a subwoofer crossover, subwoofer level control and
a master system volume control. The subwoofer output makes use of a built-in
18dB per octave electronic crossover that is fixed at 60Hz or 90Hz.
Built into the EQS560 is an auxiliary input that allows use with portable
devices (such as an MP3 player) or a video system.
2
1. Sub Level
2. Volume Control
3. Aux Switch
4. Fader Control
5. Sub Frequency Adjustment
6. Low Frequency Adjustment
7. Mid Frequency Adjustment
8. Mid-High Frequency Adjustment
9. High Frequency Adjustment
10. Power Plug
11. Front Output
12. Rear Output
13. Radio Input
14. Aux Input
15. Sub Output
16. Aux Gain Controls
17. Low-Pass Freq. 60/90Hz
CONTROL GLOSSARY
• Volume Control - This is the master volume control for the system.
• Fader Control - This is used to balance the sound between the front and rear
speakers.
• Aux Switch - This allows you to select between the main input and an
auxiliary source.
• Equalizer Band Frequency Adjustment - This adjustment allows you to
adjust the frequency for each of the five frequency bands.
3
• Low-Pass Frequency Switch - This allows the subwoofer crossover
frequency to be set at 60Hz or 90Hz.
• Subwoofer Level Control - This is the volume control for the subwoofer.
The subwoofer level control allows you to adjust the subwoofer volume at any
time to match any listening preference.
• Aux Gain Controls - These controls allow individual left and right input gain
adjustment for the auxiliary input.
APPLICATIONS
The system diagram below will help you plan your own installation.
MOUNTING PRECAUTIONS
The EQS560 graphic equalizer can be mounted next to the source unit or under
the dash with the supplied mounting brackets. For easy system set-up, mount
the equalizer so the front panel controls will be easily accessible from the
driver’s seat after installation. In addition, observe the following precautions:
1. Check clearances on both sides of a planned installation before drilling any
holes or installing any screws.
2. When routing RCA cables, keep them away from power cables and output
speaker wires.
3. Do not allow liquids or foreign objects to enter the unit.
4
4. If the unit should become wet, turn off all power and ask your authorized
Clarion dealer to clean or service the unit.
WIRING PRECAUTIONS
Read all wiring precautions. If you are not sure of the connections, contact
your authorized Clarion dealer.
1. This unit operates on an automotive 12V negative ground power source
and requires additional mobile audio components for proper operation.
2. Disconnect the negative (-) lead of the battery before making any power
connections.
3. A good chassis ground connection is critical to the performance of your
Clarion equalizer. Use the shortest ground wire possible and securely
connect to the car chassis along with the source unit ground to minimize
resistance and avoid noise problems.
4. Extra cable can cause signal loss and act as an “antenna” for noise. Use
only high-quality RCA cables that are no longer than necessary to make a
direct connection with the source unit and amplifiers.
5. If you are using a source unit, without a remote turn-on lead, the EQS560
can be turned on with a switched accessory lead. You can find this
accessory power source in the factory harness at the back of the radio. It is
the lead that turns on and off with the key.
5
SYSTEM SET-UP
Setting System Volume
After completing the system wiring, follow the steps below to properly adjust
the EQS560.
1. Turn the master volume control on the EQS560 and the amplifier gain
controls to their minimum setting.
2. Turn the source unit on and increase the volume until distortion is heard,
then reduce volume just below this point.* Once the source unit volume has
been set, it will no longer be used. Always use the volume control on the
EQS560 as the master (main) volume control. It has better electronics,
higher S/N ratio and is more linear than any source unit volume available.
*This is the maximum usable musical signal forthis source unit. turning the volume beyond this point
will increase noise and distortion without an increase in musical signal.
Setting Equalizer Controls
The EQS560 provides a graphic adjustment band for each of five frequency
ranges: sub, low, mid, mid-high and high frequency. The center frequency of
each band is adjustable to allow fine tuning of the acoustical response of the
vehicle.
1. Begin by setting the SUB/LO/MID/MID-HIGH/HIGH frequencies at the
center position.
2. Play a favorite music track and adjust individual EQ controls to a desired
taste. Avoid extreme settings which can distort musical peaks.
3. Increase or decrease the Equalizer Gain Controls as necessary.
4. If your system includes a subwoofer, slowly increase the Subwoofer
control until you hear solid bass.
5. If your system includes rear speakers. adjust the Fader control to add rear
sound. Set it so most of the music comes from the front and only fills in the
rear.
Setting the Low Pass Frequency
The EQS560 provides a built-in Low-Pass Crossover, located on the top panel
of the unit. Set at 60Hz or 90Hz depending upon the type and size of your
subwoofer system.
AUXILIAR Y INPUT
The EQS560 has is a built-in auxiliary input that allows use with portable
devices (such as an MP3 player) or a video system.
1. Plug the auxiliary source into the auxiliary RCA input.
2. With the auxiliary switch in the main position, turn equalizer volume
control to a normal listening level.
3. With the auxiliary source in play mode, switch to the auxiliary source.
6
4. Adjust the auxiliary input gain controls, located on the top panel of the
EQS560, so that the volume of the auxiliary source matches the volume of
the main source.
TROUBLESHOOTING
Problem
Unit does not work; no lights.
Solution
• Power wires are not connected. Check battery and ground wiring at unit;
check battery connections.
Problem
Sound is distorted.
Solution
• Source unit volume is set too high. Reduce source unit volume.
• EQ controls are set too high. Turn EQ controls to the center position and
listen for distortion again. If problem still occurs, see your authorized Clarion
dealer.
• Speakers may be damaged. Consult your authorized Clarion dealer.
Problem
No sound from unit.
Solution
• Wrong input is selcted. Press Aux Switch so that main inputs are on.
• No Remote-On. Using a volt meter, check for +12V from Remote-On source.
PRODUCT SPECS
Graphic CenterFrequencies:
Boost/Cut:
S/N Ratio:
Frequency Response:
Maximum Output Voltage:
THD:
Input Sensitivity:
Head Room:
Input Impedance:
Output Impedance:
Stereo Separation:
Operating Voltage:
Size:
SUB 45Hz, LOW100Hz, MID 700Hz,
MID-HIGH 2Khz, HIGH 15Khz
12dB
105dB
10Hz -50Khz +/-1dB
7V RMS
0.005
50mV– 3V RMS
20dB
10K Ohms
50K Ohms
82dB/1Khz
11 – 15VNegative Ground
24mm H x 178mm W x 110mm D
7
661 W. Redondo Beach Blvd.
Gardena, CA 90247
1-800-GO-CLARION
www.clarion-usa.com
PEQ460-10 Rev.1 (12/99)