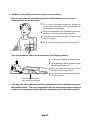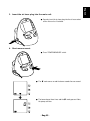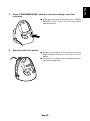
1
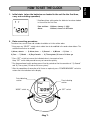
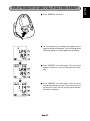
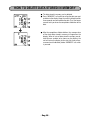
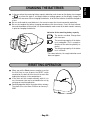
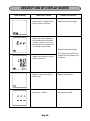
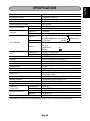
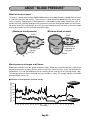
English
TM
FOR
DIGITAL BLOOD PRESSURE MONITOR
Español
INSTRUCTION MANUAL
Português
MODEL CH-485E
Deutch
Français
English
Español
Português
Deutsch
- Eng 1 -
GENERAL REMARKS
General remarks on blood pressure
and blood pressure measurement
1. If the cuff is to be deflated quickly, depress
“Exhaust button”.
2. The attached cuff is suited for an arm circumference of 22 cm to 32 cm.
3. When attaching the cuff, cuff tube should be
placed on the inside of your arm on top of
the arterial.
4. Self-measurement is no therapy! In no case
the dosage of medicaments ordered by the
doctor may be changed.
5. In preparation for blood pressure measurement, you should urinate and should remain
relatively still for 10 to 15 minutes prior to
measurement.
6. Exercise, eating and drinking, smoking, etc.,
prior to measurement may affect the results.
7. The blood pressure varies constantly throughout the day. Measurement should be made
regularly at the same time each day.
8. Do not be too impressed by the results of
one measurement. Keep a record of blood
pres sure variations. Many reading tell a
story.
9. Emotional stress may tend to cause blood
pressure to rise.
6. Measure blood pressure where the room
temperature is about 20°C. DO NOT measure
blood pressure when it is too cold (below
10°C)or too hot (above 40°C)in the room .
7. Do NOT try to measure blood pressure immediately after drinking coffee or tea or
smoking.
8. Measure blood pressure with a relaxed and
quiet posture. Keep the center of the cuff at
the level of your heart, and do NOT move
your arm of talk.
9. Do NOT measure blood pressure after the
cuff has been on for a few minute, as your
arm will have built up higher blood pressure,
and your will not get valid reading.
10. Next figure shows the classification of blood
pressure according to WHO-standard.
SYSTOLIC
(mmHg)
180
Hypertension (severe)
160
140
130
Hypertension (moderate)
Grade 1 Hypertension (mild)
High-Normal
Normal
120
Optimal
For proper measurement of blood
pressure
80
1. Take a deep breath five or six times and then
relax before measuring blood pressure. If you
are tense when taking the measurement, you
will not get a valid reading
2. Blood pressure will be elevated when you ate
in a worrisome or irritated state , suffering
from lack of sleep or constipation, or after
exercise or a meal.
3. Putting on the cuff is one of the most important tasks for ensuring proper measurement
of blood pressure. Wind the cuff around the
arm and tighten it so that one finger may be
inserted between the cuff and arm.
4. Do NOT measure blood pressure after bathing or drinking.
5. When you feel like relieving yourself, you
should do so before measuring blood pressure.
85
90 100 110 DIASTOLIC
(mmHg)
Definition and Classification of
Blood Pressure Lebels
Measure your blood pressure at the
same time on a daily basis.
* The blood pressure changes at all times. This
means that data gathered over a long period
has great significance instead of data on just
one measurement. It is therefore necessary
to measure your blood pressure with patience
on a daily basis for a long period of time. Ideally, select the best time of a day when you
can keep stable condition and measure your
blood pressure daily at the same time as far
as possible.
- Eng 2 -
Precaution for use
Nature and frequency of maintenance:
This product is designed for use over an extended
period of time; however, it is generally recommended that it be inspected every two years to
ensure proper function and performance.
Reference European standard:
Precaution for maintenance
1. Do NOT store the blood pressure monitor
where it will be exposed to direct sunlight,
high temperature (Over 60C), low temperature (below –20C), high relative humidity
(over 95%) or in a dusty place.
2. Do NOT expose the blood pressure monitor
to under force or vibration, or drop it.
3. Remove the battery/batteiries when not in
use for a long period.
4. Do not assemble the apparatus.
5. Do not bend the cuff or air hose unnecessarily
6. NEVER wipe the blood pressure monitor with
thinner or benzene, as they may damage it.
7. When the monitor is very dirty, wipe it clean
with a cloth moistened with Sterilizing alcohol or a neutral detergent, and then wipe it
with a dry cloth. Do NOT use thinner or benzene.
Manufacturer:
Name : Premier Precision Ltd.
Address : Block E, 6th floor,
Phase 2, Yip Fat Factory building,
73-75 Hoi Yuen Road, Kwun Tong,
Kowloon, Hong Kong.
European Representative:
Name
: WvW elektronische Geräte Vertrieb
GmbH
Address : Robert-Koch-Straße 20,
D-80538 München,
GERMANY
- Eng 3 -
Français
This product complies with EC instructions 93/42/
EEC (Medical Device Directive) and with the following standards: EN1060-1: 1995 “Noninvasive
Blood pressure monitors, Part 1 General requirement” and EN 1060-3: 1997 “Noninvasive Blood
pressure monitors, Part 3 Supplementary requirements for Electromechanical Blood pressure Measuring Systems”.
Deutch
Please help protect natural environment by respecting natural and/or local recycling regulations
when disposing of the batteries and the products
at the end of their useful lives.
Português
Protect the nature environment:
Español
1. If you suffer from heart disease, high blood
pressure or other circulatory disease, please
consult your doctor first.
2. If you feel abnormal pressure of the cuff during use or any other irregularity, reduce the
pressure by immediately switching off the
power or remove the batteries and consult
the sales outlet where purchased.
3. If you think the measured value is abnormal
or if measuring makes you feel unwell, discontinue use and consult your doctor.
4. Measurement of blood pressure may not be
possible for someone with a weak pulse or
arrhythmia.
5. Congestion, swelling, etc. may occur in some
people.
6. If blood pressure is measured repeatedly, an
accurate result will not be achieved. An interval of about 10 minutes should be allowed.
7. The memory is erased if the batteries are
removed for replacement, etc. and a record
should be kept of any necessary data.
English
PRECAUTION FOR USE AND MAINTENANCE
UNIVERSAL DESIGN
The product has been developed through the concept of Universal Design to ensure safe and easy use
for a wider range of users. The product, which is designed laying importance on Universal Design,
adopts a product shape and color that conveys an image of “warmth” and “gentleness” and has functions that cope with human body, which are “easy to understand,” “safety in use" and “easy to use.”
le g
and
e
g
Lar
haracters
ible c
nd
ple a
uration
Sim iful config
t
u
bea
hat
ry t ents
o
m
m
me ure
ul meas er of e)
f
p
el 30 e/Numb te & tim
es sur t da
or d pres uremen
Larg
e
pres and e
s sw asy
itch -tobu
tto
n
loo Meas
/
lse
(
pu B
s
H
Eggshap
impo ed desi
rta nc
g
e on n layi
safe ng
ty
o ck
w it h cl
BPMndar/alarm)
e
(cal
ent
asurem
le me le button
p
m
i
g
s
of sin
a ti c
om means
t
u
A by
nfiguration
e co e pocket
l
y
t
g
s
nd- stora
Sta h cuff
wit
- Eng 4 -
English
IDENTIFICATION OF PARTS
Time (Memory time)
display section
Data indicating section
SET switch
POWER/
START switch
MEMORY
switch
Deutch
Battery mark
Insufficient pressure
mark
Measurement mark
Português
Diastolic blood
pressure
display section
Pulse display
section
Alarm mark
Español
Systolic blood pressure
display section
Air hose socket
Cuff
Cuff holding
pocket
Air hose connector
Air hose
Battery cover
RESET switch
- Eng 5 -
Français
MODE
switch
HOW TO LOAD BATTERIES
(Batteries supplied with the unit should be loaded in compartment before putting the Blood
pressure monitor in use.)
(1) Open the cover of battery compartment.
Pressing the hook down, pull the cover toward you to open.
Hook
Battery
compartment
Battery
compartment
cover
Lug (projecting
section)
(2) Place batteries in the compartment.
Put the batteries paying attention to the positive
and negative terminal symbols + and –.
(See the sketch shown on the battery compartment
cover.)
4 “AA” batteries
(3) Close the battery compartment cover.
* If the Blood pressure monitor is
left unused for an extended
period of time, the batteries
should be removed from
the compartment.
Fitting the lugs of the cover
at the mating recesses of
the battery compartment
body, push the hook to
close the cover.
Fit the lugs (protections)
at the recesses.
- Eng 6 -
1. Initial state (when the batteries are loaded in the unit for the first time,
carry out resetting operation)
The alarm time, current time and calendar should be set in the written order.
* Every press on “SELECT” switch selects a data item to be modified in the order shown below. The
selected item flashes on and off.
* Press “SET” switch to increase the indicated value in increments of one.
Keep “SET” switch held pressed to carry out correction quickly.
* The aforementioned switch performance will not be carried out for the correction of “3) Second”
and “9) Time system (12-hour or 24-hour system).”
* After the completion of correction of all items as required, press “POWER/MEASURE” switch to
restore the time indication to the display.
Data indicating
section
Time indicating
section
“MODE” switch
“SET” switch
- Eng 7 -
Français
1) Alarm, minute / 2) Alarm, hour / 3) Second / 4) Minute / 5) Hour /
6) Year / 7) Month / 8) Day of month / 9) Time system (12-hour or 24-hour sys
Deutch
2. Data correcting procedure
Português
Date and time: 12:00 am, January 1, 2002
Alarm:
12:00 am, alarm is in OFF state
Español
* Date/hour/alarm setting when the batteries have been loaded
in the unit for the first time
English
HOW TO SET THE CLOCK
3. Correcting the “minute” of an alarm time
● Press “SELECT” switch for one second or more to place the
unit in the alarm-time minute correction state.
● Press “SET” switch to increase the minute of the alarm time in
increments of one minute.
4. Correcting the “hour” of an alarm time
● After the completion of the alarm-time minute correction as
described above, press “SELECT” switch to place the unit in
the alarm-time hour correction state.
● Press “SET” switch to increase the hour of the alarm time in
increments of one hour.
5. Correcting the “second” of the current time
● After the completion of the alarm-time hour correction as described above, press “SELECT” switch for one second or more
to place the unit in the current-time second correction state.
● Press “SET” switch to reset the second indication to 00. Press
“SET” switch according to a time signal. Note that the minute
indication on the display will advance when the seconds given
is 30 to 59 seconds of a minute.
6. Correction of the “minute” of the current time
● After the completion of the current-time second correction as
described above, press “SELECT” switch to place the unit in
the current-time minute correction state.
● Press “SET” switch to increase the minute of the current time
in increments of one minute.
- Eng 8 -
Español
● After the completion of the current-time minute correction as
described above, press “SELECT” switch to place the unit in
the current-time hour correction state.
● Press “SET” switch to increase the hour of the current time in
increments of one hour.
English
7. Correction of the “hour” of the current time
Português
8. Correction of the “year”
● After the completion of the year correction as described above,
press “SELECT” switch to place the unit in the month correction state.
● Press “SET” switch to increase the month in increments of one
month.
10. Correction of the “day of the month”
● After the completion of the month correction as described above,
press “SELECT” switch to place the unit in the day-of-the-month
correction state.
● Press “SET” switch to increase the day of the month in increments of one day.
- Eng 9 -
Français
9. Correction of the “month”
Deutch
● After the completion of the current-time hour correction as described above, press “SELECT” switch to place the unit in the
year correction state.
● Press “SET” switch to increase the year in increments of one
year.
● The year can be set in the range of 2002 and 2101.
11. Changeover of the “time system”
● After the completion of the day-of-the-month correction as described above, press “SELECT” switch to place the unit in the
time system selection state.
● Every time “SET” switch is pressed, the 12-hour system (12H)
and 24-hour system (24H) will be changed over.
● Press “SELECT” switch after activating the time system indication on the display to revert the display to the time indication.
This completes the clock setting procedure.
12. How to set the alarm
● While alarm symbol “bell” is shown on the display, the alarm will sound for 30 seconds when
the alarm time is reached. The alarm sounds only when the time indication is shown on the
display.
● To stop the alarm, press any switch.
● To change over the alarm status between SET/RELEASE, press “SET” switch while the time
indication is shown on the display.
Time indication
(without alarm)
Alarm time indication
- Eng 10 -
Time indication
(with alarm)
1. Put the cuff around your arm.
English
HOW TO MEASURE YOUR BLOOD PRESSURE
1. Remove the Velcro to unroll the cuff as illustrated.
● The cuff should be put on the bare arm or over a lightweight underwear.
● Draw the end of cuff to fit it on the arm and secure with
Velcro.
● Carefully put the arm taking care to obtain adequate tightness, not too tight or loose. Adequate tightness is obtained when such an allowance that you can put a finger
between the cuff and your arm is provided as illustrated
left.
Place your arm on a table or the like so that the center of the
cuff comes to the height of you heart and lightly open the
palm.
- Eng 11 -
Français
● Adjust the cuff position as that the air hose is located at
the center of your arm and so that the air hose outlet
section is spaced 1 to 2 mm from the elbow joint.
Deutch
● If you wear a heavy-weight top, please remove it. Be
aware that the upper arm may be compressed resulting
in incorrect measurements if you roll up sleeves.
Português
● Put the cuff around your arm so that the air hose comes
to the palm side.
Español
● When the cuff comes off, pass it through the metal ring.
The Velcro-attached side is the outer surface.
2. Measure your blood pressure in the correct posture
Be sure to measure your blood pressure at the same time and in the
same posture on a daily basis.
○
○
○
○
○
○
○
1
Sit on a chair in a comfortable position, placing your
arm on a table or the like to stretch out the portion from
the elbow to the hand straight.
2
The most important point for the blood pressure measurement is to level the arm band to your heart.
3
Lightly open your hand on the table with palm up and
relax your fingers.
4
Do not move your body or talk during measurement.
○
You may measure your blood pressure in the laying posture.
1
2
Lie with your head down facing the ceiling.
Lightly open your hand on the table with palm
up and straighten your arm.
3
Relax your body, arm and fingers to avoid
extra pressure on the arm band.
4
Do not move your neck or body or talk during measurement.
Take care to avoid extra
pressure on the arm band.
✭ You may use your right arm for the measurement of your blood pressure as
illustrated above. The most important point for the measurement of blood
pressures is to measure them with the same arm and in the same posture.
- Eng 12 -
Español
● Securely insert the air hose plug into the air hose socket
of the main unit as illustrated.
English
3. Insert the air hose plug into the main unit.
Português
Deutch
4. Start measurement.
● The Q mark comes on and the buzzer sounds for one second.
● The buzzer beeps three times and the Q mark goes out. Now,
the pump activates.
- Eng 13 -
Français
● Press "POWER/MEASURE" switch.
● The Blood pressure monitor automatically carries out pressurization until the pressure that is best suited to the blood pressure measurement is reached.
● When the unit determines that an adequate pressure is not
obtained, the unit starts pressurization again.
[Manual pressurization]
● Keep “POWER/MEASURE” switch held pressed until the pressure value you want to stop pressurization is reached (approximately 40 mmHg higher than the maximal blood pressure).
You can stop pressurization by the unit by releasing the switch
at the aforementioned value is reached.
● Wait a while after the completion of pressurization. Then, the
Q mark comes on and the unit automatically starts measuring your blood pressures.
● When the unit detects your pulse, the Q mark flashes on and
off, then the unit gives your blood pressure value on the lower
section of the display.
● Upon completion of measurement, the buzzer sounds and the
unit automatically exhaust air from the cuff. Then, the maximal
pressure/minimal pressure/number of pulses will appear on
the display.
● As long as the unit functions correctly, the blood pressures
and the number of pulses of the result are automatically stored
in memory as one set of data.
● The number of pieces of data that can be stored in memory is
30 sets of measurements. When you measure your blood pressure though 30 sets of measurements have already been stored
in memory, the earliest set of measurements is automatically
deleted to accept new one.
- Eng 14 -
Press “POWER/MEASURE” switch to revert the display to the time
indication.
Español
● When you want to stop measurement, press “POWER/
MEASURE” switch. The air in the cuff is exhausted to
stop measurement.
English
5.
Português
Deutch
Store the cuff in the pocket.
● Wrap the air hose lightly on the cuff with the air hose
plug inserted into the main unit. Then, put it in the cuff
pocket.
● Place the unit. as a clock, at such a location that you can
observe the display easily.
- Eng 15 -
Français
6.
AUTOMATIC CHANGEOVER FEATURE
● Press “POWER/MEASURE” switch after the completion of blood pressure measurement to revert the
display to the time display. If you do not press the
switch and leave the unit, the “Automatic changeover
feature” of the unit will work approximately three
minutes later to automatically revert the display to
the time indication. If you leave the unit for three
minutes without performing operations, the display
will automatically changeover to the time indication.
HOW TO CALL UP THE VALUES STORED IN MEMORY TO THE DISPLAY
● Except for the case where the unit is engaged in measurement, press “MEMORY” access switch to
call up the values (measurement results) stored in memory to the display.
● The value stored in memory is numbered in the order of measurements. For example, when 30 sets
of data are stored in memory, the data number 30 represents the latest data.
Data number:
1, 2, 3 ...
c
The earliest data
... 29, 30
c
The latest data
● The number of measurements that can be stored in memory is 30 sets. Then, when storing 31st
data in memory, the 1st data stored in memory will be automatically deleted. In this way, the unit
automatically delete data stored in memory in order of storage to accept new data.
● If you press “MEMORY” call switch with no data stored in memory, the clock indication will remain
on the display.
- Eng 16 -
● Press “MEMORY” call switch.
English
STEPS OF PROCEDURE TO BE TAKEN TO CALL UP DATA STORED IN MEMORY
Español
Português
Deutch
● Press “MEMORY” call switch again. This calls up the
memory number first, then the latest data on the display.
● Press “MEMORY” call switch again. This calls up the
second latest data to the screen. In this way, every time
you press this switch, the unit will give you the one previous data in sequence.
- Eng 17 -
Français
● “A ” that represents the average value appears on the
upper left section of the display. Then, the average of the
whole data stored in memory appears on the display.
HOW TO DELETE DATA STORED IN MEMORY
● The data stored in memory can be deleted.
● Press “MEMORY” call switch to call up the data you want
to delete to the display. Keep the switch held pressed for
three seconds or more to delete the data. Then, the buzzer
sounds to let you know the completion of deletion of the
data.
● After the completion of data deletion, the average value
of the whole data stored in memory will appear on the
display. When all sets of data stored in memory are deleted to leave no data to be shown on the display, the
unit will return the display to the state (the time or measurement result indication) before “MEMORY” call switch
is pressed.
- Eng 18 -
The batries are dead. Change them
with new ones.
* For some batteries, the rough indication mark
does not appear.
RESETTING OPERATION
● When you put the Blood pressure monitor in use for
the first time, be sure to press the RESET switch
mounted on the back of the main unit to reset after
loading the batteries in the compartment.
● If the main unit fails to work normally while it is in
use, the normal state may be restored to the unit by
carrying out resetting operation.
● Resetting operation erases the entire data in memory.
The clock will re-start from 12:00 am on January 1,
2002.
- Eng 19 -
Français
The remaining capacity of the batteries is sufficient.
Deutch
The remaining capacity of the batteries is inadequate. (This is a rough indication of the remaining battery capacity.)
Português
Indication of the remaining battery capacity
Español
● In the case where the remaining battery capacity indication mark shown on the display has changed
, or where the clock is no longer shown or nothing appears on the display, change the
to
batteries with new ones. When changing the batteries, all of the four batteries should be changed at
a time.
● Be sure to discard the used batteries in the correct manner for the environmental protection.
● Be sure to complete the battery changing procedure within two minutes. If not, the time information and stored data will be erased. It is recommended to make a note of the data stored in memory
in prior to changing the batteries.
English
CHANGING THE BATTERIES
DESCRIPTION OF DISPLAY MARKS
DISPLAY MARK
CONDITION / CAUSE
CORRECTIVE ACTION
Measurement is begun, but the
pressure was insufficient.
Repeat measurement again.
Appears when the blood pressure could not be measured accurately. (Some noises were
detected by the movement of
arm during measurement.)
Repeat measurement again.
Appears when the pulse could
not be measured.
First, exhaust air from the cuff,
reapply the cuff properly and
remeasure.
Appears when batteries become weak.
Replace the batteries.
Device has a trouble.
Ask purchased shop.
- Eng 20 -
Accuracy
Pressure
Pulse
Pressure
Pulse
Pressure
Marks
Viewing Size
Digit Size
Switch
Inflation
Deflation
Exhaust
Rated Voltage
Power Source
Power Consumption
Battery Life
Automatic Power Off Function
Memory Function
Dimensions
Weight
Temperature
Operating
Environment
Humidity
Temperature
Storage Environment
Humidity
Accessories
* Specifications and design may be changed without any notice in the event of improvementsbeing made.
- Eng 21 -
Français
LCD
Deutch
Pulse
LCD Indication
Português
Measurement Range
CH-485E
Oscillometric Method
Left Upper Arm
Soft cuff
22.0 to 32.0
0 - 280 mmHg
40 - 200 Pulse / Min.
±3mmHg
±5 % of reading
Systolic Blood Pressure: 3 digits
Diastolic Blood Pressure: 3 digits
Alternatively
Pulse Rate:
3 digits
Measuring
Q
Exhaust
—
▲
Re-Measure
Battery
19.5(H) × 63.0(W) mm
12.9 (H) × 6.0( W) mm
“POWER” switch
Manual Inflation by Pumping Bulb
Air release system
Quick Exhaust Valve
6 V DC
4 “AA” Size Batteries
0.1 W
Approx. 500 time Manganese (160 mmHg,
1 time /day, 22°C)
Approx. 3 min. (after activated)
30 Memories with Date and Time.
129 (W) × 121 (D) × 152 (H) mm
Approx. 610g (Include Batteries and Cuff)
10 to 40°C
30 to 85%RH
–20 to 60°C
10 to 95%RH
4 “AA” batteries, Cuff and Instruction manual
Español
Model Number
Measuring Principle
Measurement Localization
Cuff
Arm Circumference Range
English
SPECIFICATIONS
ABOUT “BLOOD PRESSURE”
What is blood pressure ...
The heart is a pump that circulates blood to different part of the body. Blood is pumped from the heart
at a constant pressure into arteries. This pressure is called the arterial blood pressure, which represents, in general, blood pressure. Blood pressure is indicated by several kinds of pressures such as:
systolic pressure (maximal blood pressure) that occurs when the heart pumps blood (see the illustration given below left); and diastolic pressure (minimal blood pressure) that occurs just when blood
returns to the heart (see the illustration give below right).
(Maximum blood pressure)
(Minimum blood pressure)
Artery
Artery
Left atrium
Left
ventricle
Left atrium
Left
ventricle
The artery wall
expands.
Contracts
Normal state is
restored to the
artery wall.
Relaxes
Blood pressure changes at all times..
Blood pressure differs with age, gender and other factors. Blood pressure of one person is likely to be
affected by biorhythm of a day, posture, physical activities, mental activities, stress and atmospheric
temperatures. It is said that blood pressure of a healthy person varies by 20 to 30 mmHg within a day.
The chart given below shows the blood pressure variation in a day. This charge indicates that blood
pressure differs in daily life.
Blood pressure value (mmHg)
● Example of blood pressure variation ina day
Max. blood pressure
160
140
120
100
80
60
Min. blood pressure
40
12 13 14 15 16 17 18 19 20 21 22 23 24 1
Time of day
- Eng 22 -
2
3
4
5
6
7
8
9 10 11
Why is the blood pressure measured at home different from that measured
at a hospital?
Blood pressure measured at home is reliable since it can
be measured in a stable and relaxed condition. Doctors
lay importance on blood pressure measurements taken
at home. It is recommended to measure your blood pressure at the same time on a daily basis to record blood
pressure variation and consult your family doctor instead
of fluctuating between hope and fear at every rise and
fall of your blood pressure.
- Eng 23 -
Français
What is the meaning of measuring blood pressure at home?
Deutch
Our blood pressure is adjusted by the function of automatic nerve. Blood pressure differs with every heart beat.
We are likely to think that our blood pressure is constant, but it varies if you take measurements in repetition. Blood pressure is susceptible to the time of day,
such as forenoon and afternoon, season and atmospheric
temperature. In addition, blood pressure is easily affected
by mental stress or emotional ups and downs. It tends
to increase when you feel tension or decrease when you
are relaxed.
Português
Why does the blood pressure obtained vary with every measurement?
Español
Blood pressure is susceptible to mental conditions, in
particular. When you have a doctor or nurse measure
your blood pressure, the pressure value is likely be higher
than usual because of concern and nervousness. (The
maximal pressure may be 25 to 30 mmHg higher than
usual. For some people, it may be 50 mmHg higher than
usual.) On the other hand, you may be relaxed at home
to obtain a stable near-normal blood pressure.
English
QUESTIONS AND ANSWERS ON BLOOD PRESSURE
BEFORE ASKING FOR REPAIR/INSPECTION
● Be sure to check the following before sending your Blood pressure
monitor for repair/inspection.
Phenomenon
Point to be checked
How to repair
Check whether batteries are dead?
Change the batteries with new ones
and press RESET button referring
to page 6.
Check whether the orientation of the
positive and negative terminals of
batteries, is correct.
Load the batteries in the correct orientation referring to page 6.
Pressure does not
arise.
Check whether the air hose plug is
connected to the main unit in the
correct manner.
Correctly connect the air hose plug
to the main unit referring to page
13.
The unit fails to
measure blood
pressure.
The “Q ” mark does not come on.
Correctly connect the air hose plug
to the main unit referring to page
13.
Check whether the arm band is correctly put on your arm.
Correctly put the arm band on your
arm referring to page 11.
Did you stay calm during measurement?
Stay calm and re-measure your
blood pressure.
The “▲” mark has come on.
Re-measure your blood pressure
without moving your body.
Display gives no
indication even when
you press Power/
Measure switch.
The sphygmomanometer may fail to measure blood pressure of a person
who has excessively weak pulses or irregular pulses.
Other phenomena
Remove the batteries from the unit and change them with new ones.
- Eng 24 -