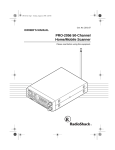
1
This manual is provided for information purposes only. All information
included herein is subject to change without notice. Canon is not
responsible for any damages, direct or indirect, arising from or related
to use of this manual.
© 1999 Canon Inc. All rights reserved. Printed in Japan.
Trademark Notice:
Canon and BJ, BJC, and Bubble Jet are trademarks of Canon Inc.
Microsoft, Windows, the Windows Logo and MS-DOS are registered
trademarks of Microsoft Corporation in the US and other countries.
Other brand and product names may be trademarks or registered
trademarks of their respective companies.
■ FCC Regulations
Color Bubble Jet Printer, Model K10158
This device complies with Part 15 of the FCC Rules. Operation is
subject to the following two conditions: (1) This device may not cause
harmful interference, and (2) this device must accept any interference
received, including interference that may cause undesired operation.
Note: This equipment has been tested and found to comply with the
limits for class B digital device, pursuant to Part 15 of the FCC Rules.
These limits are designed to provide reasonable protection against
harmful interference in a residential installation. This equipment
generates, uses and can radiate radio frequency energy and, if not
installed and used in accordance with the instructions, may cause
harmful interference to radio communications. However, there is no
guarantee that interference will not occur in a particular installation. If
this equipment does cause harmful interference to radio or television
reception, which can be determined by turning the equipment off and
on, the user is encouraged to try to correct the interference by one or
more of the following measures:
• Reorient or relocate the receiving antenna.
• Increase the separation between the equipment and receiver.
• Connect the equipment into an outlet on a circuit different from that
to which the receiver is connected.
• Consult the dealer or an experienced radio/TV technician for help.
Use of Canon Cable BIFC-50 provided with the printer is required to
comply with class B limits in Subpart B of Part 15 of FCC Rules.
Do not make any changes or modifications to the equipment unless
otherwise specified in the manual. If such changes or modifications
should be made, you could be required to stop operation of the
equipment.
Canon U.S.A. Inc.
One Canon Plaza, Lake Success, NY 11042, U.S.A.
Tel No. (516) 328-5600
1
■ Canadian Radio Interference Regulations
This digital apparatus does not exceed the Class B limits for radio noise
emissions from digital apparatus as set out in the interference-causing
equipment standard entitled “Digital Apparatus”, ICES-003 of the
Industry and Science Canada.
Cet appareil numérique respecte les limites de bruits radioélectriques
applicables aux appareils numériques de Classe B prescrites dans la
norme sur le matériel brouilleur: “Appareils Numériques”, NMB-003
édictée par l’Industrie et Sciences Canada.
■ International ENERGY STAR® Program
As an ENERGY STAR® Printer, Canon Inc. has determined that this
product meets the ENERGY STAR® guidelines for efficiency.
The International ENERGY STAR® Office Equipment
Program is a global program that promotes energy saving
through the use of computer and other office equipment. The
program backs the development and dissemination of
products with functions that effectively reduce energy
consumption. It is an open system in which businesses can
participate voluntarily. The targeted products are office
equipment such as computers, monitors, printers, faxes and
copiers. Their standards and logos are uniform among
participating nations.
2
■ Table of Contents
Chapter 1
Introduction.....................................................................................6
How to use this manual.....................................................................6
Conventions ................................................................................7
Features and benefits ........................................................................8
Compact portable design.............................................................8
Excellent print quality and speed in both colour and black and
white ........................................................................................8
Options and supplies.........................................................................9
BJ Cartridges and ink cartridges .................................................9
Print media ................................................................................11
Power supply.............................................................................12
Available options ......................................................................13
Chapter 2
Setting Up the Printer ..................................................................14
Selecting a location for your printer ...............................................14
Examining the printer .....................................................................15
Front view .................................................................................15
Rear view ..................................................................................17
Operation panel .........................................................................17
Installing the battery pack...............................................................19
Connecting the printer to your computer........................................22
Connecting the parallel interface ..............................................22
Setting up the IrDA wireless interface ......................................23
Attaching the AC adapter ...............................................................26
To connect the AC adapter........................................................26
Switching the printer on and off .....................................................27
Installing the BJ Cartridge ..............................................................28
Choosing which BJ Cartridge to use.........................................28
BJ Cartridge guidelines .............................................................29
BJ Cartridge installation............................................................30
Performing a test print ....................................................................33
Installing and using printer drivers .................................................36
Installing a printer driver for Windows 98/Windows 95/
Windows 3.1 ..........................................................................36
Installing a printer driver for DOS applications........................36
Selecting a DOS printer driver from your software
application..............................................................................37
Chapter 3
Paper Handling .............................................................................38
Selecting paper types ......................................................................38
Plain paper.................................................................................38
Special media ............................................................................39
Envelopes ..................................................................................39
Loading paper and other media ......................................................40
Chapter 4
Performing Test Prints.................................................................45
Starting the test prints .....................................................................45
Sample test prints............................................................................47
Demonstration ...........................................................................47
Printer settings...........................................................................48
Table of Contents
3
Ripple pattern ............................................................................48
Nozzle Check Pattern................................................................49
Font Sample ..............................................................................49
Hexadecimal dump test .............................................................50
4
Chapter 5
Colour Printing and Black-and-White Printing ........................51
Switching between colour printing and black-and-white printing .51
Printing with Windows .............................................................51
Printing with DOS applications ................................................51
Preparing your printer ...............................................................52
Changing the BJ Cartridges ......................................................52
Printing with a colour BJ Cartridge ................................................57
The benefits of colour printing..................................................57
Selecting the print media...........................................................57
Understanding your software application’s capabilities ...........58
Matching Colours displayed on your monitor with printouts ...59
Colour and cost .........................................................................61
Chapter 6
Maintaining the Printer ...............................................................62
Recharging and replacing the battery pack.....................................62
Recharging the battery pack......................................................62
Replacing the battery pack ........................................................64
Replacing ink cartridges .................................................................66
Handling ink cartridges .............................................................66
Examining the ink cartridges ....................................................67
Replacing an ink cartridge ........................................................68
Replacing BJ cartridges ..................................................................72
Installing the Color Image Scanner Cartridge IS-12 ......................73
Removing the BJ Cartridge.......................................................73
Installing the Scanner Cartridge................................................75
Removing the Scanner Cartridge ..............................................76
Cleaning the printer ........................................................................78
Before you start cleaning ..........................................................78
Cleaning inside and outside the printer.....................................79
Cleaning the print head .............................................................80
Preparing the printer for travel or storage.......................................81
Chapter 7
Troubleshooting ............................................................................83
Check List .......................................................................................83
Errors indicated by the CHARGE/ERROR lamp ...........................84
Clearing paper jams ........................................................................86
Operational problems......................................................................87
Print quality problems.....................................................................89
White streaks, dots missing, or irregular dots ...........................89
Colour printing problems................................................................92
Other printing problems..................................................................94
Where to Find More Help...............................................................97
Table of Contents
Appendix A Paper Specifications......................................................................99
Paper size ........................................................................................99
Paper type .......................................................................................99
Paper weight ...................................................................................99
Printing area..................................................................................100
Paper and special media ..........................................................100
Envelopes ................................................................................101
Appendix B Code Pages and Character Sets.................................................102
Code pages....................................................................................102
Character sets................................................................................108
BJ mode...................................................................................108
LQ mode .................................................................................111
Appendix C Printer Command Summaries...................................................114
Entering a setup string in Lotus 1-2-3 ..........................................114
BJ mode command summary........................................................115
Basic control codes .................................................................116
ESCape sequence codes ..........................................................116
Alternate Graphics Mode (AGM) codes .................................119
Miscellaneous control codes ...................................................119
ESCape sequence code for colour printing .............................120
LQ mode command summary ......................................................120
Basic control codes .................................................................120
ESCape sequence codes ..........................................................121
ESCape sequence code for colour printing .............................124
Appendix D Options and Supplies..................................................................125
Consumables.................................................................................125
Paper and special media................................................................126
Available options ..........................................................................126
Appendix E Infrared Communications..........................................................127
System Requirements ...................................................................127
Before Installing the IR Communications Driver Version 2.0 .....127
Appendix F Specifications...............................................................................130
Printer Specifications....................................................................130
Appendix G Interface Specifications ..............................................................134
Parallel interface ...........................................................................134
IrDA interface ...............................................................................134
Glossary ..............................................................................................................135
Index ...................................................................................................................146
Table of Contents
5
Chapter 1
Introduction
Congratulations on your purchase of the Canon BJC-50 Bubble Jet
Printer. We appreciate you choosing this printer to meet your printing
needs. The BJC-50 is compact, lightweight, and offers excellent colour
print quality. We hope you will be satisfied with this advanced Bubble
Jet technology.
■ How to use this manual
The user’s manual contains basic information about the printer, such as
initial setup procedures, basic operation, the use of supplies and options,
daily maintenance, troubleshooting, character sets, printer commands,
and so on. Read this manual carefully in order to get the most out of
your printer. The manual consists of eight sections.
Chapter 1 Introduction
Introduces the features, options, and supplies available for the printer.
Chapter 2 Setting Up the Printer
Gives instructions for setting up the printer and managing the printer
features. It also describes the printer’s components and gives advice on
caring for your printer.
Chapter 3 Paper Handling
Explains how to select the appropriate paper or special media and how
to load paper into the printer. It also gives precautions necessary for
handling print media.
Chapter 4 Performing Test Prints
Explains how to perform all the test prints.
Chapter 5 Colour Printing and Black-and-White Printing
Provides helpful hints on getting optimum results for colour printing
with the Color BJ Cartridge BC-11e and for black-and-white printing
with the Black BJ Cartridge BC-10.
6
Chapter 1 Introduction
Chapter 6 Maintaining the Printer
Explains how to replace ink cartridges and BJ Cartridges, clean the print
head and printer, and describes the proper procedures for printer
transportation and storage. Also describes installation of the optional
Color Image Scanner Cartridge IS-12.
1
Chapter 7 Troubleshooting
Gives detailed instructions for solving common problems. If you have
any difficulties, refer to this section.
Appendices
Lists paper specifications, character set tables, printer commands,
accessories and specifications.
Conventions
This manual employs the following conventions to alert you to
information that will help you use the printer safely and efficiently.
CAUTIONS ABOUT ACTIONS THAT COULD DAMAGE YOUR
HARDWARE OR SOFTWARE.
Advice or suggestions.
(☞12)
A number preceded by this mark and enclosed in parentheses tells you
the page number where you can find more information about the
previous sentence or paragraph.
Read this first!
As you unpack the box check each item against this sheet to make sure
that you have everything. This sheet also shows you how to remove the
tape and packing material from the printer.
Quick Start Guide
The Quick Start Guide summarises the steps for setting up the printer
and installing the Windows printer driver. If you are familiar with
computers and printers, follow the steps in this illustrated guide to get
set up as quickly as possible.
Chapter 1 Introduction
7
■ Features and benefits
This section summarises the features and benefits of the BJC-50.
Compact portable design
The printer’s extremely compact design and light weight allow it to fit
easily into a briefcase. Despite its small size the printer has full colour
printing capability on plain paper and a variety of other media. The
rechargeable lithium-ion battery pack allows you to operate the printer
without connecting the AC adapter. The battery pack will print up to
100 pages of normal black text at 1,500 characters per page.
Excellent print quality and speed in both colour
and black and white
With the Windows Printer Driver, your printer can print colour at 720 x
360 dpi (horizontal x vertical) resolution. In addition, the new Color BJ
Cartridge BC-11e can generate two sizes of ink droplets. This feature
delivers superior print quality, especially with graphic images.
High quality ink
The BJ Cartridges contain high quality inks. The Black BJ Cartridge
BC-10 is used for black-and-white printing and the Color BJ Cartridge
BC-11e is used for colour printing. An advanced ink formula eliminates
many problems common to ink jet printers. These inks are not easily
affected by light. They dry quickly, look great on plain paper, and are
extremely smudge-resistant.
Quiet printing
The BJC-50’s non-impact printing operates quietly.
Simple maintenance
The BJC-50 uses removable print head units so it needs little
maintenance. The Color BJ Cartridge BC-11e has three main parts: a
colour ink cartridge, a black ink cartridge, and a print head unit. The
Black BJ Cartridge BC-10 has two main parts: one black ink cartridge
and a print head unit.
8
Chapter 1 Introduction
Wireless Connection
The BJC-50 has a built-in infra-red IrDA interface which enables a
wireless interface with a suitably equipped computer. If your computer
has an IrDA interface, this gives improved portability.
1
Scanner feature
By switching the black or colour BJ Cartridge with the optional Color
Image Scanner Cartridge IS-12, you can turn the printer into a colour
image scanner.
■ Options and supplies
Canon offers the following options and supplies. Whenever you need
any of these replaceable items, contact a local Canon Authorised
Dealer or your Canon marketing representative.
BJ Cartridges and ink cartridges
Color BJ Cartridge BC-11e
This cartridge incorporates a Bubble Jet print head unit and two
replaceable ink cartridges: BCI-11 Color and BCI-11 Black as
described below.
Ink Cartridge
BCI-11 Color
Ink Cartridge BCI-11 Black
Print head unit
• BCI-11 Black: This is a replacement for the black ink cartridge used
in the Color BJ Cartridge BC-11e.
• BCI-11 Color: This is a replacement for the three-colour ink
cartridge used in the Color BJ Cartridge BC-11e.
Chapter 1 Introduction
9
Black BJ Cartridge BC-10
This cartridge contains both a print head unit and replaceable black ink
cartridge. This cartridge is more cost-effective for black-and-white
printing and enables faster output.
Ink Cartridge BCI-10 Black
Print head unit
• BCI-10 Black: This is a replacement for the black ink cartridge used
in the Black BJ Cartridge BC-10.
BJ Cartridge Storage Container SB-10
This is an optional extra storage container, like the one you received
with your printer, for storing a partially used Color BJ Cartridge BC11e or Black BJ Cartridge BC-10.
Color Image Scanner Cartridge IS-12
This optional Scanner Cartridge turns your printer into a colour scanner.
To use the printer as a scanner, you must have the optional Color Image
Scanner Cartridge IS-12, Windows 98/Windows 95 or Windows NT
4.0, and a Canon Printer Cable BIFC-50 (the IrDA interface is not
recommend for this function) to connect the printer and the computer.
The Color Image Scanner Cartridge IS-12 drops into the position
normally occupied by the BJ Cartridge.
You must install and use the IS Scan 1.20 scanner driver (supplied with
the printer) or higher. Earlier versions of this scanner driver do not work
correctly with the BJC-50.
10
Chapter 1 Introduction
Print media
To extend the capabilities of your printer, Canon offers several types of
special print media.
1
High Resolution Paper HR-101
Use this coated high-grade matt paper to achieve stunning photo
images. The coating used on this paper is of a unique formula that
ensures full compatibility with your Canon colour inks. Use this paper
for crisp colour on a high-quality, non-glossy paper. A4 and Letter
sizes are available.
Bubble Jet Paper LC-301
Specially designed for Canon Colour Bubble Jet printers, this paper
produces sharp and vivid colour output with a more natural appearance.
This water-resistant plain paper has been developed by Canon for
optimum colour printing. This excellent value paper offers an affordable
alternative to plain paper for everyday use. A4 and Letter sizes are
available.
Transparencies CF-102
Transparencies (also called Over Head Projection film or OHP film)
will produce crisp and professional images and text for overhead
presentations. Other transparencies may either not feed correctly into
the printer or not allow the inks to dry properly leading to running and
smearing of the colours. Canon overhead transparencies are specially
designed to avoid these problems. A4 and Letter sizes are available.
Back Print Film BF-102
This unique Glossy Film allows you to print extremely high quality
colour photographic images and graphics. It can be viewed either using
rear illumination, such as a light box, or as a regular print. Back Print
Film is a mylar translucent sheet. When viewed with a light box, Back
Print Film provides a sharp, bright, and vivid presentation of
photographs, portraits, and graphics. It is great for trade show displays
and other special presentations. A4 and Letter sizes are available.
Glossy Photo Paper GP-301
The printer can produce sharp and vivid colour output on this highgrade Glossy Paper because this medium is water resistant and is fully
compatible with Canon colour inks. Use this paper for your printed
output that requires crisp colour rendering on a high-quality Glossy
Paper. A4 and Letter sizes are available.
Chapter 1 Introduction
11
Glossy Photo Cards FM-101
Glossy Photo Cards FM-101 have detachable edges that you can
remove after printing so that prints look like borderless photographs.
This media is ideal for printing items such as invitation cards. Feed
paper using the optional Auto Sheet Feeder ASF-50. For detailed
instructions about using this media, refer to the instruction sheet
provided with each packet of Glossy Photo Cards FM-101.
High Gloss Film HG-101
The printer produces sharp and brilliant colour output on this high grade
gloss film. High Gloss Film is fully compatible with your Canon colour
inks. Use this film for trade show displays or other special
presentations. You can gain sharper and more vivid colour output with
High Gloss Film than with Coated Paper or Glossy Paper. A4 and
Letter sizes are available.
Fabric Sheet FS-101 (241 x 356 mm)
This Fabric Sheet is specially designed for Canon Bubble Jet printers.
Use this printable white, cotton fabric to produce your own embroidery
designs, pillows, appliqués, and so on. For detailed instructions about
using this medium, refer to the instruction sheet provided with each
packet of Fabric Sheet FS-101.
T-Shirt Transfer TR-201 (216 x 279 mm) (TR-101 in the U.S.)
T-Shirt Transfers can be used to transfer a design onto cotton or
polyester cotton-blend fabric. For detailed instructions about using this
medium, refer to the instruction sheet provided with each packet of TShirt Transfers TR-201. T-Shirt Transfers are available in A4 or A3
sizes, but only the A4 size can be used with this printer.
Power supply
Canon Li-Ion Battery LB-50
A rechargeable, replaceable battery pack is installed inside the printer to
power the printer without a mains supply. To recharge the battery pack,
just connect the AC adapter. The battery pack will recharge while the
printer is on or off.
Universal AC Adapter AD-360U
This universal adapter can be used to supply power to the printer from
any power source and to recharge the battery pack. Use this AC adapter
when travelling to countries where the AC power differs from your
country. A power cord appropriate for your country comes with the
universal adapter.
12
Chapter 1 Introduction
Available options
The following options are available for use with this printer. For details,
contact your local Canon Authorised Dealer or Canon marketing
representative.
1
Canon Auto Sheet Feeder ASF-50
This optional sheet feeder can be easily and quickly installed on the
front of the printer and allows you to stack and feed more than one sheet
at a time for multi-sheet print jobs.
Color Image Scanner Cartridge IS-12
Turns your printer into a colour scanner.
BJ Cartridge Storage Container SB-10
Use to store partially used BJ Cartridges.
Chapter 1 Introduction
13
Chapter 2
Setting Up the Printer
This chapter describes how to set up the BJC-50. It offers guidelines on
finding a suitable location for the printer, explains how to unpack the
printer, and gives an overview of the printer’s components. Even if you
have already set up the printer by following the instructions in the Quick
Start Guide, read this section to become familiar with the parts of the
printer and how to use them more efficiently.
■ Selecting a location for your printer
Carefully read the following instructions before setting up your printer
in order to choose the best location.
• Choose a flat, sturdy surface with enough space to feed paper into the
front of the printer and to handle paper output at the back of the
printer.
• Avoid excessive heat or humidity, and avoid direct sunlight. Place
the printer where the temperature is stable and comfortable.
• Do not leave the printer in a vehicle, where it may be exposed to
extremely high temperatures.
14
Chapter 2 Setting Up the Printer
• Do not install the printer near devices which contain magnets or
generate magnetic fields.
• Do not subject the printer to strong physical shock or vibration.
• Keep the printer clean. Dust accumulation can prevent proper
functioning of the printer.
• Do not place objects on the top of the printer.
2
• The top cover and front cover should be closed when the printer is not
being used.
■ Examining the printer
Familiarise yourself with the printer’s parts and functions as described
below.
Front view
Power lock switch
Top cover
Auto Sheet Feeder
ASF-50 (option)
connector
Operation panel
Feed slot
Front cover
(open)
Power
connector
Battery pack
Battery pack release
Paper Guide
Top cover
Covers the paper and BJ Cartridge during printing. The top cover
should remain closed unless you are changing BJ Cartridges or
replacing an ink cartridge.
Chapter 2 Setting Up the Printer
15
Operation panel
Allows you to operate some functions.
Auto Sheet Feeder ASF-50 connector
Connects the optional Auto Sheet Feeder ASF-50 to the printer.
Power connector
Connects the printer to the AC adapter.
Power lock switch
After the power lock switch is slid to the right, you can press the
POWER button to switch the printer on and off. After the power lock
switch is slid to the left, you cannot switch the printer on, even if you
press the POWER button. This prevents the printer from being
switched on accidentally while it is being transported. Before
transporting the printer, always slide the power lock switch to the left.
Otherwise, leave the power lock switch at the right position so you can
operate the POWER button normally to switch the printer on and off.
Battery pack
The Canon Li-Ion Battery LB-50 provides power to the printer when
the AC adapter is not connected. When the AC adapter is connected, the
printer is powered from the AC adapter. When the battery pack requires
recharging, the CHARGE/ERROR lamp will start flashing green. To
recharge the battery pack, connect the AC adapter to the printer and to a
power outlet. When the battery pack is fully charged, the
CHARGE/ERROR lamp will go off.
Battery pack release
Push to the right to release the battery pack so you can remove it. Do
not remove the battery pack unless you are going to store the printer for
a prolonged period (three months or more).
Front cover
When closed, covers the battery pack. Folds down so you can feed
paper and other media to the printer. Open the front cover only when
you are feeding paper or other media into the printer.
Feed slot
Allows you to feed one sheet of paper or other media for printing.
Always align the left edge of the sheet with the left side of the feed slot.
16
Chapter 2 Setting Up the Printer
Rear view
Half-pitched parallel
interface connector
2
Paper output slot
IrDA interface
Paper output slot
Ejects paper after it is printed. Place the printer on a flat clean surface
with enough space to support printed sheets as they are ejected.
Parallel interface connector
Connects the printer to the computer via the Canon Printer Cable
BIFC-50.
IrDA interface
Provides wireless connection between the printer and a computer
equipped with an IrDA interface.
Operation panel
POWER
lamp
CHARGE/
ERROR
lamp
CARTRIDGE
POWER
CARTRIDGE button
POWER button
RESUME
CHARGE
ERROR
RESUME button
CARTRIDGE button
Press to move the cartridge holder to the centre for switching BJ
Cartridges or replacing ink cartridges.
Chapter 2 Setting Up the Printer
17
POWER button
Press to switch the printer on and off. You can also use the POWER
button to start test prints by holding down the POWER button after you
switch the printer on. Count the number of beeps then release to select
the type of test print you want to perform. (☞45)
POWER lamp
Flashes for a few moments after power on and then lights and stays on
to indicate that the printer is ready for normal operation.
The POWER lamp flashes in the following situations:
• During print head cleaning after you switch the printer on. The print
head is cleaned automatically every time you switch on the printer.
When the POWER lamp stops flashing, print head cleaning is
finished and the printer is ready for operation.
• During print head cleaning or flushing started from the operation
panel with the RESUME button, from the Windows printer driver.
• When the last page of a print job does not print.
• While you are performing routine print head maintenance such as
replacing an ink cartridge, replacing a BJ Cartridge, changing BJ
Cartridges, or replacing the BJ Cartridge with the Color Image
Scanner Cartridge IS-12.
RESUME button
Press to cancel errors and warnings. The RESUME button also
performs these important functions:
• Error recovery. After an error occurs, press once to return the printer
to the normal operation mode.
• Paper Feed. If the POWER lamp is flashing to signal that data
remains to be printed, insert a sheet of paper in the printer and press
RESUME once to print the remaining page of data.
Do not press the RESUME button when there is no paper in the feed
slot.
• Print head cleaning. Press and hold down the RESUME button for
two seconds until the printer beeps twice then release to start print
head cleaning. The POWER lamp flashes during print head cleaning.
(☞80)
18
Chapter 2 Setting Up the Printer
• Print head flushing. Press and hold down the RESUME button for
over two seconds until the printer beeps three times then release to
start print head flushing. The POWER lamp flashes during print head
flushing. (☞80)
CHARGE/ERROR lamp
When the printer is off and the AC adapter is connected to the printer
and plugged into the power mains, the CHARGE/ERROR lamp lights
and stays on while the battery pack inside the printer is recharging.
After the battery pack is fully charged, this lamp will go off.
2
When the printer is on, the CHARGE/ERROR lamp lights or flashes
orange when an error occurs. Remove the cause of the error then press
RESUME to resume normal operation. The first time you switch on the
printer, the empty cartridge holder will move to the centre. The
CHARGE/ERROR lamp will flash once and the printer will beep to
remind you to install a BJ Cartridge.
■ Installing the battery pack
Follow this procedure to install the battery pack in the printer.
Install only a Canon Li-Ion Battery LB-50 battery pack. You must install
the battery pack and leave it installed in the printer, even if you intend to
use the printer only with the AC adapter. If the battery pack is not
installed when you switch on the printer, the CHARGE/ERROR lamp will
light orange and the printer will beep six times.
1.
Open the front cover.
2.
If you are installing a new battery pack, remove the battery pack
from its package.
Chapter 2 Setting Up the Printer
19
20
3.
Align the mark on the printer ( ) with the mark on the battery pack
( ) and insert the left end of the battery pack into the printer at a
slight angle.
4.
Push in on the right side of the battery pack to lock it in place.
5.
Close the front cover.
Chapter 2 Setting Up the Printer
FOLLOW THESE GUIDELINES WHEN STORING AND HANDLING
THE BATTERY PACK:
• A battery pack is not charged when purchased. You must charge the
battery pack for about 4 to 6 hours for it to reach full charge.
• For best results, use the battery pack at room temperature. At low
temperatures the capacity of the battery pack is diminished and it will
print fewer sheets between recharging sessions.
• Never attempt to recharge the battery pack with any device other than
the Universal AC Adapter AD-360U supplied with this printer.
• To avoid personal injury from an explosion, never expose the battery
pack to an open flame and never attempt to incinerate an old battery
pack.
• Used battery packs should be disposed of according to environmental
regulations in your country. For details, contact your Canon Authorised
Dealer or Canon representative.
• To avoid damaging the contacts on the corner of the battery pack,
avoid touching them with any metal object like a tool, jewellery, the
surface of a metal table, etc. Damaged contacts could cause leaking
and serious burns.
• To avoid personal injury from corrosive liquids, never attempt to
disassemble the battery pack.
• If any liquid from a leaking or broken battery pack gets into your eyes,
flush your eyes immediately with clean water and contact a physician.
• Never attempt to connect the battery pack directly to mains (house)
current or to a cigarette lighter socket in an automobile.
• Never attempt to use this battery pack for any purpose other than as a
power source for this printer.
• Never store a battery pack in a location above room temperature.
• Remove the battery pack immediately and contact your Canon
Authorised Dealer or Canon Representative if the battery pack shows
any signs of warping, releasing a strange odour, leaking fluid, or
overheating. However, do not be concerned if the battery pack feels
slightly warm during recharging; this is perfectly normal.
• If you intend to store the printer for a prolonged period (3 months or
more), remove the battery pack. Store the printer and battery pack in a
dust-free location away from direct sunlight.
• Always handle the battery pack with care to avoid dropping it and
damaging its casing and contacts.
Chapter 2 Setting Up the Printer
2
21
■ Connecting the printer to your computer
This printer is equipped with two interfaces. In addition to a parallel
interface, the printer also has a built-in IrDA interface for wireless
connection to a host computer equipped with an IrDA interface.
Connecting the parallel interface
A parallel interface port is provided for connection to IBM compatible
PC computers.
Follow the procedure below to connect the printer to the host computer
with the BIFC-50 printer cable.
To connect this printer to a computer via the parallel interface ports, you
must use the Canon Printer Cable BIFC-50 provided with this printer.
1.
2.
22
Make sure the printer and computer are switched off.
Connect the small end of the BIFC-50 printer cable to the parallel
interface connector on the left side of the printer. Carefully match
the shape of the small D-connectors (
) on the end of the
cable with the connector on the printer then push gently to connect
the cable to the printer.
Chapter 2 Setting Up the Printer
3.
Connect the large end of the BIFC-50 printer cable to the back of
the computer. Turn the screws on both sides of the connector to
fasten it securely.
2
Setting up the IrDA wireless interface
This printer is equipped with an IrDA 1.0 compatible infra-red wireless
communication interface port (115.2 kbps). The IrDA interface is very
popular among notebook or laptop computer users because no cable
connection between the printer and computer is required.
In order to use the IrDA wireless interface, your computer must be
equipped with an IrDA interface and have an Microsoft IR Comm
Driver (infra-red driver) Ver. 2.0 for Windows 95 installed. For other
reguirements, please see Appendix E.
Even if your computer has an IrDA interface port, you still may not be
able to use the Microsoft IR Comm Driver Ver. 2.0. To determine
whether your computer IrDA interface supports Microsoft IR Comm
Driver Ver. 2.0, contact the Help Desk of your computer manufacturer.
Chapter 2 Setting Up the Printer
23
Follow this procedure to set up the printer for data transfer via the IrDA
interface
1.
The printer IrDA interface is on the left side of the printer, below the
parallel interface connector.
IrDA interface
2.
Locate the IrDA interface on the computer. Arrange the printer so
the IrDA interface ports are facing one another.
The IrDA interface ports must face one another and be approximately
level, within a range of 15 degrees left or right, 15 degrees up or down
and not more than 1 metre (3 ft.) apart.*
*May vary depending on the specific computer, PDA, and communication protocol used.
The following conditions may reduce the reception range of the
IrDA interface.
• If another IrDA device is attached.
• If another infra-red device, like a set of wireless headphones or a
remote controller, for example, is broadcasting in the same area.
• If the IrDA port is exposed to sunlight, fluorescent light, or any
other strong light source like a large torch.
• If the IrDA port is not clean. Clean it with a soft, dry cloth if the
port is smudged or dirty.
24
Chapter 2 Setting Up the Printer
3.
Make sure the computer is set up for IrDA operation.
To use IrDA successfully, make sure the following conditions are
satisfied:
• You must use Windows 95.
• Make sure the infra-red driver Microsoft IR Comm Driver Ver.
2.0 has been installed.
• Make sure a COM port has been selected for IrDA with the Printer
Wizard. Allocation of a port for an IrDA wireless interface may
depend on the computer you are using. Usually COM4 can be
selected as an external serial (COM) communications port. For
details about how your system configuration, refer to your
computer manual.
• Make sure the BJC-50 is selected as the default printer with the
BJC-50 printer driver.
• Only the Microsoft IR Comm Driver Ver. 2.0 can be used as the
IrDA driver for the BJC-50. Other IrDA drivers cannot be used.
• The IrDA interface cannot detect the printer status and reset the
printer. If communication between the printer and computer is
interrupted and the print job is stopped, the printer is initialised
automatically. (The buffer memory of the printer is cleared and
the paper is ejected.)
Chapter 2 Setting Up the Printer
2
25
■ Attaching the AC adapter
Read the following precautions before attaching the AC adapter.
Use only the Universal AC Adapter AD-360U supplied with the printer.
• Always use the AC adapter indoors, never outdoors.
• In case of trouble (smoke, odd smells, etc.), unplug the AC adapter
immediately.
• Do not place anything in front of your power outlet that may obstruct
your access to the power supply or put pressure on the AC adapter or
its cord.
• When unplugging the AC adapter, always remove it by pulling the
connector, never by pulling the cord.
• Do not unplug the AC adapter until you have switched off the printer.
After you switch off the printer if the CHARGE/ERROR lamp
flashes green, this means the battery pack power is low. Leave the AC
adapter connected to the printer and plugged into a power outlet so
the battery pack can be recharged. While the battery pack is charging,
the CHARGE/ERROR lamp lights and remains on until the battery
pack is fully charged. (The time required for recharging is four to six
hours.) When the CHARGE/ERROR lamp goes off, the battery pack
is fully charged.
USE ONLY THE AC ADAPTER SUPPLIED WITH THE PRINTER. DO
NOT USE AC ADAPTERS FOR OTHER CANON BJ PRINTERS OR
ADAPTERS INTENDED FOR USE WITH OTHER ELECTRONIC
DEVICES.
To connect the AC adapter
1.
2.
3.
26
Connect the power cord ➊ to the AC adapter.
Insert the DC plug ➋ into the printer.
Insert the power cord ➌ into a power source.
Chapter 2 Setting Up the Printer
3
1
2
2
• If the printer is not switched on and the battery requires
recharging, the CHARGE/ERROR lamp will light green and
remain on to indicate that the battery pack is recharging.
• To recharge the battery pack, switch off the printer and connect
the AC adapter if it is not already connected. When the battery
pack is fully charged, the CHARGE/ERROR lamp will go off.
(☞62)
■ Switching the printer on and off
1.
Before you switch the printer on, check the power lock switch on the
right side of the printer. If the power lock switch is in the left
position, slide it to the right.
When the power lock switch is in the left position, it locks the power
switch off so it cannot be switched on accidentally during transportation.
Chapter 2 Setting Up the Printer
27
2.
3.
To switch the printer on, press the POWER button.
To switch the printer off, press the POWER button.
The printer has an energy saving Auto Power Off feature which will
power off the printer automatically if the printer remains idle for 30
minutes. To turn this feature off, or to set the idle time interval, open the
printer driver and adjust these settings on the Control tab.
■ Installing the BJ Cartridge
This printer is shipped with a colour and black BJ Cartridge one of
which must be installed before you can use the printer. Each BJ
Cartridge contains removable ink cartridges and a print head unit which
releases the ink.
The Color BJ Cartridge BC-11e is mainly for colour printing and the
Black BJ Cartridge BC-10 is for monochrome printing. Select the
cartridge based on your print job (colour or monochrome).
Choosing which BJ Cartridge to use
Color BJ Cartridge BC-11e
Use this cartridge for printing in colour. Use the BC-11e whenever you
want to produce brilliant colour output. Do not waste the black ink
cartridge of this colour BJ Cartridge by printing drafts of black-andwhite text documents. Use the colour BJ Cartridge only for printing
colour.
Ink Cartridge
BCI-11 Color
Ink Cartridge
BCI-11 Black
When the colour ink
runs out, replace
only this ink
cartridge.
When the black ink
runs out, replace only
this ink cartridge.
Print head unit
Print head
Color BJ Cartridge BC-11e
28
Chapter 2 Setting Up the Printer
Black BJ Cartridge BC-10
Use this cartridge for printing in black and white for draft output. When
the BC-10 is installed your output will print faster. The BC-10 is also
more cost effective for monochrome printing because it can print more
pages per cartridge than the BC-11e.
Ink Cartridge
BCI-10 Black
When the black ink runs
out, replace only this ink
cartridge.
2
Print head unit
Black BJ Cartridge BC-10
Print head
BJ Cartridge guidelines
Canon manufactures several types of BJ Cartridges, but you must use
only the BJ Cartridges designed for this printer. To ensure the best
performance with the BJC-50, use only Canon Color BJ Cartridge BC11e or Canon Black BJ Cartridge BC-10. Canon cannot guarantee your
print quality if you use any other type of BJ Cartridge.
To avoid drying out the ink, clogging the print head, or ink leakage,
follow these simple precautions:
• Do not unpack a BJ Cartridge until you are ready to use it.
• Keep the BJ Cartridge out of the reach of children. If spilled, the ink
is difficult to clean.
• Install the BJ Cartridge in the printer immediately after removing the
protective cap and protective tape.
• Never shake a BJ Cartridge.
• Never attempt to disassemble a BJ Cartridge.
• Never place a BJ Cartridge on a table with the print head facing
down.
• The BJ Cartridge must be installed in the printer or be stored in the BJ
Cartridge Storage Container SB-10. If the print head is left uncapped,
the print head may dry out.
Chapter 2 Setting Up the Printer
29
BJ Cartridge installation
1.
Make sure the AC adapter is connected and the battery pack is
installed.
2.
Press the POWER button.
When you switch the printer on, the printer beeps three times and the
cartridge holder moves to the centre if a BJ Cartridge is not installed.
3.
Raise the top cover.
• Never move the cartridge holder to the centre by pulling the film cable.
Never touch the interior of the empty cartridge holder, the terminal of
the print head unit, the print head itself, or the film cable when
installing the BJ Cartridge (shaded portions).
• When the top cover is open, never touch the orange film cable inside
the printer.
Do not touch here
Film cable
Print head
BJ Cartridge
Do not touch here
30
Chapter 2 Setting Up the Printer
4.
Remove the BJ Cartridge from its protective packaging.
Black BJ Cartridge BC-10
Color BJ Cartridge BC-11e
or
5.
2
Remove the orange protective cap from the print head and then
remove the orange protective tape.
Protective cap
Be sure to
remove the
protective tape
To avoid staining your clothing or articles in your work area, do not drop
or shake the BJ Cartridge. The ink in the BJ Cartridge can stain fabric
permanently.
6.
Point the print head down, and insert the BJ Cartridge as shown
below. Align the marks on the BJ Cartridge with the cartridge holder
(yellow-yellow, black-black).
Chapter 2 Setting Up the Printer
31
This illustration shows the installation of the Color BJ Cartridge BC-11e.
Insert the BJ Cartridge to
align the marks (
).
7.
Press down gently on the high side of the BJ Cartridge until it snaps
in place.
8.
9.
Close the top cover.
Wait about three seconds and press the CARTRIDGE button once.
CARTRIDGE
POWER
RESUME
CHARGE
ERROR
After the BJ Cartridge is installed, the printer requires at least two
seconds to detect the presence of the BJ Cartridge then the cartridge
holder will move to the home position.
32
Chapter 2 Setting Up the Printer
Always press the CARTRIDGE button to move the cartridge holder to
the home position. If you fail to press CARTRIDGE button and the
cartridge holder stays in the centre, after five minutes the buzzer beeps
three times and the cartridge holder automatically returns to the home
position to prevent the print head from drying out.
■ Performing a test print
2
To check the printer installation, print a Demonstration. This and other
test prints are described in detail in Chapter 4. (☞45)
1.
Open the front cover of the printer.
2.
Select one sheet of plain A4 or Letter size paper.
To avoid fouling the platen with wet ink, never attempt to perform a test
print on paper smaller than A4 or Letter size. You can print on either
side of plain paper.
3.
Press and hold down the POWER button until you hear one beep
and release it.
Chapter 2 Setting Up the Printer
33
4.
Slide the paper guide ➊ to the mark for the size of the media you are
loading.
5.
Hold the sheet with the print side up and align the left edge of the
sheet with the stopper ➋ on the left side of the front cover.
Stopper
2
3
A
4
Mark for the size
1
Paper guide
6.
Insert the paper straight into the printer ➌ (about 5 cm) until it stops.
Push the sheet in slightly and hold it in place for about two seconds.
The sheet will feed partially into the printer.
If the sheet is too narrow (less than 100 mm), or if the sheet is inserted
diagonally, the buzzer will beep once, the CHARGE/ERROR lamp will
light orange, and the printer will eject the paper from the feed slot. After
the sheet is inserted again correctly, the printer will reverse feed it
slightly and the buzzer will not beep. If POWER lamp is flashing, data
remains to be printed. Press the RESUME button to finish the print job.
7.
34
Press the RESUME button. The CHARGE/ERROR lamp goes off
and printing starts.
Chapter 2 Setting Up the Printer
2
The above sample was printed with the Black BJ Cartridge BC-10.
Chapter 2 Setting Up the Printer
35
■ Installing and using printer drivers
In order to use the BJC-50, you must install the correct printer driver on
your computer. This section explains the printer drivers and gives you
some hints on DOS driver selection.
Installing a printer driver for Windows 98/Windows
95/Windows 3.1
Printer drivers for both Windows 98/Windows 95 and Windows 3.1 are
provided with the printer. For installation instructions, see the Quick
Start Guide or the Windows Print Guide.
Note these two potential problems with the printer driver settings:
• If a WPS printer driver has been installed, printing may not execute
normally. If experience difficulty printing, remove the WPS driver or
reassign the WPS driver port to FILE.
Installing a printer driver for DOS applications
To use the printer with a software application running under DOS, you
must select and install a compatible driver using the software
application’s setup or installation procedure. After you select a
compatible driver, you should be able to use all the features of the
printer.
With some software applications, you may have to send control codes
directly from the computer to the printer. In this case, see Appendix C for
a complete list of printer command codes.
36
Chapter 2 Setting Up the Printer
Selecting a DOS printer driver from your software
application
Most DOS software applications include an installation or setup
procedure that you must perform in order to install a printer driver.
During this procedure you are asked to select the appropriate driver
from a list of drivers provided with the software application. Even if
you do not see a driver for the BJC-50, and this will be the case for
older programs, you can still use the BJC-50 printer if you select a
compatible driver. To allow you to do this, the BJC-50 can operate in
two modes.
2
• BJ mode: Emulates an IBM Proprinter X24E series printer.
• LQ mode: Emulates an Epson LQ-2550 series printer.
Some of these drivers may not allow you to take advantage of all the
BJC-50 printer features.
Here is a list of compatible printer drivers, listed in order of preference.
Priority
1
2
3
4
5
6
7
8
Printer Name
BJC-50
BJC-80
BJC-70
Canon Colour BJ Printer
Epson LQ-2550
Epson LQ printer
IBM Proprinter X24E
IBM printer
Printer Control Mode Remark
BJ or LQ
BJ or LQ
BJ or LQ
BJ or LQ
LQ
LQ
Black & white only
BJ
BJ
Black & white only
Note that there are restrictions on the availability of font typefaces, print
styles, and character sets, depending on whether you are using the BJ or
LQ mode.
Feature
Font Typeface
Print Style
Character Set
15 cpi, 20 cpi
Italic
Slash zero
Italic Set
Graphics Set
International Set
BJ
No
No
Yes
No
No
No
LQ
Yes
Yes
No
Yes
Yes
Yes
Chapter 2 Setting Up the Printer
37
Chapter 3
Paper Handling
This chapter describes how to load plain paper and special media in the
printer. To get the best performance from your printer, use the media
most appropriate for the task and make sure that you follow these
instructions to load it correctly.
■ Selecting paper types
One of the most important things you can do to ensure the best possible
performance from your printer is to select the correct print media. Your
printer produces letter-quality print on most plain paper, including
cotton bond and photocopier paper, and does not require special ink jet
paper. However, the print quality varies with different paper types,
especially with colour printing. Plain paper should be fully tested
before large quantities are purchased. Your printer accepts either plain
paper or the special media as described below.
Plain paper
Paper fed to the printer must be free of curls, folds, and damaged edges.
The printer can accept A4, A5, B5, Letter and Legal size sheets in
portrait orientation. Paper thickness should be in the range 64 to 105
gsm. Paper must be fed to the printer one sheet at a time unless you
have installed the optional sheet feeder. Canon produces Bubble Jet
Paper LC-301, a plain paper designed specially for Canon Bubble Jet
printers.
This printer meets the standards for using recycled paper. The BJC-50
produces excellent printouts on recycled paper.
38
Chapter 3 Paper Handling
Special media
Several special media have been designed for use with the BJC-50 and
other Canon Bubble Jet printers. When you handle special media other
than plain paper (e.g. Coated Paper), follow these guidelines:
• Store the media in its original package until you are ready to use it.
Exposing media to direct sunlight or air may lower the print quality.
• Avoid high temperature and high humidity. Store media in a
comfortable environment that is not subject to wide changes in
temperature or humidity.
• Before using the media, always read the precautions and additional
instructions printed on the package or in the instructions provided
with the packet. Special media like Fabric Sheet FS-101 and T-Shirt
Transfer TR-201 (TR-101 in the U.S.) require special handling after
printing. Detailed instructions are provided with purchase of these
media.
3
• When using High Resolution Paper HR-101, do not use the cleaning
sheet supplied with the packet. The cleaning sheet will not feed
smoothly through the BJC-50.
• When printing on Glossy photo Cards FM-101, feed the cards using
the optional Auto Sheet Feeder ASF-50.
Envelopes
You can print addresses on envelopes of two common standard sizes:
• European DL size (220 x 110 mm).
• U.S. Commercial 10 (241 x 105 mm (9.5 x 4.1 inches)).
An envelope can be loaded horizontally or vertically for printing.
Envelopes, like other media, must be loaded one at a time.
If an envelope will not advance, use the top of a biro or pen to sharpen
the crease of the right edge of the envelope.
Chapter 3 Paper Handling
39
The following envelopes cannot be used:
• Envelopes with windows, holes, perforations, cutouts, and double
flaps.
• Envelopes made with special coated paper or deeply embossed paper.
• Envelopes using peel-off sealing strips.
• Envelopes in which letters have already been enclosed.
• Warped envelopes or envelopes that have been folded.
■ Loading paper and other media
Paper and other media must be loaded one sheet at a time.
Before you attempt to load single sheets of paper or other media into
the feed slot on the front of the printer, make sure the battery pack is
installed. If the battery pack is not installed, you may experience
problems feeding paper or other media into the front feed slot. Install the
battery pack and leave it installed, even if you intend to use the printer
only with the AC adapter.
Follow this procedure to load paper or other media one sheet at a time.
Before you load a sheet of paper or other media in the printer, make
sure the computer is turned on. If you turn on the computer after the
printer is loaded, the sheet will eject from the printer.
1.
Open the printer driver for Windows 98, Windows 95 or Windows
3.1 so you can check the settings and make adjustments for the print
job.
Make sure the printer driver has been installed for Windows 98,
Windows 95, Windows 3.1, or your DOS software application.
To open the printer driver for Windows 98/Windows 95
• In your software application, pull down the File menu and select
Print.
• Check the Name entry box. If BJC-50 is not displayed as the
selected printer, click the down-arrow and select BJC-50 from the
pull down list.
40
Chapter 3 Paper Handling
• With Canon BJC-50 displayed in the Name line, click the
Properties button.
• The Paper and Graphics control sheets contain the settings for
setting up a print job. For details, refer to the Windows Print
Guide.
• On the Paper tab, check the Paper Feed setting and make sure that
it is set for Manual Feed. If this setting is set for Auto Feeder,
click Manual Feed.
To open the printer driver for Windows 3.1
• In your software application, pull down the Print Setup menu to
open the Print Setup dialog.
• If the BJC-50 has not be set as the Default Printer, click the
Specific Printer button, click the down-arrow in the entry box
below the Specific Printer heading, and select BJC-50 from the
pull-down list.
• Click the Options button.
• The Paper and Graphics tabs contain the settings for setting up a
print job. For details, refer to the Windows Print Guide.
• On the Paper control sheet, check the Paper Feed setting and make
sure that it is set for Manual Feed. If this setting is set for Auto
Feeder, click Manual Feed.
3
To check the settings for a DOS application
• Open the DOS software application and start the print setup
procedure so you can set or adjust the settings for the print job.
For details, refer to your DOS software application instructions.
2.
Make sure the printer driver and software application are set up for
the media you are going to print on. On the Paper control sheet of
the Windows printer driver, make sure the following items are set
correctly:
• For Media Type, the type of media should be selected (Plain
Paper, Coated Paper, Transparency, etc. ).
• For Paper Size, the appropriate Size should be selected for the
sheet you are loading (A4, Letter, etc.)
• For Orientation, make sure Portrait is selected.
• For Paper Feed, select Manual.
• For Graphics, you may want to click the Graphics tab to select a
setting appropriate for the content of the image on the Graphics
control sheet.
• For details, refer to the Windows Print Guide and the instructions
you received with your print media packet.
Chapter 3 Paper Handling
41
3.
Select one sheet of the media you want to load and hold the print
side up at the edge of the feed slot.
You must determine the correct print side of the sheet, based on the
type of media you are using. Refer to the table below.
Loading Table for Manual Feed
42
Name
Plain paper
Media Type
Plain Paper
Bubble Jet
Paper LC-301
Plain Paper
presentations,
etc.
Glossy Photo
Paper GP-301
High Resolution
Paper HR-101
Glossy Paper
Transparencies
CF-102
Transparency
High Gloss Film
HG-101
High Gloss
Film
Back Print Film
BF-102
Back Print Film
Matte side
up
Fabric Sheet
FS-101
Fabric Sheet
Cloth side
up
Chapter 3 Paper Handling
Coated Paper
Print Side
Either side
up
Either side
up
Purpose
General purpose
printing.
All purpose paper
for printing business
letters, tables,
graphs, charts,
colour
Glossy side Produces superior
up
results in printing
photographic
images.
Whiter side Produces vivid
up
graphics and nearphoto quality with
photographic
images.
Either side Produces colour
up
images for display
with an overhead
projector.
Specially designed
Glossy
to reproduce
side up
photographic
images in lustrous
colours.
Special mylar-based
translucent sheets
for printing colour
images to be
projected with a
backlighting device.
Printable white,
cotton fabric to
produce your own
embroidery designs,
pillows, appliqués,
and so on.
Name
Media Type
T-shirt Transfer
TR-201
(TR-101 in the
U.S.)
T-shirt Transfer Side with
green lines
face down.
Print Side
Purpose
Print on the sheet
then transfer the
colour image to a
cotton or polyestercotton blend T-shirt
with a hot iron.
Media Type: This is the name of the Media Type you will see after you pull down the
list for Media Type on the Paper control sheet of the Windows printer
driver.
4.
Slide the paper guide ➊ to the mark for the size of the media you are
loading.
5.
Hold the sheet with the print side up and align the left edge of the
sheet with the stopper ➋ on the left side of the front cover.
3
Stopper
2
3
A
4
Mark for the size
1
Paper guide
Chapter 3 Paper Handling
43
6.
Insert the paper straight into the printer ➌ (about 5 cm) until it stops.
Push the sheet in slightly and hold it in place for about two seconds.
The sheet will feed partially into the printer.
If the sheet is too narrow (less than 100 mm), or if the sheet is inserted
diagonally, the buzzer will beep once, the CHARGE/ERROR lamp will
light orange, and the printer will eject the paper from the feed slot. After
the sheet is inserted again correctly, the printer will reverse feed it
slightly and the buzzer will not beep. If POWER lamp is flashing, data
remains to be printed. Press the RESUME button to finish the print job.
7.
44
Start the print job with your software application.
Chapter 3 Paper Handling
Chapter 4
Performing Test Prints
In this chapter we will show you how to perform all the test prints with
the operation panel. These test prints can also be executed from the
Windows printer driver.
■ Starting the test prints
Follow this general procedure to perform any test print.
To avoid fouling the platen with wet ink, never attempt to perform a test
print on paper smaller than A4 or Letter size. You can print on either
side of plain paper.
1.
4
Check the table below and select the test you want to print.
Test Print
Demonstration
Printer Settings
Ripple Pattern
Nozzle Check Pattern
Hex Dump Mode
Font Sample
Number of Beeps
1
2
3
4
5*
6
See page
47
48
48
49
50
49
* The Hex Dump Mode is not a test print. This setting switches the
printer to hexadecimal dump mode.
2.
Switch off the printer by pressing the POWER button and wait for
the print head unit to return to the home position.
3.
Press and hold down the POWER button. Wait for the number of
beeps required for the test print you want then release the POWER
button. After you release the POWER button, the test print you
selected starts to print.
4.
5.
Load the printer with A4 or Letter paper. (☞43)
Press the RESUME button. The CHARGE/ERROR lamp goes off
and printing starts.
Chapter 4 Performing Test Prints
45
Samples and descriptions of each test print are provided on the
following pages.
In addition to starting the test prints, you can also use the POWER
button to change the printer default settings.
1.
2.
Press the POWER button to switch the printer off.
Press and hold down the POWER button and count the number of
beeps. Release the POWER button when you hear the number of
beeps for the defaults you want to set.
Default
LQ mode (USA)
BJ mode (USA)
LQ mode (Europe/Asia)
BJ mode (Europe)
BJ mode (UK/Asia)
No change
Number of Beeps
7
8
9
10
11
12
The following table lists the defaults for each setting.
Print Control Mode
Paper Selection
Print Mode
Reduction
Auto Power Off
Font
Code Page
Page Length
Character Set
Text Scale
Auto Line Feed
Auto Carriage Ret.
Auto Graphics Mode
Intl. Chara. Set
USA-LQ
LQ
LTR
HQ
1/1
ON
Roman
437
23 inch
Italic
OFF
CR
—
—
USA
HQ: High Quality.
46
Chapter 4 Performing Test Prints
USA-BJ
BJ
LTR
HQ
1/1
ON
Courier
437
11 inch
Set 1
OFF
CR
LF
OFF
—
Europe/Asia
LQ
A4
HQ
1/1
ON
Roman
437
23 inch
Italic
OFF
CR
—
—
USA
Europe-BJ
BJ
A4
HQ
1/1
ON
Courier
850
12 inch
Set 1
OFF
CR
LF
OFF
—
UK/Asia-BJ
BJ
A4
HQ
1/1
ON
Courier
437
12 inch
Set 1
OFF
CR
LF
OFF
—
■ Sample test prints
Demonstration
Provides an attractive demonstration of the printer’s capabilities and
describes some of the printer’s important features.
4
Chapter 4 Performing Test Prints
47
Printer settings
Lists the current settings for the printer. If you are using the printer with
DOS, this is a convenient way to check the settings for BJ Mode or LQ
Mode emulation.
Status Information Sample
Ripple pattern
The ripple pattern prints a stream of continuous characters from one
edge of the printable area to the other. This test print confirms that the
printer is printing uniformly over the entire page.
BJ Mode Ripple Pattern Sample
48
Chapter 4 Performing Test Prints
LQ Mode Ripple Pattern Sample
Nozzle Check Pattern
Prints a hatch pattern so you can check the performance of the print
heads. If the print heads become clogged, the lines will appear broken
or not complete. Normally, print head cleaning or print head flushing
will correct print head performance. (☞80)
4
Font Sample
Prints a font sample. If you are using the printer with DOS, the font
sample will print for the current emulation mode, BJ Mode or LQ
Mode.
If you want to stop printing, press the POWER button. The printer
switches off and the sheet is ejected.
BJ Mode Font Sample
Chapter 4 Performing Test Prints
49
LQ Mode Font Sample
Hexadecimal dump test
This printer has a hexadecimal dump function which prints out in
hexadecimal form all data sent from the host computer. This function
may be used to check data being sent to the printer.
To turn on the hexadecimal dump mode
1. Switch the printer off and wait for the print head to return to the
home position.
2.
Press and hold down the POWER button. Wait for the printer to
beep 5 times then release the POWER button.
3.
4.
Load the printer with a sheet of A4 or Letter size paper.
Send data to the printer. All data is printed in hexadecimal format.
To turn off the hexadecimal dump mode
Switch the printer off.
Hexadecimal Dump Sample
50
Chapter 4 Performing Test Prints
Chapter 5
Colour Printing and Black-andWhite Printing
■ Switching between colour printing and blackand-white printing
Before switching between colour printing and black-and-white printing,
you must adjust the settings with your software application and prepare
your printer by installing an appropriate BJ Cartridge.
Printing with Windows
Changing printer driver settings
You can change the settings of the Canon BJC-50 Printer Driver from
the Printer Setup dialogue box.
5
Setting up a software application
Some software applications allow you to select colour printing or blackand-white printing for each document. With such an application, you
may need to change the selection of colour or black-and-white printing.
Printing with DOS applications
Selecting a printer driver
To print in colour, you must select an appropriate printer driver for
colour printing from a printer selection menu that most DOS software
applications provide.
Setting up a software application
Some software applications allow you to select colour printing or blackand-white printing for each document. If the printer only prints in blackand-white even if you have selected a correct printer name for colour
printing, check the software application’s printer setup menu.
Chapter 5 Colour Printing and Black-and-White Printing
51
Preparing your printer
Depending on your printing needs, you may need to change the BJ
Cartridge. To print in colour, install a Color BJ Cartridge BC-11e. To
print a number of pages in black-and-white, install a Black BJ Cartridge
BC-10.
For black-and-white print jobs, we recommend that you use the Black BJ
Cartridge BC-10, not the Color BJ Cartridge BC-11e. The BC-10’s 128
nozzles deliver printing at higher speed.
Changing the BJ Cartridges
Follow the procedure below to change the BJ Cartridges. For example,
before you print a long report full of black-and-white text, replace the
Color BJ Cartridge BC-11e with a Black BJ Cartridge BC-10.
1.
Check the printer POWER lamp and make sure that it is on. If the
printer is off, press the POWER button to switch it on.
2.
Press the CARTRIDGE button on the operation panel. The
cartridge holder moves to the centre and the POWER lamp flashes.
If the print head is overheated, it may not move to the centre immediately.
Wait a few minutes for the print head to cool down. Never attempt to move
the cartridge manually by pushing it or pulling on the film cable.
3.
Open the top cover.
Film cable
When the top cover is open, never touch the orange film cable inside the
printer.
52
Chapter 5 Colour Printing and Black-and-White Printing
4.
With the tip of your finger, lift up the tab on the corner of the BJ
Cartridge then raise the cartridge and green print head unit out of the
cartridge holder.
Hold the green tab
to remove the BJ
Cartridge.
Always hold a BJ Cartridge by its sides and never touch the wet print
head or metal contacts.
5
Do not touch here!
Chapter 5 Colour Printing and Black-and-White Printing
53
5.
After removing the partially used BJ Cartridge, use the BJ Cartridge
Storage Container SB-10 supplied with the printer.
Align the marks on the BJ Cartridge with the marks on the container
and insert the BJ Cartridge into the container.
6.
Screw the lid onto the storage container until it stops then continue
twisting the lid until the mark on the lid is aligned with the mark on
the body of the storage container.
Always screw the lid on tightly to prevent the BJ Cartridge from drying
out.
Mark
7.
If you are installing a new BJ Cartridge, remove the BJ Cartridge
from its protective packaging.
Black BJ Cartridge BC-10
Color BJ Cartridge BC-11e
or
54
Chapter 5 Colour Printing and Black-and-White Printing
8.
If you are installing a new BJ Cartridge, remove the orange
protective cap and orange protective tape from the BJ Cartridge.
Protective tape
Protective cap
To avoid staining your clothing or articles in your work area, do not drop
or shake the BJ Cartridge. The ink in the BJ Cartridge can stain fabric
permanently.
9.
Insert the BJ Cartridge as shown below. Align the marks on the BJ
Cartridge and the cartridge holder (yellow-yellow, black-black).
Insert the BJ Cartridge to
align the marks (
).
5
Chapter 5 Colour Printing and Black-and-White Printing
55
10.
Press down on the high side of the BJ Cartridge until it snaps into
the cartridge holder.
11.
12.
Close the top cover.
Wait about three seconds and press the CARTRIDGE button once.
After the BJ Cartridge is installed, the printer requires at least two
seconds to detect the presence of the BJ Cartridge. The cartridge
holder moves to the home position, and the printer automatically
executes print head cleaning. Once print head cleaning is completed,
the printer is ready to print.
If print quality problems such as white streaks, missing dots, or
irregular dots are found in the initial printout, clean the print head.
(☞80)
56
Chapter 5 Colour Printing and Black-and-White Printing
■ Printing with a colour BJ Cartridge
The benefits of colour printing
Colour printing enables you to create documents that are easier to
understand, particularly if you are using coloured graphs for a
presentation.
5
Selecting the print media
The correct choice of media is particularly important for colour
printing.
The Canon BJC-50 is capable of printing not only on plain paper, but
also on envelopes, transparencies, and other media. Please use the
following guidelines when selecting a print media for your documents.
• Plain copier paper provides good results, and paper with cotton fibre
is also suitable for colour printing.
• For important presentations or documents that include intensive
graphics and colour, use High Resolution Paper HR-101, High Gloss
Chapter 5 Colour Printing and Black-and-White Printing
57
Film HG-101, Glossy Photo Paper GP-301, or similar products. The
printer will produce even more vivid colours with these media. When
printing on High Gloss Film or Glossy Paper, print on the glossy side
only.
• Use Glossy Photo Cards FM-101 when creating photo greeting cards.
This media allows you to make beautiful, borderless cards. When
printing on this media, be sure to print on the side with the glossy
finish.
• For overhead presentations, use Transparencies CF-102. Do not use
copier transparencies as they cannot absorb the ink.
• If back-lighting is available for your presentation, you can use Back
Print Film BF-102. This print medium is a mylar translucent sheet on
which colours appear very vivid when shown with a back-lighting
device.
• To print colour designs and patterns on cloth, use Canon Fabric Sheet
FS-101. Use your favourite software to produce an original design
then print the design on the fabric sheet. Create materials for pillows,
gift bags, stuffed animals, hand puppets, appliqués and so on.
• You can also produce original designs on T-Shirt Transfer TR-201
(TR-101 in the U.S.) and transfer them with a hot iron to cotton or
cotton-polyester blend T-shirts.
• For envelopes, use European DL size (220 x 110 mm) or U.S.
Commercial 10 (241 x 105 mm (9.5 x 4.1 inches)).
• When you use special print media, make sure that you always print on
the correct side. For details, refer to the table for loading special
media. (☞42)
Understanding your software application’s
capabilities
The Canon BJC-50 can print a large number of different colours. Your
software application determines which colours you can use. The
software application may support all 16.7 million colours or may be
limited, as follows:
• A limited number of colours, such as the basic eight: red, green, blue,
cyan, yellow, magenta, black, and white.
58
Chapter 5 Colour Printing and Black-and-White Printing
• A limited number of colours plus shades of those colours. Shades are
created by adding white or using different colour patterns.
• A limited number of colours plus custom colours. For example,
mixing red and blue for purple.
Matching Colours displayed on your monitor with
printouts
Colours are displayed on a video monitor by mixing the colours red,
green, and blue (the three
primary colours of visible light) in Yellow
the
Red
amounts required to produce any given colour. This sort of display
technology is called RGB. In the RGB method, the more intense the
colours you mix, the brighter the colour becomes.
Green
RGB method
Blue
Magenta CMYK
method
Cyan
5
Printing technologies, on the other hand, employ the three primary
colours cyan, magenta, and yellow, plus black (or K) to produce colour
effects. This method is called CMYK. In the CMYK method, the more
of a given colour you add to a mixture of colours, the darker the
resultant colour becomes.
As these paragraphs illustrate, the methods used to produce colour in
displays and printers are completely different. Other factors that can
affect the perception of colour are the quality of paper, type of print
media, and differences in the source of light in use when viewing the
colours. For these reasons, it is impossible to avoid some differences in
the perceived colour of a document or image viewed on a monitor, and
the same image in printed form. In order to achieve a printed result
which looks like the image displayed on the screen of a monitor, you
must first make the appropriate settings to both the software application
and the printer.
Chapter 5 Colour Printing and Black-and-White Printing
59
Adjustments made to the monitor
If you have high quality monitor capable of finely controlling the
amount of light allocated to each component of the RGB mix of
colours, it is possible to adjust the colours appearing on the screen in
such a way as to approximate the printed result. However, normal
monitors allow only rough control of brightness and contrast, control
which is applied indiscriminately to the entire screen and is not very
effective for anything more than rough adjustment of the appearance of
whole screen images. We recommend selection of a highly reliable
monitor which suffers from as little deviation in the reproduction of
colours as possible.
Some software applications allow you to adjust the Gamma value, a
value which adjusts the contrast of a colour. One rule of thumb holds
that a monitor Gamma value of about 1.4 brings the colours displayed
on a monitor into close agreement with the colours displayed on the
printed page.
Adjustment of colour from within software applications
When the software application allows adjustment of colour, the
appearance of colours on the monitor screen can be adjusted after
comparison with printed results.
Normally, colours are adjusted according to the procedure outlined
below. For further information about how to adjust colours, see the
documentation accompanying your software application.
• First, print out a colour sample using the CMYK method, and adjust
the colours appearing on the monitor screen as you compare them to
the printed result. This process is called colour calibration. By
performing this calibration, it is possible to bring the colours
displayed on the monitor screen and on the printed page into closer
match.
• If your software application uses a colour palette to set colour levels,
it is possible to finely tune the appearance of a particular colour by
adjusting the colour palette.
• If your software application permits you to adjust the colours over the
entire screen through use of a colour balance, you can make
adjustments like washing out red colours or strengthening yellows
over the entire screen at a single stroke.
60
Chapter 5 Colour Printing and Black-and-White Printing
Colour and cost
Printing in colour costs more than printing in black ink only. To reduce
the cost of colour printing, follow these guidelines:
• When printing monochrome images, install the Black BJ Cartridge
BC-10.
• When printing spreadsheet-type graphs, choose coloured hatch
patterns instead of solid colours. Hatch patterns typically use less ink
and look just as good as solid colours.
• Use lighter colours that use more white space; for example, pink
instead of red. Although white is a colour, the printer does not
produce white ink; it uses the colour of the paper as white.
• Avoid using full-colour backgrounds. For colour presentations that
do contain a full-colour background, print the background for the
final output only, not for drafts.
• Some software applications allow you to print several pages of data
on one page in condensed size. If available, use this mode for printing
multiple pages quickly at a lower cost.
5
Chapter 5 Colour Printing and Black-and-White Printing
61
Chapter 6
Maintaining the Printer
This chapter covers the care and maintenance of your Canon BJC-50
printer including instructions for transporting, storing, and cleaning the
printer, replacing BJ Cartridges, and cleaning the print head.
Your printer requires little maintenance but to keep it in top operating
condition, you should perform the following routine maintenance.
■ Recharging and replacing the battery pack
This section shows you how to recharge and replace your battery pack.
Install and use only a Canon Li-Ion Battery LB-50 in this printer. You
must install the battery pack and leave it installed in the printer even if
you intend to use the printer only with the AC adapter. If the battery pack
is not installed, the printer CHARGE/ERROR lamp will light orange and
the printer will beep six times.
Recharging the battery pack
When the power in the battery pack runs low, the CHARGE/ERROR
lamp flashes orange and the printer beeps four times. When the power
in the battery pack is depleted, the CHARGE/ERROR lamp lights
orange and the printer beeps twice (one long and one short beep).
Follow this procedure to recharge the battery pack.
NEVER ATTEMPT TO RECHARGE THE BATTERY PACK WITH
ANYTHING OTHER THAN THE UNIVERSAL AC ADAPTER AD-360U
SUPPLIED.
For best results, charge the battery pack at room temperature 10°C to
30°C (50°F to 86°F). The battery pack will recharge very slowly at low
temperature and will not charge fully at high temperature.
62
Chapter 6 Maintaining the Printer
1.
Press the POWER button to switch the printer off.
CARTRIDGE
POWER
2.
RESUME
CHARGE
ERROR
Connect the power cord to the AC adapter ➊, insert the DC plug
into the printer ➋, and insert the power cord into a power source ➌.
3
2
1
6
The CHARGE/ERROR lamp will remain illuminated green until
the battery pack is completely recharged.
3.
When the CHARGE/ERROR lamp goes off, you can disconnect
the AC adapter.
• The battery pack requires six hours (maximum) to recharge.
• The battery pack may become warm during a long print job and may
not start recharging until it has cooled (max. 30 minutes).
Chapter 6 Maintaining the Printer
63
Replacing the battery pack
Follow this procedure to replace the battery pack.
You can replace the battery pack at any time. You may want to
purchase and carry extra battery packs for emergencies. However,
please remember that new battery packs must be fully charged before
you can use them. Before you travel, make sure new battery packs are
fully charged.
You must also replace a battery pack after it is exhausted. The
CHARGE/ERROR lamp will flash and the printer will beep six times
when the battery pack becomes exhausted. After the battery pack is
exhausted, ti cannot be recharged and used again.
HANDLE THE BATTERY PACK CAREFULLY BY FOLLOWING THE
GUIDELINES DESCRIBED ON PAGE 21.
64
1.
2.
3.
4.
Press the POWER button to switch the printer off.
5.
Remove the battery pack from the printer.
If the optional sheet feeder is installed on the printer, remove it.
If the front cover is closed, open it.
Push the battery pack release to the right. The battery pack will
spring slightly out of the printer.
Chapter 6 Maintaining the Printer
6.
7.
8.
9.
10.
Remove the new battery pack from its packaging.
Align the mark on the printer ( ) with the mark on the battery pack
( ) and insert the left end of the battery pack into the printer at a
slight angle.
Push in the right side of the battery pack to lock it in place.
Close the front cover.
If you have just installed a new battery pack, you must allow it to
charge before you can use it. Just leave the AC adapter connected to
the printer and the power outlet. The battery pack will charge while
the printer is switched off or on. About six hours (maximum) is
required for the battery pack to fully charge.
6
If you have replace an exhausted battery pack, dispose of the battery
pack according to the regulations in your country. For details, contact
your Canon Authorised Dealer or Canon Representative.
Chapter 6 Maintaining the Printer
65
■ Replacing ink cartridges
In this section we show you how to handle and replace the ink
cartridges.
Handling ink cartridges
BJ Cartridges and ink cartridges should be used within six months of
purchase to ensure optimum printing. To avoid leaking or drying,
follow these simple precautions:
• Never attempt to disassemble an ink cartridge.
• Never shake an ink cartridge.
• Never unpack an ink cartridge until you are ready to install it.
• Do not remove ink cartridges from the BJ Cartridge unnecessarily.
• To prevent drying out the print head, never use the print head unit
with an ink cartridge missing.
• Always install an ink cartridge as soon as you remove the protective
cap and tape.
• Keep unused ink cartridges out of the reach of children, and discard
used ink cartridges immediately. If spilled, the ink is difficult to
clean.
66
Chapter 6 Maintaining the Printer
Examining the ink cartridges
The Color BJ Cartridge BC-11e employs the Ink Cartridge BCI-11
Color and the Ink Cartridge BCI-11 Black.
Ink Cartridge
BCI-11 Color
Ink Cartridge
BCI-11 Black
When the colour
ink runs out,
replace this ink
cartridge.
When the black ink
runs out, replace
this ink cartridge.
Print head unit
Print head
Color BJ Cartridge BC-11e
The Black BJ Cartridge BC-10 employs only one ink cartridge.
Ink Cartridge
BCI-10 Black
When the black ink runs
out, replace this ink
cartridge.
Print head unit
6
Print head
Black BJ Cartridge BC-10
Chapter 6 Maintaining the Printer
67
Replacing an ink cartridge
Replace an ink cartridge when it runs out of ink. The frequency of
changing the ink cartridges will vary according to how the printer is
used. If you frequently print images of heavy density, you will need to
change the ink cartridges more often. For details about cartridge
capacity, refer to the specifications at the end of this user’s guide.
(☞129)
1.
Check the POWER lamp and make sure that it is switched on. If the
printer is off, switch it on.
2.
Press the CARTRIDGE button. The cartridge holder moves to the
centre and the POWER lamp starts flashing.
If the print head is overheated, it may not move to the centre
immediately. Wait a few minutes for the print head to cool down. Never
attempt to move the cartridge manually by pushing it or pulling on the
film cable.
3.
Open the top cover.
Film cable
When the top cover is open, never touch the orange film cable inside
the printer.
4.
Release the hook on the ink cartridge and raise it up as shown in the
illustration below.
Dispose of the ink cartridge immediately.
You may want to place it in a plastic bag to keep from spilling any ink.
68
Chapter 6 Maintaining the Printer
Ink Cartridges BCI-11 Color and Black
Press this
white hook to
remove the
colour ink
cartridge.
Press this grey
hook to
remove the
black ink
cartridge.
Do not press the green
tab! This is for BJ
Cartridge replacement.
Be sure to leave the
green print head unit in
the printer.
Ink Cartridge BCI-10 Black
Press this grey hook to remove the
ink cartridge.
6
Do not press the green tab!
This is for BJ Cartridge replacement.
Be sure to leave the green print head
unit in the printer.
DO NOT TOUCH THE INTERIOR OF THE CARTRIDGE HOLDER,
THE BASE OF THE PRINT HEAD UNIT, THE PRINT HEAD, THE FILM
CABLE, OR THE INK CARTRIDGE FILTERS WHEN CHANGING THE
INK CARTRIDGE.
When replacing an ink cartridge, remove only the empty ink cartridge
and leave the print head unit in the cartridge holder to avoid soiling your
hands.
Chapter 6 Maintaining the Printer
69
5.
Remove the orange protective cap from the new ink cartridge.
Cap
Cap
Ink Cartridge BCI-11 Black
Ink Cartridge BCI-11 Color
Do not touch or insert anything into the filter on the ink cartridge.
Do not touch or insert
anything into these filters.
Do not touch or insert
anything into this filter.
70
Chapter 6 Maintaining the Printer
6.
Position the new ink cartridge so that its filter is on the bottom, and
insert it as shown in the illustration below.
BCI-11
BCI-10
Insert the ink cartridge
to align the marks
(
).
7.
Press down gently on the high side of the ink cartridge until the ink
cartridge clicks into the print head unit.
BCI-11
BCI-10
6
Chapter 6 Maintaining the Printer
71
8.
9.
Close the top cover.
Press the CARTRIDGE button. The cartridge holder moves to the
home position and the printer starts cleaning the print head.
■ Replacing BJ Cartridges
Follow this procedure to replace or exchange a BJ Cartridge.
Before you replace a worn BJ Cartridge...
When a print head becomes worn out, the printing is no longer crisp and
clear, gaps may appear in characters, and lines may appear broken or
not complete. However, these and similar problems can also be caused
by a clogged print head.
Before you decide to replace the BJ Cartridge, always clean the print
head to confirm that the problem is not a clogged print head.
1.
2.
Print a Nozzle Check Pattern. (☞45)
3.
Print another Nozzle Check Pattern. If the pattern is still poor, flush
the print head twice. (☞80)
4.
If print head flushing fails to correct the problem, follow the
procedure below to replace the BJ Cartridge.
If the quality of the pattern is poor, clean the print head four or five
times. (☞80)
Replacing a BJ Cartridge
Follow this procedure to replace the BJ Cartridge.
The Black BJ Cartridge BC-10 and Color BJ Cartridge BC-11e were
designed specially for this printer. Never attempt to use any other type of
cartridge with this printer.
72
1.
Check the printer POWER lamp and make sure that it is switched
on. If the printer is off, press the POWER button to switch it on.
2.
Press the CARTRIDGE button. The cartridge holder moves to the
centre and the POWER lamp flashes.
Chapter 6 Maintaining the Printer
If the print head is overheated, it may not move to the centre
immediately. Wait a few minutes for the print head to cool down. Never
attempt to move the cartridge manually by pushing it or pulling on the
film cable.
3.
Remove the BJ Cartridge and install a new BJ Cartridge. Follow the
same procedure used to replace a Color BJ Cartridge BC-11e with a
Black BJ Cartridge BC-10. (☞72)
Dispose of the old BJ Cartridge immediately.
You may want to place it in a plastic bag to prevent spillage from the
print head.
4.
Press the CARTRIDGE button.
The cartridge holder moves to the home position and the printer
starts cleaning the print head. After print head cleaning is
completed, the printer is ready for operation.
■ Installing the Color Image Scanner Cartridge
IS-12
The printer can be converted to a colour image scanner by installing the
optional Color Image Scanner Cartridge IS-12. This section describes
how to install and remove the Scanner Cartridge. For details about
operating the printer as a scanner, see the Color Image Scanner
Cartridge IS-12 User’s Manual.
6
Removing the BJ Cartridge
Follow this procedure to remove the BJ Cartridge.
1.
Check the printer POWER lamp and make sure that it is on. If the
lamp is off, press the POWER button to switch the printer on.
2.
Press the CARTRIDGE button. The cartridge holder moves to the
centre.
You must install and use the IS Scan 1.20 scanner driver or higher. Earlier
versions of this scanner driver do not work correctly with the BJC-50.
Chapter 6 Maintaining the Printer
73
3.
Open the top cover.
Film cable
When the top cover is open, never touch the orange film cable inside
the printer.
4.
With the tip of your finger, lift up the green tab on the corner of the
BJ Cartridge then raise the cartridge and green print head unit out of
the cartridge holder.
Hold the green tab
to remove the BJ
Cartridge.
Make sure that you remove the whole BJ Cartridge, not just the ink
cartridges.
5.
74
Place the BJ Cartridge with its ink cartridges in a BJ Cartridge
Storage Container SB-10.
Chapter 6 Maintaining the Printer
6.
To prevent the print head from drying out, close the lid on the
container tightly. If the print head dries out, it will no longer be able
to print.
Installing the Scanner Cartridge
Follow this procedure to install the Color Image Scanner Cartridge
IS-12.
1.
Remove the Scanner Cartridge from its protective soft case.
Save the case! You will need it to store the Scanner Cartridge when it is
not installed on the printer.
2.
With its label facing up, place the Scanner Cartridge in the cartridge
holder.
6
Film cable
Insert the Scanner
Cartridge so the marks
are aligned. (
).
When the top cover is open, never touch the orange film cable inside
the printer.
Chapter 6 Maintaining the Printer
75
3.
Press down gently on the high side of the Scanner Cartridge until it
snaps in place.
4.
Wait about three seconds and press the CARTRIDGE button once.
After the Scanner Cartridge is installed, the printer requires at least
two seconds to detect the presence of the Scanner Cartridge, then the
Scanner Cartridge moves to the home position.
5.
Close the top cover.
Removing the Scanner Cartridge
Remove the Scanner Cartridge as soon as you are finished scanning and
replace it with a BJ Cartridge.
To avoid problems with printer and Scanner Cartridge operation, never
leave the Scanner Cartridge in the printer longer than necessary. Always
remove the Scanner Cartridge and store it when it is no longer in use.
76
1.
Check the printer POWER lamp and make sure that it is on. If the
lamp is off, press the POWER button to switch the printer on.
2.
Press the CARTRIDGE button. The cartridge holder moves to the
centre.
Chapter 6 Maintaining the Printer
3.
Open the top cover.
Film cable
When the top cover is open, never touch the orange film cable inside
the printer.
4.
With the tip of your finger, lift up the tab on the Scanner Cartridge
then raise it out of the cartridge holder.
6
Tab
5.
Store the Scanner Cartridge in its protective soft case.
6.
Remove the BJ Cartridge from the BJ Cartridge Storage Container
SB-10.
Chapter 6 Maintaining the Printer
77
7.
Insert the BJ Cartridge into the cartridge holder diagonally so the
points of the small triangle marks align (yellow-yellow, blackblack).
8.
9.
Press down gently on the BJ Cartridge until it clicks into place.
10.
11.
Press the CARTRIDGE button once. The printer starts cleaning the
print head. After print head cleaning is completed, the cartridge
holder moves to the home position.
Close the top cover.
Make sure you install the IS Scan scanner driver supplied on disk
with the printer. For details, refer to the supplemental sheet for
scanner diver installation.
You must install and use the IS Scan 1.20 scanner driver or higher. Earlier
versions of this scanner driver do not work correctly with the BJC-50.
■ Cleaning the printer
Before you start cleaning
You should clean the printer regularly to avoid printing problems.
Follow these simple guidelines when you clean the printer:
• Before you clean the printer, press the POWER button to switch the
power off, unplug the AC adapter from the power source, and remove
the battery pack from the printer. (☞64)
• Use only a soft cloth to clean the printer. Do not use paper towels or
tissues.
• Do not clean the grease from the cartridge rail.
• To avoid damaging the surface of the printer, do not clean the printer
body with volatile liquids such as thinners, benzene, or any chemical
or spray cleaners.
• When cleaning the printer, avoid the area near the print head on the
BJ Cartridge. Do not touch the print head, film cable and other
delicate parts.
• Never submerge the printer in water.
78
Chapter 6 Maintaining the Printer
Cleaning inside and outside the printer
1.
Open the top cover.
Film cable
When the top cover is open, never touch the orange film cable inside
the printer.
2.
Clean the platen.
The platen, which holds the paper in position during ink transfer,
may be soiled after a paper jam or other paper feed problems. When
the platen is soiled with ink, the back or edge of the printed sheet
may be smudged. Use a soft, dry cloth to wipe the platen clean.
Platen
6
Instruction plate
WHILE YOU ARE CLEANING THE INSIDE OF THE PRINTER, DO
NOT BEND THE INSTRUCTION PLATE.
Chapter 6 Maintaining the Printer
79
3.
Clean the underside of the top cover. Ink residues may collect in this
area.
Cleaning the print head
You should start print head cleaning when your print quality is poor.
There are two methods of print head cleaning:
• Cleaning: Requires about 30 seconds and can improve print quality.
• Flushing: Requires about 60 seconds and corrects severe nozzle
clogging. Because Flushing consumes a lot of ink, execute flushing
only when the print quality does not improve after repeated cleaning.
You can start cleaning or flushing the print head with the Windows
printer driver or the operation panel. For details about starting cleaning
or flushing with the Windows printer driver, refer to the Windows Print
Guide.
To start cleaning/flushing from the operation panel:
1.
Press and hold down the RESUME button.
To start print head cleaning, hold down the RESUME button until
you hear two beeps then release it. Cleaning requires about 30
seconds.
To start print head flushing, hold down the RESUME button until
you hear three beeps then release it. Flushing requires about 60
seconds.
2.
80
To check the performance of the print head, print a Nozzle Check
Pattern. (☞45)
Chapter 6 Maintaining the Printer
■ Preparing the printer for travel or storage
Follow the procedure below before you transport or store the printer.
1.
Press the POWER button to switch off the power. This secures the
cartridge holder in the home position.
2.
On the right side of the printer, slide the power lock switch to the
left position. This locks the printer off so it cannot be switched on
accidentally during transportation.
The next time you use the printer, make sure that you slide the power
lock switch to the right position before you press the POWER button to
switch the printer on.
3.
4.
If the optional sheet feeder is attached, remove it.
5.
If the AC adapter is connected, disconnect it from the printer and the
power outlet.
6.
Make sure that the top cover is closed.
If the BIFC-50 printer cable is connected, disconnect it from the
printer and computer.
Chapter 6 Maintaining the Printer
6
81
7.
If you are going to store the printer for a prolonged period (three
months or more), remove the battery pack.
You do not have to remove the battery pack to transport the printer.
Remove the battery pack only if you are going to store the printer for a
prolonged period (three months or more).
• Open the front cover.
• Push the battery pack release to the right. The battery pack will
spring slightly out of the printer.
• Remove the battery pack and close the front cover.
8.
Replace the printer and accessories in the original packing materials
for storage, or place them in a suitable carrying case for transport.
• It is not necessary to remove the BJ Cartridge and ink cartridges
from the printer for transport.
• When travelling on an aeroplane, always pack the printer with
your hand luggage items to minimise shocks and vibrations to the
printer.
• Avoid leaving the printer in a closed automobile where it may be
exposed to extremes of temperature or humidity.
The printer can safely be sent through airport security X-ray machines.
82
Chapter 6 Maintaining the Printer
Chapter 7
Troubleshooting
If you experience problems during printing, first check your software
application settings and make sure you have selected the correct printer
driver, page size, and so on.
Print a demonstration or one of the test patterns. (☞45)
If the test prints successfully, the problem is not inside the printer, so
first check the printer cable connection at the printer and your computer.
A loose connection can generate random errors and messages that can
waste valuable time and effort in trying to identify the problem.
Switch the printer off and switch it on again. Try the print again. If the
problem persists, read the check list below and try to solve the problem.
■ Check List
Problem
Errors Indicated by the CHARGE/ERROR lamp
See Page
84
Clearing Paper Jams
86
Operational Problems
Printer does not switch on
POWER lamp comes on, but printer does not print
BJ Cartridge moves, but print does not appear
Ink runs out sooner than expected
Paper does not eject after printing
87
88
88
88
89
Print Quality Problems
White streaks, dots missing, or irregular dots
Printout is not clear
Characters are blurred or smudged
Smudges on back or edge of printed page
Output appears jagged
89
91
91
91
91
Colour Printing Problems
Printer prints only in black-and-white
Colours are broken or uneven
Colours print incorrectly
Printing is slow
92
92
93
93
7
Chapter 7 Troubleshooting
83
Problem
See Page
Other Printing Problems
Strange characters
94
Print job halts before completion
95
Characters on the screen do not match printed characters 96
Printing beyond edge of page
96
IrDA printing stops and paper is ejected
96
Printer prints incorrect number of lines on a page
96
Computer indicates a device time-out
97
Printouts are incomplete (only 50% to 75% of the page )
or printed with large white bands
97
■ Errors indicated by the CHARGE/ERROR lamp
CHARGE/ERROR lamp lights and and buzzer beeps once.
If the sheet is too narrow (less than 100 mm), or if the sheet is inserted
diagonally, the buzzer will beep once, the CHARGE/ERROR lamp
will light orange, and the printer will eject the paper from the feed slot.
After the sheet is inserted again correctly, the printer will reverse feed it
slightly and the buzzer will not beep. If POWER lamp is flashing, data
remains to be printed. Press the RESUME button to finish the print job.
CHARGE/ERROR lamp lights and stays on and buzzer beeps
twice.
The printer could not eject the paper correctly because the paper is over
58 cm long (23 in.). Remove the paper. Break the print job into shorter
pages. The printer cannot feed and eject paper longer than 58 cm
(23 in.).
CHARGE/ERROR lamp lights and stays on and buzzer beeps
three times.
No BJ Cartridge is installed on the printer. Install a BJ Cartridge. (☞28)
CHARGE/ERROR lamp lights and stays on and buzzer beeps
six times.
The battery pack is not installed correctly in the printer. Press the
POWER button to switch the printer off and install the battery pack.
(☞19) Press the POWER button to switch the printer on again. If the
problem persists, replace the battery pack. (☞62) To avoid problems
with the battery pack, always use the printer within the correct
temperature range of 0°C to 35°C (32°F to 95°F).
CHARGE/ERROR lamp flashes green when power is off.
Battery pack is damaged. Replace the battery pack. (☞62)
Buzzer beeps six times when power is on.
Battery pack is damaged. Replace the battery pack (☞62)
84
Chapter 7 Troubleshooting
CHARGE/ERROR lamp flashes and buzzer beeps once.
The printer could not feed the paper or special media correctly. Hold the
printer steady with one hand and then pull the sheet from the printer
slowly. Reload the sheet straight into the printer with the left edge of the
sheet perfectly aligned with the left side of the feed slot.
CHARGE/ERROR lamp flashes and buzzer beeps three times.
The cartridge has automatically moved to the home position. Press the
CARTRIDGE button again to move the cartridge holder to the centre.
CHARGE/ERROR lamp flashes and buzzer beeps four times.
The battery pack charge is low and the printer will switch off
automatically in about five minutes. To finish a short print job in
progress, press the RESUME button to continue printing. If possible,
use the AC adapter to power the printer and complete the print job.
Recharge the battery pack. (☞62)
CHARGE/ERROR lamp flashes and buzzer beeps five times.
The internal ink waste tank is almost full. To finish a print job in
progress, press the RESUME button and continue printing. Contact
your Canon Authorised Dealer or supplier as soon as possible.
CHARGE/ERROR lamp flashes and buzzer beeps six times.
The battery pack has been exhausted and cannot be recharged. Discard
the used battery pack and replace it with a new one. (☞64). Dispose of
the battery pack according to the regulations in your country For details,
contact your Canon Authorised Dealer or Canon Representative.
CHARGE/ERROR lamp lights orange and the printer beeps
twice, one long and one short beep.
The power in the battery pack is depleted. In order to continue using the
printer, you must connect the AC adapter. Recharge or replace the
battery pack. (☞62)
7
CHARGE/ERROR lamp and POWER lamp flash together and
the buzzer beeps once, twice, four times, six to seven times,
or 11 to 12 times.
An internal system error has occurred. Switch the printer off and
disconnect the AC adapter. Connect the AC adapter again, switch on the
printer, and perform some test prints. Usually this solves the problem,
but if the problem persists, stop using the printer and contact your
Canon Authorised Dealer or supplier.
Chapter 7 Troubleshooting
85
■ Clearing paper jams
86
1.
Gently pull the paper out of the printer with one hand while holding
the printer in place with the other. You can pull the paper out from
the front or the rear of the printer.
2.
If the paper tears off inside the printer, switch off the printer and
open the top cover. Remove the remaining paper, taking care not to
touch the film cable.
3.
Press the POWER button to switch the printer on again. The printer
is now ready to print.
4.
Open the top cover and check the platen. If the platen is soiled and
the reverse side of your output is stained with ink after a paper jam
occurs, clean the platen inside the printer. (☞79)
• If paper jams occur repeatedly, you may be loading the paper
incorrectly, or using the wrong kind of paper.
• Make sure that you are loading and feeding the paper or special
media correctly. (☞42)
Chapter 7 Troubleshooting
■ Operational problems
This section describes solutions to various problems you may have with
the operation of your printer. Each section contains several solutions.
Try them in the order listed.
Printer does not switch on
When you switch on the printer, the POWER lamp flashes until
automatic print head cleaning is completed. The POWER lamp lights
and stays on when the printer is ready for normal operation. If the
POWER la0mp is not on, the printer is not receiving power.
1.
If the power lock switch is in the left position, slide it to the right.
When the power lock switch is in the left position, it locks the power
switch off so it cannot be switched on accidentally during transportation.
2.
If the AC adapter is not attached, check the CHARGE/ERROR
lamp. If the CHARGE/ERROR lamp lights orange, this means the
battery pack requires charging. Switch off the printer and connect
the AC adapter. The CHARGE/ERROR lamp will remain
illuminated green until the battery pack is completely recharged.
7
If you want to use the printer immediately, just connect the AC adapter
and use the printer. When you switch off the printer, leave the AC
adapter connected so the battery pack will be continue recharging.
3.
If the AC adapter is connected and the POWER lamp is not on,
check the AC adapter connector on the right side of the printer and
make sure it is completely inserted into the printer.
4.
Make sure the AC adapter is plugged securely into a power outlet. If
the AC adapter is connected to a power strip, make sure that the
power strip is switched on and connected to a power outlet.
Chapter 7 Troubleshooting
87
POWER lamp comes on, but printer does not print
1. Check the printer cable connection. You must use the Canon Printer
Cable BIFC-50 supplied with this printer. Make sure the
connections are secure on the printer and on the computer.
2.
If you are using an IrDA connection, make sure the IrDA interface
ports on the printer and computer are facing one another and not
more than one metre apart. (☞23) Check the Windows 95 Printers
setup and make sure that the BJC-50 is selected as the default
printer. Check the Details sheet of the BJC-50 printer driver and
make sure an available COM port is selected for the IrDA interface.
3.
4.
Make sure the computer is set up correctly for your printer.
Make sure that your software application is set up correctly for your
printer.
BJ Cartridge moves, but printed text/graphics does not
appear
1. Make sure that the BJ Cartridge and its ink cartridges are properly
installed.
2. If print does not appear after print cartridge installation, make sure
that you have removed the protective cap and the protective tape
from the BJ Cartridge. (☞31)
3.
The nozzles on the print cartridge may be clogged. Clean the print
head. (☞80)
4.
If printed text/graphics does not appear after performing the print
head cleaning once or twice, the ink cartridge is empty. Replace it
with a new one. (☞66)
Ink runs out sooner than expected
Make sure you do not press the CARTRIDGE button and move the BJ
Cartridge to the centre unnecessarily. The printer executes print head
cleaning automatically every time you move the BJ Cartridge in this
way. This consumes ink.
88
Chapter 7 Troubleshooting
Paper does not eject after printing
Most software applications instruct the printer to eject the last sheet
after printing. However, occasionally you may need to eject a sheet
manually.
1.
2.
If there is data waiting to print, the POWER lamp flashes.
To print the last sheet, press the RESUME button.
A sheet of paper is ejected upon starting up Windows 98
This problem occurs when virtual device driver DRVWPPQT.VXD is
loaded upon starting Windows 98. Search for the file
DRVWPPQT.VXD on your hard disk and delete it if found. Ordinarily,
DRVWPPQT.VXD is located in the Windows¥System¥losubsys folder
or the Arcada¥System folder.
■ Print quality problems
Some print quality problems result from using the wrong media or print
mode. There may also be a problem with the print head or ink cartridge.
If the quality of your printout does not match your expectations, check
the list of problems and solutions below.
White streaks, dots missing, or irregular dots
If white streaks (see example below) or irregular dots appear on the
printout, or if there seem to be dots missing, the print head may be
clogged with ink, paper particles, or dust.
Clean the print head to restore print quality. (☞80)
Print sample with white streaks (clogged print head)
7
Chapter 7 Troubleshooting
89
Normal print sample
To clean the print head
1. If print quality deteriorates as described above, first clean the print
head. Press and hold down the RESUME button until you hear two
beeps then release it. Cleaning requires about 30 seconds.
2.
After cleaning is completed, print the Nozzle Check Pattern to see if
the print quality has been restored. (☞45) If horizontal lines are
missing on the Nozzle Check Pattern, the print head may be still
clogged.
3.
Clean the print head unit once again.
• If a printed page or the Nozzle Check Pattern is almost blank after
one or two cleanings, the ink cartridge has run out so replace it
with a new one. (☞66)
• If print quality is not restored after replacing the ink cartridge,
start flushing.
To start flushing
1. Press and hold down the RESUME button for about six seconds
until you hear three beeps. Flushing requires about 60 seconds.
90
2.
After executing flushing once or twice, print a page or the Nozzle
Check Pattern. (☞45) If you see irregular dots or lines on the printed
page, this means the print head has worn out.
3.
Replace the BJ Cartridge with a new one. (☞72)
Chapter 7 Troubleshooting
Printout is not clear
1. Make sure that you are using a recommended media. (☞42)
2.
Some copier paper has a right side and a wrong side. If the print
quality is poor, try turning the paper over and printing on the other
side.
3.
If the printout is faint, you may be printing in HS mode, which uses
only half the ink of the HQ mode. Open the printer driver and
change the setting.
4.
The print head nozzles may be clogged. To clean the print head,
press and hold down the RESUME button until the printer beeps
once.
Characters are blurred or smudged
1.
2.
Make sure that you are using a recommended media. (☞42)
3.
Check the print mode. If the printout is stained with ink, try using
the Fine mode. Open the printer driver and change the setting.
Some copier paper has a preferred side. If the print quality is poor,
try turning the paper over and printing on the other side.
7
Smudges on back or edge of printed page
If the printer platen has been soiled by a paper jam or by printing
beyond the paper edges, the reverse side of the printed page may have
smudge marks. Clean the platen. (☞79)
Output appears jagged
Check your software application to see what printing resolution you
have selected. Printing at 180 dpi will give the output a jagged look.
Changing the resolution to 360 dpi should correct this problem.
Chapter 7 Troubleshooting
91
■ Colour printing problems
This section contains solutions for problems you may encounter when
printing in colour.
Printer prints only in black-and-white
If you are printing from a software application that supports colour
printing but your output is only in black ink, follow these steps.
1.
Make sure that you selected the BJC-50 printer driver or a
compatible driver for another colour printer.
2.
When you print from a DOS software application, make sure that
you use the BJC-50 printer driver, or you use a compatible driver for
another colour printer and the printer is set to LQ mode.
3.
Make sure the colour ink cartridge still contains ink to print the
Nozzle Check Pattern. (☞45) If any part of the colour pattern is
blank, the colour ink cartridge has run out of ink. Replace the empty
ink cartridge. (☞66)
Colours are broken or uneven
If colours are broken, uneven, or vary from line to line, follow these
steps.
92
1.
The print mode may be inappropriate for your graphics resolution. If
you are printing high-density graphics, set the printer driver to Fine
mode.
2.
If you are generating a thin line in a non-primary colour (not cyan,
magenta, or yellow), the software may tell the printer to dither the
line by printing alternate coloured dots and blank white areas. To
correct this, choose cyan, magenta, or yellow.
3.
Make sure the colour ink cartridge still contains ink to print the
Nozzle Check Pattern. (☞45) If any part of the colour pattern is
blank, the colour ink cartridge has run out of ink. Replace the empty
ink cartridge. (☞66)
Chapter 7 Troubleshooting
Colours print incorrectly
If the colours in your printout do not match the colours on your screen,
verify that you have selected the BJC-50 printer driver or a compatible
driver.
Some colours are impossible to match exactly. The printer will match as
closely as possible.
Printing is slow
If your printer seems extremely slow when printing in colour, follow
these steps to improve the printing speed.
1.
Make sure that you are using only one software application at a
time.
2.
3.
Limit the number of colours on each page.
4.
5.
6.
7.
8.
Print at a lower resolution.
Use primary colours (cyan, magenta, yellow, and black) as much as
possible.
Increase the amount of memory in your computer.
Upgrade to a computer with a higher processing speed.
If you are using a screen saver, turn it off.
If you are using IrDA communications, print speed can be improved
by using the parallel interface (with the printer cable).
7
Chapter 7 Troubleshooting
93
■ Other printing problems
This section contains solutions for printer and printer driver problems.
Strange characters
If strange characters appear in your output, there may be a
communication problem between the printer and your computer. If your
printout does not match your expectations, follow the procedure below:
94
1.
Shut down the print job. Switch off the printer and switch off the
computer.
2.
3.
Switch the printer on and switch the computer on.
4.
If you are using Windows 98, Windows 95 or Windows 3.1, confirm
that you are using the correct printer driver.
• Make sure you have installed the BJC-50 printer driver.
• Make sure you have selected the BJC-50 printer driver for the
print job.
• Check the printer setup and make sure LPT1 has been selected for
the printer port. If WPS is selected as the printer port, remove it
from the list of printer ports or reassign it to FILE. For details,
refer to the Windows Print Guide or your Windows 98, Windows
95 or Windows 3.1 instructions.
5.
Start the print job again.
If the print job does not execute normally, check the printer cable.
• To connect the printer to an IBM compatible PC, a Canon Printer
Cable BIFC-50 is required.
• Do not use the printer near office equipment or machinery that can
generate large magnetic fields.
• If the computer and printer are not directly connected (if they are
connected through a switching device, or network, for example),
connect the computer and printer directly.
Chapter 7 Troubleshooting
Printing job halts before completion
1. Open the printer driver.
2.
Check the port setting.
If you are using Windows 98/Windows 95, go on to the next step.
-orIf you are using Windows 3.1, go to step 4.
3.
At the startup screen of Windows 98/Windows 95, click the Start
button. Click Settings then click Printers.
• Use the right mouse button to click on the BJC-50 icon then click
properties.
• Click the Details tab to open the Details control sheet. Check the
port assignment in the first box.
• If there is a WPS driver installed, make sure that this WPS driver
is not installed for the same port as the BJC-50. If the WPS driver
is installed for the same port as the BJC-50 printer driver, disable
the WPS driver temporarily by assigning it the FILE port, or
delete the WPS driver.
4.
In the Program Manager of Windows 3.1, click Main then click
Control Panel.
• If you need to change the port assignment, highlight BJC-50 in the
list of Installed Printers and click the Connect button. Select a new
port assignment from the list of Ports.
For details, refer to Windows Print Guide or your Windows
98/Windows 95 or Windows 3.1 instructions
7
Chapter 7 Troubleshooting
95
Characters on the screen do not match printed characters
Special symbols and graphics codes may be mapped to different ASCII
codes by different computers and printers. Compare the character set in
your computer manual with the printer character set shown in Appendix
B.
Printing beyond edge of page
If the printer is printing only part of each line, try the following
measures.
1.
Make sure the paper is aligned correctly with the left side of the feed
slot.
2.
Check the software application’s setting for the right margin.
The printer may print on the platen when this problem occurs. Clean the
printer platen before starting your print job. (☞79)
IrDA printing stops and paper is ejected
If printing via the IrDA interface suddenly stops, try the following
measures.
1.
2.
Make sure communication via IrDA is not blocked. (☞23)
Make sure the IrDA port is clean. Use only a soft, clean cloth to
clean IrDA port.
Printer prints incorrect number of lines on a page
If too few or too many lines are printed on the page, follow the
procedure below.
96
1.
Check the software application’s page length and top/bottom margin
settings.
2.
Make sure the paper is loaded correctly.
Chapter 7 Troubleshooting
Computer indicates a device time-out
1. Make sure that the printer is on-line.
2.
Make sure that the printer’s printer cable is securely connected to
both the printer and the computer.
Printouts are incomplete (only 50% to 75% of the page ) or
printed with large white bands
On Windows 98/Windows 95, make sure Compatible or Bi-directional
is selected for the parallel printer port (LPT1).
■ Where to Find More Help
In the event that you cannot solve a problem with the BJC-50 printer,
review the Troubleshooting section which appears earlier in this
chapter. If you still cannot resolve the problem, contact the appropriate
Canon office listed below:
Australia
Canon Australia Pty Ltd.
1 Thomas Holt Drive
North Ryde, Sydney,
N.S.W. 2113, Australia
TEL: 02-9805-2864
Web page: http://www.canon.com.au
Canada
Canon Canada Inc.
6390 Dixie Road
Mississauga, Ontario, L5T 1P7, Canada
Help Desk at 1-800-263-1121
France
Canon France S.A.
17, Quai du Président Paul Doumer,
92414 Courbevoie Cedex, France
Standard: 01. 41. 99. 77. 77
Télécopie: 01. 41. 99. 79. 51
Hot Line: 01. 41. 99. 70. 70
Web page: http://www.canon.fr
Germany
Canon Deutschland GmbH
Postfach 528, 47705 Krefeld, Germany
CANON-Hotline-Service
Customer Support: 02151/349-555
Info-Desk: 02151-349-566
Mailbox: 02151/349-577
Fax-No.: 02151/349-588
Hong Kong, Taiwan, China
Canon Hongkong Co., Ltd.
10/F., Lippo Sun Plaza 28 Canton Road
Tsimshatsui, Kowloon
Hong Kong
TEL: 852-2739-0802
FAX: 852-2739-6428
Web page: http://www.canon-asia.com
India (and other southeast Asian countries)
Canon Singapore Pte. Ltd.
79 Anson Road, #09-01/06
Singapore 079906
TEL: 65-5324400
FAX: 65-2217577
Web page: http://www.canon-asia.com
Indonesia
P.T. Datascrip
Kawasan Niaga Selatan,
Bandar Kemayoran Jakarta 10610
TEL: (62-21) 6544515
Hotline: (62-21) 6544774
FAX: (62-21) 6544811-13
Web page: http://www.canon-asia.com
Chapter 7 Troubleshooting
7
97
Korea
Lotte Canon Co., Ltd.
Headquarters:
Taehwa Bldg. #996-15
Daech-3 Dong Kangnam-Ku, Seoul
Korea
TEL: 02-3450-0700
FAX: 02-558-4365
Customer Information Center:
TEL: 02-562-9133
FAX: 02-3450-0788
Clover Service:
TEL: 080-987-8585
Malaysia
Canon Marketing (Malaysia) Sdn. Bhd.
13A, Jalan 219, 46100 Petaling Jaya
Selangor Darul Ehsan
Malaysia
TEL: 603-7577210
FAX: 603-7570948
Web page: http://www.canon.com.my
New Zealand
Canon New Zealand Ltd.
Fred Thomas Drive, Takapuna
P.O. Box 33-336
Auckland, New Zealand
TEL: 0800-222-666
Web page: http://www.canon.com.au
Philippines
Canon Marketing (Philippines) Inc.
Marvin Plaza Building
2153 Don Chino Roces Ave
Makati City
TEL: 632-812-6047, 632-812-6285
FAX: 632-812-0067
Web page: http://www.canon-asia.com
Singapore
Canon Marketing Services Pte. Ltd.
2 Alexandra Road, #04-01A
Delta House
Singapore 159919
TEL: 65-273-5311
FAX: 65-273-3317
Web page: http://www.canon.com.sg
Thailand
Canon Marketing (Thailand) Co. Ltd.
2nd Floor Indosuez House
152 Wireless Road
Bangkok 10330
Thailand
TEL: 66-2-6514000
FAX: 66-2-6514095
Web page: http://www.canon-asia.com
98
Chapter 7 Troubleshooting
United Kingdom
Canon (UK) Ltd.
Canon House, Manor Road, Wallington,
Surrey, SM6 0AJ, United Kingdom
For technical support, please contact Canon
Helpdesk:
P.O. Box 431, Wallington, Surrey SM6 0XU
TEL: (0990) 143723 (Calls may be recorded)
FAX: (0990) 143340
BBS (24 hrs): (0990) 143350
For sales enquiries, please call on:
(0121) 666-6262
United States
Canon Computer Systems, Inc.
2995 Redhill Ave.
Costa Mesa, CA92626-5048
U.S.A.
TEL: 1-800-423-2366
FAX: 714-438-3099
Web page: http://www.ccsi.canon.com
Appendix A
Paper Specifications
■ Paper size
Letter
Legal
A4
A5
B5
US Commercial 10 envelope
European DL size envelope
8.5 x 11 in.
8.5 x 14 in.
210 x 297 mm
148 x 210 mm
182 x 256 mm
9.5 x 4.1 in.
220 x 110 mm
■ Paper type
Media Name
Media Type*
Plain paper
Bubble Jet Paper LC-301
Glossy Photo Paper GP-301
Glossy Photo Cards FM-101
High Resolution Paper HR-101
Transparency CF-102
High Gloss Film HG-101
Back Print Film BF-102
Fabric Sheet FS-101
T-Shirt Transfer TR-201**
Plain Paper
Plain Paper
Glossy Paper
Glossy Photo Cards
Coated Paper
Transparency
High Gloss Film
Back Print Film
Fabric Sheet
T-Shirt Transfer
* This is the name of the Media Type you will see after you pull down
the list for Media Type on the Paper control sheet of the Windows
printer driver.
** TR-101 in the U.S.
A
■ Paper weight
64 to 105 gsm (17 to 28 lb.)
Appendix A Paper Specifications
99
■ Printing area
Paper and special media
The shaded portion in the following figure shows the recommended
printing area for paper and special media. The printer’s mechanical
printing area is inside the 3 mm top/bottom margins. However, we
recommend setting the margins greater than 22 mm because the print
quality degrades below this.
Before you print on Fabric Sheet FS-101, set the paper size for Legal.
The printing area may vary according to settings in the printer driver.
The margins and printable areas for Fabric Sheet are shown below.
A4/A5/B5 size
Letter size
7 mm
7 mm
3.4 mm
6.3 mm
6.4 mm
3.4 mm
Legal size
22 mm
22 mm
279 mm (11.0 in)
3 mm
216 mm (8.5 in)
22 mm
22 mm
297/210/256 mm
3 mm
210/148/182 mm
Fabric Sheet
FS-101
Glossy Photo
Cards FM-101
119.6mm
6.4 mm
100
241 mm
6.3 mm
Appendix A Paper Specifications
9mm
31.8mm
28mm
28.4 mm
9mm
6.4 mm
2.8 mm
216mm
31.8mm
28mm
20.5 mm
356 mm
22 mm
22 mm
356 mm (14.0 in)
7 mm
3 mm
216 mm (8.5 in)
5.1mm 5.1mm
Envelopes
The shaded portion in the figures below shows the recommended
printing areas for a US Commercial No. 10 envelope (9.5 x 4.1 in) and
European DL size envelope (220 x 110 mm). The printer's maximum
mechanical printing area is inside the top and bottom margins.
However, we recommend setting the margins wider than 22 mm
because print quality degrades below this.
The size of the printing area may vary according to settings done with
the printer driver.
U.S. Commercial 10 size
3 mm
3 mm
Paper feed
direction
6.4 mm
3 mm
22 mm
22 mm
22 mm
241.3 mm (9.5 in)
3 mm
104.8 mm (4.1 in)
7 mm
31.7 mm
6.4 mm
22 mm
104.8 mm (4.1 in)
241.3 mm (9.5 in)
European DL size
3 mm
Paper feed
direction
3 mm
A
6.4 mm
3 mm
22 mm
22 mm
22 mm
10.4 mm
220 mm (8.7 in)
3 mm
110 mm ( 4.3 in)
7 mm
6.4 mm
22 mm
110.4 mm (4.3 in)
220 mm (8.7 in)
Appendix A Paper Specifications
101
Appendix B
Code Pages and Character Sets
This section presents information on the character code pages and
character sets supported by your printer. The character sets accessed by
your printer at any time are determined by the printer control mode
being used: BJ mode or LQ mode.
■ Code pages
Your printer supports ten code pages. By selecting a code page, you
can print characters and symbols in the following languages.
Type
USA English
Multilingual (Latin I)
Slavic (Latin II)
Cyrillic (Russian)
Turkish
Portuguese
Canadian French
Arabic
Nordic
Greek
Code Page No.
Code Page 437
Code Page 850*
Code Page 852
Code Page 855
Code Page 857
Code Page 860
Code Page 863
Code Page 864
Code Page 865
Code Page 869
* Multilingual means that you can print most European languages when
you select this code page.
102
Appendix B Code Pages and Character Sets
The code page tables are shown on the following pages.
USA English –– Code Page 437
Hex
No.
0
1
2
3
4
5
6
7
8
9
A
B
C
D
E
F
0
1
2
3
4
5
6
7
8
9
A
B
C
D
E
F
0
16
32
48
64
80
96
112
128
144
160
176
192
208
224
240
1
17
33
49
65
81
97
113
129
145
161
177
193
209
225
241
2
18
34
50
66
82
98
114
130
146
162
178
194
210
226
242
3
19
35
51
67
83
99
115
131
147
163
179
195
211
227
243
4
20
36
52
68
84
100
116
132
148
164
180
196
212
228
244
5
21
37
53
69
85
101
117
133
149
165
181
197
213
229
245
6
22
38
54
70
86
102
118
134
150
166
182
198
214
230
246
7
23
39
55
71
87
103
119
135
151
167
183
199
215
231
247
8
24
40
56
72
88
104
120
136
152
168
184
200
216
232
248
9
25
41
57
73
89
105
121
137
153
169
185
201
217
233
249
10
26
42
58
74
90
106
122
138
154
170
186
202
218
234
250
187
203
219
235
251
1
2
11
27
43
59
75
91
107
123
139
155
171
1
4
12
28
44
60
76
92
108
124
140
156
172
188
204
220
236
252
13
29
45
61
77
93
109
125
141
157
173
189
205
221
237
253
14
30
46
62
78
94
110
126
142
158
174
190
206
222
238
254
15
31
47
63
79
95
111
127
143
159
175
191
207
223
239
255
B
0000
0001
0010
0011
0100
0101
0110
0111
1000
1001
1010
1011
1100
1101
1110
1111
0000 0001 0010 0011 0100 0101 0110 0111 1000 1001 1010 1011 1100 1101 1110 1111 Binary
No.
Multilingual(Latin I) –– Code Page 850*
Hex
No.
0
1
2
3
4
5
6
7
8
9
A
B
C
D
E
F
0
1
2
3
4
5
6
7
8
9
A
B
C
D
E
F
0
16
32
48
64
80
96
112
128
144
160
176
192
208
224
240
1
17
33
49
65
81
97
113
129
145
161
177
193
209
225
241
2
18
34
50
66
82
98
114
130
146
162
178
194
210
226
242
1
3
3
19
35
51
67
83
99
115
131
147
163
179
195
211
227
243
4
20
36
52
68
84
100
116
132
148
164
180
196
212
228
244
5
21
37
53
69
85
101
117
133
149
165
181
197
213
229
245
6
22
38
54
70
86
102
118
134
150
166
182
198
214
230
246
7
23
39
55
71
87
103
119
135
151
167
183
199
215
231
247
8
24
40
56
72
88
104
120
136
152
168
184
200
216
232
248
9
25
41
57
73
89
105
121
137
153
169
185
201
217
233
249
10
26
42
58
74
90
106
122
138
154
170
186
202
218
234
250
187
203
219
235
251
1
2
11
27
43
59
75
91
107
123
139
155
171
1
4
12
28
44
60
76
92
108
124
140
156
172
188
204
220
236
252
13
29
45
61
77
93
109
125
141
157
173
189
205
221
237
253
14
30
46
62
78
94
110
126
142
158
174
190
206
222
238
254
15
31
47
63
79
95
111
127
143
159
175
191
207
223
239
255
0000
0001
0010
0011
0100
0101
0110
0111
1000
1001
1010
1011
1100
1101
1110
1111
0000 0001 0010 0011 0100 0101 0110 0111 1000 1001 1010 1011 1100 1101 1110 1111 Binary
No.
Appendix B Code Pages and Character Sets
103
Slavic (Latin II) –– Code Page 852
Hex
No.
0
1
2
3
4
5
6
7
8
9
A
B
C
D
E
F
0
1
2
3
4
5
6
7
8
9
A
B
C
D
E
F
0
16
32
48
64
80
96
112
128
144
160
176
192
208
224
240
1
17
33
49
65
81
97
113
129
145
161
177
193
209
225
241
2
18
34
50
66
82
98
114
130
146
162
178
194
210
226
242
3
19
35
51
67
83
99
115
131
147
163
179
195
211
227
243
4
20
36
52
68
84
100
116
132
148
164
180
196
212
228
244
5
21
37
53
69
85
101
117
133
149
165
181
197
213
229
245
6
22
38
54
70
86
102
118
134
150
166
182
198
214
230
246
7
23
39
55
71
87
103
119
135
151
167
183
199
215
231
247
8
24
40
56
72
88
104
120
136
152
168
184
200
216
232
248
9
25
41
57
73
89
105
121
137
153
169
185
201
217
233
249
10
26
42
58
74
90
106
122
138
154
170
186
202
218
234
250
11
27
43
59
75
91
107
123
139
155
171
187
203
219
235
251
12
28
44
60
76
92
108
124
140
156
172
188
204
220
236
252
13
29
45
61
77
93
109
125
141
157
173
189
205
221
237
253
14
30
46
62
78
94
110
126
142
158
174
190
206
222
238
254
15
31
47
63
79
95
111
127
143
159
175
191
207
223
239
255
0000
0001
0010
0011
0100
0101
0110
0111
1000
1001
1010
1011
1100
1101
1110
1111
0000 0001 0010 0011 0100 0101 0110 0111 1000 1001 1010 1011 1100 1101 1110 1111 Binary
No.
Cyrillic (Russian) –– Code Page 855
Hex
No.
0
1
2
3
4
5
6
7
8
9
A
B
C
D
E
F
0
1
2
3
4
5
6
7
8
9
A
B
C
D
E
F
0
16
32
48
64
80
96
112
128
144
160
176
192
208
224
240
1
17
33
49
65
81
97
113
129
145
161
177
193
209
225
241
2
18
34
50
66
82
98
114
130
146
162
178
194
210
226
242
3
19
35
51
67
83
99
115
131
147
163
179
195
211
227
243
4
20
36
52
68
84
100
116
132
148
164
180
196
212
228
244
5
21
37
53
69
85
101
117
133
149
165
181
197
213
229
245
6
22
38
54
70
86
102
118
134
150
166
182
198
214
230
246
7
23
39
55
71
87
103
119
135
151
167
183
199
215
231
247
8
24
40
56
72
88
104
120
136
152
168
184
200
216
232
248
9
25
41
57
73
89
105
121
137
153
169
185
201
217
233
249
10
26
42
58
74
90
106
122
138
154
170
186
202
218
234
250
11
27
43
59
75
91
107
123
139
155
171
187
203
219
235
251
12
28
44
60
76
92
108
124
140
156
172
188
204
220
236
252
13
29
45
61
77
93
109
125
141
157
173
189
205
221
237
253
14
30
46
62
78
94
110
126
142
158
174
190
206
222
238
254
15
31
47
63
79
95
111
127
143
159
175
191
207
223
239
255
0000
0001
0010
0011
0100
0101
0110
0111
1000
1001
1010
1011
1100
1101
1110
1111
0000 0001 0010 0011 0100 0101 0110 0111 1000 1001 1010 1011 1100 1101 1110 1111 Binary
No.
104
Appendix B Code Pages and Character Sets
Turkish –– Code Page 857
Hex
No.
0
1
2
3
4
5
6
7
8
9
A
B
C
D
E
F
0
1
2
3
4
5
6
7
8
9
A
B
C
D
E
F
0
16
32
48
64
80
96
112
128
144
160
176
192
208
224
240
1
17
33
49
65
81
97
113
129
145
161
177
193
209
225
241
2
18
34
50
66
82
98
114
130
146
162
178
194
210
226
242
3
19
35
51
67
83
99
115
131
147
163
179
195
211
227
243
4
20
36
52
68
84
100
116
132
148
164
180
196
212
228
244
5
21
37
53
69
85
101
117
133
149
165
181
197
213
229
245
6
22
38
54
70
86
102
118
134
150
166
182
198
214
230
246
7
23
39
55
71
87
103
119
135
151
167
183
199
215
231
247
8
24
40
56
72
88
104
120
136
152
168
184
200
216
232
248
9
25
41
57
73
89
105
121
137
153
169
185
201
217
233
249
10
26
42
58
74
90
106
122
138
154
170
186
202
218
234
250
187
203
219
235
251
3
4
1
2
11
27
43
59
75
91
107
123
139
155
171
1
4
12
28
44
60
76
92
108
124
140
156
172
188
204
220
236
252
13
29
45
61
77
93
109
125
141
157
173
189
205
221
237
253
14
30
46
62
78
94
110
126
142
158
174
190
206
222
238
254
15
31
47
63
79
95
111
127
143
159
175
191
207
223
239
255
0000
B
0001
0010
0011
0100
0101
0110
0111
1000
1001
1010
1011
1100
1101
1110
1111
0000 0001 0010 0011 0100 0101 0110 0111 1000 1001 1010 1011 1100 1101 1110 1111 Binary
No.
Portuguese –– Code Page 860
Hex
No.
0
1
2
3
4
5
6
7
8
9
A
B
C
D
E
F
0
1
2
3
4
5
6
7
8
9
A
B
C
D
E
F
0
16
32
48
64
80
96
112
128
144
160
176
192
208
224
240
1
17
33
49
65
81
97
113
129
145
161
177
193
209
225
241
2
18
34
50
66
82
98
114
130
146
162
178
194
210
226
242
3
19
35
51
67
83
99
115
131
147
163
179
195
211
227
243
4
20
36
52
68
84
100
116
132
148
164
180
196
212
228
244
5
21
37
53
69
85
101
117
133
149
165
181
197
213
229
245
6
22
38
54
70
86
102
118
134
150
166
182
198
214
230
246
7
23
39
55
71
87
103
119
135
151
167
183
199
215
231
247
8
24
40
56
72
88
104
120
136
152
168
184
200
216
232
248
9
25
41
57
73
89
105
121
137
153
169
185
201
217
233
249
10
26
42
58
74
90
106
122
138
154
170
186
202
218
234
250
187
203
219
235
251
1
2
11
27
43
59
75
91
107
123
139
155
171
1
4
12
28
44
60
76
92
108
124
140
156
172
188
204
220
236
252
13
29
45
61
77
93
109
125
141
157
173
189
205
221
237
253
14
30
46
62
78
94
110
126
142
158
174
190
206
222
238
254
15
31
47
63
79
95
111
127
143
159
175
191
207
223
239
255
0000
0001
0010
0011
0100
0101
0110
0111
1000
1001
1010
1011
1100
1101
1110
1111
0000 0001 0010 0011 0100 0101 0110 0111 1000 1001 1010 1011 1100 1101 1110 1111 Binary
No.
Appendix B Code Pages and Character Sets
105
Canadian French –– Code Page 863
Hex
No.
0
1
2
3
4
5
6
7
8
9
A
B
C
D
E
F
0
1
2
3
4
5
6
7
8
9
A
B
C
D
E
F
0
16
32
48
64
80
96
112
128
144
160
176
192
208
224
240
1
17
33
49
65
81
97
113
129
145
161
177
193
209
225
241
2
18
34
50
66
82
98
114
130
146
162
178
194
210
226
242
3
19
35
51
67
83
99
115
131
147
163
179
195
211
227
243
4
20
36
52
68
84
100
116
132
148
164
180
196
212
228
244
5
21
37
53
69
85
101
117
133
149
165
181
197
213
229
245
6
22
38
54
70
86
102
118
134
150
166
182
198
214
230
246
7
23
39
55
71
87
103
119
135
151
167
183
199
215
231
247
8
24
40
56
72
88
104
120
136
152
168
184
200
216
232
248
9
25
41
57
73
89
105
121
137
153
169
185
201
217
233
249
10
26
42
58
74
90
106
122
138
154
170
186
202
218
234
250
187
203
219
235
251
188
204
220
236
252
1
2
11
27
43
59
75
91
107
123
139
155
171
1
4
12
28
44
60
76
92
108
124
140
156
172
3
4
13
29
45
61
77
93
109
125
141
157
173
189
205
221
237
253
14
30
46
62
78
94
110
126
142
158
174
190
206
222
238
254
15
31
47
63
79
95
111
127
143
159
175
191
207
223
239
255
0000
0001
0010
0011
0100
0101
0110
0111
1000
1001
1010
1011
1100
1101
1110
1111
0000 0001 0010 0011 0100 0101 0110 0111 1000 1001 1010 1011 1100 1101 1110 1111 Binary
No.
Arabic –– Code Page 864
Hex
No.
0
1
2
3
4
5
6
7
8
9
A
B
C
D
E
F
0
1
2
3
4
5
6
7
8
9
A
B
C
D
E
F
0
16
32
48
64
80
96
112
128
144
160
176
192
208
224
240
1
17
33
49
65
81
97
113
129
145
161
177
193
209
225
241
2
18
34
50
66
82
98
114
130
146
162
178
194
210
226
242
3
19
35
51
67
83
99
115
131
147
163
179
195
211
227
243
164
180
196
212
228
244
1
2
4
20
36
52
68
84
100
116
132
148
1
4
5
21
37
53
69
85
101
117
133
149
165
181
197
213
229
245
6
22
38
54
70
86
102
118
134
150
166
182
198
214
230
246
7
23
39
55
71
87
103
119
135
151
167
183
199
215
231
247
8
24
40
56
72
88
104
120
136
152
168
184
200
216
232
248
9
25
41
57
73
89
105
121
137
153
169
185
201
217
233
249
10
26
42
58
74
90
106
122
138
154
170
186
202
218
234
250
11
27
43
59
75
91
107
123
139
155
171
187
203
219
235
251
12
28
44
60
76
92
108
124
140
156
172
188
204
220
236
252
13
29
45
61
77
93
109
125
141
157
173
189
205
221
237
253
14
30
46
62
78
94
110
126
142
158
174
190
206
222
238
254
15
31
47
63
79
95
111
127
143
159
175
191
207
223
239
255
0000
0001
0010
0011
0100
0101
0110
0111
1000
1001
1010
1011
1100
1101
1110
1111
0000 0001 0010 0011 0100 0101 0110 0111 1000 1001 1010 1011 1100 1101 1110 1111 Binary
No.
106
Appendix B Code Pages and Character Sets
Nordic –– Code Page 865
Hex
No.
0
1
2
3
4
5
6
7
8
9
A
B
C
D
E
F
0
1
2
3
4
5
6
7
8
9
A
B
C
D
E
F
0
16
32
48
64
80
96
112
128
144
160
176
192
208
224
240
1
17
33
49
65
81
97
113
129
145
161
177
193
209
225
241
2
18
34
50
66
82
98
114
130
146
162
178
194
210
226
242
3
19
35
51
67
83
99
115
131
147
163
179
195
211
227
243
4
20
36
52
68
84
100
116
132
148
164
180
196
212
228
244
5
21
37
53
69
85
101
117
133
149
165
181
197
213
229
245
6
22
38
54
70
86
102
118
134
150
166
182
198
214
230
246
7
23
39
55
71
87
103
119
135
151
167
183
199
215
231
247
8
24
40
56
72
88
104
120
136
152
168
184
200
216
232
248
9
25
41
57
73
89
105
121
137
153
169
185
201
217
233
249
10
26
42
58
74
90
106
122
138
154
170
186
202
218
234
250
187
203
219
235
251
1
2
11
27
43
59
75
91
107
123
139
155
171
1
4
12
28
44
60
76
92
108
124
140
156
172
188
204
220
236
252
13
29
45
61
77
93
109
125
141
157
173
189
205
221
237
253
14
30
46
62
78
94
110
126
142
158
174
190
206
222
238
254
15
31
47
63
79
95
111
127
143
159
175
191
207
223
239
255
0000
B
0001
0010
0011
0100
0101
0110
0111
1000
1001
1010
1011
1100
1101
1110
1111
0000 0001 0010 0011 0100 0101 0110 0111 1000 1001 1010 1011 1100 1101 1110 1111 Binary
No.
Greek –– Code Page 869
Hex
No.
0
1
2
3
4
5
6
7
8
9
A
B
C
D
E
F
0
1
2
3
4
5
6
7
8
9
A
B
C
D
E
F
0
16
32
48
64
80
96
112
128
144
160
176
192
208
224
240
1
17
33
49
65
81
97
113
129
145
161
177
193
209
225
241
2
18
34
50
66
82
98
114
130
146
162
178
194
210
226
242
3
19
35
51
67
83
99
115
131
147
163
179
195
211
227
243
4
20
36
52
68
84
100
116
132
148
164
180
196
212
228
244
5
21
37
53
69
85
101
117
133
149
165
181
197
213
229
245
6
22
38
54
70
86
102
118
134
150
166
182
198
214
230
246
7
23
39
55
71
87
103
119
135
151
167
183
199
215
231
247
8
24
40
56
72
88
104
120
136
152
168
184
200
216
232
248
9
25
41
57
73
89
105
121
137
153
169
185
201
217
233
249
10
26
42
58
74
90
106
122
138
154
170
186
202
218
234
250
1
2
11
27
43
59
75
91
107
123
139
155
171
187
203
219
235
251
12
28
44
60
76
92
108
124
140
156
172
188
204
220
236
252
13
29
45
61
77
93
109
125
141
157
173
189
205
221
237
253
14
30
46
62
78
94
110
126
142
158
174
190
206
222
238
254
15
31
47
63
79
95
111
127
143
159
175
191
207
223
239
255
0000
0001
0010
0011
0100
0101
0110
0111
1000
1001
1010
1011
1100
1101
1110
1111
0000 0001 0010 0011 0100 0101 0110 0111 1000 1001 1010 1011 1100 1101 1110 1111 Binary
No.
Appendix B Code Pages and Character Sets
107
■ Character sets
BJ mode
Each of the ten code pages, 437, 850, 852, 855, 857, 860, 863, 864, 865
and 869 can be changed to three character sets: Set 1, Set 2 and All
Characters Chart. The code page tables shown on the previous pages are
All Characters Charts.
Each of the 10 code pages corresponds to an All Characters Chart. For
the All Characters Chart, there are no control codes except for the space
code at ASCII 32. All other ASCII characters are printable. The All
Characters Chart is selected by using the ESC ^ or the ESC \ code.
Character Set 1 has control codes in two places:
• Between ASCII 0 and ASCII 31 (Hex 00h and Hex 1Fh)
• Between ASCII 128 and ASCII 159 (Hex 80h and Hex 9Fh)
Character Set 2 has control codes in only one place, between ASCII 0
and ASCII 31 (Hex 00h and Hex 1Fh).
A control code is an unprintable character that the printer uses for
printer operations such as line spacing or carriage returns.
108
Appendix B Code Pages and Character Sets
The tables on the following pages show the differences between
Character Set 1 and Set 2 from the All Characters Chart. The example
below is from Code Page 437 U.S.A. English.
Hex No.
00
01
02
03
04
05
06
07
08
09
0A
0B
0C
0D
0E
0F
All Character Chart
Hex No.
10
11
12
13
14
15
16
17
18
19
1A
1B
1C
1D
1E
1F
All Character Chart
Character Set 1
NUL
Character Set 2
NUL
BEL
BS
HT
LF
VT
FF
CR
SO
SI
♥
♦
♣
♠
BEL
BS
HT
LF
VT
FF
CR
SO
SI
Character Set 1
Character Set 2
DC1
DC2
DC1
DC2
DC4
DC4
§
CAN
CAN
ESC
FS
ESC
FS
♥
♦
♣
♠
¶
§
B
▲
▼
Appendix B Code Pages and Character Sets
109
110
Hex No.
80
81
82
83
84
85
86
87
88
89
8A
8B
8C
8D
8E
8F
All Character Chart
Ç
ü
é
â
ä
à
å
ç
ê
ë
è
ï
î
ì
Ä
Å
Character Set 1
Hex No.
90
91
92
93
94
95
96
97
98
99
9A
9B
9C
9D
9E
9F
All Character Chart
É
æ
Æ
ô
ö
ò
û
ù
ÿ
Ö
Ü
¢
£
¥
Pts
ƒ
Character Set 1
Appendix B Code Pages and Character Sets
BEL
BS
HT
LF
VT
FF
CR
SO
SI
DC1
DC2
DC4
CAN
ESC
FS
Character Set 2
Ç
ü
é
â
ä
à
å
ç
ê
ë
è
ï
î
ì
Ä
Å
Character Set 2
É
æ
Æ
ô
ö
ò
û
ù
ÿ
Ö
Ü
¢
£
¥
Pts
ƒ
LQ mode
In LQ mode, your printer can select one of eight International Character
Sets, one of ten code pages, and one of two character tables: the EPSON
Italics and the EPSON Graphics character tables.
B
International character sets
By selecting an International Character Set, you can print characters
and symbols of eight different countries or languages: USA, UK,
Germany, France, Denmark, Sweden, Italy, and Spain.
When you want to print other languages, select the appropriate code
page. The printer supports many code pages: USA 437, Multilingual*
(Latin I) 850, Slavic (Latin II) 852, Cyrillic (Russian) 855, Turkish
857, Portuguese 860, Canadian French 863, Arabic 864, Nordic 865,
and Greek 869. (☞102)
When you select a code page to print characters and symbols of your
language, be sure to select the Graphics character table. Otherwise,
the characters and symbols between ASCII 128 and ASCII 255 are
changed to italic characters.
* Multilingual means that you can print most European languages when
you select this code page. However, in LQ mode, if you want to print
the languages supported by the printer in the International Character
Sets, select the appropriate International Character Set and select
USA 437 code page.
Appendix B Code Pages and Character Sets
111
The table below shows the International Character Sets.
Hex
Country
Dec
23
24
40
5B 5C 5D 5E
60
35
36
64
91
96 123 124 125 126 163 164 192 219 220 221 222 224 251 252 253 254
92
93
94
7B 7C 7D 7E A3 A4 C0 DB DC DD DE E0 FB FC FD FE
0
1
2
3
4
5
6
7
8
9
10
11
12
13
64
The international character sets 8 to 13, and 64 can be selected only by
using the escape code ESC R.
EPSON character tables
Two character tables—the Italics character table and the Graphics
character table—are available in LQ mode. The Italics character table
has control codes in two places: between ASCII 0 and ASCII 31 and
also between ASCII 128 and ASCII 159. In addition, in the Italics
character table, characters between ASCII 160 and ASCII 255 are italic
characters of characters between ASCII 0 and ASCII 127, whatever
code page you select.
The Graphics character table has control codes only in one place:
between ASCII 0 and ASCII 31. All other characters are printable. The
characters between ASCII 32 and ASCII 126 are always as shown in the
table on the next page. The characters between ASCII 128 and ASCII
255 vary depending on your selected code page. The Graphics
character table shown on the next page is for when the code page is set
to 437 USA.
The control codes between ASCII 0 and ASCII 31 can be changed to
printable characters by using the ESC ( ^ control code.
When you select a code page to print characters and symbols of your
language, select the Graphics character table. Otherwise, the
characters and symbols between ASCII 128 and ASCII 255 are changed
to Italics characters.
112
Appendix B Code Pages and Character Sets
The tables below show the Italics character table and the Graphics
character table.
Italics Character Table
Hex
No.
0
1
2
3
4
5
6
7
8
9
A
B
C
D
E
F
B
0
1
2
3
4
5
6
7
8
9
A
B
C
D
E
F
0
16
32
48
64
80
96
112
128
144
160
176
192
208
224
240
1
17
33
49
65
81
97
113
129
145
161
177
193
209
225
241
2
18
34
50
66
82
98
114
130
146
162
178
194
210
226
242
3
19
35
51
67
83
99
115
131
147
163
179
195
211
227
243
4
20
36
52
68
84
100
116
132
148
164
180
196
212
228
244
5
21
37
53
69
85
101
117
133
149
165
181
197
213
229
245
6
22
38
54
70
86
102
118
134
150
166
182
198
214
230
246
7
23
39
55
71
87
103
119
135
151
167
183
199
215
231
247
8
24
40
56
72
88
104
120
136
152
168
184
200
216
232
248
9
25
41
57
73
89
105
121
137
153
169
185
201
217
233
249
10
26
42
58
74
90
106
122
138
154
170
186
202
218
234
250
11
27
43
59
75
91
107
123
139
155
171
187
203
219
235
251
12
28
44
60
76
92
108
124
140
156
172
188
204
220
236
252
13
29
45
61
77
93
109
125
141
157
173
189
205
221
237
253
14
30
46
62
78
94
110
126
142
158
174
190
206
222
238
254
15
31
47
63
79
95
111
127
143
159
175
191
207
223
239
255
0000
0001
0010
0011
0100
0101
0110
0111
1000
1001
1010
1011
1100
1101
1110
1111
0000 0001 0010 0011 0100 0101 0110 0111 1000 1001 1010 1011 1100 1101 1110 1111 Binary
No.
Graphics Character Table
Hex
No.
0
1
2
3
4
5
6
7
8
9
A
B
C
D
E
F
0
1
2
3
4
5
6
7
8
9
A
B
C
D
E
F
0
16
32
48
64
80
96
112
128
144
160
176
192
208
224
240
1
17
33
49
65
81
97
113
129
145
161
177
193
209
225
241
2
18
34
50
66
82
98
114
130
146
162
178
194
210
226
242
3
19
35
51
67
83
99
115
131
147
163
179
195
211
227
243
4
20
36
52
68
84
100
116
132
148
164
180
196
212
228
244
5
21
37
53
69
85
101
117
133
149
165
181
197
213
229
245
6
22
38
54
70
86
102
118
134
150
166
182
198
214
230
246
7
23
39
55
71
87
103
119
135
151
167
183
199
215
231
247
8
24
40
56
72
88
104
120
136
152
168
184
200
216
232
248
9
25
41
57
73
89
105
121
137
153
169
185
201
217
233
249
10
26
42
58
74
90
106
122
138
154
170
186
202
218
234
250
11
27
43
59
75
91
107
123
139
155
171
187
203
219
235
251
12
28
44
60
76
92
108
124
140
156
172
188
204
220
236
252
13
29
45
61
77
93
109
125
141
157
173
189
205
221
237
253
14
30
46
62
78
94
110
126
142
158
174
190
206
222
238
254
15
31
47
63
79
95
111
127
143
159
175
191
207
223
239
255
0000
0001
0010
0011
0100
0101
0110
0111
1000
1001
1010
1011
1100
1101
1110
1111
0000 0001 0010 0011 0100 0101 0110 0111 1000 1001 1010 1011 1100 1101 1110 1111 Binary
No.
Appendix B Code Pages and Character Sets
113
Appendix C
Printer Command Summaries
Printer control codes are listed under each of the two printer control
modes: BJ mode and LQ mode. Printer control codes tell the printer
how to print a job.
You can send commands in several ways:
• You can use your software application to automatically embed certain
commands (such as bold, underline, or indent) within a document.
Your software application usually displays a symbol (such as B for
bold) or changes the appearance of the displayed text to indicate the
embedded commands. When the document prints, the embedded
commands control the way the printer produces the printed page. See
your software application manual for instructions on sending
commands.
• You can send specific commands directly to the printer, using either a
BASIC statement or a printer command option in your software
application.
■ Entering a setup string in Lotus 1-2-3
The procedure for entering printer control commands in Lotus 1-2-3 is
typical of the procedures used in spreadsheet software applications. If
you are using another spreadsheet, review your application manual to
determine if your software application supports printer option setups.
Although the procedure to enter the codes may differ slightly, you will
still have to enter the same number codes.
For a list of these codes, refer to the tables later in this appendix.
114
Appendix C Printer Command Summaries
BJ mode example
This part shows that the decimal form the command to specify
condensed text is 15 and the character form of the same command is SI.
To access condensed (17 cpi) text in Lotus 1-2-3 when you are in BJ
mode, follow this procedure.
Each number in the decimal form of the command must be three
characters long, so you need to use a leading zero if the code is a twodigit number. A simple command might look like this:
C
\077
1.
2.
In Lotus 1-2-3, type \PPOS to open the printer option setup menu.
To use the decimal form, type \015 to specify condensed text.
LQ mode example
Suppose you are working in LQ mode and want to print text at 12 cpi.
In Appendix B you see that the decimal code for the command for 12
cpi is 27 77. Follow this procedure to specify 12 cpi printing in Lotus
1-2-3.
1.
2.
In Lotus 1-2-3, type \PPOS to access the printer option setup menu.
To enter the code in decimal format, type \027\077. Be sure to
insert the leading zeros before the numbers so they are both three
digits.
■ BJ mode command summary
All of the control codes shown in the following tables can be used in
the BJ mode.
Because of hardware differences, the reverse feed code — ESC ] and
the printer deselect code — DC3 — are not supported by your printer.
Also, the styles of block graphics characters at 12 cpi are different from
normal Proprinter X24E printing.
Appendix C Printer Command Summaries
115
Basic control codes
Function
ASCII
Dec.
Hex.
End command
Sound beeper
Backspace
Horizontal tab control
NUL
BEL
BS
HT
0
7
8
9
00
07
08
09
LF
VT
10
11
0A
0B
FF
CR
SO
SI
12
13
14
15
0C
0D
0E
0F
DC1
DC2
DC4
CAN
SP
DEL
17
18
20
24
32
127
11
12
14
18
20
7F
Move to next tab.
Perform line feed
Vertical tab control
Move to next tab.
Perform form feed
Carriage return
Set double-wide mode by line
Set condensed mode (17 cpi)
Cancel by DC2.
Select printer
Set 10 cpi mode
Cancel double-wide mode
Cancel data
Insert space
Delete character
ESCape sequence codes
Function
ASCII
Dec.
Hex.
Set/cancel underscore mode
ESC _ n
27 45 n
1B 2D n
ESC 0
ESC 1
ESC 2
ESC 3 n
27 48
27 49
27 50
27 51 n
1B 30
1B 31
1B 32
1B 33 n
ESC 4
ESC 5 n
27 52
27 53 n
1B 34
1B 35 n
ESC 6
ESC 7
ESC :
ESC = n1 n2 id
27 54
27 55
27 58
27 61 n1 n2 id
1B 36
1B 37
1B 3A
1B 3D n1 n2 id
r1 r2 data
r1 r2 data
r1 r2 data
ESC = n1 n2 id
27 61 n1 n2 id
1B 3D n1 n2 id
27 65 n
1B 41 n
n = 0:End underscore
n = 1:Start underscore
Set 1/8 inch line spacing
Set 7/72 inch line spacing
Enable line spacing by ESC A
Set graphics line spacing
in n/216 inch increment when FUNCTION 12 is OFF;
in n/180 inch increment when FUNCTION 12 is ON (AGM mode);
n = 1 to 255
Set top of form
Set/cancel automatic line feed
n = 0:End automatic line feed
n = 1:Start automatic line feed
Select Character Set 2
Select Character Set 1
Set 12 cpi mode
24 dot font image download
id = 35 or 36
48 dot font image download
id = 37
Set text line spacing *1
r1 r2 data
ESC A n
in n/72 inch increment when FUNCTION 12 is OFF;
in n/60 inch increment when FUNCTION 12 is ON (AGM mode);
n = 1 to 255
*1 • After text line spacing is set, use the ESC 2 code to enable text line spacing.
116
Appendix C Printer Command Summaries
Function
ASCII
Dec.
Set vertical tabs
ESC B n1...n64 NUL
0 27 66 n1...n64 0 1B 42 n1...n64 00
Hex.
ESC C n
27 67 n
1B 43 n
ESC C NUL n
27 67 0 n
1B 43 00 n
ESC D n1...n28 NUL
27 68 n1...n28 0
1B 44 n1...n28 00
ESC E
ESC F
27 69
27 70
1B 45
1B 46
27 71
27 72
27 73 n
27 74 n
1B 47
1B 48
1B 49 n
1B 4A n
27 75 n1 n2 data
1B 4B n1 n2 data
27 76 n1 n2 data
27 78 n
1B 4C n1 n2 data
1B 4E n
27 79
1B 4F
n1 ... n64 = line numbers for tab stops
n = 1 to 255 lines
Set page length in lines *2
n = line numbers on a page
n = 1 to 255
Set page length in inches *2
n = inches for a page
n = 1 to 255
Set horizontal tabs
C
n1 ... n28 = columns for tab stops
Set emphasised mode
Cancel emphasised mode
Cancel printing in twice the normal dot density.
Set by ESC E.
Set double-strike mode
Cancel double-strike mode
Select font pitch and print mode
Perform graphics line spacing
ESC G
ESC H
ESC I n *3
ESC J n
Line spacing amount becomes n/216 when FUNCTION 12 is OFF;
Line spacing amount becomes n/180 when FUNCTION 12 is ON;
n = 0 to 255
Set normal density image graphics mode
ESC K n1 n2 data
Set double density image graphics mode
ESC L n1 n2 data
Set perforation skip
ESC N n
n = 1 to 255 lines
Cancel perforation skip
ESC O
*2 Since the maximum page length for the printer is 20 inches, when the specified value is
more than 20 inches, the page length is set to 20 inches.
*3 n = 0: Draft 10 cpi (default: created from Gothic 10 cpi)
n = 2: Letter Quality 10 cpi (Courier 10 cpi)
n = 3: Letter Quality Proportional (Courier Proportional)
n = 4: Download Draft 10 cpi
n = 6: Download Letter Quality 10 cpi
n = 7: Download Letter Quality Proportional
n = 8: Draft 12 cpi (created from Gothic 10 cpi)
n = 10: Letter Quality 12 cpi (created from Prestige 10 cpi)
n = 12: Download Draft 12 cpi (created from download Draft 10 cpi)
n = 14: Download Letter Quality 12 cpi
n = 16: Draft 17 cpi (created from Gothic 10 cpi)
n = 18: Download Letter Quality 17 cpi (created from Courier 10 cpi)
n = 20: Download Draft 17 cpi (created from download Draft 10 cpi)
n = 22: Download Letter Quality 17 cpi (created from download Letter Quality 10 cpi)
n=Else:Command ignored
• Internal fonts are used if the characters are not downloaded.
• When 48-dots font is downloaded and 2, 3, 10, or 18 is set to n, font created from the
current font.
• When Draft font is selected using the printer control panel, the Courier font is used.
Appendix C Printer Command Summaries
117
Function
ASCII
Dec.
Hex.
27 80 n
1B 50 n
ESC Q n
27 81 n
1B 51 n
ESC R
ESC S n
27 82
27 83
1B 52
1B 53
ESC T
27 84
1B 54
ESC U n
27 85 n
1B 55 n
ESC W n
27 87 n
1B 57n
ESC X n m
27 88 n m
1B 58 n m
27 89 n1 n2 data
1B 59 n1 n2 data
27 90 n1 n2 data
27 91 64 n1 n2
m1 m2 m3 m4
27 91 75 n1 n2 n3 id
p1 p2
1B 5A n1 n2 data
1B 5B 40 n1 n2
m1 m2 m3 m4
1B 5B 4B n1 n2 n3 id
p1 p2
27 91 84 4 0
0 0 n1 n2
27 91 92 4 0
0 0 n1 n2
27 91 103 n1 n2
m data
1B 5B 54 04 00
00 00 n1 n2
1B 5B 5C 04 00
00 00 n1 n2
1B 5B 67 n1 n2
m data
Set/cancel proportional spacing mode ESC P n
n = 0: End proportional spacing
n = 1: Start proportional spacing
Deselect printer
n = 35, 36 or 37
Set all tabs to default setting
Set super/subscript mode
Cancel by ESC T.
n = 0: Select superscript mode
n = 1: Select subscript mode
Cancel super/subscript mode
Set by ESC S.
Select print direction
n = 0: Select bidirectional printing
n = 1: Select unidirectional printing (default)
Set/cancel double-wide mode
n = 0: Cancel double-wide mode
n = 1: Start double-wide mode
Set horizontal margins
n: Define the left margin
m: Define the right margin
Set double density image graphics mode ESC Y n1 n2 data
Set quadruple density image graphics mode
ESC Z n1 n2 data
Set presentation highlight *4
ESC [ @ n1 n2
m1 m2 m3 m4
Set initial condition
ESC [ K n1 n2 n3 id
p1 p2
n1: High-order byte specifies a code page
n2: Low-order byte specifies a code page
Set code page
ESC [ T 4 0
0 0 n1 n2
Change graphics line spacing
ESC [ \ 4 0
0 0 n1 n2
Select high resolution graphics mode ESC [ g n1 n2
m data
*4 Set or cancel the presentation highlight (double-high) mode.
ASCII ESC [ @ n1 n2 m1 m2 m3 m4
DEC
27 91 64 n1 n2 m1 m2 m3 m4
HEX
1B 5B 40 n1 n2 m1 m2 m3 m4
The parameters are set as follows:
n1 = 4 n2 = 0 m1 = 0 m2 = 0
m3 determines the character height and line feed amount:
Line Feed
Character Height
m3
0
1
2
16
17
18
32
33
34
No change
No change
No change
Normal line feed
Normal line feed
Normal line feed
Double line feed
Double line feed
Double line feed
No change
Single high
Double high
No change
Single high
Double high
No change
Single high
Double high
m4 determines character width:
m4 = 0:
m4 = 2:
118
No change
Double wide
m4 = 1:
Appendix C Printer Command Summaries
Single wide
Function
ASCII
Print continuously from All Characters Chart
ESC \ n1 n2 data
Print single character from All Characters Chart
ESC ^
Set/cancel overscore mode
ESC _ n
Dec.
Hex.
27 92 n1 n2 data
1B 5C n1 n2 data
27 94
27 95 n
1B 5E
1B 5F n
27 100 n1 n2
27 106
1B 64 n1 n2
1B 6A
n = 0: Cancel overscore mode
n = 1: Set overscore mode
Relative move inline forward
Set printer off-line
ESC d n1 n2
ESC j
C
Alternate Graphics Mode (AGM) codes
When AGM is set to ON, the following commands are available. When the AGM
is not selected, the commands ESC 3, ESC A, and ESC J are used to set different
line spacing.
Function
ASCII
Dec.
Hex.
Set graphics line spacing
ESC 3 n
27 51 n
1B 33 n
ESC A n
27 65 n
1B 41 n
ESC J n
27 74 n
1B 4A n
ESC * m n1 n2 data
27 42 m n1 n2 data 1B 2A m n1 n2 data
in n/180 increments; n=1 to 255
Set text line spacing
in n/60 inch per line; n=1 to 255:
Perform graphics line spacing
Line spacing amount is n/180;
n = 0 to 255
Select graphics mode
Miscellaneous control codes
Function
ASCII
Dec.
Hex.
Select Font Global
ESC [ I n1 n2 f1 f2
s1 s2 s3
FS C B m1 m2 n1
n2 data
FS C J m n
27 91 73 n1 n2 f1 f2
s1 s2 s3
28 67 66 m1 m2 n1
n2 data
28 67 74 m n
1B 5B 49 n1 n2 f1 f2
s1 s2 s3
1C 43 42 m1 m2 n1
n2 data
1C 43 4A m n
Set 360 dpi graphics
Set/Perform graphics line spacing
m = 0: set n/180 line spacing
m = 4: set n/360 line spacing
Appendix C Printer Command Summaries
119
ESCape sequence code for colour printing
When the Color BJ Cartridge BC-11e is installed in the printer, the following
colour command is available.
Function
ASCII
Dec.
Hex.
Select colour printing
n1 = 1, n2 = 0
m = 0;
m = 1;
m = 2;
m = 3;
m = 4;
m = 5;
m = 6;
ESC [ M n1 n2 m
27 91 77 n1 n2 m
1B 5B 4D n1 n2 m
Black (default)
Blue
Red
Magenta
Green
Cyan
Yellow
■ LQ mode command summary
All of the control codes shown in the following tables can be used when
the printer is in LQ mode.
Because of hardware differences, the justification code (ESC a) is not
supported on your printer. The styles of block graphics characters at 12
cpi are also different from normal LQ-2550 printing.
Basic control codes
Function
ASCII
Dec.
Hex.
End command
Sound beeper
Backspace one character
Horizontal tab control
NUL
BEL
BS
HT
0
7
8
9
00
07
08
09
LF
VT
10
11
0A
0B
FF
CR
SO
SI
12
13
14
15
0C
0D
0E
0F
DC1
DC2
17
18
11
12
19
20
24
32
127
13
14
18
20
7F
Move to next tab.
Perform line feed
Vertical tab control
Move to next tab.
Perform form feed
Perform carriage return
Set double-wide mode by line
Set condensed mode (17 cpi)
Cancel by DC2.
Select printer
Cancel condensed mode
Set by SI. Cancel also by setting 2nd bit to 0 in the ESC ! n code.
Deselect printer
Cancel double-wide mode
Cancel line
Insert space
Delete character
120
DC3
DC4
CAN
SP
DEL
Appendix C Printer Command Summaries
ESCape sequence codes
Function
ASCII
Dec.
Hex.
Set double-wide mode by line
Set condensed mode
Control automatic sheet feeder
ESC SO
ESC SI
ESC EM n
27 14
27 15
27 25 n
1B 0E
1B 0F
1B 19 n
ASCII
ESC SP n
Dec.
27 32 n
Hex.
1B 20 n
ESC ! n
ESC #
ESC $ n1 n2
ESC % n
ESC & NUL n1 n2
r1 r2 r3 data
ESC ( - n1 n2
m d1 d2
ESC ( t n1 n2
d1 d2 d3
ESC ( ^ n1 n2 data
27 33 n
27 35
27 36 n1 n2
27 37 n
27 38 0 n1 n2
r1 r2 r3 data
27 40 45 3 0
1 d1 d2
27 40 45 3 0
d1 d2 d3
27 40 n1 n2 data
1B 21 n
1B 23
1B 24 n1 n2
1B 25 n
1B 26 00 n1 n2
r1 r2 r3 data
1B 28 2D 03 00
01 d1 d2
1B 28 2D 03 00
d1 d2 d3
1B 28 5E n1 n2 data
n = R: Eject paper
Function
Set inter-character space
n = 0 to 127
Select various print modes *1
Cancel MSB control
Set absolute print position
Select download character set
Define download characters
Select score mode *2
Assign character table *3
Print data as characters
C
*1 Use the bit pattern (bit 0 to bit 7) of n, where n can range from 0 to 255, to set
or cancel a combination of character pitch and highlighting.
Bit
1
0
0
12 cpi
10 cpi
1
PS
Cancel
2
Condensed
Cancel
3
Emphasized
Cancel
*2 d1 determines the score position:
d1 = 1: underscore
d1 = 2: strikethrough
d1 = 3: overscore
d2 determines the score type:
d2 = 0: cancel the score set by d1
d2 = 1: single continuous line
d2 = 2: double continuous line
d2 = 5: single broken line]
d2 = 6: double broken line
4
Double
Cancel
5
6
7
Double wide Italic
Underscore
Cancel
Cancel Cancel
*3 d1 defines the character table
area
d1 = 0, 48: Table 0
d1 = 1, 49: Table 1
d1 = 2, 50: Table 2
d1 = 3, 51: Table 3
d2 defines the character table
d2 = 0:
Italics table
d2 = 1:
Code Page 437
d2 = 3:
Code Page 850
d2 = 6:
Code Page 855
d2 = 7:
Code Page 860
d2 = 8:
Code Page 863
d2 = 9:
Code Page 865
d2 = 10: Code Page 852
d2 = 11: Code Page 857
d2 = 13: Code Page 864
d2 = 15: Code Page 869
d3 =0
Appendix C Printer Command Summaries
121
Function
ASCII
Dec.
Select image graphics mode *4
Set n/360 inch line spacing
ESC * m n1 n2 data
ESC + n
27 42 m n1 n2 data 1B 2A m n1 n2 data
27 43 n
1B 2B n
Hex.
ESC _ n
27 45 n
1B 2D n
ESC / c
27 47 c
1B 2F c
ESC 0
ESC 2
ESC 3 n
27 48
27 50
27 51 n
1B 30
1B 32
1B 33 n
ESC 4
27 52
1B 34
ESC 5
ESC 6
ESC 7
ESC : NUL n NUL
27 53
27 54
27 55
27 58 0 n 0
1B 35
1B 36
1B 37
1B 3A 00 n 00
ESC @
ESC =
ESC :
ESC ? n m
ESC @
27 60
27 61
27 62
27 63 n m
27 64
1B 3C
1B 3D
1B 3E
1B 3F n m
1B 40
ESC A n
27 65 n
1B 41 n
ESC B n1...n16 NUL
ESC C n
27 66 n1...n16 6 0 1B 42 n1...n16 00
27 67 n
1B 43 n
ESC C NUL n
27 67 0 n
n = 0 to 255
Set/cancel underline mode
n = 0: Cancel auto-underscore
n = 1: Set auto-underscore
Select vertical tab channel
n = 0 to 7: Select tab cancel
Set 1/8 inch line spacing
Set 1/6 inch line spacing
Set n/180 inch line spacing
n = 0 to 255
Set italic mode
Cancel by ESC 5.
Cancel italic mode
Expand printable range
Cancel printable range expansion
Copy ROM font to RAM
n: Defines font typeface
Set unidirectional print by line
Set MSB to 0
Set MSB to 1
Reassign image graphics mode
Reset printer
Initialize all printer settings to the values when the printer goes on.
Set n/60 inch line spacing
n = 0 to 85
Set vertical tabs
Set page length in lines
n = 1 to 127
Set page length in inches
1B 43 00 n
n = 1 to 20
*4
122
m Dot Density (DPI)
Vertical Horizontal
0
60
60
1
60
120
2
60
120
3
60
240
4
60
80
6
60
90
32
180
60
33
180
120
38
180
90
39
180
180
40
180
360
71
180
1440
72
360
2880
73
360
2880
Bit Image Mode
8-bit normal-density bit image
8-bit double-density bit image
8-bit double-velocity double-density bit image
8-bit quadruple-density bit image
8-bit CRT graphics I
8-bit CRT graphics II
24-bit normal-density bit image
24-bit double-density bit image
24-bit CRT graphics II
24-bit triple-density bit image
24-bit sixtuple-density bit image
48-bit triple-density bit image
48-bit sixtuple-density bit image
48-bit sixtuple-density bit image
Appendix C Printer Command Summaries
Function
ASCII
Dec.
Hex.
Set horizontal tabs
Set emphasized mode
ESC D n1...n32 NUL
ESC E
27 68n1...n32 0
27 69
1B 44n1...n32 00
1B 45
ESC F
ESC G
ESC H
ESC J n
27 70
27 71
27 72
27 74 n
1B 46
1B 47
1B 48
1B 4A n
ESC K n1 n2 data
ESC L n1 n2 data
ESC M
27 75 n1 n2 data
27 76 n1 n2 data
27 77
1B 4B n1 n2 data
1B 4C n1 n2 data
1B 4D
ESC O
ESC P
27 80
1B 50
ESC Q n
ESC R n
ESC S n
27 81 n
27 82 n
27 83 n
1B 51 n
1B 52 n
1B 53 0n
ESC T
ESC U n
27 84
27 85 n
1B 54
1B 55 n
ESC W n
27 87 n
1B 57 n
ESC Y n1 n2 data
ESC Z n1 n2 data
ESC \ n1 n2
ESC b c n1...n16 NUL
27 89 n1 n2 data
27 90 n1 n2 data
27 92 n1 n2
27 98 c n1...n16 0
1B 59 n1 n2 data
1B 5A n1 n2 data
1B 5C n1 n2
1B 62 c n1...n16 00
ESC g
27 103
1B 67
Cancel by ESC F.
Cancel emphasized mode
Set double-strike mode
Cancel double-strike mode
Perform n/180 inch line feed
n = 0 to 255
Set single-density graphics mode
Set double-density graphics mode
Set 12 cpi mode
C
Cancel by ESC P.
Set perforation skip
ESC N
n = 1 to 127
Cancel perforation skip
Set 10 cpi mode
Cancel 12 cpi or 15 cpi mode.
Set right margin
Select international character set *5
Set super/subscript mode
n = 0: Set superscript mode
n = 1: Set subscript mode
Cancel by ESC T.
Cancel super/subscript mode
Select print direction
n = 0: Set bidirectional printing
n = 1: Set undirectional printing
Set/cancel double-wide mode
n = 0: Cancel double-wide mode
n = 1: Set double-wide mode
Set double-density graphics mode
Set quadruple-density graphics mode
Set relative print position
Set vertical tabs in channels
c = 0 to 7: Select channel
Set 15 cpi mode
Cancel by ESC P.
*5
n = 0 USA
n = 1 France
n = 2 Germany
n = 3 UK
n = 4 Denmark I
n = 5 Sweden
n = 6 Italy
n = 7 Spain I
n = 8 Japan
n = 9 Norway
n = 10 Denmark II
n = 11 Spain II
n = 12 Latin America
n = 13 Korea
n = 64 Legal
The initial value is determined by FUNCTION 11, 12, and 13.
Appendix C Printer Command Summaries
123
Function
ASCII
Dec.
Hex.
27 107 n
27 108 n
27 112 n
1B 6B n
1B 6C n
1B 70 n
ESC q n
27 113 n
1B 71 n
ESC t n
27 116 n
1B 74 n
ESC w n
27 119 n
1B 77 n
Select high-speed/high-quality mode ESC x n
27 120 n
1B 78 n
Select typeface *6
ESC k n
Set left margin
ESC l n
Set/cancel proportional space mode ESC p n
n=0: Cancel proportional spacing
n=1: Set proportional spacing
Select character style
n = 0: Normal
n = 1: Outline
n = 2: Shadowing
n = 3: Outline with shadowing
n = Else: Command ignored
Select character table
n = 0: Table 0 (Italics table)
n = 1: Table 1 (Code Page Selected by FUNCTION)
n = 2: Table 2 (Download table)
n = 3: Table 3 (Code Page Selected by FUNCTION)
Set/cancel double-high mode
n = 0: Cancel double-high mode
n = 1: Set double-high mode
n = 0: Set Draft mode
n = 1: Set high-quality (HQ) mode
*6
n=0
Roman (10,12,15,17,20, Proportional)
n=1
Gothic (10,12,15,17,20, Proportional)
n=2
Courier (10,12,15,17,20, Proportional)
n=3
Prestige (10,12,15,17,20, Proportional)
n = Other Roman
The initial value of n is set via the control panel.
ESCape sequence code for colour printing
When the Color BJ Cartridge BC-11e is installed in the printer, the following
colour command is available.
124
Function
ASCII
Dec.
Hex.
Select colour printing
n = 0; Black
n = 1; Magenta
n = 2; Cyan
n = 3; Blue
n = 4; Yellow
n = 5; Red
n = 6; Green
n = else; Command ignored
ESC r n
27 114 n
1B 72 n
Appendix C Printer Command Summaries
Appendix D
Options and Supplies
Whenever you need any of these replaceable items, contact a local
Canon Authorised Dealer or your Canon representative.
■ Consumables
D
Black BJ Cartridge BC-10
Contains both a print head unit and replaceable black ink cartridge.
Ink Cartridge BCI-10 Black
Used in the Black BJ Cartridge BC-10.
Color BJ Cartridge BC-11e
Incorporates a Bubble Jet print head and two replaceable ink
cartridges: the Ink Cartridge BCI-11 Color and the Ink Cartridge
BCI-11 Black.
Ink Cartridge BCI-11 Black
Used in the Color BJ Cartridge BC-11e.
Ink Cartridge BCI-11 Color
Three-colour ink cartridge used in the Color BJ Cartridge BC-11e.
Canon Li-Ion Battery LB-50
Rechargeable battery pack.
Appendix D Options and Supplies
125
■ Paper and special media
Name
Bubble Jet Paper LC-301
Glossy Photo Paper GP-301
Glossy Photo Cards FM-101
High Resolution Paper HR-101
Transparency CF-102
High Gloss Film HG-101
Back Print Film BF-102
Fabric Sheet FS-101
T-Shirt Transfer TR-201
Media Type
Plain Paper
Glossy Paper
Glossy Photo cards
Coated Paper
Transparency
High Gloss Film
Back Print Film
Fabric Sheet
T-Shirt Transfer
Sizes
A4, LTR
A4, LTR
119.6 x 216mm
A4, LTR
A4, LTR
A4, LTR
A4, LTR
241 x 356 mm
216 x 279 mm
■ Available options
Canon Auto Sheet Feeder ASF-50
Allows you to stack and feed more than one sheet for printing.
Color Image Scanner Cartridge IS-12
This Scanner Cartridge turns your printer into a colour scanner.
BJ Cartridge Storage Container SB-10
Used for storing partially used Color BJ Cartridge BC-11e or Black
BJ Cartridge BC-10.
126
Appendix D Options and Supplies
Appendix E
Infrared Communications
■ System Requirements
In order to utilize the infrared communication capability, Microsoft IR
Communications Driver Version 2.0 is required.
Please also note that the following minimum hardware and software
requirements to enable infrared communication with the IR
Communications Driver Version 2.0.
•
•
•
•
•
Machine Architectures
CPU
IrDA
Baud Rate (Transfer Speed)
Hardware Device
• Operating System
:
:
:
:
:
IBM PC/AT or compatible computer
Intel 80386 or higher
IrDA 1.0 compliant
Max. 115.2k bps
An infrared port built into the system
or an infrared adapter connected to
one of the system's serial or parallel
ports
: Windows 95
E
■ Before Installing the IR Communications Driver
Version 2.0
Please make sure that the IR Communications Driver Version 2.0 is
installed in the hard disk of your computer.
1.
Double-click on the Add/Remove Programs icon in the Control
Panel for Windows. This displays the Add/Remove Programs
Properties window.
2.
If the IR Communications Driver Version 2.0 is displayed in the
Install/Uninstall tab (e.g., Infrared Support for Windows 95 Version
2.0), you can use the infrared communication capability.
Appendix E Infrared Communications
127
When the Microsoft IR Communications Driver
Version 2.0 is installed in the hard disk of your
computer
1.
From the Start menu, choose Find, then click on Files or Folders.
This displays the Find All Files dialog box.
2.
Enter the file name “Relnotes.doc” or “Infrared.txt” in the Named
box, and then click on the Find Now button. (Normally, these files
exist under the Windows directory.)
3.
The “Relnotes.doc” or “Infrared.txt” file describes the procedures
for installing and using the IR Communications Driver Version 2.0.
Please read the contents of the file carefully.
• When you install the IR Communications Driver Version 2.0 using the
Add New Hardware's automatic detection in the Control Panel for
Windows, the IR Communications Driver Version 2.0 may not be
installed properly. If this should occur, follow the procedure below.
1) When the message “Do you want Windows to search for your new
hardware?” is displayed, choose No.
2) Choose type of the hardware on the next screen, and then install
the IR Communications Driver Version 2.0.
• When you start up the IR Communications Driver Version 2.0, doubleclick on the Infrared icon in the Control Panel for Windows. To check
that infrared communication operation is enabled, click on the Status
tab.
• When you operate the printer using infrared communication, open the
Details tab from the printer properties dialog, then specify the COM
port in the Print to the following port box. (e.g., Infrared Serial (COM)
Connections Port Normally, COM4 is assigned.) Please note that the
LPT setting is not effective and the printer does not operate.
For more details on the port settings, please refer to the
“Relnotes.doc” or “Infrared.txt” file.
• When using the Color Image Scanner IS-12, use of an interface cable
is recommended; otherwise the scanner operation becomes slower.
128
Appendix E Infrared Communications
When the Microsoft IR Communications Driver
Version 2.0 is NOT installed in the hard disk of
your computer
Please refer to the User's Manual of your computer for more
information on infrared communication or consult with your computer
manufacturer.
If necessary, you can download the Microsoft IR Communications
Driver Version 2.0 from the Web site of Microsoft Corporation.
E
Appendix E Infrared Communications
129
Appendix F
Specifications
■ Printer Specifications
Printing Method
Bubble jet ink on-demand
Paper Handling
Automatic feed
Print Speed
BC-10 Black print speed*:
HQ mode
346 cps
HS mode
434 cps
BC-11e Colour print speed:
Fine mode
0.26 ppm
HQ mode
1.8 ppm
HS mode
2.1 ppm
Printing Direction
Uni-directional (or bi-directional, depends on data
format)
Print Width
Maximum 8 inches
Line Feed Speed
Approximately 70 ms/line at 1/6 inch line in HQ, HS
mode
Resident Printer
BJ mode : IBM Proprinter X24E emulation
Control Modes
LQ mode: EPSON LQ-2550 emulation (for colour
printing)
EPSON LQ-510 emulation (for black
printing)
Canon Extended Mode
* Print speed depends on content of the document.
130
Appendix F Specifications
Line Feed Pitch (inch) BJ mode:
LQ mode:
Printing Characters Typeface:
Pitch:
1/6, 1/8, n/60, n/72, n/180, n/216, and n/360
1/6, 1/8, n/180, and n/360 (n: programmable)
Roman, Gothic, Courier, Prestige, and Draft
BJ mode — 10, 12, 17 cpi, and PS
LQ mode — 10, 12, 15, 17, 20 cpi, and PS
Cell composition:
36 (h) x 48 (v) dot matrix in HQ mode
18 out of 36 (h) x 48 (v) dot matrix in HS
mode
Character set:
BJ mode — IBM character set 1, 2, and All
characters chart
LQ mode — Italic character table and
Graphics character
Code page: 437, 850, 860, 863, 865, 857, 855, 852, 864,
and 869
Maximum Number of Characters per Line
BJ mode:
Mode
10 cpi
10 cpi double-wide
10 cpi condensed
10 cpi condensed double-wide
12 cpi
12 cpi double-wide
Proportional spacing
Characters per line
Pitch
10.0 cpi
80.0 cpl
5.0 cpi
40.0 cpl
17.0 cpi
136.0 cpl
8.5 cpi
68.0 cpl
12.0 cpi
96.0 cpl
6.0 cpi
48.0 cpl
PS
Varies
LQ mode:
Mode
10 cpi
10 cpi double-wide
10 cpi condensed
10 cpi condensed double-wide
12 cpi
12 cpi double-wide
12 cpi condensed
12 cpi condensed double-wide
15 cpi
15 cpi double-wide
Proportional spacing
Pitch
Characters per line
10.0 cpi
80.0 cpl
5.0 cpi
40.0 cpl
17.0 cpi
136.0 cpl
8.5 cpi
68.0 cpl
12.0 cpi
96.0 cpl
6.0 cpi
48.0 cpl
20.0 cpi
160.0 cpl
10.0 cpi
80.0 cpl
15.0 cpi
120.0 cpl
7.5 cpi
60.0 cpl
PS
Varies
Appendix F Specifications
F
131
Graphic Image Print Data format: Vertical 8, 24, and/or 48-dot format
Resolution: Horizontal 60 dpi
Horizontal 120 dpi
Horizontal 180 dpi
Horizontal 240 dpi
Horizontal 360 dpi
Horizontal 720 dpi
Buffer
BJ mode: Input buffer:
34 kB (or 2 kB)
Download buffer: 0 kB (or 32 kB)
LQ mode: Input buffer:
25 kB (or 2kB)
Download buffer: 0 kB (or 23 kB)
The values in parentheses show the buffer sizes when
automatic emulation switching is turned on.
Interface
IEEE 1284 compatible parallel interface
IrDA 1.0 interface
Color BJ Cartridge BC-11e
Print head:
64 nozzles for Black, 24 nozzles each for
Cyan, Magenta, and Yellow
Ink Colour: Black, Cyan, Magenta, and Yellow
Number of pages printed (Black Ink Cartridge BCI-11):
Approx. 45 pages/cartridge in HQ mode (at
5% coverage)
Number of pages printed (Color Ink Cartridge BCI-11):
Approx. 40 pages/cartridge in HQ mode (at
7.5% coverage for each colour)
Black BJ Cartridge BC-10
Print head: 128 bubble jet nozzles
Ink Colour: Black
Number of pages printed:
Approx. 170 pages/cartridge in HQ mode
(at 5% coverage)
132
Appendix F Specifications
Acoustic Noise Level
45 dB or less in HQ mode (Approx. 43 dB in Fine mode)
(Per ISO 9296)
Operating Environment Temperature:
Humidity:
5 °C to 35 °C (41 °F to 95 °F)
10% to 90% RH (no condensation)
Storage Environment Temperature:
Humidity:
0 °C to 35 °C (32 °F to 95 °F)
5% to 95% RH (no condensation)
Power Source
Universal AC Adapter AD-360U connected to AC power
source
Power Consumption
Printing:
Standby:
Off:
Type:
Voltage level:
Size:
Weight:
Battery Pack
23W
3W
2W
Lithium-ion battery
12V DC
213.3 x 28.5 x 20.6 mm
Approx. 160 g
Dimensions (W x D x H):
302 mm (11.9 in.) x 112.5 mm (4.4 in.) x 49 mm (2 in.)
Weight
Approx. 900g (2.0 lb.) including battery
F
Appendix F Specifications
133
Appendix G
Interface Specifications
■ Parallel interface
To connect this printer with a computer via the parallel interface
connector provided on the printer, you must use the Canon Printer
Cable BIFC-50 provided with printer (or its equivalent).
Interface type:
Interface cable
Type:
Material:
Length:
Interface connectors
Printer side:
Cable side:
Parallel Centronics with 1mm-pitched
connector.
Twisted-pair shielded cable with a ferrite core
AWG#28
1.5 m (5 ft)
Japan Molex 52629-2611 (or equivalent)
Fujitsu Takamisawa Component FCN-28φP26
G/E (or equivalent)
■ IrDA interface
Because of its simplicity and versatility, the IrDA interface, controlled
by the Infra-red Data Association, is rapidly gaining popularity among
users of personal computers.
Interface type:
Data rates:
Effective angle:
Effective distance:
134
IrDA 1.0 Compatible
Maximum 115.2 kbps
±15°
Maximum 1.0 m (3.2 ft.)
Appendix G Interface Specifications
Glossary
A4 size paper
A paper size: 210 mm x 297 mm. This printer accepts A4 paper.
AC
Alternating current. The type of electrical current available from a wall
outlet.
additive colours
The three primary colours (red, green, and blue) frequently abbreviated
as RGB. When combined using an additive process at varying
intensities on a colour monitor, for example, these three colours can be
used to create a wide spectrum of colours.
AGM
Alternate Graphics Mode. Available in BJ mode for IBM Proprinter
X24E emulation.
ASCII
Acronym for American Standard Code for Information Interchange. A
set of definitions for the bit composition of characters and symbols.
ASCII defines 128 symbols using 7 binary bits and 1 parity bit.
Auto Power Off
A power save feature that switches off the printer automatically if the
printer does not receive a print job over 30 minutes. The Auto Power
Off feature is switched off and on with the printer driver.
Glossary
ASCII chart
A chart correlating ASCII codes with specific control functions or
alphanumeric characters. See control code.
battery pack
The Canon Li-Ion Battery LB-50 is a rechargeable battery installed
inside the printer.
binary
A number system consisting of two digits (0 and 1).
Glossary
135
bit
Shortened form “binary digit”. The elemental unit of digital
information. Written as either 1 or 0.
BJ Cartridge
The BJ Cartridge is composed of the print head unit and ink cartridge.
This removable cartridge makes maintenance of the printer very simple.
BJ mode
The printer control mode in which the printer emulates the IBM
Proprinter X24E.
Bubble Jet printer
An ink jet type printer that heats the ink to a boiling point in a nozzle to
form a bubble. When the bubble expands, there is no room left in the
nozzle for the ink which is ejected onto the paper.
buffer
A temporary storage area in computer or printer memory in which data
for input or output is stored until it can be processed.
byte
A unit of eight bits. A byte is approximately equivalent to a character.
cartridge holder
A unit that holds the BJ Cartridge and its ink cartridges. The cartridge
holder moves backwards and forwards when the printer is operating and
remains at rest in the home position on the left side of the printer when
the printer is not in use.
character
Any symbol that has a widely understood meaning and can thus convey
information. Some characters, such as letters, numbers, and punctuation
marks, are printable.
character set
A complete collection of the characters and symbols that constitute all
the elements of a language or discipline (mathematics, for example),
including punctuation and numbers, with a one-to-one correspondence
to the ASCII codes 00h-7Fh (hexadecimal). The printer uses these
characters to determine its printing and non-printing activities after it
receives data from the host computer.
136
Glossary
CMYK
An acronym for Cyan, Magenta, Yellow and black, the four colours
used in the standard colour model of the printing industry.
code page
A set of 256 graphic designs (characters) associated with unique code
values from 0 through 255. The printer supports 10 code pages - 437,
850, 852, 855, 857, 860, 863, 864, 865, and 869.
command
An instruction that tells the printer to perform a certain function.
Commands are sent from the host computer to the printer via the printer
cable when the printer is on-line.
Commercial 10 (US Commercial)
A common size of envelope: 9.5 x 4.1 inches or 241 x 105 mm.
composite black
The composite black colour formed by mixing cyan, yellow, and
magenta ink so that they appear almost black on a print out.
configuration
The defining of certain printer settings to allow the printer to
communicate properly with your computer.
cpi
Characters per inch. A unit of measurement relevant to a fixed-space
font. Because all characters have the same width, you can calculate the
number of characters printed per inch.
cpl
Characters per line. A unit of measurement that indicates the number of
characters printed per line.
Glossary
control code
Special data that invokes non-printing functions of the printer, such as
line feed or carriage return. In the ASCII chart, control codes are
represented by decimal numbers 0-31, 127, 128, 159, and 255.
cps
Characters per second. A unit of measurement that indicates the
printer’s speed.
dB
Stands for decibel level (a decibel being a unit of measurement for the
intensity of the sound), adjusted for background noise.
Glossary
137
default setting
A printer setting selected at the factory and permanently registered in
the printer’s ROM. It is a setting that the printer assumes unless you
provide instruction to the contrary. For example, the default printer
control mode on this printer is BJ mode.
dithering
A method by which colour dots are combined on a page to produce a
wide spectrum of colours.
dot matrix
A pattern of dots arranged in a matrix, used for creating alphanumeric
strings, punctuation, and special characters. A matrix is described by the
number of rows and columns it has, for example, 9 x 12 (108 cells).
download buffer
An area of the printer’s memory that holds downloaded font
information.
downloading
The process of transferring fonts from the computer to the printer’s
memory. These transferred fonts can be stored in the printer until it is
turned off.
dpi (dots per inch)
A unit of measurement for indicating printer resolution. The standard
resolution for your printer is 360 dpi in the HQ mode. In the smoothing
mode, resolution up to 720 x 360 dpi can be achieved.
embedded printer commands
Printer commands typed directly into a software file by a user to instruct
the printer to change its printing characteristics, such as to change fonts
or to underline text.
escape character
A non-printing character used to indicate to the printer that the data that
follows is an Escape sequence.
escape sequences
Commands beginning with the Escape character, which are used to
control the printer. The unprintable Escape character is followed by a
unique series of letters and numbers that provide instructions to the
printer.
138
Glossary
factory default
Factory defaults refer to the settings that are selected for the printer at
the factory. These settings are used unless you override them by sending
escape sequences.
fixed pitch spacing
Equal spacing for each characters of the same character set. In printing
a fixed pitch font, each character, whether narrow or wide, takes up the
same amount of space.
fixed pitch font
A font in which all characters take up the same amount of space. An “i”
takes as much space as a “w”.
font
A complete set of characters of the same size and style; a particular
implementation of a typeface. For example, 12 point, Courier bold.
font characteristics
Font characteristics determine the appearance of a printed font. These
characteristics include orientation, character height, style, stroke weight,
and typeface.
form feed
A printer function that automatically ejects the current page and
advances the printer to the top of the next page.
greyscale
The variation of colour between black and white as a result of different
intensities of black ink.
Glossary
graphic
A written, printed, or electronically displayed symbol or drawing. Also
characters or text that has been generated by a computer graphics
application program.
halftone
Shades of grey or shades of colours produced by mapping dots to be
printed. For colour printing, different coloured dots of ink are placed
closely together to create illusions of other colours.
hexadecimal
Numbers represented in base 16. Digits 0-9 and A, B, C, D, E, F are
used. Frequently used in programming and referred to as “hex”.
Glossary
139
hexadecimal dump mode
On a printer, a mode used to print out data or commands sent from the
host. It is information that is useful for debugging programs.
High Quality (HQ) mode
One of the print modes available on this printer. Print speed is 346 cps
at 10 cpi.
High Speed (HS) mode
One of the print modes available on this printer. Print speed is 434 cps
at 10 cpi.
home position
This term refers to the position of the cartridge holder when it is at rest
on the far left side of the platen. In this position, the print head is always
capped to keep it from drying out. The cartridge holder moves out of the
home position when the printer starts printing or after you press the
CARTRIDGE button to move it out so you can remove the BJ
Cartridge.
host computer
The computer that is connected to a printer and can be used to drive the
printer when the printer is on-line.
hue
A colour in the colour spectrum. Examples are red, green, and violet.
ink jet printer
A non-impact printer that ejects ink onto paper to form characters. This
printer is a special type of ink jet printer called a Bubble Jet printer.
input buffer
An area of the printer’s memory containing the data that has been sent
to the printer.
interface
The connection between two devices that makes it possible for them to
communicate with each other. The printer features a parallel interface,
which makes it compatible with IBM and similar personal computers.
In order to connect the printer and computer via the parallel interface,
you must use the Canon Printer Cable BIFC-50 provided with the
printer.
140
Glossary
interface port
The printer is provided with a parallel and an IrDA port on the left side
of the printer.
internal fonts
Internal fonts are fonts permanently stored in the printer.
IrDA
Infra-red Data Association. The standard for the infra-red wireless
communication. This printer has IrDA1.0 which allows a maximum
data transfer of 115.2 kbps.
kB
See kilobyte.
kilobyte (kB)
A unit of measurement, representing the binary number 1024, used to
describe printer or computer memory size in 1024-byte units.
landscape orientation
Landscape orientation refers to printing across the length of the page, as
opposed to portrait orientation, which is printing across the width of the
page.
Legal size paper
A paper size: 8.5 x 14 inches. This printer accepts this size of paper.
Letter size paper
A paper size: 8.5 x 11 inches. This printer accepts this size of paper.
lpi
Lines per inch. The measurement used in describing the number of lines
that will print within one vertical inch. Most printing is done in 6 or 8
lpi.
Glossary
line feed
A printer function that advances the paper one line.
LQ mode
The printer control mode in which the printer emulates the EPSON LQ2550 printer. Colour printing is only available in this mode.
noise level
See dB.
Glossary
141
non-impact printer
Printers, such as Bubble Jet, ink jet, thermal, and laser printers, that
form characters by means other than striking the character against the
paper. These printers run more quietly than dot matrix and formedcharacter printers. Your printer is a non-impact printer.
page orientation
Orientation refers to the direction of print on the page. Printing across
the width of a page is called portrait orientation printing. Printing across
the length of a page is called landscape orientation printing.
paper feed
Refers to guiding a sheet of paper into the printer’s paper path.
paper jam
Paper is caught along the paper path. You must remove jammed paper
before you can continue printing.
parallel interface
An interface that transmits multiple bits simultaneously (usually in onebyte segments). Your printer is provided with one parallel interface port
on the left side of the printer.
PC
Personal computer
pitch
Refers to the number of characters per inch that can be printed using a
fixed-space font.
platen
Printer component that holds the paper near the print head during ink
transfer.
point size
Character height is defined in points; one point is 1/72 inch. For
instance, this text is printed using a 10 point font.
printer cable
The cable used to connect your printer and a computer.
printing area
The area of a sheet of paper on which a printer can reproduce text or
graphics. The printing area is smaller than the paper.
142
Glossary
print head capping
An automatic protection function that prevents the print head unit and
ink cartridges from drying out or becoming clogged with dust.
Print mode
The print mode setting determines how the printer operates. Set the
print mode according to the type of printing you want to do and the type
of media you are using. There are three print modes: HQ (High
Quality), HS (High Speed), and FINE.
printer command
A printer command is also called an escape sequence. Refer to the
definition for Escape Sequence.
printer control mode
This printer has two control modes: LQ and BJ. The printer control
mode determines the features the printer supports.
printer driver
Software that sends printing instructions to a printer. The printer driver
keeps track of the attributes of a printer and the codes the program must
send to access those attributes.
proportionally spaced font (PS font)
A font in which each characters is given an amount of space
proportional to its size: less for an “i” and more for a “w”.
PS
In this manual, PS stands for “proportionally spaced” not “PostScript”.
RAM
Random Access Memory. Printer memory that is used for temporary
storage of information you want to print and for downloaded fonts.
Glossary
proportional spacing
The spacing of characters according to the width of each character. This
variable spacing between each character closes up awkward-looking
gaps and makes the text easier to read.
resident font
A font that is built into the printer, as opposed to one that must be
downloaded from your computer. Resident fonts are stored in ROM.
Glossary
143
resolution
The density of dots for any given output device. Expressed in terms of
dots per inch (dpi). Low resolution causes font characters and graphics
to have a jagged appearance. Higher resolution means smoother curves
and angles as well as a better match to traditional typeface designs. This
printer can normally produce output with 360 dpi resolution. When you
see a value given for resolution, the resolution for the horizontal
direction is given first and the vertical direction second. For example,
720 x 360 dpi means 720 dots horizontally and 360 dots vertically. The
maximum 720 x 360 dpi print resolution for this printer can be attained
with a Black BJ Cartridge BC-10 while the smoothing function turned
on.
RGB
An acronym for Red, Green, and Blue, the three primary colours used in
the additive process to form a wide spectrum of colours.
ROM
Read Only Memory. You cannot modify this printer memory. When the
printer is turned off, ROM memory remains intact. In this printer, the
default settings and the resident fonts are stored in ROM.
saturation
The amount of hue of a colour. The further the particular hue moves
away from the center of the colour wheel, the more saturated it is.
software application
Software prepared for a specific function or set of functions. Examples
of applications are word processing, graphics preparation, and spreadsheets. Programmers who prepare application programs include printer
drivers that support different types of printers.
spacing
All fonts are designed with either fixed or proportional spacing. Using
fixed spacing, all character cells are the same width. Using proportional
spacing, character cell width depends on the character size.
subscript
One or more characters printed one-half line below the normal printing
line. See also Superscript.
144
Glossary
subtractive colours
The three primary colours (cyan, yellow, and magenta) which when
combined through a subtractive process reflect light of a particular
colour.
superscript
One or more characters printed one-half line above the normal printing
line. See also Subscript.
text mode
The mode the printer is in when it is printing text.
text scale mode
The mode that reduces the line spacing by a factor of 14/15 (from 62 to
66 lines per page if line spacing is set to 6 lines per inch). This provides
compatibility with software that assumes 66 lines will fit on each page.
top-of-form (TOF)
The printing position at the start of a new page.
true black
Contrary to “composite black”, true black colour on a printout is
obtained with the use of black ink.
TrueType font
The scalable font technology built into Microsoft Windows 98/
Windows 95 and other software programs. It offers you the same font
images on both computer displays and printer outputs.
Glossary
typeface
The design of characters. For instance, Courier, Script, and Roman
typefaces all print characters of different designs.
typestyle
Refers to how the type face appears: slanted (italic) or upright.
Glossary
145
Index
A
AC adapter
attaching, 26
connecting to printer, 26
Auto Power Off
described, 28
Auto Sheet Feeder ASF-50
described, 16
location, 15
option, 13
B
Back Print Film BF-102
backlighting, 58
described, 11
Media Type setting, 42
print side, 42
purpose, 42
battery pack
described, 16
disposal, 21
handling, 21
handling precautions, 21
inserting in printer, 20
installing, 19, 20
location, 15
recharging, 62
replacing, 62, 64
safety precautions, 21
storing, 21
temperature, 21
battery pack release
described, 16
location, 15
BJ Cartridge
changing, 52
ink quality, 8
installation guidelines, 29
installing, 28, 30
removing for Scanner Cartridge, 73
146
Index
removing protective cap, 31
removing protective tape, 31
replacing, 72
storing, 54
test print, 33
BJ Cartridge Storage Container SB-10
described, 10
option, 13
storing BJ Cartridge, 54
BJ Mode
Font sample, 49
Ripple Pattern sample, 48
black and white
switching to colour, 51
Black BJ Cartridge BC-10
capacity, 129
changing, 52
described, 10, 67
installing, 28
service life, 129
Bubble Jet Paper LC-301
described, 11
Media Type setting, 42
print side, 42
purpose, 42
C
Canon Li-Ion Battery LB-50
battery pack, 12
installing, 19
See also “battery pack”, 21
CARTRIDGE button
described, 17
location, 17
character sets
BJ Mode, 108, 109, 110
EPSON, 112
Graphics Character Table, 113
international, 111
Italics Character Table, 113
software application adjustment, 60
switching to black and white, 51
consumables
listed, 125
D
Demonstration
sample, 35, 47
starting test print, 45
DOS
compatible printer drivers, 37
printer driver, 36, 37
drivers
DOS printer driver, 36, 37
installing printer drivers, 36
opening Windows 3.1 printer
driver, 41
opening Windows 98/Windows 95
printer driver, 40
printer drivers, 36
Windows 98/Windows 95/
Windows 3.1, 36
E
envelopes
flattening before loading, 39
errors
see “troubleshooting”, 83
F
Fabric Sheet FS-101
colour designs, 58
described, 12
Media Type setting, 42
print side, 42
feed slot
described, 16
location, 15
flushing
print head, 80
Font Sample
BJ Mode sample, 49
LQ Mode sample, 50
sample, 49, 50
starting test print, 45
front cover
described, 16
location, 15
Index
LQ Mode, 111
CHARGE/ERROR lamp
described, 19
errors, 84, 85
flashes for low power, 26
lights during recharging, 19
lights or flashes for error, 19
location, 17
cleaning
inside printer, 79
outside printer, 79
print head, 80
printer, 78
CMYK
colour printing, 59
code pages
864, 106
Canadian French 863, 106
Cyrillic 855, 104
Greek 869, 107
listed, 102
Multilingual 850, 103
Nordic 865, 107
Portuguese 860, 105
Slavic 852, 104
Turkish 857, 105
USA English 437, 103
Color BJ Cartridge BC-11e
capacity, 129
changing, 52
described, 9, 67
installing, 28
service life, 129
Color Image Scanner Cartridge IS-12
described, 10
installing, 73, 75
option, 13
removing, 76
storing, 77
colour printing
CMYK, 59
cost, 61
matching colours, 59
monitor adjustment, 60
RGB, 59
select media, 57
software application, 58
Index
147
G
Glossy Photo Cards FM-101
colour printing, 58
described, 12
Media Type setting, 42
print side, 42
purpose, 42
Glossy Photo Paper GP-301
colour printing, 58
described, 11
Media Type setting, 42
print side, 42
purpose, 42
H
Hex Dump Mode
starting test print, 45
hexadecimal dump
entering dump mode, 50
leaving dump mode, 50
High Gloss Film HG-101
colour printing, 58
described, 12
Media Type setting, 42
print side, 42
purpose, 42
High Resolution Paper HR-101
colour printing, 57
described, 11
Media Type setting, 42
print side, 42
purpose, 42
I
ink
quality, 8
Ink Cartridge BCI-10 Black
described, 10, 67
inserting, 71
removing, 69
Ink Cartridge BCI-11 Black
described, 9, 67
inserting, 71
removing, 69
Ink Cartridge BCI-11 Color
described, 9, 67
inserting, 71
148
Index
removing, 69
ink cartridges
handling, 66
replacing, 66, 68
installing
BJ Cartridge, 28, 30
interface
IrDA port, 23
parallel port, 22
IrDA
arranging printer/computer, 24
setting up wireless connection, 23
IrDA interface
described, 17
location, 17
L
Loading Table for Manual Feed
special media, 42
LQ Mode
Font sample, 50
Ripple Pattern sample, 49
M
media
Back Print Film BF-102, 11
Bubble Jet Paper LC-301, 11
envelopes, 39
Fabric Sheet FS-101, 12
Glossy Photo Paper GP-301, 11
High Gloss Film HG-101, 12
High Resolution Paper HR-101, 11
loading, 40
Loading Table for Manual Feed, 42
plain paper, 38
selecting for colour printing, 57
special media, 39
specifications, 99
T-Shirt Transfer TR-201, 12
Transparencies CF-102, 11
N
Nozzle Check Pattern
printing before replacing
BJ Cartridge, 72
sample, 49
starting test print, 45
operation panel
described, 16
location, 15, 17
options
Auto Sheet Feeder ASF-50, 13
BJ Cartridge Storage Container
SB-10, 13
Color Image Scanner Cartridge
IS-12, 13
listed, 13, 126
P
paper
inserting for test print, 34
loading, 40
paper guide
location, 15
paper jams
clearing, 86
paper output slot
described, 17
location, 17
parallel interface
connecting printer and computer, 22
described, 17
location, 17
plain paper
Media Type setting, 42
print side, 42
purpose, 42
recycled paper, 38
selecting, 38
POWER button
described, 18
location, 17
power on, 18
power connector
described, 16
location, 15
power hold switch
described, 16
location, 15
POWER lamp
described, 18
flashes at power on, 18
flashes for head cleaning, 18
flashes when changing
BJ Cartridges, 18
flashes when data remaining, 18
location, 17
power supply
AC adapter, 12
battery pack, 12
print head
cleaning, 80
flushing, 80
print head cleaning
before replacing BJ Cartridge, 72
printer
choosing a location, 14
cleaning, 78
commands, 114
connecting to computer, 22
default settings, 46
features, 8
location, 14
maintenance, 62
options, 9
preparing for transport, 81
printing area, 100
resolution, 8
specifications, 127
storage, 81
supplies, 9
switching on/off, 27
printer cable
connecting to computer, 23
connecting to printer, 22
Printer Cable BIFC-50
connecting, 22
printer commands
BJ Mode AGM codes, 118
BJ Mode basic control codes, 116
BJ Mode command summary, 115
BJ Mode ESCape sequences, 117
BJ Mode ESCape sequences
for colour, 119
BJ Mode miscellaneous codes, 118
Lotus 1-2-3, 114
LQ Mode command summary, 119
LQ Mode ESCape sequences, 120
LQ Mode ESCape sequences
for colour, 124
Index
Index
O
149
sending, 114
Printer Settings
starting test print, 45
printing area
A4/A5/B5 size, 100
Envelope size, 101
European DL 10, 101
Fabric Sheet size, 100
Legal size, 100
Letter size, 100
U.S. Commercial 10, 101
R
recycled paper
using, 38
resolution
printer, 8
RESUME button
described, 18
error recovery, 18
location, 17
paper feed, 18
start print head cleaning, 18
start print head flushing, 18
RGB
colour monitors, 59
Ripple Pattern
BJ Mode sample, 48
LQ Mode sample, 49
sample, 48, 49
starting test print, 45
S
Scanner Cartridge
installing, 73
specifications
media, 99
paper size, 99
printer, 127
Status Information
sample, 48
supplies
listed, 10
T
T-Shirt Transfer TR-201
colour designs, 58
described, 12
150
Index
Media Type setting, 43
print side, 43
purpose, 43
test prints
after BJ Cartridge installation, 33
Demonstration, 35, 45
Font Sample, 45
Hex Dump Mode, 45
inserting paper, 34
Nozzle Check Pattern, 45
Printer Settings, 45
Ripple Pattern, 45
starting, 33, 45
top cover
described, 15
location, 15
Transparencies CF-102
described, 11
Media Type setting, 42
overhead presentations, 58
print side, 42
purpose, 42
travel
preparing printer for travel, 81
troubleshooting
BJ Cartridge moves but no
printing, 88
blurring, smudging, 91
characters on screen do not match
printing, 96
CHARGE/ERROR lamp, 84, 85
check list, 83
cleaning print head, 90
colour absent, black and white
only, 92
colour broken or uneven, 92
colour not correct, 93
device time-out error, 97
dots missing, 89
flushing print head, 90
Help Desk information, 97
ink runs out too soon, 88
irregular dots, 89
page edge, back smudging, 91
paper does not eject, 89
paper jams, 86
POWER lamp on but will not
print, 88
print will not switch on, 87
printing beyond edge of page, 96
printing halts, 95
printing incomplete, 97
printing incorrect number of lines, 96
printing too slow, 93
printing with IrDA halts, 96
ragged appearance, 91
strange characters, 94
unclear text, graphics, 91
white streaks, 89
U
Universal AC Adapter AD-360U
AC adapter, 12
attaching, 26
See also “AC adapter”, 26
W
Index
Windows printer driver
Windows98/Windows 95/
Windows3.1, 36
Index
151