1
Avaya 7406E Digital Mobile Handset User
Guide
Avaya Business Communications Manager
Document Status: Standard
Document Number: NN40110-110
Document Version: 02.01
Date: May 2010
© 2010 Avaya Inc.
All Rights Reserved.
Notices
While reasonable efforts have been made to ensure that the information in this document is complete and accurate at the time of printing,
Avaya assumes no liability for any errors. Avaya reserves the right to make changes and corrections to the information in this document
without the obligation to notify any person or organization of such changes.
Documentation disclaimer
Avaya shall not be responsible for any modifications, additions, or deletions to the original published version of this documentation
unless such modifications, additions, or deletions were performed by Avaya. End User agree to indemnify and hold harmless Avaya,
Avaya’s agents, servants and employees against all claims, lawsuits, demands and judgments arising out of, or in connection with,
subsequent modifications, additions or deletions to this documentation, to the extent made by End User.
Link disclaimer
Avaya is not responsible for the contents or reliability of any linked Web sites referenced within this site or documentation(s) provided by
Avaya. Avaya is not responsible for the accuracy of any information, statement or content provided on these sites and does not
necessarily endorse the products, services, or information described or offered within them. Avaya does not guarantee that these links will
work all the time and has no control over the availability of the linked pages.
Warranty
Avaya provides a limited warranty on this product. Refer to your sales agreement to establish the terms of the limited warranty. In
addition, Avaya’s standard warranty language, as well as information regarding support for this product, while under warranty, is
available to Avaya customers and other parties through the Avaya Support Web site: http://www.avaya.com/support
Please note that if you acquired the product from an authorized reseller, the warranty is provided to you by said reseller and not by Avaya.
Licenses
THE SOFTWARE LICENSE TERMS AVAILABLE ON THE AVAYA WEBSITE, HTTP://SUPPORT.AVAYA.COM/LICENSEINFO/
ARE APPLICABLE TO ANYONE WHO DOWNLOADS, USES AND/OR INSTALLS AVAYA SOFTWARE, PURCHASED FROM
AVAYA INC., ANY AVAYA AFFILIATE, OR AN AUTHORIZED AVAYA RESELLER (AS APPLICABLE) UNDER A
COMMERCIAL AGREEMENT WITH AVAYA OR AN AUTHORIZED AVAYA RESELLER. UNLESS OTHERWISE AGREED TO
BY AVAYA IN WRITING, AVAYA DOES NOT EXTEND THIS LICENSE IF THE SOFTWARE WAS OBTAINED FROM ANYONE
OTHER THAN AVAYA, AN AVAYA AFFILIATE OR AN AVAYA AUTHORIZED RESELLER, AND AVAYA RESERVES THE
RIGHT TO TAKE LEGAL ACTION AGAINST YOU AND ANYONE ELSE USING OR SELLING THE SOFTWARE WITHOUT A
LICENSE. BY INSTALLING, DOWNLOADING OR USING THE SOFTWARE, OR AUTHORIZING OTHERS TO DO SO, YOU,
ON BEHALF OF YOURSELF AND THE ENTITY FOR WHOM YOU ARE INSTALLING, DOWNLOADING OR USING THE
SOFTWARE (HEREINAFTER REFERRED TO INTERCHANGEABLY AS "YOU" AND "END USER"), AGREE TO THESE
TERMS AND CONDITIONS AND CREATE A BINDING CONTRACT BETWEEN YOU AND AVAYA INC. OR THE
APPLICABLE AVAYA AFFILIATE ("AVAYA").
Copyright
Except where expressly stated otherwise, no use should be made of the Documentation(s) and Product(s) provided by Avaya. All content
in this documentation(s) and the product(s) provided by Avaya including the selection, arrangement and design of the content is owned
either by Avaya or its licensors and is protected by copyright and other intellectual property laws including the sui generis rights relating
to the protection of databases. You may not modify, copy, reproduce, republish, upload, post, transmit or distribute in any way any
content, in whole or in part, including any code and software. Unauthorized reproduction, transmission, dissemination, storage, and or
use without the express written consent of Avaya can be a criminal, as well as a civil offense under the applicable law.
Third Party Components
Certain software programs or portions thereof included in the Product may contain software distributed under third party agreements
("Third Party Components"), which may contain terms that expand or limit rights to use certain portions of the Product ("Third Party
Terms"). Information regarding distributed Linux OS source code (for those Products that have distributed the Linux OS source code),
and identifying the copyright holders of the Third Party Components and the Third Party Terms that apply to them is available on the
Avaya Support Web site: http://support.avaya.com/Copyright.
Trademarks
The trademarks, logos and service marks ("Marks") displayed in this site, the documentation(s) and product(s) provided by Avaya are the
registered or unregistered Marks of Avaya, its affiliates, or other third parties. Users are not permitted to use such Marks without prior
written consent from Avaya or such third party which may own the Mark. Nothing contained in this site, the documentation(s) and
product(s) should be construed as granting, by implication, estoppel, or otherwise, any license or right in and to the Marks without the
express written permission of Avaya or the applicable third party. Avaya is a registered trademark of Avaya Inc. All non-Avaya
trademarks are the property of their respective owners.
Downloading documents
For the most current versions of documentation, see the Avaya Support. Web site: http://www.avaya.com/support
Contact Avaya Support
Avaya provides a telephone number for you to use to report problems or to ask questions about your product. The support telephone
number is 1-800-242-2121 in the United States. For additional support telephone numbers, see the Avaya Web site: http://
www.avaya.com/support
Task List
3
Task List
Installing the handset charging cradle ...........................................................................17
Installing the battery pack ..............................................................................................17
Charging the battery pack for the first time....................................................................18
Navigating through programming mode menus ............................................................21
Adding an entry to the phone directory..........................................................................21
Viewing and dialing entries in the phone directory ........................................................22
Searching the phone directory.......................................................................................22
Editing an entry in the phone directory ..........................................................................22
Deleting an entry ...........................................................................................................24
Deleting all entries .........................................................................................................24
Setting key beeps ..........................................................................................................25
Setting the ring and vibration options ............................................................................25
Setting the ring type.......................................................................................................25
Setting the ring level ......................................................................................................25
Setting the noisy location level ......................................................................................25
Making a call using a line key........................................................................................27
Making a call using the handsfree/speakerphone key...................................................27
Answering a call ............................................................................................................27
Answering a call using the handsfree/speakerphone key .............................................28
Putting a call on hold .....................................................................................................28
Using handsfree/speakerphone.....................................................................................28
Using a headset.............................................................................................................28
Programming external autodial......................................................................................28
Programming internal autodial.......................................................................................29
Programming a feature..................................................................................................29
Erasing a programmed indicator key .............................................................................29
Avaya 7406E Digital Mobile Handset User Guide
4
Task List
NN40110-110
Contents
5
Contents
Contents . . . . . . . . . . . . . . . . . . . . . . . . . . . . . . . . . . . . . . . . . . . . . . . . . . . . . . 5
Customer service . . . . . . . . . . . . . . . . . . . . . . . . . . . . . . . . . . . . . . . . . . . . . . . 7
Navigation . . . . . . . . . . . . . . . . . . . . . . . . . . . . . . . . . . . . . . . . . . . . . . . . . . . . . . . . 7
Getting technical documentation . . . . . . . . . . . . . . . . . . . . . . . . . . . . . . . . . . . . . . . 7
Getting product training . . . . . . . . . . . . . . . . . . . . . . . . . . . . . . . . . . . . . . . . . . . . . . 7
Getting help from a distributor or reseller . . . . . . . . . . . . . . . . . . . . . . . . . . . . . . . . 7
Getting technical support from the Avaya Web site . . . . . . . . . . . . . . . . . . . . . . . . 7
Chapter 1
New in this release. . . . . . . . . . . . . . . . . . . . . . . . . . . . . . . . . . . . . . . . . . . . . . 9
Three-line LCD . . . . . . . . . . . . . . . . . . . . . . . . . . . . . . . . . . . . . . . . . . . . . . . . . . . . . . . 9
One-touch indicator keys . . . . . . . . . . . . . . . . . . . . . . . . . . . . . . . . . . . . . . . . . . . . . . . . 9
Choice of ring tones . . . . . . . . . . . . . . . . . . . . . . . . . . . . . . . . . . . . . . . . . . . . . . . . . . . . 9
20-name directory . . . . . . . . . . . . . . . . . . . . . . . . . . . . . . . . . . . . . . . . . . . . . . . . . . . . . 9
Chapter 2
Introduction . . . . . . . . . . . . . . . . . . . . . . . . . . . . . . . . . . . . . . . . . . . . . . . . . . 11
Handset overview . . . . . . . . . . . . . . . . . . . . . . . . . . . . . . . . . . . . . . . . . . . . . . . . . . . . 11
LCD . . . . . . . . . . . . . . . . . . . . . . . . . . . . . . . . . . . . . . . . . . . . . . . . . . . . . . . . . . . . 11
Battery level indicator . . . . . . . . . . . . . . . . . . . . . . . . . . . . . . . . . . . . . . . . . . . . . . 11
Standby mode . . . . . . . . . . . . . . . . . . . . . . . . . . . . . . . . . . . . . . . . . . . . . . . . . . . . 12
Alerts . . . . . . . . . . . . . . . . . . . . . . . . . . . . . . . . . . . . . . . . . . . . . . . . . . . . . . . . . . . 12
Ring duration and volume . . . . . . . . . . . . . . . . . . . . . . . . . . . . . . . . . . . . . . . . . . . 12
Handsfree and speakerphone . . . . . . . . . . . . . . . . . . . . . . . . . . . . . . . . . . . . . . . . 12
Headset . . . . . . . . . . . . . . . . . . . . . . . . . . . . . . . . . . . . . . . . . . . . . . . . . . . . . . . . . 13
Mute . . . . . . . . . . . . . . . . . . . . . . . . . . . . . . . . . . . . . . . . . . . . . . . . . . . . . . . . . . . 13
Handset features . . . . . . . . . . . . . . . . . . . . . . . . . . . . . . . . . . . . . . . . . . . . . . . . . . . . . 13
Indicator keys . . . . . . . . . . . . . . . . . . . . . . . . . . . . . . . . . . . . . . . . . . . . . . . . . . . . 15
Dial pad character mapping . . . . . . . . . . . . . . . . . . . . . . . . . . . . . . . . . . . . . . . . . 15
Additional handset parts . . . . . . . . . . . . . . . . . . . . . . . . . . . . . . . . . . . . . . . . . . . 15
Battery pack overview . . . . . . . . . . . . . . . . . . . . . . . . . . . . . . . . . . . . . . . . . . . . . . . . 16
Chapter 3
Preparing the Avaya 7406E Digital Mobile Handset for use . . . . . . . . . . . 17
Chapter 4
Configuring the Avaya 7406E Digital Mobile Handset settings . . . . . . . . . 19
Programming mode menus . . . . . . . . . . . . . . . . . . . . . . . . . . . . . . . . . . . . . . . . . . . . . 19
Using the directory . . . . . . . . . . . . . . . . . . . . . . . . . . . . . . . . . . . . . . . . . . . . . . . . . . . . 21
Setting volume and tones . . . . . . . . . . . . . . . . . . . . . . . . . . . . . . . . . . . . . . . . . . . . . . 24
Avaya 7406E Digital Mobile Handset User Guide
6
Contents
Checking the battery voltage . . . . . . . . . . . . . . . . . . . . . . . . . . . . . . . . . . . . . . . . . . . . 26
Chapter 5
Using the Avaya 7406E Digital Mobile Handset . . . . . . . . . . . . . . . . . . . . . 27
Programming indicator keys . . . . . . . . . . . . . . . . . . . . . . . . . . . . . . . . . . . . . . . . . . . . 28
NN40110-110
7
Customer service
Visit the Avaya Web site to access the complete range of services and support that Avaya
provides. Go to www.avaya.com or go to one of the pages listed in the following sections.
Navigation
•
•
•
•
“Getting technical documentation” on page 7
“Getting product training” on page 7
“Getting help from a distributor or reseller” on page 7
“Getting technical support from the Avaya Web site” on page 7
Getting technical documentation
To download and print selected technical publications and release notes directly from the Internet,
go to www.avaya.com/support.
Getting product training
Ongoing product training is available. For more information or to register, you can access the Web
site at www.avaya.com/support. From this Web site, you can locate the Training contacts link on
the left-hand navigation pane.
Getting help from a distributor or reseller
If you purchased a service contract for your Avaya product from a distributor or authorized
reseller, contact the technical support staff for that distributor or reseller for assistanceGetting
product training
Getting technical support from the Avaya Web site
The easiest and most effective way to get technical support for Avaya products is from the Avaya
Technical Support Web site at www.avaya.com/support.
Avaya 7406E Digital Mobile Handset User Guide
8
Customer service
NN40110-110
9
Chapter 1
New in this release
This is the first release of the Avaya 7406E Digital Mobile Handset. See the following sections for
information about features:
—
—
—
—
three-line LCD
six programmable one-touch indicator keys
choice of ring tones
20-name directory
Three-line LCD
The three-line LCD shows menu, option, and feature information. The LCD supports English,
French, and Spanish menus. For more information on the LCD, see “LCD” on page 11.
One-touch indicator keys
You can program the indicator keys with internal or external numbers for speed-dialing, or with
features. For more information on the how to program the one-touch indicator keys, see the
following procedures:
•
•
•
•
“Programming external autodial” on page 28
“Programming internal autodial” on page 29
“Programming a feature” on page 29
“Erasing a programmed indicator key” on page 29
Choice of ring tones
You can chose one of eight ring tones. For more information on ring tones, see “Setting the ring
and vibration options” on page 25.
20-name directory
You can store a maximum of 20 internal or external numbers in the handset directory. For more
information on the directory, see “Adding an entry to the phone directory” on page 21.
Avaya 7406E Digital Mobile Handset User Guide
10
Chapter 1 New in this release
NN40110-110
11
Chapter 2
Introduction
The following topics are covered in this chapter:
•
•
•
Handset overview
Handset features
Battery pack overview
Handset overview
The Avaya 7406E Digital Mobile Handset automatically links with the base station by searching
for the base station signal after the installer successfully installs the base station, and charges and
registers your handset. After the installer registers the handset, you can configure the handset
settings.
LCD
The LCD shows three rows of text, with a maximum of 16 characters in each row. The LCD also
supports the English, French, and Spanish menus. The LCD is back-lit to help with viewing under
low light conditions.
Battery level indicator
The battery level indicator appears in the upper right-hand corner of the LCD. The battery level
indicator shows four levels of battery energy. The Low Battery message appears on the LCD
when there are between five and ten minutes of talking time remaining. When the battery reaches
this low energy level and you are using the handset, you hear a warning tone approximately every
40 seconds. To charge or top-up the battery, place the handset in the charging cradle.
Avaya 7406E Digital Mobile Handset User Guide
12
Chapter 2 Introduction
The following icons appear on the LCD to indicate the battery level. The battery level icons show
approximate charge status values.
Indicates battery pack is fully charged.
Indicates battery pack is 2/3 charged.
Indicates battery pack is 1/3 charged.
Indicates battery pack is completely
discharged.
Standby mode
The handset goes into standby mode after one minute of no use. The Sleeping... message
appears on the LCD.
Alerts
There are three types of alerts:
•
•
•
audio: the handset has eight ring tones from which you can choose; press the Func key to
mute alerts.
visual: the handset LCD and dial pad are back-lit when the phone rings, and the call-hold
indicator flashes when a call is on hold.
vibration: the handset is equipped with a dc motor that vibrates the phone when it rings
(use the Programming menus to turn the vibration feature on or off).
Ring duration and volume
You can select the ring duration to be a continuous tone or an intermittent pulse. Use the volume
keys on the left-hand side of the handset to adjust the ring tone volume level. The ring tone volume
level is also the default volume level for audio alerts.
Handsfree and speakerphone
The Avaya 7406E Digital Mobile Handset offers both handsfree and speakerphone with echo
cancellation functionality.
NN40110-110
Chapter 2 Introduction
13
Headset
The Avaya 7406E Digital Mobile Handset is equipped with a headset jack to provide connection to
a headset. You can plug a headset into the headset jack during a call. The handset switches to
headset mode. Unplug the headset while on a call to revert to handset mode.
Mute
During an active call, press the Func key on the left-hand side of the handset to activate the mute
function. Press the Func key again to deactivate the mute function.
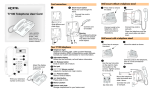
Handset features
Figure 1 on page 14 shows the layout of the handset function keys, softkeys, and keypad, as well
as additional handset features.
Avaya 7406E Digital Mobile Handset User Guide
14
Chapter 2 Introduction
Figure 1 Handset features
Call-hold indicator
Flasheswhen a call is on
hold.
LCD
Shows the call information and
handset status icons, and guides
you while using features.
Indicator keys
Start or cancel a
feature.
Soft keys
Use in Programming mode to
scroll through menus and options.
Handsfree/speaker phone
Release key
Cancels active
calls.
Hold
Places an active call on hold.
Feature key
Activates the Feature functions.
Volume control
Func key
Dial pad
Microphone
Use to access
programming
mode.
Belt clip notches
Headset port
Battery Pack
NN40110-110
Chapter 2 Introduction
15
Indicator keys
You can program each of the six indicator keys as one-touch dialing keys or as feature keys. Each
of the six indicator keys is preprogrammed as shown in the following table.
Table 1
Left-hand keys
Setting
Right-hand keys
Top
Do Not Disturb
Top
Last Number
Middle
Make Call First
Middle
Talk Mode (Dial Voice Call)
Bottom
Forward To
Bottom
Talk Mode
Dial pad character mapping
You can use the dial pad to enter numbers and characters in the directory. To enter the first
character on a key, press the appropriate dial pad key once. To enter the second character on a key,
press the appropriate dial pad key twice, and so on for subsequent characters and numbers. See
Table 1 for a character map of the dial pad.
Table 1 Dial pad character map
1
,-‘&()@!1
2
ABCabc2
3
DEFdef3
4
GHIghi4
5
JKLjkl5
6
MNOmno6
7
PQRSpqrs7
8
TUVtuv8
9
WXYZwxyz9
*
*
0
0 space
#
#
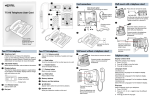
Additional handset parts
Along with this guide, the following items are included with the Avaya 7406E Digital Mobile
Handset.
Figure 2 Handset components
Handset
Charging cradle
Battery pack
ac adapter
Belt clip
Avaya 7406E Digital Mobile Handset User Guide
16
Chapter 2 Introduction
Battery pack overview
This handset contains a rechargeable nickel metal hydride battery. Before you use the Avaya
7406E Digital Mobile Handset, read the following information:
•
•
•
•
•
•
•
Install and charge the Avaya 7406E Digital Mobile Handset battery pack (see Chapter 3,
“Preparing the Avaya 7406E Digital Mobile Handset for use).
You must fully charge the rechargeable battery pack before you use the Avaya 7406E Digital
Mobile Handset for the first time.
A standard 700-mAh battery pack takes approximately three hours to charge.
Do not use the nickel metal hydride batteries provided with your Avaya 7406E Digital Mobile
Handset with any other product. These batteries are designed specifically for use with the
Avaya 7406E Digital Mobile Handset and charger only. Improper use of the Avaya 7406E
Digital Mobile Handset batteries can result in a fire hazard.
Do not charge the battery with any charger other than the one supplied with this equipment.
You must dispose of nickel metal hydride batteries properly.
Do not dispose of the batteries in office or household waste.
Warning: Risk of explosion
Do not expose the battery pack to fire. The batter pack can explode if you try to dispose of
in or expose it to a fire.
You can recycle nickel metal hydride batteries. You can help preserve the environment by
returning your unwanted batteries to your nearest recycling center for recycling or proper disposal.
A fully charged 700-mAh battery can provide four to five hours of talk time, approximately, and
has a three-year service life.
The Avaya 7406E Digital Mobile Handset meets the following talk-time parameters:
•
•
•
•
You can use the handset for an entire workday without putting it into the charger cradle for
charging or topping up.
You can use a handset with a fully-charged 700-mAh battery for four to five hours of talk time.
Most users do not use more than three hours of talk time in an average eight-hour work day.
If talk time exceeds four hours, or if you use the handset through multiple, consecutive shifts,
ensure you have multiple spare batteries on hand.
NN40110-110
17
Chapter 3
Preparing the Avaya 7406E Digital Mobile Handset for
use
Complete the procedures in this chapter to
•
•
•
install the charging cradle
install the battery pack
charge the battery pack in the Avaya 7406E Digital Mobile Handset for the first time
Installing the handset charging cradle
Warning: You must complete the steps in this section when you first initialize a
base station and configure the first handset.
1
Plug the small end of the power adapter into the back of the base station.
2
Plug the other end of the power adapter into an ac outlet near the location of the cradle.
3
Place the handset in the cradle to charge the battery.
Installing the battery pack
Complete this procedure if the battery pack is not already installed in your handset.
1
Use your thumb to slide the battery compartment cover down and off the back of the handset.
2
Position the battery pack in the bottom position inside the battery compartment.
3
Firmly press the top of the battery pack into place.
4
Replace the battery compartment cover.
Avaya 7406E Digital Mobile Handset User Guide
18
Chapter 3 Preparing the Avaya 7406E Digital Mobile Handset for use
Charging the battery pack for the first time
Warning: It is imperative that you follow the steps in this section when you first
initialize a base station and configure the first handset.
You must fully charge the rechargeable battery pack before you use your Avaya 7406E Digital
Mobile Handset for the first time.
1
Slide the handset into the charger, making sure the handset and charger contacts touch.
Charging begins as soon as the handset is placed in the base station. The logo at the front of the
charging cradle lights up to indicate that the handset is properly seated and charging.
2
Allow the battery pack to charge for a minimum of three hours.
3
Trickle charge a spare battery pack in the back battery port of the charger for 12 hours.
NN40110-110
19
Chapter 4
Configuring the Avaya 7406E Digital Mobile Handset
settings
This section describes how to set up an Avaya 7406E Digital Mobile Handset with your custom
settings. Compete the procedures in this chapter to
•
•
•
•
•
•
•
•
set the handset language
use the handset directory
set the key beep preferences
select a ring tone
select a ring type
set the ring volume
set the default volume
adjust the handset for noisy environment
Programming mode menus
The following table maps the menu items and options available when the phone is in system
programming mode. Table cells that are greyed out are for administrator use only.
Table 2 Programming mode menus
Main menu
Submenu 1
Submenu 2
Directory
Add New Entry
Enter Name
Enter Number
Remove All
View All Entries
Key Beep
Off
On
Ring/Vibration
Ring On
Both Off
Both On
Vibration On
Softkey up
Softkey down
Select
Submenu 2
Dial
Edit Name
Edit Number
Remove
Avaya 7406E Digital Mobile Handset User Guide
20
Chapter 4 Configuring the Avaya 7406E Digital Mobile Handset settings
Table 2 Programming mode menus
Main menu
Submenu 1
Ring Type
Type-1
Type-2
Type-3
Type-4
Type-5
Type-6
Type-7
Type-8
Ring Level
High
Medium
Low
Default Volume
Level-1
Level-2
Level-3
Level-4
Level-5
Level-6
Level-7
Level-8
No Default
Noisy Location
Level-1
Level-2
Level-3
Level-4
Battery Voltage
Display Battery
Voltage Level
Maintenance
Enter Pswd
Reset Handset
NN40110-110
Yes?
No?
Submenu 2
Submenu 2
Assign Port ID
1
2
3
4
Registration
No?
Yes?
Scan Base RF
No?
Yes?
Scan Environ
No?
Yes?
De-Registration
No?
Yes?
Change PSW
Enter New Password
Chapter 4 Configuring the Avaya 7406E Digital Mobile Handset settings
21
Navigating through programming mode menus
Complete this procedure to learn how to scroll up and down through the main menu, and up and
down through menu options.
1
Press the Func key to enter programming mode.
The main menu appears.
2
Use the Up, Select, and Down softkeys to scroll through the main menu.
3
At any menu level, press the Release key to return to the previous menu level.
4
At any menu level, press the Release key to exit programming mode.
Using the directory
Complete the following procedures to
•
•
•
•
•
•
•
add a new entry
view entries
search for an entry
dial an entry
edit entries
remove an entry
remove all entries
Adding an entry to the phone directory
1
In programming mode, scroll to the Directory menu.
2
Press Select.
3
Scroll to Add New Entry.
4
Press Select.
5
Use the number pad to enter the name of a contact.
6
Press Bksp to delete characters.
7
Press Next to move the cursor forward to add a space.
8
Press Select.
9
Use the number pad to enter the phone number.
10 Press Select.
The OK! message appears and the top of the Directory menu appears on the LCD.
Avaya 7406E Digital Mobile Handset User Guide
22
Chapter 4 Configuring the Avaya 7406E Digital Mobile Handset settings
Viewing and dialing entries in the phone directory
1
In programming mode, scroll to the Directory menu.
2
Press Select.
3
Scroll to View Entries.
4
Press Select.
5
Scroll through the entries.
6
Press Select to select an entry.
7
Scroll to the Dial command.
8
Press Select to dial the number from the directory.
Searching the phone directory
1
In programming mode, scroll to the Directory menu.
2
Press Select.
3
Scroll to View Entries.
4
Press Select.
5
Use the dial pad to enter a letter.
The directory does an alphabetical search for an entry starting with the letter you entered. If an
entry is found, it appears in the LCD. If no entry is found the No Entries For "DEFded3"
message appears.
Editing an entry in the phone directory
1
In programming mode, scroll to the Directory menu.
2
Press Select.
3
Scroll to View Entries.
4
Press Select.
5
Scroll through the entries.
6
Press Select to select an entry.
7
Scroll to Edit Name.
8
Press Select.
9
Press Bksp to delete characters.
10 Press Next to move the cursor forward to add a space.
11 Use the key pad to edit the name.
12 Press the Release key to return to the View Entries menu.
13 Scroll to Edit Number.
NN40110-110
Chapter 4 Configuring the Avaya 7406E Digital Mobile Handset settings
23
14 Press Select.
15 Press Bksp to delete characters.
16 Press Next to move the cursor forward to add a space.
17 Use the key pad to edit the number.
18 Press the Release key to return to the View Entries menu.
Avaya 7406E Digital Mobile Handset User Guide
24
Chapter 4 Configuring the Avaya 7406E Digital Mobile Handset settings
Deleting an entry
1
In programming mode, scroll to the Directory menu.
2
Press Select.
3
Scroll to View Entries.
4
Press Select.
5
Scroll to the entry you want to remove.
6
Press Select.
7
Scroll to the Remove command.
8
Press Select.
The Remove? prompt appears.
9
To remove the entry, press Select. To cancel the command go to step 10.
The entry is removed from the directory.
10 To cancel the Remove command, press the Release key.
Deleting all entries
1
In programming mode, scroll to the Directory menu.
2
Press Select.
3
Scroll to Remove All.
4
Press Select.
The Remove All? prompt appears.
5
To remove the entries, press Select. To cancel the command go to step 6.
All entries are removed from the directory.
6
To cancel the Remove All command, press the Release key.
Setting volume and tones
Complete the following procedures to
•
•
•
•
•
NN40110-110
turn key beeps on or off
set the ring and vibration options
select a ring type
select a ring volume
select a noisy location level
Chapter 4 Configuring the Avaya 7406E Digital Mobile Handset settings
25
Setting key beeps
1
In programming mode, scroll to the key Beep menu.
2
Press Select.
3
Scroll to the On option to turn on key beeps.
4
Scroll to the Off option to turn off key beeps.
Setting the ring and vibration options
1
In programming mode, scroll to the key Ring/Vibration menu.
2
Press Select.
3
Scroll to the Ring On option to turn on only the ringer.
4
Scroll to the Vibration On option to turn on only the vibration.
5
Scroll to the Both On option to turn on the ringer and the vibration.
6
Scroll to the Both Off option to turn off both options.
Setting the ring type
1
In programming mode, scroll to the Ring Type menu.
2
Press Select.
3
Scroll to one of the eight ring types.
4
Press Select.
Setting the ring level
1
In programming mode, scroll to the Ring Level menu.
2
Press Select.
3
Scroll to one of the three ring (High, Medium, or Low) types.
4
Press Select.
Setting the noisy location level
1
In programming mode, scroll to the Noisy Location menu.
2
Press Select.
3
Scroll to one of the four levels.
4
Press Select.
Avaya 7406E Digital Mobile Handset User Guide
26
Chapter 4 Configuring the Avaya 7406E Digital Mobile Handset settings
Checking the battery voltage
To check the voltage of the handset battery, scroll to the Display Battery menu and press Select.
The approximate voltage of the battery appears.
NN40110-110
27
Chapter 5
Using the Avaya 7406E Digital Mobile Handset
This section describes how to use the Avaya 7406E Digital Mobile Handset to
•
•
•
•
•
•
•
make calls
answer calls
put a call on hold
use handsfree/speakerphone
use a headset
program indicator keys
use features
There are many ways to place or answer a call, depending on how you program the indicator keys
and the type of call you want to make.
Making a call using a line key
1
Pick up the handset.
2
Press an indicator key that is programmed as a Line key.
You hear a dial tone.
3
Use the key pad to dial the external number or the internal extension.
Making a call using the handsfree/speakerphone key
1
Pick up the handset.
2
Press the Handsfree/Speakerphone key.
You hear a dial tone.
3
Use the key pad to dial the external number or the internal extension.
Answering a call
1
Lift the handset.
2
To answer a call, press an indicator key that is programmed as a Line key or press the Func
key.
3
To end a call, press the Release key.
Avaya 7406E Digital Mobile Handset User Guide
28
Chapter 5 Using the Avaya 7406E Digital Mobile Handset
Answering a call using the handsfree/speakerphone key
1
Lift the handset.
2
Press the Handsfree/Speakerphone key.
3
To end a call, press the Release key.
Putting a call on hold
1
While a call is active, press the Hold key.
2
To release the call and make it active again, press the flashing indicator key.
Using handsfree/speakerphone
1
Press a line key to make or answer a call.
2
While using the handset, switch the call to handsfree during a call by pressing the Handsfree/
Speakerphone key.
3
To return the call to handset mode during a call, press the Handsfree/Speakerphone key
again.
Using a headset
1
Press a line key to make or answer a call.
2
While using the handset, switch the call to the headset during a call by plugging the headset
into the headset jack.
3
To return the call to handset mode during a call, unplug the headset.
Programming indicator keys
You can program a programmable line or feature indicator key with a new number or feature.
Programming external autodial
1
Press the Feature key.
2
Enter *1 using the telephone dial pad.
3
Press an indicator key.
4
Dial the external number.
5
Select OK to store the number.
NN40110-110
Chapter 5 Using the Avaya 7406E Digital Mobile Handset
29
Programming internal autodial
1
Press the Feature key.
2
Enter *2 using the telephone dial pad.
3
Press an indicator key.
4
Dial the extension.
5
Select OK to store the number.
Programming a feature
1
Press the Feature key.
2
Enter *3 using the dial pad.
3
Press an indicator key.
4
Select Feature.
5
Enter the feature code.
6
Select OK to store the feature code.
Erasing a programmed indicator key
1
Press the Feature key.
2
Enter *1 using the dial pad.
3
Press an indicator key.
4
Select OK to erase the indicator key.
Avaya 7406E Digital Mobile Handset User Guide
30
Chapter 5 Using the Avaya 7406E Digital Mobile Handset
NN40110-110