1
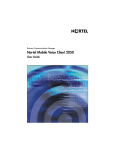
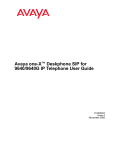
Antenna
Collar light
A
Telephone setup continued
WARNING: The rechargeable battery pack must be fully charged
before you use your 7406 handset for the first time.
Security code (continued)
To correctly charge a new battery pack and handset:
B Display
Avaya 7406 Cordless
Telephone User Card
Installation: First-time battery charging
1. Charge the battery pack in the battery port at the back of the charger for a
minimum of 30 minutes.
C Display buttons
2. Install the battery pack onto the back
of the handset.
Memory and
line buttons D
G Feature
Handset Card
F Release
Hold
3. Put the handset into the handset port
on the charger. When the contacts
touch correctly, the handset charge
indicator (left LED) lights up red. The
battery pack is fully charged when the
LED turns green (three hours).
E
H
N
Headset port
1
2 ABC
3 DEF
4 GHI
5 JKL
6 MNO
8 TUV
9 WXYZ
0
#
7 PQRS
M
Lanyard
anchor
J
Microphone
Volume
control
Your 7406 cordless telephone
A
Antenna collar light
Shows the time and date, call information, handset
status icons, and guides you through features and
options menus.
C
Your 7406 cordless telephone
G
Feature button
Starts or cancels a feature.
H
Hold button
Places calls on hold.
I
Dialpad
J
Microphone
Feature message
Display button label
Display icons
K
Options button/Mute
Display button
L
Memory and line buttons
These buttons provide one-touch dialing, feature
operations, line access or answering a line.
E
Release button
Ends an active call.
Display buttons
The labels for display buttons appear on the second
line of the display. Display button functions change
with each feature.
D
O
Battery
Pack
F
Display
Options
button/Mute
K
Flashes to signify an incoming call.
B
I
Dialpad
L
www.avaya.com
© 2010 Avaya Inc.
NN40110-102 03.01
Printed in Canada
4. Place the spare pack into the back
battery port. The battery pack indicator
light (right LED) turns red while it
charges. The spare battery pack is fully
charged in approximately 12 hours
(LED turns green).
Handset card
Answers calls, mutes the microphone on an active
call, and accesses the Options list on the display.
M
Volume control
O
When viewing the back of the base station, the TCM/RJ-11 jacks
from left to right correspond to the handset ID # 1, 2, and 3.
Handset ID #
For each new handset, you must first configure the handset ID #
to identify the handset to the base station:
1.
2.
3.
4.
5.
6.
7.
8.
9.
Press the Options button.
.
Press
Press
until the display shows
.
Press
. The display shows the current Handset ID.
If you want to change the ID number, press
.
.
The display shows
Enter the six-digit password (default 000000)
Press . The display shows
.
Press the appropriate digit on the dialpad.
Press
to accept the configuration.
Refer to the Installation manual for instructions about how to
change the password.
Security code
Adjusts the handset, headset, and ringer volume.
Lanyard anchor
If you need to assign a security code to the base, follow all the
steps in this section.
Headset port
For connecting a headset.
Write the button function on this card.
Each handset must be registered to a base by sharing an identical security code. A base can support up to three independent
handsets. Each handset assigned to a base station must have a
unique Set ID (1, 2 or 3).
If your installer has already set up a base, obtain the security
code and follow steps 1 to 8, inclusive.
For attaching a wrist strap.
N
Telephone setup
Battery pack
To assign a security code to a handset follow steps 1 to 8:
1. Press the Options button.
.
2. Press
3. Press
until the display shows
Continued...
.
4. Press
to assign a security code to the handset.
.
The display shows
5. Enter the six-digit password (default 000000).
6. Press . The display shows
7. Enter the six-digit Security code that was assigned to the
base you are connecting to.
to accept the code.
8. Press
The display shows
If you are assigning a handset to an existing base, your
handset is now connected to the system.
If you are assigning the first handset to a new base station
(which has no security code), continue with the following
steps:
9. When the displays shows
press
to get ready to send the security code to the base.
The display shows
.
10. Unplug the AC power adapter connected to the base,
and plug it back in again.
11. Within 15 seconds, press and hold the
for five seconds to send the security code to the base. The display
shows
and you hear a beep when the transfer
is successful.
Note: If the Security Code transfer fails,
displays. To correct this, repeat steps 10 and 11.
12. Press the Options button. The date and time displays.
Handset options
To access the following handset options:
1.
2.
3.
4.
5.
Press the Options button.
Press
.The display shows
.
until the display shows you the selection.
Press
Follow the directions in each section.
Press
to exit the menu.
Ring type
To select a ring type for your handset:
, press
.
1. When the display shows
2. Press
to listen to the different types of ring.
Note: There is also a Ringer Off setting.
to accept the ring type of your choice.
3. Press
The display shows the ring type number you chose.
Volume level
To select the ringer volume level for your handset:
1. Press
until the display shows
.
2. Press
. The display shows
.
3. Press the volume bar on the left side of the handset to
adjust the ringer volume.
4. Press
to accept the ringer volume.
.
The display shows
Lock Handset
To lock the buttons on the handset to prevent unintentional
button presses:
until the display shows
1. Press
2. Press . The display shows
.
3. To release the handset, press
, then press
.
.
Handset features
Language choices
1
Selects the Primary Language for the display.
2
Selects the Alternate Language 2 for the display.
3
Selects the Alternate Language 3 for the display.
4
Selects the second Alternate Language 4 for the display.
Program memory buttons
Make and answer calls
You can program a memory button with an internal or external
number or feature code.
Making calls
External autodial
There are many ways to make a call, depending on telephone
programming and the type of call.
1.
2.
3.
4.
5.
External calls using line buttons
1. Press a line button.
2. Dial the external telephone number.
1 .
Press
Press a memory button.
Dial the external number.
Press
to store the number.
Label the button.
Button Inquiry
Internal autodial
To check what is programmed on the handset memory buttons.
1.
2.
3.
4.
5.
1.
2.
3.
4.
Press
.
Press the button(s) that you want to check.
Read the display.
The diagram below shows some sample displays:
Line
Internal autodial
5.
Features
External autodial
1.
2.
3.
4.
5.
How to erase memory buttons
Press
1 .
1. Press
2. Press a memory button.
3. Press
to erase the button.
to exit.
1. Press an intercom button and enter a line pool access code.
2. When you hear an external dial tone, dial the external
telephone number.
Contact your System Administrator for the line pool code.
Internal calls using intercom buttons
3 .
Press
Press a memory button.
Press
and enter the feature code.
Press
to store the feature code.
Label the button.
Feature
Call Fwd
Intercom
Button labels
Write the memory button contents on the handset card.
1. Remove the plastic
lens and handset card
from the handset.
2. Write the button
assignment beside
each button.
3. Insert the handset
card back on the
1
2
3
handset.
4. Insert the plastic lens, matching the tabs on the lens with
the notches on the handset.
ABC
DEF
To attach the belt clip:
Attach a belt clip to your set to provide hands-free portability.
1. Line up the side tabs of the belt clip with the notches on
the sides of the handset.
2. Snap the belt clip into place.
1. Press the Options button.
To remove the belt clip:
Hold calls
1. Use a small coin to release the side tabs of the belt clip
from the notches on each side of the handset.
2. Remove the belt clip by pulling it off the handset.
. The held line button lights red.
To retrieve a held call, press the lit red line button.
The battery pack fits onto the back of the handset, as shown in
the following diagram.
Voice Call
Contact your System Administrator for a list of extension
numbers.
While on a call, press
Memory buttons are assigned as line or intercom buttons.
Memory buttons can also store internal and external numbers
or features to give you one-touch dialing or feature activation.
Line 2
The belt clip
When your telephone rings and the antenna collar light flashes:
Battery
Last Number Redial
Accessories
1. Press an intercom button.
2. Dial the extension number.
Answering calls
Memory buttons
Line 1
Handset functions and features are the same when a headset
is plugged into the headset port on the handset.
External calls using intercom buttons
Press
2 .
Press a memory button.
Dial the extension number.
Press
to store the number.
Label the button.
Intercom
Headset calls
(continued from third panel)
To change the battery pack:
1. Press down on the button at the top of
the battery pack and lift it off the handset.
2. Place it in the battery port on the charger.
3. Put the bottom of the charged battery
pack into position on the handset.
4. Snap the battery pack into place.
5. Put the handset into the handset port on the charger. Make
sure the handset and charger contacts touch. The battery
packs are charged when the indicator lights are green.
6. Exchange the handset battery pack regularly (once a week).
Recycle Note: Nickel metal hydride batteries are recyclable.
Return your unwanted batteries to the nearest recycling center
for proper disposal. Do not dispose of the batteries in office or
household waste. Phone 1-800-8-BATTERY to locate a Battery
Recycling Center near you.
Handset charger
Note: Plug the
power adapter
into the charger
before plugging
it into the wall
socket.
Battery port
Handset
socket
Power adapter
Calls are put on hold automatically when you switch from one line
to another.
Mute microphone
To mute the microphone while you are on a call, press the
Options button.
To cancel mute, press the Options button again.
Note: If you want to mute a second call that comes into the
handset, you must press the Options button again when you
answer the call.
Handset Asleep mode
If your handset remains idle for more than 15 seconds, it
automatically reverts to Handset Asleep mode.
To wake up your handset, press any key.
Call indications: While your handset is asleep, the handset
displays no message waiting indicators or indications that the
ring-again feature is active.
Priority calls with DND active: When the handset is asleep and
a Priority call is made to the 7406, it appears to the caller that
the Priority Call was successfully connected, even though you
receive no indication on your 7406 handset. As soon as you
wake the handset (whenever you have DND set) you must
always press the line or intercom button and the
button. This
ensures that your handset provides proper audible and visual
Ring Notification.
The wrist strap
The wrist strap can be attached to the handset for easy
carrying.
1. Put the loop of the wrist strap through the hook on the side
of the handset.
2. Put the other end of the wrist strap through the loop.