1
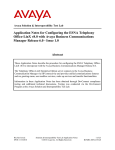
Avaya Solution & Interoperability Test Lab
Application Notes for TelStrat Engage Record Version 3.3
with Avaya Business Communication Manger Release 6.0
VoIP Recording – Issue 1.0
Abstract
These Application Notes describe the configuration steps required for the TelStrat Engage
Record version 3.3 to successfully interoperate with Avaya Business Communication Manager
Release 6.0. TelStrat Engage Record uses the LanCTE interface to BCM for call control and
utilizes Port Mirror/SPAN to passively capture the voice traffic that goes through Avaya IP
phones.
Information in these Application Notes has been obtained through DevConnect compliance
testing and additional technical discussions. Testing was conducted via the DevConnect
Program at the Avaya Solution and Interoperability Test Lab.
QT; Reviewed:
SPOC 10/11/2011
Solution & Interoperability Test Lab Application Notes
©2011 Avaya Inc. All Rights Reserved.
1 of 44
TelStratBCMVoIP
1. Introduction
The objective of this interoperability compliance testing is to verify that the TelStrat Engage
Record 3.3 (hereafter referred to as Engage) can be connected to the Avaya Business
Communication Manger release 6.0 (hereafter referred to as BCM) via the LanCTE interface
for call control. The BCM LAN CTE software can be installed on the Engage Server to send
call start, call stop, and other messaging and call events to the BCM. The Engage Record is used
to record and play back conversations through the Avaya IP phone that are registered to the
BCM via Port Mirror/SPAN to passively capture the VoIP (RTP) traffic.
2. General Test Approach and Test Results
The compliance test included configuring the Engage Server using the Engage VoIP Engine Config
Console to monitor, to record and play back the conversations on the IP phones via SIP trunk.
2.1. Interoperability Compliance Testing
The general test approach was to verify whether the Engage can monitor, record and play back the
conversations going through the Avaya BCM IP Telephones. The following areas were covered:
- Recording all calls.
- Schedule Recording based on Agent, Port Numbers, Date & Time, Days of Week, DN,
DNIS, CLID.
2.2. Test Results
All executed test cases have been passed. Avaya IP phone conversations can be monitored, recorded
and played back by using the Engage Record Server successfully.
2.3. Support
Technical support for TelStrat can be obtained by contacting TelStrat via email at
[email protected] or by calling +1 972-633-4548
3. Reference Configuration
Figure 1 illustrates the lab test configuration used during the compliant testing event between
the BCM and Engage Server combination.
QT; Reviewed:
SPOC 10/11/2011
Solution & Interoperability Test Lab Application Notes
©2011 Avaya Inc. All Rights Reserved.
2 of 44
TelStratBCMVoIP
Figure 1: Lab Test Connection Diagram for the BCM, Engage Record Server and Engage
Client
4. Equipment and Software Validated
The following equipment and software was used during the lab testing:
Equipment
Avaya BCM
Avaya IP Telephones:
Engage Record Server OS
Engage Record Server
Engage VoIPEngine Config Console
Engage Client OS
Software/Firmware
Release 6.0
1140E, 1120E
Windows 2003 Server SP2
3.3.0.6
n/a
Windows XP Pro SP3
5. Avaya Business Communication Manager Configuration
These Application Notes assume that the basic configuration has already been administered. For
further information on the BCM, please consult references in Section 9. The below procedures
describe the configuration details of the BCM with a SIP trunk to a Service Provider (in this
example is Centurylink) system.
QT; Reviewed:
SPOC 10/11/2011
Solution & Interoperability Test Lab Application Notes
©2011 Avaya Inc. All Rights Reserved.
3 of 44
TelStratBCMVoIP
5.1. Login to BCM
5.1.1. Install Business Element Manager and BCM Monitor
a) Open web browser and connect to the Web GUI http://<BCM IP address> as shown in
Figure 2. Then log in using the appropriate Username and Password.
Note: The web browser has to enable Java Runtime Environment to support the BCM Web GUI.
Figure 2 – Login to Business Communication Manager
QT; Reviewed:
SPOC 10/11/2011
Solution & Interoperability Test Lab Application Notes
©2011 Avaya Inc. All Rights Reserved.
4 of 44
TelStratBCMVoIP
b) The Welcome to BCM page is displayed. Click on the BCM applications/ web links, select
Business Element Manager, and then click Run as highlighted in red box as shown in Figure
3. This action will install Business Element Manager to the local PC. After the installation
complete, Business Element Manager shortcut will be created on desktop.
Figure 3 – Business Communication Manager
QT; Reviewed:
SPOC 10/11/2011
Solution & Interoperability Test Lab Application Notes
©2011 Avaya Inc. All Rights Reserved.
5 of 44
TelStratBCMVoIP
c) Continue with Welcome to BCM page to install BCM Monitor as shown in Figure 4. After
the installation complete, the BCM Monitor shortcut will be created on desktop.
Figure 4 – Element Manager System Overview
QT; Reviewed:
SPOC 10/11/2011
Solution & Interoperability Test Lab Application Notes
©2011 Avaya Inc. All Rights Reserved.
6 of 44
TelStratBCMVoIP
5.2. Create a new Network Element Entry for Business Element
Manager
a) Double click on the Business Element Manager desktop icon; the Avaya Business Element
Manager – Network Elements will display. Create a new Network Element as shown in
Figure 5.
Figure 5: Create a New Network Element
b) Input IP address of BCM, username: nnadmin and appropriate password to the red box as
shown in Figure 6. Then click OK.
QT; Reviewed:
SPOC 10/11/2011
Solution & Interoperability Test Lab Application Notes
©2011 Avaya Inc. All Rights Reserved.
7 of 44
TelStratBCMVoIP
Figure 6: Business Communication Manager Entry
5.2.1. Login to Business Element Manager
a) Double click on the Business Element Manager desktop icon; select the Network Element
then click Connect as shown in Figure 7.
Figure 7: Connect to BCM
b) After the connection has been established, click OK in the Confirm dialog (not shown).
Figure 8 shows Business Element Manager has been successfully logged on.
QT; Reviewed:
SPOC 10/11/2011
Solution & Interoperability Test Lab Application Notes
©2011 Avaya Inc. All Rights Reserved.
8 of 44
TelStratBCMVoIP
Figure 8: Avaya Business Element Manager
5.2.2. Login to BCM Monitor
a) Double click the BCM Monitor icon on the desktop. Then input IP address of BCM,
username: nnadmin and appropriate password as shown in Figure 9.
Figure 9: Enter Logon Information for BCM Monitor
b) Click Connect. The BCM Monitor GUI displays as shown in Figure 10.
QT; Reviewed:
SPOC 10/11/2011
Solution & Interoperability Test Lab Application Notes
©2011 Avaya Inc. All Rights Reserved.
9 of 44
TelStratBCMVoIP
Figure 10: BCM Monitor GUI
5.3. Administer Resources
This section describes how to configure a SIP Trunk on BCM to Service Provider system.
5.3.1. Administer Application Resource for SIP Trunks
These Application Notes assume that the basic configuration has already been administered. This
section describes steps for configuring Application Resource for SIP Trunks on BCM to work
with Service Provider system. For further information on Avaya Business Communication
Manager 450, please consult references in Section 9.
Select tab Configuration > Resources > Application Resources, then select SIP Trunks then
click Modify button.
A new dialog displays with title “Modify Resource Application Reservations”, input the
configuration value as shown in Figure 11:
- Minimum: 0
- Maximum: MAX
QT; Reviewed:
SPOC 10/11/2011
Solution & Interoperability Test Lab Application Notes
©2011 Avaya Inc. All Rights Reserved.
10 of 44
TelStratBCMVoIP
Figure 11 – Configuring Application Resources for SIP Trunks
QT; Reviewed:
SPOC 10/11/2011
Solution & Interoperability Test Lab Application Notes
©2011 Avaya Inc. All Rights Reserved.
11 of 44
TelStratBCMVoIP
5.3.2. Administer Media Gateway
Select tab Configuration > Resources > Media Gateways, then select Echo cancellation
enabled and as shown in red box in Figure 12.
Figure 12 – Configuring Media Gateways
5.3.3. Administer Port Ranges
Select tab Configuration > Resources > Port Ranges, then configure port ranges used for RTP
over UDP traffic as show in red box in Figure 13.
Figure 13 – Port Ranges for RTP over UDP
QT; Reviewed:
SPOC 10/11/2011
Solution & Interoperability Test Lab Application Notes
©2011 Avaya Inc. All Rights Reserved.
12 of 44
TelStratBCMVoIP
5.4. Administer SIP Trunk
This section describes the steps for configuring SIP Trunk between BCM and Service Provider
system.
5.4.1. General IP Trunk Settings
Select tab Configuration > Resources > IP Trunks > General, then select tab IP Trunking
Settings; configure Telephony Settings as shown in Figure 14.
- Forward redirected OLI: First Redirect
- Send name display: checked (enabled)
- Remote capacity MWI: checked (enabled)
- Ignore in-band DTMF in RTP: unchecked (disabled)
Figure 14 – IP Trunk Settings
QT; Reviewed:
SPOC 10/11/2011
Solution & Interoperability Test Lab Application Notes
©2011 Avaya Inc. All Rights Reserved.
13 of 44
TelStratBCMVoIP
5.4.2. Administer Global Settings
Select tab Configuration > Resources > IP Trunks > SIP Trunking, then select tab Global
Settings; Figure 15 shows the detail configuration attributes.
- SIP Settings for Local Domain: bvwdev.com; Call signaling port: 5060
- RTP Keepalives, Scope: None
- Telephony Settings, Fallback to circuit-switched: Disabled
- RFC2833 Dynamic payload: 101
Figure 15 – Global Settings for SIP Trunk
QT; Reviewed:
SPOC 10/11/2011
Solution & Interoperability Test Lab Application Notes
©2011 Avaya Inc. All Rights Reserved.
14 of 44
TelStratBCMVoIP
5.4.3. Administer Public Port
Select tab Configuration > Resources > IP Trunks > SIP Trunking, then select tab Public.
Click on tab Settings to set Provisioned Public Port to 5060 as shown in Figure 16.
Figure 16 – Provisioned Public Port Setting
5.4.4. Create a Public Account
Click on tab Accounts, and then click on Add button to create a public account for Service
Provider (Figure 17).
Figure 17 – Add a public account for SIP Trunk
The Add Account dialog displayed (not shown) to ask for the template; click on No Template
and proceed to the next step.
QT; Reviewed:
SPOC 10/11/2011
Solution & Interoperability Test Lab Application Notes
©2011 Avaya Inc. All Rights Reserved.
15 of 44
TelStratBCMVoIP
The SIP Trunk to Service Provider uses static IP endpoint and does not support registration.
Thus, the detail configuration is shown in Figure 18.
- Template: None
- SIP domain: IP address of Service Provider system
- Registration required: leave as blank
- SIP username: leave as blank
- Password: leave as blank
Figure 18 – Account Setting for Service Provider SIP Trunk
5.4.5. Basic Settings
Select account CTL created in Section 5.4.3 Select Basic tab, the Basic settings are displayed as
in Figure 19. Add an entry to Outbound Proxy Table associate to Service Provider system,
which is used by BCM to send OPTIONS to Service Provider for keep alive purposes.
- SIP Domain; Remote: IP address of Service Provider system
- SIP Domain; Local: IP address of BCM
- Proxy: leave as blank (default)
- Registrar: leave as blank (default)
- Outbound Proxy Table:
- Domain: IP address of Service Provider system
- IP Address: IP address of Service Provider system
- Port: 5060
- Load-balancing Weight: 0
- Keep Alive: OPTIONS
QT; Reviewed:
SPOC 10/11/2011
Solution & Interoperability Test Lab Application Notes
©2011 Avaya Inc. All Rights Reserved.
16 of 44
TelStratBCMVoIP
Figure 19 – Basic Configuration for Public SIP Trunk Account
5.4.6. Advance Settings
a) Select account CTL created in Section 5.4.3
b) Select Advanced tab, the Advanced settings are displayed as in Figure 20.
- Enable media relay: checked (enabled)
- Support 100rel: checked (enabled)
- Allow UPDATE: checked (enabled)
- Use null IP to hold: checked (enabled)
- Allow REFER: checked (enabled)
- Support Replaces: checked (enabled)
- Enable Connected Identify: checked (enabled)
Note: leave other fields as blank (default.)
NAT Pinhole Maintenance:
- Signalling Method: None
Session timer:
- Session refresh method: UPDATE
- Refresher: Local
- Session-Expires: 1800
- Min-SE: 90
Active call limit: 0
ITSP association method: From header domain match
Outbound Called characters to absorb: 0
QT; Reviewed:
SPOC 10/11/2011
Solution & Interoperability Test Lab Application Notes
©2011 Avaya Inc. All Rights Reserved.
17 of 44
TelStratBCMVoIP
Inbound Called prefix to prepend: leave as blank (default)
Authentication realm: leave as blank (default)
Figure 20 – Advanced Configuration for Public SIP Trunk Account
QT; Reviewed:
SPOC 10/11/2011
Solution & Interoperability Test Lab Application Notes
©2011 Avaya Inc. All Rights Reserved.
18 of 44
TelStratBCMVoIP
5.4.7. User Account Settings
a) Select account CTL created in Section 5.4.3
b) Select User Account tab, the User Account settings are displayed as in Figure 21. Click on
Modify button.
Figure 21 – Modify SIP Trunk User Account
c) Modify account dialog displays to show information of SIP Trunk account (as shown in
Figure 22). This feature gives an option to manipulate SIP header before sending to Service
Provider. In this testing, there is no SIP manipulation required, so leave all fields as blank.
Figure 22 – Modify SIP Trunk User Account Details
QT; Reviewed:
SPOC 10/11/2011
Solution & Interoperability Test Lab Application Notes
©2011 Avaya Inc. All Rights Reserved.
19 of 44
TelStratBCMVoIP
5.5. Administer Codec Profile
5.5.1. Codec Settings for SIP Trunk
Select tab Configuration > Resources > IP Trunks > SIP Trunking, then select tab Media
Parameters; the detail configuration attributes is in Figure 23.
Service Provider does not support G.729, therefore only G.711u has been selected in Seleted list,
with Voice Activity Detection disabled; G.711 payload size (ms) is set to 20ms.
Figure 23 – Codec Settings for SIP Trunk
QT; Reviewed:
SPOC 10/11/2011
Solution & Interoperability Test Lab Application Notes
©2011 Avaya Inc. All Rights Reserved.
20 of 44
TelStratBCMVoIP
5.5.2. Codec Settings for IP Sets
Select tab Configuration > Resources > Telephony Resources, then select line Internal / IP
Sets; and then configure supported codec for IP Sets as shown in Figure 24.
- Default codec: G.711-uLaw
- Default jitter buffer: Auto
- G.711 payload size (ms): 20
Figure 24 – Codec setting for IP Sets
5.6. Administer Dialing Plan
This section shows how to configure BCM VoIP lines to be used for outbound calls over the SIP
Trunk via Service Provider system. The public dialing plan will be provisioned with appropriate
parameters as detail as below. BCM uses target lines to either terminate or redirect the inbound
SIP calls.
QT; Reviewed:
SPOC 10/11/2011
Solution & Interoperability Test Lab Application Notes
©2011 Avaya Inc. All Rights Reserved.
21 of 44
TelStratBCMVoIP
5.6.1. Associate a Line Pool to VoIP Lines
Select tab Configuration > Telephony > Lines > Active VoIP Lines, then assigned a pool
name where the VoIP Lines are associated with. In this case it is Pool: BlocA (Figure 25).
Figure 25 – Line Pool Assignment for VoIP Lines
QT; Reviewed:
SPOC 10/11/2011
Solution & Interoperability Test Lab Application Notes
©2011 Avaya Inc. All Rights Reserved.
22 of 44
TelStratBCMVoIP
5.6.2. Administer DN Length
This section shows how to configure intercom DN length for BCM phone. In this testing, DN
length is set to 5.
Select tab Configuration > Telephony > Dialing Plan > General, configure DN length
(intercom) and Dialing timeout as shown in Figure 26.
- DN length (intercom): 5
- Dialing timeout: 4
Figure 26 – Define DN length (intercom)
QT; Reviewed:
SPOC 10/11/2011
Solution & Interoperability Test Lab Application Notes
©2011 Avaya Inc. All Rights Reserved.
23 of 44
TelStratBCMVoIP
5.6.3. Administer Public Network
Select tab Configuration > Telephony > Dialing Plan > Public Network, configure Public
Receive number length, Public network dialing plan and Public network code as shown in
Figure 27.
- Public Receive number length: 10
- Public network dialing plan: Public (unknown)
- Public network code: leave as blank
Figure 27 – Public Network Settings
Note: Public network code will affect the CLID of an outbound call. If specified, it will
combine with Public OLI setting for the phone to form the CLID. In this testing, CLID is set on
each phone individually, therefore it is unnecessary to define Public network code.
QT; Reviewed:
SPOC 10/11/2011
Solution & Interoperability Test Lab Application Notes
©2011 Avaya Inc. All Rights Reserved.
24 of 44
TelStratBCMVoIP
5.6.4. Administer Routing
Select tab Configuration > Telephony > Dialing Plan > Routing. On tab Routes, click Add
(not shown) to create a new route. Figure 28 shows route 3 was created.
Route 3:
- Use Pool: BlocA
- DN Type: National
Figure 28 – Create a route
5.6.5. Administer Outbound Call - Destination Codes
Destination Codes define the prefix for outbound call. This testing uses internal access code 9 to
access the SIP trunk. The code will be trimmed out before sending to Service Provider. In order
to exercise different dialing plans over the SIP Trunk, multiple Destination Codes were added.
Select tab Configuration > Telephony > Dialing Plan > Routing. On tab Destination Codes,
click Add to create a new route. Figure 29 shows following Destination Codes were created.
Destination Codes: 90.
- Purpose: BCM will use these codes:
- To reach Service Provider‟s operator by dialing 0
- To reach operator by dialing 0+10 digits
- To make international call by dialing 011+CountryCode+AreaCode+DN.
- Configuration attributes:
- Normal Route: 003 (created in Section 5.6.4)
- Absorbed Length: 1 (digit 9 will be deleted)
Destination Codes: 9411.
QT; Reviewed:
SPOC 10/11/2011
Solution & Interoperability Test Lab Application Notes
©2011 Avaya Inc. All Rights Reserved.
25 of 44
TelStratBCMVoIP
- Purpose: BCM will use this code to reach 411 services.
- Configuration attributes:
- Normal Route: 003 (created in Section 5.6.4)
- Absorbed Length: 1 (digit 9 will be deleted)
Destination Codes: 9911.
- Purpose: BCM will use this code to reach 911 services.
- Configuration attributes:
- Normal Route: 003 (created in Section 5.6.4)
- Absorbed Length: 1 (digit 9 will be deleted)
Destination Codes: 9613.
- Purpose: BCM will use this code to make NPA call by dialing 10 digits (Area
Code 613 + DN).
- Configuration attributes:
- Normal Route: 003 (created in Section 5.6.4)
- Absorbed Length: 1 (digit 9 will be deleted)
Destination Codes: 91613.
- Purpose: BCM will use this code to make North America long distance call by
dialing 1+10 digits (1+Area Code 613 + DN).
- Configuration attributes:
- Normal Route: 003 (created in Section 5.6.4)
- Absorbed Length: 1 (digit 9 will be deleted)
Destination Codes: 91800; 91866
- Purpose: BCM will use these codes to make toll free call with prefix 1800, 1866.
- Configuration:
- Normal Route: 003 (created in Section 5.6.4)
- Absorbed Length: 1 (digit 9 will be deleted)
QT; Reviewed:
SPOC 10/11/2011
Solution & Interoperability Test Lab Application Notes
©2011 Avaya Inc. All Rights Reserved.
26 of 44
TelStratBCMVoIP
Figure 29 – Administer Destination Codes
QT; Reviewed:
SPOC 10/11/2011
Solution & Interoperability Test Lab Application Notes
©2011 Avaya Inc. All Rights Reserved.
27 of 44
TelStratBCMVoIP
5.6.6. Administer Outbound Call - SIP Trunk Routing Table
The Destination Codes are associated with a VoIP pool. BCM needs to specify which signaling
protocols it going to use, SIP or H323. This section shows how to configure a SIP route on
BCM.
Select tab Configuration > Resources > IP Trunk > SIP Trunking. On tab Public, select tab
Routing Table and then click Add to create a new route. The new route is configured and
appropriated with the Destination Codes defined in Section 5.6.5, and attached to SIP Trunk
public account CTL defined in Section 5.4.3. Figure 30 shows routes 0, 1, 411, 911, and 613
were created.
Figure 30 – Administer SIP Trunk Routing Table
QT; Reviewed:
SPOC 10/11/2011
Solution & Interoperability Test Lab Application Notes
©2011 Avaya Inc. All Rights Reserved.
28 of 44
TelStratBCMVoIP
5.6.7. Administer Inbound Call - Target Line
BCM uses a virtual target line to receive VoIP inbound calls. The maximum target line available
is defined by the license. In this section, the target line is configured to terminate the call to a
specific DID number. The target line is assigned to a key on the phone set.
a) Select Configuration > Telephony > Sets > Active Sets.
b) On tab Line Access, chose a DN e.g. 22264.
c) On tab Line Assignment, click Add. Then in Add Line Assignment dialog (not shown),
input the target line number. Figure 31 shows target line 998 was being added for DN 22264.
Target Line: 998
Appearance Type: Appr&Ring
Appearance: 1
Caller IP Set: checked (enable CLID delivery)
Vmsg Set: checked if want to register voice mail service for the set, uncheck if voicemail
is not being registered.
Priv. Received #: input the private number assigned to the DN. BCM will ring the phone
if receiving the private call to this number.
Pub. Received #: input the public DID number assigned to the DN. BCM will ring the
phone if receiving the public call with this number. Target line will use this input to
terminate a SIP call from Service Provider. In this case, a target line is configured to
terminate a SIP call from Service Provider to DID number 9134400061.
Figure 31 – Administer Target Lines
QT; Reviewed:
SPOC 10/11/2011
Solution & Interoperability Test Lab Application Notes
©2011 Avaya Inc. All Rights Reserved.
29 of 44
TelStratBCMVoIP
5.7. Administer Outbound CLID Delivery
5.7.1. Administer Outbound CLID-Name Delivery
This section shows how to configure CLID-Name delivery for BCM. When DN 22264 makes an
outbound call, the display name in From header will be constructed using the Business Name
(created in step a as below) and set Name (created in step b as below).
a) Select Configuration > Telephony > Global Settings > Feature Settings. Then define
Business Names Entry 1 as “BCM450” as shown in Figure 32.
Figure 32 – Administer Business Name Entry 1 for BCM
b) Then select Configuration > Telephony > Sets > Active Sets. On Line Access tab, the
defined Name for DN 22264 is “22264” as shown in Figure 33.
Figure 33 – Define a Name for DN 22264
QT; Reviewed:
SPOC 10/11/2011
Solution & Interoperability Test Lab Application Notes
©2011 Avaya Inc. All Rights Reserved.
30 of 44
TelStratBCMVoIP
c) Continue to select Configuration > Telephony > Sets > Active Sets. On Capabilities and
Preferences tab, check Auto Called ID to enable CLID display before the call is being
answered. Then click the Preferences tab; select Business name 1 and uncheck Send long
name. Figure 34 illustrates the configuration in detail.
Business name: Business name 1
Send long name: unchecked
Figure 34 – Define CLID Name for DN 22264
QT; Reviewed:
SPOC 10/11/2011
Solution & Interoperability Test Lab Application Notes
©2011 Avaya Inc. All Rights Reserved.
31 of 44
TelStratBCMVoIP
5.7.2. Administer Outbound CLID-Number Delivery
This section shows how to configure CLID-Number delivery for BCM. When DN 22264 makes
an outbound call, the display number in the From header will be constructed using Pub. OLI.
Select Configuration > Telephony > Sets > Active Sets. On Line Access tab, define Pub. OLI
for DN 22264 as “9134400061” as shown in Figure 35.
Figure 35 – Define a Pub. OLI for DN 22264
6. Configuration for Engage
This section describes the steps on how to configure the Engage Recording system including
Engage Record Client and Engage Record Server to be able to do recording the conversations
over the IP telephones on the BCM.
Assumptions have been made as such:
The installation of BCM LAN CTE interface which has been installed on
the Engage Server in order for the Engage Server to send call start, call stop, and other
messaging and call events.
Installing of the VoIP Recording on the Engage Server.
Configure port mirroring on the network router for specific device
(IP/MAC address), in this case the Avaya IP phone, for the media traffic to be duplicated
so that the Engage can capture packages from point to point.
Refer to the reference [1] in Section 9.
QT; Reviewed:
SPOC 10/11/2011
Solution & Interoperability Test Lab Application Notes
©2011 Avaya Inc. All Rights Reserved.
32 of 44
TelStratBCMVoIP
6.1. Configure VoIP Engine Configuration
Select Start > Programs > TelStrat Engage > VOIP Engine Configuration. The Engage
VoIP Engine Config Console will appear as shown in Figure 36.
Figure 36: Engage VoIP Engine Config. Console
Click on Config and the VoIP Configuration screen will appear as shown in Figure 37.
Under CTI Option, choose BCM CTE from the drop down box.
Note: Engage will automatically set the Recording Board ID to 2200 when BCM
-
CTE has been chosen as the CTI Option.
Enter the IP address of the BCM CTI Server.
Under Calls to Record, you must select All trunk/internal calls.
By default, VoIP endpoints are managed by MAC address. If you using
static IP assignments to VoIP endpoints, you have the option to manage stations by IP
address. Select the Mirroring By IP checkbox to manage endpoints by static IP address.
Do not select this box if you use DHCP to manage the IP address of the VoIP endpoints.
Note: If a router separates the IP stations from the point at which they are spanned, then the
endpoints can only be mirrored by IP address, and this checkbox must be set. Be sure to manage
the IP endpoints by static IP address in this deployment scenario. The router will replace the
MAC address of the VoIP station with its own MAC address and the ports cannot be managed by
MAC address.
QT; Reviewed:
SPOC 10/11/2011
Solution & Interoperability Test Lab Application Notes
©2011 Avaya Inc. All Rights Reserved.
33 of 44
TelStratBCMVoIP
Figure 37: VoIP Configuration
6.2. Port Mapping
Engage Record must be programmed to map station information to an Engage Record port
number. The port numbers are a system resource that can be assigned to one or more system
users so that recording criteria can be established and call playback can be managed. The port
numbers can also be assigned to groups that can be assigned to one or more system users to ease
administration.
QT; Reviewed:
SPOC 10/11/2011
Solution & Interoperability Test Lab Application Notes
©2011 Avaya Inc. All Rights Reserved.
34 of 44
TelStratBCMVoIP
6.2.1. Add Port Mapping
To add DN of specific IP phone to record.
Right Click in the white area of Port Mapping section and select „Add‟ from the pop-up menu.
The Device and CommSrv Port Mapping screen will appear as shown in Figure 38.
In the Mac Address field, enter the MAC address of the BCM phone to
record.
If you selected the Mirroring by IP checkbox then enter the static IP address of the
BCM phone.
Enter the Directory Number to record in the DN field.
Assign a CommSrv Port number (from 0 -999) that is unique to Board
ID 2200.
Select the Add button.
Repeat this procedure for each DN to record.
Up to 1000 DNs can be recorded per Engage record server. A telephone
with multiple DNs must re-use the same CommSrv Port number for the DNs on the
telephone so that up to 1000 phones are supported.
Select Cancel to close the Window once all devices have been entered.
The following example shows how a device ID with MAC address 00 1B 25 2E 80 55 with DN
22268 is configured as the Port Number 0.
Figure 38: Device and CommSrv Port Mapping
QT; Reviewed:
SPOC 10/11/2011
Solution & Interoperability Test Lab Application Notes
©2011 Avaya Inc. All Rights Reserved.
35 of 44
TelStratBCMVoIP
After adding DNs and mapping port to the added DN, the Port Mapping will be as shown in
Figure 39.
Select OK to complete VoIP configuration
Figure 39: VoIP Configuration with Port Mapping
QT; Reviewed:
SPOC 10/11/2011
Solution & Interoperability Test Lab Application Notes
©2011 Avaya Inc. All Rights Reserved.
36 of 44
TelStratBCMVoIP
6.2.2. Applying the Changes to the Engage Server
After making the above system configuration changes on the Engage server, you must stop and
then restart the Telstrat VOIPEngine service highlighted in the red box as shown in Figure 40.
Note: You can add, modify, or delete the port mapping. The Voice Recording Server service
requires no additional attention/restart when any VOIP configuration is changed.
Open Services on the Engage Record server
Scroll down to the TelStrat VOIPEngine service
Right click on the TelStrat VOIPEngine service and select Stop.
Wait 10 seconds, and then click on the Start button to start the server.
Figure 40: Engage Server Services
6.3. Configure Engage Record
This section explains the configuration using the Engage Record Client PC to connect to Engage
Server to monitor, record and playback the recorded conversations.
It is assumed that the Engage Record Server has been successfully installed and the required
recording services are running on it. Assumption is also made that the Engage Record Client has
been successfully installed. For additional information on Engage Record suite installation and
configuration refer to Section 9 [2] and [3].
QT; Reviewed:
SPOC 10/11/2011
Solution & Interoperability Test Lab Application Notes
©2011 Avaya Inc. All Rights Reserved.
37 of 44
TelStratBCMVoIP
To access the Engage Client, navigate to Start > All Programs > TelStrat Engage > Engage
Client from the equipment it is installed on. During compliance testing the client was installed
on a PC.
The TelStrat Engage login screen is seen as in Figure 13 below. Enter the UserID, Password
and the Server Name. The server name is the IP address or the server name of the Engage
Record Server. Press OK once the above information has been entered.
Note: Server Name, in this example, was the IP address of the Engage Server, which this client
is connecting to (10.10.97.56).
Figure 41: Login Screen of Engage Client
6.4. Configure Recording Criteria
This section describes the recording criteria that can be built using the Engage Record Client to
record calls going on the IP telephones on the BCM. Example criteria discussed in this section
are Record All (recorded all calls) and selective recording (record calls as per filters set).
QT; Reviewed:
SPOC 10/11/2011
Solution & Interoperability Test Lab Application Notes
©2011 Avaya Inc. All Rights Reserved.
38 of 44
TelStratBCMVoIP
6.4.1. Record All Criteria
To create a recording criteria navigate to Engage > Record > Schedule Recording. On the right
hand window pane under the column Schedule Recording Criteria, right click the mouse button
and select the Create option provided as seen in Figure 42 below.
Figure 42: Creating Recording Criteria
In the New Criteria window type the Criteria Name and press OK as shown in Figure 43 below.
Figure 43: Creating New Criteria
QT; Reviewed:
SPOC 10/11/2011
Solution & Interoperability Test Lab Application Notes
©2011 Avaya Inc. All Rights Reserved.
39 of 44
TelStratBCMVoIP
To activate the recording criteria Record All, right click on the newly created criteria and select
Activate as shown in Figure 44. Click on OK at the Modification successful pop up (not
shown).
Figure 44: Record All Criteria Summary
After activate, the Record All criteria will be highlighted with greenish color to indicate that the
filter criteria is currently active (not shown). Figure 44 shown above also shows the summary of
the Record All criteria.
6.4.2. Selective Recording Criteria
Selective recording is where incoming/outgoing calls are recorded of selected components of
DN. With the selected DN being recorded, additional filter can be used to record the calls based
on Date & Time, Days of Week, CLID, DNIS and others.
In this example, it shows only the DN of the BCM IP phones being recorded without any filter
condition for simplicity.
To create a Selective recording criterion, navigate to Engage > Record > Schedule Recording.
On the right hand window pane under the column Schedule Recording Criteria, right click the
mouse button and select the Create option provided as seen in Figure 42.
In the New Criteria window type the Criteria Name as BCM VoIP and press OK (not shown).
To add DN to be recorded, right click on DN space, select Add and input the DN in the Engage:
DN Input as shown in Figure 45.
Click OK to input the DN then Close to turn off the DN Input pop up.
QT; Reviewed:
SPOC 10/11/2011
Solution & Interoperability Test Lab Application Notes
©2011 Avaya Inc. All Rights Reserved.
40 of 44
TelStratBCMVoIP
Figure 45: Selective Recording on DN
Now the required DN is selected as shown in Figure 46 and included into the BCM VoIP
criteria. Press OK to complete configuring the newly created criteria.
QT; Reviewed:
SPOC 10/11/2011
Solution & Interoperability Test Lab Application Notes
©2011 Avaya Inc. All Rights Reserved.
41 of 44
TelStratBCMVoIP
Figure 46: Selected DN being added to the BCM VoIP Criterion
To activate the recording criteria BCM VoIP criterion, right click on the newly created criteria
and select Activate (not shown). Click on OK at the Modification successful pop up (not
shown). After activate, the BCM VoIP criteria will be highlighted with greenish color to
indicate that the filter criteria is currently active (not shown).
7. Verification Steps
This section includes some steps that can be followed to verify the solution is working.
-
Making inbound call from PSTN phone to one IP phone (with DN
22268).
-
At the Engage Record Client PC, select Engage > Status > Active
Calls. This will show that the call is being active on the BCM over the VoIP trunk as
shown in Figure 47.
Figure 47: Active Calls
-
On the Engage Record Client PC, select Engage > Log > Playback.
The Playback log should shows one incoming call being recorded, as shown in Figure
48, and can be playback by window media player.
QT; Reviewed:
SPOC 10/11/2011
Solution & Interoperability Test Lab Application Notes
©2011 Avaya Inc. All Rights Reserved.
42 of 44
TelStratBCMVoIP
Figure 48: Playback Log
8. Conclusion
All of the executed test cases have passed and met the objectives outlined in Section 6. The
Engage Record Server version 3.3 VoIP interface is considered compliant with Avaya
Business Communication Manager Release 6.0.
9. Additional References
Product documentation for Avaya products may be found at:
https://support.avaya.com/css/Products/
Product documentation for Telstrat may be found at:
http://www.telstrat.com/content/view/276/310/
[1] Engage System Integration Notes, Engage Contact Center Suite BCM VoIP Recording,
Product Release 3.3, Standard 1.1, April 2011.
[2] Engage Contact Center Suite Installation Guide
[3] Engage Contact Center Suite System Administration Guide
QT; Reviewed:
SPOC 10/11/2011
Solution & Interoperability Test Lab Application Notes
©2011 Avaya Inc. All Rights Reserved.
43 of 44
TelStratBCMVoIP
©2011
Avaya Inc. All Rights Reserved.
Avaya and the Avaya Logo are trademarks of Avaya Inc. All trademarks identified by ® and
™ are registered trademarks or trademarks, respectively, of Avaya Inc. All other trademarks
are the property of their respective owners. The information provided in these Application
Notes is subject to change without notice. The configurations, technical data, and
recommendations provided in these Application Notes are believed to be accurate and
dependable, but are presented without express or implied warranty. Users are responsible for
their application of any products specified in these Application Notes.
Please e-mail any questions or comments pertaining to these Application Notes along with the
full title name and filename, located in the lower right corner, directly to the Avaya
DevConnect Program at [email protected].
QT; Reviewed:
SPOC 10/11/2011
Solution & Interoperability Test Lab Application Notes
©2011 Avaya Inc. All Rights Reserved.
44 of 44
TelStratBCMVoIP