1
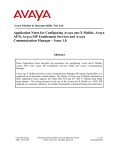
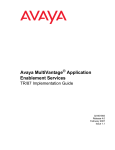
Avaya Solution & Interoperability Test Lab
Application Notes for Microsoft Office Communicator
Clients with Avaya Communication Manager Phones - Issue
1.1
Abstract
These Application Notes describe the configuration procedures for enabling Microsoft Office
Communicator (MOC) clients to operate Avaya Communication Manager phones. The MOC
client and Microsoft Office Communications Server (OCS) provide the user with multiple
modes of communications, such as Instant Messaging (IM), voice, and video. The
configuration steps described herein focus on the TR/87 integration between Avaya
Application Enablement Services and Microsoft OCS. The TR/87 integration allows MOC
clients to make and answer calls on Avaya Communication Manager phones, as well as
perform basic call control operations such as hold/retrieve, transfer, and disconnect.
RL; Reviewed:
SPOC 11/5/2007
Solution & Interoperability Test Lab Application Notes
©2007 Avaya Inc. All Rights Reserved.
1 of 48
OCS-ACM-RCC
1. Introduction
These Application Notes describe the procedures for configuring TR/87 integration between
Avaya Communication Manager and Microsoft Office Communications Server (OCS). The
TR/87 integration allows a Microsoft Office Communicator (MOC) client running on a
Microsoft Windows computer to operate an Avaya Communication Manager phone using CSTA
CTI call control constructs.
Microsoft OCS is comprised of several component servers that may run on the same physical
Microsoft Windows server or on separate physical servers, depending on the desired capacity,
topology, and security. Consult [4] and [5] for further details on the Microsoft OCS architecture
and deployment options. The MOC client is a Microsoft Windows application that allows the
user to communicate with other MOC users using any combination of Instant Messaging (IM),
audio, and video, in both point-to-point and conferencing scenarios. For voice communications,
each MOC client may be configured as an Enterprise Voice (EV) or a Remote Call Control
(RCC) client. EV mode is configured when the user wants voice calls to be established on the
computer on which the MOC client runs, whereas RCC mode is configured when the user has an
existing PBX phone and wants voice calls to be established on the PBX phone. More
specifically, in EV mode, Microsoft OCS handles the user’s voice calls, whereas in RCC mode,
the PBX handles the user’s voice calls and the MOC client only provides a user interface for
operating the PBX phone. These Application Notes focus on the RCC clients, particularly the
configuration required to allow RCC clients to place, answer, hold/retrieve, transfer, and
disconnect calls on Avaya Communication Manager phones. The configuration for EV clients,
as well as for routing calls between EV clients and Avaya Communication Manager phones, is
covered in [1]. It should be noted that these Application Notes also assume that the call routing
configuration described in [1] has already been implemented since calls between RCC clients
and EV clients are functionally equivalent to calls between Avaya Communication Manager
phones and EV clients1.
2. Configuration
The sample configuration described throughout these Application Notes is shown in Figure 1.
The Avaya 4600 Series H.323 and SIP Telephones are registered with Avaya Communication
Manager (running on the Avaya S8300 Server) and Avaya SIP Enablement Services (SES),
respectively. The Avaya Application Enablement (AE) Services server provides interfaces for
CTI applications, e.g., Microsoft OCS, to control Avaya Communication Manager elements. For
voice communications, the MOC clients in RCC mode are able to operate2 Avaya telephones,
whereas the MOC clients in EV mode are standalone voice endpoints served by Microsoft OCS.
1
Users with RCC clients still have the option of placing voice calls to other MOC users directly from their MOC
clients, i.e., instead of using the MOC client to place the calls from their PBX phones. These voice calls always
arrive on the called user’s MOC client, even if the called MOC client is a RCC client. This is because such calls are
internal to Microsoft OCS and are thus not impacted by the call routing between Microsoft OCS and Avaya
Communication Manager.
2
Although depicted in Figure 1 as operating Avaya H.323 telephones, RCC mode MOC clients can also operate
Avaya digital and analog telephones (however, operation of Avaya SIP telephones is currently not supported).
RL; Reviewed:
SPOC 11/5/2007
Solution & Interoperability Test Lab Application Notes
©2007 Avaya Inc. All Rights Reserved.
2 of 48
OCS-ACM-RCC
Both RCC and EV clients are registered with Microsoft OCS, which is comprised of one or more
of each of the following: Front-End Servers, IM Conferencing Servers, Telephony Conferencing
Servers, A/V Conferencing Servers, Web Conferencing servers, and IIS Servers. In the sample
configuration of Figure 1, the aforementioned component servers reside on a single physical
server in an Microsoft OCS Enterprise Edition (EE) Consolidated configuration. The Microsoft
OCS server and Mediation Server are supported by a Microsoft SQL 2005 database server, as
well as another Microsoft Windows Server running Active Directory (AD), DNS, and Certificate
Authority (CA) servers. The Microsoft Exchange 2007 Server is enabled with Unified
Messaging and provides e-mail, voicemail, and Auto Attendant services.
Microsoft AD,
DNS, and CA
Servers
Microsoft
Exchange
2007 Server
.100
.110
Microsoft OCS EE
Consolidated
Server
Microsoft SQL
2005 Server
.103
.106
Microsoft
Mediation
Server
.102
135.8.19.0/24
.121
.120
Avaya SIP Enablement
Services Server
Avaya G350 Media Gateway and
Avaya S8300 Server running Avaya
Communication Manager
.123
Enterprise IP Network
Avaya Application Enablement
Services Server
Microsoft Office
Communicator Clients
in EV mode
Avaya 4600 Series H.323 and
SIP Telephones
Microsoft Office Communicator Clients in RCC mode
operating Avaya 4600 Series H.323 Telephones
Figure 1: Network Configuration
RL; Reviewed:
SPOC 11/5/2007
Solution & Interoperability Test Lab Application Notes
©2007 Avaya Inc. All Rights Reserved.
3 of 48
OCS-ACM-RCC
3. Equipment and Software Validated
The following equipment and software were used for the sample configuration provided:
Equipment & Software
Avaya S8300 Server
Avaya G350 Media Gateway
Media Gateway Processor
Avaya Application Enablement Services Server
Avaya SIP Enablement Services Server
Avaya 4600 Series H.323 IP Telephones
Avaya 4600 Series SIP Telephones
Microsoft Active Directory, DNS Server, and
Certification Authority on Microsoft Windows Server
2003 R2 Enterprise Edition Service Pack 2
Microsoft Exchange 2007 Server on Microsoft Windows
Server 2003 R2 Enterprise x64 Edition Service Pack 2
Microsoft Office Communications Server 2007 on
Server 2003 R2 Enterprise Edition Service Pack 2
Microsoft SQL 2005 Server on Microsoft Windows
Server 2003 R2 Enterprise Edition Service Pack 2
Microsoft Mediation Server on Microsoft Windows
Server 2003 R2 Enterprise Edition Service Pack 2
Microsoft Office Communicator on Microsoft Windows
XP Professional Version 2002 Service Pack 2
Version
Avaya Communication Manager
4.0.1 (R014x.00.1.731.2)
26.33.0
4.0.1 (Build 57-0)
SES-4.0.0.0-033.6
2.8 (4621SW)
2.8 (4625SW)
2.2.2 (4621SW)
5.2.3790.1830
08.01.0085.004
3.0.6362.0
2005.90.3042.0
3.0.6362.0
2.0.6362.0
Table 1: Equipment/Software List
RL; Reviewed:
SPOC 11/5/2007
Solution & Interoperability Test Lab Application Notes
©2007 Avaya Inc. All Rights Reserved.
4 of 48
OCS-ACM-RCC
4. Avaya Communication Manager and Avaya Application
Enablement Services Integration
These Application Notes assume that basic Avaya Communication Manager and Avaya
Application Enablement (AE) Services administration has already been performed. These
Application Notes further assume that an AE Services connection and TSAPI CTI link has
already been configured and established between Avaya Communication Manager and Avaya
AE Services.
4.1. Extensions
In the sample configuration, assume that Avaya Communication Manager phones that are
associated with RCC clients are assigned 5-digit extensions that begin with “23”, Avaya
Communication Manager phones that are not associated with RCC clients are assigned 5-digit
extensions that begin with “21” and “22”, and Microsoft EV clients are assigned 5-digit
“extensions” that begin with “3”.
4.2. Avaya AE Services License
Launch a web browser, enter the URL https://<IP address of AE Services server>/WebLM/,
and log into the Avaya AE Services Web License Manager interface. In the left pane under
Licensed Products, click on “Application_Enablement”. In the right pane, verify that there
are sufficient Unified CC API Desktop Edition licenses; if not, contact an authorized Avaya
account representative to obtain any required licenses.
RL; Reviewed:
SPOC 11/5/2007
Solution & Interoperability Test Lab Application Notes
©2007 Avaya Inc. All Rights Reserved.
5 of 48
OCS-ACM-RCC
4.3. TR/87 Port
Launch a web browser, enter the URL https://<IP address of AE Services
server>:8443/MVAP, and log into the Avaya AE Services OAM Web Interface. In the left
pane, select CTI OAM Admin. In the left pane of the CTI OAM Home Web Interface, select
Administration Æ Network Configuration Æ Ports. In the right pane, enable TR/87 Port
and click on “Apply Changes” (not shown below).
RL; Reviewed:
SPOC 11/5/2007
Solution & Interoperability Test Lab Application Notes
©2007 Avaya Inc. All Rights Reserved.
6 of 48
OCS-ACM-RCC
5. Certificates
The Avaya AE Services and Microsoft OCS servers must exchange signed server certificates
each time a Transport Layer Security (TLS) enabled TCP connection is initiated between the two
servers. The certificates must be obtained from the same Certificate Authority (CA) or from
CAs in the same certificate chain. In the sample configuration, a Microsoft Enterprise CA
(running on Microsoft Windows Server 2003) serves as the CA for both.
5.1. Install Certificate Chain (Trusted Certificate) on Microsoft OCS
Server
This section describes the steps for downloading the certificate chain (trusted certificate) from
the Microsoft Enterprise CA and installing the certificate chain on a Microsoft OCS server. The
certificate chain should actually have already been installed during Microsoft OCS installation;
this section is provided for reference and completeness.
Step
Description
1. On the Microsoft OCS server, launch a web browser and enter the URL http://<Name or IP
address of Certificate Authority server>/certsrv. If prompted for a user name and password,
enter the credentials of a domain administrator account.
2.
In the Microsoft Certificate Services Welcome page, click on “Download a CA certificate,
certificate chain, or CRL”.
RL; Reviewed:
SPOC 11/5/2007
Solution & Interoperability Test Lab Application Notes
©2007 Avaya Inc. All Rights Reserved.
7 of 48
OCS-ACM-RCC
Step
Description
3. In the Microsoft Certificate Services Download a CA Certificate, Certificate Chain, or CRL
page, select the “Current” CA certificate of the Microsoft Enterprise CA, set Encoding
method to “Base 64”, and click on “Download CA certificate chain”.
4.
When prompted, save the CA certificate chain file to a local directory on the Microsoft OCS
server. After saving, navigate to that directory in Windows Explorer, right-click on the CA
certificate chain file, and select “Install Certificate”.
RL; Reviewed:
SPOC 11/5/2007
Solution & Interoperability Test Lab Application Notes
©2007 Avaya Inc. All Rights Reserved.
8 of 48
OCS-ACM-RCC
Step
Description
5. In the Certificate Import Wizard dialog box, click on “Next”.
6.
In the Certificate Import Wizard dialog box, select “Place all certificates in the following
store” and click on “Browse”.
RL; Reviewed:
SPOC 11/5/2007
Solution & Interoperability Test Lab Application Notes
©2007 Avaya Inc. All Rights Reserved.
9 of 48
OCS-ACM-RCC
Step
Description
7. In the Select Certificate Store dialog box, select “Trusted Root Certification Authorities” and
click on “OK”.
8.
In the Certificate Import Wizard dialog box, click on “Next”.
RL; Reviewed:
SPOC 11/5/2007
Solution & Interoperability Test Lab Application Notes
©2007 Avaya Inc. All Rights Reserved.
10 of 48
OCS-ACM-RCC
Step
Description
9. In the Certificate Import Wizard dialog box, click on “Finish”.
10. Repeat Steps 1 – 9 on each Microsoft OCS server in the enterprise pool.
RL; Reviewed:
SPOC 11/5/2007
Solution & Interoperability Test Lab Application Notes
©2007 Avaya Inc. All Rights Reserved.
11 of 48
OCS-ACM-RCC
5.2. Create Certificate Template for Server Certificates
The server certificates exchanged between Avaya AE Services and Microsoft OCS must support
both Server Authentication and Client Authentication. This section describes the steps for
creating a certificate template for such server certificates on the Microsoft Enterprise CA.
Step
Description
1. On the Microsoft Enterprise CA server, launch the Certification Authority Microsoft
Management Console (MMC) snap-in.
2.
In the left pane of the Certification Authority MMC snap-in, expand the Certification Authority
node, right-click on Certificate Templates, and select “Manage” to launch the Certificate
Templates MMC snap-in.
3.
In the right pane of the Certificate Templates MMC snap-in, right-click on the Web Server
template, and select “Duplicate Template”.
RL; Reviewed:
SPOC 11/5/2007
Solution & Interoperability Test Lab Application Notes
©2007 Avaya Inc. All Rights Reserved.
12 of 48
OCS-ACM-RCC
Step
Description
4. In the Properties of New Template dialog box, select the General tab, and enter a descriptive
Template display name and Template name.
5.
In the Properties of New Template dialog box, select the Request Handling tab, and ensure
that Purpose is set to “Signature and encryption”. Click on “CSPs”.
RL; Reviewed:
SPOC 11/5/2007
Solution & Interoperability Test Lab Application Notes
©2007 Avaya Inc. All Rights Reserved.
13 of 48
OCS-ACM-RCC
Step
Description
6. In the CSP Selection dialog box, select “Requests must use one of the following CSPs:” and
check the “Microsoft Enhanced Cryptographic Provider v1.0” checkbox. Click on “OK”.
7.
In the Properties of New Template dialog box, select the Subject Name tab and ensure that
“Supply in the request” is selected.
RL; Reviewed:
SPOC 11/5/2007
Solution & Interoperability Test Lab Application Notes
©2007 Avaya Inc. All Rights Reserved.
14 of 48
OCS-ACM-RCC
Step
Description
8. In the Properties of New Template dialog box, select the Extensions tab. In the Extensions
included in this template section, select “Application Policies” and click on “Edit”.
9.
In the Edit Application Policies Extension dialog box, click on “Add”.
RL; Reviewed:
SPOC 11/5/2007
Solution & Interoperability Test Lab Application Notes
©2007 Avaya Inc. All Rights Reserved.
15 of 48
OCS-ACM-RCC
Step
Description
10. In the Add Application Policy dialog box, select “Client Authentication” and click on “OK”.
11. In the Edit Application Policies Extension dialog box, ensure that both Server Authentication
and Client Authentication are included in the Application Policies list. Click on “OK”.
RL; Reviewed:
SPOC 11/5/2007
Solution & Interoperability Test Lab Application Notes
©2007 Avaya Inc. All Rights Reserved.
16 of 48
OCS-ACM-RCC
Step
Description
12. In the Properties of New Template dialog box, click on “OK”.
13. In the Certification Authority MMC snap-in, expand the Certification Authority node, rightclick on Certificate Templates, and select “New Æ Certificate Template to Issue”.
RL; Reviewed:
SPOC 11/5/2007
Solution & Interoperability Test Lab Application Notes
©2007 Avaya Inc. All Rights Reserved.
17 of 48
OCS-ACM-RCC
Step
Description
14. In the Enable Certificate Templates dialog box, select the Certificate Template created in Steps
3 -12 and click on “OK”.
5.3. Request and Install Server Certificate on Microsoft OCS Server
This section describes the steps for requesting the server certificate (based on the certificate
template created in Section 5.2) from the Microsoft Enterprise CA and installing the server
certificate on a Microsoft OCS server.
Step
Description
1. On a Microsoft OCS server, launch a web browser and enter the URL http://<Name or IP
address of Certificate Authority server>/certsrv. If prompted for a user name and password,
enter the credentials of a domain administrator account.
2.
In the Microsoft Certificate Services Welcome page, click on “Request a certificate”.
RL; Reviewed:
SPOC 11/5/2007
Solution & Interoperability Test Lab Application Notes
©2007 Avaya Inc. All Rights Reserved.
18 of 48
OCS-ACM-RCC
Step
Description
3. In the Microsoft Certificate Services Request a Certificate page, click on “advanced
certificate request”.
4.
In the Microsoft Certificate Services Advanced Certificate Request page, click on “Create
and submit a request to this CA”.
5.
In the Microsoft Certificate Services Advanced Certificate Request page, select the
Certificate Template created in Section 5.2, and configure the fields in the Identifying
Information For Offline Template section. For Name, enter the FQDN of the Microsoft OCS
enterprise pool.
RL; Reviewed:
SPOC 11/5/2007
Solution & Interoperability Test Lab Application Notes
©2007 Avaya Inc. All Rights Reserved.
19 of 48
OCS-ACM-RCC
Step
Description
6. Scroll down in the Microsoft Certificate Services Advanced Certificate Request page. In the
Key Options section, select “Microsoft Enhanced Cryptographic Provider v1.0” for CSP,
and check the Store certificate in the local computer certificate store checkbox. In the
Additional Options section, enter a descriptive Friendly Name for the certificate and enter the
following (without the quotes) in the Attributes text box:
“san:dns=<name1>&dns=<name2>&dns=<name3>”
where <name1> is the SIP domain of Microsoft OCS, <name2> is the FQDN of a physical
server on which Microsoft OCS is running, and <name3> is the FQDN of the Microsoft OCS
enterprise pool. If there are multiple SIP domains supported on Microsoft OCS or if Microsoft
OCS runs on multiple physical servers, then append the SIP domains and FQDNs in the manner
illustrated above. In the example below,
“san:dns=sip.sitlms.net&dns=msocsent1.sitlms.net&dns=Entpool.sitlms.net” is entered.
7.
In the Microsoft Certificate Services Certificate Issued page, click on “Install this
certificate”.
RL; Reviewed:
SPOC 11/5/2007
Solution & Interoperability Test Lab Application Notes
©2007 Avaya Inc. All Rights Reserved.
20 of 48
OCS-ACM-RCC
Step
Description
8. Repeat Steps 1 – 7 on each Microsoft OCS server in the enterprise pool.
5.4. Assign Server Certificate to Microsoft OCS Enterprise Pool
Server Connections
This section describes the steps for assigning the server certificate installed in Section 5.3 to
inbound and outbound connections on a Microsoft OCS enterprise pool server.
Step
Description
1. On a Microsoft OCS server, launch the Microsoft Office Communications Server 2007 MMC
snap-in. In the left pane, expand the Forest node down to the Front Ends level (Forest Æ
Enterprise pools Æ <name of Pool> Æ Front Ends), right-click on the FQDN of a physical
server on which Microsoft OCS runs, and select “Properties”.
RL; Reviewed:
SPOC 11/5/2007
Solution & Interoperability Test Lab Application Notes
©2007 Avaya Inc. All Rights Reserved.
21 of 48
OCS-ACM-RCC
Step
Description
2. In the Properties dialog box, click on “Select Certificate”.
3.
In the Select Certificate dialog box, select the certificate installed in Section 5.3 and click on
“OK”.
Note: This new certificate replaces the certificate assigned during Microsoft OCS installation.
RL; Reviewed:
SPOC 11/5/2007
Solution & Interoperability Test Lab Application Notes
©2007 Avaya Inc. All Rights Reserved.
22 of 48
OCS-ACM-RCC
Step
Description
4. In the Properties dialog box, click on “OK”.
5.
Repeat Steps 1 – 4 on each Microsoft OCS server in the enterprise pool.
5.5. Install Certificate Chain (Trusted Certificate) on Avaya Application
Enablement Services Server
This section describes the steps for installing the Microsoft Enterprise CA certificate chain
(trusted certificate) on an Avaya AE Services server.
Step
Description
1. On a Microsoft OCS server, make a copy of the CA certificate chain file downloaded in Section
5.1 Steps 1 - 4. Open the copied file with a text editor, and replace “CERTIFICATE” with
“PKCS7” in both the header and trailer. Copy the entire contents of the modified file into the
Windows clipboard.
RL; Reviewed:
SPOC 11/5/2007
Solution & Interoperability Test Lab Application Notes
©2007 Avaya Inc. All Rights Reserved.
23 of 48
OCS-ACM-RCC
Step
Description
2. On the Microsoft OCS server, launch a web browser and log into the Avaya AE Services OAM
Web Interface. In the left pane, select CTI OAM Admin Æ Administration Æ Certificate
Management Æ Trusted Certificate. In the Trusted Certificates page, click on “Import”.
3.
In the Trusted Certificate Import page, enter a descriptive name for Certificate Alias, and
paste the copied contents from Step 1 into the Certificate PEM textbox. Click on “Apply”.
If the import is successful, the message “Certificate imported successfully” is displayed on the
Trusted Certificate Import page.
RL; Reviewed:
SPOC 11/5/2007
Solution & Interoperability Test Lab Application Notes
©2007 Avaya Inc. All Rights Reserved.
24 of 48
OCS-ACM-RCC
5.6. Request and Install Server Certificate on Avaya Application
Enablement Services Server
This section describes the steps for requesting the server certificate (based on the certificate
template created in Section 5.2) from the Microsoft Enterprise CA and installing the server
certificate on an Avaya AE Services server
Step
Description
1. On the Microsoft OCS server, launch a web browser and log into the Avaya AE Services OAM
Web Interface. In the left pane, select CTI OAM Admin Æ Administration Æ Certificate
Management Æ Server Certificate. In the Server Certificates page, click on “Add”.
RL; Reviewed:
SPOC 11/5/2007
Solution & Interoperability Test Lab Application Notes
©2007 Avaya Inc. All Rights Reserved.
25 of 48
OCS-ACM-RCC
Step
Description
2. In the Add Server Certificate page, configure the following and click on “Apply”.
• Certificate Alias – enter a descriptive name.
• Password and Re-enter Password – enter an arbitrary password.
• Distinguished Name – enter “CN=<FQDN of Avaya AE Services
server>,OU=<Department>,O=<Company>,L=<City>,S=<State>,C=<Country/Region>” .
Use the same Department, Company, City, State, and Country/Region values entered in
Section 5.3 Step 5. In the example below,
“CN=msavaes1.sitlms.net,OU=SITL,O=Avaya,L=Lincroft,S=New Jersey,C=US” is entered.
• Challenge Password and Re-enter Challenge Password – enter an arbitrary password.
• Leave the other fields at the defaults.
RL; Reviewed:
SPOC 11/5/2007
Solution & Interoperability Test Lab Application Notes
©2007 Avaya Inc. All Rights Reserved.
26 of 48
OCS-ACM-RCC
Step
Description
3. In the Server Certificate Manual Enrollment Request page , copy the entire contents of the
Certificate Request PEM textbox into the Windows clipboard.
4.
Repeat Section 5.3 Steps 1 - 3.
5.
In the Microsoft Certificate Services Advanced Certificate Request page, click on “Submit a
certificate request by using a base-64-encoded CMC or PKCS #10 file, or submit a renewal
request by using a base-64-encoded PKCS #7 file”.
RL; Reviewed:
SPOC 11/5/2007
Solution & Interoperability Test Lab Application Notes
©2007 Avaya Inc. All Rights Reserved.
27 of 48
OCS-ACM-RCC
Step
Description
6. In the Submit a Certificate Request or Renewal Request page, paste the copied contents from
Step 3 into the Saved Request textbox, select the Certificate Template created in Section 5.2,
and click on “Submit”.
7.
In the Certificate Issued page, select “Base 64 encoded” and click on “Download certificate”.
8.
When prompted, save the certificate file to a local directory on the Microsoft OCS server. After
saving, open the certificate file with a text editor and copy the entire contents of the certificate
file, including the header and trailer, into the Windows clipboard.
RL; Reviewed:
SPOC 11/5/2007
Solution & Interoperability Test Lab Application Notes
©2007 Avaya Inc. All Rights Reserved.
28 of 48
OCS-ACM-RCC
Step
Description
9. In the left pane of the Avaya AE Services OAM Web Interface, select CTI OAM Admin Æ
Administration Æ Certificate Management Æ Server Certificate Æ Pending Requests. In
the Pending Requests Certificate Requests page, select the alias for the certificate request
created in Steps 1 - 3 and click on “Manual Enroll”.
10. In the Server Certificate Manual Enrollment Request page, click on “Import”.
RL; Reviewed:
SPOC 11/5/2007
Solution & Interoperability Test Lab Application Notes
©2007 Avaya Inc. All Rights Reserved.
29 of 48
OCS-ACM-RCC
Step
Description
11. In the Server Certificate Import page, enter the same Certificate Alias, ensure that the
Establish Chain of Trust checkbox is checked, paste the copied contents from Step 8 into the
Certificate PEM textbox, and click on “Apply”.
If the import is successful, the message “Certificate imported successfully” is displayed on the
Server Certificate Import page.
RL; Reviewed:
SPOC 11/5/2007
Solution & Interoperability Test Lab Application Notes
©2007 Avaya Inc. All Rights Reserved.
30 of 48
OCS-ACM-RCC
6. Avaya Application Enablement Services TR/87
Configuration
This section describes the Active Directory and Dial Plan configuration on Avaya AE Services
for TR/87 integration with Microsoft OCS.
Step
Description
1. Launch a web browser and log into the Avaya AE Services OAM Web Interface. In the left
pane, select CTI OAM Admin Æ Administration Æ TR87 Configuration Æ Active
Directory. In the Active Directory Configuration page, configure the following and click on
“Apply Changes”.
• User DN for Query Authentication – enter the Distinguished Name (DN) of an Active
Directory user object that has sufficient privileges for accessing Active Directory. In the
example below, the DN of the domain administrator is entered:
“CN=Administrator,CN=Users,DC=sitlms,DC=net”
• Password and Confirm Password – enter the Active Directory password for the user.
• Base Search DN – enter a DN that includes all Active Directory users (particularly those that
are also configured as Microsoft OCS users).
• IP Address – enter the IP address of the Active Directory server.
• Port – enter “389”.
RL; Reviewed:
SPOC 11/5/2007
Solution & Interoperability Test Lab Application Notes
©2007 Avaya Inc. All Rights Reserved.
31 of 48
OCS-ACM-RCC
Step
Description
2. In the left pane, select Dial Plan Æ Switch Administration. In the Switch Dial Plan
Administration page, select the switch connection corresponding to the appropriate Avaya
Communication Manager, and click on “Detail”.
RL; Reviewed:
SPOC 11/5/2007
Solution & Interoperability Test Lab Application Notes
©2007 Avaya Inc. All Rights Reserved.
32 of 48
OCS-ACM-RCC
Step
Description
3. In the Dial Plan Settings – Conversion Rules page, click on “Add” in the From TelURI
section. Avaya AE Services uses the From TelURI table to convert E.164-formatted numbers in
TR/87 requests received from Microsoft OCS into extensions and number strings that Avaya
Communication Manager can handle and route. For example, when an RCC client places a call
on behalf of an Avaya Communication Manager phone, Microsoft OCS sends a call initiation
request to Avaya AE Services. The calling number (device identifier) in the request is the
number assigned to the RCC user in Microsoft OCS (see Section 7 Step 3) and may be in E.164
format. An appropriate entry in the From TelURI table would then be required to extract the
extension of the associated Avaya Communication Manager phone from the E.164-formatted
number. In the sample configuration, Microsoft OCS users were all assigned E.164 11-digit
numbers.
If the called number in the request is also an E.164-formatted number (which commonly occurs
when the RCC client places a call using the MOC Contacts list), an appropriate entry in the
From TelURI table can extract the intended extension and/or append routing digits. The From
TelURI table, however, does not convert numbers that are not E.164-formatted, so Avaya AE
Services passes such numbers without modification to Avaya Communication Manager.
Therefore, RCC clients can also dial any extension or number string that Avaya Communication
Manager is appropriately configured to handle and route.
RL; Reviewed:
SPOC 11/5/2007
Solution & Interoperability Test Lab Application Notes
©2007 Avaya Inc. All Rights Reserved.
33 of 48
OCS-ACM-RCC
Step
Description
4. In the Add Dial Plan From TelURI page, configure an entry that converts the E.164-formatted
numbers assigned to the RCC clients (see Section 7 Step 3) to the corresponding Avaya
Communication Manager phone extensions (see Section 4.1), and click on “Apply Changes”.
This entry applies to the calling number when a RCC client sends a call initiation request to
Avaya AE Services, and allows Avaya Communication Manager to identify the phone for which
the RCC client is placing the call. In the example below, the entry matches E.164 11-digit
numbers that start with “+17328823” and deletes the leading six digits to obtain extensions of the
form 23xxx.
Note: This entry also applies to the called number if the called number is the E.164-formatted
number assigned to another RCC client.
5.
In the Add Dial Plan page, click on “Apply”.
6.
Repeat Steps 3 – 5 as necessary for each range of E.164-formatted numbers assigned to RCC
clients.
RL; Reviewed:
SPOC 11/5/2007
Solution & Interoperability Test Lab Application Notes
©2007 Avaya Inc. All Rights Reserved.
34 of 48
OCS-ACM-RCC
Step
Description
7. Repeat Steps 3 – 5 to configure an entry that extracts the “extensions” from the E.164-formatted
numbers assigned to the EV clients (refer to [1] and Section 4.1). This entry applies to the called
number when a RCC client sends a call initiation request to Avaya AE Services, where the called
number is the E.164-formatted number assigned to an EV client. The extracted “extensions” can
then be used by Avaya Communication Manager to route the calls to Microsoft OCS according
to the routing configuration described in [1]. In the example below, the entry matches E.164 11digit numbers that start with “+1732883” and deletes the leading six digits to obtain extensions
of the form 3xxxx. The routing configuration described in [1] routes calls placed to 3xxxx to
Microsoft OCS. Note that Avaya Communication Manager applies the same routing
configuration when RCC clients use extension dialing, i.e., dialing 3xxxx, to call EV clients.
Repeat this step as necessary for each range of E.164-formatted numbers assigned to EV clients.
RL; Reviewed:
SPOC 11/5/2007
Solution & Interoperability Test Lab Application Notes
©2007 Avaya Inc. All Rights Reserved.
35 of 48
OCS-ACM-RCC
Step
Description
8. Repeat Steps 3 – 5 to configure an entry that extracts the extensions from E.164-formatted
numbers corresponding to Avaya Communication Manager phones that are not associated with
RCC clients. This entry applies to the called number when a RCC client sends a call initiation
request to Avaya AE Services, where the called number is an E.164-formatted number
containing the extension of an Avaya Communication Manager phone that is not associated with
an RCC client. In the example below, the entry matches E.164 11-digit numbers that start with
“+17328822” and deletes the leading six digits to obtain extensions of the form 22xxx. Repeat
this step as necessary for each range of E.164-formatted numbers corresponding to Avaya
Communication Manager phones that are not associated with RCC clients.
RL; Reviewed:
SPOC 11/5/2007
Solution & Interoperability Test Lab Application Notes
©2007 Avaya Inc. All Rights Reserved.
36 of 48
OCS-ACM-RCC
Step
Description
9. Repeat Steps 3 – 5 to configure an entry that adds a leading digit to E.164-formatted external
numbers, and click on “Apply Changes”. The leading digit must be the ARS Access Code
configured on Avaya Communication Manager for ARS routing (refer to [1]). This entry applies
to the called number when a RCC client sends a call initiation request to Avaya AE Services,
where the called number is the E.164-formatted number of an external phone. In the example
below, the entry matches E.164 11-digit numbers that start with “+1” and adds a leading “9”.
Note that since the order of From TelURI entries is significant, this entry must be configured and
placed after the entries described in Steps 4 – 8.
Note: Alternatively, RCC clients can dial the ARS Access Code followed by the 11-digit
external number (without the leading “+”). Avaya AE Services would send the resulting dialed
12-digit string as is since the From TelURI table only affects numbers with a leading “+”.
RL; Reviewed:
SPOC 11/5/2007
Solution & Interoperability Test Lab Application Notes
©2007 Avaya Inc. All Rights Reserved.
37 of 48
OCS-ACM-RCC
Step
Description
10. In the Dial Plan Settings – Conversion Rules page, click on “Add” in the To TelURI section.
Avaya AE Services uses the To TelURI table to convert extensions and number strings received
from Avaya Communication Manager into formatted numbers that Microsoft OCS recognizes.
For example, when an RCC-associated Avaya Communication Manager phone places or receives
a call, Avaya Communication Manager sends a call notification to Avaya AE Services, where the
calling and called numbers may be extensions or any number strings. An appropriate entry in the
To TelURI table can convert the numbers into E.164-formatted numbers or any other formatted
numbers that Microsoft OCS recognizes. In the sample configuration, Microsoft OCS users
were all assigned E.164 11-digit numbers. If the reformatted calling/called number is that of
another Microsoft OCS user (whether configured for RCC or EV mode), then the RCC client can
also resolve the number to the calling user’s name.
No explicit To TelURI table entry is necessary for calls where the calling/called number is the
extension of an RCC-associated Avaya Communication Manager phone. This is because the
mapping between the extension and associated Microsoft OCS number is already known from an
appropriate entry in the From TelURI table (see Steps 4 - 6).
RL; Reviewed:
SPOC 11/5/2007
Solution & Interoperability Test Lab Application Notes
©2007 Avaya Inc. All Rights Reserved.
38 of 48
OCS-ACM-RCC
Step
Description
11. In the Add Dial Plan To TelURI page, configure an entry that adds a leading “+” to non-E.164formatted numbers, and click on “Apply Changes”. This entry applies to the calling or called
number when Avaya AE Services sends a call notification to a RCC client, where the number
lacks a leading “+”. This can occur when an external phone or EV client3 calls a RCC client, or
when the Avaya Communication Manager phone associated with the RCC client dials an
external phone. After the leading “+” is added, the RCC client attempts to resolve the E.164formatted calling/called number to the name of a Microsoft OCS user. If the caller or callee is an
external phone, then the resolution does not return a name. The E.164-formatted calling/called
number is then presented in the call alert and added to the MOC Recent Contacts list. The
external phone can thus be easily called back using the MOC Recent Contacts list (assuming the
From TelURI entry in Step 9 has been added). If the caller is an EV client, then the resolution
returns the name of the EV client user. The calling user’s name is then presented in the call alert
and added to the MOC Recent Contacts list.
12. In the Add Dial Plan page, click on “Apply”.
3
The original calling party number sent by Microsoft OCS for such a call may be in fact an E.164-formatted
number, but the leading “+” is removed by Avaya Communication Manager.
RL; Reviewed:
SPOC 11/5/2007
Solution & Interoperability Test Lab Application Notes
©2007 Avaya Inc. All Rights Reserved.
39 of 48
OCS-ACM-RCC
7. Configure Microsoft Office Communications Server
This section highlights the Microsoft Office Communications Server (OCS) configuration for
TR/87 integration with Avaya AE Services. These Application Notes assume that basic
Microsoft OCS server installation and configuration have already been performed according to
the guidelines provided in [6], [7], and [8]. These Application Notes further assume that user
accounts have been created in Microsoft Active Directory and enabled for Microsoft OCS.
Step
Description
1. On the Microsoft OCS server, launch the Microsoft Office Communications Server 2007
(MMC) snap-in. In the left pane, expand the Forest node down to the Users level (Forest Æ
Enterprise pools Æ <name of Pool> Æ Users). In the right pane, right-click on a user and
select “Properties”.
RL; Reviewed:
SPOC 11/5/2007
Solution & Interoperability Test Lab Application Notes
©2007 Avaya Inc. All Rights Reserved.
40 of 48
OCS-ACM-RCC
Step
Description
2. In the selected user’s Properties dialog box, click on “Configure”.
RL; Reviewed:
SPOC 11/5/2007
Solution & Interoperability Test Lab Application Notes
©2007 Avaya Inc. All Rights Reserved.
41 of 48
OCS-ACM-RCC
Step
Description
3. In the User Options dialog box, in the Telephony section, select “Enable Remote call
control”, enter “sip:aes@<FQDN of AE Services server>” for Server URI, and enter an E.164
Tel URI for Line URI. The trailing five digits of the E.164 Tel URI should contain the user’s
Avaya Communication Manager phone extension (see Section 4.1). In the sample configuration,
users were configured with Line URIs of the form “Tel:+17328823xxx”, where 23xxx is the
user’s Avaya Communication Manager phone extension and +17328823xxx is the corresponding
E.164 11-digit number. Click on “OK”.
4.
Back in the selected user’s Properties dialog box, click on “OK”.
5.
Repeat Steps 1 – 4 for other users with RCC clients.
RL; Reviewed:
SPOC 11/5/2007
Solution & Interoperability Test Lab Application Notes
©2007 Avaya Inc. All Rights Reserved.
42 of 48
OCS-ACM-RCC
Step
Description
6. In the left pane of the Microsoft Office Communications Server 2007 MMC snap-in, expand
the Forest node down to the Enterprise Pool level (Forest Æ Enterprise pools Æ <name of
Pool>), right-click on Front Ends, and select “Properties”.
7.
In the Front Ends Properties dialog box, select the Routing tab and click on “Add”.
RL; Reviewed:
SPOC 11/5/2007
Solution & Interoperability Test Lab Application Notes
©2007 Avaya Inc. All Rights Reserved.
43 of 48
OCS-ACM-RCC
Step
Description
8. In the Add Static Route dialog box, in the Matching URI section, enter the FQDN of the
Avaya AE Services server for Domain. In the Next hop section, enter the FQDN of the Avaya
AE Services server for FQDN, select “TLS” for Transport, and enter the Avaya AE Services
TR/87 Port (see Section 4.3) for Port. Click on “OK”.
9.
In the Front Ends Properties dialog box, select the Host Authorization tab and click on
“Add”.
RL; Reviewed:
SPOC 11/5/2007
Solution & Interoperability Test Lab Application Notes
©2007 Avaya Inc. All Rights Reserved.
44 of 48
OCS-ACM-RCC
Step
Description
10. In the Add Authorized Host dialog box, in the Server section, select “FQDN” and enter the
FQDN of the Avaya AE Services server. In the Settings section, ensure that the Outbound
Only checkbox is unchecked, and check the Throttle As Server and Treat As Authenticated
checkboxes. Click on “OK”.
11. In the Front Ends Properties dialog box, click on “OK”.
RL; Reviewed:
SPOC 11/5/2007
Solution & Interoperability Test Lab Application Notes
©2007 Avaya Inc. All Rights Reserved.
45 of 48
OCS-ACM-RCC
8. Verification Steps
The following steps may be used to verify the configuration:
• Place outbound calls from a RCC client to Avaya phones (associated and not associated
with RCC clients), EV clients, and Microsoft Exchange voicemail access and Auto
Attendant using extension dialing. Verify that the calls are established successfully on
the associated RCC Avaya phones.
• Place outbound calls from a RCC client to Avaya phones (associated and not associated
with RCC clients), EV clients, and Microsoft Exchange voicemail access and Auto
Attendant using the MOC Contacts list. Verify that the calls are established successfully
on the associated RCC Avaya phones.
• Establish a call between two RCC-associated Avaya phones. Verify that both users’
names are displayed on the RCC clients.
• Establish a call from an Avaya phone to an RCC-associated Avaya phone. Verify that
the calling extension is displayed on the RCC client.
• Establish a call from an EV client to an RCC-associated Avaya phone. Verify that the
name of the calling user is displayed on the RCC client.
• Establish outbound calls from an RCC-associated Avaya phone. Verify that the calls are
accurately reflected on the RCC client.
• Place inbound calls to an RCC-associated Avaya phone. Verify that the calls can be
answered at the RCC client and the phone.
• Establish multiple inbound and outbound calls on an RCC-associated Avaya phone.
Verify that the RCC client displays a conversation window for each call and the user can
move easily between the conversation windows.
• Verify that call hold, retrieve, disconnect, and transfer operations performed from a RCC
client are accurately reflected on the Avaya phone associated with the RCC client.
• Verify that call hold, retrieve, disconnect, and transfer operations performed from an
RCC-associated Avaya phone are accurately reflected on the RCC client.
• Establish multiple inbound and outbound calls on an RCC-associated Avaya phone.
Verify that the RCC client displays a conversation window for each call and the user can
move easily between the conversation windows.
• Establish an IM conversation between two RCC clients and escalate the conversation to a
voice call. Verify that the call is established successfully on the associated RCC phones.
• Configure an RCC client to forward calls to another destination (Avaya phones
associated and not associated with RCC clients, and EV clients). Place inbound calls to
the Avaya phone associated with the forwarding RCC client. Verify that the calls are
forwarded to the correct destinations.
• Verify that the presence status of the RCC client correctly reflects the telephony status (in
a call or idle) of the associated Avaya phone.
RL; Reviewed:
SPOC 11/5/2007
Solution & Interoperability Test Lab Application Notes
©2007 Avaya Inc. All Rights Reserved.
46 of 48
OCS-ACM-RCC
9. Conclusion
These Application Notes described the configuration procedures for enabling Microsoft Office
Communicator (MOC) clients to place, answer, hold/retrieve, transfer, and disconnect calls on
Avaya Communication Manager phones. The integration between MOC clients and Avaya
Communication Manager phones was achieved through TR/87 integration between Avaya
Application Enablement Services and Microsoft OCS.
The following was observed from sanity testing of basic telephony functionality:
On a call between two RCC-associated Avaya phones, when the call is transferred to an EV
client, the transfer succeeds, but the call is dropped on the RCC client associated with the
transferred Avaya phone (the call is still up between the transferred phone and EV client).
10. Additional References
[1] “Application Notes for Call Routing Between Avaya Communication Manager and Microsoft
Office Communications Server”, Issue 1.0, September 2007
The following document may be obtained from http://support.avaya.com.
[2] “Avaya MultiVantage Application Enablement Services Administration and Maintenance
Guide Release 4.0.1”, Issue 7, July 2007, Document Number 02-300357.
[3] “Avaya MultiVantage Application Enablement Services Implementation Guide for Microsoft
Live Communications Server”, Issue 3, July 2007, Document Number 02-601893.
The following documents may be obtained from http://www.microsoft.com.
[4] “Microsoft Office Communications Server 2007 Technical Overview”, July 2007.
[5] “Microsoft Office Communications Server 2007 Planning Guide”, July 2007.
[6] “Microsoft Office Communications Server 2007 Enterprise Edition Deployment Guide”, July
2007.
[7] “Microsoft Office Communications Server 2007 Enterprise Voice Planning and Deployment
Guide”, July 2007.
[8] “Microsoft Office Communications Server 2007 Administration Guide”, July 2007.
[9] “Integrating Telephony with Office Communications Server 2007”, July 2007.
RL; Reviewed:
SPOC 11/5/2007
Solution & Interoperability Test Lab Application Notes
©2007 Avaya Inc. All Rights Reserved.
47 of 48
OCS-ACM-RCC
© 2007 Avaya Inc. All Rights Reserved.
Avaya and the Avaya Logo are trademarks of Avaya Inc. All trademarks identified by ® and ™
are registered trademarks or trademarks, respectively, of Avaya Inc. All other trademarks are the
property of their respective owners. The information provided in these Application Notes is
subject to change without notice. The configurations, technical data, and recommendations
provided in these Application Notes are believed to be accurate and dependable, but are
presented without express or implied warranty. Users are responsible for their application of any
products specified in these Application Notes.
Please e-mail any questions or comments pertaining to these Application Notes along with the
full title and filename, located in the lower right corner, directly to the Avaya Solution &
Interoperability Test Lab at [email protected]
RL; Reviewed:
SPOC 11/5/2007
Solution & Interoperability Test Lab Application Notes
©2007 Avaya Inc. All Rights Reserved.
48 of 48
OCS-ACM-RCC