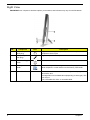
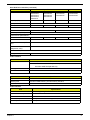
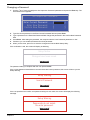
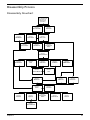
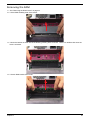
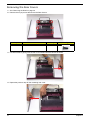
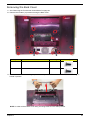
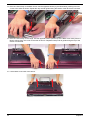
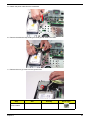
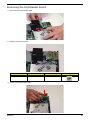
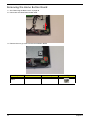
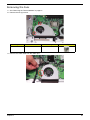
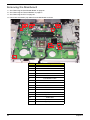
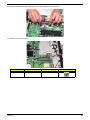
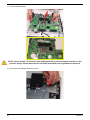
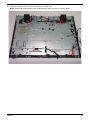
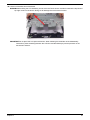
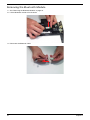
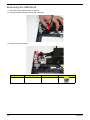
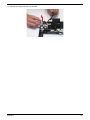
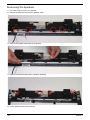
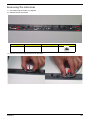
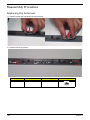
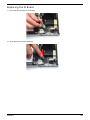
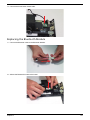
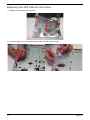
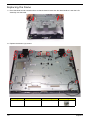
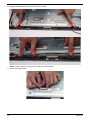
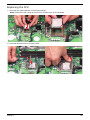
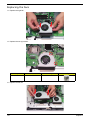
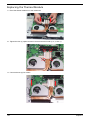
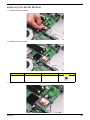
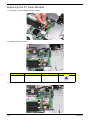
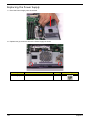
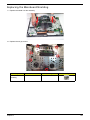
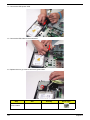
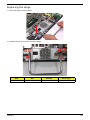
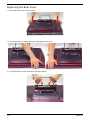
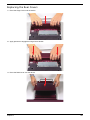
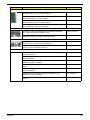
1
Aspire Z5700/Z5710 Series Service Guide Service guide files and updates are available on the ACER/CSD web; for more information, please refer to http://csd.acer.com.tw PRINTED IN TAIWAN Revision History Please refer to the table below for the updates made on this service guide. Date II Chapter Updates Copyright Copyright © 2010 by Acer Incorporated. All rights reserved. No part of this publication may be reproduced, transmitted, transcribed, stored in a retrieval system, or translated into any language or computer language, in any form or by any means, electronic, mechanical, magnetic, optical, chemical, manual or otherwise, without the prior written permission of Acer Incorporated. Disclaimer The information in this guide is subject to change without notice. Acer Incorporated makes no representations or warranties, either expressed or implied, with respect to the contents hereof and specifically disclaims any warranties of merchantability or fitness for any particular purpose. Any Acer Incorporated software described in this manual is sold or licensed "as is". Should the programs prove defective following their purchase, the buyer (and not Acer Incorporated, its distributor, or its dealer) assumes the entire cost of all necessary servicing, repair, and any incidental or consequential damages resulting from any defect in the software. Acer is a registered trademark of Acer Corporation. Intel is a registered trademark of Intel Corporation. Other brand and product names are trademarks and/or registered trademarks of their respective holders. III Conventions The following conventions are used in this manual: SCREEN MESSAGES Denotes actual messages that appear on screen. NOTE Gives bits and pieces of additional information related to the current topic. WARNING Alerts you to any damage that might result from doing or not doing specific actions. CAUTION Gives precautionary measures to avoid possible hardware or software problems. IMPORTANT Reminds you to do specific actions relevant to the accomplishment of procedures. NOTE: This symbol where placed in the Service Guide designates a component that should be recycled according to the local regulations. IV Preface Before using this information and the product it supports, please read the following general information. 1. This Service Guide provides you with all technical information relating to the BASIC CONFIGURATION decided for Acer's "global" product offering. To better fit local market requirements and enhance product competitiveness, your regional office MAY have decided to extend the functionality of a machine (e.g. add-on card, modem, or extra memory capability). These LOCALIZED FEATURES will NOT be covered in this generic service guide. In such cases, please contact your regional offices or the responsible personnel/channel to provide you with further technical details. 2. Please note WHEN ORDERING FRU PARTS, that you should check the most up-to-date information available on your regional web or channel. If, for whatever reason, a part number change is made, it will not be noted in the printed Service Guide. For ACER-AUTHORIZED SERVICE PROVIDERS, your Acer office may have a DIFFERENT part number code to those given in the FRU list of this printed Service Guide. You MUST use the list provided by your regional Acer office to order FRU parts for repair and service of customer machines. V VI Table of Contents System Specifications 1 Features . . . . . . . . . . . . . . . . . . . . . . . . . . . . . . . . . . . . . . . . . . . . . . . . . . . . . . . . . . . .1 System Block Diagram . . . . . . . . . . . . . . . . . . . . . . . . . . . . . . . . . . . . . . . . . . . . . . . . .6 Your Computer tour . . . . . . . . . . . . . . . . . . . . . . . . . . . . . . . . . . . . . . . . . . . . . . . . . . . . . . . . . . . 7 Front View . . . . . . . . . . . . . . . . . . . . . . . . . . . . . . . . . . . . . . . . . . . . . . . . . . . . . . .7 Right View . . . . . . . . . . . . . . . . . . . . . . . . . . . . . . . . . . . . . . . . . . . . . . . . . . . . . . .8 Left View . . . . . . . . . . . . . . . . . . . . . . . . . . . . . . . . . . . . . . . . . . . . . . . . . . . . . . . .9 Rear View . . . . . . . . . . . . . . . . . . . . . . . . . . . . . . . . . . . . . . . . . . . . . . . . . . . . . .10 Using the Keyboard . . . . . . . . . . . . . . . . . . . . . . . . . . . . . . . . . . . . . . . . . . . . . . . . . .11 Windows Keys . . . . . . . . . . . . . . . . . . . . . . . . . . . . . . . . . . . . . . . . . . . . . . . . . . . . . . . . . 12 Hardware Specifications and Configurations . . . . . . . . . . . . . . . . . . . . . . . . . . . . . . .13 System Utilities 23 BIOS Setup Utility . . . . . . . . . . . . . . . . . . . . . . . . . . . . . . . . . . . . . . . . . . . . . . . . . . . .23 Navigating the BIOS Utility . . . . . . . . . . . . . . . . . . . . . . . . . . . . . . . . . . . . . . . . .23 CMOS Setup Utility . . . . . . . . . . . . . . . . . . . . . . . . . . . . . . . . . . . . . . . . . . . . . . .24 Product Information . . . . . . . . . . . . . . . . . . . . . . . . . . . . . . . . . . . . . . . . . . . . . . .25 Standard CMOS Features . . . . . . . . . . . . . . . . . . . . . . . . . . . . . . . . . . . . . . . . .26 Advanced BIOS Features . . . . . . . . . . . . . . . . . . . . . . . . . . . . . . . . . . . . . . . . . .27 Advanced Chipset Features . . . . . . . . . . . . . . . . . . . . . . . . . . . . . . . . . . . . . . . .28 Integrated Peripherals . . . . . . . . . . . . . . . . . . . . . . . . . . . . . . . . . . . . . . . . . . . . .29 Power Management Features . . . . . . . . . . . . . . . . . . . . . . . . . . . . . . . . . . . . . . .30 PC Health . . . . . . . . . . . . . . . . . . . . . . . . . . . . . . . . . . . . . . . . . . . . . . . . . . . . . .31 Frequency Voltage Control . . . . . . . . . . . . . . . . . . . . . . . . . . . . . . . . . . . . . . . . .32 BIOS Security Features . . . . . . . . . . . . . . . . . . . . . . . . . . . . . . . . . . . . . . . . . . .33 BIOS Flash Utilities . . . . . . . . . . . . . . . . . . . . . . . . . . . . . . . . . . . . . . . . . . . . . . . . . . .36 DOS Flash Utility . . . . . . . . . . . . . . . . . . . . . . . . . . . . . . . . . . . . . . . . . . . . . . . . .37 Win Flash Utility . . . . . . . . . . . . . . . . . . . . . . . . . . . . . . . . . . . . . . . . . . . . . . . . .38 Using DMI Tools . . . . . . . . . . . . . . . . . . . . . . . . . . . . . . . . . . . . . . . . . . . . . . . . .39 Machine Disassembly and Replacement 40 Disassembly Requirements . . . . . . . . . . . . . . . . . . . . . . . . . . . . . . . . . . . . . . . . . . . .40 General Information . . . . . . . . . . . . . . . . . . . . . . . . . . . . . . . . . . . . . . . . . . . . . . . . . .40 Pre-disassembly Instructions . . . . . . . . . . . . . . . . . . . . . . . . . . . . . . . . . . . . . . .40 Disassembly Process . . . . . . . . . . . . . . . . . . . . . . . . . . . . . . . . . . . . . . . . . . . . . . . . .42 Disassembly Flowchart . . . . . . . . . . . . . . . . . . . . . . . . . . . . . . . . . . . . . . . . . . . .42 Removing the RAM Covers . . . . . . . . . . . . . . . . . . . . . . . . . . . . . . . . . . . . . . . .44 Removing the RAM . . . . . . . . . . . . . . . . . . . . . . . . . . . . . . . . . . . . . . . . . . . . . . .46 Removing the Rear Covers . . . . . . . . . . . . . . . . . . . . . . . . . . . . . . . . . . . . . . . . .47 Removing the Back Cover . . . . . . . . . . . . . . . . . . . . . . . . . . . . . . . . . . . . . . . . .48 Removing the Hinge . . . . . . . . . . . . . . . . . . . . . . . . . . . . . . . . . . . . . . . . . . . . . .50 Removing the Mainboard Shielding . . . . . . . . . . . . . . . . . . . . . . . . . . . . . . . . . .51 Removing the Hard Disk Drive . . . . . . . . . . . . . . . . . . . . . . . . . . . . . . . . . . . . . .55 Removing the Power Supply . . . . . . . . . . . . . . . . . . . . . . . . . . . . . . . . . . . . . . . .58 Removing the Touchscreen Control Board . . . . . . . . . . . . . . . . . . . . . . . . . . . . .59 Removing the Card Reader Board . . . . . . . . . . . . . . . . . . . . . . . . . . . . . . . . . . .62 Removing the Audio Board . . . . . . . . . . . . . . . . . . . . . . . . . . . . . . . . . . . . . . . . .63 Removing the ODD Eject Board . . . . . . . . . . . . . . . . . . . . . . . . . . . . . . . . . . . . .65 Removing the ODD . . . . . . . . . . . . . . . . . . . . . . . . . . . . . . . . . . . . . . . . . . . . . . .67 . . . . . . . . . . . . . . . . . . . . . . . . . . . . . . . . . . . . . . . . . . . . . . . . . . . . . . . . . . . . . .69 Removing the Inverter Board . . . . . . . . . . . . . . . . . . . . . . . . . . . . . . . . . . . . . . .70 Removing the Home Button Board . . . . . . . . . . . . . . . . . . . . . . . . . . . . . . . . . . .73 Removing the Camera Module . . . . . . . . . . . . . . . . . . . . . . . . . . . . . . . . . . . . . .75 Removing the TV Tuner Module . . . . . . . . . . . . . . . . . . . . . . . . . . . . . . . . . . . . .77 Removing the Wireless LAN Module . . . . . . . . . . . . . . . . . . . . . . . . . . . . . . . . .79 VII Table of Contents Removing the Thermal Module . . . . . . . . . . . . . . . . . . . . . . . . . . . . . . . . . . . . . .81 Removing the Fans . . . . . . . . . . . . . . . . . . . . . . . . . . . . . . . . . . . . . . . . . . . . . . .82 Removing the CPU . . . . . . . . . . . . . . . . . . . . . . . . . . . . . . . . . . . . . . . . . . . . . . .84 Removing the Mainboard . . . . . . . . . . . . . . . . . . . . . . . . . . . . . . . . . . . . . . . . . .85 Removing the Frame . . . . . . . . . . . . . . . . . . . . . . . . . . . . . . . . . . . . . . . . . . . . .89 Removing the LCD Panel . . . . . . . . . . . . . . . . . . . . . . . . . . . . . . . . . . . . . . . . . .95 Removing the Bluetooth Module . . . . . . . . . . . . . . . . . . . . . . . . . . . . . . . . . . . . .97 Removing the IR Board . . . . . . . . . . . . . . . . . . . . . . . . . . . . . . . . . . . . . . . . . . . .98 Removing the Home Button Board . . . . . . . . . . . . . . . . . . . . . . . . . . . . . . . . . .100 Removing the USB Board . . . . . . . . . . . . . . . . . . . . . . . . . . . . . . . . . . . . . . . . .101 Removing the Speakers . . . . . . . . . . . . . . . . . . . . . . . . . . . . . . . . . . . . . . . . . .103 Removing the Antennas . . . . . . . . . . . . . . . . . . . . . . . . . . . . . . . . . . . . . . . . . .104 Reassembly Procedure . . . . . . . . . . . . . . . . . . . . . . . . . . . . . . . . . . . . . . . . . . . . . .105 Replacing the Antennas . . . . . . . . . . . . . . . . . . . . . . . . . . . . . . . . . . . . . . . . . .105 Replacing the Speakers . . . . . . . . . . . . . . . . . . . . . . . . . . . . . . . . . . . . . . . . . .106 Replacing the USB Board . . . . . . . . . . . . . . . . . . . . . . . . . . . . . . . . . . . . . . . . .107 Replacing the IR Board . . . . . . . . . . . . . . . . . . . . . . . . . . . . . . . . . . . . . . . . . . .108 Replacing the Home Button Board . . . . . . . . . . . . . . . . . . . . . . . . . . . . . . . . . .109 Replacing the Bluetooth Module . . . . . . . . . . . . . . . . . . . . . . . . . . . . . . . . . . . .110 Replacing the LCD Panel in the Frame . . . . . . . . . . . . . . . . . . . . . . . . . . . . . .111 Replacing the Frame . . . . . . . . . . . . . . . . . . . . . . . . . . . . . . . . . . . . . . . . . . . . .113 Replacing the Mainboard . . . . . . . . . . . . . . . . . . . . . . . . . . . . . . . . . . . . . . . . .117 Replacing the CPU . . . . . . . . . . . . . . . . . . . . . . . . . . . . . . . . . . . . . . . . . . . . . .120 Replacing the Fans . . . . . . . . . . . . . . . . . . . . . . . . . . . . . . . . . . . . . . . . . . . . . .121 Replacing the Thermal Module . . . . . . . . . . . . . . . . . . . . . . . . . . . . . . . . . . . . .123 Replacing the WLAN Module . . . . . . . . . . . . . . . . . . . . . . . . . . . . . . . . . . . . . .124 Replacing the TV Tuner Module . . . . . . . . . . . . . . . . . . . . . . . . . . . . . . . . . . . .125 Replacing the Camera Module . . . . . . . . . . . . . . . . . . . . . . . . . . . . . . . . . . . . .126 Replacing the Power Board . . . . . . . . . . . . . . . . . . . . . . . . . . . . . . . . . . . . . . .128 Replacing the Inverter Board . . . . . . . . . . . . . . . . . . . . . . . . . . . . . . . . . . . . . .129 Replacing the ODD Module . . . . . . . . . . . . . . . . . . . . . . . . . . . . . . . . . . . . . . .132 Replacing the ODD Eject Board . . . . . . . . . . . . . . . . . . . . . . . . . . . . . . . . . . . .134 Replacing the Audio Board . . . . . . . . . . . . . . . . . . . . . . . . . . . . . . . . . . . . . . . .135 Connect the Card Reader Board . . . . . . . . . . . . . . . . . . . . . . . . . . . . . . . . . . .136 Replacing the Touchscreen Board . . . . . . . . . . . . . . . . . . . . . . . . . . . . . . . . . .137 Replacing the Power Supply . . . . . . . . . . . . . . . . . . . . . . . . . . . . . . . . . . . . . . .139 Replacing the HDD . . . . . . . . . . . . . . . . . . . . . . . . . . . . . . . . . . . . . . . . . . . . . .140 Replacing the Mainboard Shielding . . . . . . . . . . . . . . . . . . . . . . . . . . . . . . . . .142 Replacing the Hinge . . . . . . . . . . . . . . . . . . . . . . . . . . . . . . . . . . . . . . . . . . . . .146 Replacing the Rear Cover . . . . . . . . . . . . . . . . . . . . . . . . . . . . . . . . . . . . . . . . .147 Replacing the Rear Covers . . . . . . . . . . . . . . . . . . . . . . . . . . . . . . . . . . . . . . . .149 Replacing the RAM . . . . . . . . . . . . . . . . . . . . . . . . . . . . . . . . . . . . . . . . . . . . . .151 Replacing the Rear Covers . . . . . . . . . . . . . . . . . . . . . . . . . . . . . . . . . . . . . . . .152 Troubleshooting 154 Common Problems . . . . . . . . . . . . . . . . . . . . . . . . . . . . . . . . . . . . . . . . . . . . . . . . . .154 ODD Failure . . . . . . . . . . . . . . . . . . . . . . . . . . . . . . . . . . . . . . . . . . . . . . . . . . .155 Wireless Failure . . . . . . . . . . . . . . . . . . . . . . . . . . . . . . . . . . . . . . . . . . . . . . . .158 Camera Failure . . . . . . . . . . . . . . . . . . . . . . . . . . . . . . . . . . . . . . . . . . . . . . . . .159 Speaker Failure . . . . . . . . . . . . . . . . . . . . . . . . . . . . . . . . . . . . . . . . . . . . . . . . .160 LCD Failure . . . . . . . . . . . . . . . . . . . . . . . . . . . . . . . . . . . . . . . . . . . . . . . . . . . .162 General Troubleshooting Issues . . . . . . . . . . . . . . . . . . . . . . . . . . . . . . . . . . . .164 Intermittent Problems . . . . . . . . . . . . . . . . . . . . . . . . . . . . . . . . . . . . . . . . . . . . . . . .167 Undetermined Problems . . . . . . . . . . . . . . . . . . . . . . . . . . . . . . . . . . . . . . . . . . . . . .167 POST Codes . . . . . . . . . . . . . . . . . . . . . . . . . . . . . . . . . . . . . . . . . . . . . . . . . . .168 VIII Table of Contents Jumper and Connector Locations 175 Mainboard Top View . . . . . . . . . . . . . . . . . . . . . . . . . . . . . . . . . . . . . . . . . . . . . . . . .175 BIOS Recovery . . . . . . . . . . . . . . . . . . . . . . . . . . . . . . . . . . . . . . . . . . . . . . . . . . . . .176 FRU (Field Replaceable Unit) List 177 Exploded Diagrams . . . . . . . . . . . . . . . . . . . . . . . . . . . . . . . . . . . . . . . . . . . . . . . . .178 FRU List . . . . . . . . . . . . . . . . . . . . . . . . . . . . . . . . . . . . . . . . . . . . . . . . . . . . . . . . . .180 Model Definition and Configuration 188 Test Compatible Components 190 Online Support Information 192 Index 193 IX Table of Contents X Chapter 1 System Specifications Features Below is a brief summary of the computer’s many features: Operating system • Genuine Windows® 7 Home Premium (Touch Pack) Processor Z5710 • Intel® Core™ i7-860/i7-870 processor (8 MB L3 cache, 2.80/2.93 GHz, with Turbo Boost up to 3.46/3.60 GHz, DDR3 1066 MHz, 95 W), supporting Intel® EM64T Technology, Intel® Virtualization Technology • Intel® Core™ i5-750 processor (8 MB L3 cache, 2.66 GHz with Turbo Boost up to 3.20 GHz, DDR3 1333 MHz, 95 W), supporting Intel® EM64T Technology, Intel® Virtualization Technology Z5700/Z5710 • Intel® Core™ i5-650/i5-660/i5-670 processor (4 MB L3 cache, 3.20/3.33/3.46 GHz, DDR3 1333 MHz, 73 W), supporting Intel® EM64T Technology, Intel® Virtualization Technology, Intel® HD graphics • Intel® Core™ i5-661 processor (4 MB L3 cache, 3.33 GHz, DDR3 1333 MHz, 87 W), supporting Intel® EM64T Technology, Intel® Virtualization Technology, Intel® HD graphics • Intel® Core™ i3-530/i3-540 processor (4 MB L3 cache, 2.93/3.06 GHz , DDR3 1333 MHz, 73 W), supporting Intel® EM64T Technology, Intel® Virtualization Technology, Intel® HD graphics • Intel® Pentium® processor G6950 (3 MB L3 cache, 2.80GHz, DDR3 1066 MHz, 73W) supporting Intel® EM64T Technology, Intel® Virtualization Technology Chipset • Intel® H57 Express Chipset Memory • Chapter 1 Dual-channel DDR3 1066/1333 MHz SDRAM support: • Up to 2 GB per memory module • Upgrade option with four unbuffered DIMM slots 1 Graphics Z5710 • NVIDIA® GeForce® G210M with 512 MB of dedicated DDR3 VRAM, supporting NVIDIA® CUDA™, PhysX™, PureVideo® HD technology, OpenEXR High Dynamic-Range (HDR) technology, Shader Model 4.0, Microsoft® DirectX® 10.1, OpenGL® 3.0 • NVIDIA® GeForce® GT240M with 1 GB of dedicated DDR3 VRAM, supporting NVIDIA® CUDA™, PhysX™, PureVideo® HD technology, OpenEXR High Dynamic-Range (HDR) technology, Shader Model 4.0, Microsoft® DirectX® 10.1, OpenGL® 3.0 • Dual independent display support • 16.7 million colors • External resolution / refresh rates: • VGA port up to 2048 x 1536: 85 Hz • HDMI™ port up to 1920 x 1200: 60 Hz • MPEG-2/DVD, MPEG-4 decoding • WMV9 (VC-1), H.264 (AVC), DivX® decoding • HDMI™ (High-Definition Multimedia Interface) with HDCP (High-bandwidth Digital Content Protection) support Z5700 • Intel® HD Graphics with 1.70 GB of video memory, featuring: • Intel® Clear Video HD Technology, DVD upscaling • MPEG-2, VC-1, AVC/H.264 decoding • De-interlacing, sharpness detail, noise reduction, Film Mode detection, video scaling, panel scalar • Microsoft® DirectX® 10 support • Intel® Dynamic Video Memory Technology 5.0 (Intel® DVMT 5.0) support • VGA port resolution / refresh rate up to 2560 x 1600: 60 Hz4 Display • 23" Full HD 1920 x 1080 pixel resolution, high brightness (300-nit), TFT LCD • 16:9 aspect ratio • 5 ms response time • 16.7 million colors • 1000:1 (ACM) contrast ratio Touchscreen • Integrated Windows® 7 compliant multi-touch capable optical solution Hard drive Hard disk drive • 500/640/750 GB / 1 TB 7200 RPM • 1/1.5/2 TB 5400 RPM Solid state drive • 2 80 GB (optional) Chapter 1 Optical drive 4X Blu-ray Disc™ Reader / DVD-Super Multi double-layer drive: • Read: 48X CD-ROM, 48X CD-R, 48 CD-RW, 16X DVD-ROM, 16X DVD-R, 16X DVD+R, 8X DVDROM DL, 8X DVD-R DL, 8X DVD+R DL, 8X DVD-RW, 8X DVD+RW, 12X DVD-RAM, 6X BDROM, 6X BD-R, 2X BD-RE, 6X BD-ROM DL, 2X BD-R DL, 2X BD-RE DL • Write: 48X CD-R, 10X CD-RW, 16X DVD-R, 16X DVD+R, 16X DVD-RW, 16X DVD+RW, 5X DVDRAM, 8X DVD+R DL, 8X DVD-R DL 8X DVD-Super Multi double-layer drive: • Read: 48X CD-ROM, 48X CD-R, 48 CD-RW, 16X DVD-ROM, 16X DVD-R, 16X DVD+R, 8X DVDROM DL, 8X DVD-R DL, 8X DVD+R DL, 8X DVD-RW, 8X DVD+RW, 12X DVD-RAM • Write: 48X CD-R, 10X CD-RW, 16X DVD-R, 16X DVD+R, 16X DVD-RW, 16X DVD+RW, 5X DVDRAM, 8X DVD+R DL, 8X DVD-R DL Card reader • Multi-in-1 card reader, supporting: • MultiMediaCard (MMC) • Secure Digital™ (SD) Card / SDHC™ Card • Memory Stick™ / Memory Stick PRO Duo™ / Memory Stick PRO-HG Duo™ TV-tuner Hybrid TV-tuner supporting worldwide analog/DVB-T (Digital Video Broadcasting-Terrestrial) • TV-tuner I/O: • AIO platform • RF-in Hybrid TV-tuner supporting worldwide analog and ATSC (Advanced Television Systems Committee) • TV-tuner I/O: • AIO platform • RF-in Digital TV-tuner supporting ISDB-T/BS/CS • TV-tuner I/O: • Tower platform • RF-in Hybrid TV-tuner supporting DMB-T/H (Digital Multimedia Broadcast-Terrestial/Handheld) • TV-tuner I/O: • AIO platform • RF-in Audio Chapter 1 • Integrated 5 W stereo speaker system • High-definition audio support 3 Communication • • WLAN: • 802.11 b/g Wi-Fi CERTIFIED™ • 802.11 b/g/n Wi-Fi CERTIFIED™ WPAN: • • Bluetooth® 2.1 + EDR LAN: • Gigabit Ethernet • Built-in 1 MP high-def webcam with 1280 x 800 resolution image capture • Built-in microphone I/O ports Side: • Multi-in-1 card reader • Two USB 2.0 ports • High-definition headphone and microphone jacks • Ambient light switch • BCAS card Reader Slot (Japan only) • Four USB 2.0 ports • Audio Rear: • • Headphone/speaker/line-out jack • Microphone-in jack • Line-in jack Video • • Communication • • HDMI™ port with HDCP support Ethernet (RJ-45) port TV-tuner • IR blaster port (bundled with TV-tuner card) • TV-tuner port (bundled with TV-tuner card) Power Supply Unit • Adapter • 4 250 W Chapter 1 Software • • • • Productivity: • Acer Touch Suite • Adobe® Reader® • eSobi™ • Microsoft® Office 2007 Trial with Microsoft® Works • Microsoft® Touch Pack (Microsoft® Surface Globe/Microsoft® Surface Collage/Microsoft® Surface Lagoon/Microsoft® Blackboard/Microsoft® Rebound/ Microsoft® Garden Pond) Multimedia: • CyberLink® PowerCinema® • CyberLink® YouCam® Security: • McAfee® Internet Security Suite 2009 Trial9 • MyWinLocker® Entertainment • • Oberon TouchGames Utilities • Acer eRecovery Management Security • Kensington lock slot • Hardware and BIOS passwords Dimensions and Weight • 570 (W) x 484.0 (H) x 84.6 (D) mm System Compliance • PC 2001 • ENERGY STAR® NOTE: The specifications listed above are for reference only. The exact configuration of your PC depends on the model purchased. Chapter 1 5 System Block Diagram VRM 11.1 CPU Core ISL6334 Lynnfield/ Clarkdale Processor MXM CNN (Graphics) Mobile PCI-E Module PCIE 2.0 x16(PEG) TYPE-A(or B) (285 pin) (Max 45W) TMDS Channel A DDR3 DIMM0 8GB per channel CN14 CN13 Channel B DDR3 DIMM0 DDR3 DIMM1 8GB per channel CN18 CN17 Dual channel DDR3 800/1066/1333MHz 1.5V 64-bit/45nm LGA1156 (37.5x37.5mm) DDR3 DIMM1 VTT_CPU (95W) TMDS LEVEL SHIFT (Lynnfield option) HDMI CN LVDS UMA LCD Panel CNN LEVEL SHIFT Samsung LTM230TT01 (23'' 16:10) (34.5W) (Clarkdale option) Ibex Peak SDVOB (No MXM option) PCH PCI-E x1 LQFP64 ACIN SATA HDD(3.5") SATA 0 SATA ODD SATA 1 eSATA SATA 2 SATA II P3P3V_DUAL P1P8V(SFR) USB 3 (2.5" x SSD) RJ45 CNN CARD READER CNN USB 2.0 PCIE 2 Mini PCIE1 USB 10 WLAN CNN CLOCK Generator CK505 14.318MHz RTC Battery 802.11 b/g/n 3G/WiMax P12V VREG_12V GB LAN Intel 82578DC (Realtek RTS5159-GR) SATA 3 2nd SATA HDD PCIE 5 FCBGA951 (27x27mm) (6.5W) DDRIII Power P1P05V_PCH 25MHz LVDS Transmitter Chrontel CH7308 VCC3 x4 TMDS LVDS VCC5 PECI DMI Inverter CONN 14.318MHz P5V_STBY FDI (*1) (Clarkdale option) TMDS TOUCH Screen USB 8 CAREMA with Array MIC BLUE TOOTH USB 4 Fan CNN USB 2.0 VCC_CORE/VTT_CPU PCIE 3 TV Tuner CARD CNN LPC USB 1,5 SIDE USB x2 Reset Circuit USB 12 USB 2 32.768KHz REAR USB x4 Mini PCIE2 B-CAS CNN EC/KBC USB 0,9,11,13 Brightness Control LED Indicator MAIN SW CNN 32.768KHz ITE8512 AUDIO AMP AUDIO CODEC MAX9736BETJ+ ALC888S-VC2 QFN32 LQFP48 5.1 Channel LQFP128 Azailia FAN CTRL (CPU/MXM) INT SPK CNN (3) 6 Head Phone & MIC IN CONN 1Mb SPI FLASH ROM IR RECEIVER IR Blaster System Ambient Light Sensor 5.1 Channel Line In Line Line Line Out(1) Out(1) Out(1) Chapter 1 Your Computer tour This section describes port locations, indicators, and controls for the computer. IMPORTANT:Your computer’s hardware options, port locations, and indicators may vary from this illustration. Front View No. Chapter 1 Component Icon Description 1 Microphone Use to talk through when making Voice over Internet Protocol (VoIP) calls. 2 HD webcam Use to let others see who they are communicating with when making VoIP calls. 3 Display screen Also called Liquid-Crystal Display (LCD), displays computer output. 4 Acer TouchPortal Access and control some of the handy features of your new computer. 5 Power Button Press this button to turn the power on or off. You can also configure the power button to operate in Standby/Resume mode or Hibernate mode. 7 Right View IMPORTANT:Your computer’s hardware options, port locations, and indicators may vary from this illustration. No. 8 Component Icon Description 1 Headphone jack (white plug) Plug powered, analog front speakers, an external amplifier, or headphones into this jack. 2 Microphone jack (pink plug) Plug a microphone into this jack. 3 Illumination Toggle Switch 4 Memory card reader Insert a memory card from a digital camera, MP3 player, PDA, cellular telephone, or other device into the memory card reader. 5 Optical Disk Drive Use this drive to listen to audio CDs, install games and programs, watch DVDs, and store large files onto recordable discs (depending on drive type). This drive may be a CD, recordable CD, DVD, or recordable DVD. Chapter 1 Left View IMPORTANT:Your computer’s hardware options, port locations, and indicators may vary from this illustration. No. Component Icon Description 1 B-CAS reader Subscription service available for select models only. 2 USB 2.0 port Plug USB (Universal Serial Bus) devices (such as a USB external drive, printer, scanner, camera, keyboard, or mouse) into this port. Chapter 1 9 Rear View IMPORTANT:Your computer’s hardware options, port locations, and indicators may vary from this illustration. No. 10 Component Icon Description 1 Power connector Plug the power cord into this connector. 2 Kensington™ lock slot Secure your computer to an object by connecting a Kensington cable lock to this slot. 3 USB ports Plug USB (Universal Serial Bus) devices (such as a USB printer, scanner, camera, keyboard, or mouse) into these ports. 4 Ethernet (network) jack Plug an Ethernet network cable or a device (such as a DSL or cable modem for a broadband Internet connection) into this jack. 5 Line-out/Speakerout jack Plug an line output to an amplifier or entertainment system into this jack for sound output. 6 eSATA port Plug external hard drives into this connector. 7 TV Tuner Allows a TV Tuner to be connected to the system. 8 IR port Allows data transfer between the desktop and a mobile device. Chapter 1 Using the Keyboard The keyboard has several different types of keys and buttons as shown below. Function keys Audio playback keys Fn key Windows key Feature Application key Icon Navigation keys Description Function keys Press these keys to start program actions. Each program uses different function keys for different purposes. See the program documentation to find out more about the function key actions. Audio playback keys Press these keys to play your audio files and to adjust the volume. Windows key Press this key to open the Windows Start menu. This key can also be used in combination with other keys to open utilities. See “Windows Keys” on page 12. Fn key Press this key in combination with keys that have alternate functions defined, such as the F9-F12 keys. Press <Fn> + < > to increase the brightness of the display. Press <Fn> + < > to decrease the brightness of the display. Application key Press this key to access shortcut menus and help assistants in Windows. Navigation keys Press these keys to move the cursor and to copy, cut, and paste objects. Chapter 1 11 Windows Keys The keyboard has two keys that perform Windows-specific functions. Key Description Windows key Pressed alone, this key has the same effect as clicking on the Windows Start button; it launches the Start menu. It can also be used with other keys to provide a variety of functions: < >: < > + <D>: Display the desktop < > + <E>: Open Windows Explore < > + <F>: Search for a file or folder < > + <G>: Cycle through Sidebar gadgets < > + <L>: Lock your computer (if you are connected to a network domain), or switch users (if you're not connected to a network domain) < > + <M>: Minimizes all windows < > + <R>: Open the Run dialog box < > + <T>: Cycle through programs on the taskbar < > + <U>: Open Ease of Access Center < > + <X>: Open Windows Mobility Center < > + <BREAK>: Display the System Properties dialog box < > + <SHIFT+M>: Restore minimized windows to the desktop < > + <TAB>: Cycle through programs on the taskbar by using Windows Flip 3-D < > + <SPACEBAR>: Bring all gadgets to the front and select Windows Sidebar Open or close the Start menu <CTRL> + < > <CTRL> + < > + <F>: Search for computers (if you are on a network) + <TAB>: Use the arrow keys to cycle through programs on the taskbar by using Windows Flip 3-D Note: Depending on your edition of Windows 7 some shortcuts may not function as described. Application key 12 This key has the same effect as clicking the right mouse button; it opens the application's context menu. Chapter 1 Hardware Specifications and Configurations Processor Item Specification CPU type* • Intel® Core2™ Duo processor • Intel® Core™2 Quad processor • Pentium® dual-core Processor *Dependent on model shipped. Chipset Item Core logic Features Specification Ibex Peak package H57 • FCBGA package • Package size: 27mm x 27mm • Ball Count: 951 • Ball pitch: 0.7mm • PCI Express* Base Specification, Revision 2.0 support for up to eight ports. • PCI Local Bus Specification, Revision 2.3 support for 33 MHz PCI operations (supports up to four Req/Gnt pairs). • ACPI Power Management Logic Support, Revision 3.0b • Enhanced DMA controller, interrupt controller, and timer functions • Integrated Serial ATA host controllers with independent DMA operation on up to six ports. • FIS-based Port Multiplier support on SATA Ports 4 and 5 in AHCI/RAID mode. • USB host interface with support for up to fourteen USB ports; two EHCI highspeed USB 2.0 Host controllers, 2 rate matching hubs, seven UHCI host controllers; o Integrated 10/100/1000 Gigabit Ethernet MAC with System Defense • System Management Bus (SMBus) Specification, Version 2.0 with additional support for I2C devices • Supports Intel® High Definition Audio • Supports Intel® Matrix Storage Technology • Supports Intel® Active Management Technology • Supports Intel® Virtualization Technology for Directed I/O • Supports Intel® Trusted Execution Technology • Dual Channel NAND Interface supporting 1.8V ONFi* 2.0 compliant NAND • • Supports buffered mode generating extra clocks from CK505 timer. • Low Pin Count (LPC) interface • Firmware Hub (FWH) interface support • Serial Peripheral Interface (SPI) support • Intel® Quiet System Technology (Desktop only) • Intel® Anti-Theft Technology • Integrated TPM 1.2 • JTAG Boundary Scan support CPU Package • LGA1156 CPU Core Voltage • 95W Chapter 1 13 Processor Specifications Processor CPU Speed Cores Bus Speed Power Cache Size Package i3 530 2.93G 2 1333 73W 4M FCBGA KC.53001.CI3 i3 540 3.06G 2 1333 73W 4M FCBGA KC.54001.CI3 Acer P/N i5 650 3.2G 2 1333 73W 4M FCBGA KC.65001.CI5 i5 660 3.33G 2 1333 73W 4M FCBGA KC.66001.CI5 i5 661 3.33G 2 1333 73W 4M FCBGA KC.66101.CI5 i5 670 3.46G 2 1333 87W 4M FCBGA KC.67001.CI5 73W i5 750 2.66G 4 1333 8M FCBGA KC.75001.CI5 i7 860 2.8G 4 1333 8M FCBGA KC.86001.CI7 i7 870 2.93G 4 1333 8M FCBGA KC.87001.CI7 BIOS Item Specification BIOS vendor American Megatrends BIOS Version 3.0 BIOS ROM type 16Mbits, 8 pin SOIC package Features • PC/AT Compatible System BIOS. • ACPI 3.0 Compliance/Support, S0, S1, S3, S4, S5. • Boot Block Recovery mode from CD-ROM/USB FDD/USB CDROM/USB-DVD ROM/USB Disk-On-Key • Security Setting (Password on boot or Setup Menu). • BIOS update in DOS/Windows. • Quiet/Quick Boot. • Support SLP 1.0/2.1. • Support Power On by LAN/RTC. • Support Wake up by Keyboard/Mouse. • Support SMBIOS V2.6 • Support onboard Lan PXE boot • Support the restore on AC Power Loss. • Support intel turboot technology. • Support Intel Management Engine function. • Support CPU Hyper-Threading (HT)/Dual Core. • Support CPU Virtualization Technology (VT). • Support CPU Speedstep technology. • Support Lynnfiled/Clarkdale C state. System Memory Item 14 Specification Memory controller Built in DIMM socket number 2 Supports memory size per socket 512/1024/2048MB (1 bank or 2 bank) Supports maximum memory size 8192MB (4096MB+4096MB SO-DIMMs) Supports DIMM type 2 DDR3 SO-DIMM Supports DIMM Speed 800/1066/1333 MHz Supports DIMM voltage 1.5V Chapter 1 Memory Combinations Slot 1 Slot 2 Total Memory 0MB 1024MB 1024MB 0MB 2048MB 2048MB 0MB 4096MB 4096MB 1024MB 0MB 1024MB 1024MB 512MB 1536MB 1024MB 1024MB 2048MB 1024MB 2048MB 3072MB 2048MB 0MB 2048MB 2048MB 512MB 2560MB 2048MB 1024MB 3072MB 2048MB 2048MB 4096MB 4096MB 4096MB 8192MB Above table lists some system memory configurations. You may combine DIMMs with various capacities to form other combinations. On above table, the configuration of slot 1 and slot 2 could be reversed. USB Port Item Specification Chipset SB710 embedded USB compliance level 2.0 OHCI 5 OHCI and 2 EHCI Host controllers Number of USB port(s) 6 Location 2 left, 4 back Wireless Module Item Specification Model and Type Lite-On WN6605LH-AA, Quanta EM307 WLAN EM307 Conformity 802.11 b/g/n WiMax Modulation Technique OFDM with BPSK QPSK, 16QAM, 64QAM (g/n), DQPSK, DBPSK and CCK (b) Frequency Range 2412 ~ 2484MHz ISM band Channels 1---14 channels for active channels Data Rate (Mbps) 802.11b data rate: 11,5.5,2,1 Mbps with DBPSK and DQPSK modulation 802.11 g data rate: 54, 48, 36, 24, 18, 12, 9, 6Mbps Security (WEP) WPA, WPA2 Operating Temperature Operating -10°C to +75°C Storage -40°C to +80°C Touchscreen Item Touchscreen Chapter 1 Specifications Windows 7 multitouch and gestures 15 Hard Disk Drive Interface Item Specifications Vendor & Model Name Hitachi HDT721016SLxxx HCT721016SLxxx HDT721025SLxxx HCT721025SLxxx HDT721032SLxxx HCT721032SLxxx Hitachi HDT721050SLxxx HCT721050SLxxx HDE721050SLxxx Hitachi HDT721064SLxxx HCT721064SLxxx HDE721064SLxxx HDT721075SLxxx HCT721075SLxxx HDE721075SLxxx Hitachi HDT721010SLxxx HCT721010SLxxx HDE721010SLxxx Capacity (GB) 160, 160, 250, 250, 320, 320 500 640, 640, 640, 750, 750, 750, 1000 Bytes per sector 512 Data heads 1, 1, 2, 2, 2, 2 3 6 6 1 2 2 3 Drive Format Disks Spindle speed (RPM) 7200 Performance Specifications Buffer size 8MB 8MB 16 Interface 32 SATA Internal transfer rate (MB/ sec, max) 300MB/s maximum I/O data transfer rate (Mbytes/sec max) 1406 Mbits/s maximum DC Power Requirements Voltage +5.0V ± 5%. Hard Disk Drive Interface (continued) Item Specifications Vendor & Model Name Seagate ST31000528AS, ST3750528AS, ST3500418AS, ST3500410AS, ST3320418AS (Pharaoh) Seagate ST3250318AS, ST3160318AS (Pharaoh) Seagate ST9100822A, ST9808210A, ST960821A, ST950212A, ST9402113A, ST930219A (Momentus) Capacity (GB) 1000, 750 250, 160 100, 80, 60, 50, 40, 30 Bytes per sector 512 512 Data heads 4 1 512 4, 3, 3, 2, 2, 2 Drive Format Disks 2, 2, 1, 1, 1 Spindle speed (RPM) 1 2, 2, 2, 1, 1, 1, 7200 5400 Performance Specifications Buffer size Interface 32MB, 32MB, 16MB, 16MB, 16MB 8MB 8MB, 8MB, 8MB, 2MB, 2MB, 2MB SATA Internal transfer rate (MB/sec, max) 300MB/s maximum I/O data transfer rate (Mbytes/sec max) 300 DC Power Requirements Voltage 16 5V +10% / -7.5% -.12V +10% / -7.5% Chapter 1 Hard Disk Drive Interface (continued) Item Specifications Vendor & Model Name Western Digital, WD3200AAJS, WD2500AAJS, WD1600AAJS, WD800AAJS Western Digital WD3200AAKS, WD2500AAKS, WD1600AAKS Capacity (GB) 320, 250, 160, 80 320, 250, 160 Bytes per sector Data heads Western Digital WD5000AAJS, WD6400AAJS Western Digital WD5000AAKS, WD6400AAKS 500, 640 500, 640 4 4 512 2, 2, 1, 1 2, 2, 1 Drive Format Disks 1 2 Spindle speed (RPM) 7200 Performance Specifications Buffer size 8MB Interface 16MB 8MB 16MB SATA Internal transfer rate (MB/ sec) 70MB/s sustained I/O data transfer rate (Mbytes/sec max) 3000 Mbits/s maximum DC Power Requirements Voltage +5.0V ± 5%.and +12.0V ± 10% Video Interface Item Chipset Specification UMA: Ibex Peak H57 Discrete: GT240M 1024MB DDR3 (N10P-GS) G210M 512MB DDR3(N10M-GS) Package FCBGA951 Interface PCIE 2.0 x16 VRAM Item Specification Chipset Nvidia Geforce G210M Memory size Onboard 512MB memory; 64-bits memory interface Interface MXM 3.0 Audio Interface Item Specification Audio Controller Alc268 supporting Azalia function Audio onboard or optional Onboard Mono or Stereo Stereo Internal Microphone Headphone /Mic /line out support Internal Speaker 5W Speakers 300Hz to 20kHz +/- 3dB Chapter 1 17 Keyboard Controller Item Specification Controller IT8512E/NX-L embedded Total number of keypads Windows logo key Hotkeys Bluetooth Item Specification Chipset Broadcom BCM2046, Bluetooth2.1 + EDR, USB interface module Data throughput Protocol Bluetooth 2.1 + EDR Connector type USB TV Tuner Item Specification TV Tuner • ATSC/QAM/HRC/IRC/Standard Cable • DVB-T • ISDB-T • DMB-T/H • Meets Microsoft Media Center TV Tuner requirements VGA Controller Item VGA Controller Specifications • INTEL GL40/GM45 Internal Graphics • • • • Direct 3D, Integrated LVDS Dual view and Dual video TV-out ATI M92-M HDMI Port- Not available with this model Item Specification Chipset Throughput Compliance level 18 Chapter 1 LCD 23” Item Vendor/model name Specification Samsung LTM230HT01-A05 LTM230HT01 LG LM230WF1 Screen Diagonal (mm) Active Area (mm) 584.2 509.76 x 286.74 Display resolution (pixels) 1920 x 1080 Pixel Pitch 0.2655 x 0.2655 Display Mode Normally White 0.265 x 0.265 300 Typical White Luminance (cd/ m2) also called Brightness Supported Colors 16.7M Contrast Ratio 1000 Response Time (Optical Rise Time/Fall Time) msec 5 1.3 / 3.7 Nominal Input Voltage VDD 5 Interface LVDS Viewing Angle (degree) Horizontal: Vertical: 80 Temperature Range (°C) Operating Storage (shipping) 0 - 50 -25 - 60 0 - 35 5 - 35 0 - 50 -20 - 60 LCD Display Supported Resolution 24 bits (UMA) Resolution 30 bits 36 bits (Discrete) 48 bits 800x600 Y N Y N 1024x768 Y N Y N 1152x864 Y N Y N 1280x600 Y N N N 1280x720 Y N Y N 1280x768 Y N Y N 1280x800 Y N Y N 1280x960 Y N Y N 1280x1024 Y N Y N 1360x768 Y N Y N Chapter 1 19 24 bits (UMA) Resolution 36 bits (Discrete) 30 bits 48 bits 1366x768 Y N N N 1400x900 Y N N N 1400x1050 Y N N N 1600x900 Y N Y N 1600x1024 N N Y N 1680x1050 Y N Y N 1920x1080 Y N Y N Power Supply Item Specifications AC Input • Auto ranging from 100V to 240V and 50Hz to 60Hz DC Output • 5V, 40W; 3.3V, 19.8W; 12V, 174W; 12V, 6W, 5VSB, 10W • Uses 3 prong ICE-320-C13 or IEC-320-C5 connector for AC power • Hold up time of 16ms under maximum load • Meet <1W Standby Energy Star requirement for Desktop Category B • Meet EU Lot 6 requirement RTC Battery Item Lithium Rechargeable Battery Specifications • Model: MIT CR2032 • Voltage:2.5-3.0V • Capacity: 210mAh • Vendor: Mitsubishi AC Adaptor Item Specification Input rating AC 100V - 240V, 50/60Hz Output 19V 135W Maximum input AC current Inrush current Efficiency 20 Chapter 1 System Power Management Item Specification Mech. Off (G3) Al devices in the system are turned off completely. Working (G0/S0) Individual devices such as the CPU and hard disc may be power managed in this state. Suspend to RAM (S3) CPU set power down VGA Suspend PCMCIA Suspend Audio Power Down Hard Disk Power Down CD-ROM Power Down Super I/O Low Power mode Save to Disk (S4) Also called Hibernation Mode. System saves all system states and data onto the disc prior to power off the whole system. Chapter 1 21 22 Chapter 1 Chapter 2 System Utilities BIOS Setup Utility The BIOS Setup Utility is a hardware configuration program built into your computer’s BIOS (Basic Input/ Output System). Your computer is already properly configured and optimized, and you do not need to run this utility. However, if you encounter configuration problems, you may need to run Setup. Please also refer to Chapter 4 Troubleshooting when problem arises. To activate the BIOS Utility, press F2 during POST (when “Press <F2> to enter Setup” message is prompted on the bottom of screen). Press <F12> during POST to enter multi-boot menu. In this menu, user can change boot device without entering BIOS SETUP Utility. Navigating the BIOS Utility There are six menu options: Information, Main, Advanced, Security, Boot, and Exit. Follow these instructions: • To choose a menu, use the left and right arrow keys. • To choose an item, use the up and down arrow keys. • To change the value of a parameter, press F5 or F6. • A plus sign (+) indicates the item has sub-items. Press Enter to expand this item. • Press Esc while you are in any of the menu options to go to the Exit menu. In any menu, you can load default settings by pressing F9. You can also press F10 to save any changes made and exit the BIOS Setup Utility. NOTE: You can change the value of a parameter if it is enclosed in square brackets. Navigation keys for a particular menu are shown on the bottom of the screen. Help for parameters are found in the Item Specific Help part of the screen. Read this carefully when making changes to parameter values. Please note that system information is subject to different models. • Chapter 2 23 CMOS Setup Utility The CMOS Setup Utility screen displays a list of the functions and features available in the BIOS. CMOS Setup Utility - Copyright (C) 1985-2010, American Megatrends Inc. Product Information PC Health Status Standard CMOS Features F r e q u e n c y Vo l t a g e C o n t r o l Advanced Bios Features BIOS Security Features Advanced Chipset Features Load Default Settings Integrated Peripherals Save and Exit Setup Power Management Features Exit Without Saving :Move Enter:Select F 1 : G e n ea rl H e l p - / + / Va:lu e F 1 0 : ve Sa ESC : Exit F 9 : O p t i m i zeedf aDu l t s Use the arrow keys to scroll to the required menu and press Enter. 24 Chapter 2 Product Information The Product Information screen displays a summary of the computer hardware information. CMOS Setup Utility - Copyright (C) 1985-2010, American Megatrends Inc. Product Information Product Information Overview Help Item P r o c e s s o r Ty p e Intel (R) Core(TM) i7 CPU 860 @ 2.80GHz Processor Speed System Memory Product Name System Serial Number S y s t e m B I O S Ve r s i o n BIOS Release Date A s s e t Ta g N u m b e r 2.80GHz 4096MB ZX6910 PWGJNJNJNJ00500F4D6900 P01-A3 04/21/2010 E C F i r m w a r e Ve r s i o n R1.03 :Move Enter:Select F 1 : G e n ea rl H e l p - / + / Va:lu e F 1 0 : ve Sa ESC : Exit F 9 : O p t i m i zeedf aDu l t s NOTE: The system information is subject to different models. Parameter Description Processor Type This field shows the system processor type. Processor Speed This field shows the speed of the processor. System Memory This field reports the memory size of the system. Product Name This field shows product name of the system. System Serial Number This field displays the serial number of this unit. System BIOS Version Displays system BIOS version. BIOS Release Date This field displays the release date of the system BIOS. Asset Tag Number This field displays the asset tag number. EC Firmware Version This field displays the EC Firmware version number. Chapter 2 25 Standard CMOS Features The Standard CMOS Features screen allows the user to set the system time and date as well as set HDD and ODD options. CMOS Setup Utility - Copyright (C) 1985-2010, American Megatrends Inc. Standard CMOS Features System Date S y s t e m Ti m e Help Item [ Tu e 0 4 / 2 5 / 2 0 1 0 ] [05:00:33] AHCI Port1 AHCI Port2 AHCI Port4 U s e [ E n t e r ] , [ TA B ] o r [ S h i f t - TA B ] t o select a field. [Hard Disk] [ ATA P I C D R O M ] [Not Detected] Halt On Use [+] or [-] to configure system Date [All, But Keyboard] :Move Enter:Select F 1 : G e n ea rl H e l p - / + / Va:lu e F 1 0 : ve Sa ESC : Exit F 9 : O p t i m i zeedf aDu l t s NOTE: The screen above is for your reference only. Actual values may differ. The table below describes the parameters in this screen. Settings in boldface are the default parameter settings. Parameter Description Format/Option System Date Sets the system date. Format MM/DD/YYYY (month/ day/year) System Time Sets the system time. The hours are displayed with 24-hour format. Format: HH:MM:SS (hour:minute:second) Instructs the BIOS to halt during boot up for the selected error parameter. Options: SATA Port 1 SATA Port 2 AHCI Port 4 Halt On 26 • All Errors • No Errors • All, But keyboard Chapter 2 Advanced BIOS Features The Advanced BIOS Features screen allows configuration of the various advanced BIOS options. CMOS Setup Utility - Copyright (C) 1985-2010, American Megatrends Inc. Advanced BIOS Features Quick Boot Quiet Boot [Enabled] [Enabled] 1st Boot Device 2nd Boot Device 3rd Boot Device 4th Boot Device [ H D D P O - W D C W D 2 0 FA D ] [CD/DVD:P1-Slimtype] [Removable Device] [LAN] Hard Disk Drive Priority Optical Disk Drive Priority [Press Enter] [Press Enter] Bootup Num-Lock USB Beep Message [On] [Disabled] :Move Enter:Select F 1 : G e n ea rl H e l p Help Item Allows BIOS to skip certain steps during booting. This will reduce the time needed to boot the system. - / + / Va:lu e F 1 0 : ve Sa ESC : Exit F 9 : O p t i m i zeedf aDu l t s The table below describes the items, menus, and submenus in this screen. Parameter Description Format/Option Quick Boot Allows BIOS to skip certain steps while booting. Enabled or Disabled Quiet Boot Allows BIOS to change display parameters while booting changing boot speed. Enabled or Disabled Hard Disk Drive Priority Enter to set the boot drive priority. Press Enter to set the order priority Optical Disk Driver Priority Enter to set the boot driver priority. Press Enter to set the order priority Boot Num-Lock Turns Num-Lock on or off on boot up. On or Off USB Beep Message Allows a beep during USB enumeration. Enabled or Disabled 1st Boot Device 2nd Boot Device 3rd Boot Device 4th Boot Device Chapter 2 27 Advanced Chipset Features The Advanced Chipset Features screens. CMOS Setup Utility - Copyright (C) 1985-2010, American Megatrends Inc. Advanced Chipset Features Intel EIST Intel(R) RurboMode tech Intel XD Bit Intel VT Memory Hole Remapping :Move [Enabled] [Enabled] [Enabled] [Enabled] [Enabled] Enter:Select F 1 : G e n ea rl H e l p Help Item Disable: Disable GV3 Enable: Enable GV3 - / + / Va:lu e F 1 0 : ve Sa ESC : Exit F 9 : O p t i m i zeedf aDu l t s The table below describes the items, menus, and submenus in this screen. Parameter 28 Description Format/Option Intel XD Bit When disabled this forces the XD feature flag to always return to 0. Enabled or Disabled Memory Hole Remappingt When enabled allows remapping of overlapped PCI memory above the total physical memory. Enabled or Disabled Video Memory Size Sets the amount of system memory used by the internal graphics device. Enter to set DVMT mode Turns on DVMT mode for use with internal graphics. Select DVMT DVMT/Fixed Memory Size Set the memory allocated for DVMT. (XP only) Options: • 128MB • 256MB • Maximum Chapter 2 Integrated Peripherals The Integrated Peripherals screen contains parameters for device peripherals. CMOS Setup Utility - Copyright (C) 1985-2010, American Megatrends Inc. Integrated Peripherals O n b o a r d S ATA C o n t r o l l e r O n b o a r d S ATA M o d e Onboard USB Controller USB Storage Emulation Onboard Audio Controller Onboard LAN Controller Onboard LAN Option ROM Onboard CIR Controller :Move [Enabled] [AHCI] [Enabled] [Auto] [Enabled] [Enabled] [Disenabled] [Enabled] Enter:Select F 1 : G e n ea rl H e l p Help Item Options Disabled Enabled - / + / Va:lu e F 1 0 : ve Sa ESC : Exit F 9 : O p t i m i zeedf aDu l t s The table below describes the items, menus, and submenus in this screen. Parameter Description Format/Option Onboard SATA Controller Enable the SATA controller Enabled or Disabled Onboard SATA Mode Set the SATA mode Options: • IDE • AHCI Onboard USB Controller Enable the USB controller. Enabled or Disabled USB Storage Emulation Set the USB storage emulation Options: • Auto • Floppy • Hard Disk Onboard Audio Controller Enable or disable the audio controller Enabled or Disabled Onboard LAN Controller Enable or disable the LAN controller Enabled or Disabled Onboard LAN Option ROM Disable or enable LAN optional ROM Disabled or Enabled Onboard CIR Controller Enable or disable the CIR Controller Enabled or Disable Chapter 2 29 Power Management Features The Power Management Features screen contains parameters used for device power management. CMOS Setup Utility - Copyright (C) 1985-2010, American Megatrends Inc. Power Management Features ACPI Suspend Mode P o w e r O n b y RT C A l a r m Power On by Onboard LAN Wa k e U p b y U S B K B / M o u s e Restore on AC Power Loss :Move Enter:Select F 1 : G e n ea rl H e l p [S3 (STR)] [Disabled] [Disabled] [Enabled] Mode [Last State] Help Item Select the ACPI state used for System Suspend. - / + / Va:lu e F 1 0 : ve Sa ESC : Exit F 9 : O p t i m i zeedf aDu l t s The table below describes the parameters in this screen. Settings in boldface are the default and suggested parameter settings. Parameter 30 Description Option ACPI Suspend Mode Choose between STR (Suspend to Ram) and POS (Power on Standby). POS uses more power during suspend. S1(POS)/ S3(STR) Power On by RTC Alarm Disable or Enable auto wake up at a fixed time everyday. Disabled or Enabled Power On by onboard LAN Disable or Enable wake up when the system power is off and a LAN device is activated. Disabled or Enabled Wake Up by USB KB/ Mouse Disable or Enable wake up when the system is in standby and a USB device is activated. Enabled or Disabled Restore On AC Power Loss Set the state the device returns to in the event of AC power loss. Off causes the device to remain off in the event of power loss, On restarts the device when AC power resumes, and Last State returns the device to the state it was at when power loss occurred. Off or On or Last State Chapter 2 PC Health The PC Health screen displays CPU/Chipset temperature information and contains customizable safety monitors for the CPU. CMOS Setup Utility - Copyright (C) 1985-2010, American Megatrends Inc. PC Health C P U Te m p e r a t u r e ( P E C I M o d e ) CPU Fan1 Speed CPU Fan2 Speed +1.1V +3.30V +5.00V +12.0V +1.5V : 48°C : 2095 RPM : 2103 RPM : 1.15 V : 1.09 V : 5.05 V : 12.12 V : 1.45 V Smart Fan [Enabled] :Move Enter:Select F 1 : G e n ea rl H e l p Help Item If disabled, System Fan will run direstly the maximum speed. - / + / Va:lu e F 1 0 : ve Sa ESC : Exit F 9 : O p t i m i zeedf aDu l t s The table below describes the parameters in this screen. Settings in boldface are the default and suggested parameter settings. Parameter Description Option CPU Temperature Displays the current CPU temperature (°C). This field is read only. N/A CPU Fan1 Speed Displays the current CPU fan speed. This field is read only. N/A CPU Fan2 Speed Displays the current system fan speed. This field is read only. N/A +5.00V Displays the power supply voltage for the nominal 5V bus. This field is read only. N/A +3.30V Displays the power supply voltage for the nominal 3.3V bus. This field is read only. N/A +1.1V Displays the nominal 1.1 V bus. This field is read only. N/A +12.0V Displays the power supply voltage for the nominal 12.0V bus. This field is read only. N/A Smart Fan Enabled allows auto fan control. If disabled the fan runs continuously at maximum speed. Enabled or Disabled. Chapter 2 31 Frequency Voltage Control The Frequency Voltage Control Screen to set memory and processor parameters. CMOS Setup Utility - Copyright (C) 1985-2010, American Megatrends Inc. F r e q u e n c y Vo l t a g e C o n t r o l Enable Clock to All PCEI Spread Spectrum Help Item [Enabled] [Enabled] Options Disabled Enabled :Move Enter:Select F 1 : G e n ea rl H e l p - / + / Va:lu e F 1 0 : ve Sa ESC : Exit F 9 : O p t i m i zeedf aDu l t s The table below describes the parameters in this screen. Settings in boldface are the default and suggested parameter settings. Parameter 32 Description Option Enable Clock to All PCIE Enabled or disabled for reducing clock consumption. Enabled or Disabled Spread Spectrum Enabled to assist with EMI emissions, Disabled to assist with stability. Enabled or Disabled Chapter 2 BIOS Security Features The BIOS Security Features screen contains parameters that help safeguard and protect your computer from unauthorized use. CMOS Setup Utility - Copyright (C) 1985-2010, American Megatrends Inc. BIOS Security Features Supervisor Password User Password Change Supervisor Password :Move Help Item :Not Installed :Not Installed [Press Enter] Enter:Select F 1 : G e n ea rl H e l p Install or change the password. - / + / Va:lu e F 1 0 : ve Sa ESC : Exit F 9 : O p t i m i zeedf aDu l t s The table below describes the parameters in this screen. Parameter Description Option Supervisor Password Shows the setting of the Supervisor password Not Installed or Installed User Password Shows the setting of the user password Not Installed or Installed Change Supervisor Password Press Enter to set the supervisor password. When set, this password protects the BIOS Setup Utility from unauthorized access. The user can not either enter the Setup menu nor change the value of parameters. N/A Change User Password Press Enter to set the user password. When set, this password prompts the user to enter a password during the boot sequence. The user must enter the correct password to be able to continue booting the system. This option is only available if a supervisor password has been specified N/A Security Option Press Enter to set the security option. This option is only available if a supervisor password has been specified. NOTE: When prompted to enter a password, only three tries are allowed before the system halts. Do not lose the password. Chapter 2 33 Setting a Password Follow these steps as you set the user or the supervisor password: 1. Use the and keys to highlight the Set Supervisor Password parameter and press the Enter key. The Set Supervisor Password box appears: Set Supervisor Password Enter New Password Confirm New Password 2. [ [ ] ] Type a password in the “Enter New Password” field. The password length can not exceeds 8 alphanumeric characters (A-Z, a-z, 0-9, not case sensitive). Retype the password in the “Confirm New Password” field. IMPORTANT:Be very careful when typing your password because the characters do not appear on the screen. 3. Press Enter. After setting the password, the computer sets the User Password parameter to “Set”. 4. If desired, you can opt to enable the Password on boot parameter. 5. When you are done, press F10 to save the changes and exit the BIOS Setup Utility. Removing a Password Follow these steps: 1. Use the and keys to highlight the Set Supervisor Password parameter and press the Enter key. The Set Password box appears: Set Supervisor Password Enter Current Password Enter New Password Confirm New Password 34 [ [ [ ] ] ] 2. Type the current password in the Enter Current Password field and press Enter. 3. Press Enter twice without typing anything in the Enter New Password and Confirm New Password fields. The computer then sets the Supervisor Password parameter to “Clear”. 4. When you have changed the settings, press u to save the changes and exit the BIOS Setup Utility. Chapter 2 Changing a Password 1. Use the and keys to highlight the Set Supervisor Password parameter and press the Enter key. The Set Password box appears. Set Supervisor Password Enter Current Password Enter New Password Confirm New Password [ [ [ ] ] ] 2. Type the current password in the Enter Current Password field and press Enter. 3. Type a password in the Enter New Password field. Retype the password in the Confirm New Password field. 4. Press Enter. After setting the password, the computer sets the User Password parameter to “Set”. 5. If desired, you can enable the Password on boot parameter. 6. When you are done, press F10 to save the changes and exit the BIOS Setup Utility. If the verification is OK, the screen will display as following. Setup Notice Changes have been saved. [Continue] The password setting is complete after the user presses Enter. If the current password entered does not match the actual current password, the screen will show you the Setup Warning. Setup Warning Invalid Password. [Continue] If the new password and confirm new password strings do not match, the screen will display the following message. Setup Warning Passwords do not match. Re-enter password. [Continue] Chapter 2 35 BIOS Flash Utilities The BIOS flash memory update is required for the following conditions: • New versions of system programs • New features or options • Restore BIOS when it becomes corrupted. This section contains instructions for the following BIOS utilities: 36 • DOS flashit utility • WinPhlash utility • DMI Tools Chapter 2 DOS Flash Utility Perform the following steps to use the DOS Flash Utility: 1. Copy the flash utilities to the bootable device. 2. Attach the device to the system and restart. 3. Press F2 during boot to enter the Setup Menu. 4. Select Boot Menu to modify the boot priority order, for example, if using USB HDD to Update BIOS, move USB HDD to position 1. IMPORTANT:Please use a device that can be booted in DOS mode (FAT 16 or FAT 32 partitions only) CMOS Setup Utility - Copyright (C) 1985-2010, American Megatrends Inc. Advanced BIOS Features Quick Boot Quiet Boot [Enabled] [Enabled] 1st Boot Device 2nd Boot Device 3rd Boot Device 4th Boot Device [ H D D P O - W D C W D 2 0 FA D ] [CD/DVD:P1-Slimtype] [Removable Device] [LAN] Hard Disk Drive Priority Optical Disk Drive Priority [Press Enter] [Press Enter] Bootup Num-Lock USB Beep Message [On] [Disabled] :Move Enter:Select F 1 : G e n ea rl H e l p Help Item Allows BIOS to skip certain steps during booting. This will reduce the time needed to boot the system. - / + / Va:lu e F 1 0 : ve Sa ESC : Exit F 9 : O p t i m i zeedf aDu l t s 5. Navigate to the BIOS file in DOS mode. 6. Enter the command “FBB” to begin the flash BIOS process. The flash process will run automatically. When complete, the system will restart automatically. 7. When the system boots, then it will display "Press Del to Enter BIOS Setup" and "Press F1 to Continue". 8. Press F1 to load the CMOS defaults or press Del to go BIOS SETUP and manually configure BIOS. Chapter 2 37 Win Flash Utility Perform the following steps to use the WinFlash Utility: 1. Open the Start menu and type CMD to open command mode. 2. Type “fbbwin64” to flash BIOS. The process will start automatically. IMPORTANT:During the flash process the keyboard and mouse will not function. 38 3. Once the flash process has finished, shutdown the system and press the power button to restart. 4. When the system boots, then it will display "Press Del to Enter BIOS Setup" and "Press F1 to Continue". 5. Press F1 to load the CMOS defaults or press Del to go BIOS SETUP and manually configure BIOS. Chapter 2 Using DMI Tools Use QDMI30A to change the asset tag, product name, or serial number of the machine. 1. Copy the file qdmi30a.exe to USB flash disk with bootable diskette or USB drive. 2. Press F2 during boot to enter the Setup Menu. 3. Select Boot Menu to modify the boot priority order, for example, if using a USB HDD to run DMI Tools, move USB HDD to position 1. 4. Boot into DOS. 5. Key in “qdmi30a” then click “Enter”. The following screen appears. Select one of the functions to modify. To modify the asset tag, key in “1” and then key in a string for the new asset tag as shown below. To modify the product number, key in “2” then key in a new string for the product number as shown below. To modify the serial number, key in “3” then key in a new string for the serial number as shown below. To modify the 1394 GUID number, key in “4” then key in a new string for the 1394 GUID number as shown below Chapter 2 39 Chapter 3 Machine Disassembly and Replacement WARNING:This computer has two highly sensitive touchscreen sensors on the top left and right corners of the LCD. The sensors are an integral part of the LCD and cannot be separately replaced. The sensors are exposed as soon as the rear cover is removed. During disassembly: • DO NOT make contact with the sensors. • Raise the LCD off any surface it is placed face down on so that the sensors do not rest on the surface. • ALWAYS employ an antistatic mat. IMPORTANT:The outside housing and color may vary from the images that appear in this section. This chapter contains step-by-step procedures on how to disassemble the computer for maintenance and troubleshooting. Disassembly Requirements To disassemble the computer, you need the following tools: • Wrist grounding strap and conductive mat for preventing electrostatic discharge • Flat screwdriver • Three (3) sizes of Philips screwdrivers: 7mm, 4mm and 2mm • Pin or unbent paperclip or similar. • Block of sponge or similar soft material smaller in surface area than the LCD and at least 1” (2.5cm) high. NOTE: The screws for the different components vary in size. During the disassembly process, group the screws with the corresponding components to avoid mismatch when putting back the components. General Information Pre-disassembly Instructions Before proceeding with the disassembly procedure, make sure that you do the following: 1. Turn off the power to the system and all peripherals. 2. Unplug the AC adapter and all power and signal cables from the system. 3. Place the system on an antistatic mat. The flowchart provided in the succeeding disassembly section illustrates the entire disassembly sequence. Observe the order of the sequence to avoid damage to any of the hardware components. Main Screw List Screw Quantity Part Number M2.5*4.0-I(NYLOK)IRON 6 86.G8507.001 M2.5*4.0-I(NI)(NYLOK)IRON 26 86.G8507.002 M2.5*7.0-I(B) (NYLOK)IRON 4 86.G8507.003 M4.0*6-I(NI,NYLOK) 4 86.G8507.004 Chapter 3 40 Screw 41 Quantity Part Number M2.5*5.0-I(BNI)(NYLOK)IRON 3 86.G8507.005 M3*4-I(NI)(NYLOK)IRON 4 86.G8507.006 6-32UNC*5-B(NYLOK)IRON 4 86.G8507.007 M2.0*2.5-I (BNI,NYLOK)IRON 4 86.G8507.008 M2.0*3.0-I-NI-NYLOK IRON 7 86.G8507.009 Chapter 3 Disassembly Process Disassembly Flowchart Turn off power and disconnect all cables before proceeding Remove Stand Assembly Remove HDD Module Remove Audio Board Remove Inverter Board Remove ODD Bezel Remove Rear Cover Remove ODD Module Remove Touchscreen Board Remove Mainboard Shield Remove WLAN Board Remove FAN Remove VGA Board Remove Thermal Module Remove TV Module Remove CPU Remove Mainboard Remove Frame Remove Antennas Remove Speakers Remove DIMM Module Remove USB Board Remove IR Receiver Remove LCD Panel Remove Home Button Board Remove Power Board Remove Webcam Remove Bluetooth Module Chapter 3 42 Screw List Step 43 Screw Quantity Stand Cover M2.5*4 2 Stand Hinge M4*6 Ni 4 Rear Cover M2.5*7 4 Audio Board M2.5*4 Ni 2 HDD M2.5*4 Ni 2 HDD Bracket M3*4 Ni 4 ODD M2.5*4 Ni 2 ODD Brackets M2*2.5 Ni 4 Inverter Board M2.5*4 Ni 2 Touchscreen Control Board M2.5*4 Ni 2 Mainboard Shielding M2.5*4 Ni 7 WLAN M2*3 1 TV Tuner Module M2.5*4 Ni 1 VGA Card M2.5*4 Ni 4 Fan M2.5*5 Ni 3 Mainboard M2.5*4 Ni 1 USB Board M2.5*4 Ni 2 IR Receiver M2*3 1 Frame M2.5*4 Ni 15 LCD Panel M3*4 4 Power Board M2.5*4 Ni 2 Camera M2*3 2 Antennas M1.7*4 2 Speakers M2.5*4.0-I(NYLOK)IRON 6 Chapter 3 Removing the RAM Covers 1. See “Pre-disassembly Instructions” on page 40. 2. Apply pressure to one end of the RAM Cover, while pulling up with the opposite hand as shown. 3. Lift the RAM Cover clear of the device. 4. Grasp the Hinge Cover with both hands. Chapter 3 44 5. Lift the Hinge Cover clear of the device. 45 Chapter 3 Removing the RAM 1. See “Removing the RAM Covers” on page 44 2. Lift the RAM Shielding clear of the device. 3. Unlock the latches on either side of the RAM by pressing down as shown. There is an audible click when the latch is unlocked. 4. Lift each RAM module from its slot. Chapter 3 46 Removing the Rear Covers 1. See “Removing the RAM” on page 46 2. Remove the six (6) screws that secure the Rear Covers. Step Rear Covers Size M2.5*6.0 Quantity Screw Type 6 3. Use both hands to gently push the rear cover outward from the device as shown. 4. Repeat the previous step for the remaining rear cover. 47 Chapter 3 Removing the Back Cover 1. See “Removing the Touchscreen Control Board” on page 59 2. Remove the fourteen (14) screws securing the Back Cover. Step Back Cover Size Quantity Screw Type 2.5*8 2.4*8 3. Use both hands to move the Hinge up into the stand position. There is an audible click when the Hinge is locked in position. NOTE: In order to lift the Back Cover away, the Hinge must be in the stand position. Chapter 3 48 4. Place one hand firmly on the Back Cover. Use the opposite hand to pry the Bezel away, working from one corner to the other as shown. Repeat this step until all guides along the bottom of the device are unlocked. 5. Place one hand firmly on the Hinge. Use the opposite hand to pull the top of the Back Cover away from the Bezel, working from one corner to the other as shown. Repeat this step until all guides along the top of the device are unlocked. 6. Lift the Back Cover clear of the device. 49 Chapter 3 Removing the Hinge 1. See “Removing the Back Cover” on page 48 2. Replace the Hinge to the carry position. 3. Remove the six (6) screws securing the Hinge. Step Hinge Size M4*8 Quantity Screw Type 6 4. Lift the Hinge clear of the device. Chapter 3 50 Removing the Mainboard Shielding 1. See “Removing the Audio Board” on page 63. 2. See “Removing the Touchscreen Control Board” on page 59. 3. Remove the one (1) screw from the ground wire. Step HDD Ground Cable Size M2.5*4 Quantity Screw Type 1 4. Remove the small power cable from the mainboard. 51 Chapter 3 5. Detach the power cable from the mainboard. 6. Remove the adhesive tape holding the HDD ground cable to the HDD. 7. Remove the one (1) screw from the ground wire. Step Converter Ground Cable Chapter 3 Size M2.5*4 Quantity Screw Type 1 52 8. Disconnect the HDD cable. 9. Remove the power cable from the HDD. 10. Remove the six (6) screws. Step Mainboard Shielding 53 Size M2.5*4Ni Quantity Screw Type 6 Chapter 3 11. Lift the mainboard shielding away from the chassis. Chapter 3 54 Removing the Hard Disk Drive 1. See “Removing the Back Cover” on page 48. 2. Disconnect the HDD cable. 3. Remove the two (2) screws. Step HDD 55 Size M2.5*4 Quantity Screw Type 2 Chapter 3 4. Slide the HDD towards the speakers to release it from the flanges. 5. Lift the HDD out of the chassis. 6. Remove the four (4) screws from the HDD bracket (both sides). Step HD Bracket Chapter 3 Size M3*4 Quantity Screw Type 4 56 7. Remove the brackets from the HDD. 57 Chapter 3 Removing the Power Supply 1. See “Removing the Hinge” on page 50 2. Remove two (2) screws securing the Power Supply as shown. Step Power Supply Size M2.5*4 Quantity Screw Type 2 3. Lift the Power Supply clear of the device. Chapter 3 58 Removing the Touchscreen Control Board 1. See “Removing the Back Cover” on page 48 2. Remove the one (1) ground cable screw. Step Touchscreen Control Board Size M2.5*4 Quantity Screw Type 1 3. Disconnect the right (top in this image) touch sensor cable. 59 Chapter 3 4. Disconnect the left (bottom in this image) touch sensor cable. 5. Disconnect the touchscreen board to mainboard cable. 6. Remove the two (2) screws. Step Touchscreen Board Chapter 3 Size M2.0*4 Quantity Screw Type 2 60 7. Lift the touchscreen board away. 61 Chapter 3 Removing the Card Reader Board 1. Disconnect the Card reader cable. 2. Remove the two (2) screws. Step Card Reader Board Size 2.5*4 Quantity Screw Type 2 3. Lift the card reader board away. Chapter 3 62 Removing the Audio Board 1. See “Removing the Back Cover” on page 48. 2. Disconnect the Audio board cable. 3. Remove the two (2) screws from the audio board. Step Audio Board 63 Size M2.5*4 Quantity Screw Type 2 Chapter 3 4. Lift the audio board and cable away at an angle from the rear cover. Chapter 3 64 Removing the ODD Eject Board 1. See “Removing the Back Cover” on page 48 2. Disconnect the ODD Eject Board Cable. 3. Remove the one (1) screw from the ODD eject board. Step Audio Board 65 Size M2.5*4 Quantity Screw Type 2 Chapter 3 4. Remove the ODD Eject Board. Chapter 3 66 Removing the ODD 1. See “Removing the Back Cover” on page 48. 2. Remove the two (2) screws. Step ODD Size M2.5*4 Quantity Screw Type 2 3. Slide the ODD assembly out. 67 Chapter 3 4. Lift the ODD away from the chassis. 5. Remove the two (2) screws from the side bracket and remove the bracket. Step ODD Side Bracket Chapter 3 Size M2*2.5 Quantity Screw Type 2 68 6. Remove the two (2) screws from the ODD rear bracket and remove the bracket. Step ODD Rear Bracket 69 Size M2*2.5 Quantity Screw Type 2 Chapter 3 Removing the Inverter Board 1. See “Removing the Back Cover” on page 48. 2. Remove the adhesive covering the Inverter Board cable 1. 3. Disconnect the LCD to Inverter Board cable 1. 4. Unlock the cable clasp. Chapter 3 70 5. Disconnect the LCD to Inverter Board cable 2. 6. Disconnect the mainboard to inverter cable. 7. Remove the two (2) screws from the inverter board. Step Inverter Board 71 Size M2.5*3 Quantity Screw Type 2 Chapter 3 8. Remove the Inverter Board. Chapter 3 72 Removing the Home Button Board 1. See “Removing the Back Cover” on page 48 2. Disconnect the Home Button board cable. 3. Remove the one (1) screw from the Home Button Board Step Home Button Board 73 Size M2.5*4 Quantity Screw Type 1 Chapter 3 4. Remove the Home Button Board from the chassis. Chapter 3 74 Removing the Camera Module 1. See “Removing the Back Cover” on page 48 2. Remove the two (2) screws from the Camera Module Step Camera Module Size M2.0*3 Quantity Screw Type 2 3. Lift the Camera Module out of the chassis. 75 Chapter 3 4. Turn the Camera Module over. 5. Disconnect the cable from the Camera Module. Chapter 3 76 Removing the TV Tuner Module 1. See “Removing the Card Reader Board” on page 62. 2. Disconnect the TV Tuner antenna. 3. Remove the one (1) screw. Step TV Card 77 Size M2.0*3 Quantity Screw Type 1 Chapter 3 4. Lift the TV module away. Chapter 3 78 Removing the Wireless LAN Module 1. See “Removing the Card Reader Board” on page 62. 2. Disconnect the WLAN antennas. 3. Remove the one (1) screw from the WLAN module. Step WLAN 79 Size M2.0*3 Quantity Screw Type 1 Chapter 3 4. Lift the WLAN module away. Chapter 3 80 Removing the Thermal Module 1. See “Removing the Thermal Module” on page 81. 2. Disconnect the two (2) fan cables. 3. Loosen the four (4) captive screws in numerical order (1, 2, 3, then 4). 1 4 3 2 s 4. Lift the thermal module away. 81 Chapter 3 Removing the Fans 1. See “Removing the Thermal Module” on page 81. 2. Remove the two (2) screws. Step Fan Size 2.5*5 Quantity Screw Type 2 3. Remove the LVDS cable from the cable clips. Chapter 3 82 4. Remove the fan. 5. Remove the two (2) screws. Step Fan Size 2.5*5 Quantity Screw Type 2 6. Remove the fan. 83 Chapter 3 Removing the CPU 1. See “Removing the CPU” on page 84. 2. Unlock the CPU by pressing down on the locking latch and moving it out and away from the CPU. 3. Lift the CPU out of the package. CAUTION: Avoid any contact with a thermal pad or thermal grease. Chapter 3 84 Removing the Mainboard 1. See “Removing the Card Reader Board” on page 62. 2. See “Removing the Thermal Module” on page 81. 3. See “Removing the CPU” on page 84. 4. Disconnect the sixteen (16) cables from the Mainboard as shown. 16 13 8 11 9 15 14 12 7 6 5 4 1 3 2 10 Item 85 Description 1 LVDS Cable 2 CCD Cable 3 Inverter Cable 4 MIC Cable 5 ODD Button Cable 6 Card Reader Cable 7 Bluetooth Cable 8 Home Button Cable 9 IR Cable 10 Touch Screen 11 Audio Cable 12 TV Tuner Cable 13 Light Foot Cable 14 USB Cable 15 Speaker Cable 16 Light Pipe Cable Chapter 3 5. Remove the adhesive tabs holding the Audio board cable to the mainboard. 6. Remove the two (2) screws. Step Mainboard Chapter 3 Size M2.5*4 Quantity Screw Type 1 86 7. Lift the mainboard away. NOTE: Circuit boards >10 cm² have been highlighted with a yellow rectangle as shown in the previous image. Please detach the Circuit board and follow local regulations for disposal. 8. Disconnect the IR Board cable and remove. 87 Chapter 3 9. Open cable clips as shown. Remove all cables from cable clips. NOTE: Make note of the location which cables belong in which clip before removing them. Chapter 3 88 Removing the Frame 1. See “Removing the Mainboard Shielding” on page 51. 2. See “Removing the Touchscreen Control Board” on page 59. 3. See “Removing the Mainboard” on page 85. 4. See “Removing the Frame” on page 89. 5. See “Removing the Frame” on page 89. 6. Remove the adhesive tape holding the LVDS cable to the LCD bracket. 7. Remove the LVDS connector protective cover. 89 Chapter 3 8. Unlock the LVDS cable. 9. Remove the LVDS cable. Chapter 3 90 10. Remove the adhesive tape from the sensor cables. 11. Remove the two (2) sensor connectors. 91 Chapter 3 12. Remove the adhesive tape covering the TBD cable and remove. 13. Remove the adhesive tape covering the inverter cable. Chapter 3 92 14. Remove the thirteen (13) screws. Step Frame 93 Size M2.5*4 Quantity Screw Type 13 Chapter 3 15. Lift the LCD bracket clear of the bezel. WARNING:When lifting the LCD Assembly, do not touch the Touch sensor modules located at the top left and top right corners of the device. Doing so will damage the touch screen function. IMPORTANT:Do not place the LCD panel face down. When following the remainder of the disassembly instructions, place something between the LCD face and the tabletop to prevent pressure on the touchscreen sensors. Chapter 3 94 Removing the LCD Panel 1. See “Removing the Frame” on page 89. 2. Remove the four (4) screws from the LCD assembly. Step LCD Panel Size M3*4 Quantity Screw Type 4 3. Lift the edge of the LCD bracket and pass the converter cables through. 95 Chapter 3 4. Lift the LCD bracket away from the LCD assembly. IMPORTANT:The touchscreen control board and LCD panel must be returned together for RMA purposes. See “Removing the Touchscreen Control Board” on page 59. The touchscreen control board records the specific panel’s data, do not separate these for RMA. Chapter 3 96 Removing the Bluetooth Module 1. See “Removing the Bluetooth Module” on page 97. 2. Lift the Bluetooth module off of the bezel. 3. Disconnect the Bluetooth cable. 97 Chapter 3 Removing the IR Board 1. See “Removing the Frame” on page 89. 2. Disconnect the home button board cable. 3. Remove the one (1) screw. Step Home Board Chapter 3 Size M2.5*3 Quantity Screw Type 1 98 4. Remove the home button board from the bezel. 99 Chapter 3 Removing the Home Button Board 1. See “Removing the Frame” on page 89. 2. Lift the power board away from the bezel. Chapter 3 100 Removing the USB Board 1. See “Removing the Back Cover” on page 48. 2. Remove the adhesive tape covering the USB cable. 3. Remove the two (2) screws. Step USB Board 101 Size M2.5*4 Quantity Screw Type 2 Chapter 3 4. Remove the USB board from the chassis. Chapter 3 102 Removing the Speakers 1. See “Removing the Frame” on page 89. 2. Remove the adhesive tape from the speaker cable. 3. Remove the speaker cable from the LCD bezel. 4. Remove the adhesive tape from the speaker assembly. 5. Lift the speakers away from the bezel. 103 Chapter 3 Removing the Antennas 1. See “Removing the Frame” on page 89. 2. Remove the two (2) screws. Step Antennas Size M1.7*4 Quantity Screw Type 2 3. Remove the left and right antennas from the bezel. Chapter 3 104 Reassembly Procedure Replacing the Antennas 4. Replace the left and right antennas onto the bezel. 5. Replace the two (2) screws. Step Antennas 105 Size M1.7*4 Quantity Screw Type 2 Chapter 3 Replacing the Speakers 1. Place the speakers onto the LCD bezel and apply the adhesive tape to secure the assembly. 2. Place the speaker cable onto the LCD bezel. 3. Place the adhesive tape to secure the speaker cable. Chapter 3 106 Replacing the USB Board 1. Place the USB board onto the LCD bezel. 2. Replace the two (2) screws. Step USB Board Size M2.5*4 Quantity Screw Type 2 3. Replace the adhesive tape to secure the USB cable. 107 Chapter 3 Replacing the IR Board 1. Place the IR board into the LCD bezel. 2. Apply pressure to set the adhesive. Chapter 3 108 Replacing the Home Button Board 1. Place the home button board onto the LCD bezel. 2. Replace the one (1) screw. Step Home Board 109 Size M2.5*3 Quantity Screw Type 1 Chapter 3 3. Connect the home button board cable. Replacing the Bluetooth Module 1. Connect the Bluetooth cable to the Bluetooth Module. 2. Adhere the Bluetooth module to the bezel. Chapter 3 110 Replacing the LCD Panel in the Frame 1. Replace the LCD panel onto the frame. 2. Lower the edge of the LCD bracket and pass the converter cables through. 111 Chapter 3 3. Replace the four (4) screws from the LCD assembly. Step LCD Panel Chapter 3 Size M3*4 Quantity Screw Type 4 112 Replacing the Frame 1. Place the bezel around a raised surface so that the bezel is lower than the raised surface. Lower the LCD Assembly onto the bezel. 2. Replace the thirteen (13) screws. Step Frame 113 Size M2.5*4 Quantity Screw Type 13 Chapter 3 3. Replace the adhesive tape to secure the inverter cable. 4. Replace the adhesive tape to secure the TBD cable. 5. Replace the right and left sensor connectors. Chapter 3 114 6. Replace the adhesive tape to secure the sensor cables. NOTE: There is tape on both the top and side of the LCD bracket. 7. Connect the LVDS cable. 115 Chapter 3 8. Lock the LVDS cable. 9. Adhere the LVDS connector protective cover. 10. Replace the adhesive tape holding the LVDS cable to the LCD bracket. Chapter 3 116 Replacing the Mainboard 1. Replace all cables into the cable clips and lock them. TBD 2. Connect the IR Board cable. 117 Chapter 3 3. Place the mainboard onto the chassis. 4. Replace the two (2) screws. Step Mainboard Size M2.5*4 Quantity Screw Type 1 5. Replace the adhesive tabs to secure the Audio board cable to the mainboard. Chapter 3 118 6. Connect the following sixteen (16) cables to the Mainboard as shown. 16 13 8 11 9 15 14 12 7 6 5 4 1 3 2 10 Item 1 119 Description LVDS Cable 2 CCD Cable 3 Inverter Cable 4 MIC Cable 5 ODD Button Cable 6 Card Reader Cable 7 Bluetooth Cable 8 Home Button Cable 9 IR Cable 10 Touch Screen 11 Audio Cable 12 TV Tuner Cable 13 Light Foot Cable 14 USB Cable 15 Speaker Cable 16 Light Pipe Cable Chapter 3 Replacing the CPU 1. Place the CPU paying attention to the locating triangle. NOTE: Ensure the CPU is lined up with the Pin1 Socket locator on the mainboard. 2. Press the latch down and in to lock the CPU. Chapter 3 120 Replacing the Fans 3. Replace the right fan. 4. Replace the two (2) screws. Step Fan Size 2.5*5 Quantity Screw Type 2 5. Replace the left fan. 121 Chapter 3 6. Place the LVDS cable into the cable clips. 7. Replace the two (2) screws. Step Fan Chapter 3 Size 2.5*5 Quantity Screw Type 2 122 Replacing the Thermal Module 1. Place the thermal module on to the mainboard. 2. Tighten the four (4) captive screws in reverse numerical order (4, 3, 2, then 1). 1 4 3 2 3. Connect the two (2) fan cables. 123 Chapter 3 Replacing the WLAN Module 1. Replace the WLAN module. 2. Replace the one (1) screw. Step WLAN Size M2.0*3 Quantity Screw Type 1 3. Replace the two (2) connectors. The black cable is placed closest to the DIMM slots. Chapter 3 124 Replacing the TV Tuner Module 1. Place the TV Tuner module into the connector. 2. Replace the one (1) screw. Step TV Card Size M2.0*3 Quantity Screw Type 1 3. Connect the TV Tuner cable. 125 Chapter 3 Replacing the Camera Module 1. Connect the camera cable to the Camera Module. 2. Turn the Camera Module over. 3. Place the Camera Module on to the chassis. Chapter 3 126 4. Replace the two (2) screws to secure the Camera Module Step Camera Module 127 Size M2.0*3 Quantity Screw Type 2 Chapter 3 Replacing the Power Board 1. Place the Power Board onto the chassis. 2. Replace the one (1) screw. Step Home Button Board Size M2.5*4 Quantity Screw Type 1 3. Connect the Home Button board cable. Chapter 3 128 Replacing the Inverter Board 1. Place the Inverter Board onto the chassis. 2. Replace the two (2) screws to secure the inverter board. Step Inverter Board Size M2.5*3 Quantity Screw Type 2 3. Connect the mainboard to inverter cable. 129 Chapter 3 4. Connect the LCD to Inverter Board cable 2. 5. Lock the cable clasp. 6. Connect the LCD to Inverter Board cable 1. Chapter 3 130 7. Apply the adhesive tape to secure the Inverter Board cable 1. 131 Chapter 3 Replacing the ODD Module 1. Replace the rear ODD bracket and replace the two (2) screws. Step ODD Rear Bracket Size M2*2.5 Quantity Screw Type 2 2. Replace the side ODD bracket and replace the two (2) screws. Step ODD Side Bracket Chapter 3 Size M2*2.5 Quantity Screw Type 2 132 3. Place the ODD onto the chassis. 4. Slide the ODD assembly into place. 5. Replace the two (2) screws. Step ODD 133 Size M2.5*4 Quantity Screw Type 2 Chapter 3 Replacing the ODD Eject Board 1. Place the ODD Eject Board onto the chassis. 2. Replace the one (1) screw to secure the ODD eject board. Step Audio Board Size M2.5*4 Quantity Screw Type 2 3. Connect the ODD Eject Board Cable. Chapter 3 134 Replacing the Audio Board 1. Place the audio board onto the chassis. 2. Connect the two (2) screws to secure the audio board. Step Audio Board Size M2.5*4 Quantity Screw Type 2 3. Connect the Audio board cable. 135 Chapter 3 Connect the Card Reader Board 1. Place the card reader board onto the chassis. 2. Replace the two (2) screws. Step Card Reader Board Size 2.5*4 Quantity Screw Type 2 3. Connect the Card Reader Board cable. Chapter 3 136 Replacing the Touchscreen Board 1. Place the touchscreen board onto the chassis. 2. Replace the two (2) screws. Step Touchscreen Control Board Size M2.5*4 Quantity Screw Type 1 3. Connect the touchscreen board to mainboard cable. 137 Chapter 3 4. Connect the left (bottom) touch sensor cable. 5. Connect the right (top) touch sensor cable. 6. Replace the one (1) ground cable screw. Chapter 3 138 Replacing the Power Supply 1. Place the Power Supply onto the chassis. 2. Replace two (2) screws to secure the Power Supply as shown. Step Power Supply 139 Size M2.5*4 Quantity Screw Type 2 Chapter 3 Replacing the HDD 1. Replace the HDD brackets. 2. Replace the four (4) screws to secure the HDD bracket (both sides). Step HD Bracket Size M3*4 Quantity Screw Type 4 3. Place the HDD on to the chassis. Chapter 3 140 4. Slide the HDD away from the speakers to secure it. 5. Replace the two (2) screws. Step HDD Size M2.5*4 Quantity Screw Type 2 6. Connect the HDD cable. 141 Chapter 3 Replacing the Mainboard Shielding 1. Replace the shield onto the assembly. 2. Replace the six (6) screws. Step Mainboard Shielding Chapter 3 Size M2.5*4Ni Quantity Screw Type 6 142 3. Connect the HDD power cable. 4. Connect the HDD cable to the mainboard. 5. Replace the one (1) screw to secure the ground wire. Step Converter Ground Cable 143 Size M2.5*4 Quantity Screw Type 1 Chapter 3 6. Adhere the adhesive tape to secure the HDD ground cable to the HDD. 7. Connect the power cable to the mainboard. 8. Connect the TBD wire to the mainboard. Chapter 3 144 9. Connect the one (1) screw to secure the ground wire. Step HDD Ground Cable 145 Size M2.5*4 Quantity Screw Type 1 Chapter 3 Replacing the Hinge 1. Place the Hinge onto the chassis. 2. Replace the six (6) screws to secure the Hinge. Step Hinge Chapter 3 Size M4*8 Quantity Screw Type 6 146 Replacing the Rear Cover 3. Place the Back Cover on to the device. 4. Press down firmly to engage the locking clips beneath the cover. 5. Use both hands to move the Hinge to the down position. 147 Chapter 3 6. Remove the fourteen (14) screws securing the Back Cover. Step Back Cover Size Quantity Screw Type 2.5*8 2.4*8 Chapter 3 148 Replacing the Rear Covers 1. Place the first Rear Cover onto the Back Cover and slide it into place. 2. Repeat for the second Rear Cover. 149 Chapter 3 3. Replace the six (6) screws to secure the Rear Covers. Step Rear Covers Chapter 3 Size M2.5*6.0 Quantity Screw Type 6 150 Replacing the RAM 4. Place each RAM module into its slot. 5. Lock the latches on either side of the RAM by pressing inwards as shown. 6. Place the RAM Shielding onto the device. 151 Chapter 3 Replacing the Rear Covers 1. Place the Hinge Cover onto the device. 2. Apply pressure to engage the Hinge Cover latches. 3. Place the RAM Cover onto the device. Chapter 3 152 4. Slide the RAM Cover into place. 153 Chapter 3 Chapter 4 Troubleshooting Common Problems Use the following procedure as a guide for computer problems. NOTE: The diagnostic tests are intended to test only Acer products. Non-Acer products, prototype cards, or modified options can give false errors and invalid system responses. 1. Obtain the failing symptoms in as much detail as possible. 2. Verify the symptoms by attempting to re-create the failure by running the diagnostic test or by repeating the same operation. 3. Use the troubleshooting sections to try and resolve the issue. START Hardware Issue Hardware or Software failure? Software Issue Determine Hardware failure 4. Component failure LCD failure Mainboard failure Go to specific component failure section Go to LCD failure section Replace Mainboard HDD Image failure If the Issue is still not resolved, see “Online Support Information” on page 192. Chapter 4 154 ODD Failure If an Optical Disk Drive failure is determined, use the following flowchart to determine the required action: START DVD does not play Check DVD cable connection NG OK Check DVD module Reconnect cable correctly OK Close OK Close OK Close NG NG Replace ODD module NG OK Replace Mainboard ODD Not Operating Correctly If the ODD exhibits any of the following symptoms it may be faulty: • Audio CDs do not play when loaded • DVDs do not play when loaded • Blank discs do not burn correctly • DVD or CD play breaks up or jumps • Optical drive not found or not active: • Not shown in My Computer or the BIOS setup • LED does not flash when the computer starts up • The tray does not eject • Access failure screen displays • The ODD is noisy Perform the following general solutions one at a time to correct the problem. 1. Reboot the computer and retry the operation. 2. Try an alternate disc. 3. Navigate to Start Computer. Check that the ODD device is displayed in the Devices with Removable Storage panel. 4. Navigate to Start Control Panel System and Maintenance System Device Manager. a. 155 Double-click lDE ATA/ATAPI controllers. If a device displays a down arrow, right-click on the device and click Enable. Chapter 4 b. Double-click DVD/CD-ROM drives. If the device displays a down arrow, right-click on the device and click Enable. c. Check that there are no yellow exclamation marks against the items in lDE ATA/ATAPI controllers. If a device has an exclamation mark, right-click on the device and uninstall and reinstall the driver. d. Check that there are no yellow exclamation marks against the items in DVD/CD-ROM drives. If a device has an exclamation mark, right-click on the device and uninstall and reinstall the driver. e. If the exclamation marker is not removed from the item in the lists, try removing any recently installed software and retrying the operation. Discs Do Not Play If discs do not play when inserted in the drive, perform the following actions one at a time to correct the problem. 1. Check that the disc is correctly seated in the drive tray and that the label on the disc is visible. 2. Check that the media is clean and scratch free. 3. Try an alternate disc in the drive. 4. Ensure that AutoPlay is enabled: 5. a. Navigate to Start Control Panel Hardware and Sound AutoPlay. b. Select Use AutoPlay for all media and devices. c. In the Audio CD and DVD Movie fields, select the desired player from the drop down menu. Check that the Regional Code is correct for the selected media: IMPORTANT:Region can only be changed a limited number of times. After Changes remaining reaches zero, the region cannot be changed even Windows is reinstalled or the drive is moved to another computer. a. Navigate to Start Control Panel System and Maintenance System Device Manager. b. Double-click DVD/CD-ROM drives. c. Right-click DVD drive and click Properties, then click the DVD Region tab. d. Select the region suitable for the media inserted in the drive. Discs Do Not Burn Properly If discs can not be burned, perform the following actions one at a time to correct the problem. 1. 2. Ensure that the default drive is record enabled: a. Navigate to Start Computer and right-click the writable ODD icon. Click Properties. b. Select the Recording tab. In the Desktop disc recording panel, select the writable ODD from the drop down list. c. Click OK. Ensure that the software used for burning discs is the factory default. If using different software, refer to the software's user manual. Playback is Choppy If playback is choppy or jumps, perform the following actions one at a time to correct the problem. 1. 2. Check that system resources are not running low: a. Try closing some applications. b. Reboot and try the operation again. Check that the ODD controller transfer mode is set to DMA: a. Navigate to Start Control Panel System and Maintenance System Device Manager. b. Double-click IDE ATA/ATAPI controllers, then right-click ATA Device 0. Chapter 4 156 c. Click Properties and select the Advanced Settings tab. Ensure that the Enable DMA box is checked and click OK. d. Repeat for the other ATA Devices shown if applicable. Drive Not Detected If Windows cannot detect the drive, perform the following actions one at a time to correct the problem. 1. Restart the computer and press F2 to enter the BIOS Utility. 2. Check that the drive is detected in the ATAPI Model Name field on the Information page. NOTE: Check that the entry is identical to one of the ODDs specified in “Hardware Specifications and Configurations” on page 13. 3. Turn off the power and remove the cover to inspect the connections to the ODD. See “Disassembly Process” on page 42. a. Check for broken connectors on the drive, motherboard, and cables. b. Check for bent or broken pins on the drive, motherboard, and cable connections. c. Try an alternate cable, if available. If the drive works with the new cable, the original cable should be replaced. 4. Reseat the drive ensuring and all cables are connected correctly. 5. Replace the ODD. See “Disassembly Process” on page 42. Drive Read Failure If discs cannot be read when inserted in the drive, perform the following actions one at a time to correct the problem. 1. Remove and clean the failed disc. 2. Retry reading the CD or DVD. d. Test the drive using other discs. e. Play a DVD movie f. Listen to a music CD If the ODD works properly with alternate discs, the original disc is probably defective and should be replaced. 3. 4. 157 Turn off the power and remove the cover to inspect the connections to the ODD. See “Disassembly Process” on page 42. a. Check for broken connectors on the drive, motherboard, and cables. b. Check for bent or broken pins on the drive, motherboard, and cable connections. c. Try an alternate cable, if available. If the drive works with the new cable, the original cable should be replaced. Replace the ODD. See “Disassembly Process” on page 42. Chapter 4 Wireless Failure If the wireless functionality fails, use the following flowchart to determine the required action: START Wirelss function failure Check WLAN cable connection NG OK Check WLAN module Reconnect cable correctly OK Close OK Close OK Close NG NG Replace WLAN module NG OK Replace Mainboard Chapter 4 158 Camera Failure If the camera functionality fails, use the following flowchart to determine the required action: START Camera function failure Check camera cable connection NG OK Check camera module Reconnect cable correctly OK Close Replace camera module OK Close Replace Mainboard OK Close NG NG NG OK 159 Chapter 4 Speaker Failure If the internal speaker fails, use the following flowchart to determine the required action: START Speaker function failure Check speaker cable connection NG OK Check speaker module Reconnect cable correctly OK Close Replace speaker module OK Close Replace Mainboard OK Close NG NG NG OK Sound Problems If sound problems are experienced, perform the following actions one at a time to correct the problem. 1. Reboot the computer. 2. Navigate to Start Control Panel System and Maintenance System Device Manager. Check the Device Manager to determine that: • The device is properly installed. • There are no red Xs or yellow exclamation marks. • There are no device conflicts. • No hardware is listed under Other Devices. 3. Roll back the audio driver to the previous version, if updated recently. 4. Remove and reinstall the audio driver. 5. Ensure that all volume controls are set mid range: a. Click the volume icon on the taskbar and drag the slider to 50. Ensure that the volume is not muted. b. Click Mixer to verify that other audio applications are set to 50 and not muted. 6. Navigate to Start Control Panel Hardware and Sound Sound. Ensure that Speakers are selected as the default audio device (green check mark). NOTE: If Speakers does not show, right-click on the Playback tab and select Show Disabled Devices (clear by default). 7. Select Speakers and click Configure to start Speaker Setup. Follow the onscreen prompts to configure the speakers. 8. Remove and recently installed hardware or software. Chapter 4 160 9. Restore system and file settings from a known good date using System Restore. If the issue is not fixed, repeat the preceding steps and select an earlier time and date. 10. Reinstall the Operating System. 11. If the Issue is still not resolved, see “Online Support Information” on page 192. 161 Chapter 4 LCD Failure If the integrated LCD display fails, use the following flowchart to determine the required action: START Check LCD cable connected OK Check LCD cable is good OK Check LCD module is good OK NG Reconnect LCD cable OK Close OK Close OK Close NG Replace LCD cable NG Replace LCD module NG Replace Mainboard Close No POST or Video If the POST or video doesn’t display, perform the following actions one at a time to correct the problem. 1. Make sure the computer has power by checking at least one of the following occurs: • Fans start up • Status LEDs light up 2. Drain any stored power by removing the power cable and battery and holding down the power button for 10 seconds. Reconnect the power and reboot the computer. 3. Disconnect power and all external devices including port replicators or docking stations. Remove any memory cards and CD/DVD discs. Restart the computer. If the computer boots correctly, add the devices one by one until the failure point is discovered. 4. Reseat the memory modules. 5. Remove the drives (see “Disassembly Process” on page 42). 6. If the Issue is still not resolved, see “Online Support Information” on page 192. Chapter 4 162 Abnormal Video Display If video displays abnormally, perform the following actions one at a time to correct the problem. 1. Reboot the computer. 2. If permanent vertical/horizontal lines or dark spots display in the same location, the LCD is faulty and should be replaced. See “Disassembly Process” on page 42. 3. If extensive pixel damage is present (different colored spots in the same locations on the screen), the LCD is faulty and should be replaced. See “Disassembly Process” on page 42. 4. Adjust the brightness to its highest level. See the User Manual for instructions on adjusting settings. NOTE: Ensure that the computer is not running on battery alone as this may reduce display brightness. If the display is too dim at the highest brightness setting, the LCD is faulty and should be replaced. See “Disassembly Process” on page 42. 5. Check the display resolution is correctly configured: a. Minimize or close all Windows. b. If display size is only abnormal in an application, check the view settings and control/mouse wheel zoom feature in the application. c. If desktop display resolution is not normal, right-click on the desktop and select Personalize Display Settings. d. Click and drag the Resolution slider to the desired resolution. e. Click Apply and check the display. Readjust if necessary. 6. Roll back the video driver to the previous version if updated. 7. Remove and reinstall the video driver. 8. Check the Device Manager to determine that: 9. • The device is properly installed. There are no red Xs or yellow exclamation marks. • There are no device conflicts. • No hardware is listed under Other Devices. If the Issue is still not resolved, see “Online Support Information” on page 192. 10. Run the Windows Memory Diagnostic from the operating system DVD and follow the onscreen prompts. 11. If the Issue is still not resolved, see “Online Support Information” on page 192. 163 Chapter 4 General Troubleshooting Issues Computer Shutsdown Intermittently If the system powers off at intervals, perform the following actions one at a time to correct the problem. 1. Check the power cable is properly connected to the computer and the electrical outlet. 2. Remove any extension cables between the computer and the outlet. 3. Remove any surge protectors between the computer and the electrical outlet. Plug the computer directly into a known good electrical outlet. 4. Disconnect the power and open the casing to check the Thermal Unit and fan airways are free of obstructions. 5. Remove all external and non-essential hardware connected to the computer that are not necessary to boot the computer to the failure point. 6. Remove any recently installed software. 7. If the Issue is still not resolved, see “Online Support Information” on page 192. Random Loss of BIOS Settings If the computer is experiencing intermittent loss of BIOS information, perform the following actions one at a time to correct the problem. 1. If the computer is more than one year old, replace the CMOS battery. 2. Run a complete virus scan using up-to-date software to ensure the computer is virus free. 3. If the computer is experiencing HDD or ODD BIOS information loss, disconnect and reconnect the power and data cables between devices. If the BIOS settings are still lost, replace the cables. 4. If HDD information is missing from the BIOS, the drive may be defective and should be replaced. 5. Replace the Motherboard. 6. If the Issue is still not resolved, see “Online Support Information” on page 192. Microphone Problems If internal or external Microphones do no operate correctly, perform the following actions one at a time to correct the problem. 1. Check that the microphone is enabled. Navigate to Start Control Panel Hardware and Sound Sound and select the Recording tab. 2. Right-click on the Recording tab and select Show Disabled Devices (clear by default). 3. The microphone appears on the Recording tab. 4. Right-click on the microphone and select Enable. 5. Select the microphone then click Properties. Select the Levels tab. 6. Increase the volume to the maximum setting and click OK. 7. Test the microphone hardware: 8. a. Select the microphone and click Configure. b. Select Set up microphone. c. Select the microphone type from the list and click Next. d. Follow the onscreen prompts to complete the test. If the Issue is still not resolved, see “Online Support Information” on page 192. Chapter 4 164 HDD Not Operating Correctly If the HDD does not operate correctly, perform the following actions one at a time to correct the problem. 1. Disconnect all external devices. 2. Run a complete virus scan using up-to-date software to ensure the computer is virus free. 3. Run the Windows 7 Startup Repair Utility: a. insert the Windows 7 Operating System DVD in the ODD and restart the computer. b. When prompted, press any key to start to the operating system DVD. c. The Install Windows screen displays. Click Next. d. Select Repair your computer. e. The System Recovery Options screen displays. Click Next. f. Select the appropriate operating system, and click Next. NOTE: Click Load Drivers if controller drives are required. g. Select Startup Repair. h. Startup Repair attempts to locate and resolve issues with the computer. i. When complete, click Finish. If an issue is discovered, follow the onscreen information to resolve the problem. 4. Run the Windows Memory Diagnostic Tool. For more information see Windows Help and Support. 5. Restart the computer and press F2 to enter the BIOS Utility. Check the BIOS settings are correct and that CD/DVD drive is set as the first boot device on the Boot menu. 6. Ensure all cables and jumpers on the HDD and ODD are set correctly. 7. Remove any recently added hardware and associated software. 8. Run the Windows Disk Defragmenter. For more information see Windows Help and Support. 9. Run Windows Check Disk by entering chkdsk /r from a command prompt. For more information see Windows Help and Support. 10. Restore system and file settings from a known good date using System Restore. If the issue is not fixed, repeat the preceding steps and select an earlier time and date. 11. Replace the HDD. See “Disassembly Process” on page 42. External Mouse Failure If an external Mouse fails, perform the following actions one at a time to correct the problem. 1. Try an alternative mouse. 2. If the mouse uses a wireless connection, insert new batteries and confirm there is a good connection. See the mouse user manual. 3. If the mouse uses a USB connection, try an alternate USB port. 4. Try an alternative program to verify mouse operation. Reinstall the program experiencing mouse failure. 5. Restart the computer. 6. Remove any recently added hardware and associated software. 7. Remove any recently added software and reboot. 8. Restore system and file settings from a known good date using System Restore. If the issue is not fixed, repeat the preceding steps and select an earlier time and date. 9. Run the Event Viewer to check the events log for errors. For more information see Windows Help and Support. 10. Roll back the mouse driver to the previous version if updated recently. 165 Chapter 4 11. Remove and reinstall the mouse driver. 12. Check the Device Manager to determine that: • The device is properly installed. There are no red Xs or yellow exclamation marks. • There are no device conflicts. • No hardware is listed under Other Devices. 13. If the Issue is still not resolved, see “Online Support Information” on page 192. Chapter 4 166 Intermittent Problems Intermittent system hang problems can be caused by a variety of reasons that have nothing to do with a hardware defect, such as: cosmic radiation, electrostatic discharge, or software errors. FRU replacement should be considered only when a recurring problem exists. When analyzing an intermittent problem, do the following: 1. Run the advanced diagnostic test for the system board in loop mode at least 10 times. 2. If no error is detected, do not replace any FRU. 3. If any error is detected, replace the FRU. Rerun the test to verify that there are no more errors. Undetermined Problems The diagnostic problems does not identify which adapter or device failed, which installed devices are incorrect, whether a short circuit is suspected, or whether the system is inoperative. Follow these procedures to isolate the failing FRU (do not isolate non-defective FRU). NOTE: Verify that all attached devices are supported by the computer. NOTE: Verify that the power supply being used at the time of the failure is operating correctly. 167 1. Power-off the computer. 2. Visually check for damage. If any problems are found, replace the FRU. 3. Remove or disconnect all of the following devices: • Non-Acer devices • Printer, mouse, and other external devices • Hard disk drive • DIMM • CD-ROM/Diskette drive Module 4. Power-on the computer. 5. Determine if the problem has changed. 6. If the problem does not recur, reconnect the removed devices one at a time until you find the failing FRU. 7. If the Issue is still not resolved, see “Online Support Information” on page 192. Chapter 4 POST Codes These tables describe the POST codes and descriptions during the POST. Bootblock Initialization Code Checkpoints Checkpoint Description Before D0 If boot block debugger is enabled, CPU cache-as-RAM functionality is enabled at this point. Stack will be enabled from this point. D0 Early Boot Strap Processor (BSP) initialization like microcode update, frequency and other CPU critical initialization. Early chipset initialization is done. D1 Early super I/O initialization is done including RTC and keyboard controller. Serial port is enabled at this point if needed for debugging. NMI is disabled. Perform keyboard controller BAT test. Save power-on CPUID value in scratch CMOS. Go to flat mode with 4GB limit and GA20 enabled. D2 Verify the boot block checksum. System will hang here if checksum is bad. D3 Disable CACHE before memory detection. Execute full memory sizing module. If memory sizing module not executed, start memory refresh and do memory sizing in Boot block code. Do additional chipset initialization. Re-enable CACHE. Verify that flat mode is enabled. D4 Test base 512KB memory. Adjust policies and cache first 8MB. Set stack. D5 Bootblock code is copied from ROM to lower system memory and control is given to it. BIOS now executes out of RAM. Copies compressed boot block code to memory in right segments. Copies BIOS from ROM to RAM for faster access. Performs main BIOS checksum and updates recovery status accordingly. D6 Both key sequence and OEM specific method is checked to determine if BIOS recovery is forced. If BIOS recovery is necessary, control flows to checkpoint E0. See Bootblock Recovery Code Checkpoints section of document for more information. D7 Restore CPUID value back into register. The Bootblock-Runtime interface module is moved to system memory and control is given to it. Determine whether to execute serial flash. D8 The Runtime module is uncompressed into memory. CPUID information is stored in memory. D9 Store the Uncompressed pointer for future use in PMM. Copying Main BIOS into memory. Leaves all RAM below 1MB Read-Write including E000 and F000 shadow areas but closing SMRAM. DA Restore CPUID value back into register. Give control to BIOS POST (ExecutePOSTKernel). See POST Code Checkpoints section of document for more information. DC System is waking from ACPI S3 state E1-E8EC-EE OEM memory detection/configuration error. This range is reserved for chipset vendors & system manufacturers. The error associated with this value may be different from one platform to the next. Chapter 4 168 Bootblock Recovery Code Checkpoints Checkpoint Description E0 Initialize the floppy controller in the super I/O. Some interrupt vectors are initialized. DMA controller is initialized. 8259 interrupt controller is initialized. L1 cache is enabled. E9 Set up floppy controller and data. Attempt to read from floppy. EA Enable ATAPI hardware. Attempt to read from ARMD and ATAPI CDROM. EB Disable ATAPI hardware. Jump back to checkpoint E9. EF Read error occurred on media. Jump back to checkpoint EB. F0 Search for pre-defined recovery file name in root directory. F1 Recovery file not found. F2 Start reading FAT table and analyze FAT to find the clusters occupied by the recovery file. F3 Start reading the recovery file cluster by cluster. F5 Disable L1 cache. FA Check the validity of the recovery file configuration to the current configuration of the flash part. FB Make flash write enabled through chipset and OEM specific method. Detect proper flash part. Verify that the found flash part size equals the recovery file size. F4 The recovery file size does not equal the found flash part size. FC Erase the flash part. FD Program the flash part. FF The flash has been updated successfully. Make flash write disabled. Disable ATAPI hardware. Restore CPUID value back into register. Give control to F000 ROM at F000:FFF0h. POST Code Checkpoints Checkpoint 169 Description 03 Disable NMI, Parity, video for EGA, and DMA controllers. Initialize BIOS, POST, Runtime data area. Also initialize BIOS modules on POST entry and GPNV area. Initialized CMOS as mentioned in the Kernel Variable "wCMOSFlags." 04 Check CMOS diagnostic byte to determine if battery power is OK and CMOS checksum is OK. Verify CMOS checksum manually by reading storage area. If the CMOS checksum is bad, update CMOS with power-on default values and clear passwords. Initialize status register A.Initializes data variables that are based on CMOS setup questions. Initializes both the 8259 compatible PICs in the system 05 Initializes the interrupt controlling hardware (generally PIC) and interrupt vector table. 06 Do R/W test to CH-2 count reg. Initialize CH-0 as system timer. Install the POSTINT1Ch handler. Enable IRQ-0 in PIC for system timer interrupt.Traps INT1Ch vector to "POSTINT1ChHandlerBlock." 07 Fixes CPU POST interface calling pointer. 08 Initializes the CPU. The BAT test is being done on KBC. Program the keyboard controller command byte is being done after Auto detection of KB/MS using AMI KB-5. C0 Early CPU Init Start -- Disable Cache - Init Local APIC C1 Set up boot strap processor Information C2 Set up boot strap processor for POST C5 Enumerate and set up application processors C6 Re-enable cache for boot strap processor C7 Early CPU Init Exit Chapter 4 Checkpoint Description 0A Initializes the 8042 compatible Key Board Controller. 0B Detects the presence of PS/2 mouse. 0C Detects the presence of Keyboard in KBC port. 0E Testing and initialization of different Input Devices. Also, update the Kernel Variables.Traps the INT09h vector, so that the POST INT09h handler gets control for IRQ1. Uncompress all available language, BIOS logo, and Silent logo modules. 13 Early POST initialization of chipset registers. 20 Relocate System Management Interrupt vector for all CPU in the system. 24 Uncompress and initialize any platform specific BIOS modules. GPNV is initialized at this checkpoint. 2A Initializes different devices through DIM.See DIM Code Checkpoints section of document for more information. 2C Initializes different devices. Detects and initializes the video adapter installed in the system that have optional ROMs. 2E Initializes all the output devices. 31 Allocate memory for ADM module and uncompress it. Give control to ADM module for initialization. Initialize language and font modules for ADM. Activate ADM module. 33 Initializes the silent boot module. Set the window for displaying text information. 37 Displaying sign-on message, CPU information, setup key message, and any OEM specific information. 38 Initializes different devices through DIM. See DIM Code Checkpoints section of document for more information. USB controllers are initialized at this point. 39 Initializes DMAC-1 & DMAC-2. 3A Initialize RTC date/time. 3B Test for total memory installed in the system. Also, Check for DEL or ESC keys to limit memory test. Display total memory in the system. 3C Mid POST initialization of chipset registers. 40 Detect different devices (Parallel ports, serial ports, and coprocessor in CPU, … etc.) successfully installed in the system and update the BDA, EBDA…etc. 52 Updates CMOS memory size from memory found in memory test. Allocates memory for Extended BIOS Data Area from base memory. Programming the memory hole or any kind of implementation that needs an adjustment in system RAM size if needed. 60 Initializes NUM-LOCK status and programs the KBD typematic rate. 75 Initialize Int-13 and prepare for IPL detection. 78 Initializes IPL devices controlled by BIOS and option ROMs. 7C Generate and write contents of ESCD in NVRam. 84 Log errors encountered during POST. 85 Display errors to the user and gets the user response for error. 87 Execute BIOS setup if needed / requested. Check boot password if installed. 8C Late POST initialization of chipset registers. 8D Build ACPI tables (if ACPI is supported) 8E Program the peripheral parameters. Enable/Disable NMI as selected 90 Initialization of system management interrupt by invoking all handlers. Please note this checkpoint comes right after checkpoint 20h A1 Clean-up work needed before booting to OS. Chapter 4 170 Checkpoint 171 Description A2 Takes care of runtime image preparation for different BIOS modules. Fill the free area in F000h segment with 0FFh. Initializes the Microsoft IRQ Routing Table. Prepares the runtime language module. Disables the system configuration display if needed. A4 Initialize runtime language module. Display boot option popup menu. A7 Displays the system configuration screen if enabled. Initialize the CPU's before boot, which includes the programming of the MTRR's. A9 Wait for user input at config display if needed. AA Uninstall POST INT1Ch vector and INT09h vector. AB Prepare BBS for Int 19 boot. Init MP tables. AC End of POST initialization of chipset registers. De-initializes the ADM module. B1 Save system context for ACPI. Prepare CPU for OS boot including final MTRR values. 00 Passes control to OS Loader (typically INT19h). Chapter 4 DIM Code Checkpoints Checkpoint Description 2A Initialize different buses and perform the following functions: Reset, Detect, and Disable (function 0); Static Device Initialization (function 1); Boot Output Device Initialization (function 2). Function 0 disables all device nodes, PCI devices, and PnP ISA cards. It also assigns PCI bus numbers. Function 1 initializes all static devices that include manual configured onboard peripherals, memory and I/O decode windows in PCI-PCI bridges, and noncompliant PCI devices. Static resources are also reserved. Function 2 searches for and initializes any PnP, PCI, or AGP video devices. 38 Initialize different buses and perform the following functions: Boot Input Device Initialization (function 3); IPL Device Initialization (function 4); General Device Initialization (function 5). Function 3 searches for and configures PCI input devices and detects if system has standard keyboard controller. Function 4 searches for and configures all PnP and PCI boot devices. Function 5 configures all onboard peripherals that are set to an automatic configuration and configures all remaining PnP and PCI devices. ACPI Runtime Checkpoints Checkpoint Description AC First ASL check point. Indicates the system is running in ACPI mode. AA System is running in APIC mode. 01, 02, 03, 04, 05 Entering sleep state S1, S2, S3, S4, or S5. 10, 20, 30, 40, 50 Waking from sleep state S1, S2, S3, S4, or S5. Boot Block Beep Codes Number of Beeps Description 1 No media present. (Insert diskette in floppy drive A:) 2 'AMIBOOT.ROM' file not found in root directory of diskette in A: 3 Insert next diskette if multiple diskettes are used for recovery 4 Flash Programming successful 5 File read error 7 No Flash EPROM detected 10 Flash Erase error 11 Flash Program error 12 'AMIBOOT.ROM' file size error 13 BIOS ROM image mismatch (file layout does not match image present in flash device) POST BIOS Beep Codes Number of Beeps Description 1 Memory refresh timer error. 3 Base memory read/write test error 6 Keyboard controller BAT command failed 7 General exception error (processor exception interrupt error) Chapter 4 172 Number of Beeps 8 Description Display memory error (system video adapter) Troubleshooting POST BIOS Beep Codes Number of Beeps 1, 3 Reseat the memory, or replace with known good modules. 6, 7 Fatal error indicating a serious problem with the system. Consult your system manufacturer. Before declaring the motherboard beyond all hope, eliminate the possibility of interference by a malfunctioning add-in card. Remove all expansion cards except the video adapter. 8 173 Troubleshooting Action • If beep codes are generated when all other expansion cards are absent, consult your system manufacturer's technical support. • If beep codes are not generated when all other expansion cards are absent, one of the add-in cards is causing the malfunction. Insert the cards back into the system one at a time until the problem happens again. This will reveal the malfunctioning card. If the system video adapter is an add-in card, replace or reseat the video adapter. If the video adapter is an integrated part of the system board, the board may be faulty. Chapter 4 Chapter 4 174 Chapter 5 Jumper and Connector Locations Mainboard Top View 3 4 19 2 5 1 6 18 7 17 16 8 15 9 10 Item 11 Description Item 13 14 Description 1 Iinverter conn 11 Audio conn 2 power conn 12 light foot conn 3 LCD conn 13 light pipe conn 4 GPU FAN conn 14 B-CAS conn 5 CPU FAN conn 15 USB conn 6 camera conn 16 Speaker conn 7 card reader conn 17 PSU SYS 8 Bluetooth conn 18 PSU CPU 9 Home button conn 19 SSD conn 10 IR conn Chapter 5 12 175 BIOS Recovery 1. Please save the SUPER.ROM to a USB key (Root Folder). NOTE: The USB flash should be a FAT 32 format. It does not need to be a bootable device. 176 2. Connect the USB key to a USB port in the system. 3. Press the power button to power the system up. 4. Press and hold Ctrl+Home. 5. Continue to press and hold Ctrl+Home until the USB device LED comes on. After the LED comes on, release Ctrl+Home. 6. The system implements the upgrade and reboots automatically. Upon reboot, ensure the BIOS has recovered. Chapter 5 Chapter 6 FRU (Field Replaceable Unit) List This chapter gives you the FRU (Field Replaceable Unit) listing in global configurations of this computer. Refer to this chapter whenever ordering for parts to repair or for RMA (Return Merchandise Authorization). Please note that WHEN ORDERING FRU PARTS, you should check the most up-to-date information available on your regional web or channel. For whatever reasons a part number change is made, it will not be noted on the printed Service Guide. For ACER AUTHORIZED SERVICE PROVIDERS, your Acer office may have a DIFFERENT part number code from those given in the FRU list of this printed Service Guide. You MUST use the local FRU list provided by your regional Acer office to order FRU parts for repair and service of customer machines. To scrap or to return the defective parts, you should follow the local government ordinance or regulations on how to dispose it properly, or follow the rules set by your regional Acer office on how to return it. Chapter 6 177 Exploded Diagrams Main Assembly 14 15 13 12 11 10 9 8 16 7 17 6 5 18 4 19 3 20 2 1 No. 178 Description Acer P/N 1 EL5 FRONT BEZEL ZUB ASSY SILVER 34EL5FBTN00 2 LCD(TFT)23” LTM230H01-A03 AA0230HT002 3 EL5LCD FRAME SUB ASSY 3SEL5LSTN00 4 EL5 MB (LYN)DIS W/O CPU 31EL5MB0020 Chapter 6 No. Description Acer P/N 5 TQ2G_3.3 CAMB_ARMB W/23” NBA230G3 ASSY 21HYECA00Q0 6 EL5 CPU ASSY (INT,LYNNFIELD 2.66) STN BSQ 23EL5CATN00 7 SS(64G) MMCRE645MPP-OVA STN BSQ ABSE64G5004 8 HDD (1TB) HDT721010SLA360 0A37993 STNBSQ AB721010011 9 EL5 BACK FRAME SUB ASSY 3YEL5BATN00 10 EL5 BACK COVER SUB ASSY RED 3Q3L5BCTN00 11 REAR COVER LEFT EL8(EBEL8001,REV3A) SILVER EBEL8001010 12 FRAME RAM COVER EL8 (FBEL8001,REV3A) FBEL8001010 13 REAR COVER RIGHT EL8(EBEL8002,REV3A) SILVER EBEL8002010 14 EL8 RAM COVER SUB ASSY RED 3REL8RCTN00 15 HINGE COVER EU EL8 (EBL8022,REV3A) RED EBEL8022010 16 HINGE(JAR) EL8 (FAEL8003,REV3A) FBEL8008010 17 EL5 CARD READER BOARD ASSY ENEL5CB0000 18 POWER SUPPLY 100.240V 250W DPS-250AB-53A AF250C00001 19 EL5 AUDIO BOARD ASSY 32EL5AB0000 20 DVD R/R W/RAM 30656280 AD7643SAR STN B AW07643S000 IMPORTANT: *The touchscreen control board and LCD panel must be returned together for RMA purposes. See “Removing the Touchscreen Control Board” on page 59. The touchscreen control board records the specific panel’s data, please do not separate these for RMA. Chapter 6 179 FRU List CATEGORY ACER DESCRIPTION ACER PART NO. ADD ON CARD 288-1N135-000AC GEFORCE G210M 512MB (64BITS) DDR3 SAMSUNG MXM3 VG.PCMG2.100 288-1N136-000AC GEFORCE GT240M 1GB (128BITS) DDR3 SAMSUNG MXM3 VG.PCMG2.400 AUDIO BOARD 55.SDB07.001 CARD READER BOARD 55.SDB07.002 POWER BOARD 55.SDB07.003 ODD BOARD 55.SDB07.004 B CAS BOARD 55.SCY07.005 INVERTER BOARD DA-4A12-QT03L 19.SCY07.001 INVERTER BOARD IV40157/T-LF 19.SCY07.002 Lite-On WN6602RH, Ralink RT3090 WLAN Lite-On WN6602RH, Ralink RT3090, 802.11b/g/n 1x1 WLAN (mini-car NI.10200.034 QMI QBT400UB Bluetooth Qcom Technology Inc., Broadcom BCM2046, Bluetooth2.1 + EDR, USB interface module BT.14500.001 CAMERA FO20FF-232H 2.0M 57.SDB07.001 CAMERA CNF925021004170LH 2.0M 57.SDB07.002 AverMedia A336-D Mini-Card WW Analog + DVB-T Digital TU.10500.052 AverMedia A336-A Mini-Card WW Analog + ATSC Digital TU.10500.051 AverMedia A325 Mini-Card ISDB-T/BS/CS w/o B-CAS card reader TU.10500.055 BOARD 180 Chapter 6 CATEGORY ACER DESCRIPTION ACER PART NO. POWER CORD POWER CORD 1.8M BLACK UK 3P 27.SC907.001 POWER CORD 1.8M BLACK SWISS 3P 27.SC907.002 POWER CORD 1.8M BLACK S.A 3P 27.SC907.003 POWER CORD 1.8M BLACK UK 3P 27.SC907.004 POWER CORD 1.8M BLACK IT 3P 27.SC907.005 POWER CORD 1.8M BLACK INDIA 3P 27.SC907.006 POWER CORD 1.8M BLACK DANISH 3P 27.SC907.007 POWER CORD 1.8M BLACK AUS 3P 27.SC907.008 POWER CORD 1.8M BLACK ARGENTINE 3P 27.SC907.009 POWER CORD 1.8M BLACK US BSMI 3P 27.SC907.010 POWER CORD 1.8M BLACK JP 2P 27.SC907.011 POWER CORD 1.8M BLACK US 3P 27.SC907.012 POWER CORD 1.8M BLACK CHINA 3P 27.SC907.013 POWER CORD 1.8M BLACK EU 3P 27.SCY07.001 CABLE - AUDIO/B TO MB 50.SDB07.001 LVDS CABLE 50.SDB07.002 HDD CABLE 50.SCY07.003 ODD CABLE 50.SDB07.003 CABLE - CONTROL BORAD TO SENSOR/R 50.SDB07.004 CABLE Chapter 6 CABLE - CONTROL BORAD TO SENSOR/L 50.SDB07.005 CABLE - MB TO CONTROL BOARD 50.SDB07.006 IR CABLE 50.SDB07.007 181 CATEGORY ACER DESCRIPTION ACER PART NO. INVERTER CABLE 50.SDB07.008 LED CABLE 50.SCY07.009 USB CABLE W/PORT 50.SCY07.010 POWER CABLE 50.SCY07.011 CARD READER CABLE 50.SDB07.009 HOME BUTTON CABLE 50.SCY07.016 BLUETOOTH CABLE 50.SCY07.013 TV TUNER CABLE 50.SCY07.014 TV EXTERNAL ANTENNA - DVB-T 50.SCY07.017 TV EXTERNAL ANTENNA - ATSC 50.G8507.011 ANTENNA 50.SCY07.018 CASE/COVER/BRACKET ASSEMBLY 182 FRONT COVER ASSY SILVER W/SPEAKER,H/BUTTON B,ANTENNA,USB PORT 60.SDB07.001 BACK COVER RED HDMI W/TV, IR, IR BLASKER, W/O B CAS 60.SDB07.002 BACK COVER RED HDMI W/O TV, W/O B CAS 60.SDB07.003 BACK COVER RED HDMI W/TV, W/ B CAS 60.SDB07.004 BACK COVER RED HDMI W/O TV, W/ B CAS 60.SDB07.005 RAM COVER - RED 42.SCY07.001 Chapter 6 CATEGORY ACER DESCRIPTION ACER PART NO. HINGE COVER 42.SCY07.002 REAR COVER SILVER - LEFT W/O B-CAS 60.SCY07.004 REAR COVER SILVER - LEFT W/B CAS 60.SCY07.005 REAR COVER SILVER - RIGHT 60.SCY07.006 LCD FRAME 33.SDB07.001 BACK FRAME 33.SDB07.002 FRAME RAM COVER 33.SCY07.003 HINGE 60.SCY07.007 ODD BRACKET 33.SCY07.004 HDD BRACKET 33.SCY07.005 MXM BRACKET 33.SCY07.006 SPEAKER SET 23.SCY07.005 THERMAL MODULE - UMA/DIS 60.SDB07.006 HEATSINK DIS 60.SDB07.007 FAN UMA - RIGHT 23.SDB07.001 FAN DIS - LEFT 23.SDB07.002 HEAT SINK Chapter 6 183 CATEGORY ACER DESCRIPTION ACER PART NO. CPU/PROCESSOR CPU Intel Core i5 750 LGA 2.66G 8M 1333 1156 95W B-1 KC.75001.CI5 CPU Intel Core i7 860 LGA 2.8G 8M 1333 1156 95W B-1 Quad Core KC.86001.CI7 CPU Intel Core i7 870 LGA 2.93G 8M 1333 1156 95W B-1 Quad Core KC.87001.CI7 CPU Intel Core i3 530 LGA 2.93G 4M 1333 1156 73W C-2 Dual Core KC.53001.CI3 CPU Intel Core i3 540 LGA 3.06G 4M 1333 1156 73W C-2 Dual Core KC.54001.CI3 CPU Intel Core i5 650 LGA 3.2G 4M 1333 1156 C-2 73W, Dual Core KC.65001.CI5 CPU Intel Core i5 660 LGA 3.33G 4M 1333 1156 C-2 73W Dual Core KC.66001.CI5 CPU Intel Core i5 661 LGA 3.33G 4M 1333 1156 C-2 87W, Dual Core KC.66101.CI5 CPU Intel Core i5 670 LGA 3.46G 4M 1333 1156 C-2 73W, Dual Core KC.67001.CI5 CPU Intel Pentium Dual-Core G6950 LGA 2.8G 3M 1066 1156 C-2 73W KC.69501.DEG HDD/HARD DISK DRIVE 184 HDD SEAGATE 3.5" 7200rpm 1000GB ST31000528AS(Pharaoh) SATA II 32MB LF F/W:CC44 KH.01K01.007 HDD HGST 3.5" 7200rpm 1000GB HDT721010SLA360 Saturn SATA II 16MB LF F/W:31B KH.01K07.002 HDD HGST 3.5" 7200rpm 1000GB HDS721010CLA332 (Jupiter) SATA II 32MB LF F/W:3EA KH.01K07.003 HDD WD 3.5" 5400rpm 1000GB WD10EADS-22M2B0 (GP500) SATA II 32MB LF F/W:01.00A01 KH.01K08.005 HDD WD 3.5" 5400rpm 2000GB WD20EADS-22R6B0 (GP500) SATA II 32MB LF F/W:01.00A01 KH.02K08.001 HDD WD 3.5" 5400rpm 1500GB WD15EADS-22P8B0 (GP500) SATA 32MB LF F/W:01.00A01 KH.15K08.001 HDD SEAGATE 3.5" 7200rpm 500GB ST3500418AS(Pharaoh) SATA II 16MB LF F/W:CC44 KH.50001.012 HDD HGST 3.5" 7200rpm 500GB HDS721050CLA362 (Jupiter) SATA II 16MB LF F/W:3EA KH.50007.012 HDD WD 3.5" 7200rpm 500GB WD5000AAKS-22V1A0 SATA II 16MB LF F/W:05.01D05 KH.50008.014 HDD HGST 3.5" 7200rpm 640GB HDT721064SLA360 Saturn SATA II 16MB LF F/W:31B KH.64007.001 HDD HGST 3.5" 7200rpm 640GB HDS721064CLA332 (Jupiter) SATA II 32MB LF F/W:3EA KH.64007.002 Chapter 6 CATEGORY ACER DESCRIPTION ACER PART NO. KEYBOARD Chapter 6 Keyboard CHICONY KG-0766 RF2.4 104KS Silver US with new color AC-MT-010 KB.RF403.245 Keyboard CHICONY KG-0766 RF2.4 104KS Silver Traditional Chinese with new color AC-MT-010 KB.RF403.246 Keyboard CHICONY KG-0766 RF2.4 104KS Silver Simplified Chinese with new color AC-MT-010 KB.RF403.247 Keyboard CHICONY KG-0766 RF2.4 104KS Silver US International with new color AC-MT-010 KB.RF403.248 Keyboard CHICONY KG-0766 RF2.4 104KS Silver Arabic/ English with new color AC-MT-010 KB.RF403.249 Keyboard CHICONY KG-0766 RF2.4 104KS Silver Thailand with new color AC-MT-010 KB.RF403.250 Keyboard CHICONY KG-0766 RF2.4 105KS Silver Spanish with new color AC-MT-010 KB.RF403.251 Keyboard CHICONY KG-0766 RF2.4 105KS Silver Portuguese with new color AC-MT-010 KB.RF403.252 Keyboard CHICONY KG-0766 RF2.4 105KS Silver Canadian French with new color AC-MT-010 KB.RF403.253 Keyboard CHICONY KG-0766 RF2.4 107KS Silver Brazilian Portuguese with new color AC-MT-010 KB.RF403.254 Keyboard CHICONY KG-0766 RF2.4 109KS Silver Japanese with new color AC-MT-010 KB.RF403.255 Keyboard CHICONY KG-0766 RF2.4 105KS Silver German with new color AC-MT-010 KB.RF403.256 Keyboard CHICONY KG-0766 RF2.4 105KS Silver Italian with new color AC-MT-010 KB.RF403.257 Keyboard CHICONY KG-0766 RF2.4 105KS Silver French with new color AC-MT-010 KB.RF403.258 Keyboard CHICONY KG-0766 RF2.4 105KS Silver Swedish with new color AC-MT-010 KB.RF403.259 Keyboard CHICONY KG-0766 RF2.4 105KS Silver UK with new color AC-MT-010 KB.RF403.260 Keyboard CHICONY KG-0766 RF2.4 105KS Silver Dutch with new color AC-MT-010 KB.RF403.261 Keyboard CHICONY KG-0766 RF2.4 105KS Silver Swiss/G with new color AC-MT-010 KB.RF403.262 Keyboard CHICONY KG-0766 RF2.4 105KS Silver Belgium with new color AC-MT-010 KB.RF403.263 Keyboard CHICONY KG-0766 RF2.4 105KS Silver Icelandic with new color AC-MT-010 KB.RF403.264 Keyboard CHICONY KG-0766 RF2.4 105KS Silver Norwegian with new color AC-MT-010 KB.RF403.265 Keyboard CHICONY KG-0766 RF2.4 104KS Silver Hebrew with new color AC-MT-010 KB.RF403.266 Keyboard CHICONY KG-0766 RF2.4 105KS Silver Slovenian with new color AC-MT-010 KB.RF403.267 Keyboard CHICONY KG-0766 RF2.4 105KS Silver Slovak with new color AC-MT-010 KB.RF403.268 185 CATEGORY ACER DESCRIPTION ACER PART NO. Keyboard CHICONY KG-0766 RF2.4 104KS Silver Russian with new color AC-MT-010 KB.RF403.269 Keyboard CHICONY KG-0766 RF2.4 105KS Silver Hungarian with new color AC-MT-010 KB.RF403.270 Keyboard CHICONY KG-0766 RF2.4 104KS Silver Greek with new color AC-MT-010 KB.RF403.271 Keyboard CHICONY KG-0766 RF2.4 105KS Silver Danish with new color AC-MT-010 KB.RF403.272 Keyboard CHICONY KG-0766 RF2.4 104KS Silver Czech with new color AC-MT-010 KB.RF403.273 Keyboard CHICONY KG-0766 RF2.4 105KS Silver Romanian with new color AC-MT-010 KB.RF403.274 Keyboard CHICONY KG-0766 RF2.4 105KS Silver Turkish with new color AC-MT-010 KB.RF403.275 Keyboard CHICONY KG-0766 RF2.4 105KS Silver Turkish-Q with new color AC-MT-010 KB.RF403.276 Keyboard CHICONY KG-0766 RF2.4 105KS Silver Arabic/ French with new color AC-MT-010 KB.RF403.277 Keyboard CHICONY KG-0766 RF2.4 104KS Silver Kazakh with new color AC-MT-010 KB.RF403.278 Keyboard CHICONY KG-0766 RF2.4 105KS Silver Nordic with new color AC-MT-010 KB.RF403.280 Keyboard CHICONY KG-0766 RF2.4 105KS Silver Spanish Latin with new color AC-MT-010 KB.RF403.281 Keyboard CHICONY KG-0766 RF2.4 105KS Silver Polish with new color AC-MT-010 KB.RF403.282 Keyboard CHICONY KG-0766 RF2.4 104KS Silver Turkmen with new color AC-MT-010 KB.RF403.279 Chicony wireless mouse RF2.4 MG-0766 with new colorACMT-010 MS.11200.063 USB IR RECEIVER RG-0618U-995L RV.11000.010 ODD PLDS Super-Multi DRIVE 12.7mm Slot DL 8X DL-8ATSH LF+HF W/O bezel SATA (HF + Win7) KU.0080F.012 Mainboard Intel H57 Intel H57 H57 Proprietary W/O 1394 LF UMA version MB.SC906.010 Mainboard Intel H57 Intel H57 H57 Proprietary W/O 1394 LF MB.SC906.007 MOUSE OPTICAL DRIVE MAINBOARD 186 Chapter 6 CATEGORY ACER DESCRIPTION ACER PART NO. MEMORY Memory SAMSUNG UNB-DIMM DDRIII 1333 1GB M378B2873EH1-CH9 LF 128*8 0.055um KN.1GB0B.030 Memory UNIFOSA UNB-DIMM DDRIII 1333 1GB GU502203EP0201 LF 128*8 0.065um KN.1GB0H.015 Memory SAMSUNG UNB-DIMM DDRIII 1333 2GB M378B5673EH1-CH9 LF 128*8 0.055um KN.2GB0B.014 Memory UNIFOSA UNB-DIMM DDRIII 1333 2GB GU512303EP0202 LF 128*8 0.065um KN.2GB0H.009 LCD PANEL W/TOUCH LCD 23 IN. TQ2 TOUCH MODULE W/CONTROL BOARD LPL FHD None Glare LM230WF1 TLA3 6K.SCY07.003 LCD 23 IN. TQ2 TOUCH MODULE W/CONTROL BOARD SAMSUNG FHD None Glare LTM230HT01 A03 6K.SCY07.004 PSU DELTA DPS-250AB-53A 250W Active PFC Custom "Open" Frame 100-127V/220-240V, EPA 5.0, PY.25009.012 PSU LITE-ON PS-5221-8AB 250W Active PFC Custom "Open" Frame 100-127V/220-240V, EPA 5.0 PY.2500B.005 POWER SUPPLY REMOTE CONTROLLER Chapter 6 Philips Remote Controller RC2604307/01BG for EMEA;pair with RV.11000.007 RT.11300.021 Philips Remote Controller RC2604302/01B MSFT code US;pair with OVU430008 RT.11300.022 Philips Remote Controller RC2604301/01B MSFT code EMEA;pair with OVU430008 RT.11300.023 SMK Remote Controller Japan RRS9003-3407EC Quatro Pulse RT.11300.026 Philips Remote Controller RC2604302/01B MSFT code US;pair with OVU430008 RT.11300.022 Philips Remote Controller RC2604301/01B MSFT code EMEA;pair with OVU430008 RT.11300.023 SMK Remote Controller Japan RRS9003-3407EC Quatro Pulse RT.11300.026 187 Appendix A Model Definition and Configuration Appendix A 188 189 Appendix A Appendix B Test Compatible Components This computer’s compatibility is tested and verified by Acer’s internal testing department. All of its system functions are tested under OS Linux, Windows® XP Home Edition, Windows® Vista, Windows® 7 Home Premium, Windows® 7 Professional, and Windows® 7 Starter. Refer to the following lists for components, adapter cards, and peripherals which have passed these tests. Regarding configuration, combination and test procedures, please refer to the Aspire one series Compatibility Test Report released by the Acer Mobile System Testing Department. Appendix B 190 191 Appendix B Appendix C Online Support Information This section describes online technical support services available to help you repair your Acer Systems. If you are a distributor, dealer, ASP or TPM, please refer your technical queries to your local Acer branch office. Acer Branch Offices and Regional Business Units may access our website. However some information sources will require a user i.d. and password. These can be obtained directly from Acer CSD Taiwan. Acer's Website offers you convenient and valuable support resources whenever you need them. In the Technical Information section you can download information on all of Acer's Notebook, Desktop and Server models including: • Service guides for all models • User's manuals • Bios updates • Software utilities • Spare parts lists • TABs (Technical Announcement Bulletin) For these purposes, we have included an Acrobat File to facilitate the problem-free downloading of our technical material. Also contained on this website are: • Detailed information on Acer's International Traveler's Warranty (ITW) • Returned material authorization procedures • An overview of all the support services we offer, accompanied by a list of telephone, fax and email contacts for all your technical queries. We are always looking for ways to optimize and improve our services, so if you have any suggestions or comments, please do not hesitate to communicate these to us. Appendix C 192 Index B Removing 48 Base Assembly M Removing 47 Main Unit Disassembly BIOS Flowchart 42 vendor 14 Version 14 BIOS Utility 23–36 Advanced 27 Exit 36 Navigating 23 PC Health 36 Power 36 Save and Exit 36 System Security 36 Board Layout Model Definition 188 O Online Support Information 192 P Panel 7 front 7 S Top View 175 System D Block Diagram 6 Disassembly T General Information 40 Test Compatible Components 190 Disassembly Requirements 40 U F Undetermined Problems 167 FRU (Field Replaceable Unit) List 177 utility I BIOS 23–36 Intermittent Problems 167 J W Windows 2000 Environment Test 190 Jumper and Connector Locations 175 Top View 175 K Keyboard Usage 11 L LCD Bezel Removing 50 LCD Brackets Removing 58 LCD Cable Removing 58 LCD Module 193 194 195 196