1
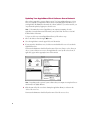
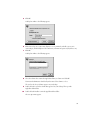
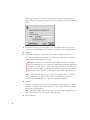
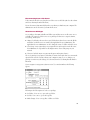
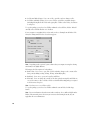
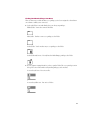
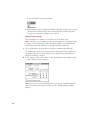
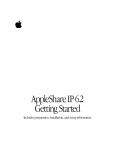
AppleShare Client 3.8 User’s Manual K Apple Computer, Inc. © 1998 Apple Computer, Inc. All rights reserved. Under the copyright laws, this manual may not be copied, in whole or in part, without the written consent of Apple. Your rights to the software are governed by the accompanying software license agreement. The Apple logo is a trademark of Apple Computer, Inc., registered in the U.S. and other countries. Use of the “keyboard” Apple logo (Option-Shift-K) for commercial purposes without the prior written consent of Apple may constitute trademark infringement and unfair competition in violation of federal and state laws. Every effort has been made to ensure that the information in this manual is accurate. Apple is not responsible for printing or clerical errors. Apple Computer, Inc. 1 Infinite Loop Cupertino, CA 95014-2084 408-996-1010 http://www.apple.com Apple, the Apple logo, AppleShare, AppleTalk, Mac, and Macintosh are trademarks of Apple Computer, Inc., registered in the U.S. and other countries. Balloon Help and Finder are trademarks of Apple Computer, Inc. Other company and product names mentioned herein are trademarks of their respective companies. Mention of third-party products is for informational purposes only and constitutes neither an endorsement nor a recommendation. Apple assumes no responsibility with regard to the performance or use of these products. Simultaneously published in the United States and Canada. 1 AppleShare Client 3.8 User’s Manual How to Use This Manual This manual describes how to upgrade and use your AppleShare Client 3.8 software. Print a copy of this manual so that it is available for easy reference. System Requirements You’ll get the best performance from your AppleShare network and be able to use new features (such as being able to cancel a connection that is taking a long time to establish itself ) by installing the following software: m Mac OS 8.1 or later (which includes Open Transport 1.3.1) m AppleShare Client 3.8 The minimum software required to use AppleShare Client 3.8 is system software version 7.6 or later and Open Transport 1.1.2 or later. Installing this software will allow you to use AppleShare Client 3.8, but you won’t have the added enhancements of Mac OS 8.1. Updating Your System Software To use AppleShare Client 3.8 you need to upgrade your system software to version 7.6 or later and configure your AppleTalk and TCP/IP control panels. Contact your server administrator for information about upgrading your system software and configuring the AppleTalk and TCP/IP control panels for your network. Note: If you upgraded from system software version 7.6 to a later version, or if you used the Mac OS Setup Assistant and the Internet Setup Assistant after installing Mac OS 8.1, then your AppleTalk and TCP/IP settings are already set up. Note: To determine the version of system software your computer is running, choose About This Macintosh (or About This Computer, depending on the version of system software your computer is currently using) from the Finder’s Apple (K) menu. 3 Updating Your AppleShare Client Software Over a Network After you have upgraded to system software version 7.6 or later and Open Transport 1.1.2 or later, you can update your AppleShare Client software by installing AppleShare Client 3.8. If your AppleShare IP administrator has made the software available to you on the network, you can perform the update by logging on to the file server. Note: To determine the version of AppleShare your computer is running, select the AppleShare icon in the Extensions folder inside your System Folder. Then choose Get Info from the Finder’s File menu. To log on to a file server to install AppleShare Client 3.8, follow these steps: 1 Choose the Chooser from the Apple (K) menu. 2 Select the AppleShare icon in the upper-left box of the window. 3 If your network is divided into zones, click the zone in which the file server is located in the AppleTalk Zones list. Your network administrator should tell you the name of the zone (if any) to select. After you choose a zone or if there are no zones, the AppleShare file servers (in the selected zone, if applicable) appear in the upper-right corner of the window. Note: Depending on the version of system software that your computer is using, the Chooser window may look slightly different. 4 Click the name of the file server that is sharing the AppleShare Client 3.8 software in the “Select a file server” list. Your network administrator should tell you the name of the file server to select. 4 5 Click OK. A dialog box similar to the following appears. 6 Click Guest to log on as a guest user (if guest access is permitted on the file server you’re connecting to). Or click Registered User and enter your name and password (if you have one). 7 Click OK. A dialog box similar to the following appears. 8 Select the volume that contains the AppleShare Client 3.8 software and click OK. Your network administrator should tell you the name of the volume to select. The icon for the selected volume appears on your desktop. 9 10 Double-click the icon for the volume that appeared on your desktop. Then open the AppleShare Client folder. Double-click the Installer icon in the AppleShare Client folder. A license agreement appears. 5 11 To display the license agreement in the language that is appropriate for you, choose a language from the pop-up menu. 12 Read the license agreement and if you agree to its terms, click Agree. The following dialog box appears. 13 Verify that your computer’s startup disk is named in the Installer window as the destination disk. If the wrong disk is shown, click Switch Disk until the name of your startup disk appears. 14 Click Install. 15 When a message tells you that installation is complete, restart your computer. AppleShare Client Quick Reference This section provides at-a-glance directions for the most common AppleShare tasks. Your AppleShare IP or network administrator should be able to help you with any of these tasks. Connecting to a Server You can use the AppleShare software to connect to a file server on your network. 6 1 Choose the Chooser from the Apple (K) menu. 2 Click the AppleShare icon in the upper-left box of the window. If your network contains zones, they are listed in the AppleTalk Zones list. When you select a zone, AppleShare file servers in that zone are listed in the upper-right portion of the window. Note: Depending on the version of system software that your computer is using, the Chooser window may look slightly different. 3 Click the zone (if any) and the file server you want to connect to. Your network administrator should tell you the name of the zone (if any) to select. A file server may be available in more than one zone. For best performance, connect to the server that is in the same zone as your own computer. ( Your computer’s zone is displayed in the “Current zone” pop-up menu in the AppleTalk control panel.) Important If your computer is set up for TCP and if the file server you selected is set up for TCP, the connection is made over TCP automatically. Otherwise, the connection is made over AppleTalk. Note: If the server and client are not on the same AppleTalk network, the server you want to connect to may not appear in the “Select a file server” list. To connect to the server, click the Server IP Address button and enter the server’s IP address or name in the dialog box that appears. Then click OK. 4 Click OK. 7 If it takes more than a few seconds to contact the server, a connection status dialog box appears. When your computer is connected to the server, a dialog box similar to the following appears. 5 Click Guest to log on as a guest user (if guest access is permitted on the file server you’re connecting to). Or click Registered User and enter your name and password (if you have one). 6 Click OK. 7 In the window that appears, click the name of the volume or volumes you want to use. If you click the checkbox next to the name of a volume, your computer will connect to the volume automatically the next time it starts up. Warning Don’t connect to more than one volume with the same name—even if the volumes are in different zones; the volumes may actually represent the same volume that is located on a server that can be accessed in several zones. If you log on to the same server in two zones and you attempt to copy the same files or folders from one icon representing a volume on the server to another icon representing the same volume, data loss will occur. Note: The files and folders that you can see on the server depend on the access privileges that your administrator has assigned to the volume. For more information about access privileges, ask your administrator or see “About Access Privileges” on page 9. 8 Click OK. When the connection is made, the selected volume appears on your desktop. To see the files and folders it contains, double-click the volume’s icon. To cancel the connection, click Cancel in the Connection Status window. Note: To determine whether you have connected to a server over TCP or AppleTalk, select a volume’s icon and choose Get Info from the Finder’s File menu. 9 8 Close the Chooser. Disconnecting From a File Server To disconnect from a file server, drag the icon of the server to the Trash. (Or select the volume and choose Put Away from the File menu.) You are disconnected automatically from the server when you shut down your computer. The administrator can also disconnect you from the file server. About Access Privileges Access privileges determine what files and folders you and other users on a file server can see or change. The owner of a folder can set access privileges for three user categories: Owner, User/Group, and Everyone. m “Owner,” by default, is the user who created a folder that is shared over a network. All files and folders on the file server are owned by the AppleShare IP server administrator. The AppleShare IP server administrator can also change the owner of a folder on the file server. m “User/Group” is any registered user or group in the Users & Groups List on the file server. Your administrator is responsible for entering the names of users and groups on your network. m “Everyone” includes anyone on your network (guests and registered users). The access privileges you assign to a folder that you want to share with others on your network depend on the version of system software your computer is using. To see or change access privileges to an item on your desktop, select the item, then choose Sharing from the Finder’s File menu. If your computer is using system software version 7.6, a window similar to the following appears. Following are brief descriptions of each access privilege: m See Folders: Users can see, open, and copy folders. m See Files: Users can see, open, and copy files. m Make Changes: Users can copy files or folders to a folder. 9 m See Files and Make Changes: Users can see files, open files, and save changes to files. m See Folders and Make Changes: Users can see folders, open folders, and make changes. (including deleting files from a folder and copying files or folders to the folder); also known as a drop box. To copy the privileges you selected to all folders within the selected folder, click the “Make all currently enclosed folders like this one” checkbox. If your computer is using Mac OS 8.0 or later, and you choose Sharing from the Finder’s File menu, the sharing window for the selected item appears. Note: Depending on the version of system software that your computer is using, the sharing window may look slightly different. Following are brief descriptions of each privilege: m Read & Write: Users can see, open, and copy files and make changes to the contents of the share point (including creating, deleting, moving, and modifying files). m Read Only: Users can see, open, and copy files and folders. m Write Only: Users can change the contents of the share point by moving files and folders in or to it, but cannot see files or folders. A folder to which the Write Only privilege is assigned is also known as a drop box. Note: Users have no access to folders or files. To copy the privileges you selected to all folders within the current folder, click the Copy button. Note: For more information about the items in these windows, choose Balloon Help from the Finder’s File menu and point to the item you’re interested in learning about. Or, ask your AppleShare IP server administrator. 10 Finding Out What Privileges You Have There are three ways to find out what access privileges you’ve been assigned to a shared item on a volume to which you’re connected. m Look at the folder icons in the Finder; the icons show your privileges. Tabbed folder: You are the owner of the folder. Plain folder: You have some access privileges to the folder. Locked folder: You do not have any access privileges to the folder. Locked folder with arrow: You only have the Make Changes privilege to the folder. m If your computer is using Mac OS 8.0 or later, open the folder. The access privilege icons in the top-left corner of the window tell you what privileges you do not have. A crossed-out file icon: You can’t see files. A crossed-out folder icon: You can’t see folders. 11 A crossed-out pencil: You can’t make changes. m Click the folder and choose Sharing from the Finder’s File menu. A window shows you who owns the folder and what privileges you have for the folder. If you own the folder, this is also where you can change the privileges you’ve assigned. Setting Access Privileges You can change the access privileges to folders that you own on the file server. Note: You can also set access privileges to items on your hard disk, then make them available to others on your network using the built-in file sharing capabilities of your Macintosh. For more information about file sharing, choose Help from the Finder’s Help menu. 1 Select a folder that you own on the file server and choose Sharing from the File menu. The sharing window for the selected item appears. The sharing window may look different depending on the version of system software on your computer. For more information, see “About Access Privileges” on page 9. 2 If your computer is using system software 7.6, click the checkboxes of the privileges you want to assign to this item so that an X appears. Note: If you are connected to an AppleShare IP file server, the only combinations that take effect are See Folders and See Files; See Folders, See Files, and Make Changes; and Make Changes. 12 3 If your computer is using Mac OS 8.0 or later, make sure the “Use enclosing folder’s privileges” checkbox is not checked. Then choose the Owner, User/Group, and guest privileges you want from the pop-up menus to the right. For more information on the user categories or privileges, see “About Access Privileges” on page 9. 4 Close the window and click Save. 13