1
TM
TM
TM
Quick Reference Guide
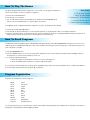
Front Panel Controls
Pitch Bend Wheel - temporarily changes the instrument’s tuning
Modulation Wheel - adds effects like vibrato and tremolo; its effect can be
different from one Program to the next
Master Volume - determines the output level of the analog outputs
Controller A-C Sliders - modulates a sound in Program or Mix mode
Controller D / Edit Value Slider - modulates a sound in Program or Mix mode,
changes the currently selected parameter in any of the Edit modes
Value buttons - increase or decrease the currently selected parameter, or let you
scroll backward and forward through Mixes or Programs
Edit Select button - determines which Edit Mode is selected (Mix Edit, Program
Edit, Effects Edit or Global Edit)
Store button - lets you store an edited Program or Mix into internal memory, or
a sound card, or to external MIDI devices
Page buttons - move the display between the various pages of a selected Function
Mix button - selects Mix Mode
Program button - selects Program Mode
Bank buttons - let you switch between banks in Mix/Program Play Mode
Compare button - compares an edited Mix or Program to its original version
Global button - gives you access to parameters that control the entire instrument
including master tuning/transposition and keyboard sensitivity
00-120 Buttons - in Program and Mix modes these select the sound group (Pianos,
Brass, etc.), in Edit modes these select parameters to be edited
0-9 Buttons - in Mix or Program modes these select individual Programs/Mixes, in
Edit modes these select parameters to be edited
QS Quick Facts
Welcome to the QS-Series Synthesizer Quick Reference Guide. This is a supplement to the manual designed to quickly get you up
and running with these keyboards. Some of the key features of the QS include:
• 16 MB of Sound ROM standard
• Expandable to 32 MB via our 8 MB PCMCIA format QCards
• Up to 16 MB of user sample storage available through Flash RAM PCMCIA cards
• True 64 Note Polyphony
• 4 High Quality Multieffects Busses
• ADAT Optical Digital Outputs
• 4 Independant Analog Outputs
• 4 Realtime Controller Sliders
• Built-In Serial port for direct Mac™ or PC connection
• Extensive Tracking Generator and Matrix Modulation sections
• 88 Note Weighted (QS8.1), 76 Note Semi-Weighted (QS7.1), or 61 Note Semi-Weighted (QS6.1)
Keyboard with Aftertouch and Release Velocity
• Included CD-ROM with Sequencing and Sound Editing Applications and Files
For more information please refer to the QS Reference Manual that comes with your keyboard.
How To Play The Demos
The QS is equipped with five demo sequences to show a few of its Programs and Effects in
various musical styles. To listen to the demo sequences:
1. Press and hold the MIX button.
2. Press the 0,1,2,3 or 4 button.
3. You can adjust the volume in the headphones or speakers with the VOLUME knob,
and you can press the MIX button to stop the demo at any time.
Demo Credits:
0. “Jinx” by James Reynolds
1. “Bang!” by Taiho Yamada
2. “Dreamcurrents” by Erik Norlander
3. “Iron Man” by Keith Emerson
4. “Camera Obscura” by David Bryce
Some QCards are also equipped with demo sequences. To play a card sequence (if available):
1. Press and hold the SEQ START button.
2. Press the 00, 10, 20, 30 or 40 button to access Card A sequences, or 50, 60, 70, 80 or 90 to access Card B sequences
3. Press any of the 0-9 buttons on the keypad. A card can be programmed to hold up to 50 Standard MIDI File sequences with Sound
Bridge software. See the instructions for Sound Bridge for more information.
How To Recall Programs
The QS-Series synths have 640 Programs and 500 Mixes available internally, and adding PCMCIA RAM cards give you access to up to
2,048 Programs and 1,600 Mixes. With this many sounds available, we have given users several ways to recall specific Programs. To
recall a Program on the QS:
1. Press the PROGRAM button.
2. Press the <BANK> buttons to choose a Program bank. Available choices are User, Preset1, Preset2, Preset3, GenMIDI, and up to
11 Card banks if a sound card is inserted into each slot.
3. To call up an individual Program:
a. Press the number of the Program you want to recall on the keypad, or
b. Press the VALUE up/down buttons to scroll through the Programs.
So, if you want to hear a Grand Piano Program, press the BANK> button until you have selected Bank “Pre1”, and then press 00 and
0 on the number pad. This will select Program 00, “TrueStereo”.
Program Organization
Programs are arranged into eleven catagories:
00-09:
10-19:
20-29:
30-39:
40-49:
50-59:
60-69:
70-79:
80-109:
110-119:
120-127:
Pianos
Chromatic
Organ
Guitar
Bass
Strings
Brass
Winds
Synth
Rhythm/FX
Drums/Percussion
So, following this layout, you can find a bass sound in any number starting with 40, such as 40, 42, 45, etc. (Exception: The Preset 4
{Pre4} bank is arranged in the General MIDI standard.)
Using The Modulation Sources
Each Program has the Modulation Wheel assigned to the most logical parameter. For example, the Modulation Wheel may be
assigned to Vibrato on a Brass sound and Reverb Mix on a Piano sound.
The A-D Controller Sliders also transmit controller data which can affect local synthesizer functions, MIDI data, or both. This allows
you to alter the currently recalled Program (or Mix), or control external MIDI devices using the QS as a master controller.
For some great examples of the Controller Sliders’ use as real time controllers, try them on the following Programs: Preset 1:23
“ABCDrawbar”, Preset 1:96 “Kalimpanad”, Preset 2:68 “Orchestral”, Preset 2:117 “Circles”, User:15 “Sebastian”.
How To Recall Mixes
A Mix is a combination of up to 16 Programs. These Programs can be split or layered across the keyboard, for a huge live
performance sound, or separated on different MIDI channels for multitimbral sequencing. A mix can be recalled in the same way a
Program is recalled:
1. Press the MIX button.
2. Press the <BANK> buttons to choose a Mix bank. Available choices are User, Preset1, Preset2, Preset3, GenMIDI, and up to 11 Card
banks if a sound card is inserted in each slot.
3. To call up an individual Mix
a. Press the number of the Mix you want to recall on the keypad, or
b. Press the VALUE up/down buttons to scroll through the Mixes.
Editing A Mix
One of the most popular uses for Mix mode is configuring a Multitimbral MIDI setup. In Mix mode, you can control not only what
Program is on each MIDI channel, but also where it is panned, what the relative volume level is in the mix, its effects level and which
effects buss it is routed to, relative transposition between channels, and many other factors. This allows you to create an entire production, including the effects and the mixdown, all in one Mix location. For example, “Multitmbrl” (User, #00) has all 16 MIDI channels assigned to different programs for easy setup with a sequencer. To assign a program to a MIDI channel in Mix mode:
1. Press MIX, then PAGE>. The number “1” on the lower part of the display should be flashing.
2. Choose a Program for this channel using the BANK and Keypad buttons.
3. Press the <PAGE> buttons to select the channel that you want to edit. The number for the selected MIDI channel will flash.
Each channel in a Mix can have its own Effects buss setting and effects send amount. This means that each Program in a split or
layer, or each Program in a Multitimbral MIDI setup, can have effects individually assigned. To assign effects to a Program in Mix mode:
1.
2.
3.
4.
Press MIX, then EDIT SELECT.
Press the LEVEL button (60-Brass Button).
Press PAGE> until the top of the display reads “P6” (Page 6).
Use the Value Buttons to select which of the four Effects busses will be used for the currently selected MIDI Channel.
See the QS Reference Manual for an explanation of the “PROG” setting.
5. Press <PAGE to reach “P5” (Page 5).
6. Use the Edit Value Slider to adjust the Effects level of the currently selected MIDI Channel.
Editing Effects
The QS-Series synthesizers have one of the most powerful effects sections ever built into a synthesizer. Four high quality multi-effects
busses, based on our Q2™ Master Effects Processor, give you complete control over your music. Each Program in a Mix, or each
Sound in a Program, can be routed to one of four effects busses. This allows you to add chorus to a bass, reverb to a snare drum,
and delay and reverb to a lead sound without being forced to add effects where they aren’t wanted.
For example, to edit the reverb decay in an effects setup:
1. In Program mode, press EDIT SELECT 2 times.
2. Press the REVERB button (100-SYNTH 3 button).
3. Press the PAGE> button until the display reads “Rvb Decay”.
4. Move the Edit Value Slider to edit the Decay time.
You can follow the above procedure to edit other effects by choosing a different effect type in step #2 and adjusting the appropriate
parameters for that effect type. The QS offers reverb, delay, EQ, stereo chorus, flanging, overdrive, and several other effect types
onboard.
Editing A Program
Before editing a Program, it is important to understand the organization of sounds in the QS Synths. A Program is made up of up
to 4 Sounds and the Parameters that are common to all of them (name, etc.). When editing a Program on the QS, you will be adjusting
one of these Sounds in the layer. You can choose which Sound you are editing by pressing the Sound 1, 2, 3, or 4 buttons (00, 10, 20,
or 30 buttons).
Most people begin programming by modifying existing Programs that are close to the sound they are going for. If you want to write
a new Program from scratch, one way to do this is to reset the keyboard. The QS can be re-initialized without erasing any programs,
and by doing this you create an empty edit buffer with default settings to work with. To re-initialize your keyboard, turn on the
power while holding the 0 and 3 Buttons. The Global menu settings will be returned to their default settings when you do this.
Editing on the QS is made easy with an array of dedicated edit buttons and the Edit Value Slider. To edit a Program:
1. Press PROGRAM, then EDIT SELECT.
2. You can select which Sound, from 1 to 4, you want to edit by pressing the 00, 10, 20 or 30 button.
3. Press the VOICE button (40 button) to view which sample is assigned to this Sound. The Edit Value Slider edits which Voice Group
the sample is from, and you can page forward to choose the specific sample.
4. Press the PITCH button (60 button) to edit the sound’s Pitch. The Edit Value Slider edits the semitone tuning of the Sound. Press
PAGE> to reach other Pitch parameters.
5. Press the FILTER button (70 button) to edit the Filter settings. The Edit Value Slider edits the Filter Frequency. Press PAGE> to reach
other Filter Parameters.
6. Press any of the other Keypad buttons to view and edit other parameters in the Program. There is a wide variety of parameters
to edit in the pages of Edit Functions. See your QS Reference Manual for more information about editing Programs.
©1999 Alesis Corporation
Specifications Subject To Change Without Notice 7-52-0022-A 6/00