1
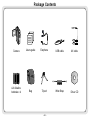
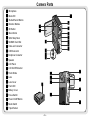
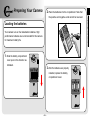
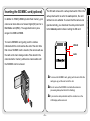
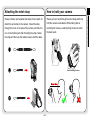
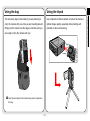
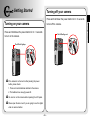
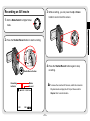
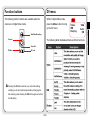
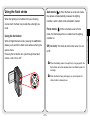
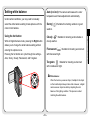
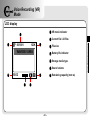
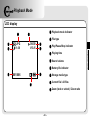
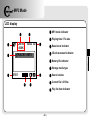
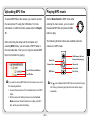
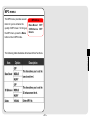
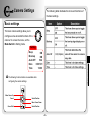
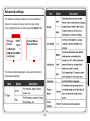
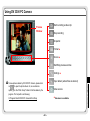
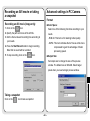
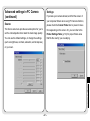
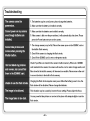
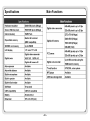
Preparing Your Camera Getting Started Digital Video Mode Digital Camera Mode Voice Recording Mode Playback Mode MP3 Mode Camera Settings TV Output Copying Files to PC Using PC Camera PocketDV 3300 Users Manual English Welcome Dear user, thanks for purchasing this product. Much investment in time and effort has gone into its development, and it is our hope that it will give you many years of trouble-free service. Safety Notice 1. Do not drop, puncture or disassemble the camera; otherwise the warranty will be voided. 2. Avoid all contact with water and dry hands before using. 3. Do not expose the camera to high temperature or leave it in direct sunlight. Doing so may damage the camera. 4. Use the camera with care. Avoid pressing hard on the camera body. 5. For your own safety, avoid using the camera when there is a storm or lightning. 6. Avoid using batteries of different brands or types at the same time. There is potential of explosion by doing that. 7. Remove batteries during long periods between usage, as deteriorated batteries may affect the functionality of the camera. 8. Remove batteries if they show signs of leaking or distortion. 9. Use only the accessories supplied by the manufacturer. 10. Keep the camera out of the reach of children. ~1~ Package Contents Camera Users guide Earphone USB cable AV cable AA Alkaline batteries x 4 Bag Tripod Wrist Strap Driver CD ~2~ Camera Parts Microphone Back LED Shutter/Record Button Direction Buttons OK Button Menu Button Wrist Strap Hook SD/MMC Card Slot Video-out Connector USB Connector Earphone Connector Speaker LCD Panel LCD On/Off Detector Flash Strobe Lens Lens Cover Front LED Battery Cover Focus Switch Power On/Off Button Mode Switch Tripod Socket ~3~ Preparing Your Camera 2. Place the batteries into the compartment. Note that Loading the batteries Your camera runs on four AA alkaline batteries. High performance batteries are recommended for this camera for maximum battery life. 1. Slide the battery compartment cover open in the direction as indicated. 3. After the batteries are properly installed, replace the battery compartment cover. ~4~ Preparing Your Camera the positive and negative ends cannot be reversed. Inserting the SD/MMC card (optional) The SD card comes with a write-protect switch. When the will become non-writable. To ensure that the camera can camera can store data on a Secure Digital (SD) card or a operate normally, you should set the write-protect switch MultiMedia card (MMC). The supported memory size to the Unlock position before inserting the SD card. ranges from 8MB to 256MB. To insert a SD/MMC card, gently push the card as Unlock indicated until the card reaches the end of the slot. Note that once a SD/MMC card is inserted, the camera will use Lock the card as the main storage media. Files stored in the camera's built-in memory will become inaccessible until the SD/MMC card is removed. To remove the SD/MMC card, gently push the card. After the card pops up, pull the card out of the slot. Do not remove the SD/MMC card while the camera is processing data (when the LED is flashing). If you insert a write-protected card, the media icon on the LCD display will become red. ~5~ Preparing Your Camera write-protect switch is set to the Lock position, the card In addition to 16MB (128Mbits) built-in flash memory, your How to hold your camera Please unfasten and separate the strap into two parts. To Please put your hand through the wrist strap and firmly attach the wrist strap to the camera, thread the strap hold the camera as illustrated. While taking stills or through the hook on the side of the camera, and then the recording AVI movies, avoid blocking the lens to retain one on the bottom part. After threading the strap, fasten the best result. the strap and then use the leather wrap to hold the strap. Avoid blocking the lens. ~6~ Preparing Your Camera Attaching the wrist strap Using the tripod The accessory bag comes handy if you are planning to Use a tripod to minimize camera movement and ensure carry the camera with you while you are travelling around. optimal image quality, especially while shooting self- Simply put the camera into the bag as indicated, and you portraits or video conferencing. are ready to carry the camera with you. Tight Loose Avoid severe impact to the camera body even it is placed in the bag. ~7~ Preparing Your Camera Using the bag Getting Started Turning off your camera Press and hold down the power button for 2 ~ 3 seconds to turn off the camera. Press and hold down the power button for 2 ~ 3 seconds The LED will go out. to turn on the camera. The LED will light up. If the camera is not turned on after pressing the power button, please check: 1. There are four AA batteries installed in the camera. 2. The batteries have enough power left. You can turn on the camera without opening the LCD panel. Please open the lens cover if you are going to use the digital video or camera function. ~8~ Getting Started Turning on your camera Setting the date and time 4. Repeat step 2 and enter the When you power on the camera for the first time, you 12 : 00 : 00 set time. Note that the second digits are not adjustable. After to Setting mode. the correct time has been set up, press the OK button to confirm the setting. 2. Press the Up or Down button to highlight Date, and then press the OK button or the Right button to enter the sub-menu. Setting Beep ON Boot-up ON Auto Off 10m 03/01/01 Date Time 12:00 While operating the camera, pressing the Menu button can bring up a sub-menu under most circumstances. The menu items vary according to the mode you select. When a submenu is being shown on the screen, you can use the illustrated function buttons to make your selection. 3. Press the Left or Right button Date Move Cursor Up to move the cursor. Press the Up or Down button to change Cancel 2003 / 01 / 01 Confirm Move Cursor Down Cancel/Exit the value. After the correct date has been set up, press the OK button to confirm the setting. ~9~ Confirm Getting Started method described in step 3 to need to set up the date and time: 1. Set the Mode Switch Time Time sub-menu. Use the same Checking the media and power status Tips for best shooting Keep the focus set to However, you can easily check the media type and power Make sure your subject is well lit from the front. status on the LCD display. except for close-ups. Keep the camera level and steady when releasing the shutter. Storage media indicator: Make sure you have adequate light when taking stills : The camera is using the built-in memory for file or recording AVI movies. storage. : The camera is using a memory card for file storage. For stable and smooth image Power status indicator: quality, move the : Full battery life. camera slowly : Adequate battery life. during filming. : Low battery life. : Empty battery life. Please replace the batteries immediately when the icon is flashing red. When the camera is using a SD/MMC card as main storage media, files stored in the camera's built-in memory will become inaccessible until the card is removed. For details under different modes, please refer to the respective chapters. Make sure you have adequate light ~ 10 ~ Getting Started The LCD display varies according to the operation mode. Storage capacity chart The following chart is estimated based on a 64MB SD card. Actual capacity ~ 11 ~ Getting Started may vary (up to +5%) depending on the environment and color condition. Digital Video (DV) Mode LCD display Recording indicator 00:00 QVGA Fine Recording time lapse Image resolution Image quality Battery life indicator 1. 00 06:20 Storage media type Remaining capacity (mm:ss) Zoom ratio ~ 12 ~ Digital Video Mode DV mode indicator Recording an AVI movie 3. While recording, you can press the Up or Down button to zoom in/out the screen. 1. Set the Mode Switch to Digital Video mode. Digital Video Mode 2. Press the Shutter/Record button to start recording. 4. Press the Shutter/Record button again to stop recording. Shutter/Record button Recording indicator Minute Second 00:00 To review the recorded AVI movies, switch the camera to Playback mode and play the AVI clips. Please refer to QVGA Fine Chapter 6 for more information. 1. 00 260 ~ 13 ~ Function buttons DV menu The following function buttons are available while the While in Digital Video mode, camera is in Digital Video mode: press the Menu button to bring VGA Auto ON Start/Stop Recording Zoom In The following table illustrates all items and their functions. Zoom Out DV Menu AE Lock Pressing the OK button will lock your current AE setting, enabling you to shoot other subjects without changing the AE metering value. Pressing the OK button again will unlock the AE setting. ~ 14 ~ Digital Video Mode up the DV menu. DV Video WB Display Digital Camera Mode LCD display Digital Camera mode indicator Flash indicator White balance indicator Image resolution Image quality 1. 00 EV+1 260 Battery life indicator Storage media type Remaining capacity (pic.) Exposure compensation value Zoom ratio ~ 15 ~ Digital Camera Mode Self-timer indicator 1280 Fine Taking a still 3. Before shooting, you can press the Up or Down button to adjust the zoom ratio. 1. Set the Mode Switch to Digital Camera mode. Digital Camera Mode 2. Use the Focus Switch to set focus as appropriate. 4. Press the Shutter/Record button to take a still. 16"~ (40cm~ ) Shutter/Record button 12"~16" (30cm~40cm) ~ 16 ~ Using the flash strobe Auto mode ( A ): When the flash is set to Auto mode, the camera will automatically measure the lighting When the lighting is not sufficient for your shooting condition, and the flash will be activated if needed. environment, the flash can provide the extra light you need. ): When the flash is set to Force mode, the flash always fires no matter how the lighting condition is. While in Digital Camera mode, pressing the Left button allows you to switch the flash mode without entering the Off (no icon): The flash will not function when it is set options menu. to Off. Pressing the hot button can cycle through three flash modes - Auto, Force, Off. When the battery power is low (with only one gauge left), the flash strobe cannot be activated due to insufficient power for recharge. While the flash is being recharged, you cannot press the shutter button to take pictures. ~ 17 ~ Digital Camera Mode Using the hot button Force mode ( Setting white balance Auto (no icon): The camera will measure the color temperature and make adjustments automatically. Under certain conditions, you may need to manually select the white balance setting to take pictures with the Sunny ( correct color balance. weather. Using the hot button Cloudy ( While in Digital Camera mode, pressing the Right button cloudy weather. ): Suitable for shooting outdoors in good allows you to change the white balance setting without entering the options menu. Fluorescent ( Pressing the hot button can cycle through five settings - with fluorescent light. ): Suitable for shooting environment Auto, Sunny, Cloudy, Fluorescent, and Tungsten. Tungsten ( ): Suitable for shooting environment with incandescent light. White balance: When the human eye sees an object, it adapts to the object so that a white object always looks white. However, a digital camera sees an object as white by adjusting the color balance of the lighting condition. This process is called matching the white balance. ~ 18 ~ Digital Camera Mode ): Suitable for shooting under shades or Using the self-timer Setting exposure compensation 1. While in Digital Camera mode, press the Menu button Setting the EV value enables you to manually control the brightness of the taken stills. to bring up the Camera menu. 1. Press the Menu button to bring up the Camera menu. and then select ON in the sub-menu. Then press the Menu button to exit. Camera Strobe AUTO ImageSize 2M SelfTimer ON DateStamp OFF Display OFF Highlight the Camera tab, and press the Right button to select the Advanced tab. 2. Highlight the Exposure item, and then select a desired EV value in the sub-menu. The 3. When the Shutter/Record button is pressed, the larger the number is, the camera will have ten seconds delay before taking a Advanced Quality Fine Exposure 0 WB AUTO brighter the stills will be. picture. After the shutter fires, the SelfTimer will be automatically disabled. Setting the value too high may cause the pictures to appear over-exposed. 10 ~ 19 ~ Digital Camera Mode 2. Highlight the SelfTimer item, Function buttons Camera menu The following function buttons are available while the The Camera menu provides several items for you to fine- camera is in Digital Camera mode: tune the camera function. To bring up the Camera menu, press the Menu button while in Digital Camera mode. To access the advanced menu, move the cursor to Zoom In Flash Mode White Balance highlight the Camera tab, and then press the Right button. Zoom Out Camera Menu Camera AE Lock Strobe AUTO ImageSize 2M SelfTimer OFF DateStamp OFF Display OFF Pressing the OK button will lock your current AE setting, enabling you to shoot other subjects without changing the AE metering value. Pressing the OK button again will unlock the AE setting. ~ 20 ~ Advanced Quality Fine Exposure 0 WB AUTO Digital Camera Mode Shutter Camera menu (continued) The following table illustrates all items and functions of the advanced camera settings. The following table illustrates all items and functions of the basic camera settings. Digital Camera Mode ~ 21 ~ Voice Recording (VR) Mode LCD display VR mode indicator Current file / All files 123K File size WAVE0001.WAV Battery life indicator Storage media type Sound volume 10:52 Remaining capacity (mm:ss) ~ 22 ~ Voice Recording Mode 001/001 Recording a sound clip 3. Press the Shutter/Record button again to stop recording. 1. Set the Mode Switch to Voice Recording mode. 2. Press the Shutter/Record button to start recording. Voice Recording Mode Shutter/Record button Microphone Avoid blocking the microphone while recording voice. ~ 23 ~ Deleting sound clips Function buttons When highlighting a sound clip, press the Menu button The following function buttons are available while the and a sub-menu will pop up asking if you want to delete camera is in Voice Recording mode: one or all files. Select Delete One to delete the highlighted file. Select Delete Delete All to delete all recorded Delete One Delete All Volume Down /Pause (while playing) Volume Up Select File Delete File ~ 24 ~ Play File Voice Recording Mode sound clips. Start/Stop Recording Select File Playback Mode LCD display Playback mode indicator File type 00:00 Play/Pause/Stop indicator VOL15 Playing time Sound volume Battery life indicator 001/006 Storage media type Current file / All files Zoom (lock or unlock) / Zoom ratio ~ 25 ~ Playback Mode JPG 1.00 Thumbnail browser Playing an AVI movie or a WAV file While in thumbnail browser, highlight an AVI movie or a Set the Mode Switch to Playback mode. WAV file. Then press the OK button to play the file. After entering the Playback mode, you will see the While playing the file, you can use the function buttons thumbnail interface. Use the direction buttons to highlight as illustrated: a thumbnail. You can tell the file type by the color of the encircling square: Show Info JPG Volume Up Previous File Yellow: JPG files. Next File Volume Down Green: WAV files. Go Back to Thumbnail Play / Pause 001/006 If you want to restart playing the same file, you can press The following function buttons are available in the thumbnail browser: the OK button to pause, and then press the Right or Left button to restart. Show Info Select File Delete File Play/View File ~ 26 ~ Playback Mode Red: AVI files. Viewing a JPG picture While viewing the full-screen JPG picture, If you zoom in the picture and then press the OK button, the zoom ratio While in thumbnail mode, highlight a JPG picture and will be locked. You can then browse the picture using the press the OK button to view the file in full-screen mode. direction buttons. Zoom-lock Screen Under zoom-lock mode, you can use the function buttons use the function buttons as illustrated: as illustrated: Show Info Show Info Zoom In Previous File Up Left Next File Go Back to Thumbnail Right Down Zoom Out Go Back to Thumbnail Zoom Lock Unlock The maximum zoom ratio varies according to the image's resolution. ~ 27 ~ Playback Mode Full Screen When viewing a JPG picture in full-screen mode, you can Deleting files When highlighting a thumbnail, press the Menu button and a sub-menu will pop up asking if you want to delete one or all files. Select Delete One to delete the highlighted file. Select Delete All to delete all stored files. Delete Delete One Delete All Playback Mode ~ 28 ~ MP3 Mode LCD display MP3 mode indicator Playing time / File size 00:00 4500K Bass 3D Bass boost indicator 3D enhancement indicator Battery life indicator Storage media type 01/01 Sound volume Current file / All files Play list item indicator ~ 29 ~ MP3 Mode TRACK01.MP3 Uploading MP3 files Playing MP3 music To upload MP3 files to the camera, you need to connect Set the Mode Switch to MP3 mode. After the camera to a PC using the USB cable. For more entering the main screen, you can select information on USB connection, please refer to Chapter the desired MP3 title and press the OK 10. button to play. After connecting the camera to the computer and The following function buttons are available when the selecting DISK mode, you can locate a "MP3" folder in camera is in MP3 mode: the removable disk. Then you can copy the desired MP3 files into the folder for playing. /Pause (while playing) Volume Down Volume Up Select File For JPG, AVI, and WAV files MP3 Menu Play / Stop For MP3 files If you want to remove MP3 files from the camera, use one of The icon indicates that the MP3 file is included in the play the following methods: list. During continuous play, files in the list will be played 1. Connect the camera to a PC and delete files in the "MP3" repeatedly. folder. 2. Set the camera to Setting mode and use the Format Media command. Note that all files, including non-MP3 files, will be gone after formatting. ~ 30 ~ MP3 Mode Add/Remove List Item Select File MP3 menu The MP3 menu provides several items for you to enhance the quality of MP3 music. To bring up the MP3 menu, press the Menu MP3 Menu Bass Boost OFF 3D Enhance OFF Delete button while in MP3 mode. The following table illustrates all items and their functions. MP3 Mode ~ 31 ~ Camera Settings The following table illustrates the items and functions of the basic settings. Basic settings The basic camera settings allow you to configure some elemental functions of the camera. To access the menu, set the Mode Switch to Setting mode. Setting Camera Settings Beep ON Boot-up ON Auto Off 10m 03/01/01 Date Time 12:00 The following function buttons are available while configuring the camera settings. Move Cursor Up Cancel Select/Confirm Move Cursor Down Cancel/Exit Select/Confirm ~ 32 ~ Advanced settings The advanced settings involve with more complicated options. To access the menu, open the basic setting menu, highlight the tab, and then press the Right button. Advanced TV Type NTSC Flicker 60Hz LCD Bright 1 USB Mode MENU Language 2-1 Format Media Reset Default 2-2 Camera Settings The following table illustrates the items and functions of the advanced settings. ~ 33 ~ TV Output Connecting the camera to TV Connect your camera and TV via an AV cable for real- Turn on your TV and switch to AV mode. time display. You can export your video clips, still pictures Connect the audio and video ends of the AV cable to your TV. and audio recordings directly to your TV to share them Connect the other end to your camera. with friends and family. Turn on the camera. Video TV Output AV Mode Audio ~ 34 ~ Copying Files to PC Do not connect the USB cable to your computer now. Shut down all other applications running on your computer. If the title screen does not appear automatically, please Installing the driver (for 98SE) double-click on My Computer and then the CD-ROM drive. Then browse to the folder "\DV 3300 Driver" and start the If you are using Windows 98 SE, you need to install DV Setup.exe program manually. 3300 Driver before your camera connects to your computer for the first time. Please follow these steps to complete the installation. 1. Turn on your computer. Then place the accessory CD into the CD-ROM drive. 3300 Driver. ~ 35 ~ icon to launch the installation of DV Copying Files to PC 2. Click on the Installing the driver (for 98SE) (continued) 5. After the installation is completed, you may need to restart your computer for the driver to take effect. 3. The Install Shield Wizard will then appear and automatically install the program. Please click on Next to continue the installation. After rebooting your computer, please connect the camera to 4. After the driver installation is completed, the program the PC and select DISK (removable disk) mode to capture will prompt you to install Direct X 8.0 or above. If you the device. are not sure if this program has been installed in your Copying Files to PC computer, please click Yes to continue. The program Direct X 8.0 or above is necessary for viewing the AVI movies recorded by the camera. ~ 36 ~ If the camera's USB mode is set to MENU (please refer to Connecting the camera to your PC the Advanced settings in Chapter 8), a menu will pop up 1. Turn on your computer, and then connect the USB when the camera is connected to your computer. You can then select CAMERA (for PC camera) cable to the USB port of your computer. or DISK (for removable disk) USB Mode according to your purpose. CAMERA DISK Notice for Windows 2000/XP/ME users: If you select DISK mode and then want to disconnect the camera from your computer, please follow these steps: 1. Double-click 2. Click on the system tray. (USB Disk), and then click Stop. 3. Select the camera when the confirmation screen appears 2. Connect the other end of the USB cable to your and click OK. 4. Follow the on-screen instructions to safely disconnect the camera. camera from your computer. Copying Files to PC ~ 37 ~ Copying files to your PC For Windows 2000/ME/98SE users: Double-click on My Computer. By copying files from the camera to your computer, you can permanently save your creative works in the hard disk. To copy files from the camera, you must select DISK (removable disk) mode when connecting the camera to your PC. Then double-click on the icon of the removable disk that 1. This step varies according to your operation system. has just appeared. For Windows XP users: After the camera is connected to your computer, a dialogue window will appear automatically. Please select the item Open folder to view Copying Files to PC files using Windows Explorer and click OK. ~ 38 ~ Copying files to your PC (continued) 4. Drag the pictures to your desired target folder. Windows XP 2. Double-click on the DCIM file folder. Windows XP Windows 2000/ME/98 SE Copy pictures to "My Documents" 3. Double-click on the 100MEDIA file folder. Windows 2000/ME/98 SE ~ 39 ~ Copying Files to PC Windows 2000/ME/98 SE Windows XP File locations Uploading/Deleting MP3 files The following figure shows where different types of files The "MP3" folder is for storing the MP3 files. To upload or are located in different folders. delete a MP3 file, you must connect the camera to a PC and set the camera to DISK (removable disk) mode. Then copy the MP3 files to the "MP3" folder or delete files in the folder. For JPG, AVI, and WAV files Copying Files to PC For MP3 files ~ 40 ~ Viewing/Playing files on your PC 2. Double-click on the desired file, and the file will be opened by the program matching the file's type. 1. Double-click on My Documents or other folder that stores your files. Windows XP Windows XP Windows 2000/ME/98 SE ~ 41 ~ Copying Files to PC Windows 2000/ME/98 SE Using PC Camera Notice for Windows XP users: During the installation process, the Scanner and Camera Wizard dialogue window may appear. If this happens, Installing the application please click on Cancel and proceed with the installation process. You need to install DV 3300 PC Camera to take advantage of the PC camera function. Please follow these steps to install the application. 1. Turn on your computer, and then place the accessory CD into the CD-ROM drive. (Please see step 1 in Notice for Windows 2000 users: Chapter 10 - Installing the driver for reference.) When using the PC camera function for the first time, the following warning message may appear twice or more. 2. After the title screen appears, click on the Please click Yes to continue the process. The camera is fully icon to compatible with Windows 2000 operation system. install the application. Follow the on-screen Using PC Camera instructions to complete the installation. After the installation is completed, the program will prompt you to install Direct X 8.0 or above. If you are not sure if this program has been installed in your computer, please click Yes to continue. ~ 42 ~ Installing the application (continued) Notice for Windows 98SE users: 1. Click Next when the following screen appears. Notice for Windows ME users: When the following screen appears, please select Automatic search for a better driver and click Next to continue. 2. When the following screen appears, please select Search for the best driver for your device and click Next to continue. asked to insert a licensed 98SE CD into the CD-ROM drive to copy some needed files. 4. Follow the on-screen instructions to finish the installation. ~ 43 ~ Using PC Camera 3. During the installation process, some users might be Starting the application 2. Double-click the DV 3300 PC Camera icon on the Desktop to start the program. After the program is 1. Connect the camera to your computer with the USB started, you can begin to use the PC camera function. cable. Select CAMERA mode when prompted in the camera LCD screen. USB Mode CAMERA DISK If the camera is set to DISK mode when connected to the PC, you can press the Menu button and switch to CAMERA mode manually. Please open the lens cover to capture real-time image. If you want to use the Video Conferencing function, please install programs such as Netmeeting to serve the purpose. can start the program from the Programs menu. ~ 44 ~ Using PC Camera If you cannot find the program shortcut on the desktop, you Using DV 3300 PC Camera Start recording a video clip Preview Window Stop recording Snapshot Format * Source * Start/Stop preview window Settings Open album (where files are stored) to open the photo album. Or, as an alternate Video source option, go to the "Work Temp" folder to find files taken by the program. The full path is as following: * Sub-menu is available. C:/Program Files/DV3300 PC Camera/Work Temp ~ 45 ~ Using PC Camera To view pictures taken by DV 3300 PC Camera, please click on * Recording an AVI movie or taking a snapshot Advanced settings in PC Camera Format: Recording an AVI movie (image only): 1. Click on the icon. ! Color Space: Select one of the following functions according to your 2. Specify the path and name of the AVI file. needs. 3. Set the frame rate and recording time according to - RGB 24: This item is for retaining better quality. your needs. - MJPG: This item indicates the AVI movie will be more 4. Press the Start Record button to begin recording. compressed to gain the advantage of faster Note that no sound will be recorded. 5. To stop recording, click on the processing speed. icon. ! Output Size: Set output size to change the size of the preview window. The default size is 320x240. Select larger pixels when you need a larger preview window. Using PC Camera Taking a snapshot: Click on the icon to take a snapshot. ~ 46 ~ Advanced settings in PC Camera (continued) Settings: If you take your camera abroad, and find the screen of your computer flickers when using PC Camera function, Source: please check the Cancel Flicker box to prevent noises The Source sub-menu provides several options for you to from appearing on the screen. Or, you can refer to the set the color adjustments to retain the best image quality. Flicker Settings Table (p. 50) for proper flicker value You can use the default settings, or change the settings that fits the country you are staying. (such as brightness, contrast, saturation, and sharpness) on your own. Using PC Camera ~ 47 ~ Troubleshooting ~ 48 ~ Troubleshooting (continued) ~ 49 ~ Flicker Settings Table LED Event Table * The flicker setting is based on the frequency standard of your local power supply. ~ 50 ~ System Message Table ~ 51 ~ Specifications Main Functions ~ 52 ~ Aiptek Service If you have any problems, please contact AIPTEK office to which your country is assigned. Please note: If you reside outside of the United States or Germany, please contact AIPTEK International Inc. AIPTEK International GmbH Halskestrasse 6 47877 Willich, Germany TEL +49 21 54 - 92 35 50 Fax +49 21 54 - 92 35 68 http://www.aiptek.de AIPTEK, Inc. 51 Discovery, Suite 100 AIPTEK International Inc. Irvine, CA 92618, USA No. 19 Industry E. Road IV TEL: 949-585-9600 Hsin-Chu Science Park FAX: 949-585-9345 Hsin-Chu 300 http://www.aiptek.com Taiwan, R.O.C. Online registration website: Tel: 886-3-5678138 Http://www.aiptek.com/registration/registration.htm Fax: 886-3-5678569 (Online registration entitles you to special services, http://www.aiptek.com.tw downloads, and promotions.) ~ 53 ~