1
Chapter 1: Building Master and
Detail Pages
AL
In This Chapter
✓ Developing master and detail pages at the same time
RI
✓ Building your master and detail pages separately
✓ Putting together master and detail pages for ASP.NET
TE
✓ Making sure your master and detail pages work
MA
S
TE
D
imple sets of data can be expressed in a simple table, much like a traditional spreadsheet. But sometimes you don’t want to display complete
details on a given table. For example, suppose you want to display a master
list of employees but want to view the full address and department details for
an employee only when that record is selected. Dreamweaver CS5 enables
you to do this by setting up what is known as a master-detail relationship.
GH
A master page displays a list of records and corresponding links for each
record. A user can click a link to see further information about a record on
its associated detail page.
PY
RI
Depending on your programming language, you can either build the set of
master and detail pages all in one operation, or you can separately build the
master pages and then the detail pages. You find out more about both methods in this chapter.
CO
The examples in this chapter use a simple Employee table, which you can
see in Table 1-1. The first value, the empid, is a special field called a key. It
always has a unique value. Therefore, if you query for a record in a table by
using the key, you always get only the row that you’re looking for because
no two rows have the same key.
732
Building Master and Detail Pages in One Operation (PHP, ASP, JSP, ColdFusion)
Table 1-1
Employee Table
Column Name
Type of Data
empid
Integer
first_name
20-character string
last_name
20-character string
address1
25-character string
address2
25-character string
city
20-character string
state
2-character string
zip
10-character string
deptid
Integer
Building Master and Detail Pages in One
Operation (PHP, ASP, JSP, ColdFusion)
For PHP, ASP, JSP, and ColdFusion, you can build sets of master and detail
pages in one operation. You can use the same method for all these languages. Creating both the master and detail pages at the same time is generally easier, but Dreamweaver gives you the flexibility of creating them
separately, too.
To create a master and detail page set for PHP, ASP, JSP, or ColdFusion,
follow these steps:
1. Create a new dynamic page or open an existing one.
The page you created or open is displayed in Dreamweaver; this page
becomes your master page in the language that you selected.
2. Define a recordset for the page.
For the lowdown on creating a recordset, check out Book VIII, Chapter 1.
The recordset provides the data that’s displayed on both the master and
detail pages. Make sure that you include all the table columns that you
need to create your master page, including the unique key (the record
ID column) for each record and all the table columns that you need to
create your detail page. Typically, you display more columns on the
detail page than on the master page.
For the example in this chapter, we created an employee_records recordset and included all the columns in the employee table (see Table 1-1).
Building Master and Detail Pages in One Operation (PHP, ASP, JSP, ColdFusion)
733
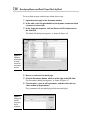
3. Save your changes to the master page.
Figure 1-1:
Dreamweaver with
a recordset
defined.
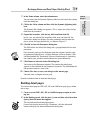
4. Choose Insert➪Data Objects➪Master Detail Page Set to insert the
master and detail pages.
The Insert Master-Detail Page Set dialog box appears (see Figure 1-2).
You specify the properties for the master page in the top half of this
dialog box and the properties for the detail page in the lower half.
5. In the Recordset drop-down list, select the recordset that you want to
use for the master page.
For this example, we selected employee_records. After you select a
recordset, Dreamweaver fills in the rest of the fields with the columns
from the recordset.
6. In the Master Page Fields area, select which records you want to
appear on the master page.
Click the plus (+) icon to add a field and click the minus (–) icon to
remove a field. In Figure 1-2, we selected the first_name and last_name
fields. These fields appear on the master page in a table format.
Typically, fewer fields appear on the master page than on the detail
page.
Building Master and
Detail Pages
The new recordset appears in the Bindings panel, and connection code
is automatically added to the dynamic page, as shown in Figure 1-1. This
page allows a listing of employees to be displayed on the master page.
Book IX
Chapter 1
734
Building Master and Detail Pages in One Operation (PHP, ASP, JSP, ColdFusion)
Figure 1-2:
The Insert
MasterDetail Page
Set dialog
box.
7. In the Link to Detail From drop-down list, select the field in the
recordset that you want to serve as the link to the detail page.
This field is the one that a user clicks to display details for a given
employee. For example, we selected the last_name field to serve as the
link to the detail page for each record.
8. In the Pass Unique Key drop-down list, select which field contains the
values that you want to pass on to the detail page so it can identify the
records.
Typically, you select the key field of the table. This key field tells the
detail page which record to display for the user. For our example, we
selected the empid field.
9. Specify the number of records that you want to show at one time on
the master page.
In the example, we chose to show 10 records at a time.
10. In the Detail Page Name text box, enter a name for the detail page or
click the Browse button to select an existing file.
For the example, we specified detail.php. Dreamweaver automatically
uses this name when it creates the detail page.
Building Master and Detail Pages in One Operation (PHP, ASP, JSP, ColdFusion)
735
11. In the Detail Page Fields area, select which records you want to
appear on the master page.
12. Click OK.
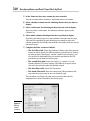
Dreamweaver creates the master and detail pages and includes dynamic
content and server behaviors in both. The Document window contains the
automatically generated objects (a repeated region, navigation objects,
record, counter, and link to the detail page), as shown in Figure 1-3.
13. Modify the design of the master and detail pages.
You can modify your dynamic fields just as you’d edit any other object
(see Figure 1-4).
Figure 1-3:
The
document
shows a
repeated
region,
navigation
objects,
record
counter, and
a link to the
detail page.
Building Master and
Detail Pages
Click the plus (+) icon and minus (–) icon to change the fields that
appear on the detail page. Typically, more fields appear on the detail
page than the master page. For the example, we selected all the fields in
the table. Figure 1-2 shows the configuration of the Insert Master-Detail
Page Set dialog box based on the example values.
Book IX
Chapter 1
736
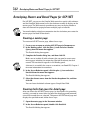
Developing Master and Detail Pages Block by Block
Figure 1-4:
The detail
page is
created
automatically by
Dreamweaver.
When you finish designing the pages, you’re ready to preview your work in a
browser. See the “Testing Your Master and Detail Pages” section, later in this
chapter, for details.
For ASP.NET (which is a different server technology than ASP), you need
to build the master and detail pages separately (as described in the
“Developing Master and Detail Pages for ASP.NET” section, later in this chapter). You can’t build these pages at the same time in one operation for ASP.
NET.
Developing Master and Detail Pages Block by Block
You can develop a master page block by block for PHP, ASP, JSP, and
ColdFusion. Although you usually create the master and detail pages at the
same time, you can also create them block by block to have complete control over the placement of the blocks.
Creating the master page
To create a dynamic master page, follow these steps:
1. Create a page and define a recordset.
Turn to Book VIII, Chapter 1 to find out how to define a recordset.
Developing Master and Detail Pages Block by Block
737
2. In the Document window, place the insertion point where you want
the records to appear on the page.
The Dynamic Table dialog box appears, as shown in Figure 1-5.
Figure 1-5:
The
Dynamic
Table dialog
box.
4. In the Recordset drop-down list, select the name of the recordset that
you want to appear on the master page.
5. Specify the number of records that you want to show at one time on
the master page.
In the example, we wanted to show 10 records at a time.
6. (Optional) Specify border, cell padding, and cell spacing.
7. Click OK to close the dialog box.
The master table is created and added to your document.
If you don’t want users to see some of the columns on the master page,
delete the column from the table by following these steps:
1. In Design view, click anywhere on the master page.
2. Put the pointer near the top of the column so that the column’s entries
are outlined in red. Then click to select the column.
3. Click the Delete button to delete the column from the table.
Setting up links to open a detail page
After you create the master page (as the preceding section describes),
you need to create links that open the detail page and communicate which
record the user selected so that only the detail for that record displays.
Building Master and
Detail Pages
3. Choose Insert➪Data Objects➪Dynamic Data➪Dynamic Table.
Book IX
Chapter 1
738
Developing Master and Detail Pages Block by Block
To set up links to open a detail page, follow these steps:
1. Open the master page in the Document window.
2. In the table, select the placeholder for the dynamic content on which
you want to create a link.
3. In the Properties inspector, click the Browse for File button next to
the Link field.
The Select File dialog box appears, as shown in Figure 1-6.
Figure 1-6:
Configure
which page
to link to
and which
parameters
to send.
4. Browse to and select the detail page.
5. Click the Parameters button, which is to the right of the URL field.
The Parameters dialog box appears, as shown in Figure 1-7.
6. Click the plus (+) icon to add a parameter, and then select the key
value column as the parameter.
This parameter tells the detail page which row to display.
Figure 1-7:
Configuring
the URL
parameter
and its
recordset.
Developing Master and Detail Pages Block by Block
739
7. In the Name column, enter the column name.
8. Click in the Value column and then click the Dynamic (lightning bolt)
icon.
The Dynamic Data dialog box appears. This is where you select the key
field from the recordset.
9. Expand the recordset, click the key field, and then click OK.
In this case, we selected the empid key field. After you click OK, the
Parameters dialog box displays the new parameter and the code that
places it into the page dynamically, as shown in Figure 1-7.
10. Click OK to close the Parameters dialog box.
The URL field in the Select File dialog box is prepopulated with the new
parameter.
Each dynamic page type has different code that appears because each
programming language uses a slightly different syntax to display a URL
variable dynamically. Fortunately, because Dreamweaver is generating
the code for you, you don’t need to know the syntax differences.
11. Click Choose to close the Select File dialog box.
You return to the Document window. The name of the detail page
appears in the Link field in the Properties inspector. The placeholder for
the dynamic content is now a link.
12. Choose File➪Save to save your changes to the master page.
You now have a complete master page.
Read on to find out how to make the detail page.
Building detail pages
To create a detail page for PHP, ASP, JSP, and ColdFusion page types, follow
these steps:
1. Create a new or PHP, ASP, JSP, or ColdFusion page or open an existing one.
2. In the Bindings panel, click the plus (+) icon and then select Recordset
(Query) from the menu that appears.
The simple Recordset dialog box appears.
If you want to write your own SQL statements, click the Advanced
button to display the advanced Recordset dialog box.
Building Master and
Detail Pages
You can also click the Dynamic lightning bolt icon and select the column
from the dialog box.
Book IX
Chapter 1
740
Developing Master and Detail Pages Block by Block
3. In the Name text box, enter a name for your recordset.
You can use only letters, numbers, and underscores in the name.
4. Select a database connection for obtaining the data that you want to
display.
5. Select a table name for obtaining the data that you want to display.
After you select a table name, the database columns appear in the
Columns list.
6. Select which columns should provide the record data to display.
Typically, your detail page uses more columns than your master page.
You want the recordset for your detail page to contain at least one
column (generally the id field) that matches the column that you use for
the master page.
7. Complete the Filter sections as follows:
• The first Filter field: Select the database column name that contains
values to match against the URL parameter (specified in the “Setting
up links to open a detail page” section, earlier in this chapter). You
use the filter to find and display the record specified by the URL
parameter passed from the master page.
• The second Filter field: Select the equals (=) symbol, if it’s not
already selected. This filter requires the fields to be equal, which
they must be to display only the detailed record.
• The third Filter field: Select URL Parameter.
• The fourth Filter field: Enter the name of the URL parameter that
you want the master page to pass to the detail page.
The recordset (see Figure 1-8) now returns only the data for the
employee who’s been selected on the master page.
Figure 1-8:
Defining
a detail
recordset.
Developing Master and Detail Pages Block by Block
741
8. Click the Test button.
The Test Value dialog box appears.
This value represents which detail record is displayed. This test helps
you check that the detail page brings back the data you expect.
A table displaying data from the recordset appears.
10. Click OK.
The Test SQL Statement window closes.
11. In the Recordset dialog box, click OK.
12. To bind the columns in the recordset to the detail page, select the
columns in the Bindings panel and drag those columns onto the detail
page.
Your detail page can now process requests from the master page. Figure
1-9 shows the Document window after adding fields from the recordset.
Figure 1-9:
The
Document
window
after
dragging
several
fields
from the
recordset
onto it.
See the section “Testing Your Master and Detail Pages,” later in this chapter,
to find out how to preview your master and detail pages in a browser.
Building Master and
Detail Pages
9. Enter a value in the Test Value field, and then click OK.
Book IX
Chapter 1
742
Developing Master and Detail Pages for ASP.NET
Developing Master and Detail Pages for ASP.NET
For ASP.NET, you can use the DataSet Web control to specify table columns
and the DataGrid Web control to list the database records to display on the
master page. The Web controls provide an easy way to display database
data with controls for paging between multiple pages of records.
You need to define a database connection for the site before you create the
master page. See Book VII for details.
Creating a master page
To create an ASP.NET master page, follow these steps:
1. Create a new or open an existing ASP.NET page in Dreamweaver.
2. In the Bindings panel, click the plus (+) icon and select DataSet
(Query) from the menu that appears.
The DataSet dialog box appears.
3. Complete the DataSet dialog box, and then click OK.
Make sure to include all table columns that you need to create your
master page, including the unique key (Record ID column) for each
record. The new dataset appears in the Binding panel.
A dataset is essentially the same as a recordset; see Book VIII, Chapter 1
for more information on recordsets.
4. In the Server Behaviors panel, click the plus (+) icon and select
DataGrid from the menu that appears.
The DataGrid dialog box appears.
5. Select the dataset source from the DataSet drop-down list, and then
click OK.
You can leave the default column type as Simple Data Field.
Creating links that open the detail page
After you create the ASP.NET master page (as described in the preceding
section), you need to create links that open the detail page and communicate which record the user selected. To open an ASP.NET detail page and
display the specified record, follow these steps:
1. Open the master page in the Document window.
2. In the Server Behaviors panel, double-click DataGrid.
The DataGrid dialog box appears.
Developing Master and Detail Pages for ASP.NET
743
3. In the Columns list, select the column that you want to serve as the
link to the detail page.
4. Click the Change Column Type button.
5. Select Hyperlink from the pop-up menu.
The Hyperlink Column dialog box appears.
6. In the Hyperlink Text section, specify the text that you want to display
in the hyperlink column.
Here are your choices:
• Static Text: Use a generic description for this column. Enter text for
the link, such as Details.
• Data Field: Add text for a link based on a hyperlink column. Then
from the drop-down list, select a data field in your dataset. In the
example, we selected the last_name column.
• Format String: This field is generated automatically and displays the
format of the URL text.
7. In the Linked Page section, specify the URL for the hyperlink column
text.
Here are your choices:
• Static Text: Use a generic link for this column. Enter the URL for the
link, such as Details.aspx.
• Data Field: Add a link for data displayed in the hyperlink column.
Then from the drop-down list, select a data field in your dataset. In
the example, we selected the first_name column.
• Format String: This field is generated automatically and displays the
format of the URL link.
The URL opens the detail page and uniquely identifies the record to display on the detail page.
8. In the Linked Page section, click the Browse button next to the Format
String box.
9. Locate and select which detail page you want to display.
Note the following when selecting your link page:
• When you select a detail page, Dreamweaver adds information to the
URL that specifies a parameter to use to identify the record.
• Dreamweaver automatically names this parameter based on your
database field name, but you can change the name to something else
if you want to.
Building Master and
Detail Pages
You can use any field that identifies the record for expanding the detail
of the record.
Book IX
Chapter 1
744
Testing Your Master and Detail Pages
• Be sure to note the name of the URL parameter because you need
that name when you create the detail page (which you can read
about in the following section, “Creating a detail page”).
• Dreamweaver uses a {0} placeholder to indicate where it places the
value of the unique identifier when someone accesses the page.
10. Click OK to close the Hyperlink Column dialog box.
11. Click OK.
The DataGrid dialog box closes. The DataGrid on your page is updated.
Creating a detail page
After you create a master page for ASP.NET (as described in the two previous sections), you need to create a detail page to display the record. To do
so, you need to define a dataset for the record and bind its columns to the
detail page.
When creating the detail page, you need to know the database column
name that you want to reference and the URL parameter that the master
page uses to find and display that column’s record on the detail page. If you
don’t remember the URL parameter name, open the master page, go to the
Bindings panel, and look under the DataSet listing.
To create an ASP.NET detail page, create a new ASP.NET page in
Dreamweaver and follow Steps 2 through 12 in the earlier section, “Building
detail pages.” Although these steps show you how to fill out the Recordset
dialog box, the steps are the same for the DataSet dialog box, which you fill
out when creating an ASP.NET detail page.
Testing Your Master and Detail Pages
After you create a master and detail page set, you need to test those pages.
Follow these steps to preview the pages in a browser:
1. Open the master page.
2. Choose File➪Preview in Browser➪Name of Browser.
3. When Dreamweaver asks if it’s okay to copy the file to the testing site,
click OK.
Your browser launches with your master page, as shown in Figure 1-10.
4. Click a hyperlink to view the associated detail page for that record.
In the employee example, the linked field is the employee’s last name.
When you click a link, the browser page changes to expand the record
and display the detail page.
Testing Your Master and Detail Pages
745
Book IX
Chapter 1
Building Master and
Detail Pages
Figure 1-10:
The browser
displays the
master page
that uses
the data
from the
databases.
Be sure that both your master page and detail page are transferred to the
staging server. If they do not, you get a Page not found error message when
you click a link in the master page.
746
Book IX: Developing Applications Rapidly