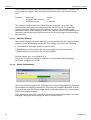
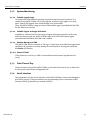
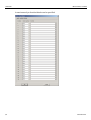
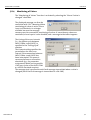
1
Additional Manual
INSYS GSM 4.2 LOGO!
December 06
Copyright © December 06 INSYS MICROELECTRONICS GmbH
Any duplication of this Additional Manual is prohibited. All rights on this documentation
and the devices are with INSYS MICROELECTRONICS GmbH Regensburg.
Restrictions of guarantee
This Additional Manual contains a concise description. The compilation of the text has
been made with the utmost care. Despite all efforts, there may be deviations compared
with the actual functions. No guarantee can therefore be given for the accuracy of the
contents. We can neither take over a legal responsibility nor any liability for incorrect
information and their consequences. Suggestions for improvements and comments are
gladly accepted.
Trademarks
The use of a trademark not shown below is not an indication that it is freely available for
use.
MNP is a registered trademark of Microcom Inc.
IBM PC, AT, XT are registered trademarks of International Business Machine Corporation.
INSYS ® is a registered trademark of INSYS MICROELECTRONICS GmbH.
Windows™ is a registered trademark of Microsoft Corporation.
Publisher:
INSYS MICROELECTRONICS GmbH
Waffnergasse 8
D-93047 Regensburg, Germany
Phone:
+49 (0)941/58692-0
Fax:
+49 (0)941/563471
e-mail:
[email protected]
Internet:
http://www.insys-tec.de
Subject to technical changes as well as correction.
Date: Dezember 06
31-22-03.080 english
II
Dezember 06
INSYS GSM 4.2 LOGO!
1
SCOPE OF SUPPLY.......................................................4
2
GENERAL.....................................................................4
2.1
APPLICATION OPTIONS FOR INSYS GSM 4.2 LOGO!......................5
2.1.1
2.1.2
Fault Messages....................................................................................5
Remote Monitoring ............................................................................6
2.2
ADVANTAGES COMPARED TO STANDARD SIEMENS LOGO! ...............6
2.3
ADVANTAGES COMPARED TO PREVIOUS VERSIONS OF INSYS GSM ...6
2.4
LIMITATIONS .............................................................................7
3
FUNCTION DESCRIPTIONS ..........................................8
3.1
DESCRIPTION OF TERMS ..............................................................8
3.1.1
3.1.2
PA Buffer/PA-SMS...............................................................................8
Actual Values ....................................................................................12
3.2
INDEPENDENT ACTIONS ............................................................13
3.2.1
3.2.2
3.2.3
Monitoring of Values by Polling the PA Buffer ................................13
Periodic PA-SMS ................................................................................15
PA-SMS for Alarm Input....................................................................16
3.3
SCAN OPTIONS VIA SMS...........................................................17
3.3.1
3.3.2
3.3.3
3.3.4
3.3.5
3.3.6
SMS Commands ................................................................................17
Monitoring of PA Buffer (Process Image Buffer)..............................18
Reading Out the Actual Values.........................................................18
Status Scan of LOGO! ........................................................................21
LOGO! Checksum ..............................................................................22
Summary of LOGO!-Specific SMS Commands ..................................23
3.4
NEW AND EXPANDED HISTORICAL ENTRIES ..................................23
3.4.1
3.4.2
New Historical Entries ......................................................................23
Expanded Historical Entries..............................................................23
Dezember 06
Content
I
Content
II
INSYS GSM 4.2 LOGO!
4
COMMISSIONING .....................................................24
4.1
INSTALLATION OVERVIEW..........................................................24
4.1.1
4.1.2
Installation for Configuration ..........................................................24
Installation for Operation with Siemens LOGO! ..............................24
4.2
FIRMWARE UPDATE ..................................................................25
4.3
COMMISSIONING .....................................................................25
4.4
TROUBLESHOOTING..................................................................28
4.4.1
4.4.2
4.4.3
No response to commands ...............................................................28
A connection is not established........................................................28
Alarm SMS is not transmitted ..........................................................28
4.5
SIGNAL QUALITY ......................................................................29
4.6
LOGIN STATE IN GSM NETWORK ................................................29
5
CONFIGURATION USING THE HSCOMM LOGO!
SOFTWARE................................................................31
5.1
GENERAL ................................................................................31
5.2
HELP......................................................................................31
5.3
MENUS ..................................................................................31
5.3.1
5.3.2
5.3.3
5.3.4
5.3.5
5.3.6
File .....................................................................................................31
Interface ............................................................................................32
Errors .................................................................................................32
Language...........................................................................................32
PLC .....................................................................................................32
Overview ...........................................................................................32
5.4
STATUS BAR ...........................................................................33
5.5
BUTTONS ...............................................................................33
5.5.1
5.5.2
Send settings.....................................................................................33
Read settings ....................................................................................33
Dezember 06
INSYS GSM 4.2 LOGO!
5.5.3
5.5.4
5.5.5
5.5.6
Send default settings........................................................................33
Reset..................................................................................................33
Synchronize.......................................................................................33
Abort .................................................................................................33
5.6
TABS .....................................................................................34
5.7
BASIC SETTINGS .......................................................................34
5.7.1
5.7.2
5.7.3
5.7.4
GSM Connection ...............................................................................35
System Monitoring ...........................................................................37
Date/Time of Day..............................................................................37
Serial Interface..................................................................................37
5.8
LOGO! SETTINGS ....................................................................38
5.8.1
5.8.2
5.8.3
5.8.4
5.8.5
Defining Values to be Utilized..........................................................39
Configuring Periodic PA-SMS............................................................39
Defining Actual Values .....................................................................39
Monitoring of Values........................................................................41
Defining and Configuring Values to be Monitored..........................42
5.9
ALARM/SWITCHING .................................................................45
5.10
OTHER RECIPIENTS ...................................................................47
6
VENTILATION SYSTEM EXAMPLE..............................48
6.1
SYSTEM AND FUNCTION DESCRIPTION FOR VENTILATION SYSTEM.....48
6.1.1
6.1.2
System Description ...........................................................................48
Monitoring the System Function Using the INSYS GSM 4.2 LOGO!.48
6.2
TERMINAL DIAGRAM FOR INSYS GSM 4.2 LOGO! TO SIEMENS
LOGO! ..................................................................................49
6.3
CONTROL SYSTEM FUNCTION CHART ...........................................50
6.4
CONFIGURATION OF INSYS GSM 4.2 LOGO!..............................51
6.5
SCAN OF ACTUAL VALUES ..........................................................56
Dezember 06
Content
III
Scope of Supply
1
INSYS GSM 4.2 LOGO!
Scope of Supply
Check the contents received against the scope of supply before commissioning.
• INSYS GSM 4.2 LOGO!
• 9-pin serial cable with D-Sub 9 plug/socket connectors for connecting the PC to
the INSYS GSM 4.2 (RS232 cable)
• 9-pin cable with D-Sub 9 plug/plug connectors for connecting the INSYS GSM
4.2 LOGO! to the Siemens adapter cable. – order number: 31-02-02.008
• User Manual INSYS GSM 4.2
• Additional Manual INSYS GSM 4.2 LOGO!
• CD-ROM (option) – order number: 31-02-02.008
If contents are missing, contact your supply source.
Inspect the device for damage during transport. If damage is detected, contact
your supply source.
Save the packing materials for shipping or storage purposes.
Optional Accessories
GSM antenna:
External wall-mounted antenna, magnetic base-mounted antenna, or patchmounted antenna
2
General
Basically, the INSYS GSM 4.2 LOGO! offers the same technical features and
functionalities as the standard version.
The technical specifications and function descriptions for the standard version are
not presented in this manual (except where necessary). For this information, refer
to the user manual for the standard version.
Cases where the INSYS GSM 4.2 LOGO! differs from the standard version are
noted in the appropriate sections.
4
Dezember 06
INSYS GSM 4.2 LOGO!
2.1
Application Options for INSYS GSM 4.2 LOGO!
2.1.1
Fault Messages
General
The I/O of LOGO! and its expansion modules can be monitored for particular states
or signal levels and a fault message transmitted in the event of a change.
The following I/O elements can be monitored:
-
Digital inputs
-
Digital outputs
-
Digital bit memory
-
Shift register inputs
-
LOGO! operator buttons (arrow keys ÕÖ×Ø)
-
Analog inputs
-
Analog outputs
-
Analog bit memory
The fault message can have the following content:
-
A text message that is permanently assigned to the monitored value
-
An image of all utilized I/O elements utilized containing the values at the time
of the fault (keyword “PA-SMS”)
The fault message can be transmitted as follows:
Dezember 06
-
Via SMS to a mobile phone
-
Via SMS to a conventional phone (provider-dependent)
-
Via SMS to a fax device (provider-dependent)
-
Via SMS to an e-mail recipient (provider-dependent, not PA-SMS)
5
General
INSYS GSM 4.2 LOGO!
2.1.2
Remote Monitoring
Independent of automatic monitoring, a variety of information on the current
LOGO! states can be read out via SMS or a GSM data connection:
-
Status of LOGO! (RUN/STOP/ERROR/etc.), status of LOGO! can also be changed
from RUN to STOP and vice versa.
-
Checksum of the control program running on LOGO! for unique identification
-
Monitoring of LOGO! I/O elements of (keyword “PA-SMS”); this message can
also be generated independently (keyword “Periodic PA-SMS”)
-
Readout of actual values of control program function blocks (e.g., counter
values, elapsed time counters, triggers, etc.)
The two switching outputs of the INSYS GSM 4.2 LOGO! (switchable via SMS) can
also be used to actively intervene in the LOGO! control program sequence.
2.2
Advantages Compared to Standard Siemens LOGO!
Siemens LOGO! is a programmable microcontroller with many applications and
expansion options.
Unfortunately, the LOGO! concept does not include remote monitoring or fault
notification functions.
The INSYS GSM 4.2 LOGO! works in combination with Siemens LOGO! to provide a
small, but powerful remote monitoring and fault message system that can be
easily programmed for use in a variety of applications.
2.3
Advantages Compared to Previous Versions of INSYS GSM
Up to now, the INSYS GSM series can use pulses to control alarm inputs of the
INSYS GSM, enabling up to 20 fault messages to be triggered. This option is not
tied to specific devices and thus can be used with all controller types.
6
Dezember 06
INSYS GSM 4.2 LOGO!
2.4
General
Limitations
The following functions are not possible:
-
Online test (i.e., online monitoring) via a GSM data connection using the
Siemens LOGO!Soft Comfort PC software
-
Online readout or update by GSM connection from the control program using
the Siemens LOGO!Soft Comfort PC software
-
Use of protected program module cards. The INSYS GSM 4.2 LOGO! and
Siemens LOGO! are connected via the RS232 interface; thus, the program
module slot is occupied.
Siemens LOGO! cannot be directly influenced, e.g., outputs and bit memory
cannot be set. However, it is possible to indirectly influence LOGO! using the
switching outputs of the INSYS GSM 4.2 LOGO!.
Dezember 06
7
Commisioning
INSYS GSM 4.2 LOGO!
3
Function Descriptions
3.1
Description of Terms
3.1.1
PA Buffer/PA-SMS
3.1.1.1 PA Buffer (Process Image Buffer)
The PA buffer contains the current I/O states or values of the Siemens LOGO! and
its expansion modules:
-
Digital inputs (I1 ... I24)
-
Digital outputs (Q1 to Q16)
-
Digital bit memory (M1 to M24)
-
Shift register inputs (S1 to S8)
-
LOGO! operator buttons (arrow keys ÕÖ×Ø)
-
Analog inputs (AI1 to AI8)
-
Analog outputs (AQ1 to AQ2)
-
Analog bit memory (AM1 to AM6)
The PA buffer contains the maximum possible I/O elements of a Siemens LOGO!
system (including expansion modules).
The number of actual I/O elements in the system is dependent on the respective
LOGO! Basic module version and the utilized expansion modules.
8
Dezember 06
INSYS GSM 4.2 LOGO!
Commisioning
3.1.1.2 PA-SMS (Process Image SMS)
The INSYS GSM 4.2 LOGO! version uses the PA-SMS to send the PA buffer content
of the connected LOGO! in readable format:
Dezember 06
I:
xxxxxxxx
xxxxxxxx
xxxxxxxx
(Inputs 8 – 1); Values from left (I8) to right (I1)
(Inputs 16 to 9)
(Inputs 24 to 17)
Q:
xxxxxxxx
xxxxxxxx
(Outputs 8 to 1)
(Outputs 16 to 9)
M:
xxxxxxxx
xxxxxxxx
xxxxxxxx
(Bit memory 8 to 1)
(Bit memory 16 to 9)
(Bit memory 24 to 17)
S:
xxxxxxxx
(Shift register inputs 8 to 1)
C:
xxxx
(Buttons 4 to 1 in the ÖÕØ× symbols)
AI:
xxxxx
xxxxx
xxxxx
xxxxx
xxxxx
xxxxx
xxxxx
xxxxx
(Analog input 1)
(Analog input 2)
(Analog input 3)
(Analog input 4)
(Analog input 5)
(Analog input 6)
(Analog input 7)
(Analog input 8)
AQ:
xxxxx
xxxxx
(Analog output 1)
(Analog output 2)
AM:
xxxxx
xxxxx
xxxxx
xxxxx
xxxxx
xxxxx
(Analog bit memory 1)
(Analog bit memory 2)
(Analog bit memory 3)
(Analog bit memory 4)
(Analog bit memory 5)
(Analog bit memory 6)
9
Commisioning
INSYS GSM 4.2 LOGO!
If the complete PA buffer is displayed, a PA-SMS would be unable to be
transmitted as a single SMS because no more than 140 characters can be
transmitted per SMS.
Therefore, the scope and content of the PA-SMS should be adapted to the I/O
elements of the LOGO! application that are actually present and utilized (keyword
“Utilized values”).
If a PA-SMS has more than 140 characters, it is automatically divided into multiple
SMS messages (maximum of 3), whereby the “cutoff” is always made after a
complete range of values (e.g., between AI and AQ).
A PA-SMS cannot be sent to an e-mail address.
3.1.1.2.1 Representation of digital values
Digital values are always represented in single digits indicating their logical state
(0 or 1).
Eight values per line (counting right to left) are used, except in the case of
operator buttons, where 4 values per line are used.
Values not utilized are represented with an “x”. Lines in which no value is utilized
are omitted altogether, provided there are no subsequent lines containing a
utilized value.
3.1.1.2.2 Representation of analog values
Representation of analog values always corresponds to the internal
representation of analog values in LOGO!
Example:
Utilization of a LOGO! 24
The input voltage range of the analog input is 0 to 10 V.
This range is represented by values in 1,000 increments.
A voltage of 4.5 V at the analog input has a value of 450 [00450].
Input voltage in V * 100 = Internal value of LOGO!
Values are represented in five digits with leading zeros. One analog value is
output per line.
10
Dezember 06
INSYS GSM 4.2 LOGO!
Commisioning
Values not utilized are represented with an x. Entire lines in which no value is
utilized are not displayed.
If no value at all is utilized by a value block, the complete representation,
including the name designation, is omitted for this value.
Example:
The following values are utilized in a LOGO! control program:
I1, I2, and I5
Q1 and Q2
M1 to M6, and M17
AQ1
The PA-SMS has the following appearance:
I:
xxx1xx10
Q:
xxxxxx11
M:
xx100111
xxxxxxxx
xxxxxxx1
AQ:
00086
Dezember 06
11
Commisioning
INSYS GSM 4.2 LOGO!
3.1.2
Actual Values
A LOGO! control program is divided into blocks. Actual values are assigned to each
of these blocks during runtime of the control program. For example, for pulse
counters, the actual value is the pulse count.
While the PA buffer displays the permanent LOGO! I/O elements (inputs, outputs,
etc.), an actual value scan can be used to read out function block values of the
LOGO! control program itself.
Actual values of function blocks are scanned via SMS. The utilized blocks are
addressed using three-digit block numbers that are assigned by the LOGO!Soft
Comfort PC software.
The following function blocks are supported by the INSYS GSM 4.2 LOGO!:
-
ON delay
-
OFF delay
-
Latching On delay
-
ON/OFF delay
-
Staircase lighting switch
-
Convenience switch
-
Interval time-delay relay
-
Interval time-delay relay, edge-triggered
-
Pulse generator
-
Counter
-
Elapsed time counter
-
Trigger
-
Trigger, analog
-
Delta trigger
-
Comparator, analog
-
Analog value monitoring
-
Amplifier
NEW from firmware version 1.25:
12
-
ramp function
-
PI Controller
-
Multiplexer, analog
Dezember 06
INSYS GSM 4.2 LOGO!
3.2
Independent Actions
3.2.1
Monitoring of Values by Polling the PA Buffer
Commisioning
The LOGO! PA buffer values are monitored in order to generate a fault message
when a value changes.
This monitoring is performed in the polling operation, that is, the INSYS GSM 4.2
LOGO! reads out the LOGO! PA buffer cyclically, thus enabling changes to be
detected.
The scan interval can be set in the seconds range (1 to 255 s).
If a change in a monitored value is registered, a fault message is transmitted
(SMS, SMS to fax, SMS to e-mail, SMS to conventional telephone).
In the case of digital values, the following events (selectable) can trigger
transmittal of a fault message:
-
Change to 0
-
Change to 1
-
Any change
For analog values, an upper limit and a lower limit must be specified; in this case,
the following events (selectable) can also trigger transmittal of a fault message:
-
Value leaves the specified range (lower limit to upper limit)
-
Value enters the specified range (lower limit to upper limit)
-
Any range change
The fault message can have the following content (selectable):
Dezember 06
-
PA-SMS: An image of the PA buffer (utilized values) containing all current
values at the time of the change is received. Depending on the number of
utilized values in the PA buffer, the SMS can also be divided into multiple (up
to 3) SMS. This message cannot be sent as an e-mail.
-
Text message with predefined message: This facilitates easier classification of
the change. A general message can be prefixed to each of these messages (e.g.,
with asset number, address, etc.).
13
Commisioning
INSYS GSM 4.2 LOGO!
All fault messages can be transmitted to a primary recipient and up to 10 other
recipients, irrespective of the content.
A maximum of 20 values from the PA buffer can be monitored.
As is the case for each automatic SMS transmittal for INSYS GSM 4.2 LOGO!,
additional attempts will be made to transmit the message in the event of an error
(can be adjusted, default: 3 attempts).
Use of alarm inputs
Use of the two alarm inputs available on the INSYS GSM 4.2 LOGO! is restricted
when value monitoring is active.
If 1 to 10 values are being monitored, alarm input 2 is not available. If more than
10 values (11-20) are being monitored, alarm input 1 is also not available.
Behavior after Reset or Power-Up
After a reset or power-up of the INSYS GSM 4.2 LOGO!, values in the PA buffer that
are outside the condition specified during parameter assignment do not result in
a fault message. The LOGO! status is accepted in this case without being
evaluated.
Timing
The shortest polling cycle is 1 s, i.e., signals of less than 1 s cannot be detected, in
general.
The PA buffer will not be polled if the INSYS GSM 4.2 LOGO! is occupied with any
of the following actions:
14
-
Scan of field strength and login state, duration of approximately 5 s, interval of
60 s, can be disabled.
-
Scan of SMS input memory and its execution, duration of approximately 5 s,
interval of 60 s, can be disabled.
-
Existing GSM connection (data connection, DTMF connection, security
callback)
-
Transmittal of an SMS, e.g., fault message, “alive” SMS (can be disabled),
power-up SMS (can be disabled), duration of approximately 10 s)
Dezember 06
INSYS GSM 4.2 LOGO!
Commisioning
In all cases, changes in the monitored values must remain static until the polling
is repeated. This condition is satisfied in most applications (e.g., liquid level
monitoring systems or motor circuit breakers).
The monitoring function using INSYS GSM 4.2 LOGO! is primarily intended for
static signals and values.
If the utilized signal (e.g., pulses) does not conform to this requirement, it must be
fed to an ON or OFF delay or an RS flip-flop in the LOGO! control program.
Occurrence of Multiple Faults or Changes
If multiple changes occur within one polling interval, the corresponding messages
are transmitted in the order in which they occur in the PA buffer or PA-SMS, i.e.,
starting from I1 to I24 to outputs Q, bit memory M, etc., to analog bit memory
AM1 to AM6.
Polling of the PA buffer does not restart until all changes occurring during this
scan interval have been evaluated and transmitted as fault messages.
If a change occurs in another monitored value while a fault message is being
transmitted, the new fault message will be generated once the first alarm has
been transmitted and the next PA buffer poll operation has taken place. This will
only occur if the change is static over this time period.
3.2.2
Periodic PA-SMS
In addition to value monitoring, it is also possible to receive the current states and
values of the LOGO! PA buffer at periodic intervals.
A periodic PA-SMS can be transmitted at hourly intervals ranging from 1 to 255
hours. After the specified time has elapsed, the PA buffer is read out and the
utilized values of the PA buffer are transmitted as a PA-SMS.
The LOGO! PA buffer scan is attempted up to three times, if necessary. “NO
SUCCESS” will be transmitted instead of the PA-SMS.
The timing of this SMS is deferred if any of the following functions are being
executed at that moment:
-
Dezember 06
Scan of login state and field strength (update of STATUS and SIGNAL LEDs),
duration of approximately 5 s, interval of 60 s (can be disabled, but operation
of the two LEDs will no longer be possible)
15
Commisioning
INSYS GSM 4.2 LOGO!
-
Scan of SMS input memory and, if necessary, execution of a received SMS
command; duration of approximately 5 s plus command execution time;
interval of 60 s (can be disabled, but scanning or parameter assignment via
SMS will no longer be possible)
-
GSM connections are active (data connection, DTMF connection, security
callback)
-
Transmission of an SMS, e.g., fault message, “alive” SMS (can be disabled),
power-up SMS (can be deactivated); duration of approximately 10 s)
If the LOGOUT time becomes active at the moment that the PA-SMS is periodically
processed, the module will be logged in to the GSM network and then logged out
again prior to transmittal.
The periodic PA-SMS is transmitted to only one destination. An expanded
recipient list cannot be utilized in this case.
Depending on the number of utilized values in the PA buffer, the SMS can also be
divided into multiple (up to 3) SMS.
As is the case for each automatic SMS transmittal for INSYS GSM 4.2 LOGO!,
additional attempts will be made to transmit the message in the event of an error
(can be adjusted, default: 3 attempts).
3.2.3
PA-SMS for Alarm Input
This function represents an expansion to the previous alarm input functionality of
the INSYS GSM 4.2 LOGO! However, instead of a fixed alarm text, a PA-SMS
(process image SMS) is transmitted, i.e., the utilized values of the LOGO! PA buffer.
For example, this function can be used to connect a service button. When this
button is activated, a PA-SMS will be transmitted containing the image of the
current values in the PA buffer. A LOGO! input or output does not have to be used
for this.
The LOGO! PA buffer scan is attempted up to three times, if necessary. If still no
reply is received from LOGO!, an SMS containing the text NO SUCCESS will be
transmitted instead of the PA-SMS.
As with all other alarm messages, the message can be transmitted to as many as
10 other recipients besides the primary recipient.
Depending on the number of utilized values in the PA buffer, the SMS can also be
divided into multiple (up to 3) SMS.
16
Dezember 06
INSYS GSM 4.2 LOGO!
Commisioning
As is the case for each automatic SMS transmittal for INSYS GSM 4.2 LOGO!,
additional attempts will be made to transmit the message in the event of an error
(can be adjusted, default: 3 attempts).
This function can only be used if the number of monitored values (see Section
4.2.1 Monitoring of Values) does not exceed 10. Otherwise, an alarm input cannot
be used.
In addition, all relevant properties for “standard” alarm processing of the INSYS
GSM 4.2 LOGO! are applicable.
3.3
Scan Options via SMS
3.3.1
SMS Commands
Many of the functions of the INSYS GSM 4.2 LOGO! can be configured via SMS
(automatic SMS evaluation function must be enabled). Moreover, it is also
possible to access the inputs and outputs of the INSYS GSM 4.2 LOGO!
Various information on the state of the LOGO! device as well as the control
program being run can be scanned via SMS in for the INSYS GSM 4.2 LOGO!
version.
Received SMS messages are evaluated in the INSYS GSM 4.2 LOGO! once per
minute. During this time, the LOGO! PA buffer is not polled (function: “monitoring
of values”).
All commands via SMS must exhibit the following syntax:
[<password>,]<command>[,CN: <callback>]
CN represents callback number
<password>
<command>
<callback>
Password for remote configuration and SMS scan. If a
password is not set, the separating comma is omitted. No
blank spaces are allowed between the password, comma, and
command.
Command to be executed, including parameters
Optional callback number to which the return
message will be sent via SMS. If a return SMS is not desired,
the separating comma is omitted. No blank spaces are
allowed between the command, comma, and “CN:”. A blank
space must be inserted after the “CN:”.
Note: The following characters do not have to be sent: “[„, „]”, “<” and “>”. They
are merely used in the syntax description to label parameters (“<” and “>”)
as well as optional parameters (“[” and “]”).
Dezember 06
17
Commisioning
3.3.2
INSYS GSM 4.2 LOGO!
Monitoring of PA Buffer (Process Image Buffer)
Command:
MONITOR?
A reply follows in the form of a PA-SMS. It contains the current states of the
utilized values in the PA buffer.
If the content of this message does not fit into one SMS, the message is
automatically divided into multiple (up to 3) SMS messages.
The LOGO! PA buffer scan is attempted up to three times, if necessary. If still no
reply is received from LOGO!, an SMS containing the text “NO SUCCESS” will be
transmitted instead of the PA-SMS.
A callback number (“CN: “) must be specified.
3.3.3
Reading Out the Actual Values
Command:
BLOCK<blocknumber1>[,<blocknumber2>[,<blocknumber3>]]?
The block numbers must always be specified with three digits.
A reply follows containing the actual values of the desired function blocks.
The actual values of up to three function blocks can be scanned for each SMS.
The scan of actual values on LOGO! is attempted up to three times, if necessary. If
still no reply is received from LOGO!, an SMS containing the text NO SUCCESS
will be transmitted instead of the actual-value SMS.
A callback number (“CN: “) must be specified.
A one-time configuration of the INSYS GSM 4.2 LOGO! is also required in order to
assign function and block numbers to the device.
18
Dezember 06
INSYS GSM 4.2 LOGO!
Commisioning
The following output always occurs in the reply for each block:
BLOCK<blocknumber>:
<actualvalue1>
[<actualvalue2>
[<actualvalue3>]]
If a requested block is not entered in the INSYS GSM 4.2 LOGO! and is thus
unknown, the following output occurs for this block:
BLOCK<blocknumber>:
UNKNOWN
The output is terminated after the first unknown block.
The following table shows the output format of each of the supported function
blocks. The actual value designations are geared to the nomenclature of LOGO!:
Function
Output Format
ON delay
BLOCK<blocknumber>
T=xx:yy<timebasis>
BLOCK<blocknumber>
T=xx:yy<timebasis>
BLOCK<blocknumber>
T=xx:yy<timebasis>
BLOCK<blocknumber>
T=xx:yy<timebasis>
BLOCK<blocknumber>
T=xx:yy<timebasis>
BLOCK<blocknumber>
T=xx:yy<timebasis>
BLOCK<blocknumber>
T=xx:yy<timebasis>
BLOCK<blocknumber>
T=xx:yy<timebasis>
BLOCK<blocknumber>
T=xx:yy<timebasis>
BLOCK<blocknumber>
Cnt=xxxxxx
BLOCK<blocknumber>
MN=xxxxh
OT=xxxxxh
OFF delay
Latching ON delay
ON/OFF delay
Staircase lighting switch
Convenience switch
Interval time-delay relay
Interval time-delay relay, edgetriggered
Pulse generator
Counter
Elapsed time counter
Dezember 06
19
Commisioning
INSYS GSM 4.2 LOGO!
Function
Output Format
Trigger
BLOCK<blocknumber>
fa=xxxx
BLOCK<blocknumber>
Ax=+/-xxxxx
BLOCK<blocknumber>
Ax=+/-xxxxx
BLOCK<blocknumber>
Ax=+/-xxxxx
Ay=+/-xxxxx
?=+/-xxxxx
BLOCK<blocknumber>
Aen=+/-xxxxx
Ax=+/-xxxxx
BLOCK<blocknumber>
Ax=+/-xxxxx
Trigger, analog
Delta trigger
Comparator, analog
Analog value monitoring
Amplifier
new:
ramp function
PI Controller
Multiplexer, analog
Note:
20
BLOCK<blocknumber>
Aq=+/-xxxxx
BLOCK<blocknumber>
Aq=+/-xxxxx
BLOCK<blocknumber>
Aq=+/-xxxxx
For function blocks for which a timer value is returned (T=…), the timer
for this function that is currently active is always output, provided the
function has multiple timers (e.g., convenience switch).
Dezember 06
INSYS GSM 4.2 LOGO!
3.3.4
Commisioning
Status Scan of LOGO!
3.3.4.1 Scanning Status
Command: STATUS?
A reply follows indicating the status of LOGO!
The LOGO! status scan is attempted up to three times, if necessary. If still no reply
is received from LOGO!, an SMS containing the text NO SUCCESS will be
transmitted instead of the status SMS.
A callback number (“CN: “) must be specified.
The format of the reply is as follows:
STATUS: <logo-status>
<logo-status>:
RUN
STOP/ REMOTE
PARAM
Status
Meaning
RUN
LOGO! is in RUN mode
STOP/
REMOTE
LOGO! is in STOP mode; when an
INSYS GSM 4.2 is interfaced, REMOTE
is always signaled as well because the
serial interface is connected
PARAM
LOGO! is in parameter assignment
mode
NO SUCCESS INSYS GSM 4.2 message:
Dezember 06
-
LOGO! did not reply (cable not
connected, etc.)
-
LOGO! is in programming
mode
21
Commisioning
3.3.4.2
INSYS GSM 4.2 LOGO!
Changing Status
e.g.: Set status to RUN
Command:
STATUS=<logo-status>
<logo-status>: RUN
STOP
Switch on LOGO!,
start control program
Switch off LOGO!,
terminate control program
The LOGO! status change is attempted up to three times, if necessary. If still no
reply is received from LOGO!, an SMS containing the text “NO SUCCESS” will be
transmitted instead of “OK”
If LOGO! acknowledges the status change negatively, “ERROR” is sent as the reply
SMS. This can also occur if the current LOGO! status already matches the status to
be set.
A callback number (“CN: “) does not have to be specified. However, without a
callback number, there is no reply.
3.3.5
LOGO! Checksum
Command:
CHKSUM?
A reply follows containing the checksum of the control program running on the
LOGO!
The checksum output is made up of four hexadecimal digits.
This function can be used to uniquely identify a control program (version control).
When an elapsed time counter is used, the checksum is changed when the “Reset
All” (Ral) input of the counter is activated the first time. Afterwards, the checksum
is not changed. In this case, the checksum of the control program must be read
out again.
The LOGO! checksum scan is attempted up to three times, if necessary. If still no
reply is received from LOGO!, an SMS containing the text “NO SUCCESS” will be
transmitted instead of the checksum SMS.
A callback number (“CN: “) must be specified.
22
Dezember 06
INSYS GSM 4.2 LOGO!
3.3.6
Commisioning
Summary of LOGO!-Specific SMS Commands
Command
Function
BLOCK<blocknumber1>
[,<blocknumber2>
[,<blocknumber3>]]?
CHKSUM?
Actual value scan of up to 3 function blocks
on the basis of the block number assigned in
the control program
MONITOR?
STATUS?
STATUS=<logostatus>
Scan of checksum of the control program
running on LOGO!
Scan of current values of PA buffer in the
form of a PA-SMS
Scan of LOGO! operating status
Change of LOGO! operating status
Like all other commands from the expanded command set of the INSYS GSM 4.2,
these command entries can also be preceded by AT**. These commands can be
sent not only via SMS but also via a GSM data connection. This requires a change
in the remote configuration mode. In this case, AT** must be prefixed.
3.4
New and Expanded Historical Entries
3.4.1
New Historical Entries
Meaning
SYSTEM
PLC ERROR
PLC PERIODIC
3.4.2
A reply was not received after three
attempts during LOGO!
communication
“Periodic PA-SMS” operation is starting
Expanded Historical Entries
Meaning
ALARM
Dezember 06
START
If a fault message becomes active due
to value monitoring, “PLC CHANGE” is
indicated as a more detailed
description in place of where the
number of pulses and the alarm input
are specified for alarms via the alarm
input.
23
Commisioning
INSYS GSM 4.2 LOGO!
4
Commissioning
4.1
Installation Overview
4.1.1
Installation for Configuration
For initial commissioning and for configuration, the serial interface (RS 232) of the
INSYS GSM 4.2 LOGO! and the configuration PC are connected.
The supplied standard 9-pin cable with D-Sub 9 plug and socket connectors is
used as the cable for the RS 232.
4.1.2
Installation for Operation with Siemens LOGO!
For operation with LOGO!, the additional enclosed 9-pin INSYS adapter cable is
used.
The end of the cable with the fastening nuts is connected to the Siemens LOGO!
PC cable, the opposite end of which is inserted in the module card slot of LOGO!
The end of the cable with the fastening screws is connected to the D-Sub socket of
the INSYS GSM 4.2 LOGO!.
Note:
24
Each time the PC and LOGO! connection is reestablished, the INSYS GSM
4.2 LOGO! should be restarted (Reset key pressed).
Dezember 06
INSYS GSM 4.2 LOGO!
4.2
Commisioning
Firmware Update
The firmware for the INSYS GSM 4.2 LOGO! as well as the flashloader software
and the associated operator’s guide can be found on the supplied CD-ROM.
4.3
Commissioning
The easiest way to perform initial commissioning is to use the HSComm GSM
LOGO! parameter assignment software.
Perform the following steps:
1. Have the SIM card and PIN number ready (but do not use yet).
2. Connect the INSYS GSM and the PC using the serial cable (male/female).
Connect the GSM antenna.
3. Connect the voltage supply to the 10 to 60 VDC terminals and the negative
pole to GND, and switch on.
4. Initialization begins.
• Connect LED illuminates for approximately 4 s.
• After an additional 8 s, the Status LED starts flashing for approximately 20
s.
• Then, the Status LED goes out because an SIM card is not inserted and a PIN
is not stored.
• The Signal LED illuminates or flashes depending on the strength of the
GSM network.
5. Start HSComm in Windows:
Dezember 06
25
Commisioning
INSYS GSM 4.2 LOGO!
The program starts.
6. On the Interface menu, select the following default settings for the serial
interface on the configuration PC:
If the INSYS GSM 4.2 is in an undefined state, you have the option of first restoring
the factory settings (Send default settings button). If the INSYS GSM 4.2 does not
respond to the transferred commands, select the Synchronize RS232 button to
adapt the baud rate and data format automatically.
26
Dezember 06
INSYS GSM 4.2 LOGO!
Commisioning
7. Enter the PIN number (stored in the INSYS GSM 4.2 LOGO!): Select the Basic
Settings tab, select New PIN, and enter the PIN for the SIM card. The PIN will be
stored in the INSYS GSM and used at each restart to log in to the GSM network.
Transmit the setting by activating the Send settings button.
8. Disconnect the voltage supply.
9. Press the recessed yellow knob above the SIM card holder
(see picture) and remove the card holder. Insert the SIM
card and reinsert the card holder. The contacts of the SIM
card point to the left during insertion.
10. Connect the power supply.
11. The initialization operation starts over (see item 4): If
the device has successfully logged in, the Power and Signal
LEDs then illuminate, and the Signal LED indicates the
strength of the GSM signal.
Dezember 06
27
Commisioning
INSYS GSM 4.2 LOGO!
12. Check the field strength of the GSM signal using the Detect GSM intensity button:
The reply should indicate a field strength of at least 12; otherwise, the antennal
must be relocated.
4.4
Troubleshooting
4.4.1
No response to commands
¾
The INSYS GSM 4.2 LOGO! and the terminal (configuration PC or controller)
must operate the serial interface with the same baud rate and data format
(default: 19,200 bits per second, 8N1).
¾
The INSYS GSM 4.2 LOGO! can be reset to the factory settings by holding
down the Reset button (> 25 s).
4.4.2
4.4.3
A connection is not established
¾
Check the signal quality of the GSM network.
¾
Is the INSYS GSM 4.2 LOGO! logged in?
¾
Is the SIM card activated for incoming data connections?
¾
Has the call number been selected for the data connection?
¾
Is there sufficient power supply for transmittal?
Alarm SMS is not transmitted
Was the SMS service center number entered correctly?
¾ Deactivate DTR drop if no device is connected at the serial interface or the
device does not support the DTR function.
¾ Deactivate handshake if no device is connected at the serial interface or the
device does not support the hardware handshake.
28
Dezember 06
INSYS GSM 4.2 LOGO!
4.5
Commisioning
Signal Quality
The signal quality at the receiving location is scanned using the Detect GSM
intensity button on the Basic Settings tab or the AT**SIGNAL AT command. The
reply should supply a value greater than 12 (maximum is 31). If the receiving
conditions are below this criterion, relocate the antenna. If the reply contains a
value of 99, the field strength cannot be determined (e.g., a power failure
occurred or the antenna is defective).
The Signal LED indicates the signal quality at update intervals of 1 minute (in the
idle state):
LED Signal
4.6
Reply of AT**SIGNAL?
Permanently
on
25 to 31
60 ms
23 to 24
140 ms
21 to 22
260 ms
19 to 20
380 ms
17 to 18
500 ms
15 to 16
1,000 ms
13 to 14
Permanently
off
0 to 12
99
Quality of Radio Link
Optimal
Very good
Good
Adequate
Inadequate Î Improve location
Cannot be determined
Login State in GSM Network
Enter AT+CREG?<CR> in the terminal window to check whether your SIM card
and the entered PIN were accepted by the GSM network. The form of the reply is
<+CREG: 0,3> -. rejected. The login state is indicated by the second parameter in
the reply.
0
1
2
3
5
Dezember 06
Not logged in, no search for GSM network
Logged in with default carrier
Not logged in, search for GSM network
Rejected
Logged in, roaming
29
Commisioning
INSYS GSM 4.2 LOGO!
If you are not logged in, use the AT+CPIN?<CR> command in the terminal
window to check whether the device is awaiting a PIN entry. Replies have the
following meanings:
READY
No other entries required
SIM PIN
Enter the PIN for the SIM card Î Store the PIN for automatic login
by the INSYS GSM 4.2 LOGO! and execute a Reset.
SIM PUK
Enter PUK for the SIM card Î PIN has been repeatedly entered
incorrectly and is locked. The PUK, which can be found in your GSM
provider contract, is required. Remove the SIM card and enter the
PUK using the menu of a standard mobile phone. Always check
afterwards to make sure that the correct PIN is stored in the INSYS
GSM.
30
Dezember 06
INSYS GSM 4.2 LOGO!
5
Configuration using the HSComm LOGO! Software
5.1
General
HSComm
The HSComm LOGO! software is used to assign parameters for the INSYS GSM 4.2
LOGO! in Windows. No explicit knowledge of the AT commands and their
parameters is required to use this software. The settings are only transferred to
the INSYS GSM 4.2 LOGO! by activating the “Send” instruction. Likewise, the
settings are only read out by activating the “Read settings” instruction.
The HSComm LOGO! parameter assignment software can be downloaded free of
charge on the Internet: http://www.insys-tec.de
5.2
Help
Context-sensitive Help can be called at any time using the F1 key or the Help
menu.
A complete command reference for the expanded INSYS AT commands can also
be found in Help.
5.3
Menus
5.3.1
File
The current settings as displayed in the HSComm interface can be saved as a file
and redisplayed.
Dezember 06
31
HSComm
5.3.2
INSYS GSM 4.2 LOGO!
Interface
Settings for the serial interface used on the configuration PC. The baud rate and
format (data bits, stop bit, parity) must match the settings of the serial interface
on the side of the INSYS GSM 4.2 LOGO!
5.3.3
Errors
If errors occur during parameter assignment, a menu is displayed indicating the
error messages in plain text.
5.3.4
Language
Selection of the HSComm interface
language: German or English. The
setting does not have any effect on the
functionality of the INSYS GSM 4.2
LOGO!
5.3.5
PLC
Recommended default settings and notes on use of the INSYS GSM 4.2 with a PLC
from leading manufacturers. These settings can be adapted to the particular
requirements.
These settings are only transferred by activating the Configure PLC modem button.
5.3.6
Overview
All of the current settings of HSComm LOGO! are displayed for easy review. The
output extends over several screens and can be printed out or saved as a text file.
Note:
32
Read out your device settings and have them ready whenever you
initiate a connection to the hotline!
Dezember 06
INSYS GSM 4.2 LOGO!
5.4
HSComm
Status Bar
The status bar at the bottom of the HSComm window shows the serial interface
settings and activities. RX and TX illuminate synchronously when receiving and
sending data.
5.5
Buttons
5.5.1
Send settings
The current HSComm settings will be transferred to the INSYS GSM 4.2 LOGO!
The settings in the PLC window are only transferred when the Send PLC
configuration button is activated.
5.5.2
Read settings
The current settings of the INSYS GSM 4.2 LOGO! will be read out and displayed in
HSComm.
5.5.3
Send default settings
The factory settings are loaded and a reset is executed. The device then logs in to
the GSM network again if the PIN is stored.
5.5.4
Reset
Software reset of the INSYS GSM 4.2 LOGO! The device then logs in to the GSM
network again if the PIN is stored.
5.5.5
Synchronize
The serial interface of the INSYS GSM 4.2 LOGO! and the connected device must
be configured the same. When the “Synchronize” button is activated, all possible
settings for baud rate and data format are checked on the PC side until both sides
match.
5.5.6
Abort
Cancels an ongoing data transmission (Send settings, Read settings, Send default
settings – indicated by the progress bar over the buttons).
Dezember 06
33
HSComm
5.6
INSYS GSM 4.2 LOGO!
Tabs
Settings for the basic and expanded functions are divided over several dialogs,
which can be selected using tabs. The settings are not transferred to the INSYS
GSM 4.2 LOGO! until the Send settings button is activated.
Functions relevant to the LOGO! version are described in the following sections.
The factory settings should be retained elsewhere, as these settings are not
essential for operation with LOGO!
Additional function descriptions can be found in the user manual for the standard
version.
5.7
Basic Settings
General settings are made on the Basic Settings menu.
34
Dezember 06
INSYS GSM 4.2 LOGO!
5.7.1
5.7.1.1
HSComm
GSM Connection
PIN
The INSYS GSM 4.2 can store the PIN for the SIM card internally and use it to log in
to the GSM network independently.
To enter a PIN, select New PIN and enter the PIN. An * is displayed in place of the
entered characters. The default setting is “0000”. If the INSYS GSM 4.2 has stored
a PIN, the PIN active option is selected.
If the Delete PIN option is selected, any PIN that is stored in the INSYS GSM 4.2 will
be deleted. This option also enables operation of SIM cards without a PIN.
PIN active indicates that a PIN is stored. The login state is shown underneath and
takes the following form:
GSM: Logged in
GSM: Rejected
GSM: Not logged in
GSM: Network search
SIM PIN missing
SIM PUK missing
Ready
Access not permitted by GSM network
SIM accepted but no access to GSM network
Radio contact with GSM network is too weak Î
Relocate antenna
Enter PIN for SIM card and restart the device
PIN for SIM card locked after repeated erroneous
password entry attempts. The PUK, which can be
found in your GSM provider contract, is required.
Remove the SIM card and enter the PUK using the
menu of a standard mobile phone. Before inserting
the card, always check to make sure that the correct
PIN is stored in the INSYS GSM.
5.7.1.2
Service Center Number
Transmittal of alarm messages via SMS requires that you enter the number of the
SMS Service Center (SMSC) of your GSM network operator . Enter the number in
international format (e.g., Germany: +49...) .
The number of the SMS Service Center for your SIM card can be found in your
GSM provider contract.
5.7.1.3
Automatic SMS Evaluation
Received SMS are read out once per minute. Each SMS is checked for usability
(parameter assignment, alarm input scan, switching output setting) and, if
applicable, validity (format, password, selective call acceptance). After this
evaluation, a reply SMS is sent, if appropriate, and the SMS is then removed from
the memory. Incoming SMS can also be protected with the remote parameter
assignment password.
5.7.1.4
SMS Memory Locations
The number of available SMS memory locations available on the SIM card is read
out using the ‘Determine SIM SMS-memory locations’ button.
Dezember 06
35
HSComm
INSYS GSM 4.2 LOGO!
The controller scans the SMS memory locations in 1-minute cycles. The baud rate
and number of assigned SMS memory locations determine the duration of the
scan.
Example:
Baud rate
Assigned SMS memory
Duration of scan
19200
15
5 seconds
The number of SMS memory locations that the controller has to take into
consideration during its scan routine must be specified in the ‘Assigned SMS
memory locations’ field. A potential problem can occur if the incoming SMS
exceed the scanned SMS memory. In this case, SMS are stored in the memory area
not taken into consideration by the scan and can thus no longer be processed by
the controller.
5.7.1.5
Selection Attempt
The number of object selection attempts can be specified for the situation where
selection is not immediately successful. This setting is active for the following:
• Transmittal of messages (alarm or routine SMS)
• Establishment of connection for alarm messages via a data connection
Establishment of connection for security callback.
Possible values are 1 to 12 (default is 3).
Only one transmission attempt is made for a confirmation SMS following a
parameter assignment via SMS.
5.7.1.6
Detect Field Intensity
The current field strength of the GSM signal is read out and graphically displayed.
Values below 12 indicate a weak field – the antenna should be relocated. A value
of 99 indicates that the field strength could not be determined, e.g., due to power
failure or damaged antenna.
If the antenna is relocated, a period of 5 to 10 s normally elapses before the field
strength is displayed correctly by the INSYS GSM 4.2 LOGO!.
36
Dezember 06
INSYS GSM 4.2 LOGO!
5.7.2
HSComm
System Monitoring
5.7.2.1
Periodic Logout/Login
To enable the GSM network operator to perform maintenance functions, it is
useful for the INSYS GSM 4.2 to briefly log out and then log in again on a daily
basis. Specify the logout time and duration (1 to 98 minutes).
Then, the INSYS GSM 4.2 logs in to the GSM network again, provided that the PIN
for the SIM card is stored.
5.7.2.2
Periodic Logout and Login with Reset
In addition, a device can be reset using a logout and login operation with reset.
After the device reset, the INSYS GSM 4.2 logs in to the GSM network again,
provided that the PIN for the SIM card is stored.
5.7.2.3
Routine Message via SMS
The INSYS GSM 4.2 can transmit a “life sign” in the form of an SMS message to the
specified call number on a daily, weekly, or monthly basis. During transmission,
the Status LED flashes.
5.7.2.4 Power-UP SMS
If this function is active, an SMS is transmitted at each power-up (but not at a
reset).
5.7.3
Date/Time of Day
Date and time of day of the INSYS GSM 4.2 real-time clock can be set as desired or
to the system time of the configuration PC.
5.7.4
Serial Interface
The parameters for the serial interface of the INSYS GSM 4.2 cannot be changed in
the LOGO! version. These parameters are permanently set for connection to the
Siemens LOGO! (9,600 bits per second and 8E1).
Dezember 06
37
HSComm
5.8
INSYS GSM 4.2 LOGO!
LOGO! Settings
The LOGO!-specific settings are activated in a tree structure in the left pane.
Double-clicking the desired function opens the relevant parameter assignment
menu. An image of the PA buffer is displayed in the right pane as an overview.
38
Dezember 06
INSYS GSM 4.2 LOGO!
5.8.1
HSComm
Defining Values to be Utilized
The first configuration step is to define which values of the PA buffer are to be
utilized in the LOGO! control program. These values form the content of a PA-SMS
and represent the basic set of values to be monitored.
Double-clicking in the tree structure on the left opens the corresponding window
(here, for example, the window for digital inputs).
The check boxes for the utilized values must be selected; they appear green in the
PA buffer overview in the right pane.
5.8.2
Configuring Periodic PA-SMS
If a periodic PA-SMS is to be sent, the
corresponding check box must be
selected on the “Periodic PA-SMS”
menu. The timing of the scan intervals
is entered in the “Polling Cycle”
window. The recipient of the periodic
PA-SMS must be entered in the “Target
Number” window.
5.8.3
Defining Actual Values
To enable actual values of function blocks to be scanned via SMS using the INSYS
GSM 4.2 LOGO!, the block numbers and function block type must be assigned
from the LOGO! control program.
Dezember 06
39
HSComm
INSYS GSM 4.2 LOGO!
A maximum of 30 function blocks can be specified.
40
Dezember 06
INSYS GSM 4.2 LOGO!
5.8.4
HSComm
Monitoring of Values
The “Monitoring of Values” function is activated by selecting the “Alarm if value is
changed” check box.
The displayed message can then be
confirmed with “OK.” Meaning: When
monitoring of values is active, alarm
input 2 of the device is no longer
available because the message
memory must be reserved for monitoring of values. If more than 10 values are
monitored, alarm input 1 is also disabled, and a message to that effect appears.
The timing of the scan intervals
(i.e., the update cycle between
INSYS GSM 4.2 and LOGO!) is
specified in the “Polling Cycle”
window.
The timeout setting specifies the
pause before the next scan
interval if the connection between
INSYS GSM 4.2 and LOGO! has
been interrupted. This pause is
necessary because a connection
elsewhere (e.g., for parameter
assignment) would not be possible
if the scan cycles of the INSYS GSM
4.2 LOGO! remained constant.
The message text is prefixed to each fault message transmitted when a value is
changed (not if the fault message is transmitted as a PA-SMS)
Dezember 06
41
HSComm
5.8.5
INSYS GSM 4.2 LOGO!
Defining and Configuring Values to be Monitored
The values to be monitored are defined and parameterized in the menus below.
A specified state or range is assigned to the monitored values, and the fault
message type is defined.
Only values that have been selected as utilized values (shaded in green) can be
monitored. The screen below is the starting point:
42
Dezember 06
INSYS GSM 4.2 LOGO!
5.8.5.1
HSComm
Defining Monitored Values
The first configuration
step is to define which
values of the PA buffer
are to be monitored in
the LOGO! control
program.
Double-clicking in the
tree structure on the
left opens the
corresponding
window (here, for example, the window for digital inputs).
Only those values that have been defined as utilized values can be selected.
The check boxes for the utilized values must be selected; these values appear red
in the PA buffer overview in the right pane.
5.8.5.2
Configuring Monitored Values
Once a check box is selected, another window appears in which you select the
value to be monitored and the associated message.
These windows can be opened at any time by double-clicking the monitored
values highlighted in red in the right pane (PA buffer overview).
The following configuration
options are available for digital
values.
In this example, a fault
message containing a defined
text is transmitted if Input I1
goes to 1.
If other recipients besides the
main recipient number are
defined, this is indicated by the
presence of the group symbol
next to the number field.
Dezember 06
43
HSComm
INSYS GSM 4.2 LOGO!
The following configuration options are
available for analog values.
In this example, a fault message is
transmitted as a PA-SMS if analog
Input AI3 moves outside the range of
250 to 800.
The lower limit must be less than the
upper limit.
The lower limit can be set to 0.
If other recipients besides the main
recipient number are defined, this is
indicated by the presence of the group
symbol next to the number field.
44
Dezember 06
INSYS GSM 4.2 LOGO!
5.9
HSComm
Alarm/Switching
Information on the use of the alarm inputs of INSYS GSM 4.2 to execute standard
alarm functions can be found in the user manual for the standard version.
Only those items that have been added for the LOGO! version are presented here.
Alarm input 2 is no longer available for configuration as an alarm input since
values were defined for monitoring in the previous examples (see above). This is
indicated by the following display:
Alarm input 1 can still be utilized as before as an alarm input as long as the
number of LOGO! values monitored does not exceed 10.
Dezember 06
45
HSComm
INSYS GSM 4.2 LOGO!
An option has been added to transmit a PA-SMS containing the current LOGO! PA
buffer status when the alarm input is activated (here, in this example, using the
available alarm input 1):
All utilized values are entered in the PA-SMS; these values can be selected in the
LOGO! tab.
An option is also available to enter additional recipients for this message. This is
indicated by the group symbol next to the number field.
46
Dezember 06
INSYS GSM 4.2 LOGO!
5.10
HSComm
Other Recipients
In addition to the main recipient, up to 10 additional recipients out of the pool of
numbers can be specified to receive each fault message. The number pool can
contain 20 recipient numbers.
The additional recipients (in rows) are linked to the available alarm messages (in
columns).
For each alarm message, a maximum of 10 additional recipients can be assigned.
The Delete all connections button removes all of the entered links.
If fault messages are to be defined for value monitoring, the assignment is made
by designating the monitored values rather than using an alarm input:
Dezember 06
47
Example
INSYS GSM 4.2 LOGO!
6
Ventilation System Example
6.1
System and Function Description for Ventilation System
6.1.1
System Description
Fans are used to introduce fresh air and
discharge exhaust/warmed air.
Filter
Flow indicators monitor the fans; if a flow
indicator is activated (debounce time of 10
Flow
s), the system switches off and the fault light
indicator
is set.
Intake
Overpressure is not permissible; therefore,
the intake fan runs/restarts only if the
Abwärme
Exhaust
exhaust fan is working.
Filter
There is a filter with a switching contact at
Machine
Flow
both fans. After the maintenance period
indicator
expires, the switching contact is activated
and the fault light is set. System operation is
not adversely affected.
An elapsed time counter is administered for each motor. After the maintenance
period, the fault light is set. System operation is not adversely affected.
A fault counter is administered.
6.1.2
Monitoring the System Function Using the INSYS GSM 4.2 LOGO!
The following SMS are generated:
INSYS ventilation demo system: Emergency OFF was activated
INSYS ventilation demo system: Fresh air filter change required
INSYS ventilation demo system: Exhaust filter change required
INSYS ventilation demo system: Intake flow indicator has been activated
INSYS ventilation demo system: Exhaust flow indicator has been activated
INSYS ventilation demo system: Room temperature greater than +55 C
Note:
48
Actual values of the fault counter as well as the elapsed time counters
can be requested via SMS.
Dezember 06
INSYS GSM 4.2 LOGO!
6.2
Example
Terminal Diagram for INSYS GSM 4.2 LOGO! to Siemens
LOGO!
+24 V
S
1
Sch
alte
rSch
EIN
ließ
/AU
er
S
S
3
S
4
Sch
alte
NOrT- Öff
AUner
S
Str
öm Sch
ung alte
swä rcht Öff
er Ablner
uft
S
6
Str
öm Sch
ung alte
swä rcht Öff
er Zulner
uft
Sch
alte
Filt
rer
Öff
Zul
ner
uft
S
7
S
5
Sch
alte
Filt
rer
Öff
Abl
ner
uft
S
2
Tas
terQuiSch
ttierließ
unger
EIN
/AU
S
H1
50.. 10..
GN .80 .60 GN GN RE GN INP INP GN
D VD VD D D SE D UT UT D
2
1
T
C C
L+M
L+ M I1 I2 I3 I4 I5 I6 I7 I8
L+ M
LOGO!
INSYS GSM 4.1
Version LOGO!
RS-232 Kabel
männlich / männlich
OU
OU OU
OU
T 2T 2- T 1T 1NO OU NC NO OU NC
T2
T1
AM2
PT100
LOGO!-PCKabel
PE
Q2
Q1
Q3
Q4
M M M ICM
IC
1+ 1- 2+ 2 21
AB
LU
FT
K1
ZU
LU
FT
K2
ST
ÖR
UN
G
T
H2
GND
PT
100
R1
Additional components utilized:
H1
H2
K1
K2
R1
S1 (normally open contact)
S2 (normally open contact)
S3 (normally closed contact)
S4 (normally closed contact)
S6 (normally closed contact)
S7 (normally open contact)
S5 (normally closed contact)
Dezember 06
On/Off message light
Fault message light
Primary protection for exhaust
Primary protection for intake
PT100 temperature sensor
On-off switch
Acknowledgement button
Emergency OFF switch
Exhaust flow indicator
Intake flow indicator
Intake filter
Exhaust filter
49
Example
6.3
50
INSYS GSM 4.2 LOGO!
Control System Function Chart
Dezember 06
INSYS GSM 4.2 LOGO!
6.4
Example
Configuration of INSYS GSM 4.2 LOGO!
Configuration of basic settings
Dezember 06
51
Example
INSYS GSM 4.2 LOGO!
Configuration overview of utilized values; these values are then included in a PASMS
Configuration of the periodic PA-SMS
52
Dezember 06
INSYS GSM 4.2 LOGO!
Example
Configuration of the function blocks for the actual value scan
Dezember 06
53
Example
INSYS GSM 4.2 LOGO!
Configuration of value monitoring; message text is prefixed to each fault
message.
Overview of all monitored and utilized values
54
Dezember 06
INSYS GSM 4.2 LOGO!
Dezember 06
Example
55
Example
INSYS GSM 4.2 LOGO!
A PT100 temperature sensor is
connected directly at analog input AI3
(AM2 PT100 expansion module).
Limit values are calculated according to
the following formula:
Limit = (Temperature/°C x 4) + 200
For an upper limit of +55°C, an upper
limit of 420 is calculated.
Monitoring only takes place when an
upper limit is exceeded, so a lower limit
of 0 is suitable (corresponds to –50°C).
A look at the relevant section of the
control program reveals that linking
inputs to circuit elements is not strictly
necessary to monitor inputs alone. It is only necessary to connect AI3 to a memory
bit since utilized inputs are not permitted to be open-circuit inputs.
Using this simple approach, LOGO! can be used solely to expand the inputs of the
INSYS GSM 4.2 LOGO!
6.5
Scan of Actual Values
Scan of fault counter via SMS:
The following SMS should be sent to the INSYS GSM 4.2 LOGO!:
BLOCK021?
Scan of exhaust and intake elapsed time counters via SMS:
The following SMS should be sent to the INSYS GSM 4.2 LOGO!:
BLOCK016,017?
56
Dezember 06