1
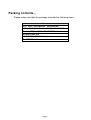
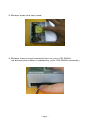
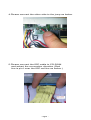
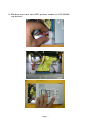
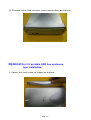
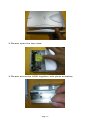
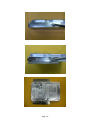
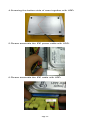
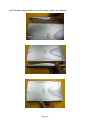
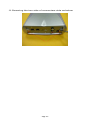
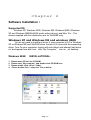
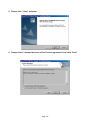
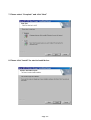
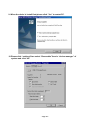
USER’S MANUAL
5.25” Type
USB 2.0+1394 HARD DISK
/5.25”PORTABLE CD-ROM
COMBO BOX ENCLOSURE
(with audio out function)
Index
Page
Introduction…………………………………………………..………………
Features &Specification…………………………………………………….
Requirements……………………..….………………………………………
Package contents…………………..……………….……………………….
Hardware Installation…..….………………………………………………….
Software Installation…...…………….……………….……………………….
2
2
2
3
4
17
- Page 1 -
Introduction:
This is an 5.25” 1394+USB2.0 combo hard disk /cd-rom enclosure,it will offer an easy to
carry Interface solution for user to add more storage & portable device for your PC.
Features & Specification:
1. USB INTERFACE:
▲
▲
▲
▲
▲
Interface standard: USB Ver:2.0
USB connectors/cable: 1 USB B type female connector and 1 USB A TO B Cable
Data transfer rate: USB2.0:High Speed 480Mbps
For one 3.5 inch Hard Disk only
EMI : CE & FCC
2. IEEE1394A INTERFACE
▲ Data Transfer Rate :100,200,400 (Mb/S).
▲ IEEE Standard :IEEE 1394A Compliant.
▲ Connectors : 2PORT x 6 to 6pin for exterior another 1394 HDD Box, IEEE 1394A
Standard.
▲ Separate cable bias (TPBIAS) and driver termination voltages supply for each
port.
▲ Truly Plug & Play automatic system configuration.
▲ Ideal for backup , storage Data files .
Requirements:
IBM PC/AT Compatible or Apple iMac.G4
USB 2.0 Host card or USB 2.0 HUB device/IEEE1394 PCI CARD
Windows 2000, Windows XP, Windows ME or Windows 98SE operating
system /Mac OS G4.
- Page 2 -
Packing contents:
Please make sure that this package includes the following items.
Item
5.25'' HDD / CD-ROM BOX
ENCLUSURE
USB A TO B CABLE/ 1394 6PIN TO 6PIN CABLE
Screw ( AFFIX CASE&HDD /CD ROM) set
POWER ADAPTER
CD DRIVER (WITH MANUAL)
PLATE SET
- Page 3 -
Chapter 1
Hardware Installation:
Optional : For portable CD-ROM box type
1. Open the two side of case as below.
- Page 4 -
2.Please open the top case.
3.Please insert vocal transmit line on your CD ROM
as below.(this cable is added by your CD-ROM normally)
- Page 5 -
4.Please connect the other side to the jump as below.
5.Please connect the IDE cable to CD-ROM
and advert the connection direction (Red
line is pin1 near the IDE red line as below.)
- Page 6 -
6.Please connect the IDE power cable to CD-ROM
as below.
- Page 7 -
7.Screwing the bottom side of case.
8.Please close the top side of case as below.
- Page 8 -
9.Please assemble the two side case as below.
10.Screwing the two side as below.
- Page 9 -
11.Please refer the correct case assembly as below.
Optional:For 3.5’ portable HDD box enclosure
type installation.
1. Open the two side of case as below.
- Page 10 -
2.Please open the top case.
3.Please screw the HDD together with plate as below.
- Page 11 -
- Page 12 -
4.Screwing the bottom side of case together with HDD.
5.Please assemble the IDE power cable with HDD.
6.Please assemble the IDE cable with HDD.
- Page 13 -
7.Please refer the view for assembly
and advert the connection direction (Red
line is pin1 near the IDE red line as below.)
8.Please close the top side of case as below.
9.Please insert the front panel side of case as below.
- Page 14 -
10.Please assemble the two side case as below.
- Page 15 -
11.Screwing the two side of connecters side as below.
- Page 16 -
Chapter 2
Software Installation:
Supported OS
Windows XP, Windows 2000, Windows ME, Windows 98SE (Windows
XP and Windows ME&Win2000 works without driver) and Mac 10.x . The
drivers supplied with this distribution are for Win98SE only.
Windows XP and Windows ME and windows 2000
You do not need to install any driver if your computer’s O.S is Windows
XP or Windows ME and Win2000 since the two O.S come with the supporting
driver. Turn On your computer, system will auto detect and attempt load driver
on “and appear new disk icon with “My Computer” icon on pc desktop
Windows 98SE
INSTALLATIONAL:
1. Please insert CD into the CD-ROM
2. Please enter “My computer” and double click CD-ROM icon
3. Please double click “driver” folder
4. Please double click “ setup.exe” file as below:
- Page 17 -
5. Please click ” Next” as below:
6. Please select “I accept the terms of the licenese agreement”and click “Next”
- Page 18 -
7. Please select “Complete” and click “Next”
8. Please click “Install” for start to install driver.
- Page 19 -
9. When the drvier is install final,please click “Yes” to reatart PC.
10.Please click “settings”then select “Removable”item in “device manager” of
system and click “ok”
- Page 20 -
11. Windows will ask you to restart PC ,please click “yes”
12.“My computer” will appear “Removable Disk”,please format HDD
when you use it at first time.
- Page 21 -