1
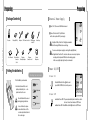
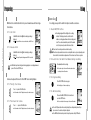
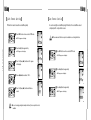
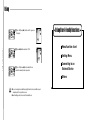
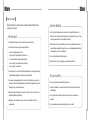
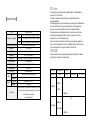
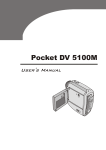
MADE IN KOREA
Version 1.0
Main Features
Telephone Message Recording
Quick Message Search
You can record the important telephone conversation and messages.
Desired recorded message can be easily searched by scan function
while playing back.
Firmware Upgrade Function
High-quality Design
Comfortable Grip & Dynamic Design
Long Recording Time
In LP mode, 66 hours and 20 minutes(128MB), 133 hours and 20 minutes(256MB).
Automatic Power Off
Power automatically turns off when the recorder is not in use for more than three
minutes.
Vibration Mode on Recording
Secret Recording with Vibration on Recording On & Off.
Additional Recording (Appendix)
You can add the recording to the same file number without affecting
the original.
Time Indicator for Remained Recording
All in One Menu Button
Recording Quality Mode
Recorded Message Monitoring
Recording quality can be selected using four modes, XQ/HQ/SP/LP.
Recording can be monitored through earphone during recording.
VOR Recording
File Search (Intro Scan)
The Recorder activates when sound is present, so that it may save memory space for
eliminating blank space in recording.
Intro scan function consecutively plays the first 7 seconds of each file
for easy search of the recorded messages.
Microphone Sensitivity
Playback Speed
Microphone sensitivity can be adjusted according to the distance from the sound
source and the ambient noise level.
It’s possible to set playback speed in 7 steps,
50/70/100(normal)/130/150/170/200%.
Repeated Playback
Hearing Aids
Any desired recorded file can be played repeatedly.
You can listen to the voice coming from the microphone on
earphones and adjust the sound levels without using the recording
function.
Section Repeat Playback
02
01
Download and Upload files Easily thru PC connection.
Beep sound can be set to sound at every press of the button.
Voice Recorder
Voice Recorder
USB Digital Interface
Beep Sound
Contents
User-Friendly Functions
Features
Name of Each Part
Package Contents
Putting the Batteries
External Power Supply Setting
Power ON/OFF
HOLD Setting
Volume Adjustment
1
5
7
7
8
8
9
9
03
Recording
Playback
Playback Speed Adjustment
Section Repeat Playback
Intro Scan
Deleting Recorded File
Recovery of erased file
Format
10
11
12
13
13
14
16
17
21
23
Connecting to an External Device
Recording through an External Microphone
Connecting to an Audio System
Listening through an Earphone
Recording a Telephone Message
Connecting to a PC
DVR Manager Installation Guide for Win XP User
Trouble Shooting in Manager Program for Win XP
Firmware Upgrade
26
27
28
29
30
34
36
39
Others
Precautions
Troubleshooting
Specifications
Warranty
41
43
45
04
Using
Menu Structure
Menu Setting
Voice Recorder
Voice Recorder
Preparing
Preparing
Preparing
Name of Each Part
Front View
Left
LCD Display
Folder Indicator
Back View
Right
Battery Level Indicator
Hand Strap Ring
Mic.
Sensitivity
Indicator
Section Repeat
Indicator
LCD Display
File No.
Indicator
Recording Quality
Indicator
Menu Button
Remained
Memory Indicator
Recording/Play
back Time
Indicator
Rec./Stop Button
Hold Status
Indicator
Recording/Playback Level Indicator
and Remained Memory Indicator
Repeat Playback
Indicator
Erase Button and
Section Repeat
Button
Top View
Battery Cover
Strap Hole
Built-in Speaker
Volume
Button
USB Port
Terminal
Play / Pause
Button
REW / FF Button
Hold Switch
06
05
VOR Recording
Indicator
Microphone/Input Terminal
Earphone / Output Terminal
Built-in Mic
Voice Recorder
Voice Recorder
Recording
Indicator
Preparing
Preparing
External Power Supply
Package Contents
1⃞ Select“DC”at the menu of USB Mode in General.
2⃞ Connect the Recorder to PC by USB cable.
● Recorder operates with PC power supply.
Earphone
USB Connection Cable
DVR-Manager
Install CD
Hand Strap
Using Direct USB port from the PC is highly recommended
rather than using USB hub due to weak voltage.
You can use external power supply by connecting DC adaptor(Optional)
User’s Manual
External Device
Connection
Cable
Telephone
Recording Adaptor
Telephone
Connection Cord
External
Microphone
Power ON/OFF
Putting the batteries
Checking the batteries
1.Push the Battery cover downside.
Full
2. Insert two batteries with the correct
polarity as indicated by the + and -
symbols and close the cover.
Recorded files will not be erased
during replacing the batteries.
In case of malfunction, please
remove the batteries out of the
recorder and put the batteries into
the recorder again.
● Using External Power thru PC connection could cause some noisy on telephone
recording and it could prevent VOR function from working properly.
In this case, using DC adaptor(optional) is recommended.
▶ Power ON
Slide the HOLD switch in the direction, and
press the REC/STOP button to turn the power on.
High-Normal
Weak
Exhausted
▶ Power OFF
● Automatic Power OFF - The power automatically turns off when the recorder is
not in use for more than 3 minutes at STOP mode.
● Manual Power OFF - Slide HOLD switch in the direction at STOP mode.
08
07
Battery(AAAX2)
Voice Recorder
Voice Recorder
Recorder
Preparing
Using
Recording
HOLD function locks all the button functions to prevent unwanted use and the discharge
of the batteries.
▶ To Set HOLD
Slide HOLD switch in the
playback.
▶ To Release HOLD
Slide HOLD switch in the
playback.
●
direction during recording or
Flickering of the symbol disappears and HOLD is cancelled.
● HOLD switch performs locking function during playback or recording and manual
power off function at STOP mode.
Volume can be adjusted from level 0 to 20 at STOP mode or during Playback.
▶ To Turn Up the Volume
Press ‘+’symbol of the VOL button.
● As the number on the LCD display increases, the volume increases.
▶ To Turn Down the Volume
Press‘-’ symbol of the VOL button.
● As the number on the LCD display decreases, the volume decreases.
● Recording begins with the red light on the recording
indicator. The display shows the current folder, file
number, recording elapsed time and the recording sound
level. The recorder automatically selects the file number
next to the previously recorded file in current folder.
● Please check the recording sound level works while recording.
● When the recording sound level does not work on recording with loud voice, stop recording and play back
the recorded file to check whether recording works well. Then continue to use if there is no problem.
▶ To Record into the Next File Number during recording
Press ▶▶button while recording.
●The recorder stops at the current file number and continues
recording into the next file number.
▶ To Stop Recording
Press REC/STOP button once again.
●The red light goes off and recording stops.
▶ To Add Recording
Press and hold REC/STOP button for more than 3
seconds at STOP mode.
● The recorder attaches the message to the current file number.
●Press the Play/Pause button while recording to display the recording remaining time and if you
press once more, the current recording time is displayed.
●Press MENU button while recording in order to change the previous setting of VOR function.
10
09
The symbol flickers at one second intervals, and HOLD is set.
▶ Press REC/STOP button.
Voice Recorder
Voice Recorder
●
direction during recording or
In recording, please position the built-in microphone toward the sound source.
Using
Using
Playback
Playback Speed Adjustment
▶ To Start Playback
1⃞ Press Menu(M) Button and Select the folder which
contains the file to play.
▶ To start play back
1⃞ Press Play/Pause(▶■) button.
●Play back starts.
● For folder selection, pls. refer to page 23
●For careful search, press the button briefly. For quick search,
press and hold the button for a few seconds.
2⃞ Press Menu(M) button seven times.
●Default speed is set as‘100’(Normal).
3⃞ Press Play/Pause(▶■) button.
●The Recorder starts playback with the file number, playback
elapsed time and playback sound level.
3⃞ ◀◀/ ▶▶ button with direction of right or left.
11
▶ To Stop Playback
Press Play/Pause(▶■) button.
●Playback stops. Now, press Play/Pause(▶■) button again to resume playback from the
previous stop position.
▶ To search the desired section within a file during
Press and hold ▶▶button during playback.
▶ To playback other recorded file during playback of
Press FF(▶▶) button shortly during playback.
●The playback of current file stop and playback of next file starts Press REW (◀◀)
button shortly during playback.
●The playback of previous file starts.
●The file is fast forwarded and playback resumes when you release the button.
Press and hold ◀◀ button during playback
● The file is rewind and playback resumes when you release the button.
12
●Playback speed can be adjusted in 7 levels as follows (50,
70, 100(normal), 130, 150, 170, 200%).
Voice Recorder
Voice Recorder
● At stop mode, you can adjust play back speed also.
2⃞ In stop mode, press the FF/REW(◀◀/ ▶▶) button to
select the file number to play back.
Using
Using
Section Repeat Playback
1⃞ Press A > B button at the starting point of the
desired section
Deleting the Recorded File
▶ To delete a recorded file
●‘A’ appears and ‘B’ flickers.
1⃞ Press Menu(M) button and Select the folder that
contains the file to be deleted.
2⃞ In stop mode, press ◀◀/ ▶▶button with direction of
right or left to select the recorded file to delete.
●For careful search, press the button briefly.
For quick search, press and hold the button for a few seconds.
Intro Scan
3⃞ Press ERASE button briefly.
●The selected file number flickers and the selected file
is played back.
Press and hold Play/Pause(▶■) button for more than
3 seconds at STOP mode.
●This function enables fast file search by playing back the
first 7 seconds of each file.
●For playback the file during scanning, press JOG button in.
●Press REC/STOP button in while playback to display the playback remaining time and if you
press once more, the current playback time is displayed.
●Pressing Menu(M) button twice while playback shows the status of repeat playback, you can
change the status with ◀◀/ ▶▶ buttons.
●Pressing Menu(M) button four times shows ‘SR:100’ on display. If you don’t want to change
playback speed, simply press other buttons except for ◀◀/ ▶▶ buttons.
4⃞ Press ERASE button again briefly.
●The selected file is deleted and file numbers are automatically
rearranged.
● The ERASE operation is cancelled if any other button is pressed during the
selected file number is flickering or the ERASE button is not pressed again in 5
seconds.
14
13
●‘B’ appears and the section from 'A' to 'B' is repeated.
● Press A > B button once again to cancel Section Repeat Playback
and then, normal playback continues.
Voice Recorder
Voice Recorder
● For folder selection, pls. refer to page 23.
2⃞ Press A > B button again at the ending point of the desired
section.
Using
Using
▶ To delete all the files in the selected folder
This function enables to recovers the erased file by mistake of user.
● In case of recording after deleting a recorded file, Recovery is not available.
1⃞ Press Menu(M) button and Select a folder to be
deleted.
●For folder selection, pls. refer to page 23.
1⃞ Press MENU(M) button over five seconds at STOP mode.
●The selected folder flickers and 1-FOLDER and ERASE is
displayed.
2⃞ Press ◀◀/ ▶▶ button and Select‘FRCV: YS
16
15
2⃞ Press ERASE button more than 5 seconds.
3⃞ Press ERASE button for more than 5 seconds again.
●All the selected folder is deleted.
● The ERASE operation is cancelled if any other button is pressed during the
selected file number is flickering or the ERASE button is not pressed again in 5
seconds.
Voice Recorder
Voice Recorder
●FRCV:No appears on the display.
3⃞ Press‘Play/Pause(▶■)’button and erased files
are recovered.
● In case of erasing by using Reset mode(Low Format), the recovery function is not available.
Using
Using
Quick Format Setting
Low Format Setting
This function is used to erase the recorded files quickly.
In case of erasing the recorded file by using this function, the recorded file is erased
completely and it’s not possible to recover.
1⃞ Press MENU button over five seconds at STOP mode.
● Please make sure that file recovery is not available in case of using this function.
2⃞ Press Menu(M) button again shortly.
● FA-For appears on the display.
1⃞ Press MENU button over five seconds at STOP mode.
● FRCV:No appears on the display.
2⃞ Press Menu(M) button again shortly.
4⃞ Press ◀◀/ ▶▶ button and Select‘YES’.
5⃞ Press‘Play/Pause(▶■)’button and all files are
erased.
● In case of erasing by using Reset mode(Low Format), the recovery function is not
available.
●FA-For appears on the display.
3⃞ Press Menu(M) button again shortly.
●RESET appears on the display.
18
17
3⃞ Press‘Play/Pause(▶■)’button and‘No’appears
on the display.
Voice Recorder
Voice Recorder
●FRCV:No appears on the display.
Using
19
Voice Recorder
4⃞ Press‘Play/Pause(▶■)’button and‘No’appears on
the display.
5⃞ Press ◀◀/ ▶▶ button and Select‘YES’.
Using User-Friendly Functions
▶Menu function chart
▶Setting Menu
6⃞ Press‘Play/Pause(▶■)’button and all files are
erased. Also memory format is proceeded.
▶Connecting to an
External Device
▶Others
● In case of erasing the recorded file by using this function, the recorded file is erased
completely and it’s not possible to recover.
● Low formatting restores the recorder to the default mode.
Set Up Menu
Set Up Menu
Menu Structure
SIGNAL MODE
Setting
SM BEEP
SM SIL
USB Mode
Setting
UM USB
UM DC
Listen & Repeat
Setting
L REP ON
L REP OFF
SM VIB
Folder Selection
VOR Recording
Mic. Sensitive
Setting
Repeat
Playback
SP
LP
VOR ON
MIC HI
HQ
XQ
VOR OF
MIC LO
MIC US
REP ONE
REP FOLDER
REP ALL
REP NONE
LCD BACKLIGHT Setting
CHECK VERSION INFORMATION
22
21
Recording
Quality Setting
Voice Recorder
Voice Recorder
PLAYBACK SPEED Setting
Set Up Menu
Set Up Menu
1⃞ At stop mode, press Menu(M) button to move into each menu mode.
Numbers to Press
Menu(M) button
Menu
Items
2⃞ Press ◀◀/ ▶▶ button and Select each function on the mode.
1
Menu
Items
Folder
Selection
Folder can be selected for playback or recording.
Press ◀◀/ ▶▶button and select folders from A to D.
You can set up recording quality.
Press ◀◀/ ▶▶button and select recording quality among LP,SP,HQ,XQ.
LP: Longtime Recording mode
SP: Standard Recording mode
HQ: High-quality Recording mode
XQ: Ultra high-quality Recording mode
3
VOR
Recording
VOR (Voice Operated Recording)
With VOR mode, the recorder activates only when sound is present and
pauses when no sound is detected.
4
Mic.
Sensitivity
Setting
You can control Mic. Sensitivity according to sound level and noise
neighborhood.
Press ◀◀/ ▶▶button and select sensitivity among Hi,Lo,US.
High : Select in case the sound source is distant or the ambient noise level
is low.
2
Repeat
Playback
Setting
6
Beep, Silent, Vibration modes are available.
Press ◀◀/ ▶▶button and select among SM Beep, SM SIL, SM VIB.
SM Beep : Beep sounds
SM SIL : No sound
Signal Mode
SM VIB : The recorder vibrates only when recording starts and stops.
Setup
(Vibration works only at following three operations)
Power On: The recorder vibrates for about 2 seconds.
REC START: The recorder vibrates twice shortly.
REC STOP: The recorder vibrates once shortly.
7
You can control playback speed with fast or slow speed.
Playback
Press ◀◀/ ▶▶button and select Playback Speed as follows.
Speed Setup
SR50, SR70, SR100(NORMAL), SR130, SR150, SR175, SR200
24
5
Repeat Playback Setting
Press ◀◀/ ▶▶button and select repeat mode among REP ONE, REP
FOLDER REP ALL, REP NONE.
REP ONE: To repeat One file
REP Folder: To repeat One folder
REP All: To repeat all files
REP None: No Repeat
Set Up
*Recording
Quality
Setting
23
Voice Recorder
Numbers to
Voice Recorder
4
Lo : Select in case the sound source is close or the ambient noise level is
high.
User : Select this to manually set the microphone’s sensitively.
* Microphone sensitivity can be adjusted in 15 steps and it can be made each
2 step
Set Up Menu
Press Menu(M)
Set Up
Set Up Menu
Numbers to Press
USB Mode
Setup
By connecting Recorder to PC thru USB cable, USB connection or DC Power
Supply can be selectable according to user s choice.
Press ◀◀/ ▶▶button and select USB or DC in orders.
UM USB: USB connection
UM DC: DC Power Supply
Listen and
Repeat
Setup
You can hear and follow-up because the concerned time has no sound after
section repeat playback is setup.
If you connect earphone to the recorder, you can hear your own voice when
you speak at this mode.
Press ◀◀/ ▶▶button and select L REP ON, L REP OFF in orders.
L REP ON: For this function
L REP OFF: No for this function
10
LCD
Backlight
time setup
Backlight time can be setup.
Press ◀◀/ ▶▶button and select Off, 10sec, 20sec, 30sec, 60sec, all in
orders.
11
Check
Version
Information
You can check full memory capacity, version information.
8
25
9
▶ Connect external microphone to Voice
Recorder.
● Plug the external microphone into the
Microphone/Input terminal of the Recorder.
To start Recording
Press REC/STOP button.
● Voice is recorded through the external microphone.
26
Set Up
Voice Recorder
Menu
Items
Menu(M) button
Voice Recorder
Connecting to an External Device
To finish Recording
Press REC/STOP button again.
● Recording stops.
● Please check the recording sound level works while recording.
Connecting to an External Device
Connecting to an Audio System
To start Recording
Press REC/STOP button and the play button of the audio system
simultaneously.
● The Voice Recorder starts recording the audio contents. To Finish Recording
To finish Recording
Press REC/STOP button and the stop button of the audio system
simultaneously.
● Recording stops.
● Please check the recording sound level works while recording.
▶ To Record Contents of the Recorder into an Audio
System.
Connect the Voice Recorder to the audio system.
● Connect the Earphone/Output terminal to the microphone
terminal of the audio system using the supplied external
device connection cable.
To start recording
1⃞ Select the file to be recorded.
2⃞ Press ▶■button of the Voice Recorder and the record button of the audio
system simultaneously.
● The selected file in the Voice Recorder is recorded into the audio system.
To finish recording
28
27
● Connect the Microphone/Input terminal to
the Earphone terminal of the audio system
using the supplied external device
connection cable.
Connecting to an Audio System (continued )
Press ▶■button of the Voice Recorder and the stop button of the audio
system.
● Recording stops.
● The recording sound volume can be adjusted using VOL button of the Voice Recorder.
● Recording quality may be affected by the performance of the external device.
Listening through an Earphone
▶ Plug the earphone to the Earphone/Output terminal.
● Adjust the recording sound volume with the volume control of the audio system.
● Recording quality may be affected by the performance of the external device.
Voice Recorder
Voice Recorder
▶ To Record contents of the Audio into the
Voice Recorder,
Connect the Voice Recorder to the audio
system.
Connecting to an External Device
●The playback sound is automatically routed to the earphone.
The playback volume can be adjusted by + and - of VOL
button.
Connecting to an External Device
Recording a Telephone Message
Telephone messages can be recorded on the Voice Recorder.
To Start Recording
Press REC/STOP button during the telephone conversation.
DVR-Manager software provides various functions such as file uploading to PC,
playback, recording, editing of recorded files and sending recorded files via email.
Installation of DVRDVR-Manager should be installed to PC prior to connecting Voice Recorder to PC.
System
Requirements
Computer: IBM-compatible, Intel Pentium (or better) based with USB
port support
Memory: More than 64MB of RAM
OS: Windows 98/Me/2000/XP
Hard Disk: More than 50MB space
For Playing: Sound card and speaker
For Recording: Sound card and microphone
●The Voice Recorder starts recording the conversation.
To Finish Recording
● Caution: Installation should be proceeded without connecting the recorder to PC
via USB cable.
When you insert DVR-Manager CD into CD-ROM drive, the language selection window appears.
Press REC/STOP button again.
●Recording stops.
●The digital telephone cannot be connected to the Voice recorder.
●To record only when you talk on the telephone, please select VOR recording and then
press REC/STOP button. (For details, pls. refer to page )
●If the VOR function does not work properly, set the MIC sensitivity low.
(For details, pls. refer to page )
●The input volume of the recorded sound is affected by the telephone and phone line
condition. If input volume is too low, disable the VOR function.
(For details, pls. refer to page .)
2
1
Select language
Click
30
29
● Using the external device connection cable,
connect the Microphone/Input terminal of the
Voice Recorder and the telephone recording
adapter as shown in the picture.
Connecting to a PC
Voice Recorder
Voice Recorder
▶ Connect the Voice Recorder to
the telephone.
Connecting to an External Device
3
Connecting to an External Device
Click
4
8
Click
9
Click
Click
Voice Recorder
Voice Recorder
Connecting to an External Device
31
32
6
5
Click
Type in your name and company name.
● Installation has been completed and the shortcut icon appears on the desktop.
7
Click
Connecting to an External Device
Connecting to an External Device
DVR Manager Installation Guide Win XP User
First connect Recorder to PC for the better use of the Recorder Manager
Pro Software.
You should install DVR-Manager Program provided by maker for uploading or
downloading a file(s) from computer to the Voice Recorder .
Please watch out below procedure before the installation of DVR-Manager Program.
USB port connection terminal
Installation of DVR-Manager
Complete installation procedure as computer indicates.
PC
USB
connection
cable
Diameter 3.5
There will be "DVRM-008" icon on the screen if completed installation.
●Please refer tp enclosed User Manual Guide for more deail.
Microphone in put terminal
of the sound card
33
Take the batteries out of the Voice Recorder.
USB port connection terminal
Connect the Voice Recorder to computer by the provided USB cable and then press "REC/STOP"
Button.
Check " the picture shown the connection of Voice Recorder to computer" on the LCD of Voice
Recorder.
●If you can't find out the picture, you are required to select "USB" from "DC" at "USB Mode" Refer to User Guide
Manual.
● After connecting the Recorder to PC, try not to touch the Recorder since it
may cause the malfunction of the device.
● If you have connected USB cable while batteries are installed, you must
first press REC/STOP button to power on Recorder.
When you connect the voice recorder to computer first time after purchasing, you can find out "Found
New Hardware".
Click the Pop-up Window and then check "Forus USB Controller-DVR008".
34
Connection of the Voice Recorder to computer(Installation of
Voice Recorder
Voice Recorder
Insert DVR-Manager CD to CD-Rom
Connecting to an External Device
Connecting to an External Device
Trouble Shooting in Manager program for Win
● If "USB Device" on it, disconnect the Voice
reocrder from USB Cable and then try to
connect again. Check "Forus USB
Controller-DVR008"
1⃞ Remove abnormal driver installed
● Place the mouse to "Start" on the Win XP.
● Control Panel->System->System Properties->Hardware->Device Manager
If "Forus USB Controller-DVR-008" is detected, click "Next".
On the Notice about "MS Logo Test" as below, maker recommends to keep the rest procedures of
installtion because this is no harmful to your PC thru its strict compliance testing with this OS by
itself.
36
35
●Yes. I installed Driver without checking if "USB Driver" or "Forus USB Controller-DVR008"
in "The Found New Hardware Wizard"
Voice Recorder
Voice Recorder
● If you see "USB Device" Constantly, Look at
the "Tip for Voice Recorder" in
English/Readme/CD.
If you won't continuously find out "Forus USB Controller-DVR008" on The Found New
Hardware Wizard when the Voice Recorde connects to PC, please check if you installed
"Driver" or not in the connection of the Voice Recorder to the PC at the first time.
Connecting to an External Device
Connecting to an External Device
Connecting to a PC
Using online
Instruction for using DVR-Manager is provided in detail in Help.
If installation is finished, shortcut icon is displayed.
2⃞ Select Help of main menu
● If the Driver is installed abnormally, you can find out the above window with "the yellow question mark and
USB Device".
●Remove the Driver by clicking the right mouse and "Unintall".
● Help appears.
Uninstall DVR-Manager
Multi-languages Support
●Uninstall the installed DVR-Manager Program in the PC.
●Restart the PC.
●Install DVR-Manager Program again. Restart PC.
In case of managing files in PC, you can use conveniently because multi-language for
file name or error message is supported.
Installation DVR-Manager Program and Driver of the Voice Recorder again.
Refer to previous pages about Installation of DVR-Manager and Driver.
DVR-Manager Deleting
● Despite the above procedures, the PC does not detect the Voice Recorder in
DVR-Manager Program, follow up the above procedures to remove DVR-Manager &
abnormal Driver excepting the Installtion Drvier at.
Get the "USB Driver_XP.exe" from the provided CD or website(Maker or distributor) and
install this driver by double-click and then connect the Voice Recorder to PC and follow up
the procedures to install the Driver .
● Select menus in the sequence of : Start > Settings > Control panel > Add/Remove
Program > DVR-Manager DVR-xxx Ver.1.0 > Add/Remove
38
37
● DVR-Manager is executed.
Voice Recorder
Voice Recorder
1⃞ Double click the shortcut icon.
Connecting to an External Device
Connecting to an External Device
Firmware Upgrade
This unit provides the Firmware Upgrade function to improve the unit functions and
to correct errors.
1⃞ Connect the recorder to PC thru USB cable
Please adopt temporary measures as follows when upgrading firmware did not be
completed normally because of the batteries’separation or shock to the unit.
1⃞ Remove the batteries from the unit please.
Voice Recorder
2⃞ Execute DVR Manager and download‘FSV510_FIRMUP.ROM’(UPGRADE
FILE) to D folder of the recorder.
● Caution: In case of downloading upgrade file, there should be no file at D folder.
2⃞ Push down Hold key and set up Hold-On mode.
3⃞ After download is completed, disconnect USB cable.
4⃞ Power on the unit. Then the unit is upgraded automatically. Remove
the batteries when‘FINSH’appears on the display and put the
batteries on again.
● Do not remove the batteries or drop or give a shock to the unit while upgrading
firmware.
3⃞ Press and hold‘REC’button and connect the unit to PC via
USB cable.
4⃞ Please repeat the above procedures of upgrading firmware from
No.2 to No.4.
40
39
Voice Recorder
● Caution: DVR Manager should be installed in advance.
(Refer to Installation of DVR Manager)
▶ Trouble shooting in case of error while upgrading firmware
Others
Others
Precautions
Important information on safe and efficient operation. Read this information before
using your voice recorder.
For the Battery
1. Do not short-circuit, disassemble or heat the battery, or do not put the battery into a fire.
For the unit
2. Do not leave the unit in such a location as described below.
- A place of very high temperature (60℃)
- A place subject to direct sunlight or near heat sources
cause the generation of heat, or the breakdown of the battery.
2. When the skin or clothes are stained with electrolyte such as an alkaline solution, wash the
stain out with water immediately. If you get it in your eyes, seek immediate medical treatment
after washing out the area of the eye with water.
3. Do not use the different kind of batteries together.
- A car with its windows closed (especially in summer)
- A place subject to excessive moisture like a bathroom
4. When the unit is not in use for a long time, remove the battery from the unit.
41
42
- A place subject to excessive dust
3. Do not apply heavy forces to the LCD (Liquid Crystal Display) unit, or it may cause breakage
or abnormal display taking into account the properties of liquid crystal.
For your safety
4. If you place cards using magnetism such as cash cards or transportation pass cards near to
the speaker of the unit, the magnetism may be transformed due to magnetic influence so that
the magnetic cards cannot be used any more.
5. Our company does not reimburse you for any loss from the use of the Voice recorder or any
demand of indemnity from a third party.
6. Message loss due to malfunctions, repairs, etc is not a responsibility of ours. Please
understand this.
Voice Recorder
Voice Recorder
1. Do not drop the unit or give a shock to the unit. It may cause a malfunction.
Electrolyte such as an alkaline solution may flow out, so you may get it in your eyes, or it may
1. Do not repair, disassemble or modify this unit by yourself.
2. If smoke or deformation occurs due to the generation of heat, remove the battery from the
unit immediately.
3. Do not use this unit in an airplane or place where the use of electronic machines are
prohibited.
4. Do not use during you are driving or walking. It may cause an accident.
Others
Others
Troubleshooting
No sound comes
from the
Check the following items before asking a technical support.
▶ Adjust the volume.
(Refer to page 9)
CHECK1
Is the volume set to '0'?
CHECK2
Is the earphone plugged in? ▶ Pull out the earphone completely.
CHECK1
Is the volume set to '0'?
CHECK2
Is the earphone plugged in ▶ Plug the earphone in properly.
properly?
CHECK1
Has the sound card been
installed?
▶Install the sound card first and
then reinstall the 'DVR-Manager'
software.
CHECK2
Is the volume set
excessively high?
▶ Adjust the volume of the
DVR-Manager, since the excessively
high volume may cause noise.
CHECK1
Is the external microphone ▶ Connect the external microphone
connected to the PC (Sound to the sound card and start
recording.(Refer to page 33)
Card)?
CHECK2
▶ Cancel Mute function, if the unit is
Does the MIC IN
in the mode, and select the MIC IN.
(Microphone) become
active at the Recording
Control Window, when you
click : Control Panel >
Multimedia > Audio >
Recording?
When using Voice
Is the battery's power
exhausted?
▶ Replace the battery with a new
one. (Refer to page 7)
CHECK2
Is the battery installed to
the correct polarity?
▶ Install the battery to the correct
polarity
▶ Adjust the volume.
(Refer to page 9)
For DVR-Manager
Recordng
doesn’t work.
Playback
doesn’t work.
CHECK1
Is the device locked by the
▶ Release the HOLD key
HOLD key?
CHECK2
Has the memory or file
numbers been used up?
▶ Delete unnecessary files.
(Refer to pages 14)
CHECK3
Is the battery's power
exhausted?
▶ Replace the battery with a new
one. (Refer to page 7)
CHECK1
Is the device locked by the
▶ Release the HOLD key
HOLD key?
CHECK2
Is there any recorded file?
▶ Check the folder and file numbers.
CHECK3
Is the battery's power
exhausted?
▶ Replace the battery with a new one.
(Refer to page 7)
REC/PLAY icons
are inactive.When
using D
44
43
Voice Recorder
LCD doesn’t
work.
The
earphones do
Voice Recorder
CHECK1
Can't hear the
voice due to
Can't record
with an external
microphone
FCC note :
Specifications
Item
Digital Voice Recorder
128MB
Continuous recording time
Maximum number of recording files
Dimensions
Weight
Power Source
Battery life
Recording medium
Sampling Frequency
Frequency range
PC interface
Built-in
Input
External
Earphone
Output
Speaker
XQ : 15H 20M , HQ : 22H, SP : 30H 40M, LP : 66H 40M
256MB
XQ : 30H 40M, HQ : 44H, SP : 61H 20M, LP : 133H 20M
512MB
XQ : 61H 20M, HQ : 88H, SP : 122H 40M, LP : 266H 40M
396 files(99 files in one folder, total 4 folders)
36 x19 x 95mm
40g(excluding the battery)
Two DC 1.5V (2 x AAA battery )
Recording Approx. 20 hours(LP mode) / Playback Approx. 20 hours (earphone, LP)
CAUTION :
Changes or modifications not expressly approved by the manufacturer responsible for compliance
could void the user's authority to operate the equipment.
Built-in Flash Memory
SP, LP ; 8KHz / XQ : 16KHz / HQ : 11KHz
500Hz ~ 3.5KHz
USB (Universal Serial Bus)
Product
DIGITAL RECORDER
Model
Omni-directional electret condenser microphone
Assurance period
1 YEAR
Item
Plug-in electret condenser microphone (Mono)
Ø 23 / Mono / 8Ω
Sales date
tel
Earphones (Ø 3.5 / Stereo)
2 AAA battery, Earphone, USB connection cable, DVR-Manager CD, External
Accessories
This equipment has been tested and found to comply with the limits for a Class B digital device,
pursuant to part 15 of the FCC Rules.
These limits are designed to provide reasonable protection against harmful interference
in a residential installation.
This equipment generates, uses and can radiate radio frequency energy and, if not installed and used
in accordance with the instructions, may cause harmful interference to radio communications.
However, there is no guarantee that interference will not occur in a particular installation.
If this equipment does cause harmful interference to radio or television reception, which can be
determined by turning the equipment off and on, the user is encouraged to try to correct the
interference by one or more of the following measures
-Reorient or relocate the receiving antenna.-Increase the separation between the equipment and
receiver.-Connect the equipment into an outlet on a circuit different from that to which the receiver is
connected. -Consult the dealer or an experienced radio/TV technician for help.
Address
Customer
Name
device connection cable, Telephone recording adapter, Telephone connection
signature
cord, External microphone, Hand strap,
External Adapter(Optional)
tel
Address
Sales agency
Agency name
signature
yy mm dd