1
IGEL Universal Management
Suite v4
User manual
IGEL Technology GmbH
IGEL Universal Management Suite v4
06.05.2015
Important Information
Please note some important information before reading this documentation.
Copyright
This publication is protected under international copyright laws. All rights reserved. With the exception of
documentation kept by the purchaser for backup purposes, no part of this manual – including the products
and software described in it – may be reproduced, manipulated, transmitted, transcribed, copied, stored in
a data retrieval system or translated in any form or by any means without the express written permission of
IGEL Technology GmbH.
Copyright © 2015 IGEL Technology GmbH. All rights reserved.
Trademarks
IGEL is a registered trademark of IGEL Technology GmbH.
Any other names or products mentioned in this manual may be registered trademarks of the associated
companies or protected by copyright through these companies. They are mentioned solely for explanatory
or identification purposes, and to the advantage of the owner.
Disclaimer
The specifications and information contained in this manual are intended for information use only, are
subject to change at any time without notice and should not be construed as constituting a commitment or
obligation on the part of IGEL Technology GmbH. IGEL Technology GmbH assumes no responsibility or
liability for any errors or inaccuracies that may appear in this manual, including any pertaining to the
products and software described in it. IGEL Technology GmbH makes no representations or warranties
with respect to the contents thereof and specifically disclaims any implied warranties of merchantability or
fitness for any particular purpose.
IGEL Support and Knowledge Base
If you have any questions regarding an IGEL product and are already an IGEL customer, please contact
your dedicated sales partner first.
If you are currently testing IGEL products or your sales partner is unable to provide the help you need,
please fill in the support form after logging on at the IGEL Support Portal
https://www.igel.com/en/members-area/login-logout.html.
We will then contact you as soon as possible. It will make things easier for our support staff if you provide
us with all the information that is available. Please see also our notes regarding support and service
information.
Please visit our IGEL Knowledge Base http://edocs.igel.com to find additional Best Practice and How To
documentation as well as the IGEL Support FAQ
http://faq.igel.com/otrs-igel/public.pl?Action=PublicFAQExplorer;CategoryID=3.
2
IGEL Technology GmbH
IGEL Universal Management Suite v4
4.09.100
Contents
1.
IGEL Universal Management Suite .....................................................................................................................7
1.1.
1.2.
1.3.
2.
Installation.......................................................................................................................................................11
2.1.
2.2.
2.3.
2.4.
3.
Order of priority for settings ........................................................................................................61
Order of priority for profiles ........................................................................................................62
Using profiles ...............................................................................................................................63
User profiles - IGEL Shared Workplace ........................................................................................70
Master profiles .............................................................................................................................76
Template profiles .........................................................................................................................81
Views ..............................................................................................................................................................94
7.1.
7.2.
7.3.
8.
Managing thin clients...................................................................................................................44
Configuring thin clients ................................................................................................................51
Shadowing (VNC) .........................................................................................................................52
Firmware licenses ........................................................................................................................58
Profiles ............................................................................................................................................................61
6.1.
6.2.
6.3.
6.4.
6.5.
6.6.
7.
The console window ....................................................................................................................26
The IGEL UMS Administrator .......................................................................................................37
Thin Clients .....................................................................................................................................................44
5.1.
5.2.
5.3.
5.4.
6.
Connecting the UMS Console to the server .................................................................................18
Registering thin clients on the UMS Server .................................................................................19
Working with the IGEL UMS .............................................................................................................................26
4.1.
4.2.
5.
Installation requirements ............................................................................................................11
Installing a UMS Server ................................................................................................................12
Updating a UMS Installation ........................................................................................................13
Connecting to External Database Systems ..................................................................................15
First steps .......................................................................................................................................................18
3.1.
3.2.
4.
Typical areas of use ........................................................................................................................ 7
Attributes of the IGEL UMS ............................................................................................................ 8
IGEL UMS components................................................................................................................... 9
Creating a new view .....................................................................................................................94
Saving the view results list ...........................................................................................................98
Sending a View via E-mail ............................................................................................................98
Scheduled Jobs .............................................................................................................................................100
8.1.
8.2.
8.3.
8.4.
8.5.
8.6.
Setting up a new task .................................................................................................................100
Commands for Jobs ....................................................................................................................101
Details ........................................................................................................................................102
Schedule .....................................................................................................................................103
Assignment.................................................................................................................................104
Results ........................................................................................................................................105
3
IGEL Technology GmbH
IGEL Universal Management Suite v4
4.09.100
9.
Files ..............................................................................................................................................................107
9.1.
9.2.
9.3.
9.4.
10.
Universal Firmware Update ............................................................................................................................110
10.1.
10.2.
10.3.
10.4.
10.5.
11.
Changing server settings ............................................................................................................110
Searching for and downloading updates ...................................................................................111
Importing from a local source ....................................................................................................112
Importing from the UMS WebDAV ............................................................................................112
Assigning an Update to a Thin Client .........................................................................................113
Managing certificates ....................................................................................................................................114
11.1.
11.2.
11.3.
11.4.
12.
Registering a file on the UMS Server .........................................................................................107
Transferring a file to a thin client ...............................................................................................108
Removing a file from a thin client ..............................................................................................109
Transferring a file to the UMS Server ........................................................................................109
Installing Server Certificates ......................................................................................................114
Removing a Certificate ...............................................................................................................114
Saving a certificate .....................................................................................................................114
Importing a console certificate ..................................................................................................115
Administration area .......................................................................................................................................116
12.1. UMS network .............................................................................................................................116
12.2. UMS Server ................................................................................................................................117
12.3. Global configuration ..................................................................................................................117
13.
Importing Active Directory users ....................................................................................................................125
13.1. Explanation of symbols ..............................................................................................................126
13.2. Searching in the Active Directory...............................................................................................127
13.3. Import results list .......................................................................................................................128
14.
Administrator accounts and access rights ......................................................................................................129
14.1. Administrators and groups ........................................................................................................129
14.2. Access rights...............................................................................................................................130
15.
User logs .......................................................................................................................................................136
15.1. Administration ...........................................................................................................................136
15.2. Logging dialog window...............................................................................................................137
16.
17.
Log files and support .....................................................................................................................................140
Optional Extensions (HA and UCB) ..................................................................................................................141
17.1. IGEL UMS High Availability (HA).................................................................................................141
17.2. IGEL Universal Customization Builder (UCB)..............................................................................149
18.
19.
Glossar ..........................................................................................................................................................162
Index .............................................................................................................................................................163
4
IGEL Technology GmbH
IGEL Universal Management Suite v4
4.09.100
About this document
This document describes the procedure for installing and using the IGEL Universal Management Suite
(UMS) based on Version 4.09.100. The firmware parameters for the thin client are described in greater
detail in the relevant IGEL Universal Desktop or IGEL Zero manual, even if these parameters can be
configured via the UMS.
This document assumes that a fully functional installation of the IGEL UMS as well as at least one IGEL thin
client which is to be managed are available.
IGEL one thin clients may be registered in the UMS, but not configured.
This manual is divided into the following sections:
IGEL Universal Management
Suite (page 7)
Attributes and components of the UMS
Installation (page 11)
Requirements, installation, updates, external DB systems
First steps (page 18)
Establishing a connection to the server, registering
Working with the IGEL UMS
(page 26)
Console window and Administrator
Managing, (page 29)
configuring and mirroring thin clients; firmware licenses
Creating and (page 61)
configuring profiles; user profiles (IGEL Shared Workplace)
Creating and (page 94)
saving views
Setting up planned (page 100)
tasks, details, schedule, assignment, results
Registering, (page 107)
transferring and removing files on the server and client
Preparing, searching for, (page
110)
downloading, importing and assigning Universal Firmware
Updates
Managing certificates (page
114)
Installing server and console certificates
Administration area (page 116) UMS Server, global configuration
Importing Active Directory
users (page 125)
Symbols, searching in the AD, import results list
Administrator accounts and
access rights (page 129)
Administrators, groups, authorizations
User logs (page 136)
(general), administration, logging, filter settings
Log files and support (page 140) Help
Appendix (page 141)
UMS High Availability Extension, Universal Customization
Builder
5
IGEL Technology GmbH
IGEL Universal Management Suite v4
4.09.100
Formatting and meanings
The following formatting is used in the document:
Hyperlink
Internal or external links
Proper names
Proper names of products, firms etc.
GUI text
Items of text from the user interface
Menu→Path
(Context) menu paths in systems and programs
Entry
Program code or system entries
Keyboard
Commands that are entered using the keyboard
Note regarding operation
Warning: Important note which must be observed
What is new in 4.09.100?
You will find the release notes for the IGEL Universal Management Suite 4.09.100 both as a text file next
to the installation programs on our download server
(http://myigel.biz/index.php?dir=IGEL_UNIVERSAL_MANAGEMENT_SUITE/) and in our Knowledge Base
(http://edocs.igel.com/).
The most important functional change in this version is the master profile (page 76) concept which makes
configuring the thin clients even more flexible and straightforward thanks to more easily manageable
administrator rights.
In addition, the IGEL Universal Management Suite can now send views via e-mail (page 98) – either with a
click or automatically as an administrative task (page 119).
UMS now offers the option of allowing connections secured exclusively with HTTPS (SSL) (page 38) when
communicating with the server.
The Java version used has been updated. Java 1.8.0_40 or newer is now needed to bring up the UMS
Console via Java Web Start.
6
IGEL Technology GmbH
IGEL Universal Management Suite v4
4.09.100
1.
IGEL Universal Management Suite
The IGEL Universal Management Suite (UMS) is a user-friendly and highly efficient piece of software
which allows you to remote-configure and manage IGEL thin clients. Using the UMS helps to reduce the
costs of workstation administration and support. With its open, network-friendly structure, it can be
incorporated optimally into an existing company infrastructure.
The IGEL Universal Management Suite sets new standards when it comes to managing modern thin
clients. It offers a wide range of features which allow large thin client environments with various
configurations to be managed quickly, easily and securely – even across WANs. With its support for a wide
range of operating systems, databases and directory services such as Microsoft® Active Directory, the
Universal Management Suite can easily be integrated into any existing environment.
Each IGEL thin client comes with a free version of the IGEL Universal Management Suite. When combined
with the outstanding IGEL hardware, this gives you the most innovative thin client solution currently
available on the market.
An overview of devices supported by the IGEL Universal Management Suite can be found in these FAQs.
1.1. Typical areas of use
•
•
•
•
Automatically setting up thin clients with the correct configuration when they go into operation
Changing the settings of the devices as well as those of the software clients, tools and local logs
Distributing updates and firmware images
Diagnostics and support
7
IGEL Technology GmbH
IGEL Universal Management Suite v4
4.09.100
1.2. Attributes of the IGEL UMS
Quick installation:
An assistant helps you during the installation procedure. As a further
option, external database systems can also be used alongside the
integrated database.
Straightforward management Most hardware and software settings can be made with just a few clicks.
at the click of a mouse:
Standardized user interface:
The UMS user interface is similar to that for local thin client
configuration. The additional remote management functions give the
administrator complete control in the familiar, proven environment.
No scripting:
Although scripting is supported, you will only need it for managing the
thin client configuration in the most exceptional circumstances.
Asset management:
Automatic capturing of all your hardware information, licensed features
and installed hotfixes.
Commentary fields:
For various customer-specific information such as location, installation
date and inventory number.
Support for numerous
operating systems:
The UMS Server can run on many common versions of Microsoft®
Windows® Server and Linux.
Access independent of the
operating system:
The UMS Console is Java-based and allows system administration via any
device with the Java Runtime Environment – even without a local
installation of the UMS Console (Java Web Start), see Installation
requirements (page 144).
Encrypted communication:
Certificate-based SSL-encrypted communication between remote
management servers and clients to prevent unauthorized
reconfiguration of the devices.
Failsafe update function:
If the thin client fails while the update is in progress (e.g. as a result of a
power outage or loss of the network connection), it will still remain
usable. The update process will then be completed when the device next
boots.
Based on standard
communication protocols:
There is no need to reconfigure routers and firewalls because HTTP and
FTP are used.
Support for extensive
environments:
The IGEL Universal Management Suite can be scaled to accommodate
several thousand thin clients.
Group and profile-based
administration:
The thin clients within a given organizational unit can be administered
very easily via profiles. If members of staff move to another department,
the administrator can change the settings with a simple drag-and-drop
procedure.
Trouble-free rollout:
IGEL thin clients can be automatically assigned to a group on the basis
of either the relevant sub-network or a list of MAC addresses provided
by IGEL. They then automatically receive the configuration settings for
the group.
Comprehensive support for
Most IGEL thin client settings, such as device or session configurations,
all configuration parameters: can be changed at the click of a mouse via the UMS user interface.
8
IGEL Technology GmbH
IGEL Universal Management Suite v4
4.09.100
Transferral of administrative
rights:
Large organizations can authorize a number of system administrators for
different control and authorization areas. These administrative accounts
can be imported from an Active Directory.
Planning tasks:
Maintenance tasks can be scheduled to take place during the night so
that day-to-day operations are not disrupted.
VNC shadowing:
Members of the IT support team have remote access to thin client
screens, enabling them to rapidly identify problems and demonstrate
solutions directly to users.
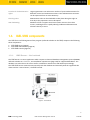
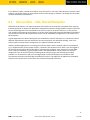
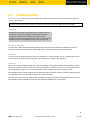
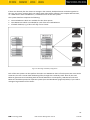
1.3. IGEL UMS components
The IGEL Universal Management Suite program (referred to below as the UMS) comprises the following
three components:
•
•
•
IGEL UMS Server (page 9)
IGEL UMS Administrator (page 10)
IGEL UMS Console (page 10)
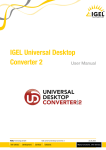
1.3.1.
UMS Server – the backend
The UMS Server is a server application which requires a relational database management system (RDBMS,
referred to below as a database; see Installation requirements (page 144) for supported databases. The
database can either be on the server itself or installed on remote hosts and linked up accordingly.
The IGEL UMS Server communicates internally with the database and externally with the registered thin
clients and the "control center", the UMS Console.
Figure 1: The backend
9
IGEL Technology GmbH
IGEL Universal Management Suite v4
4.09.100
Data transmission between the server and thin clients/console is encrypted. Typically, the UMS Console is
installed not only on the server system but also on other computers in the network.
Each configuration for the managed thin clients is saved in the database. Changes to the configuration are
made in the database and are transferred to the thin client if necessary. The thin client can retrieve the
information from the database during the booting procedure or you can send the new configuration to the
thin client manually. A scheduled configuration update is also possible.
1.3.2.
UMS Administrator – the administration program
The UMS Administrator is one of the UMS Server's administrative components and, as such, is only
available via the server.
The key parts of the UMS Administrator are as follows:
•
•
Network configuration (ports, WebDAV resources)
Database configuration (data sources, backups)
Many administrative tasks are also available via the UMS Console.
1.3.3.
UMS Console – the central control hub
The UMS Console is the interface to the UMS Server.
The key functions of the UMS Console are as follows:
•
•
•
Displaying the thin clients' configuration parameters
Setting up profiles and planned tasks
Administering firmware updates
The thin clients and their configuration are administered via the GUI of the UMS Console. This is the central
control hub for thin client administration. The console can be installed either on the server itself or locally
on another computer within the network. Alternatively, it can be launched as a Java Web Start application
without being installed.
10
IGEL Technology GmbH
IGEL Universal Management Suite v4
4.09.100
2.
Installation
In this chapter, you can find out what requirements must be met in order to install the UMS successfully.
Using an example, we show an installation with a Windows or Linux operating system. You can also find out
what you need to bear in mind when performing an update and where you can connect external database
systems.
2.1. Installation requirements
In order to install the IGEL Universal Management Suite, your hardware and software must meet the
following minimum requirements:
UMS complete installation
•
•
•
At least 1 GB of RAM (2 GB recommended)
At least 1 GB of free HDD space (plus database system)
For details of the supported operating systems, please see the UMS Data Sheet on the IGEL website.
Tip: FAQ for installing the UMS on 64-bit systems
Individual console installation
•
•
•
•
At least 512 MB of RAM (1 GB recommended)
At least 250 MB of free HDD space
Java Web Start Console: Java 1.8.0_40 or newer required
For details of the supported operating systems, please see the UMS Data Sheet on the IGEL website.
Warning: The UMS Server must not be installed on a domain controller system. Manually modifying the
Java Runtime Environment on the UMS Server is not recommended. Running additional Apache Tomcat
web servers together with the UMS Server is not recommended either.
For details of the supported database systems, please see the UMS Data Sheet on the IGEL website. Details
of the requirements when installing and operating the database can be found in the documentation for the
particular DBMS.
From an IP point of view, the UMS Server and Load Balancer for high availability (High Availability (page
141), HA) must be within the same network without NAT or proxies which influence communication
between the components.
The internal database (Embedded DB) cannot be used for an HA network. You can also use the Embedded
Database for a dedicated test installation with only a single server for the UMS Server and Load Balancer.
However, you cannot use this to set up a real HA network.
11
IGEL Technology GmbH
IGEL Universal Management Suite v4
4.09.100
2.2. Installing a UMS Server
This example describes the complete procedure for installing a UMS Server with an internal Embedded DB.
If your required installation differs, you can select individual components accordingly, e.g. for an individual
console installation.
You will find instructions for installing the UMS HA (High Availability) Extension in the Appendix (page
141).
2.2.1.
Installation under Windows
The procedure for installing the IGEL Universal Management Suite under Windows is as follows:
1. First download the current version of the IGEL Universal Management Suite from the IGEL Download
Server and launch the installer by running the EXE file.
You will need administration rights for the computer in order to install the IGEL UMS.
2. Close any other applications and confirm that you have done so.
3. Read and confirm the license agreement.
4. Read the explanation of the installation process.
5. Select a path for the installation.
6. Select the type of installation (see above).
7. Set a user and the password for the database connection.
8. Choose a name for the entry in the Windows Start Menu.
9. Read the summary and start the installation process.
10. Close the program once installation is complete.
If you have chosen the standard installation, the IGEL Universal Management Suite Server will now
run with the Embedded Database.
11. Launch the UMS Console.
12. Connect to the server using the access data you gave during the installation (database user).
To use the UMS with external databases, see Connecting external databases (page 15).
The Windows installer creates entries in the Windows software directory and the Start Menu. An icon for
launching the UMS Console will also be placed on the desktop.
FAQ Installation of UMS on 64-bit systems
(https://faq.igel.com/otrs-igel/public.pl?Action=PublicFAQZoom;ItemID=647)
12
IGEL Technology GmbH
IGEL Universal Management Suite v4
4.09.100
2.2.2.
Installation under LINUX
The procedure for installing the IGEL Universal Management Suite under Linux is as follows:
1. First download the current version of the IGEL Universal Management Suite from the IGEL Download
Server. The installation program under Linux is an X11 application.
2. Log in as ROOT.
You will need ROOT rights for the computer in order to install the IGEL UMS.
3. Open a terminal window such as xterm, Console, Gnome Terminal etc. and switch to the directory of
the installation package.
4. Check that the package can be executed. In order for it to be executed, you may need to create it using
chmod a+x setup*.bin.
5. Run the setup-igel-ums-linux-0.1.bin installation file. Use sudo to run setup with ROOT
permission.
The installer will be unpacked to /tmp, will run its Java Engine and will remove itself again once the
installation is complete.
6. Close any other applications and confirm that you have done so.
7. Read and confirm the license agreement.
8. Read the explanation of the installation process.
9. Select a path for the installation.
10. Select the type of installation (see above).
11. Set a user and the password for the database connection.
12. Read the summary and start the installation process.
13. Close the program once installation is complete.
If you have chosen the standard installation, the IGEL Universal Management Suite Server will now
run with the Embedded Database.
14. Launch the UMS Console in installation folder, e.g.
/opt/IGEL/RemoteManager/RemoteManager.sh
15. Connect to the server using the access data you gave during the installation.
To use the UMS with external databases, see Connecting external databases (page 15).
FAQ Installation of UMS on 64-bit systems
(https://faq.igel.com/otrs-igel/public.pl?Action=PublicFAQZoom;ItemID=647)
2.3. Updating a UMS Installation
Create a backup of the database before updating a previously installed version of the IGEL UMS.
If you still use an older version of the IGEL Remote Manager with SAP DB, we recommend that you switch
to the Embedded DB before updating the IGEL UMS. For a more detailed description of the switchover
process, please contact IGEL Support.
13
IGEL Technology GmbH
IGEL Universal Management Suite v4
4.09.100
Warning: Installing a version of the UMS which is older than the one currently used is only possible if you
have a backup of the database with the corresponding older schema. This is because the database schema
can only be updated to newer versions and changes cannot be undone! To ensure that it is possible to
revert to a previous version, you should make backups of your current system before updating the UMS.
It is advisable to set up a test system where you can initially install new versions of the IGEL UMS. This will
enable you to check your processes before you start using the new version on your actual system. This also
applies to hotfixes, patches etc. for the server system and database.
If you have a console version which is older than your server version, you will not be able to connect to
the server (Unable to load tree error message). In this case, be sure to update your installation of
the console too.
2.3.1.
Updating under WINDOWS
The procedure when updating under Windows is as follows:
1. First download the current version of the IGEL Universal Management Suite from the IGEL Download
Server and launch the installer by running the EXE file.
You will need administration rights for the computer in order to install the IGEL UMS.
2. Close any other applications and confirm that you have done so.
3. Read and confirm the license agreement.
4. Read the explanation of the installation process.
5. Select a path for the installation.
6. Choose a name for the entry in the Windows Start Menu.
7. Read the summary and start the installation process.
8. Confirm that you have closed all other UMS applications.
9. Confirm the automatic updating of the database schema (see warning above).
10. Close the program once installation is complete.
Once the update has been installed successfully, the UMS Server will once again connect to the
previously used database.
11. Launch the UMS Console.
12. Connect to the server using the access data you gave during the installation.
The Windows installer creates entries in the Windows software directory and the Start Menu. An icon for
launching the UMS Console will also be placed on the desktop.
14
IGEL Technology GmbH
IGEL Universal Management Suite v4
4.09.100
2.3.2.
Updating under LINUX
The procedure when updating under Linux is as follows:
1. First download the current version of the IGEL Universal Management Suite from the IGEL Download
Server. The installation program under Linux is an X11 application.
2. Log in as ROOT.
You will need ROOT rights for the computer in order to install the IGEL UMS.
3. Open a terminal window such as xterm, Console, Gnome Terminal etc. and switch to the directory of
the installation package.
4. Check that the package can be executed. In order for it to be executed, you may need to create it using
chmod a+x setup*.bin.
5. Run the setup-igel-ums-linux-[version].bin installation file.
6. The installer will be unpacked to /tmp, will run its Java Engine and will remove itself again once the
installation is complete.
7. Close any other applications and confirm that you have done so.
8. Read and confirm the license agreement.
9. Read the explanation of the installation process.
10. Select a path for the installation.
11. Read the summary and start the installation process.
12. Confirm that you have closed all other UMS applications.
13. Confirm the automatic updating of the database schema (see warning above).
14. Close the program once installation is complete.
Once the update has been installed successfully, the UMS Server will once again connect to the
previously used database.
15. Launch the UMS Console in installation folder, e.g.
/opt/IGEL/RemoteManager/RemoteManager.sh
16. Connect to the server using the access data you gave during the installation.
2.4. Connecting to External Database Systems
You will find details of the supported database systems and the HA Extension in the IGEL UMS Data Sheet
and on the IGEL website respectively. Details of the requirements when installing and operating the
database can be found in the administration manual for the particular DBMS.
To configure the database, use the relevant DBMS management program.
The configuration for setting up the data source and connecting the UMS to the database should be carried
out in the UMS Administrator.
All UMS Servers must work with the same database.
15
IGEL Technology GmbH
IGEL Universal Management Suite v4
4.09.100
2.4.1.
Oracle
To integrate Oracle, proceed as follows:
1. Set up a new database user with Resource authorization.
2. Set up a new Oracle type data source in the UMS Administrator.
A number of Oracle versions set up the Resource role without CREATE VIEW authorization. Please
ensure that this authorization is set for the role.
2.4.2.
Microsoft SQL Server
To connect the Microsoft SQL Server, proceed as follows:
1. Open the SQL Console of the SQL Server by selecting New Query.
2. Use the following script as a template, change it as necessary and then execute it.
To avoid problems when enabling the data source, ensure that LOGIN, USER and SCHEMA are the
same.
CREATE DATABASE rmdb
GO
USE rmdb
GO
CREATE LOGIN igelums with PASSWORD = 'setyourpasswordhere',
DEFAULT_DATABASE=rmdb
GO
CREATE USER igelums with DEFAULT_SCHEMA = igelums
GO
CREATE SCHEMA igelums AUTHORIZATION igelums GRANT CONTROL to igelums
GO
3. Set up a new SQL Server type data source in the UMS Administrator.
4. Ensure that the server port of the SQL Server is configured correctly in the data source. The default
value is 1433.
The Microsoft SQL Server should allow Windows and SQL authentication.
2.4.3.
PostgreSQL
IGEL UMS uses PostgreSQL functions (from Version 8.2). Older versions are not supported.
When installing a new instance of the PostgreSQL database, set the following parameters:
1. Install the database cluster with UTF-8 coding.
2. Accept the conditions for all addresses, not just localhost.
3. Activate Procedural Language PL/pgsql in the default database.
For further information regarding installation of the PostgreSQL database, see
http://www.postgresql.org.
16
IGEL Technology GmbH
IGEL Universal Management Suite v4
4.09.100
Once installation is complete, carry out the following configuration procedure:
1. Change the server parameters: The parameter listen_addresses in the file postgresql.conf
must contain the host name of the IGEL UMS Server OR '*' in order to allow connections to each
host.
2. Set up a host parameter in the file pg_hba.conf in order to give the UMS Server the authorization
to log in using the user data defined there.
If the IGEL UMS Server is installed on the same machine as the PostgreSQL Server, no changes to
these files are needed.
3. Launch the administration tool pgAdmin.
4. Create a new login role with the name rmlogin.
5. Create a new database with
name = rmdb
owner = rmlogin
encoding = UTF-8
6. Set up a new schema within the rmdb database with
name = rmlogin
7. Check whether the language plpgsql is available in the rmdb database.
If not, set it up.
8. In the UMS Administrator, create a new PostgreSQL-type data source with the host name of the
PostgreSQL Server and the correct server port (default is 5432), user rmlogin and database rmdb.
2.4.4.
Apache Derby
As with other external databases, we recommend that you create a new database instance for use by the
IGEL UMS.
Perform the following steps to create a new database instance and define the instance as a data source in
the UMS Administrator:
1. For security purposes, enable User Authentication in the Derby DB.
2. Launch the ij Utility (in [derby-installation-dir]/bin).
3. To create the rmdb instance, execute the following command:
connect
'jdbc:derby:rmdb;user=dbm;password=dbmpw;create=true';
4. Define the UMS database user rmlogin with passwordi rmpassword
CALL SYSCS_UTIL.SYSCS_SET_DATABASE_PROPERTY('derby.user.rmlogin',
'rmpassword');
5. Exit ij and launch the Derby Network Server.
6. In the UMS Administrator, create a new Derby-type data source with the host name of the Derby
Server and the correct server port (default is 1527), user rmlogin and database rmdb.
For further information regarding installation of the Derby database, see http://db.apache.org/derby.
17
IGEL Technology GmbH
IGEL Universal Management Suite v4
4.09.100
3.
First steps
In order to be able to work with the IGEL UMS, you will first need to install the UMS Server, Console and
Database before registering at least one thin client or loading the UMS Demonstration Database Backup.
This is available on the IGEL Download Server.
The procedure for connecting to the server and registering thin clients using the UMS Console is described
below. You will find detailed information regarding the IGEL UMS functions in the chapter Working with
IGEL UMS (page 26).
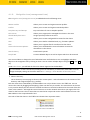
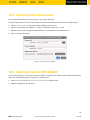
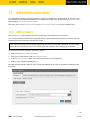
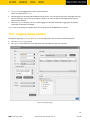
3.1. Connecting the UMS Console to the server
To establish a connection to the UMS Server, proceed as follows:
1. Launch the UMS Console.
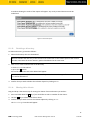
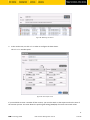
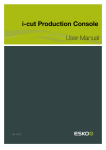
2. Click on System→Connect to... in order to connect to the UMS Server.
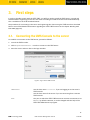
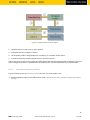
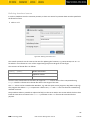
3. Enter the server and user data in the login window:
Figure 2: Log on to the UMS Console
UMS Server:
Use the host name localhost if you are logging on to the server's
UMS Console.
Use the host name of the server if you are connecting from a remote
UMS Console.
Port:
The port on which the IGEL UMS GUI server receives connections is set
to 8443 by default. However, it can be changed with the help of the
IGEL UMS Administrator program.
18
IGEL Technology GmbH
IGEL Universal Management Suite v4
4.09.100
User name and Password:
Enter the user name and password of a UMS administrator. When
setting up the IGEL UMS for the first time, these are the access data for
the database user account which was created while the UMS Server was
being installed. Log on using the user name <User>@<Domain> if you
belong to a domain configured in the UMS.
Click on Connect.
The data entered here, e.g. server name, port and user name, are saved for subsequent connection
processes. The next time you establish a connection, you will only need to enter the password. The server
and user information last used are also stored in drop-down lists and can therefore be reused quickly. You
can delete this list of stored login data in Misc→Settings→General→Clear Login History.
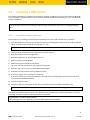
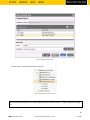
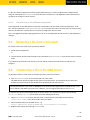
3.2. Registering thin clients on the UMS Server
Thin clients can be registered in the UMS Database in various ways:
•
•
•
•
•
Searching for thin clients within the network (page 19)
Importing thin clients via csv files (page 22)
Registering manually on the thin client (page 25)
Registering thin clients automatically (page 25)
Setting up thin clients manually (page 26)
If you would like to upload a server certificate of your own (page 116), please do this before registering
thin clients on the UMS. Otherwise, you will need to remove the old certificates from the thin clients
manually after changing the certificate.
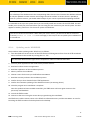
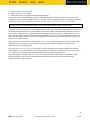
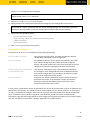
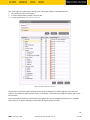
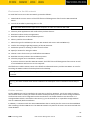
3.2.1.
Searching for thin clients in the network
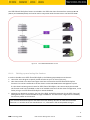
To search for thin clients in the network and select them for registration, proceed as follows:
1. Log in to the UMS Console.
The content panel of the console will be displayed.
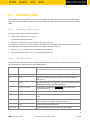
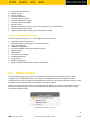
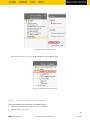
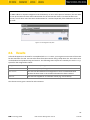
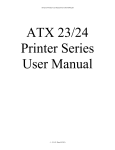
2. Click on Thin Clients→Scan Thin Clients to access the window allowing you to search for thin clients in
the network.
19
IGEL Technology GmbH
IGEL Universal Management Suite v4
4.09.100
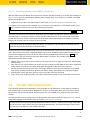
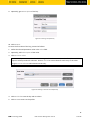
Alternatively, you can start a search by clicking on the button in the tool bar.
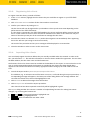
Figure 3: Scan for thin clients
1. You can search the entire network for thin clients that are switched on or restrict your search to
specific IP address ranges.
2. Select the thin clients to be registered by checking the Include checkboxes.
3. Click OK.
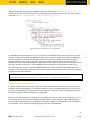
3.2.2.
Scan for Thin Clients
A thin client must be switched on and functioning if it is to be scanned. Furthermore, the thin client's
firmware must support the IGEL UMS software. This is the case for all IGEL thin clients with original
firmware as well as for devices from other manufacturers on which the IGEL Linux system was installed
using the IGEL Universal Desktop Converter 2.
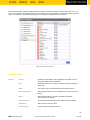
The following scan options are available:
20
IGEL Technology GmbH
IGEL Universal Management Suite v4
4.09.100
Local network of the UMS server
With this option, a broadcast message is sent by the
network containing the IGEL UMS server. The IGEL
UMS server may be in a different network segment from
the one that contains the IGEL UMS Console. If the
server is installed on the IGEL UMS server and has
various network interfaces, only the first interface will be
used to send the broadcast message.
IP range
When a message is sent, each IP in the specified range
will be contacted, even if routers suppress broadcast
messages.
List of IP ranges
If a number of network segments need to be scanned,
you can create a list of the IP ranges. To do this, click on
Edit List and Add to add ranges.
Use TCP for searching
Select this option if you would like to use TCP instead of
UDP for scanning. In certain networks, scanning with TCP
is more reliable, although it does take longer.
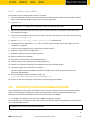
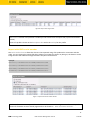
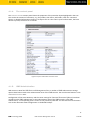
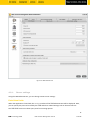
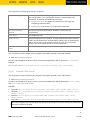
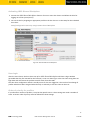
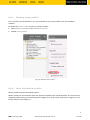
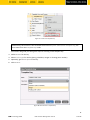
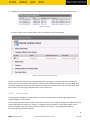
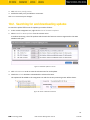
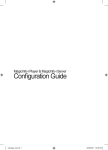
Once the scanning procedure is complete, the thin clients that have been detected will be displayed in a
sortable list in the scan results window.
In the Certificate Stored column, you can see whether a thin client already has a certificate from a UMS
Server. Thin client certificates can now be registered on the Server.
In the Filter field, you can enter a search string, e.g. parts of the device name, IP address or MAC address,
which will be searched for in all visible fields.
Figure 4: Results of the scan process
21
IGEL Technology GmbH
IGEL Universal Management Suite v4
4.09.100
3.2.3.
Registering thin clients
To register new thin clients, proceed as follows:
1. In the Include column, highlight the thin clients that you would like to register in your IGEL UMS
Database.
2. Click Select New Devices to select all thin clients without a certificate.
3. Confirm your selection by clicking on OK.
The thin clients will now be registered in your database. This may take some time depending on the
performance of the IGEL UMS Server.
If a thin client is registered in the IGEL UMS Database, the server certificate will be saved on the thin
client. Further access to the thin client will now be validated on the basis of this certificate. Only the
owner of the other private part of the certificate can manage the thin client.
4. Store the thin clients in a selected directory within the navigation tree immediately after registering
them. This will save you having to sort them manually.
The result of the procedure and any error messages will be displayed in a new window.
5. Close this window in order to return to the main screen.
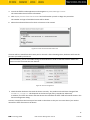
3.2.4.
Importing thin clients
You can already register thin clients before they are actually installed within the network. In order to do
this, you will need a csv file with the information on the thin clients needed for registration. This is at least
the MAC address, the thin client name and the firmware ID.
The firmware for the thin clients must be available in the database for the import. To ensure that this is the
case, it can be imported along with the firmware or provided by thin clients that have already been
registered. This method is therefore not always appropriate when setting up the IGEL UMS for the first
time.
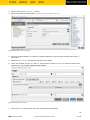
1. Launch the import under System→Import→Import Thin Clients.
If invalid data, e.g. an unknown item of firmware or an error, are found during the import procedure, a
corresponding message will appear in the lower part of the dialog field in the message window. The
row with the relevant thin client will be highlighted in red.
2. Click on Clear to delete all messages from the window.
3. Click on Import TCs to launch the import procedure.
Thin clients that have been imported successfully will be highlighted in green.
The Import dialog window also contains a number of simple editing functions for making last-minute
changes, e.g. correcting the firmware ID:
•
•
•
and Ctrl-V for copying and pasting a highlighted row
Del/Ctrl-X for deleting a highlighted row
Return/Enter inserts an additional row under a field
Ctrl-C
22
IGEL Technology GmbH
IGEL Universal Management Suite v4
4.09.100
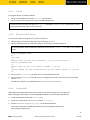
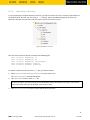
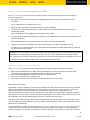
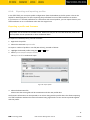
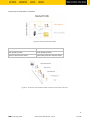
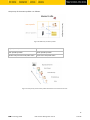
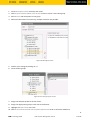
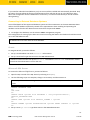
Import with short format
The short format provides the information required for the import and assignment to a profile: MAC
address, device name, firmware ID, profile ID.
The ID of a firmware version already registered can be found via Misc→Firmware Statistics.
The ID of a profile is shown in the description data and in the tool tip for the profile.
Example:
00E0C5540B8B;IGEL-00E0C5540B8B;1;26
00E0C5540B8C;IGEL-00E0C5540B8C;1;26
00E0C5540B8D;IGEL-00E0C5540B8D;1;26
Figure 5: Import with short format
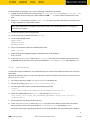
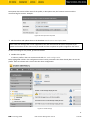
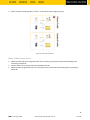
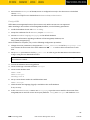
Import with long format
Unlike the short format, the long format also allows further data, e.g. the storage directory in the UMS
navigation tree, serial number, site etc. to be imported. You will see what information can be imported
after selecting the long format in the import dialog.
Example:
/Import;00E0C5540B9A;IGEL Universal Desktop
LX;5.03.100.01;IGEL-1;Büro1;EDV;Meier;0815;01.06.2014;F44
M;26;01
/Import;00E0C5540B9B;IGEL Universal Desktop
LX;5.03.100.01;IGEL-2;Büro2;EDV;Müller;4711;01.06.2014;F45
M;26;01
/Import;00E0C5540B9C;IGEL Universal Desktop
LX;5.03.100.01;IGEL-2;Büro3;EDV;Schulz;42;01.06.2014;F46M;
26;01
23
IGEL Technology GmbH
IGEL Universal Management Suite v4
4.09.100
Figure 6: Import with long format
The Firmware column in the preview is made up of two values from the import file (system and firmware
version).
The ID of a profile is shown in the description data and in the tool tip for the profile.
Import with IGEL serial number
The serial number format allows thin clients to be imported using a file produced in connection with the
order. You can request this import file when ordering your IGEL thin clients. By doing so, the devices can be
integrated into the UMS and configured before they are even delivered.
Example:
08154711;14D3B8C01B14110EBE;00E0C56133E4
47110815;14D3B8C01B14110EC6;00E0C56133EC
42007ABC;14D3B8C01B14110ED7;00E0C56133FD
007ABC42;14D3B8C01B14110EF9;00E0C561341F
Figure 7: Import with serial number format
The device firmware is not imported from the file. The firmware with the highest ID is allocated by default.
The IDs for firmware versions already registered can be found via Misc→Firmware Statistics.
24
IGEL Technology GmbH
IGEL Universal Management Suite v4
4.09.100
In the import file, the serial number constitutes the first part of each row. In the preview, it is listed as the
last column.
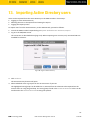
3.2.5.
Registering thin clients manually
You can also register a thin client on the UMS Server on the client itself:
1. Enter the name and the address of your UMS Server and the server port (standard setting 30001)
under System→Remote Management in the thin client setup.
2. Carry out the registration procedure, entering the login data for the UMS Server.
3. Reboot the thin client.
On thin clients with the UDLX firmware, you will find a dedicated program for registering on the UMS
Server under System in the Application Launcher. As a result, you can determine from the client itself the
sub-directory in the navigation tree to which the client will be added.
There are two ways to pass on the IP address of the UMS Server to the thin client:
•
If you register a thin client on the UMS Server, the IP address of the server will be saved on the thin
client. The registry key is: system.remotemanager.server0.ip.
The thin client connects to this IP address in order to retrieve its settings each time it boots.
Alternatively, you can configure your DHCP server in such a way that it provides the IP address via
Option 224.
•
The second way is to create an alias with the name igelrmserver for the UMS Server in your DNS.
If you would like to add thin clients to your UMS Database manually, you must use one of these options.
Otherwise, the thin client will not be able to connect to the server.
3.2.6.
Registering thin clients automatically
The IGEL UMS Server can be configured in such a way that all thin clients without a certificate which boot
in the server's network are automatically registered.
1. To do this, enable the Automatic Registration parameter under Settings→Further Settings in the IGEL
UMS Administrator program.
2. You can register an IGEL thin client on the UMS Server automatically by setting the DNS entry
igelrmserver (Record Type A) or a DHCP option (224).
3. Set the DHCP option 224 as a string - not as DWORD - to the IP address of the server by adding the
following to the dhcpd.conf file in the appropriate section, e.g. in the global area:
option igelrmserver code 224 = text
option igelrmserver "<IP of the UMS Server>"
4. You should also set the DNS entry igelrmserver to the IP address of the UMS Server.
25
IGEL Technology GmbH
IGEL Universal Management Suite v4
4.09.100
Warning: If this option is enabled, each thin client without a certificate in the network will be added to the
UMS Database. If you reset a client to the factory settings and reboot it, it will immediately be registered
on the server again. We recommend automatic registration if new clients are to be registered during a
network rollout. Once the clients have been registered, disable the automatic registration option on the
UMS Server.
3.2.7.
Setting up thin clients manually
To create an entry for a thin client in the database manually, proceed as follows:
1. Select New Thin Client either in the context menu of a thin client directory or in the menu under
System→New.
2. Give the MAC address, the name and the firmware of the thin client and, optionally, select a directory
for the client.
The firmware for the thin clients must be available in the database for the manual set-up. To ensure that
this is the case, it can be imported along with the firmware or provided by thin clients that have already
been registered. This method is therefore not always appropriate when setting up the IGEL UMS for the
first time.
4.
Working with the IGEL UMS
The IGEL Universal Management Suite provides extensive tools for managing your thin client
infrastructure. The majority of administrative tasks can be found in the UMS Console, while the UMS
Administrator provides a number of tools for server configuration.
The program's graphical user interface and the tools available are described in detail below.
4.1. The console window
The UMS Console contains various tools and information areas.
Key elements include:
•
•
•
The navigation tree
The (context) menu
The content panel
The UMS Console window is made up of the following parts:
26
IGEL Technology GmbH
IGEL Universal Management Suite v4
4.09.100
Figure 8: The UMS console window
1
The menu bar
(page 28)
All commands and actions can be executed from the menu. You can use
shortcuts ( Alt + underlined character in the menu item) to access the menu bar
via the keyboard.
2
Symbol bar (page
30)
Frequently used commands relating to objects in the navigation tree.
3
The navigation tree Provides access to all UMS objects such as thin clients registered on the UMS
(page 31)
Server, directories, profiles, views and planned tasks.
4
The content panel
(page 33)
Information regarding the selected object (most entry fields can be edited
directly).
5
UMS
administration
(page 33)
Allows you to manage tasks, e.g. configuring domains, Universal Firmware
Updates and the scheduled backup of the UMS Database (Embedded DB only).
6
Messages (page
34)
Displays actions launched in the UMS Console. Green text indicates successful
procedures. Red rows highlight a problem while the command was being
executed.
7
Status row (page
34)
Status messages from the console, e.g. the server currently connected and the
user name.
8
Context menu
(page 35)
Objects such as profiles and files which are assigned to the thin clients or folders
(directly or indirectly).
27
IGEL Technology GmbH
IGEL Universal Management Suite v4
4.09.100
4.1.1.
Menu bar
At the top edge of the console window you will find the context-dependent menu bar.
It consists of five menus – System, Edit, Thin Clients, Misc and Help.
System
Menu → System
Connec to ... Disconnect
Allows you to establish and terminate the UMS Server connection
Refresh
Allows you to refresh the view
New
Allows you to create new UMS objects such as directories, profiles, tasks etc.
Import/Export
Allows you to import and export objects such as firmware, profiles, thin
clients
Administrator Accounts
Allows you to set up and manage UMS user accounts and groups
Snapshot Management
Allows you to manage structures on the UMS Web Server
Logging
Displays message/event logs and exports the logs
License Management
Allows you to create and assign firmware licenses to thin clients
VNC Viewer
Allows you to shadow a thin client
Open Customization
Builder *
Allows you to launch the Universal Customization Builder, see UCB in the
appendix (page 149).
Exit
Allows you to exit the UMS Console application
* if licensed
Edit
Menu → Edit
Save Description
Allows you to save changes to the data in the content panel
Edit Configuration
Configuration parameters for a thin client or profile
Rename, Delete
Object-related actions within the tree
Access Control
Allows you to manage user and group rights for the selected object
Cut, Copy, Paste
Object-related actions within the tree
28
IGEL Technology GmbH
IGEL Universal Management Suite v4
4.09.100
Thin clients
Menu → Thin Clients
Thin client commands (Suspend,
Shutdown ...)
Commands that can be issued to thin clients, e.g. shut down,
restart, firmware update, send/receive settings, send message
etc.
Take over Settings from ...
Allows you to send profile settings to the thin client on a one-off
basis
Clear Configuration Change Status
flag
Allows you to reset change markings (blue dot next to the icons
for the thin clients)
Check the template definitions *
Allows you to check the assignment of template values
Scan for Thin Clients
Allows you to search for thin clients in the network of the UMS
Server
* if feature enabled
Extras
Menu → Misc
Default Directories
Automatic assignment of thin clients to directories according to
specific rules.
Search
Allows you to search for objects.
Scheduled Jobs
Allows you to manage public holiday lists and assign tasks to
hosts.
Change Password
Allows the password of a logged-in user to be changed.
SQL Console
Direct access to the database with SQL scripts
Firmware Statistics
A list of firmware versions registered in the database
Remove Unused Firmware
Allows you to delete from the database firmware versions which
are not used by any thin client or profile.
Cache Management
Allows you to view, update and empty the UMS Server cache.
Settings
Configuration parameters such as console language, timeout
values for online checks or Universal Firmware Update search
etc.
Warning: The SQL Console is intended solely for administrative purposes. You can destroy the database
through SQL operations on the Console.
29
IGEL Technology GmbH
IGEL Universal Management Suite v4
4.09.100
Help
Menu → Help
Help
Link to the manual on edocs.igel.com
IGEL Knowledge Base
Link to further online documentation on edocs.igel.com
Save Support Information...
Allows you to save UMS Server and Console log files in a ZIP file
Save TC Files for Support
Allows you to save log and configuration files for a thin client in a
ZIP file.
Licenses from Third-Party Providers
List of the licenses for third-party software and libraries used in
the UMS, e.g. Apache Tomcat
Info
Shows details of the current version of the UMS Console and
Java environment as well as the logged-in user
4.1.2.
Tool bar
In the tool bar, you will find buttons for frequently used commands:
Figure 9: The symbol bar
The symbols are as follows (in the correct order):
Update
Allows you to update the view and status of the thin clients.
Online Check
Allows you to perform an online check of the thin clients.
Scan Thin Clients
Allows you to search for thin clients within the network.
Rename
Allows you to change the name of objects in the navigation tree.
Delete
Allows you to delete objects in the navigation tree.
Authorizations
Allows you to specify access rights for selected objects.
Cut, Copy, Paste
You can also move objects within the tree via drag and drop.
Save Description Data
Allows you to save edited description data for thin clients or
profiles (data in the content panel).
Edit configuration
Allows you to maintain the configuration parameters for thin
clients or profiles. These normally correspond to the parameters in
the clients' local setup.
Step Backwards / Forwards
Allows you to move backwards and forwards in the console
history.
The step backwards/forwards merely allows you to review the objects last visited. It does not allow you
to undo changes you have made!
30
IGEL Technology GmbH
IGEL Universal Management Suite v4
4.09.100
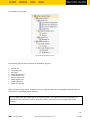
4.1.3.
Navigation tree (management tree)
The navigation tree (management tree) is subdivided into the following areas:
Master Profiles
Allows you to create and organize master profiles
Profiles
Allows you to create and organize standard profiles
Template Keys and Groups
Keys and values for use in template profiles
Thin Clients
Allows you to organize the managed thin clients in this area
Shared Workplace Users
Assigns specific profiles to AD users
Views
Allows you to create configurable list views for thin clients
Jobs
Allows you to define scheduled tasks, e.g. firmware updates
Files
Allows you to register files for transferral to thin clients
Universal Firmware Updates
Allows you to download the current firmware versions for
distribution to thin clients
Search History
Saved search queries
Recycle Bin
Contains deleted objects as well as objects which can be restored
You can use sliders to change the size of individual areas and hide them. You can highlight and select
objects in the navigation tree by clicking on them. You can select multiple objects using the Shift or the Ctrl
key.
Under Thin Clients, you will find all of the thin clients registered in the database.
Tip: The number of items contained (including items in sub-folders) is shown after each folder. You can
change the display settings in the menu under Misc > Settings > Show Number of Directory Items.
Select a directory.
The TC directory content page is shown in the content panel – with information on the contents of the
directory and assigned objects (e.g. profiles).
Each thin client that is identified by its MAC address can only be shown once in the UMS tree. You can
move a thin client by dragging and dropping it from one directory to another. The name shown in the tree
is only used to identify the thin client in the UMS and does not need to be identical to the name of the thin
client in the network – although this internal name is set to the network name when you register the thin
client for the first time. The TC name does not need to be unique and can be used a number of times. The
MAC address is the unique identifier here.
The color of the thin clients in the UMS tree indicates their respective status:
Figure 10: Colors in the UMS tree
31
IGEL Technology GmbH
IGEL Universal Management Suite v4
4.09.100
•
•
•
Green if the thin client is online
Red if the thin client is offline
Exclamation mark if changes have not yet been applied
Recognition occurs automatically by regularly sending UDP packets to the thin clients that are currently
displayed in the UMS Console (default: every 3 seconds). You can update this status manually in the symbol
bar and specify the query interval for the online check in the Misc→Settings→Online Check menu.
The online check can be disabled completely in the UMS Administrator (page 37) application.
In the Profiles sub-structure, you can manage profiles for thin clients or thin client directories. You have the
option of creating directories for saving profiles and can add, delete and change the profiles in this part of
the structure. Information on a selected profile is shown in the content panel. To assign a profile to a thin
client, you can drag and drop the thin client into the profile or vice versa. This also works with profiles and
thin client directories. Profiles can also be assigned to the thin clients or thin client directories via the Add
button in the object areas (8).
All generated thin client views are shown under Views. You can generate new views, edit or delete views
and export the result of the view in various formats (e.g. XML). This tree structure can also contain
sub-directories for arranging views.
If you use the IGEL Shared Workplace function in order to distribute user-specific profiles to thin clients
when logging on, you should assign one or more profiles to an AD user or a group in the Shared Workplace
Users area. You can also generate a simulated view of the settings taking effect here.
All specified jobs are shown under Jobs. You can create new planned jobs and edit or delete listed jobs.
Jobs are assigned to thin clients in the detailed view for a job. This tree structure can also contain
sub-directories for organizing jobs.
32
IGEL Technology GmbH
IGEL Universal Management Suite v4
4.09.100
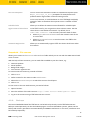
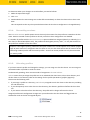
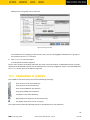
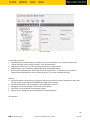
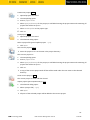
4.1.4.
The content panel
The contents area or content panel shows the properties of the particular object highlighted in the tree.
This can be the contents of a directory, e.g. the profiles, thin clients, sub-folders, tasks etc. contained
therein, or detailed information relating to an object such as a thin client's system information, the basic
data for a profile, the hit list for a view etc.
Figure 11: System information of the thin client
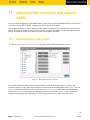
4.1.5.
UMS Administration
With Version 3.09 of the IGEL Universal Management Suite, a number of UMS Administrator settings
options have been moved to the administration area of the UMS Console. The console now features a new
UMS Administration area.
Configuration of the Active Directory and the server settings for Universal Firmware Updates have been
moved from the UMS Administrator to the administration area of the UMS Console. In the UMS
Administrator, a corresponding note is shown on the previously used tabs. You will also find new functions
such as the alternative LDAP configuration or scheduled backups.
33
IGEL Technology GmbH
IGEL Universal Management Suite v4
4.09.100
4.1.6.
Messages
The Messages window area contains information regarding the successful or unsuccessful execution of
commands. If a command could not be executed successfully, a message written in red appears in the list. A
warning symbol will also flash in the status bar of the UMS Console until the user selects the message.
Click Show Result or double-click the message in order to view the relevant details.
You can delete messages you have already dealt with or wait until the message window is automatically
reset when you close the UMS Console.
You can change the size of the message window using the middle slider or hide it altogether.
Figure 12: The Messages window
4.1.7.
Status bar
The status bar shows the name of the UMS Server currently connected and the user who is logged in to the
console. The symbol at the bottom right indicates the status of the message window. For example, it signals
when new warning messages are present. These can be seen here even if the message area is hidden.
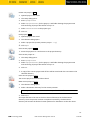
4.1.8.
Assigned objects
To ensure that you can quickly tell directly and indirectly assigned objects apart, the assigned objects area
is subdivided into two parts.
Directly assigned objects have been assigned to an individual thin client, folder or profile,
whereas indirect objects have been "inherited" via the file structure.
34
IGEL Technology GmbH
IGEL Universal Management Suite v4
4.09.100
Double-click an object in the assignment area in order to directly edit the profile assigned to a thin
client.
Figure 13: Directly and indirectly assigned objects
4.1.9.
Context menu
You will be given an object-dependent context menu by right-clicking on the corresponding object.
Depending on your selection, actions for folders, thin clients, Shared Workplace users etc. will be available.
The chosen command will be carried out for all objects previously marked in the tree.
Certain commands can only be executed for individual objects, not for directories with objects. These
options are then disabled in the menu. Example: The command File TC > UMS can only be executed for an
individual thin client. In contrast, the command File UMS > TC can be executed for all thin clients in a
directory.
4.1.10. Search for objects in the UMS
Objects within the UMS navigation tree can be found using the following functions:
35
IGEL Technology GmbH
IGEL Universal Management Suite v4
4.09.100
•
•
•
Quick Search
Search function
View
Quick Search in the symbol bar provides the quickest access to the search function. The entry mask is
always visible in the console window. The key combination Shift-Ctrl-F places the cursor in the entry field. The
Quick Search search queries are restricted to a small number of object properties: object name, object ID,
MAC address, IP address. These data are buffered locally when the console is launched and can therefore
be searched very quickly without having to access the database. The user's last 20 search queries are saved
to allow quick access. They are saved in the console user's system user data (Windows Registry) rather than
in the UMS database.
Figure 14: Search Parameters for Thin Clients
The normal UMS search function (Misc→Search or Ctrl-F key combination) provides additional options for
searching the UMS database. In addition to the Quick Search data (see above), all other thin client, profile
or view data can be selected here, e.g. an individual inventory number or the monitor model connected.
Various criteria can be logically linked (AND / OR). The user's search queries are recorded under Search
History in the navigation tree and can therefore be processed or reused easily.
Views (page 94) function very similarly to search queries. Here too, various criteria can be linked and the
query saved. Unlike with search queries, however, views are available to all UMS administrators together –
depending on their authorizations. Views can also be taken into account when defining planned tasks (page
100).
36
IGEL Technology GmbH
IGEL Universal Management Suite v4
4.09.100
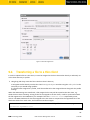
4.1.11. Deleting objects in the UMS / recycle bin
With the IGEL Universal Management Suite from Version 4.07.100 onwards, you can also move objects to
the recycle bin instead of permanently deleting them straight away. The recycle bin is enabled or disabled
globally for all UMS users.
Enable the recycle bin in the administration area under Additional Settings→Enable Recycle Bin.
If an object in the structure tree is deleted (Delete function in the symbol bar, in the context menu or the
Del key), it will be moved to the recycle bin following confirmation.
If the recycle bin is active, objects can also be deleted directly and permanently by pressing Shift-Del .
Directories are moved to the recycle bin along with their sub-folders and all items and can therefore be
restored again as a complete structure. You will find the UMS recycle bin as the lowest node in the UMS
console structure tree. Items in the recycle bin can be permanently deleted there or restored. To do this,
bring up the context menu for an item in the recycle bin.
If you cannot bring up the context menu for items in the recycle bin, the recycle bin is probably inactive.
Check the status of the recycle bin as described above.
Virtually all items from the UMS structure tree can be moved to the recycle bin: thin clients, profiles, views,
tasks, files and their directories. Shared Workplace users cannot be deleted, while administrator accounts
(in account management) and search history items can only be deleted permanently (with Shift-Del ). The
highest nodes in the structure tree cannot be deleted either. However, this procedure will affect all
deletable items beneath this node!
•
•
•
•
•
Objects in the recycle bin cannot be found via the search function or views and cannot be addressed by
planned tasks.
Thin clients in the recycle bin will not receive any new settings from the UMS but will remain registered
in the UMS and can be restored again along with all assigned profiles from the recycle bin.
The fact that profiles in the recycle bin are no longer effective means that the settings for thin clients
may change. Profiles previously assigned to thin clients will be reactivated if they are restored again.
Planned tasks, views and search queries in the recycle bin will not be executed.
At the same time, assigned profiles, files, views and firmware updates in the recycle bin are not active.
4.2. The IGEL UMS Administrator
The IGEL UMS Administrator application is only available on one UMS Server as this makes it possible to
intervene directly in communications between the services. It allows basic data such as the ports used or
data sources connected to be edited. These functions are not available in the administration area of the
console.
The Administrator's server configuration can be exported and imported again for backups via File. You can
change the language of the Administrator tool under File→Settings→Language.
The authorizations for changing settings depend on whether a person is authorized to change IGEL UMS
files on the server system. When using the IGEL UMS Administrator, you should therefore use the same
user account as you did when you installed the UMS.
37
IGEL Technology GmbH
IGEL Universal Management Suite v4
4.09.100
Figure 15: UMS Administrator
4.2.1.
Server settings
Using the UMS Administrator, you can change various server settings.
Ports/time limits
When the application is launched, the Settings window of the UMS Administrator will be displayed. Here,
you can specify the ports to be used by the UMS and other related settings such as the time limit etc.
The IGEL UMS server uses these open ports for incoming queries:
38
IGEL Technology GmbH
IGEL Universal Management Suite v4
4.09.100
Port name
used by
Task
Server port
TC server
The thin clients connect to this port. The default port is
30001. It can be changed here.
GUI server port
IGEL UMS Console
Establishes the connection to the server. You must enter
this port in the logon window of the IGEL UMS Console,
the default number is 8443.
HTTP port
Java Web Start interface
If you would like to use Java Web Start, you must specify
this port in the connection URL, e.g.
http://hostname:9080/start_rm.html. The
default port for the UMS TC web server is 9080.
DB port
Communication with the Embedded DB takes place via
port 1528, for external databases you can set the port
under Data Sources.
Activate Allow SSL Connections only in order to encrypt network traffic to and from IGEL UMS. If you
do, Java Web Start will only work with the GUI Server port (default 8443).
Do not activate Allow SSL Connections only if you have thin clients with Windows Embedded 7 before
version 3.08.100 running and want to use Universal Firmware Update. Those older Windows firmwares
do not support updates via HTTPS.
In the Scan Parameters area, the following values can be configured:
Time out
This parameter specifies how long the IGEL UMS will wait for a response to
scan packets that were sent to the network. The value is given in
milliseconds and is set to 6000 by default.
Broadcast IP
Broadcast address that is used for scan packets. It is only used for scanning
the local network. If IP ranges are used, the UDP packets will be sent to each
client within the IP range. The default setting here is 255.255.255.255. Under
normal circumstances, this does not need to be changed.
Specify scan reply port
(UDP)
Allows you to specify a set port via which the thin clients respond if you use
UDP for scanning. If TCP is used, this port is not needed because the
response is given via a configured socket. If you leave the default setting and
do not specify a port, the application will select any free port.
In the Online Status Check Parameters area, Time Out specifies how long the system will wait for a
response to an online status query message. The IGEL UMS Console attempts to contact all thin clients that
are currently visible in the console. Each thin client in this area must respond to the status query in the
specified time or will otherwise be flagged as offline. The default value is 100 ms.
To disable the online status check, proceed as follows:
Select Disable Online Status Check.
You can also disable the online check on the UMS Console. The difference in this case is that the function is
only disabled for this one console installation.
Other settings
Various other general parameters can be configured here:
39
IGEL Technology GmbH
IGEL Universal Management Suite v4
4.09.100
Thin Client Requests
You can restrict the maximum number of simultaneous requests (such
as get_settings_on_boot) accepted if for example there are
problems with a large number of clients booting at once.
In this case, however, it would be better to use a UMS High Availability
network in order to distribute client queries across a number of UMS
Servers.
Scheduled Jobs
Allows you to define the maximum time allowed for scheduled jobs.
Agjust names of Thin Clients
In the UMS Console, you can give thin clients a device name. The thin
clients have a name within the network – by default, this is
IGEL-<MAC address>. You can now synchronize both of these:
•
•
Automatic Registration
Select Adjust UMS-Internal Name to use the network name of the
TC in the UMS.
Select Adjust Network Name to use the name in the UMS as the
device name too.
Allows you to automatically register IGEL thin clients which boot within
the network.
Snapshotd - File sources
Allows you to create Web Resources in the WebDAV folder which you can use with the UMS-internal web
server Tomcat.
With the help of these resources, you can make files available to your thin clients, e.g.
•
•
•
•
Firmware updates
Partial updates
Background images
Virus scanner signatures etc.
To create a new web resource, proceed as follows:
1. Click on New.
2. Define a name for the resource under Public Name .
3. Select the Document base path to which the resource should point.
4. Click on OK.
To test access to the new web resource, proceed as follows:
1. Open a browser.
2. Enter the address of the web resource: http://<UMS Server>:9080/<public name>
3. Log in to the resource using a UMS administrator account.
4.2.2.
Backups
The internal Embedded DB of the UMS Server can be backed up directly via the UMS Administrator.
Backups created previously can also be loaded up again. For external database systems, please use the
backup and recovery procedures recommended by the DBMS manufacturer. In this case, certificates must
be backed up separately.
40
IGEL Technology GmbH
IGEL Universal Management Suite v4
4.09.100
Creating a Backup
To create a backup, proceed as follows:
1. Click on Change next to the Directory entry field to change the destination directory.
The file selection window will appear.
2. Specify the storage location for your backups.
3. Click on Create.
4. Enter a name for this backup in the pop-up window.
The data will be saved in the directory you have selected.
The certificate files server.pem and server.crt will also be included in the backup.
Restoring a Backup
Your current database will be overwritten. It is strongly recommended that you create a backup of the
current data before another backup is restored.
To restore a saved backup, proceed as follows:
1. Select the desired backup from the backup list.
2. Click on Restore.
3. Once your data have been restored, the login data for the database will be displayed.
Deleting a Backup
To delete a saved backup, proceed as follows:
1. Select the desired backup from the backup list.
2. Click Delete to remove backups that you no longer need.
Both the entry in the UMS Administrator and the backup file on the hard disk will be deleted!
Backup on the Command Line
A command line program for creating a backup with batch file scripts is also available. The program is called
embackup.exe and it can be found in the rmadmin directory in the UMS installation directory.
You can launch the program with the following options:
b path/filename:
the path and the name of the backup file that is created
r path/filename:
the backup file with the specified path will be restored in the
database
u username:
UMS user name
p password:
Password of the UMS user
41
IGEL Technology GmbH
IGEL Universal Management Suite v4
4.09.100
Tipp & Trick
See Planned backup (Embedded DB) (page 118)
4.2.3.
Data Sources
The connection to a database system is provided via data sources which you can manage in the UMS
Administrator. If you have chosen the standard installation, the Embedded DB is already set up as the data
source and enabled.
See also: Connecting external database systems (page 15)
Setting up a Data Source
1. Click on Add to add a first data source or an additional one.
A dialog window will open.
2. Select the DBMS type, the host / port for establishing the connection and the user set up on the DBMS.
More detailed information regarding the supported DBMS can be found in the UMS Data Sheet on the
IGEL website and in the UMS HA appendix (page 141).
Provided that a data source has not been enabled, these settings can still be changed by selecting
Edit. The active data source is protected against changes to its configuration. By selecting Change
Password, you can set a new password for the database user. This is also possible when a data source
is active.
3. Click on Test to test the connection to the database.
This is also possible when a data source is inactive.
Activating a data source
You can set up a number of data sources. However, only one can be actively used by the server.
To activate this data source, proceed as follows:
1. Select a data source from the list of sources that have been set up.
2. Click Activate.
3. Enter the password for the data source that you have selected.
While the data source is being activated, the application checks whether a valid database schema can
be found. If no schema is found, a new schema will be created. An out-of-date schema will be updated,
and, if the schema contains unfamiliar data, these will be overwritten.
4. Confirm each of these actions.
Warning: Overwriting existing data means that the entire database schema will be deleted and not just
the out-of-date tables used by the IGEL UMS.
42
IGEL Technology GmbH
IGEL Universal Management Suite v4
4.09.100
Copying a data source
To switch from the standard installation with an Embedded DB to an external database system, e.g. an
Oracle RAC cluster, proceed as follows:
1. Prepare the new database in accordance with the installation instructions for the UMS.
2. Set up a suitable new data source for this DBMS.
3. Select the Embedded DB data source which is still active.
4. Click Copy.
5. Select the destination data source.
6. Start the process after entering the destination login data.
7. Activate the new data source.
Optimizing the active Embedded DB
Click Optimize Database to optimize an active Embedded Database.
The contents of the database will be restructured.
The database index will be renewed in order to speed up database operations.
A message window will appear once the procedure has been successfully completed.
4.2.4.
Certificates
Via the Certificates window area, you can not only save and restore certificates but also convert them, e.g.
from the Remote Manager 2.x format into the current format in each case.
You can also import an exported KeyStore file when reinstalling the IGEL UMS.
43
IGEL Technology GmbH
IGEL Universal Management Suite v4
4.09.100
5.
Thin Clients
The Thin Clients node is a key part of the navigation tree. Here, you can organize and manage all devices
registered on the UMS Server. This includes IGEL thin clients and external devices installed with UDC.
5.1. Managing thin clients
In the IGEL UMS, you can sort thin clients according to directories via a structure tree. You can use this
facility to provide devices forming groups on the basis of their location or structure with the same profiles
or to sort the thin clients in keeping with your company structure.
5.1.1.
Creating a directory
You can create as many directories and sub-directories as you want in order to group the thin clients
together. When you create sub-directories, the thin clients organized in it form sub-groups of a group.
A thin client that is unequivocally identified by its MAC address can only be stored in a single directory, i.e.
only as a member of a single group.
To create a directory or sub-directory, proceed as follows:
1. Select a directory, e.g. Thin Clients.
2. Click System→New →New Directory in the main menu bar
or select the option New Directory from the context menu of the selected directory.
3. Enter a name for the new directory.
4. Click OK.
The new directory will be displayed directly below the selected directory in the structure tree.
You can now move thin clients to this new directory.
44
IGEL Technology GmbH
IGEL Universal Management Suite v4
4.09.100
5.1.2.
Importing a directory
If you are planning a complex directory structure, you do not need to set it up in a step-by-step manner in
the UMS Console. Instead, you can create a csv file (e.g. with a spreadsheet program) in which you
determine the directory structure and then import the structure from this list.
Figure 16: UMS tree structure
The tree structure shown above is based on the following file:
Thin
Thin
Thin
Thin
Thin
Clients;
Clients;
Clients;
Clients;
Clients;
Augsburg; TS
Augsburg; QA
Augsburg; Development
Bremen; Support
Bremen; PreSales
To import a directory structure from a csv file, proceed as follows:
1. Select System→Import→Import Directories from the main menu.
The Import Directories window will appear.
2. Click Open File in order to load a csv file.
In the first column, you must specify one of the default master directories. In this way, you can also
import directory structures for profiles, tasks, views or files.
3. Click Import Directories in order to create the directory structure.
45
IGEL Technology GmbH
IGEL Universal Management Suite v4
4.09.100
A window showing the result of the import will appear. Any newly created directories will be
underlined.
Figure 17: Result of import
5.1.3.
Deleting a directory
To delete a directory, proceed as follows:
1. Select the directory that is to be deleted.
Be sure to delete the directory in the structure tree rather than in the content panel of the console
window, otherwise the entire directory path will be deleted at the same time.
2. Click Delete in the context menu of the directory
or click Delete in the tool bar
or press the Del button.
A list of all objects that are to be deleted will appear.
If a directory is deleted, all sub-directories and objects such as thin clients, profiles or views contained
in it will be deleted too.
3. Confirm that you wish to delete the relevant objects by clicking on OK.
5.1.4.
Moving thin clients
Drag and drop is the easiest way of moving thin clients from one directory to another:
1. Press and hold down the Ctrl key if you would like to select a number of thin clients.
2. Use the Shift key to select a row of thin clients.
3. Confirm that you wish to move the relevant objects by clicking on Yes.
The Time Changed window will appear.
46
IGEL Technology GmbH
IGEL Universal Management Suite v4
4.09.100
If profiles are indirectly assigned to a thin client or revoked as a result of the thin client being moved
to a different directory, its configuration too will change. The new configuration can take effect either
immediately or when the thin client is next rebooted.
4. Select when you want the changes to take effect and confirm this by clicking on OK.
You can disable these confirmation dialogs in the relevant window. You can then undo this change again
under Misc→Settings→General.
5.1.5.
Defining rules for stipulated directories
You can define rules for default directories. During the registration process, the thin clients will
automatically be allocated to specific directories in the tree on the basis of these rules. They are given the
settings of the profiles for these directories. As a result, all you need to do is register the thin clients in
order to ensure that they are automatically assigned previously created profiles.
To define rules for default directories, proceed as follows:
1. Select Misc→Default Directories.
The list of pre-defined rules will be shown in the pop-up dialog.
2. Click Add, Edit and Remove to add a new rule or edit or delete an existing one.
3. Click the up and down buttons to change the order of the rules.
The order of the rules is important because the first rule satisfied by a thin client determines the directory
in which the thin client will be stored.
Creating/editing a directory rule
1. Click Add under Misc→Default Directories to create a new rule.
Click Edit under Misc→Default Directories to change an existing rule.
2. Select the directory where the thin clients are to be stored if they satisfy the rule.
3. Enable the option Overwrites Existing Directory Allocation in order to re-register in the destination
directory a previously registered thin client.
4. Enable the option Apply Rule When the TC is Booted in order to move a previously registered thin
client to the associated directory in accordance with the directory rule each time its reboots. In this
case, there is no need to re-register it
Establishing conditions
With the help of the assistant dialog, you can establish in three steps the conditions which must be met in
order to use the rule.
1. Select a search parameter or a selection criterion.
The available criteria are:
47
IGEL Technology GmbH
IGEL Universal Management Suite v4
4.09.100
-
IP address
Name of the thin client
Network name
Product name
Product ID
Firmware version
Network mask
2. Specify the reference value for the criterion.
The possible entry ranges will vary depending on the chosen criterion. Further information on the
various entry areas can be found under Search.
3. Click Continue to proceed.
You will be given an overview of the defined default directory.
4. Enable the option Further Narrow Down Search or Set Further Selection Criterion in order to define
the rule more precisely.
The assistant will once again open the Select Search Parameter window.
5. Repeat steps 1 to 3.
6. Click Finished.
The new rule will be set up and will be shown in the list.
Figure 18: Create default directory rules
Using a directory rule
The rules can be used regardless of new clients being imported or existing clients booting:
Click Use in the directory rule overview.
You can also define how thin clients which do not satisfy any of the rules are to be handled. You can leave
them in the current directory or collect them in a specific other folder.
48
IGEL Technology GmbH
IGEL Universal Management Suite v4
4.09.100
Examples
First example:
Assigning a thin client to a directory on the basis of device data
A thin client satisfies this rule if it is a UD3 device with a
firmware version higher than 4.0 and the IP address comes
from the 10.201.0.x range.
Figure 19: Change default directory rule
Second example:
Assigning a thin client to a directory on the basis of network
masks
If a thin client is registered in the IGEL UMS, it is moved to a
folder which is determined on the basis of the Network Mask
criterion. If the relevant folder does not exist, it will be created.
Because this rule always applies, it is not a good idea to define
a further rule. Only the first rule will be effective. If the
network mask rule sorts all thin clients into directories, no
further rule is active. The relevant folder is determined
through this operation:
Folder = IP address AND network mask
49
IGEL Technology GmbH
IGEL Universal Management Suite v4
4.09.100
IP address
Network mask
Resulting directory
130.094.122.195
255.255.255.224
130.094.122.192
172.16.232.15
255.255.0.0
172.16.0.0
192.168.1.1
255.255.255.0
192.168.1.0
Special case – structure tag
The structure tag is a special selection criterion for directory rules. A flag of this type can be allocated
locally on the thin client or assigned to each thin client via DHCP. If a thin client is registered and returns
such a structure tag, it can be stored in the designated directory on the basis of a directory rule. Unlike with
"normal" directory rules, the rule with structure tags covers several directories at a time – this makes this
solution more flexible and straightforward and provides optimum support when rolling out thin clients
automatically.
A Best Practice document regarding the use of the structure tags can be found here
(http://edocs.igel.com/index.htm#10202089.htm).
Requirements:
The following requirements must be met if a thin client is to supply the information regarding storage in a
specific directory.
•
•
•
IGEL UMS 4.08.100 or newer
Client with IGEL Linux 5.05.100 or newer
Structure tag is assigned to the client manually or via DHCP
Assigning a structure tag to the thin client:
•
•
Automatically via DHCP: Use Option 226 of your DHCP server in order to supply the thin clients in the
network with the desired structure tags. The client then passes on the tag to the UMS Server upon
registration.
Manually on the thin client: You can also allocate the structure tag during manual registration from the
thin client. See IGEL Linux remote administration (http://edocs.igel.com/index.htm#2694_1.htm).
50
IGEL Technology GmbH
IGEL Universal Management Suite v4
4.09.100
5.2. Configuring thin clients
You can configure a thin client
-
locally on the device itself
via the configuration dialog of the UMS
via a profile for the UMS
or
-
via VNC access.
You can edit the thin client configuration locally in the client setup or directly for this client in the IGEL
UMS:
Double-click the thin client in the navigation tree
or select Edit Configuration from the menu / context menu
or select the corresponding symbol from the tool bar.
The thin client setup dialog in the UMS and the profile configuration procedure are structured in the same
way as the local setup application. Details of this are set out in the relevant system manual.
To determine when changes to the configuration are to take effect, proceed as follows.
1. Change the configuration.
2. Click Save.
3. Select when the settings are to take effect.
-
Next reboot: The thin client will automatically retrieve its settings each time it boots.
Immediately: The settings will be transferred to the thin client immediately.
If the thin client is not switched on, this operation cannot be performed and the thin client will be given
its settings the next time it reboots. In both cases, the settings will initially be saved in the database.
If you have selected Immediately, a pop-up dialog will ask the user whether the new settings should take
effect immediately. You can change the user message using the following two registry parameters:
userinterface.rmagent.enable_usermessage and
userinterface.rmagent.message_timeout.
51
IGEL Technology GmbH
IGEL Universal Management Suite v4
4.09.100
5.3. Shadowing (VNC)
The IGEL UMS Console allows you to observe the desktop of a thin client on your local PC via shadowing
with VNC. In order to enable shadowing, you must allow remote access in the security options for the thin
client.
5.3.1.
Launching a VNC session
To launch a VNC session, proceed as follows:
1. In the context menu, click Shadowing.
A connection dialog will appear.
2. Enter the password if you have set one in the security options.
If you have a user account, you can connect to the UMS Server and launch the IGEL VNC Viewer separately.
The IGEL applications folder in the Windows Start Menu contains a link to it.
1. Enter a host name or the IP address manually on the first tab.
2. On the second tab, select a thin client from the structure tree.
5.3.2.
IGEL VNC Viewer
If you have launched a VNC session, the shadowed desktop will be shown in the IGEL VNC Viewer window.
This window has its own menu with the following items:
File
Tab
Overview
Shows an overview of all VNC sessions currently connected.
Double-clicke of the displayed desktops for a full-screen view of
it.
Terminate
Terminates all VNC sessions and closes the window.
New
Opens the connection dialog so that you can launch another
VNC session.
Adjust
With this option, you can adjust the size of the window in which
the desktop currently selected is displayed.
Send Ctrl-Alt-Del
Sends the key combination Ctrl + Alt + Del to the remote host
currently displayed.
Refresh
Refreshes the window content.
Screenshot
Saves a screenshot of the window contents on the local hard
drive.
Options
Opens a dialog window in which you can specify further options
such as coding, color depth, update interval etc.
Close
Closes the currently selected tab.
Help / Info
Shows the software version of the IGEL VNC Viewer.
52
IGEL Technology GmbH
IGEL Universal Management Suite v4
4.09.100
You can specify the following parameters as options:
Preferred Coding
The coding used when sending image data from the thin client to your PC.
The coding option Tight is particularly useful in a network with a low
bandwidth. It contains two additional parameters:
•
Compression level: The higher the compression, the longer the
computing operation takes!
•
JPEG quality: If you select Off, no JPEG data will be sent.
Use Draw Rectangle
Method
This option improves performance. However, artifacts may be
encountered.
Color Depth
8 or 24 bits per pixel
Update Period
Time period between two updates. A longer time period reduces network
traffic, but the update may not be seamless. Please note: An update query
will be sent as soon as you move the mouse or enter a key in the VNC
Viewer. This event will be passed on to the remote host.
Save Properties as Standard Saves the current settings as standard values for future VNC sessions.
Values
You can specify an external VNC viewer program from another provider in the UMS Console:
Click Misc→Settings→General.
To pass on the IP address of the thin client to an external application, add the parameter <hostname>.
Example:
External VNC viewer: C:\Program Files\TightVNC\vncviewer.exe <hostname>
5.3.3.
External VNC viewer
You can specify an external VNC viewer program from another provider in the UMS Console:
Click on Misc→Settings→General.
To pass on the IP address of the thin client to an external application, add the parameters <host name>
and <port> in External VNC Viewer.
Examples:
•
•
•
•
TightVNC: "C:\Program Files\TightVNC\tvnviewer.exe" <host name>:<port>
UltraVNC: "C:\Program Files\uvnc\UltraVNC\vncviewer.exe" -connect <host
name>::<port>
RealVNC: "C:\Program Files\RealVNC\VNC Viewer\vncviewer.exe" <host
name>:<port>
TigerVNC: "C:\Program Files\TigerVNC\vncviewer.exe" <host name>:<port>
Place the program path in double quotation marks as shown above to ensure that the call works even
if there are spaces in the path.
53
IGEL Technology GmbH
IGEL Universal Management Suite v4
4.09.100
5.3.4.
Secure shadowing (VNC with SSL)
The Secure Shadowing function improves security when remote maintaining a thin client via VNC at a
number of locations:
•
Encryption: The connection between the shadowing computer and the shadowed thin client is
encrypted.
This is independent of the VNC viewer used.
•
•
Integrity: Only thin clients in the UMS database can be shadowed.
Authorization: Only authorized persons (UMS administrators with adequate authorizations) can
shadow thin clients.
Direct shadowing without logging on to the UMS is not possible.
•
Limiting: Only the VNC viewer program configured in the UMS (internal or external VNC viewer) can be
used for shadowing.
Direct shadowing of a thin client by another thin client is likewise not permitted.
•
Logging: Connections established via secure shadowing are recorded in the UMS server log.
In addition to the connection data, the associated user data (shadowing UMS administrator, optional)
can be recorded in the log too.
Of course, this is only relevant to thin clients which meet the requirements for secure shadowing and have
enabled the corresponding option. Other thin clients can be "freely" shadowed in the familiar manner
and, if necessary, secured by requesting a password. If you would like to allow secure shadowing only, you
can specify this in Misc Settings (page 124) in the UMS Administration area.
Basic principles and requirements
The Secure Shadowing option can be enabled subject to the following requirements being met:
•
•
•
•
IGEL Universal Desktop Linux or IGEL Universal Desktop OS 2, each from Version 5.03.190 or IGEL
Universal Desktop Windows Embedded Standard 7 from Version 3.09.100
IGEL Universal Management Suite from Version 4.07.100 onwards
Thin client is registered on the UMS server
Thin client can communicate with UMS console and UMS server (see below)
Basic technical principles:
Unlike with "normal" shadowing, the connection between the VNC viewer and the VNC server (on the thin
client) is not established directly during secure shadowing. Instead, it runs via two proxies – one for the
UMS console and one for the VNC server on the thin client. These proxies communicate via an
SSL-encrypted channel, while the local communication, e.g. between the VNC viewer application and the
UMS proxy, takes place in the conventional unencrypted manner. As a result, a secure connection can also
be established with external VNC programs that do not support SSL connections.
The two proxies (UMS console and thin client) communicate with SSL encryption via the same port as the
"normal" VNC connection: 5900. As a result, no special rules for firewalls need to be configured in order to
perform secure shadowing.
If secure shadowing is active for a thin client (Setup→System→Shadowing→Secure Shadowing), the thin
client generates a certificate in accordance with the X.509 standard and transfers it to the UMS Server
when the system is next started. The UMS server checks subsequent requests for a secure VNC connection
54
IGEL Technology GmbH
IGEL Universal Management Suite v4
4.09.100
using the certificate. The certificate in PEM format can be found in the /wfs/ca-certs/tc_ca.crt
directory on the thin client. The validity of the certificate can be checked on the (Linux) thin client using the
command: x11vnc -sslCertInfo /wfs/ca-certs/tc_ca.crt
Figure 20: Thin client certificate for secure shadowing
If a UMS administrator calls up the Shadowing function in the UMS Console for the thin client, the console
receives a signed request from the UMS Server which is then passed on to the thin client to be shadowed.
This in turn passes on the request to the UMS server which checks the validity of the request using the
original certificate. If this check is successful, the console reports that the channel for the connection
between the proxies can be established. The UMS proxy on the console connects to the server proxy on the
thin client, and the server proxy in turn establishes on the thin client the connection to its VNC server.
Only when these connections have been established does the console call up the VNC viewer which then
connects to the console proxy. The VNC client and VNC server are now connected via the two proxies which
transfer data with SSL encryption.
Secure shadowing can be enforced independently of the thin client configuration for all thin clients that
support this function: UMS Administration > Misc Settings > Activate Global Secure VNC.
Shadow thin clients securely
In order to shadow a thin client securely (with encryption), the administrator must log on to the server via
the UMS console. When doing so, it is irrelevant whether a purely local UMS administrator account is used
or the user was adopted via an Active Directory for example. As always, however, the UMS administrator
must have the right to shadow the object, see (page 132).
The thin client to be shadowed is called up in the navigation tree and, as usual, can be executed via Shadow
in the context menu. The connection window however differs from the dialog for normal VNC shadowing.
The IP and port of the thin client to be shadowed cannot be changed, and a password for the connection is
not requested – this is superfluous after logging on to the console beforehand.
55
IGEL Technology GmbH
IGEL Universal Management Suite v4
4.09.100
Figure 21: Secure shadowing connection dialog
When a VNC connection has been established, the symbol in the connection tab indicates secure
shadowing:
Figure 22: Secure VNC connection
VNC logging
Connections via secure shadowing are always logged in the UMS. Via UMS Administration→Misc
Settings→Secure VNC, you can configure whether the user name of the person shadowing is to be
recorded in the log (the default is inactive).
56
IGEL Technology GmbH
IGEL Universal Management Suite v4
4.09.100
Figure 23: Options for VNC logging
The VNC log can be called up via the context menu of a thin client or folder (for several thin clients,
Logging→Secure VNC Logs). The name, MAC address and IP address of the shadowed thin client, the time
and duration of the procedure and, if configured accordingly, the user name of the shadowing UMS
administrator are logged.
Figure 24: Log entries for secure VNC connections
To sort the list (e.g. according to user names), click on the relevant column header or filter the content
shown by making entries in the Filter field.
57
IGEL Technology GmbH
IGEL Universal Management Suite v4
4.09.100
5.4. Firmware licenses
IGEL thin clients from the Universal Desktop product range (e.g. UD5) are supplied with an installed
license. This license enables you to use various firmware functions and is linked to the MAC address of the
thin client. Manually created thin clients or hardware from other manufacturers "converted" using the UDC
may not have a license. The license must therefore be added to the firmware later on. Upgrade licenses too
can be rolled out later on using the UMS license management system.
5.4.1.
License management
Under System→Manage Licenses, you can export to a CSV file the MAC addresses for all thin clients, all
unlicensed thin clients or the thin clients selected from a view. This file can then be sent to IGEL
Technology GmbH in order to request a license file for these devices.
Once received, the license file can be added to the license management system using the Add (+) button.
The license will be distributed to the previously selected thin clients during the next booting procedure.
The thin client must be able to contact the UMS Server with its full qualified domain name, e.g.
mytcserver.mydomain.tld.
5.4.2.
UDC2 test licenses
If you are testing the IGEL Universal Desktop Converter 2 (UDC2), please use the normal licensing
mechanism. UDC2 test licenses are already linked to your hardware, which is represented by its MAC
address.
5.4.3.
Distributing UDC2 licenses
The IGEL Universal Desktop Converter 2 includes a USB token with the IGEL Universal Desktop OS as
well as a SIM card with the licenses you will need to run this firmware on an intended system.
Install the IGEL Universal Desktop OS 2 on the intended system (see IGEL UDC2 installation manual) and
license the software
•
•
by creating a license during installation, or
by distributing licenses to previously installed systems using the UMS license management feature.
Important: The IGEL Universal Desktop OS 2 must be installed on the intended devices and the devices
must be registered on the UMS Server.
To create a UDC2 license, proceed as follows:
1. Insert the SIM card with the licenses into the USB token's card slot.
2. Insert the USB token into the PC on which the UMS Console is installed.
This only applies to the Windows version.
3. If necessary, install the driver for the smartcard reader. You will find a driver on the USB token.
58
IGEL Technology GmbH
IGEL Universal Management Suite v4
4.09.100
4. Launch the UMS Console application and navigate to System→Manage Licenses.
The new window shows license information.
5. Click Display Licenses from the Smartcard and confirm that you wish to begin the procedure.
The number and type of available licenses will be shown.
6. Select the unlicensed devices for which a license is to be created.
Figure 25: Create licenses from IGEL smart card
A license will be created from the license pool on the stick. After rebooting twice, the device will have the
functions provided by the license.
As an alternative, you can send UMS settings to UDC2 devices in order to transfer licenses. Reboot the
devices in order to activate the new licenses.
Figure 26: License management
Check whether the device has used the license correctly. The product ID should have changed from
X20 to 120, 520 or 720. This depends on the license type (Entry, Standard or Advanced).
In addition, the IGEL thin clients and UDC devices licensed with the IGEL UMS will now be shown in the
license management dialog.
Licenses created from the license pool are saved on the token so that you can reuse them if you need to
reinstall the IGEL firmware on the device.
59
IGEL Technology GmbH
IGEL Universal Management Suite v4
4.09.100
5.4.4.
Upgrading licenses
When upgrading the license of a UD device, you should use the same mechanism with a USB token and SIM
card as you do for UDC licenses.
Upgrade licenses available on a SIM card are displayed along with their license type, e.g. IGEL Shared
Workplace. The device selection only shows suitable devices, e.g. IGEL thin clients without Shared
Workplace license.
60
IGEL Technology GmbH
IGEL Universal Management Suite v4
4.09.100
6.
Profiles
Profiles are predefined configurations which can be assigned globally to directories, groups, users or thin
clients via the Universal Management Suite. The following types exist:
Standard profiles
...can be assigned to objects (thin clients or users) directly or indirectly via directories.
An object can receive its settings from a number of directly or indirectly assigned
profiles.
During the assignment process, the profile settings overwrite the settings configured
directly on the thin client.
Master profiles (page
76)
...allow more flexible access rights within the IGEL UMS as they can override the
settings for standard profiles and have their own authorizations.
These various profile types can be combined with each other.
Special profile types
User profiles (page 70) Standard and master profiles can be assigned to Active Directory users and thus allow:
Template profiles
(page 81)
•
Shared Workplace: Changing users at a workstation
•
Roaming Doctors: Changing workstations for a user
Standard and master profiles can be used even more flexibly and combined with the help
of values determined dynamically.
6.1. Order of priority for settings
Parameters set via a profile are blocked in the configuration dialog and indicated by a lock symbol.
Figure 27: Setting with lock symbol
61
IGEL Technology GmbH
IGEL Universal Management Suite v4
4.09.100
They can only be edited in the profile. The name of the profile responsible for the locked status will be
shown if you move the mouse pointer over the lock symbol.
Each parameter has two value types:
•
•
values determined by the thin client and
value determined by the profiles.
These values exist alongside each other, although there is a rule whereby profile settings always take
precedence.
If you have set a value for a parameter in a profile and then remove the assignment to a thin client, the
value of the parameter will be changed back to its previous thin client value. The profile value will not be
copied to the thin client settings.
6.2. Order of priority for profiles
If you have assigned several profiles to a thin client and enabled a specific setting in all profiles, you may
like to know which profile provides the valid value for this setting or, in other words, which profile has
priority over the others.
Try to avoid enabling the same settings in a number of profiles by setting up separate groups of active
parameters for different profiles. Otherwise, the following symbolic rule applies:
The closer an object to which the profile was assigned is to the thin client, the higher the position of the
profile is in the hierarchy.
Figure 28: The priority of the standard profiles increases from one level to the next.
Higher priority
than...
closer to the thin client
further away from the thin client
Sub-directory
Higher-level directory
62
IGEL Technology GmbH
IGEL Universal Management Suite v4
4.09.100
If a number of profiles are assigned to a directory or a number of profiles are assigned directly, the newer
profile with the higher profile ID will overwrite the settings.
In order to read out the ID of a profile, point to a profile in the list of assigned profiles with the mouse
pointer. A tool tip with the profile ID will be shown.
The lists of assigned profiles and indirectly assigned profiles are sorted according to the order of priority. As
far as direct profiles or indirect profiles on a directory level are concerned, profiles higher in the list have
higher priority.
(new related group 2)
Creating profiles ........................................................................................................ 63
Exporting and importing profiles ............................................................................... 65
Configuring profile settings ....................................................................................... 66
Overwriting sessions ................................................................................................. 68
Allocating profiles ...................................................................................................... 68
Checking profiles ....................................................................................................... 69
Removing assigned profiles from a thin client .......................................................... 69
Deleting profiles ......................................................................................................... 69
6.3. Using profiles
In this chapter, you can learn about the procedure for
•
•
•
•
•
•
•
•
Creating profiles (page 63)
Allocating profiles (page 68)
Checking profiles (page 69)
Removing assigned profiles from a thin client (page 69)
Overwriting sessions (page 68)
Exporting and importing profiles (page 65)
Configuring profile settings (page 66)
Deleting profiles (page 69)
6.3.1.
Creating profiles
You can create a sub-directory hierarchy in order to organize your profiles:
Select the Profile node or a sub-directory in the UMS tree structure.
The Profile Directory area contained in it is shown at the right.
To create a new profile, proceed as follows:
1. Select Profile from the menu System→New
or select the corresponding option from the context menu
or import a previously created profile.
63
IGEL Technology GmbH
IGEL Universal Management Suite v4
4.09.100
The New Profile dialog window will appear.
The new profile will be stored in the selected profile directory. If no profile directory was selected, it
will be stored in the Profiles node itself.
2. Enter a name and a description for the profile.
3. Specify whether the new profile should use the settings for an existing profile or thin client.
If you need an "empty" profile that will not use any existing settings, you must select a firmware
version for the new profile. In this case, do not select an object from the tree structure.
4. Select one of the possible options:
-
Do not enable any settings
Enable settings whose value differs from the default value
Enable all settings
Overwrite sessions
5. Click Create to set up and save the profile.
New profile - options
The options in the New Profile window have the following meanings:
Do not enable any settings
No settings are initially active. You have to enable the desired
settings when editing the profile configuration.
Enable all settings
All available parameters for the profile are enabled. A thin client
that receives settings from this profile cannot be configured
directly. This option makes sense only if you would like to have all
settings for a thin client managed on the basis of this profile.
Enable settings whose values differ
from the default value
This option is advantageous only if you would like to distribute
the settings for a pre-configured thin client to additional devices.
This manual configuration is performed on the basis of a profile
which can be assigned to further devices.
Overwrite sessions
Overwrites the sessions defined for the thin client with sessions
defined for the profile. If the checkbox is empty, the sessions
defined in the profile are added to the sessions which were
previously defined for the thin client.
In many cases, profiles which contain all parameters for an item of firmware take up space in databases and
backup files unnecessarily. You should therefore use this option only if it seems necessary. In the majority
of cases, it is advisable to configure a thin client on the basis of several profiles with specific configuration
parts. If firmware has not yet been registered in the database, profiles cannot be created because
information regarding the settings which are then assigned to the profile is needed. You can create profiles
only with a firmware version which is already registered in the UMS Database.
64
IGEL Technology GmbH
IGEL Universal Management Suite v4
4.09.100
6.3.2.
Exporting and importing profiles
In the IGEL UMS, you can export profile configurations from the database to the file system. This can be
helpful for backup purposes or when importing the profile data from one UMS installation to another.
If you have an XML file with profile data or a ZIP archive with several profiles, you can import these to your
UMS installation or to an installation other than the original one.
Exporting a profile and firmware
The profiles are converted into the XML format. Make sure that you do not make these files public if the
source profiles contain passwords or other confidential data!
To export an individual profile, proceed as follows:
1. Right-click the profile.
2. Select the command Export Profile.
To export a number of profiles in one file (ZIP archive), proceed as follows:
1. Highlight the desired profiles using the Ctrl and Shift keys.
2. Select System→Export→Export Profile.
The Export Profiles window will open.
Figure 29: Export profile
3. Select the destination file.
Please note that existing files will be overwritten with the new profile data.
The firmware information can be exported to an archive along with the profile data. This allows importing
to a UMS installation without the relevant firmware being registered. This can now be imported together
with the profile.
65
IGEL Technology GmbH
IGEL Universal Management Suite v4
4.09.100
Importing a profile and firmware
To import an individual profile, proceed as follows:
1. Click System→Import→Import Profiles.
2. Select the XML file or archive containing your profile(s).
The Import Profiles dialog window will appear. This shows the name and firmware version of each
profile configuration contained in the file you have selected.
3. Uncheck one of the boxes in the left row of the table to exclude the relevant profile from the import
process.
During the import, you can retain the original directory path of the profile. Alternatively, the profile
can be placed in the main directory.
A dialog window shows whether all the selected profiles were imported.
An item of firmware from an archive which was previously not present in the database will
automatically be imported together with the corresponding profile.
Importing profiles with unknown firmware
Profiles whose underlying firmware is not contained in the database or the import file cannot be imported
and will be highlighted in red in the import view.
Such profiles can contain settings which do not feature in any of the registered firmware versions.
To import profiles with unknown firmware, proceed as follows:
1. Click the firmware field that is highlighted in red.
2. Select any firmware version that is known to the system.
3. Import the profile.
If you select an item of firmware that is known to the system, the version will be implicitly converted.
Normally, this has only a negligible effect on the profile settings if you select a similar firmware version or a
newer version of the same model. However, unknown firmware settings will be lost in the process.
6.3.3.
Configuring profile settings
The properties of a profile consist of so-called description data and the profile configuration.
66
IGEL Technology GmbH
IGEL Universal Management Suite v4
4.09.100
Description data consist of the name of the profile, a description text, the firmware version and the
overwrite flag for sessions. Example:
Figure 30: Description data of profile
Edit these data and update them in the database via Edit→Save Description Data.
Please note that settings that are not supported in the new firmware will be lost in the profile if you
update the firmware of thin clients and you would also like to update the profile assigned to the clients.
To edit the settings for the profile, proceed as follows:
Double-click a profile
or select a profile in the tree structure and click Edit→Edit Configuration.
Paths highlighted in blue in the configuration menu lead to parameters that have already been set via the
profile. These are shown with a lock in the thin client configuration.
Figure 31: Profile settings
67
IGEL Technology GmbH
IGEL Universal Management Suite v4
4.09.100
To determine when your changes are to take effect, proceed as follows:
1. Make the required changes.
2. Click Save.
3. Decide whether the new settings are to take effect immediately or when the relevant thin clients next
boot.
This corresponds to the way the system behaves when the thin client configuration is changed directly.
6.3.4.
Overwriting sessions
The Overwrite Sessions profile option ensures that only the sessions for this profile are created on the thin
client. Sessions created in other profiles or directly in the thin client configuration are disabled.
If a number of profiles with the Overwrite Sessions option enabled are assigned (directly or indirectly) to a
thin client (or Shared Workplace user), the profile with the highest priority "wins", i.e. only the sessions for
this profile are available on the thin client.
Exception: If the highest-priority profile with the option enabled is a standard profile and if master profiles
(page 76) with sessions are assigned to the thin client or user, the thin client will receive all sessions of the
overwriting standard profile and the master profiles – sessions in master profiles can only be overwritten
by a master profile.
6.3.5.
Allocating profiles
If you have created a profile and changed its settings, you can assign it to the thin clients. You can assign an
unlimited number of profiles to each thin client.
Fundamentally speaking, there are two modes of assignment: direct or indirect.
Indirect means that you assign the profile not to an individual thin client but to a thin client directory and
all thin clients in this directory take on the settings for this profile (see Order of profiles (page 62)).
Please note the following rules:
•
•
•
If you assign a profile to a directory, it is indirectly assigned to each thin client in this directory including
the sub-directories.
If you subsequently move a thin client to this directory, the directory profiles will affect this thin client
too.
If you remove a thin client from this directory, the profile will no longer influence this client.
Assigned profiles with configuration changes not yet transferred to the thin client are flagged with an
exclamation mark in the list of assigned objects:
68
IGEL Technology GmbH
IGEL Universal Management Suite v4
4.09.100
6.3.6.
Checking profiles
If you have assigned a profile to a thin client, check the results:
1. Select a thin client and click Edit→Edit Configuration.
The current configuration for the thin client will be displayed.
A lock symbol will be shown in front of each overwritten setting, i.e. in front of an active setting for an
assigned profile. The value that you have specified in the profile will be shown. You cannot change the
setting here.
2. Move the mouse over the lock symbol.
A tool tip will show the profile from which the parameter value was taken. This is useful if you have
assigned more than one profile to the thin client. If a setting is active in a number of assigned profiles,
the value in the most up-to-date profile will apply.
In the Assigned Objects area, you can navigate to an assigned thin client, profile or assigned file, or edit the
configuration.
Select an object.
Click the Edit symbol to edit the object.
Click the Navigate symbol to navigate to this object in the tree structure.
Double-click an assigned object to jump straight to it.
6.3.7.
Removing assigned profiles from a thin client
You can remove assigned profiles from a thin client or a thin client directory:
1. Select a thin client or a thin client directory in the Profiles window area.
2. Click the Remove symbol.
or
3. Select an assigned profile from the list in the window area for a thin client or a directory in the Assigned
Objects area.
4. Click the Remove symbol.
This profile will now no longer affect the individual thin client(s) in the directory. The overwritten value for
the settings is reset to the value which was valid before the profile was assigned.
6.3.8.
Deleting profiles
If you would like to delete a profile, you have the following options:
1. Select the profile in the UMS navigation tree.
2. In the symbol bar, click on the Delete symbol
or press the Del button on your keyboard
or right-click on the profile and select the Delete option from the context menu.
The same applies to directories too. These are deleted along with all sub-directories and profiles.
69
IGEL Technology GmbH
IGEL Universal Management Suite v4
4.09.100
If you delete a profile, it will be removed for every thin client or every thin client directory to which it was
assigned. The profile values no longer affect the thin client settings. In addition, all settings for the profile
from the database will be deleted.
6.4. User profiles - IGEL Shared Workplace
IGEL Shared Workplace is an optional feature of the IGEL Universal Desktop firmware which must be
licensed separately. It allows user-dependent configuration based on settings profiles created in the IGEL
Universal Management Suite and linked to the user accounts in the Active Directory. In the process,
user-specific profile settings are passed on to the thin client along with the device-dependent parameters.
You will find an overview of the parameters which can be individually configured for a user further on in
this document.
Typical applications for Shared Workplace are workstations used for shift work or in call centers, where
different staff members use the same device and thus need their own individual settings, such as for
session types or mouse-button configuration for right/left-handed operation.
Another possible application is in roaming environments where users frequently switch IT workstations,
e.g. in hospitals and at service/ticket counters, checkouts and reception areas. After a user has logged in,
the thin client licensed for Shared Workplace automatically configures itself. It does this via the UMS
server using the individual or group profile stored in the UMS database. These profiles can easily be
assigned to a user in the IGEL Universal Management console using a convenient drag-and-drop
procedure. In environments with an increasing number of Shared Workplace workstations, IGEL
recommends using the new UMS High Availability Extension. The high level of UMS Server availability
achieved ensures that users receive their own personalized profile at all times.
70
IGEL Technology GmbH
IGEL Universal Management Suite v4
4.09.100
The IGEL Shared Workplace feature is included in the IGEL thin client firmware from version 4.08.100
(UD-LX) and 2.09.500 (UD-ES) and can be used in conjunction with the new version 4 of the IGEL UMS.
Figure 32:
6.4.1.
IGEL SHARED WORKPLACE scenario
Setting up and using the feature
In order to be able to use IGEL Shared Workplace, the following requirements must be met:
•
•
Users who are to be given a specific profile must be set up in an Active Directory.
Thin clients which are to allow user logins must have a license for the IGEL Shared Workplace
function. This can be transferred to the thin clients via the IGEL UMS license management system.
If a thin client has been given a license for IGEL Shared Workplace, this cannot simply be canceled.
The function itself can be disabled via the list of available services in the thin client configuration, or the
facility to log in via IGEL Shared Workplace remains disabled.
•
Although not absolutely necessary, the use of the High Availability Extension for the IGEL Universal
Management Suite is recommended for larger installations. This will ensure a high level of availability
for the user profiles in the network.
If you use IGEL Shared Workplace with IGEL Universal Desktop ES, bear in mind that the default
password user must be set for the standard user user, otherwise it will not be possible to log in.
71
IGEL Technology GmbH
IGEL Universal Management Suite v4
4.09.100
Configuration in the UMS Console
In this chapter, you will find out how to link an Active Directory, assign user profiles, enable the IGEL
Shared Workplace, set up the user login/logout and assign priorities.
Linking an Active Directory
Other LDAP servers (Novell eDirectory, OpenLDAP etc.) cannot be used for IGEL Shared Workplace user
authentication purposes.
Figure 33: Connect Active Directory
Assigning a user profile
Select an object within the AD structure. You will need to authenticate yourself vis-à-vis the Active
Directory in order to do so.
Assign the desired user profile to this object:
Server→Shared Workplace User→[Active Directory]→[Object]
Figure 34: Assign user profile
As with thin clients, a number of individual profiles can be assigned. In this case, indirectly as well as
directly assigned profiles will be taken into account.
72
IGEL Technology GmbH
IGEL Universal Management Suite v4
4.09.100
Activating IGEL Shared Workplace
Activate the IGEL Shared Workplace function for one or more thin clients and define the links for
logging out of the system (Linux).
You can do this by assigning an appropriate profile to the thin client or in the setup for the individual
thin client:
Setup/Configuration→Security→Login→IGEL Shared Workplace
Figure 35: Activate IGEL Shared Workplace
User login
After the next reboot, the thin clients set up for IGEL Shared Workplace will show a login window
(provided that they are licensed for this function). A user can then log in at the thin client using their AD
login data and will receive the profiles saved for them from the UMS.
The thin client configuration which is actually active for the user logged in is the result of cumulating all
profiles which have been assigned either directly or indirectly to the thin client or the user.
Order of priority for profiles
If you allocate a number of profiles, it may be that specific user or client settings are made a number of
times. A certain order of priority must be defined for these settings.
73
IGEL Technology GmbH
IGEL Universal Management Suite v4
4.09.100
The priority of the profiles is as follows:
Figure 36: Hierarchy of standard profiles
Higher priority
than...
user-specific profiles
device-specific profiles
closer to the user/thin client
further away from the user/thin client
Figure 37: The priority of the standard profiles increases from one level to the next.
74
IGEL Technology GmbH
IGEL Universal Management Suite v4
4.09.100
Higher priority
than...
primary groups
other groups
other groups
organizational unit
Rules within same levels
•
•
•
Profiles which are assigned to the user's primary group are prioritized in descending order according to
profile ID (highest ID = highest priority).
Groups within a level are prioritized in alphabetical order.
Profiles assigned directly to the user/device are prioritized in descending order according to profile ID.
Logout and change of user
As a user, you log out of a thin client with the Windows Embedded Standard system via the start menu.
For IGEL Universal Desktop Linux, you can place buttons for logging out in the Application Launcher, on
the desktop and in the IGEL Menu.
A hotkey for logging out can also be configured. You will also find these settings under
Setup/Configuration→Security→Login→IGEL Shared Workplace.
6.4.2.
Parameters configurable in the user profile
Not all parameters available in an item of firmware can be configured on a user-specific basis. Whilst, in a
number cases, this is due to technical reasons, there are also instances where it makes sense to configure a
parameter only for the device rather than for the user.
The device-specific system settings for the IGEL operating systems which cannot be configured effectively
are listed below. No check takes place in the IGEL UMS.
Universal Desktop Linux (page 75)
Universal Desktop Windows Embedded Standard (page 76)
UD Linux device-specific parameters
The following system settings are not configurable in the user profile:
•
•
Network settings including those for the network drives
Screen configuration for IGEL Linux v5 to 5.05.100 and for IGEL Linux v4 to 4.13.100.
Depending on the hardware used, display errors may occur if the user changes the resolution or
rotates the screen even under IGEL Linux from Release 4.14.100.
75
IGEL Technology GmbH
IGEL Universal Management Suite v4
4.09.100
•
•
•
•
•
•
•
•
•
•
•
Touchscreen configuration
Update settings
Security settings
Remote management
Customer-specific partition
Server for background images
Customer-specific bootsplash
Browser plug-ins
SCIM entry methods, however, these can be enabled on a user-specific basis
Three-button mouse emulation
Appliance Mode (VMware View, Citrix XenDesktop and Spice)
UD W7 device-specific settings
The following system settings cannot be configured in the user profile:
•
•
•
•
•
•
•
•
•
•
•
•
Language, standards and formats
Network settings including those for the network drives
Active Directory login
USB device configuration
List of the available features and Windows Services
Update settings
Setup session
User and security settings
File Based Write Filter
Energy options
Remote management
Appliance Mode (VMware View and Citrix XenDesktop)
6.5. Master profiles
The aim of introducing master profiles is to be able to reproduce the more complex system of rights
management for UMS administrators in very large or distributed environments. Important profile
configurations can now be assigned to all registered thin clients on a priority basis without having to revoke
the rights of other administrators to manage other settings or profiles.
Master profiles have their own section in the IGEL UMS navigation tree. In terms of their effects, they are
identical to standard profiles, but are prioritized differently. Master profiles are profiles whose settings
override all standard profiles.
Figure 38: Master profiles in the tree
76
IGEL Technology GmbH
IGEL Universal Management Suite v4
4.09.100
6.5.1.
Enabling master profiles
You can specify yourself whether or not you would like to use master profiles. They are enabled as
standard.
To disable the master profiles function, proceed as follows:
1. Select Additional Settings in the UMS Administration.
2. Disable master profiles.
Figure 39: Disabling master profiles
6.5.2.
Order of priority for profiles
Master profiles override all standard profiles.
Master profiles are prioritized the other way around compared to the standard profiles. This means that a
competing profile setting is prioritized higher the higher up in the hierarchy the profile is assigned, i.e. the
further away from the object it is.
77
IGEL Technology GmbH
IGEL Universal Management Suite v4
4.09.100
The priority of the master profiles is as follows:
Figure 40: Hierarchy of master profiles
Higher priority
than...
user-specific profiles
device-specific profiles
further away from the user/thin client
closer to the user/thin client
Figure 41: The priority of the master profiles decreases from one level to the next.
78
IGEL Technology GmbH
IGEL Universal Management Suite v4
4.09.100
Higher priority
than...
organizational unit
other groups
other groups
primary groups
Figure 42: The priority of the master profiles decreases from one level to the next.
Higher priority
than...
further away from the thin client
closer to the thin client
higher-level directory
sub-directory
Summary of priorities in descending order
1. User-specific master profiles ("closer" to the user means lower priority)
2. Device-specific master profiles ("closer" to the device means lower priority)
3. User-specific standard profiles ("closer" to the user means higher priority)
79
IGEL Technology GmbH
IGEL Universal Management Suite v4
4.09.100
4. Device-specific standard profiles ("closer" to the device means higher priority)
Figure 43: Summary of priorities
Rules within same levels
•
•
•
Master profiles which are assigned to the user's primary group are prioritized in descending order
according to profile ID.
Groups within a level are prioritized in alphabetical order.
Master profiles assigned directly to the user/device are prioritized in descending order according to
profile ID.
80
IGEL Technology GmbH
IGEL Universal Management Suite v4
4.09.100
6.6. Template profiles
A template profile allows you to add variables for individual parameters in the profile and to assign their
values to thin clients.
Standard profiles AND master profiles can become template profiles through the use of variables.
Example
A company's thin clients are spread across a number of sites.
All clients are to receive a browser session with the same
settings via a profile, but a different start page is to be
configured in the global settings for each site. It should also be
possible to choose an individual session name for each site.
Previous solution
Up until now, a dedicated profile with global settings and session data would be created for each site.
Sometimes, the desired combination of settings can be achieved by passing on various profiles.
Problem
In many cases, the desired settings cannot be combined via various profiles, e.g. for configuring a session.
The unnecessarily large number of profiles is also difficult to manage in the long term.
Solution
The use of a single template profile offers greater flexibility. This contains all data for the browser session
which are common to the thin clients as well as placeholders, so-called template keys. The template keys
contain parameters which are to receive divergent values for different clients at different sites.
The template profile is then assigned to the clients directly or indirectly. The site-relevant template values
are assigned to the particular clients that are to receive this value.
The thin client thus receives a profile whose settings are made up of fixed data updated in the profile and
the template values assigned to it that are referenced by template keys in the profile.
81
IGEL Technology GmbH
IGEL Universal Management Suite v4
4.09.100
Figure 44: Template profiles functional diagram
1. Template keys are used in one or more profiles.
2. A template key has a number of values.
3. The template profile is assigned directly or indirectly to a number of thin clients.
4. A value from the key can be assigned to one or more thin clients.
A thin client thus receives not only general profile settings but also the template value assigned to it instead
of the configuration which is represented in the profile by the associated template key as a placeholder.
6.6.1.
Activate template profiles
If you would like to use the template profiles function, you must enable it first.
Enable template profiles in the UMS Console under UMS Administration→Global Configuration→Misc
Settings
82
IGEL Technology GmbH
IGEL Universal Management Suite v4
4.09.100
Figure 45: Activate template profiles
The Template Keys and Groups node will open in the navigation tree:
Figure 46: Template Keys and Value Groups
6.6.2.
Create template keys and values
To create template keys and values, proceed as follows:
1. Open the context menu for the Template Keys folder.
2. Click on New Template Key.
83
IGEL Technology GmbH
IGEL Universal Management Suite v4
4.09.100
Figure 47: Create new template key
Alternatively, this function is also accessible via the menu System→New→New Template Key, the
focus must be on the Template Keys node.
An assistant will guide you through the steps for creating a new template key:
3. Define a name for the key.
4. Select a value type for the key (String, Checkbox, Integer or Floating point number).
5. Optionally, give a description of the key.
6. Click on Next.
Figure 48: Basic data for a template key
84
IGEL Technology GmbH
IGEL Universal Management Suite v4
4.09.100
To specify the first value of the key, proceed as follows:
1. Enter the desired parameter value in the Value field.
2. Optionally, add a description of the value.
3. Click on Create Value.
Figure 49: Create value for the key
To specify further values for the key, proceed as follows:
1. Change the entries under Value
and Description.
2. Click again on Create Value.
3. Click on Finish to save the key with its values once you have created all desired values.
85
IGEL Technology GmbH
IGEL Universal Management Suite v4
4.09.100
Figure 50: New template keys
The key with its values will be shown in the tree:
Figure 51: Template key and its values
The recommended workflow is to create template keys and values from the
87).
profile configuration (page
86
IGEL Technology GmbH
IGEL Universal Management Suite v4
4.09.100
Create keys and values in the profile
In profiles, specific parameters with a template key can be configured. To do this, combine the following
steps to form a workflow:
•
•
Create template keys and values (page 83)
Use template keys in profiles (page 89)
To use template keys when configuring a profile, proceed as follows:
1. Open an existing profile or create a new profile.
2. Click on Edit Configuration in order to bring up the parameters to be updated.
3. Configure in the familiar manner the parameter values which are to apply to all thin clients with this
profile.
4. Select a parameter which is to obtain a client-specific value from a template key.
5. Click the activation symbol in front of the parameter until the desired function is active (here:Template
key active):
The parameter is inactive and will not be configured by the profile.
The parameter is active and the set value will be configured by the profile, template keys are not
available for the parameter.
The parameter is active and the set value will be configured by the profile, template keys are available
for the parameter.
Template keys are active for this parameter, the profile receives a value from the key later on.
Certain parameters cannot be configured with template keys and only offer the option inactive or
active. This applies for example to passwords or parameters which depend on other configuration
settings.
6. Click on the selection symbol
7. Click on Add
in order to select a template key.
to create a new template key.
An assistant will guide you through the steps for creating a new template key:
8. Give a name for the key.
The value type for the key is stipulated by the parameter.
87
IGEL Technology GmbH
IGEL Universal Management Suite v4
4.09.100
9. Optionally, give a description of the key.
Figure 52: Creating a template key
10. Click on Next.
To enter the first value of the key, proceed as follows:
1. Define the desired parameter value in the Value field.
2. Optionally, add a description of the value.
3. Click on Create Value.
In the case of parameters with a fixed value range such as selection menu or checkbox, the available
options will be provided for selection. Click on Add all to create values for each entry in the value
range or Create Value to add selected entries only.
Figure 53: Defining a value for the template key
4. Click on Finish to save the key with its values.
5. Click on OK to return to the profile.
88
IGEL Technology GmbH
IGEL Universal Management Suite v4
4.09.100
The key will be shown in the profile parameter:
Figure 54: New template key
6. Save the template profile.
Profiles which use at least one template key in the configuration are labeled with a special symbol in
the navigation tree:
6.6.3.
.
Use template keys in profiles
Template keys are listed in the Template Keys and Groups / Template Keys node in the navigation tree.
They can be moved to their own sub-folders.
To use a template key in the profile, proceed as follows:
1. Open an existing profile or create a new profile.
2. In the profile configuration, bring up the parameters to be updated.
3. Configure in the familiar manner the parameter values which are to be shared by all thin clients with
this profile.
4. Now select a parameter which is to be supplied with client-specific values from a template key.
5. Click the activation symbol in front of the parameter until the desired function is active
(here:Template key active):
The parameter is inactive and will not be configured by the profile.
The parameter is active and the set value will be configured by the profile, template keys are not
available for the parameter.
The parameter is active and the set value will be configured by the profile, template keys are available
for the parameter.
Template keys are active for this parameter, the profile receives a value from the key later on.
Certain parameters cannot be configured with template keys and only offer the option inactive or
active. This applies for example to passwords or parameters which depend on other configuration
settings.
6. Click on the selection symbol
to choose a template key.
7. Double-click on the desired template key.
Alternatively, you can create a new key, see Create template keys and values in the profile (page 87).
89
IGEL Technology GmbH
IGEL Universal Management Suite v4
4.09.100
8. Click on OK.
9. Save the template profile.
Profiles which use at least one template key in the configuration are labeled with a special symbol in
the navigation tree:
6.6.4.
.
Assign template profiles and values to the thin clients
Once you have created the template keys and values and configured profiles using the template keys, you
will need to bring together the keys and values again on the thin client.
To assign to a thin client a template profile and the values needed to replace the keys, proceed as follows:
1. Select a template profile and assign it in the usual manner to a group of thin clients or a thin client
directory.
2. Select a value for each template key used in the profile.
3. Assign the relevant values to the corresponding thin clients.
Figure 55: Example of template profile and value assignment
4. Assign further key values to further thin clients. Several values for various keys can also be assigned
collectively ( Shift and Ctrl keys).
Each thin client must then have an assigned value for each key in the assigned profiles.
To check that template profiles and values have been assigned correctly, proceed as follows:
1. Click on Thin Clients in the top menu bar.
2. Select Check the Template Definitions.
The selected and checked thin clients are flagged according to the result:
all template keys are defined
missing template keys
90
IGEL Technology GmbH
IGEL Universal Management Suite v4
4.09.100
3. Double-click on the message in the message window to open the error log for the check function:
Figure 56: Check log
Or click on a thin client and the results of the check will be shown immediately:
Figure 57: Results of check on the thin client
As soon as the thin clients receive their updated profile settings (e.g. automatically after restarting the
clients), the keys contained in the profile for each thin client will be replaced by the corresponding value
from their assignment to the thin client and then transferred to the thin client. The local thin client setup
thus receives only the usual parameter values and no more keys.
6.6.5.
Value groups
In value groups, logically associated values from various template keys can be brought together and
assigned together to thin clients.
If for example you have various profiles which are to receive country-specific settings via template keys and
value assignments, all values for a country / a language can be grouped in a value group. When such a
group is assigned, a thin client also receives all values for its country / its language contained in it.
To create a group, proceed as follows:
91
IGEL Technology GmbH
IGEL Universal Management Suite v4
4.09.100
1. Create a template profile with keys and values.
2. Click on System→New→New Value Group in order to create a new value group.
3. Enter a name and description for the group.
4. Select the valid values from each key, multiple selections are possible.
Figure 58: Selecting key values
5. Confirm your settings by clicking on OK.
6. Create further groups.
Figure 59: One value group per country
7. Assign the template profile to all thin clients.
8. Assign the appropriate group in each case to the devices.
9. Highlight the Thin Clients tree node.
10. Click on Thin Clients→Check the Template Definitions in order to check the definitions.
92
IGEL Technology GmbH
IGEL Universal Management Suite v4
4.09.100
The result is shown in the message window.
After the next restart or a manual transfer, the thin clients will receive the new session data with shared
and country-specific profile settings.
The advantage of this method is that you only need to add further key values to the relevant value group in
the future in order to assign these to the site's thin clients. In addition, a better overview is possible if there
are a large number of template keys and values.
93
IGEL Technology GmbH
IGEL Universal Management Suite v4
4.09.100
7.
Views
A thin client view is a selection of the thin clients available in the database which is created on the basis of
definable rules. All thin clients which satisfy this rule are shown in the view.
Example:
You would like to view a list of the thin clients which have an IP
address in a specific address range. In order to generate this
list, you can create a view whose rule is determined by the IP
address range. The views are shown in the UMS tree structure
and you can configure access rights for this purpose.
Views not only provide information regarding the database content but can also be used for example to
define planned tasks (such as a firmware update) for a specific selection of thin clients. As a result, you do
not need to assign individually to the task the thin clients that are to be updated. Instead, the devices are
determined on the basis of the view, e.g. using the firmware already installed, for the duration of the task.
A view does not make changes to thin client settings or the directory structure of the UMS tree. It merely
offers a specific view of the thin clients registered in the UMS.
7.1. Creating a new view
To create a new view, proceed as follows:
1. Move the mouse over the Views tree node.
2. In the context menu, select New View
or select System→New→New View in the menu.
The Create New View window will open.
3. Give the view a name and a more detailed description.
4. Click Continue.
The Select Search Parameter window will open.
5. Gradually link together several criteria in a logical fashion.
6. Define the view parameters, e.g. for the firmware under 4.09.100 if you would like to distribute this
update and all clients with older firmware are to be updated.
Equal to, Higher than and Lower than are available as comparative operators. You can also define a
regular expression for the search.
7. Click Continue.
The Create New View window will open.
8. Click Create View to finish creating the view
or specify your search in more detail.
In the chosen example, we add a further restriction in the form of the product ID. This makes it possible to
narrow down the selection to UD LX devices for which the new firmware is suitable. To do this, select the
regular expression UD.*LX. This will capture all Universal Desktop Linux-type devices.
94
IGEL Technology GmbH
IGEL Universal Management Suite v4
4.09.100
7.1.1.
Example of how to create a view
The example shows the following individual steps:
1. We give the view a name and a description: Update UDLX, update to 4.09.100
and select a first search parameter: Firmware version
Figure 60: Define search parameters
2. We define a first search criterion: below 4.09.100
and select further restrictions: Next→Narrow search criterion
Figure 61: Create new view
95
IGEL Technology GmbH
IGEL Universal Management Suite v4
4.09.100
3. As a further search parameter, we select Product ID
and as a search criterion we define UD.*LX and enable Use Regular Expression.
Figure 62: Text search
4. We check the Create View checkbox and click Finished.
The result is shown in the content panel.
Figure 63: Finish view creation
96
IGEL Technology GmbH
IGEL Universal Management Suite v4
4.09.100
Figure 64: Matching thin clients
5. In the results view, we click Edit in order to configure the data shown.
The Edit View window opens.
Figure 65: View expert mode
If you would like to enter a number of filter criteria, you can also switch to the expert mode at the start of
the creation process. This view allows the quick logical linking (AND/OR) of several criteria and values.
97
IGEL Technology GmbH
IGEL Universal Management Suite v4
4.09.100
7.2. Saving the view results list
Select Save Under, e.g. in the context menu of a view, in order to save the current view results list in
file form. Three file formats are available for export: XML, HTML and XSL-FO.
This is an example of an XML file for the above view:
Figure 66: XML export of results
7.3. Sending a View via E-mail
E-mails can only be sent if you have made appropriate mail settings (page 123) under UMS
Administration→Global Configuration→Mail Settings.
To send a view via e-mail, proceed as follows:
1. Right-click on a view.
2. Select Send View Results via E-Mail... in the context menu.
The Send View Results via E-Mail... window opens.
98
IGEL Technology GmbH
IGEL Universal Management Suite v4
4.09.100
3. Enter the recipient address in the Mail Recipient field. A number of recipient addresses can be entered,
separate them with a ";" (semicolon).
4. Under Result Format, select the format in which the view is to be sent.
5. Check the Create Archive box to send the view as a zip file.
Figure 67: Sending view results via e-mail
You can also send views automatically and regularly as an administrative task (page 119).
99
IGEL Technology GmbH
IGEL Universal Management Suite v4
4.09.100
8.
Scheduled Jobs
The task planner serves to determine when specific thin client commands are executed. These tasks can be
repeated at intervals or on specific days of the week.
To get an overview of all tasks defined and planned to date, proceed as follows:
Select a folder from the Jobs sub-structure.
All scheduled jobs in the folder are shown on the right-hand side of the window with all important data
such as the command to be executed, the date and the time of the next execution etc.
Figure 68: Scheduled jobs
Via the context menu, you can edit, rename, delete a task etc. and delete the previous results of task
execution.
8.1. Setting up a new task
Select New Scheduled test jobJob from the Context menu or System.
The configuration window contains three tabs:
-
Details
Schedule
Assignment
100
IGEL Technology GmbH
IGEL Universal Management Suite v4
4.09.100
8.2. Commands for Jobs
Command
Description
Update
Executes the firmware update with the existing settings (Linux)
Shutdown
Shuts down the thin client
Reboot
Reboots the thin client
Suspend
Puts the thin client into standby mode
Update next Reboot
Executes the firmware update when the thin client reboots (Linux)
Update on Shutdown
Executes the firmware update when the thin client shuts down (Linux)
Wake up
Boots the thin client via the network (Wake-on-LAN)
Settings TC -> UMS
Reads the local thin client configuration to the UMS
Settings UMS -> TC
Sends the configuration of the UMS to the thin client
Download Codecs
Loads codecs for the MPlayer (Linux, obsolete)
Remove Codecs
Removes codecs from the MPlayer (Linux, obsolete)
Download Flashplayer
Loads the Flash player plug-in for Firefox (Linux)
Remove Flashplayer
Deletes the Flash player plug-in for Firefox (Linux)
Download Firmware Snapshot
Executes the firmware update with the existing settings (WES)
Partial Update
Executes the partial update with the existing settings (WES)
Update Desktop Customization
Updates the set desktop background and the boot logo (Linux)
101
IGEL Technology GmbH
IGEL Universal Management Suite v4
4.09.100
8.3. Details
Name
Name of the task
Command
Command which is executed for all assigned thin clients.
Start date/execution time
Time of first execution.
Active
Tasks can be enabled or skipped as necessary.
Comment
Further information regarding the task.
Back up results
Loggable results are collected in the database. This is not possible
with the Wake-on LAN command.
Max. processes
Maximum number of processes executed simultaneously, these
processes may thus be executed in block fashion.
Time-out
The maximum waiting time before the UMS sends the command to
the next thin client.
Delay
The minimum waiting time before the UMS sends the command to
the next thin client.
Retry when booting
Parameter for the update command - clients that are switched off
perform the update when they next boot.
Job ID
Internal task number which cannot be changed. This field is empty if
a task is new.
User
Name of the UMS user executing the command.
102
IGEL Technology GmbH
IGEL Universal Management Suite v4
4.09.100
Figure 69: Job details
8.4. Schedule
Start date/execution time
Time of first execution.
Expiry data/time
After this point, no further commands will be executed.
Repeat job
A task can be repeated at fixed intervals or on specific days. Public
holidays can be excluded separately. You can update the list of
public holidays under Misc→Planned Tasks→Public Holiday Lists.
Abort execution
When tasks are executed repeatedly, incomplete tasks can be
aborted. No further commands will then be sent to thin clients.
The Max. processes, delay and time-out options make sense for all commands which take a long time to
execute or cause heavy network traffic, e.g. downloading a firmware update, codec or snapshot. To prevent
a large number of thin clients downloading data from a file server at once, it is advisable to reduce the
number of simultaneous threads (e.g. to 10) and to set up a delay (e.g. 1 minute).
103
IGEL Technology GmbH
IGEL Universal Management Suite v4
4.09.100
Figure 70: Job schedule
8.5. Assignment
By selecting Add (+), you can assign a task to specific thin clients.
You can also select a thin client directory. The task will then be assigned to all devices located in this
directory at the point of execution.
The most flexible assignment can be achieved by selecting devices dynamically with the help of a selected
view. At the point of execution, the devices will first be ascertained on the basis of the selection conditions
for the view. The tasks will then be assigned to them.
104
IGEL Technology GmbH
IGEL Universal Management Suite v4
4.09.100
Write authorization for the relevant objects is required in order to set up static thin client assignment via
the MAC address or dynamic assignment via the directory or view. At the point of execution, the user who
has set up the task must have write authorization for the relevant thin client. This must be taken into
account, even if other users have write authorization for a task and especially if the database user has set
up a task.
Figure 71: Job assignment by view
8.6. Results
A fourth tab appears in the view for a completed task: Results Here, you are given an overview of the status
for the execution of a task. You can select items from the overview using a drop-down list. This results view
can be deleted and updated using two buttons. The following status reports are issued by the task message
system for the assigned thin clients:
Being executed
The task is currently being executed.
OK
The task is complete, all assigned thin clients have been dealt with.
Out of time
The task was aborted before all assigned thin clients could be dealt with
because the abort time or the maximum duration has been reached.
Aborted
The task was stopped for an unknown reason (e.g. server failure).
Thin clients too are given a status for task execution:
105
IGEL Technology GmbH
IGEL Universal Management Suite v4
4.09.100
Running
The command is currently being executed. The server is waiting for a reply.
Waiting
The task is running, the command will be executed when the next process is
available.
Transferred
The command was successfully executed or transferred to the thin client.
Aborted
Aborted owing to an internal error or an unknown cause.
Failed
The command could not be executed, the reason is shown in the message
column.
At next boot
The command will be executed when the device next boots.
Not done
The command was not executed because the time-out for the task was
reached.
Figure 72: Job status list
106
IGEL Technology GmbH
IGEL Universal Management Suite v4
4.09.100
9.
Files
Through a file transfer, you can save files in the thin client's local file system. A file must be registered on a
UMS Server before it can be sent to the thin client. Examples include virus scanner signatures required
locally on the thin client, browser certificates, license information etc.
9.1. Registering a file on the UMS Server
A file must be registered on the UMS Server before it can be loaded onto a thin client.
To register a file on the UMS Server, proceed as follows:
1. Create a web resource, e.g. with the name ums_filetransfer, using the UMS Administrator.
2. In the UMS Console, select System→New→New File from the menu bar or go to Files in the tree
structure and select New File from the context menu.
3. Under File Origin, specify the path of the previously created web resource for uploading to the UMS
Server by selecting a local path or server path.
4. Under Classification, specify whether the file is to be saved with or without a browser certificate.
5. Under Thin Client Storage Path, specify the path in the client's local file system.
6. Allocate access rights.
These will be attached to the file when it is transferred to the client and will be used on the destination
system.
7. Confirm the settings by clicking on OK.
The file will now be copied to the web resource and will be registered on the UMS Server.
107
IGEL Technology GmbH
IGEL Universal Management Suite v4
4.09.100
Figure 73: New file registration
9.2. Transferring a file to a thin client
In order to upload a file to a thin client, it must be assigned to the thin client either directly or indirectly via
a thin client directory or profile.
Using drag and drop, move the file to the thin client's directory
or integrate the file directly into the thin client's Assigned Objects window using the Add Symbol in the
same way as you would assign profiles.
If a file has been assigned to a profile, it will be transferred to the assigned clients along with the profile
settings.
When the UMS settings are transferred, a file assigned in this way will be copied to the thin client, e.g.
while the thin client is booting. As long as the file is assigned to the thin client, it will be synchronized with
the file registered on the UMS Server, for example if the file bookmarks.html is replaced by a new
version. The MD5 checksum for the file assigned to the thin client is compared to the registered file. If the
checksums differ from each other, the file will be transferred again.
The thin client must be able to contact the UMS Server with its full qualified domain name, e.g.
mytcserver.mydomain.tld.
108
IGEL Technology GmbH
IGEL Universal Management Suite v4
4.09.100
If a file was directly replaced on the file system (web resource), it must be updated in the UMS Console
using the command Update File Version from the file's context menu. The UMS Server will otherwise not
recognize the change in the file version.
9.2.1.
Transferring a file without assignment
A file registered on the UMS Server can also be transferred to the thin client without preparation. To do
this, use the command Transfer File to the Thin Client from the thin client's context menu or the thin client
menu in the menu bar. The file does not need to be assigned to the thin client.
This is a straightforward file copying operation. The file is not updated if the file version on the UMS Server
changes.
9.3. Removing a file from a thin client
To remove a file from a thin client, proceed as follows:
Delete the file assignment
or
remove the file directly with the help of the command Delete File from TC from the thin client's context
menu.
If you delete a file from the tree structure, this file will be removed from all devices to which it was
assigned.
9.4. Transferring a file to the UMS Server
To download a file on a thin client to the web resources, proceed as follows:
Click Files→File TC→UMS in the context menu of a thin client.
The UMS cannot search through the thin client's local file system. You therefore have to know the
location and name of the file you would like to download to the web resource.
A file transferred from a thin client to WebDAV is not automatically registered on the UMS Server. It can
then be found in the UMS' http server area. However, you can register files later on via New File.
To read out the current local configuration of the thin client, you will need to copy the two local files
setup.ini and group.ini via the IGEL Universal Management Suite.
1. Select Files→ File TC→UMS from the thin client's context menu in the UMS Console. Specify
/wfs/<file name> as the source (thin client save path).
2. Select the destination on the UMS server, e.g.
http://umsserver.domain:9080/ums_filetransfer/<filename>.
3. Begin the file transfer by selecting File TC→UMS.
109
IGEL Technology GmbH
IGEL Universal Management Suite v4
4.09.100
10. Universal Firmware Update
Firmware updates for all IGEL thin clients and Universal Desktop OS (Universal Firmware Converter UDC)
are available on the public IGEL server http://myigel.biz. Within the UMS, you can check for newly
available updates, download them and easily distribute them to thin clients.
10.1. Changing server settings
IGEL's public update server is pre-configured. If you would like to use your own FTP server for distributing
updates, you can change the server settings accordingly:
1. In the Administration area of the UMS Console, switch to Global Configuration→Universal Firmware
Update.
2. Click Edit.
The Edit FTP Server Configuration window will open.
Figure 74: IGEL Universal Firmware update
3. Change the settings for your server.
4. Click Test Server Connection in order to check communication with the IGEL Server and, optionally,
with your own FTP server.
Problem
You want to use a proxy server to access the IGEL update server via HTTP.
Solution
Configure the proxy settings for Universal Firmware Update:
1. Start the UMS console.
2. Go to Administration→Gobal Configuration→Universal Firmware Update.
110
IGEL Technology GmbH
IGEL Universal Management Suite v4
4.09.100
3. Click Edit Proxy Configuration.
4. Enable the HTTP proxy and define a connection.
Click Save to activate your changes.
10.2. Searching for and downloading updates
To search the public IGEL server for updates, proceed as follows:
1. In the console navigation tree, right-click Universal Firmware Updates.
2. Select Search for New Updates from the context menu.
A window containing a list of all updates which match the firmware versions registered in the UMS
Database will open.
Figure 75: Available updates on server
3. Click Information in order to view the release notes for each update.
4. Check the Include checkbox to download the relevant firmware.
The update will be added to the navigation tree and the current processing status will be shown.
Figure 76: Status of firmware download
111
IGEL Technology GmbH
IGEL Universal Management Suite v4
4.09.100
10.3. Importing from a local source
You can also load updates from a local source, e.g. from a USB stick.
An item of firmware from a local source does not have the metainformation stored on the IGEL Server.
1. Select Firmware Archive from the firmware updates context menu.
2. Select a compressed Linux update (ZIP file) or a Windows snapshot (SNP) file.
3. Specify a directory for storing the update before it is distributed to thin clients later on.
4. Click OK to start the import.
Figure 77: Import from ZIP or SNP file
10.4. Importing from the UMS WebDAV
You can also register as a Universal Firmware Update a snapshot of a Windows Embedded Standard thin
client that was created earlier and stored in a web resource:
1. Select Snapshot from the Universal Firmware Updates context menu.
2. Specify the update to be imported.
112
IGEL Technology GmbH
IGEL Universal Management Suite v4
4.09.100
10.5. Assigning an Update to a Thin Client
To assign a registered firmware update to a thin client, proceed as follows:
Directly:
by drag and drop
via Assigned Objects in the thin client window
Indirectly via a directory
:
Launch the update process after transferring the information to the thin client manually or as a
Planned Task.
As a result of the assignment, a "hidden" profile with the necessary update information will be generated.
The thin client can then perform its update on the basis of this information. You can tell that a Universal
Firmware Update has been assigned to a thin client by the fact that the configuration previously or already
defined was changed, the automatically generated update profile has precedence over the thin client's
other profiles.
Figure 78: Auto-created update profile
Assigning an update still does not start the update process. The information needed for the update is
merely transferred to the thin client.
113
IGEL Technology GmbH
IGEL Universal Management Suite v4
4.09.100
11. Managing certificates
Manage your UMS certificates for server, client and console application.
11.1. Installing Server Certificates
The IGEL UMS saves a certificate on each thin client it controls. This certificate prevents unauthorized
access to the thin client configuration. During the installation, a distinct pair of keys (one public and one
private) is generated for each IGEL UMS Server. When registering a thin client in the UMS, the public part is
automatically transferred to the thin client and saved there. From this point onwards, a comparison with
the server's private key will be made each time that the thin client is accessed. If other IGEL UMS
installations try to access the thin client, access will be denied.
You can also upload a certificate of your own to the UMS, for more information read the instructions in
UMS Network (page 116).
11.2. Removing a Certificate
UMS also allows you to remove the certificate from thin clients. This may be necessary
•
•
in order to prepare for moving a thin client from the test environment to the productive environment
in order to prepare for replacing the server certificate.
To remove the certificate, proceed as follows:
Select Remove UMS Certificate under Thin Clients→Commands→Other Thin Client commands.
Each IGEL UMS Server can now access the thin client configuration until one of the servers registers
the client.
11.3. Saving a certificate
You can also save the certificate on a thin client which is already registered in the database. This can be
particularly helpful if the certificate has been deleted from the thin client manually.
To save a certificate on a thin client, proceed as follows:
1. Select a group or an individual thin client.
2. Select Save Certificate under Thin Clients→Commands→Other.
As an alternative, you can also re-register the thin client.
114
IGEL Technology GmbH
IGEL Universal Management Suite v4
4.09.100
11.4. Importing a console certificate
If you install the IGEL UMS Console on another computer, you will need to import the
<INSTALLDIR>\rmclient\cacherts certificate.
Copy this file onto a diskette
or
Save this file in an approved folder which can be accessed from the destination computer.
115
IGEL Technology GmbH
IGEL Universal Management Suite v4
4.09.100
12. Administration area
The UMS Administration area brings together a number of configuration options which, in the past, were
only available via the UMS Administrator on the UMS Server itself. These include linking Active Directories
and setting up Universal Firmware Updates.
New tools such as Administrative Tasks or the Server Services Status View are also available here.
12.1. UMS network
The UMS Network node shows information regarding the SSL certificate currently used.
You can also replace the certificate (self-signed) which is generated during installation with your own SSL
certificate here. This must be in the PKCS 12 format.
If you replace certificates, do this before registering thin clients on the UMS. Otherwise, you will need to
remove the old certificates from the thin clients (page 114) manually after changing the certificate.
To install your own SSL certificate, proceed as follows:
1. Click on the Replace Certificate button.
2. Select your certificate file under Select Keystore File.
3. In the Keystore Password field, enter the password for your certificate file.
4. Confirm your settings by clicking on OK.
The UMS Console will then prompt you to restart the UMS Server in order to complete installation of the
certificate.
116
IGEL Technology GmbH
IGEL Universal Management Suite v4
4.09.100
12.2. UMS Server
The Server sub-node lists all servers and Load Balancers belonging to the UMS installation.
With a standard installation, only one available server normally appears here – in a HA network, all installed
servers and Load Balancers are shown.
Figure 79: Status of UMS server
An overview of queries as well as queries that are waiting or have been rejected by thin clients makes it
possible to estimate the server load across the relevant time period.
Click Show History to bring up a scalable view. You can use the mouse to zoom in on sections or restore
the view by pressing the mouse button and moving the mouse to the left.
12.3. Global configuration
Under Global Configuration, you can regulate Administrative Tasks (page 117), integrate user data from the
Active Directory (page 121), set up Universal Firmware Updates (page 121) and manage licenses (page 121).
12.3.1. Creating administrative tasks
Administrative tasks allow you to create backups (internal Embedded DB only) and clean the database
(remove unused firmware, clear the cache, delete logging information and other) on a scheduled, recurrent
basis.
To create a new administrative task, proceed as follows:
1. Set up a new administrative task by clicking on Add (+).
2. Give the task a name.
3. Under Action, select the type of task (backup or remove firmware).
4. If necessary, add a more detailed description.
In this first view, tasks can also be disabled and only enabled later on.
117
IGEL Technology GmbH
IGEL Universal Management Suite v4
4.09.100
Creating a planned backup (Embedded DB)
To create a planned backup, proceed as follows:
1. Specify the directory on the server in which the backup (.embak) created is to be stored.
2. Click Continue.
3. Assign the task to a server.
When the Embedded DB is used, there can only be one connected server. The task must therefore be
assigned to a single server on a fixed basis.
4. Click Continue.
5. Set the time when the task is to be executed for the first time and, if necessary, the interval at which it
is to be repeated, e.g. every week on Sunday.
As with planned tasks, public holidays can be excluded.
6. Click Finished to complete the configuration of the task.
Figure 80: Execution time of task
Remove Unused Firmware
To delete unused firmware versions from the database on a regular basis, proceed as follows:
1. Select this action for a new administrative task.
2. Click Continue.
3. Assign the task to a server.
In the UMS HA network, only one server can execute a task in each case.
4. Click Continue.
5. Set the time when the task is to be executed for the first time and, if necessary, the interval at which it
is to be repeated, e.g. every week on Sunday.
As with planned tasks, public holidays can be excluded.
118
IGEL Technology GmbH
IGEL Universal Management Suite v4
4.09.100
6. Click Finished to complete the configuration of the task.
Figure 81: Task status
Refresh Caches
This task refreshes the UMS Server cache at a defined point in time or on a regular basis. You can configure
the cache itself under Global Configuration→Cache Configuration.
Delet Logging Data
Deletes the previously created UMS message and event log. For this task, you can specify a target directory
in which the logging data will be backed up before the log is deleted from the UMS Server.
The logs for Secure Shadowing (page 54) are not deleted as a result of this administrative task.
Delete Thin Clients
This task deletes at the requested point in time all thin clients from the UMS Database which, when
running, meet the criteria of a view (e.g. "all thin clients which were not booted for more than a year").
Exporting view results via e-mail
E-mails can only be sent if you have made appropriate mail settings (page 123) under UMS
Administration→Configuration→Mail Settings.
To set up the regular sending of a view via e-mail, proceed as follows:
1. Select Export View Results via E-Mail in the Create a New Administrative Task window.
119
IGEL Technology GmbH
IGEL Universal Management Suite v4
4.09.100
2. Select a view via the View-ID→[...] button.
3. Select the desired data fields under Visible Columns Configuration→[...].
Figure 82: Selecting a view and columns
4. Enter the recipient address. A number of recipient addresses can be entered, separate them with a ";"
(semicolon).
5. Select the Result format and whether the file is to be zipped.
6. In the next window, set the start and end, the frequency and the Weekdays on which the task is to be
executed. You can exclude individual public holidays.
Figure 83: Setting execution time
7. Click on the Finish button when you have entered all the information.
120
IGEL Technology GmbH
IGEL Universal Management Suite v4
4.09.100
12.3.2. Linking an Active Directory / LDAP
It can make sense to link the UMS Server to an existing Active Directory for two reasons:
•
•
You would like to import users from the AD as UMS administrator accounts.
You would like to use user profiles via IGEL Shared Workplace.
For both purposes, you first need to link the relevant Active Directories in the administration area under
Global Configuration→Active Directory / LDAP Configuration.
1. Add a new entry to the list of linked Active Directories by selecting Add (+).
2. Specify the name of the domain, the domain controller and the page size.
The page size limits the number of hits (i.e. objects) in the Active Directory on the server side. The
standard value is 1,000. Change this value according to your server configuration.
3. Click Test Connection to test the connection after entering valid user data.
A number of Active Directories can be linked. You should therefore ensure that you give the correct
domain when logging in (e.g. to the UMS Console).
In this document, the terms Active Directory and LDAP are, to an extent, used interchangeably:
•
•
Administrative users / UMS administrators can be imported both from an AD and from an LDAP.
Shared Workplace users can authenticate themselves only vis-à-vis an Active Directory. An LDAP
service cannot be used for this purpose.
12.3.3. Universal Firmware Update
The setup procedure is described in the chapter Universal Firmware Update (page 110).
12.3.4. License configuration
In this area, you are given an overview of the availability and status of all licenses and a list of registration
data.
12.3.5. Cache
The cache is integrated into the UMS GUI Server and is configured from the UMS Administrator. It is
designed to improve overall performance when the thin client retrieves its settings. Furthermore, the UMS
can provide the thin client settings even if the UMS Database is not running. Please bear in mind, however,
that you cannot change thin client settings if the database is not enabled.
121
IGEL Technology GmbH
IGEL Universal Management Suite v4
4.09.100
Enable cache
Enable or disable cache
Delete stray files
Deletes entries in the cache that cannot be found in the database.
Add all thin clients
When the cache is updated, you can add to it the settings for all thin
clients which are known to the UMS. Otherwise, only the settings of the
thin clients which have connected at least once to the UMS of the
current host will be added.
Update cache when the
server is launched
The cache is updated when the server is launched. To make detailed
changes to the update settings, go into the UMS Console and click
Administrative Tasks in the UMS Administration.
Select Misc→Manage Cache in the UMS Console menu.
Various details about the cache are shown in the dialog window. These include which entries can be
found in the cache, when the next update will take place etc.
A number of cache actions can also be performed here:
Update cache
Updates all cache contents immediately
Empty cache
Removes all cache entries immediately
Update view
Provides an updated view of the cache information
The Administration area of the UMS Console also allows you to set up an administrative task in order to
update the cache automatically on a regular basis.
12.3.6. Wake-on-LAN
Thin clients can be wakened via the network using magic packets. In the UMS Administrator, you can
specify the addresses to which these packets are sent. By default, they are sent as a broadcast and to the
last known IP of the thin client.
Figure 84: Wake-on-LAN settings
122
IGEL Technology GmbH
IGEL Universal Management Suite v4
4.09.100
12.3.7. Logging
You can set up logs relating to two different areas:
Message log settings:
Logging for actions prompted by the user
Event log settings:
Logging for actions prompted by the thin client
Each log type – independently of one another – can be:
•
•
•
enabled or disabled,
saved for a limited time, for a limited number of entries or indefinitely,
set up and the actions which are to be registered controlled.
Some tips when working with logs:
You can register detailed information along with messages.
You can also record the name of the UMS administrator who performed the particular action.
You can enable or disable actions that are to be logged in the log level configuration.
By default, all actions are recorded when the logging function is enabled.
Click System→Logging to bring up the current log and the exported information in the UMS Console.
The log information can be manually exported there too.
The Administration area of the UMS Console also allows you to set up an administrative task in order to
backup and delete the logs automatically on a regular basis.
12.3.8. E-mail settings
The e-mail settings described here must be made in order to use the Send View via E-Mail (page 98) and
Export the View Results via E-Mail (page 119) functions.
1. Open the UMS Administration→Global Configuration→E-Mail Settings page.
2. In the SMTP Host field, enter the name known in the DNS or the IP address of the SMTP server
(outgoing mail server).
3. In the E-Mail Sender Address field, enter the desired sender of the e-mails.
4. In the SMTP User Name field, specify with which user name the IGEL Universal Management Suite is
to log on to the SMTP server.
5. In the SMTP Password field, enter the password for the SMTP user.
6. In SMTP Port, specify to which server port the IGEL Universal Management Suite is to connect. For
unencrypted SMTP, the port is 25. If SMTP-SSL is used, the port is 465.
123
IGEL Technology GmbH
IGEL Universal Management Suite v4
4.09.100
7. Select Enable SMTP Authentication, Enable SMTP-SSL or Enable SMTP-STARTTLS if the SMTP server
uses one of these options. You can find out which methods are supported in the documentation from
your e-mail provider. If you would like to use a Gmail account, read the Mail Settings for Gmail
Accounts Best Practice document.
8. Check your settings by clicking on the Test Settings button. If the test is successful, the results bar will
turn green. If not, it will turn red.
Figure 85: E-mail settings
You will find the settings for sending e-mails via Gmail (Google Mail) in a Best Practice document
(http://edocs.igel.com/index.htm#10202904.htm).
12.3.9. Misc settings
Further global parameters can be found here:
•
•
•
•
•
Activate recycle bin: Enables the UMS recycle bin (page 37).
Activate Global Secure VNC: Allows Secure Shadowing (page 54) only for all thin clients that support it.
Log user for secure VNC: Adds the user name to the Secure Shadowing (page 54) log.
Enable template profiles: Enables support for template profiles (page 81).
Enable master profiles: Allows the use of master profiles (page 76).
124
IGEL Technology GmbH
IGEL Universal Management Suite v4
4.09.100
13. Importing Active Directory users
Users can be imported from the Active Directory to the UMS Console in three steps:
•
•
•
Logging in to the Active Directory
Selecting the users to be imported and starting the import
Logging the import process
To import users from the Active Directory to the UMS Console, proceed as follows:
1. Launch the UMS Console's import dialog via System→Administrator Accounts→Import.
2. Log in to the AD/LDAP service.
The connection is described above (page 121). When importing user accounts, only connected ADs are
available for selection.
Figure 86: Login to Active Directory
3. Click Continue.
The Active Directory browser will open.
4. Select individual users or groups from the structure tree of your AD.
The highlighted users/groups can be added to or removed from the selection to be imported via the
context menu or using drag and drop. The users/groups found in the Found AD Accounts hit list can be
transferred to the Selected Accounts list using the symbols.
125
IGEL Technology GmbH
IGEL Universal Management Suite v4
4.09.100
Multiple users and groups can be selected.
Figure 87: AD Import Filter
As an alternative to navigating in the structure tree, you can also highlight and add users or groups to
the selection via the Search function.
5. Click Continue to start the import.
A confirmation window will appear.
Once a user has been successfully imported, this action cannot be undone. A UMS administrator set up by
mistake must be deleted manually via the administrator account management system. The IGEL UMS uses
the account as the name of the AD user imported.
13.1. Explanation of symbols
The symbols in the AD structure tree have the following meanings:
User account in the Active Directory
User group in the Active Directory
User account added to the selection
User group added to the selection
Computer in the Active Directory
Organizational unit (OU) in the Active Directory
Any object which is not a user or a group
The context menu allows the following actions to be performed on tree elements:
126
IGEL Technology GmbH
IGEL Universal Management Suite v4
4.09.100
Adds a user (or group member) to the selection
Adds a user group to the selection
Sets an element as a starting point for searching in the AD
Shows the properties (details) of the element
Some tips:
•
•
•
•
By holding down the Ctrl key when dragging and dropping a group, the group members and not the
group itself will be selected.
If an organizational unit is selected, only the members will be added, not the OU itself.
The Ins and Del keys can be used to add and remove elements from the selection.
If a user is both an administrator and a group member in the UMS, the user's own authorizations will
take precedence.
13.2. Searching in the Active Directory
The options in the AD structure tree have the following meanings:
Account
Allows you to search on the basis of account names of parts thereof
Object type
Allows you to restrict a search to users or groups
Filter
Filter criteria in accordance with the RFC-2254 standard
Starting point
Element within the tree where the search begins
Reset
Resets all search options to the standard values
Search
Starts the specified search
The context menu allows the following actions to be performed on items in the list of hits:
Adds a user (or group member) to the selection
Adds a user group to the selection
Shows the properties of the element
Shows a tool tip (object properties with a mouse-over)
Via the context menu, you can once again bring up the properties of the objects selected for import and
remove objects prior to the import if necessary.
127
IGEL Technology GmbH
IGEL Universal Management Suite v4
4.09.100
13.3. Import results list
Once the import is complete, a results window will appear.
This shows how many accounts were ignored during the import and which ones were imported
successfully. If a user account already exists in the UMS, this AD account will be skipped during the import.
Figure 88: Result of Import
128
IGEL Technology GmbH
IGEL Universal Management Suite v4
4.09.100
14. Administrator accounts and access
rights
For the purpose of logging in to the UMS Console, you can either import UMS administrator accounts from
a linked Active Directory or create, organize and remove accounts manually.
Access rights to objects or actions within the IGEL UMS are attached to these administrator accounts and
groups. The rights of database users who were created during the installation or when setting up the data
source cannot be restricted. They always have full access rights in the UMS.
14.1. Administrators and groups
Click System→Administrator Accounts to manage the IGEL UMS administrator accounts.
Figure 89:
IGEL UMS Administrator Accounts
All available accounts are listed in the left-hand column, while the available groups are listed in the
right-hand column. To the right of each column you will find the associated buttons such as New, Edit and
Remove. For administrator accounts, you can also change the password and show group memberships.
Details of the members who make up a selected group can also be shown. Effective Rights provides an
insight into the rights that were directly or indirectly granted to a user or taken away from them.
129
IGEL Technology GmbH
IGEL Universal Management Suite v4
4.09.100
14.2. Access rights
Authorizations in the IGEL UMS include:
•
•
•
General rights which can be granted to an administrator or denied either directly via the account or
indirectly on the basis of group membership,
Access rights to objects in the navigation tree,
Actions within the UMS Console.
The indirect rights given to an administrator on the basis of their group membership can be changed
further for each administrator in the group. In this case, rights that were granted directly have precedence
over those granted indirectly.
An administrator can be a member of several groups and receive the corresponding rights. If authorizations
contradict each other, the withdrawal of an authorization takes precedence over the granting of it. If a
prohibition regarding an action or object from a group is issued, it will overrule all rights from other groups.
Generally speaking, the same authorization settings are used for groups and administrators. The following
description of individual configuration options for administrators therefore applies equally to groups too.
14.2.1. Basic authorizations
The following table lists the basic access rights needed to set up, edit or delete objects. An object can be a
directory, an element in a tree structure (thin clients, profiles...) or nodes in the administration area of the
console, e.g. administrative tasks or the AD connection.
Figure 90: Basic access rights
130
IGEL Technology GmbH
IGEL Universal Management Suite v4
4.09.100
Example 1:
In order to be able to change the configuration of a thin client,
a user requires authorization to search the thin client's
directory path and configure the thin client itself.
Example 2:
In order to be able to configure a scheduled backup of the
internal database, an administrative user requires search,
Global Configuration and write authorization for
administrative tasks (reading authorization is automatically set
at the same time).
14.2.2. General administrator rights
The general administrator rights essentially relate to actions in the menu of the console:
Figure 91: General administrator permissions
Administrator accounts are particularly important here. This is the system for managing authorizations
itself. An administrator with this authorization can grant themselves and others rights, take away those
rights and set up new accounts. This authorization should only be granted to users who are to have full
access to all objects and actions in the UMS.
The individual items:
131
IGEL Technology GmbH
IGEL Universal Management Suite v4
4.09.100
Administrator Accounts
Authorization management may be performed.
Events and messages
The event and message log may be viewed if Logging is enabled.
Managing firmware
Firmware versions can be imported, exported and removed from the
database.
Manage Licenses
IGEL firmware licenses can be allocated to thin clients.
Manage Snapshots
Snapshots for IGEL thin clients can be registered on the UMS Server
and removed again.
Scan Thin Clients
The network can be scanned for thin clients, for example if they are to
be registered on the UMS Server.
Manage Cache
The UMS Server cache can be viewed, updated and deleted.
Managing public holiday lists
Public holidays can be defined in order to plan tasks.
Host assignment
Planned tasks can be assigned to various hosts.
SQL Console
The SQL Console may be run. Warning:The SQL Console can cause
considerable damage to the database!
Default Directories
Directories and rules for automatically sorting thin clients can be
created and deleted.
Saving support information
Database and server log files can be exported for support purposes.
14.2.3. Object-related access rights
Administrators and administrator groups can be granted specific rights with regard to objects in the
navigation tree. These authorizations are inherited "downwards", e.g. from a folder to the thin clients
within this folder.
132
IGEL Technology GmbH
IGEL Universal Management Suite v4
4.09.100
You can change the authorization settings after selecting an object in the following ways:
•
•
•
via the context menu of the object
or via the authorization symbol in the tool bar
or via the menu item Edit→Authorizations
Figure 92: Object related permissions
The above list contains all object-related authorizations available in the UMS navigation tree. Only one
selection is available for each selected object. For example, a view cannot be assigned updates and cannot
be shut down.
Associated authorizations are automatically set together but can be changed manually later on. Enabled
authorizations or denials relating to nodes affect all objects within the node.
133
IGEL Technology GmbH
IGEL Universal Management Suite v4
4.09.100
The overview shows a selected administrator's rights to an object. Details can be found under Effective
Rights. The rules for determining rights are also shown here, e.g. whether an authorization was granted
directly or whether it is granted via a group or an inheritance within the tree structure.
Figure 93: Effective permissions
Available rights
General
Search
Visibility of the object in the navigation tree (path as far as
the object must also be allowed!)
Read
Read authorization in respect of folder contents and object
attributes
Move
Thin clients can be moved without write authorization.
Edit configuration
Write authorization for the configuration of a thin client (TC
Setup)
Write
Write authorization in respect of folders and object
attributes (not TC Setup)
Authorizations
The authorization settings for the object can be changed.
Shadowing
VNC access to the thin client
Send message
The thin client's message function
134
IGEL Technology GmbH
IGEL Universal Management Suite v4
4.09.100
Assignment
Energy
Firmware
Assign profile
A profile may be assigned to the object.
Assign file
A file may be assigned to the object.
Assign update
A firmware update may be assigned to the object.
Reboot
Rebooting the thin client.
Idle state
Putting the thin client into the idle state.
Shut down
Shutting down the thin client
Wake up
Waking up the thin client using wake-on-LAN.
Update
The firmware update may be carried out.
Reset
Resetting the firmware to the factory defaults.
Media Player
Downloading Media Player codec licenses.
Flash Player
Downloading an Adobe Flash Player license.
File transfer
An assigned file may be transferred to the thin client.
14.2.4. Access rights in the administration area
In the administration area of the console, you can search, read and write general authorizations and grant
or deny authorizations for administrator accounts. Authorizations should only be granted to users who will
actually perform administrative tasks on the UMS.
135
IGEL Technology GmbH
IGEL Universal Management Suite v4
4.09.100
15. User logs
The logging system is used by the UMS and the registered thin clients in order to record all changes to the
database. Only successful actions are logged. You will not find details of any errors in the log file of the UMS
GUI Server.
The logging system is subdivided into two areas:
Messages:
Actions initiated by a user.
Events:
Actions initiated by a thin client.
15.1. Administration
The administration settings for the logging procedure are configured in the IGEL UMS Administrator under
Settings→Logging.
Figure 94: Log configuration
136
IGEL Technology GmbH
IGEL Universal Management Suite v4
4.09.100
•
Messages can be logged either with or without details.
There are no details for events.
•
•
Old messages can automatically be deleted from the list. You can specify how many messages are kept
and for how long. You can set up an export procedure in order to backup messages before they are
automatically deleted.
With the Log Level buttons, you can enable logging for selected commands. Logging for all possible
commands is selected as standard.
Apply saves your settings and applies them for the purposes of the RMGuiServer service.
15.2. Logging dialog window
Information regarding messages and events can be displayed in the console in the following ways:
•
•
via the System→Logging menu
via Logging in the context menu of the directories and objects in the tree structure
Figure 95: Message logging
137
IGEL Technology GmbH
IGEL Universal Management Suite v4
4.09.100
15.2.1. Setting a filter
To set a filter, proceed as follows:
1. In the Filter window area, specify criteria in order to load a specific selection of messages from the
database.
All filter fields are combined with the operator AND.
These values can be connected with the operator OR only if a filter field allows multiple selections, e.g.
if several thin clients can be selected.
2. Click Use Filter to enable the new settings.
The log messages or events will be reloaded from the database on the basis of the filter settings.
Messages/events can be exported to HTML, XML and CSV files by selecting Export.
Setting a filter for events
To set a filter for events, proceed as follows:
1. Specify the command if you know what it is.
2. Specify the MAC address of the thin client for which you wish to display the events.
Figure 96: Event logging
138
IGEL Technology GmbH
IGEL Universal Management Suite v4
4.09.100
Filter for messages
User
Select the name of the UMS administrator who is responsible for the message. If this
field is left empty, the messages of all users will be shown.
Object type
Specify an object for which you would like to display the messages. If this field is left
empty, the messages for all object types will be shown.
Category
Each command belongs to a category, e.g. security, settings and objects.
Command
If a command is known, you can specify it yourself.
Time zone
You can specify the time zone with which the logging time for messages is shown.
Setting a filter for categories
To adjust the filter, select the option Category if you would like to select all messages for a specific
category (e.g. those relating to firmware updates).
All commands within this category such as Delete firmware update or Assign firmware update will
then be evaluated in order to identify the messages or events.
Comments
The quick filter does not apply to the export action.
One of the most important commands is the command GET_SETTINGS_ON_REBOOT. The time stamp
for this command provides details of the time when the thin client last booted. This can be used to define a
new BOOT TIME view criterion. With the help of this criterion, you can easily determine which thin clients
have not been booted after a certain date.
The administration settings for the number of messages and – more importantly – for the events should
be handled with great care. The higher these values are, the more space will be required for the
tablespace in the database. If you enable logging, you should monitor your database closely until you are
sure that sufficient space is available for the messages and/or events.
139
IGEL Technology GmbH
IGEL Universal Management Suite v4
4.09.100
16. Log files and support
If you have problems with the IGEL UMS and contact your service provider, you can provide various UMS
log files. You can easily generate these logs as a ZIP archive. To do this, select Help→Save Support
Information.
If you are already an IGEL customer, please contact your dedicated sales partner first. They will be happy
to answer any questions relating to IGEL products.
If you are currently testing IGEL products or your sales partner is unable to provide the help you need,
please fill in the support form after logging in at
https://www.igel.com/en/members-area/login-logout.html.
We will then contact you as soon as possible. It will make things easier for our support staff if you provide
us with all the information that is available. Please see our notes regarding support and service information
https://www.igel.com/en/company/legal-documents/support-and-service-information.html too.
You will find the IGEL Knowledge Database with user manuals, support FAQs and best practice/how-to
documents at http://edocs.igel.com http://edocs.igel.com.
140
IGEL Technology GmbH
IGEL Universal Management Suite v4
4.09.100
17. Optional Extensions (HA and UCB)
This appendix contains comprehensive information regarding the optional extra functions IGEL UMS High
Availability Extension and IGEL Universal Customization Builder.
17.1. IGEL UMS High Availability (HA)
The optional High Availability Extension is part of the IGEL UMS from Version 4.0. It is designed to
address the needs of large thin client environments in which new settings need to be rolled out to several
hundred thin clients at once, or in which the fail-safe rollout of new settings is mission-critical for the
organization concerned. The technical implementation is based on a network of several UMS management
servers.
An upstream UMS Load Balancer takes over load distribution and thus ensures that each thin client can
receive new settings at any time – even at the start of a working day when several thousand devices log on
to the UMS Server simultaneously and search for new configuration profiles or firmware updates. To
ensure maximum process reliability and high availability, IGEL also recommends that the UMS Load
Balancer and UMS Database have a redundant design.
The High Availability Extension comes in packages of 50 licenses. All managed thin clients must be fully
licensed in order to use it. Each version of the IGEL UMS 4 contains five test licenses allowing you to
evaluate the function free of charge and without having to register.
Please also see our New Installation of an HA Network http://edocs.igel.com/index.htm#10200454.htm
Best Practice document.
17.1.1. Configuration options
In principle, you can connect as many UMS Servers and Load Balancers in an HA network as you want.
However, two basic scenarios for typical applications should be described in greater detail:
•
•
Basic high availability, e.g. to ensure the availability of user profiles (Shared Workplace) for a relatively
small number of thin clients
load distribution (network with many thin clients).
From an IP point of view, the UMS Server and Load Balancer must be within the same network without
NAT or proxies which influence communications between the components.
Basic high availability solution
To ensure that users logging in to a thin client with their AD user account can reliably receive the profile
assigned to them (thin client firmware with Shared Workplace feature set), both the server and the Load
Balancer must offer redundancy. The database should ideally be designed as a cluster in order to minimize
potential errors.
141
IGEL Technology GmbH
IGEL Universal Management Suite v4
4.09.100
If there are relatively few thin clients to manage in the network, load distribution can be disregarded. In
this case, two server systems which can replace each other will be sufficient. The complete HA Extension,
i.e. a UMS Server and a Load Balancer, is installed on each of the two systems.
The system therefore comprises the following:
•
•
•
two Load Balancers which are available for thin client queries
two UMS Servers which are available for each of the two Load Balancers
a failsafe database, e.g. a Microsoft SQL Server cluster.
Figure 97: Basic high availability configuration
Each of the two systems can also perform the tasks as a UMS Server alone. If both systems are active at the
same time, this has a certain load distributing effect, though this is relatively small. After all, the Load
Balancer generates extra load along with the actual UMS Server. Consequently, UMS Servers and Load
Balancers should be operated on separate systems (see Load distribution (page 142) below) if you need to
manage a large number of thin clients.
142
IGEL Technology GmbH
IGEL Universal Management Suite v4
4.09.100
High availability and load distribution
The smallest configuration with real load distribution comprises four to five separate server systems:
•
•
•
two Load Balancers,
two to three UMS Servers,
a high-performance, fail-safe database (cluster).
Figure 98: High availability with load balancing
Queries from the thin clients can be passed on to the UMS Servers by both Load Balancers. If one of the
Load Balancers should fail, the other remains available and assumes responsibility for communications
alone. Therefore, there are provisions for no more than three UMS Servers in this configuration. A greater
number of servers could overload a single Load Balancer, which would itself then become s a bottleneck.
For very large installations with more than three UMS Servers, the number of Load Balancers should be
increased accordingly. Generally speaking, one Load Balancer alone can serve up to three servers.
Rule of thumb for sensible load distribution: One server per 2,000 managed thin clients and one Load
Balancer per 5,000 thin clients.
17.1.2. HA Installation
Here, you can find out more about:
•
•
•
•
Installation requirements (page 144)
Re-installation (page 144)
Connecting external database systems (page 15)
Licensing the High Availability Extension. (page 149)
143
IGEL Technology GmbH
IGEL Universal Management Suite v4
4.09.100
Installation requirements
In order to install an IGEL UMS High Availability network, your hardware and software must meet the
following minimum requirements.
Warning: The UMS Server must not be installed on a domain controller system. Manually modifying the
Java Runtime Environment on the UMS Server is not recommended. Running additional Apache Tomcat
web servers together with the UMS Server is not recommended either.
UMS Server installation – including individual HA network components
•
•
•
Operating system: Microsoft Windows Server 2003/2008 R2
At least 512 MB of RAM (1024 MB recommended)
At least 400 MB of free HDD space (plus database system)
If you use Windows Server 2008 R2, please ensure that the 32-bit compatibility mode is active before
installing the UMS.
Installing the UMS Console
•
•
•
•
At least 256 MB of RAM (512 MB recommended)
At least 50 MB of free HDD space
Java Web Start Console: Java 1.8.0_40 or newer required
For details of the supported operating systems, please see the UMS Data Sheet on the IGEL website.
Database systems (DBMS)
For details of the supported database systems, please see the UMS Data Sheet on the IGEL website. Details
of the requirements when installing and operating the database can be found in the documentation for the
particular DBMS.
From an IP point of view, the UMS Server and Load Balancer for high availability (High Availability (page
141), HA) must be within the same network without NAT or proxies which influence communication
between the components.
The internal database (Embedded DB) cannot be used for an HA network. You can also use the Embedded
Database for a dedicated test installation with only a single server for the UMS Server and Load Balancer.
However, you cannot use this to set up a real HA network.
Installing a simple high availability solution
To use the High Availability Extension, please select the option for installing the HA network components
(UMS Server and UMS Load Balancer).
This example describes the procedure for installing a simple high availability solution. The UMS Server and
Load Balancer are therefore installed on each of the servers. If your required installation differs, you can
select individual components accordingly.
144
IGEL Technology GmbH
IGEL Universal Management Suite v4
4.09.100
First server in the HA network
To install the first server in the HA network, proceed as follows:
1. Download the current version of the IGEL Universal Management Suite from the IGEL Download
Server.
2. Launch the installer by executing the EXE file.
You will need administration rights for the computer in order to install the IGEL UMS.
3. Close any other applications and confirm that you have done so.
4. Read and confirm the license agreement.
5. Read the explanation of the installation process.
6. Select a path for the installation.
7. Select the type of installation (in this case: HA network with server and Load Balancer).
8. Confirm the message regarding licensing of the HA Extension.
9. Enable the option for creating an IGEL network token.
10. Specify a location for saving the token.
11. Choose a name for the entry in the Windows Start Menu.
12. Read the summary and start the installation process.
13. Close the program once installation is complete.
If you have chosen to install a UMS HA network, the IGEL Universal Management Suite server as well
as a Load Balancer will now run on this computer.
The Windows installer creates entries in the Windows software directory and the Start Menu. An icon for
launching the UMS Console will also be placed on the desktop.
Warning: The IGEL network token is required when installing further servers. Make sure that it is well
protected.
Warning: The IGEL network token will be needed for all subsequent server installations. Please keep it
safe.
Further servers
Further UMS Servers can be installed in the same way as the first. However, you do not need to create a
new network token. Instead, you select the token created previously on the first server during installation
to allow new servers to be integrated into the HA network. You should therefore save the token on a
storage medium which is accessible to the server (e.g. on the network or on a portable storage medium
such as a USB stick) before installation.
In addition, a connection with the same UMS Database that is used by the first server must be established
after installing a further UMS Server. The UMS HA network only works if all servers are connected with the
same database.
145
IGEL Technology GmbH
IGEL Universal Management Suite v4
4.09.100
To install further servers, proceed as follows:
1. Download the current version of the IGEL Universal Management Suite from the IGEL Download
Server.
2. Launch the installer by running the EXE file.
You will need administration rights for the computer in order to install the IGEL UMS.
3. Close any other applications and confirm that you have done so.
4. Read and confirm the license agreement.
5. Read the explanation of the installation process.
6. Select a path for the installation.
7. Select the type of installation (in this case: HA network with server and Load Balancer).
8. Confirm the message regarding licensing of the HA Extension.
9. Disable the option for creating an IGEL network token.
10. Select the token to be used.
11. Optional: Load a tc.keystore file.
12. Choose a name for the entry in the Windows Start Menu.
13. Read the summary and start the installation process.
14. Close the program once installation is complete.
For additional HA servers, you must enter and enable the data source in the following way:
1. Launch the UMS Administrator:
2. Create a data source and enter exactly the same parameters as the ones used by Server 1.
3. Activate the new data source.
4. Close the UMS Administrator.
If you have chosen to install a UMS HA network, the IGEL Universal Management Suite server as well as a
Load Balancer will now run on this computer.
The Windows installer creates entries in the Windows software directory and the Start Menu. An icon for
launching the UMS Console will also be placed on the desktop.
Warning: The IGEL network token is required when installing further servers. Make sure that it is well
protected.
Installing individual HA network components
The procedure for installing UMS HA network components separately is similar. Here too, a network token
is created when installing the first components (server or Load Balancer) and is used when installing further
components.
If a UMS Server is installed individually, the UMS Console and UMS Administrator applications for managing
the installation are available on the system in addition to the server services. After configuring and enabling
the HA network database via the UMS Administrator, the server will be available in the HA network.
146
IGEL Technology GmbH
IGEL Universal Management Suite v4
4.09.100
If you install an individual Load Balancer, only its service will be installed and automatically launched. Only
the option for uninstalling the Universal Management Suite will then be set up in the Windows Start
Menu. No configuration on the Load Balancer is necessary. It connects automatically to the HA network
during booting.
Connecting to External Database Systems
You will find details of the supported database systems and the HA Extension in the IGEL UMS Data Sheet
and on the IGEL website respectively. Details of the requirements when installing and operating the
database can be found in the administration manual for the particular DBMS.
To configure the database, use the relevant DBMS management program.
The configuration for setting up the data source and connecting the UMS to the database should be carried
out in the UMS Administrator.
All UMS Servers must work with the same database.
Oracle
To integrate Oracle, proceed as follows:
1. Set up a new database user with Resource authorization.
2. Set up a new Oracle type data source in the UMS Administrator.
A number of Oracle versions set up the Resource role without CREATE VIEW authorization. Please
ensure that this authorization is set for the role.
Microsoft SQL Server
To connect the Microsoft SQL Server, proceed as follows:
1. Open the SQL Console of the SQL Server by selecting New Query.
2. Use the following script as a template, change it as necessary and then execute it.
To avoid problems when enabling the data source, ensure that LOGIN, USER and SCHEMA are the
same.
CREATE DATABASE rmdb
GO
USE rmdb
GO
CREATE LOGIN igelums with PASSWORD = 'setyourpasswordhere',
DEFAULT_DATABASE=rmdb
GO
CREATE USER igelums with DEFAULT_SCHEMA = igelums
GO
CREATE SCHEMA igelums AUTHORIZATION igelums GRANT CONTROL to igelums
GO
3. Set up a new SQL Server type data source in the UMS Administrator.
147
IGEL Technology GmbH
IGEL Universal Management Suite v4
4.09.100
4. Ensure that the server port of the SQL Server is configured correctly in the data source. The default
value is 1433.
The Microsoft SQL Server should allow Windows and SQL authentication.
PostgreSQL
IGEL UMS uses PostgreSQL functions (from Version 8.2). Older versions are not supported.
When installing a new instance of the PostgreSQL database, set the following parameters:
1. Install the database cluster with UTF-8 coding.
2. Accept the conditions for all addresses, not just localhost.
3. Activate Procedural Language PL/pgsql in the default database.
For further information regarding installation of the PostgreSQL database, see
http://www.postgresql.org.
Once installation is complete, carry out the following configuration procedure:
1. Change the server parameters: The parameter listen_addresses in the file postgresql.conf
must contain the host name of the IGEL UMS Server OR '*' in order to allow connections to each
host.
2. Set up a host parameter in the file pg_hba.conf in order to give the UMS Server the authorization
to log in using the user data defined there.
If the IGEL UMS Server is installed on the same machine as the PostgreSQL Server, no changes to
these files are needed.
3. Launch the administration tool pgAdmin.
4. Create a new login role with the name rmlogin.
5. Create a new database with
name = rmdb
owner = rmlogin
encoding = UTF-8
6. Set up a new schema within the rmdb database with
name = rmlogin
7. Check whether the language plpgsql is available in the rmdb database.
If not, set it up.
8. In the UMS Administrator, create a new PostgreSQL-type data source with the host name of the
PostgreSQL Server and the correct server port (default is 5432), user rmlogin and database rmdb.
148
IGEL Technology GmbH
IGEL Universal Management Suite v4
4.09.100
Apache Derby
As with other external databases, we recommend that you create a new database instance for use by the
IGEL UMS.
Perform the following steps to create a new database instance and define the instance as a data source in
the UMS Administrator:
1. For security purposes, enable User Authentication in the Derby DB.
2. Launch the ij Utility (in [derby-installation-dir]/bin).
3. To create the rmdb instance, execute the following command:
connect
'jdbc:derby:rmdb;user=dbm;password=dbmpw;create=true';
4. Define the UMS database user rmlogin with passwordi rmpassword
CALL SYSCS_UTIL.SYSCS_SET_DATABASE_PROPERTY('derby.user.rmlogin',
'rmpassword');
5. Exit ij and launch the Derby Network Server.
6. In the UMS Administrator, create a new Derby-type data source with the host name of the Derby
Server and the correct server port (default is 1527), user rmlogin and database rmdb.
For further information regarding installation of the Derby database, see http://db.apache.org/derby.
Licensing the High Availability Extension
The HA network must be licensed in order to use it. For a basic installation, you will receive a license for five
thin clients managed by the UMS to enable you to carry out basic tests, e.g. with IGEL test set-ups. If you
require licenses for further thin clients, please contact your IGEL reseller.
You should register the license file you receive in the UMS Console under System→Manage Licenses.
The license status is shown in the administration area of the console under Global
Configuration→License Configuration.
17.2. IGEL Universal Customization Builder (UCB)
With the Universal Customization Builder (UCB), the firmware for IGEL Universal Desktop thin clients
can easily and reliably be expanded and adapted to meet your needs. For example, you may choose to
install local device drivers or special applications. You can even set important Windows registry keys – with
no detailed knowledge of Shell or Windows scripting.
The IGEL Universal Customization Builder (UCB) is an optional extension of the IGEL Universal
Management Suite (UMS) which enables you not only to put together individual expansion packages for
the IGEL Universal Desktop firmware, but also to package them and roll them out on a centralized basis.
Numerous helpful features such as predefined templates, the user-friendly GUI or IGEL helpdesk support
make this reliable application easy to use. The UCB supports all IGEL Universal Desktop thin clients with
Linux and Windows Embedded – including PCs and thin clients which were standardized with the help of
the IGEL Universal Desktop Converter 2 (UDC2) migration software.
149
IGEL Technology GmbH
IGEL Universal Management Suite v4
4.09.100
Figure 99: IGEL UCB
Typical usage scenarios:
•
•
•
•
Supplementing local apps: Rolling out applications for local operations, e.g. checkout software for
retailers and other sector-specific software, on a centralized basis
Upgrading device drivers: For sector-specific peripherals or original drivers
Setting registry keys: Individually adapting Windows Embedded Standard
Kiosk systems: Equipping thin clients with special local applications or software clients in order to
operate them independently of the company network, e.g. as time recording terminals
Features:
•
•
•
•
•
Simple procedures for generating, packing and rolling out firmware expansion packages for IGEL Linux
(custom partition) and Windows Embedded Standard (partial update).
Predefined templates: Task-oriented for typical application scenarios
Debugging: Automatic package creation with syntax checks
Automatic versioning within customization projects
Support for the packages created available from the IGEL help desk
Your benefits:
150
IGEL Technology GmbH
IGEL Universal Management Suite v4
4.09.100
•
•
•
•
•
Reduced project costs: With the UCB, you can now perform firmware expansions quickly and easily
yourself (without assistance from an external service provider)
Ease of use: User-friendly GUI with the familiar look and feel of the IGEL UMS, no detailed knowledge of
Shell or Windows scripting necessary (templates)
Quick, low-cost rollout: Convenient, remote rollouts using IGEL UMS (comes supplied with all IGEL
Universal Desktop thin clients)
Reliable processes and functions: User prompting via GUI and templates, simple debugging and support
from IGEL
Transparency: Automatic versioning within customization projects
Warning: Before distributing changes to your actual systems, it is important to test partial updates or
customer-specific partitions on one or more thin clients to ensure that they are stable and function
correctly!
17.2.1. Requirements
IGEL Customization Builder is part of the IGEL Universal Management Suite from Version 4.03.200
onwards (Windows only). The system requirements for the particular UMS version used apply in each case.
17.2.2. Licensing
A UCB license is required to use the optional UCB extension for the IGEL Universal Management Suite
(UMS). In order to obtain this license, you must successfully take part in a paid IGEL UCB training course
(in-house or classroom training).
The license is registered in the administration area of the UMS Console under Global
Configuration→License Configuration.
17.2.3. Partial update for IGEL thin clients with Windows Embedded Standard
A partial update is a collection of tasks which are grouped together in a script. This script is sent to the thin
clients together with the files that are to be distributed. The script is executed on the thin client and works
through the pre-defined tasks.
Various tasks such as distributing files, setting up registry keys, executing commands and many others can
be defined for a partial update. Similar tasks of the equivalent type are grouped together in sections. A
project can contain a number of partial updates with various sections and tasks. Using the import function,
a number of partial updates can be brought together to form a project.
151
IGEL Technology GmbH
IGEL Universal Management Suite v4
4.09.100
An example is shown here:
Figure 100: Partial update project
The following types of tasks (sections) are available in projects:
•
•
•
•
•
•
•
•
•
Roll out file
Create directory
Set rights
Delete file/directory
Create registry key
Roll out registry file
Delete registry key
Install application
Execute command
When a project is being "built", all necessary scripts are generated and stored together with the required
source files in a selectable project directory.
Warning: Before distributing changes to your actual systems, it is important to test partial updates or
customer-specific partitions on one or more thin clients to ensure that they are stable and function
correctly!
152
IGEL Technology GmbH
IGEL Universal Management Suite v4
4.09.100
Project functions
Launch the Universal Customization Builder in the UMS Console via System→Open Customization
Builder.
The following functions are available for a partial update project:
153
IGEL Technology GmbH
IGEL Universal Management Suite v4
4.09.100
Create new project ( Ctrl+n )
1. Opened projects are saved.
2. The setup dialog opens.
3. Enter a project name.
4. Select a project directory for the project; a sub-folder bearing the project name and containing all
project files will be set up in it.
5. Select Partial Update as the project type.
6. Click OK.
Load project ( Ctrl+o )
1. Opened projects are saved.
2. The selection dialog opens.
Select a project file (partial update project .ipu).
1. Click Open.
Save current project ( Ctrl+s )
Saves the project as it is at the time in the project directory.
Save current project as...
1. The setup dialog opens.
2. Enter a project name.
3. Select a project directory for the project; a sub-folder bearing the project name and containing all
project files will be set up in it.
4. Click OK.
A copy of the current project with all files will be saved under the new name in the selected
directory.
Close current project ( Ctrl+0 )
The current project is saved and then closed.
Import project (partial update only) ( Ctrl+i )
1. The selection dialog opens.
2. Select a project file (.ipu).
3. Click Open.
All parts of the selected project will be added to the current project.
154
IGEL Technology GmbH
IGEL Universal Management Suite v4
4.09.100
Build current project ( Ctrl+b)
1. The selection dialog opens.
2. Select a destination directory for the partial update.
Warning - All files in the destination directory will be deleted!
3. Click Open.
All scripts and files to be sent to the thin client will be stored in the destination directory. Once the
process has been completed successfully, the destination directory will contain the finished partial
update for distribution to the thin clients.
Add element ( Insert )
Sets up a new element depending on the current element type.
Delete element ( Delete )
Deletes the selected elements.
Move element upwards ( Page Up )
Moves the selected element up one position.
Move element downwards ( Page Down )
Moves the selected element down one position.
Open all elements
Opens all tree nodes.
Close all elements
Closes all tree nodes.
Transferring the partial update
To transfer partial updates to the system, proceed as follows:
1. Launch the thin client configuration (locally or in the UMS).
2. Select System→Updates→Partial Update.
3. Check the Partial Update checkbox.
4. Select a transfer protocol (HTTP, FTP, FILE).
5. Specify the source server/path on the drive (destination directory for the partial update project).
6. If necessary, enter the relevant login data.
7. Click Apply to save the settings.
8. Click Search for Updates in order to search the source for available updates (only locally on the thin
client).
Available updates can then be installed directly. The device will reboot for this purpose. It will also reboot
after the update has been installed.
155
IGEL Technology GmbH
IGEL Universal Management Suite v4
4.09.100
In the UMS, you can launch the distribution of the partial update via the thin client's context menu
(Commands→WES→Partial Update) or set up a planned task which will perform the distribution on a
scheduled basis.
17.2.4. Own partition for thin clients with IGEL Linux
A custom partition project creates an archive which, on thin clients with IGEL Linux, is converted into a
partition on the data medium. The files to be saved in this partition are also contained in the project
archive.
A custom partition project in the Universal Customization Builder consists of a single node. A custom
partition is created in just a few steps:
1. Select the directory with the files to be transferred.
2. Launch the project building process.
3. Select the path on which the compressed archive file is to be saved.
Warning: Before distributing changes to your actual systems, it is important to test partial updates or
customer-specific partitions on one or more thin clients to ensure that they are stable and function
correctly!
Project functions
Launch the Universal Customization Builder in the UMS Console via System→Open Customization
Builder.
The following functions are available for a custom partition project:
156
IGEL Technology GmbH
IGEL Universal Management Suite v4
4.09.100
Create new project ( Ctrl+n )
1. Opened projects are saved.
2. The setup dialog opens.
3. Enter a project name.
4. Select a project directory for the project; a sub-folder bearing the project name
and containing all project files will be set up in it.
5. Select Custom Partition as the project type.
6. Click OK.
Load project ( Ctrl+o )
1. Opened projects are saved.
2. The selection dialog opens.
3. Select a project file (custom partition project .icp).
4. Click Open.
Save current project ( Ctrl+s )
Saves the project as it is at the time in the project directory.
Save current project as...
1. The setup dialog opens.
2. Enter a project name.
3. Select a project directory for the project; a sub-folder bearing the project name
and containing all project files will be set up in it.
4. Click OK.
A copy of the current project with all files will be saved under the new name in the
selected directory.
Close current project ( Ctrl+0 )
The current project is saved and then closed.
Build current project ( Ctrl+b)
1. The selection dialog opens.
2. Select a destination directory for the custom partition.
Warning - All files in the destination directory will be deleted!
3. Click Open.
All scripts and files to be sent to the thin client will be stored in the destination
directory. Once the process has been completed successfully, the destination
directory will contain the finished custom partition for distribution to the thin clients.
157
IGEL Technology GmbH
IGEL Universal Management Suite v4
4.09.100
Transferring the customer's own partition
To transfer partial updates to the system, proceed as follows:
1. Launch the thin client configuration (locally or in the UMS).
2. Enable the customer's own partition and specify the partition size.
3. Specify the destination directory for the project as the download source for the partition.
4. If necessary, specify the actions to be performed when mounting or unmounting the partition.
5. Apply the settings for the thin client.
Enabling the partition
The customer partition is disabled by default.
Click on System→Firmware Configuration→Own Customer Partition→Partition in the setup to enable
the customer partition in the IGEL setup for the thin client (or with the IGEL Universal Management
Suite) via the setup path.
The size of the partition is shown in the form of a numerical value (bytes) followed by a multiplier.
Sensible figures are for example 100 K (for 100 KiB = 100 * 1024 bytes) or 100 M (for 100 MiB = 100 * 1024
* 1024 bytes).
Figure 101: Activating customer-specific partition
158
IGEL Technology GmbH
IGEL Universal Management Suite v4
4.09.100
The size of the partition should be set to at least 100 KiB. However, no more than 300 MiB should be
reserved for the customer-specific partition (based on the 1 GB standard CF used in IGEL Linux thin
clients). This is because subsequent firmware updates may require more storage space than the current
version.
Figure 102: System feedback
Click on Apply or OK in order to confirm your settings.
The partition will be created and mounted at the specified location.
A status window provides information on the process and gives details of any errors when creating the
partition. If for example there is insufficient space on the storage medium, it will not be possible to create
the partition.
Figure 103: Error messages
If you attempt to change the size of a previously created customer partition, you may find that you are
unable to do so if a process is still accessing the partition, e.g. if its content is still being shown in the
terminal window.
159
IGEL Technology GmbH
IGEL Universal Management Suite v4
4.09.100
Defining download source
In order to load data onto the customer partition, at least one source for partition data must be specified in
the Download area.
Click on Add.
Figure 104: Defining download source
The transfer protocols are the same as the ones for updating the firmware, e.g. HTTP, HTTPS, FTP. An INF
file which in turn references a tar archive zipped using bzip2 must be given as the target.
The structure of the INF file is as follows:
[INFO], [PART]
Header information
file="test.tar.bz2"
Zipped tar archive
version="1"
Version of the file
The files to be transferred must therefore be zipped in a tar archive which is then compressed using
bzip2. This file is referenced in the INF file which is the target of the URL.
The tar archive can be created under Windows, e.g. with the open source program 7-Zip (www.7-zip.org).
This program also allows bzip2 compression. Under Linux, tar and bz2 files can often be created using
onboard resources.
The procedure makes it possible to replace the file(s) on the server with a new version which the thin client
loads the next time it is booted. The Version parameter in the INF file must be increased for this
purpose.
160
IGEL Technology GmbH
IGEL Universal Management Suite v4
4.09.100
Carrying out actions
Once the customer partition has been mounted or unmounted, commands (Shellscript) can automatically
be executed. For example, a program loaded to the partition can be launched or closed upon shutdown
(the partition will be unmounted again in the process).
161
IGEL Technology GmbH
IGEL Universal Management Suite v4
4.09.100
18. Glossar
Active Directory (AD)
Active Directory (AD) implements Microsoft's LDAP directory services for Windows environments. Active
Directory allows administrators to assign company-wide rules, distribute software to Windows computers
and install important system updates throughout the IT infrastructure. All data and settings for an Active
Directory organization are stored in a central database. The organization of an Active Directory can
comprise anywhere from a few hundred to several million objects.
Lightweight Directory Access Protocol (LDAP)
Lightweight Directory Access Protocol (LDAP) is a network protocol for querying or modifying directory
services via TCP/IP. A directory is a set of information with similar attributes, organized into a logical and
hierarchical structure. A familiar example is a telephone directory which is made up of an alphabetical list
of names along with the relevant telephone numbers and addresses.
162
IGEL Technology GmbH
IGEL Universal Management Suite v4
4.09.100
19. Index
Commands for Jobs ......................................... 101
Comments........................................................ 139
A
About this document ............................................ 5
Access rights .....................................................129
Access rights in the administration area ..........135
Activate template profiles ..................................82
Activating a data source .....................................43
Activating IGEL Shared Workplace .....................72
Active Directory (AD) ........................................162
Administration ..................................................136
Administration area ..........................................116
Administrator accounts and access rights ........129
Administrators and groups ...............................129
Allocating profiles ...............................................68
Apache Derby ............................................. 17, 149
Assign template profiles and values to the thin
clients..................................................................90
Configuration in the UMS Console .................... 71
Configuration options ...................................... 142
Configuring profile settings ............................... 66
Configuring thin clients ...................................... 51
Connecting the UMS Console to the server ...... 18
Connecting to External Database Systems .15, 148
Context menu .................................................... 36
Copying a data source ....................................... 44
Create keys and values in the profile ................ 87
Create template keys and values....................... 83
Creating a Backup .............................................. 42
Creating a directory ........................................... 45
Creating a new view .......................................... 94
Creating a planned backup (Embedded DB) .... 118
Creating administrative tasks .......................... 117
Creating profiles ................................................ 63
Assigned objects .................................................35
Creating/editing a directory rule ....................... 48
Assigning a user profile.......................................71
Assigning an Update to a Thin Client ................112
D
Data Sources ...................................................... 43
Assignment .......................................................104
Database systems (DBMS) ............................... 145
Attributes of the IGEL UMS .................................. 8
Defining download source ............................... 160
Available rights .................................................134
Defining rules for stipulated directories ............ 48
B
Backup on the Command Line ............................42
Delet Logging Data........................................... 119
Backups ...............................................................41
Deleting a Backup .............................................. 42
Basic authorizations..........................................130
Deleting a directory ........................................... 47
Basic high availability solution..........................142
Deleting objects in the UMS / recycle bin ......... 38
Basic principles and requirements .....................54
Deleting profiles................................................. 69
C
Cache ................................................................121
Details .............................................................. 102
Carrying out actions..........................................161
Certificates..........................................................44
E
Edit ..................................................................... 29
Changing server settings ..................................110
E-mail settings ................................................. 123
Checking profiles ................................................68
Enabling master profiles .................................... 76
Delete Thin Clients ........................................... 119
Distributing UDC2 licenses................................. 58
163
IGEL Technology GmbH
IGEL Universal Management Suite v4
4.09.100
Enabling the partition .......................................159
Importing a console certificate ........................ 115
Establishing conditions .......................................48
Importing a directory ......................................... 46
Example of how to create a view .......................95
Importing a profile and firmware ...................... 65
Examples .............................................................49
Importing Active Directory users ..................... 125
Explanation of symbols.....................................126
Importing from a local source ......................... 111
Exporting a profile and firmware .......................65
Importing from the UMS WebDAV .................. 112
Exporting and importing profiles ........................65
Importing profiles with unknown firmware ...... 66
Exporting view results via e-mail ......................119
Importing thin clients ........................................ 22
External VNC viewer ...........................................54
Installation ......................................................... 11
Extras ..................................................................30
Installation requirements ...........................11, 145
F
Files ...................................................................107
Installation under LINUX .................................... 13
Filter for messages............................................139
Installing a simple high availability solution .... 145
Firmware licenses ...............................................58
Installing a UMS Server ...................................... 12
First server in the HA network..........................146
Installing individual HA network components. 147
First steps............................................................18
Installing Server Certificates ............................ 114
Formatting and meanings..................................... 6
Installing the UMS Console .............................. 145
Further servers .................................................146
L
Launching a VNC session ................................... 52
G
General administrator rights ............................131
Installation under Windows .............................. 12
License configuration....................................... 121
Global configuration .........................................117
License management ......................................... 58
H
HA Installation ..................................................144
Licensing .......................................................... 152
Help.....................................................................30
Lightweight Directory Access Protocol (LDAP) 162
High availability and load distribution ..............143
Linking an Active Directory ................................ 71
I
IGEL UMS components ......................................... 9
Licensing the High Availability Extension ........ 150
Linking an Active Directory / LDAP .................. 121
Log files and support ....................................... 140
IGEL UMS High Availability (HA) .......................142
Logging ............................................................. 123
IGEL Universal Customization Builder (UCB) ....150
Logging dialog window .................................... 137
IGEL Universal Management Suite ....................... 7
Logout and change of user ................................ 74
IGEL VNC Viewer .................................................52
Import results list..............................................127
M
Managing certificates ...................................... 114
Import with IGEL serial number .........................24
Managing thin clients ........................................ 45
Import with long format .....................................23
Master profiles .................................................. 76
Import with short format ...................................22
Menu bar ........................................................... 28
Important Information ......................................... 2
Messages ........................................................... 35
164
IGEL Technology GmbH
IGEL Universal Management Suite v4
4.09.100
Microsoft SQL Server .................................. 16, 148
Restoring a Backup ............................................ 42
Misc settings .....................................................124
Results.............................................................. 105
Moving thin clients .............................................47
S
Saving a certificate........................................... 114
N
Navigation tree (management tree)...................31
Saving the view results list................................. 98
New profile - options ..........................................64
Scan for Thin Clients .......................................... 20
O
Object-related access rights .............................132
Schedule .......................................................... 103
Optimizing the active Embedded DB ..................44
Search for objects in the UMS ........................... 36
Optional Extensions (HA and UCB) ...................141
Searching for and downloading updates ......... 111
Oracle ......................................................... 16, 148
Searching for thin clients in the network .......... 19
Order of priority for profiles ................... 62, 73, 77
Searching in the Active Directory .................... 127
Order of priority for settings ..............................61
Secure shadowing (VNC with SSL) ..................... 54
Other settings .....................................................40
Sending a View via E-mail .................................. 98
Overwriting sessions...........................................67
Server settings ................................................... 39
Own partition for thin clients with IGEL Linux..157
Setting a filter .................................................. 138
P
Parameters configurable in the user profile ......75
Setting a filter for categories ........................... 139
Partial update for IGEL thin clients with Windows
Embedded Standard .........................................152
Setting up a Data Source ................................... 43
Ports/time limits .................................................39
Setting up and using the feature ....................... 70
PostgreSQL.................................................. 16, 149
Setting up thin clients manually ........................ 26
Profiles ................................................................61
Shadow thin clients securely ............................. 56
Project functions ...................................... 154, 157
Shadowing (VNC) ............................................... 52
R
Refresh Caches .................................................119
Snapshotd - File sources .................................... 41
Registering a file on the UMS Server ................107
Status bar ........................................................... 35
Registering thin clients .......................................22
System ............................................................... 28
Registering thin clients automatically ................25
Registering thin clients manually .......................25
T
Template profiles ............................................... 81
Registering thin clients on the UMS Server ........19
The console window .......................................... 26
Remove Unused Firmware ...............................118
The content panel .............................................. 34
Removing a Certificate .....................................114
The IGEL UMS Administrator ............................. 38
Removing a file from a thin client ....................109
Thin clients ......................................................... 29
Removing assigned profiles from a thin client ...69
Thin Clients ........................................................ 45
Requirements ...................................................152
Tipp & Trick ........................................................ 43
Scheduled Jobs ................................................ 100
Setting a filter for events ................................. 138
Setting up a new task....................................... 100
Special case – structure tag ............................... 51
165
IGEL Technology GmbH
IGEL Universal Management Suite v4
4.09.100
Tool bar...............................................................31
What is new in 4.09.100? .....................................6
Transferring a file to a thin client .....................108
Working with the IGEL UMS .............................. 26
Transferring a file to the UMS Server ...............109
Transferring a file without assignment ............109
Transferring the customer's own partition ......159
Transferring the partial update ........................156
Typical areas of use .............................................. 7
U
UD Linux device-specific parameters .................75
UD W7 device-specific settings ..........................75
UDC2 test licenses ..............................................58
UMS Administration ...........................................34
UMS Administrator – the administration program
............................................................................10
UMS Console – the central control hub .............10
UMS network ....................................................116
UMS Server .......................................................117
UMS Server – the backend ................................... 9
UMS Server installation – including individual HA
network components .......................................145
Universal Firmware Update...................... 110, 121
Updating a UMS Installation ...............................13
Updating under LINUX ........................................15
Updating under WINDOWS ................................14
Upgrading licenses..............................................60
Use template keys in profiles .............................89
User login ............................................................73
User logs ...........................................................136
User profiles - IGEL Shared Workplace ...............69
Using a directory rule .........................................49
Using profiles ....................................................63
V
Value groups .......................................................91
Views ..................................................................94
VNC logging ........................................................57
W
Wake-on-LAN....................................................122
166
IGEL Technology GmbH
IGEL Universal Management Suite v4
4.09.100