1
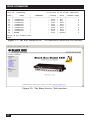
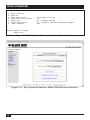
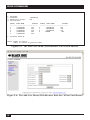
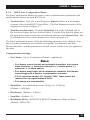
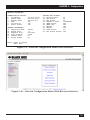
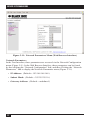
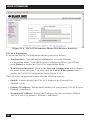
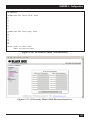
SECURE SITE MANAGERS
5.7.4.1. Adding IP Addresses to the Allow and Deny Lists
To add an IP Address to the Allow or Deny list, and begin configuring the IP Security
feature, proceed as follows.
Notes:
• Both the Allow and Deny list can include Linux operators, wild
cards, and net/mask pairs.
• In some cases, it is not necessary to enter all four “digits” of the
IP Address. For example, if you wish to allow access to all IP
addresses that begin with “192,” then you would only need to
enter “192.”
• The IP Security Configuration menu is only available when the
Supervisor Mode is active.
1.
2.
3.
64
Access the IP Security Configuration Menu.
a)
Web Browser Interface: Click on the Network Configuration link on
the left hand side of the screen. When the Network Configuration menu
appears, click on IP Security to display the screen shown in
Figure 5-17.
b)
Text Interface: Type /N [Enter] to display the Network Configuration
Menu. From the Network Configuration Menu, type 5 [Enter] to
display the screen shown in Figure 5-16.
Allow List: Enter the IP Address(es) for the clients that you wish to allow.
Note that if an IP Address is found in the Allow list, the client will be allowed
to connect, and the Secure Site Manager will not check the Deny list.
a)
Web Browser Interface: Click the cursor inside the first empty field in
the parameters menu, then key in the desired IP Address, operators, wild
cards, and/or net/mask pairs.
b)
Text Interface: Note the number for the first empty field in the Allow
list, then type that number at the command prompt, press [Enter], and
then follow the instructions in the resulting submenu.
Deny List: Enter the IP Address(es) for the clients that you wish to deny.
Note that if the client’s IP Address is not found in the Deny List, that client
will be allowed to connect. Use the same procedure for entering IP Addresses
described in Step 2 above.