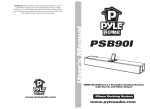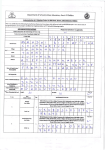
1
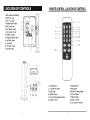
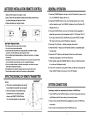
IMPORTANT: Pack carefully in original package if possible. We are not
responsible for damage incurred in returning items for repair, A letter
stating your exact street addres,daytirne phone number,and the problem
you are experiencing should be included. You must also enclose a copy
of the original receipt a sproaf of date of purchase
PHITB4BK
iPodliPltone 2.. f TolIVer Docking
Speaker SySftetll IIVifII FM Radio
_.pyl_udlo.coftl
iPhone Docking Syste.n
MnIVIN'·pv'eaudio.cont
IMPORTANT SAFETY INSTRUCTIONS
Ct.IITD: TO ItHIUCIi THIi _
A
_
_.
A ......_..
OF ~ IIIOCK, DO IIOT
....... - - .
'E*MiCOYERICRBACIQ.IIIOUIER~
MRn IIIIM. ItfRItISMCllCl Ttl QUAI.JFD
__
.---_
. . . . __. ___._
...---. _f>f_
....
. ... ..A --------.. _.,.._ ........- . .... . -------.
_ _ _ r _ ) ' _ _ " _u .....,.
USE UNDERSUPERVlllON OF ANADULTDUE TO LONG COftD
ThII un.... I long N; cotd or oCher long cord ItIat CMI _Iy be IrWId on or pulled on, CIUIIng In)Lry, PIlat .......
It IIIft'IIIgId 10 I; wi nat chpI 0'l'Il' llIbiIIop,I6t. WhIIII CIn be puIId on by chIdnn or trIpptd O¥II' 1CC1denIIIy.
..... .,.;",tllo,!Mit, lit _to ....... optratin,
FCC NO'TlC€;
T"l'M *lUiprMnI 11M ~ -..d and found to ~
wIII'1l1w ..... !Dr. CIIM B dlgltll.....,.. P!nI*II h
part 15 at ..... FCC RuIM. n-. hllllfWdo.Ig.-.dkl
pnMdoo ~w praItdIon . . . hanrIuI
~~ ~ • .......,11111 ......1IIIn. ThII_iprMnI
~ ..... .-.d",",""'IIII11do~....gy
ancI,1f1'lCll NlllllIodencl UMd In ~wIIII1he
ntNc!kJna.mey _
,.".,.1~ II> r.dlo
.............
~.1Iww . no~l8ehl~ "' not
OIDJ. In I ~"r lnIIBI"b>.If'" ~doM
_
~I "' ~ '" rIIdID arWoWllan
-_:
...-p1jon. ...nIch CII'I be; ~ ~ "mk'lg lIMo
~ aIf and on,IM . - IIINICCIUfIIgIId ., ay to
<XIIT&t IIw I.......... by ..... or ....... of 1M IoIIDrImg
-.
"'-enot:etlud"-_ .......
.....:I....,..
haw thoI
10 1M
.......
1.Read~i~
""
__ ...-
pll'tain toJOU' .. nit. For .......
capM.;llly
mnn.a.l to an
tIM uMt. IN)' tICII
........
- , .............. _
2. _
.:.ptt-Indrudlon
• _ 110_". _ _
J........
. ... ..
. . -....:=...
~
-"""w _ _ I00_ ...
__
... _ _ _ bo_
4. ....
Follow
IIInIttIlCdoM
__
._
....... __... __ _
-""'-. .
----_ _-._-_.
_ ..
_ _ ... _
.... _
S. Do
Do....notu.tflls~._WlIIer
~
.... _
_ _ _ " . . . , . . 110 ..... _ . __ . - . . . .....
• A8aIIorltor ........ 1Iw ~.m.ma.
.1~1Iw~ ~
--- ---.-I~~.
~Iions
lhoI_iprMnIMd
• CcnnKIlhI ~ r.tc .. ouIIoI on • d~
dII'wwrt ""'" IIwt II> wIti\ 1M ~ 110 <D\-=t.d.
• c.",. . the _
II" an .,.~ ,.!I"fT\'
Id"..... bMlp.
.
.. a.n..only
with
doth _
_
_drY
............
~
...... oo ... _ .... _
....... .,-_
, . Do not block...,. weIItI'-IIon OI*'lnp. r!Odd In
~ wltfI the mIIIIufiIctww'.1rmrudIoIII.
_"'-*'Io"' ...
_ond lll ... _
---_
.. .....
.. _ _ . . - ..
-~-- .......
FCC NOTICE:
To ....... CCllIIrMd~. I'oIcw 1M 8IIactIId
i'I:AiIldon NNctIonIIII'Id 11M ot'ti Ihleldld cabIM
~ ccmec:Iing 11:1 odw ~ MocUl'cdoM not
8UIhaiDd by tINo I!I8I1UIKturw rrtfIi voiCI ~ UhorIIy
to opetW INs deYIee.
..... ...
=:::!"~O.:::""_·=::.,.,=
.
_.. _ _ _ _ 10_ ..... . . . . _
...
..,he.t ___ ..ct. .. rwliItorw,
L Do not . . . . _
' - t ,....., no-. ot other appr.tJItIII (indudilll
ampliflerll thatptOd_hat.
t . Do notllWut tha ufIly ~o(tM poIIriull or
poundlrrc-lJlN
A poIMHd plu, hu _ IIIIdM
witt. _ wid. th.n 1M at .... ....... ndint:.".. ply.
hal _ Wadas ...... third ~III JI"OnI. the...,
w..H ot thethlrd pronr ... prwIdoId fiIr)'aUf.....,.
iftha.....,..;.l.d pi ......... not fit IrIID JOUr out.t, ........
... ~iub~Gf.ot.oIn. ......
10. ~ tha pc!'MI' cord fiorn
_IUd on ot plncMd
pi.,..
bel.,.
""""".ndIM
pail'll when tho:IJ ..it fnIm 1M ~.
~atplup,m..- _ _
11, Only _
atiadlrlWU/ace"sow.,-tW b)-
tl. ".."uf.d&.w.
1
:zo. Service
Do not IltItmpt 10 service this product yourselhs
oper1 lnS or remOYInscown ma, apose rou 10
d.nKCfOl's voltage or other huanll. Refer all servicing
10 qualm,d ...Mce ~nnel,
21. RtpI--a p..t:l
When "'Placement p;lrts..., required, be ... .., the servia
11. UnpI..-thio:....,.w. durlnl U....I.. ftorrnI or ....
unuMd b .... 1*iDU "'time.
teciI~lcian 1I!1eS replacement p.rts specified t, the
mlnufacturer Or those that hive the same ch.arlcleriI1h:s
IS the ori&!nll part, Unauthorized substitutions may molt
in fire or ,Iectrlc ~ or other huards,
14. R.r.a1I.,..;a .... to ~ ....... person .....
'*
s-ki.... ~1Iired ...... the ~ hu """
dam. In AII)'~, aid! u ......,...,ppl)' mnI or
1. Main Body
5. Speaker Net
6. 7. Remote Sensor
8. Loud Speakers
2.....
3, Washer
4. Saew
9. _
n...., ....
....., ia"mopt, liquid h.. ' - ' opa.d ... ~
Upon complll'llon of.ny serriee or repairs 10 this product
IIkthe ... ",ice Iadoniciln to ~rform safety checb to
dWllmlne that thot productlsln proptH' operlting conditi<m
"-"'-'Into ttM ~u .. tlM"P~'" tr..n
..,..ed to .... or mMturedoa not operate nonnoi"
or h.. ' - ' chpp.d.
15. Power :soTh. f>l"'du<;llhould bI! oper,ted only from tt.. t)'P- of
power SOI,UU Indlaoled on the mlrldng label , If)'OU Ire
not lure of the type of powet IUF'P1y lO)'OUr homr.
conlultyour I pplilnce dnler or local power com""..,.
for products Intettded toopMllII ffom btttef)'~,
or othersouras, ~to the operatln. lnltructlonl,
21. Wd or ceIng ITlCUItIIY<iJ
The p!OdUd.nou1d be rTlOI.A1ted to. wall orcellng on~
u recomrneori9d by the lM/lulactlW8l',
M,Damap ....... I..........
Unpl\l(the product from the Will oudet Ind mer
wrvldn,to quallfi,ect terYIc:e ~sonnel IInderthe
followinC c:ondftio>m;
.. 'llhen the powe,..,lIpplyCOrd or plu, II d,mlged,
b. IfllGuld hn been spilled orobJ«t1 hive fillen Into the
16. Power " _
An outside Inlennl ')'IIem lhould not be localed In
the Yldnlty of ovo:mead power lines Or otI1er eIectrk:
Iisht or powet circuit:l, or when! It an f..llrrta suet.
po-< lines Or cil'aJitl, When Instilling an outside
utennl system, mrane are should bI! tHen m keep
fn;lm w..chinC such power lines or circuits n contact
witt. them misht be fatal,
prod~ct,
8
c , Ifthe produa II.. bnn apoud 10 rain orwallll'.
d. If the produc.1 does no! operate normall)' by following tile
open.ti"gl"1tTUctlonl,
Adjusl only tIlole controll that a.., CCI'tered t, 1M
operati"l Instrudions, u an adjuslmllflt ofother
controls may mult In damage and will requl..,
exlenslYe won by a qualified lechnldan to l'HIo.., the
proc!lIc.1 to ItI ......",.1"I"'rltion.
. ' Ifth. product hul>-tn dropped or thotubin.r. h., been
damapd ,
f. When the product O!Id!lbltl, dl.tinct. chanlC' In
pe<forllllnat - thlslncllatu, need for ... rYk:e,
11. o-to.dinl
Do notoverload Will outlets Ind enenslOf1 cord. II this
an result In I risk or fi", o,mect,ic:lhock.
1•• 0btId ,lid liquid trrIrJ
New' pUlh objects ofl.., kind Into 1M proc:I~ throuCh
as thl)' """Y touch cbnC.roul voltaIC' points or short out
pam thlt could multln fi", or electric Ihock.
N~ Iplll or IpraYlny I)'~ ofllquld on the product.
15. N*lO CAn 1ysIMI1nNIJ.
This reminder i$ proyided to <:all the CATV $)'Stem
Instlllle< 's atlefltlon to ArtIcle 820-40 of the NEC that
provides ",icIeI11MS for pt'OperClOundingatld, In
p.rticular. lpecifiel that the cable ground Ih.1I be
connected 10 the g_tldinl systllm of the b"lIdlng. IS
dose to the point of able entry IS practic:aJ.
1'. OutDoor amtnlll cro......
If.n outside IRUnna II
connected 10 the product,
IN .ure Ih. arrtenna
system I•• rounded so II
to p<CI'Iide some protKtion
N...,
11.lnstvo!tale suraes ,lid
built up stalk charse-,
Sc!ctlon 110 of the National
Electrical Code, ANSI/NFPA 70, provides informanor.
\IIIth I'IIspeeI to plOpl!'t FOundlnl of the mast 1M
supporting structu.." groundln, of the lud·ln wi.., 10 In
antennl di5Ci1lrp prodlld, l iD! of croundinc conduclor'$,
Ioation of antenna dilchar.. produd:, conneetion 10
groulldinC e leclrodes and ..,qulrements for the ""unding
-
INSTALLATION
..
2
Refet .. seMct!gto qudfIed servia! pMOf1nei, SerYk.ing
Is req'*'ed when the unit has been d~ any way suet!
IS the foUowin(: the power-sllpply cord 01 plllg has beetl
damaged, liquid /las been $pled Into the ..,It, 1M unit has
been expo5ed to rain o r molnure, the u nIt l1u been
'*opped 01' the unit does not operate normdy,
5
9 - []
_..... __ Flg. 1
2 '--~
3 ·--·····_-
4 ---"A
I
A
1). ~ 1M'MlOden base to the mai'I body by the It4lPitd _ _ and w.hers _the Fig, 1 aboo.w.
2). The speaker net carl be taken out and raauembied _ kI fig. 2 above.
3
LOCATION OF CONTROLS
1. ANT (Antenna for FM Radio)
2 . VIDEO OUT Jack
3. AUX 1 Input Jacks
4. POWER ONJOFF Switch
5. AUX 2 (Input) Jack
6. VOL (Volume)· Button
7. VOL (Volume) + Button
'.
2
,
1
3
5
3 '
6
0
2
8. STANDBY Indicator
9. CI Standby ON/OFF Button
,i
10. t+4 (TUNE· Button
12. Hot (TUNE + Button
,j
13. SOURCE Button
i
11 .
8
10
;0
0
~I /C Butlon
•
13 · .
•
[[ I)
~
I
"
CJ
.'
····· 5
Nd:
........- _.... ····· 1
--- IJ
OOOC?9
;
, .:I- a, ,
'T"
!
I',
"'f"
•
I
10 11
!
"
2 . .. / . (CH+/CH-) Button
7. RANDOM Button
8. MENU BuHon
3, MUTE Button
9. REPEAT/5T (5'0<90) Buttoo
4. I+VTlJNE - Button
10. SOURCE Button
11 . C3'Enter Button
12. BASS +f- Buttons
1. STANDBY Button
5. HII M (Play/Pause/Memory) Button
6. HlflTUNE + Button
13. VOL (Volume) +1- Buttons
4
5
GENERAL OPERATION
1. Press the POWER Switch on the rear of unit to ON position to power on the
1. SIde and 11ft the battery door as figure 1 beIOYI.
2. 1ns12l1 2 (two) AAA size batteries ~nduded) inID Ihe balte!y compartment as
the polarity markings inside as figure 2 beIow".
3. Replace Ihe battery door as lIgure 3 below.
2. Press the STANDBY Button on the unit or Remote Control to tum on the
unit from standby mode. The STANDBY Indicator will tum off but the LCD
Display will tum on.
rna
t al~:: 4
1
unit. The STANDBY Indicator will tum on .
3. Press the SOURCE Button on the unit or Remote Control repeatedly to
select the input source as the connections to AUX 1 (LCD shows -AUX1 -);
AUX 2 (LCD shows -AUX2-); iPodllPhone (LCD shows - IPOD-) or Radio
3
2
FM mode (LCD shows current FM station's frequency).
BATTERY PRI!CAUTION8:
4. Press the VOL (Volume) +1- Buttons to adjust volume level.
Folow U - prac:aLJlons v.t1en uatng a battary In tta device:
5. Press the BASS +/- Buttons on the Remote Control to increase/decrease
1. Use orYojthe stze and t)JIeof battery spacWIed.
2. Be 81ft to fuIowthaaxT9Cl.pdarity when Instaling 1ha batWf as Indk::atad n 1ha bat*y
the bass level.
compettrnenl A rever.Id battery may cause damage to the device.
3. Do not rrix dift'ertInt types of batI:eries klg8Iher (e.g. AikaliM and C8rb0n-mc) orold baUariea
with hsh ones.
... If the betIeriae In the deYIce are CCII'III.ITIIII or the deYIce 18 not to be U88d for along period of1J'ne,
rsrnave1ha batEries to prevent damage or IrfJry from ~ battery leakage.
5. Do not try Ie I'IIdJarRa the batiary not Intandad to be 11IdlargIId; It CII'1 a.wheat and~.
(FoIow battery marw.sfac:b.rets nstruc:tions.)
6. The batteria88ha1 not be ~ to 8XOfI68ive heat IIUdl as sunahln8, I'northe Ike.
7. Clean !he battery contacts and abo those aliha device prior 'c battery i'tstaIation
:~~~~~~~~~::
NOTES:
• When there is an obstacle between the unit and
the transmitter, the transrnilter may not operate.
• VVhen direct sunlght, an Incandescent lamp,
fluorescent lamp or any other strong Ight
....
temporary, press again to tum the sound back on.
7. When finished, press the STANDBY Button on the unit or Remote Control
to tum the unit off (standby mode).
8. If the unit is not used for a long period of time , tum off the unit by press the
Power ON/OFF Switch on the rear of unit to OFF posltJon.
SYSTEM CONNECTIONS
Ustenlng to music from external audio device or IPodIiPhone:
1. Plug the iPodJiPhone to 1he iPocViPhone dockilg. Or, Connect the external aucio device such
stines on the REMOTE SENSOR of the
8S MP3 P\ay9r1D the AUX 2 Jack ontne1Dpafunitas the flQulliI below.
unit. the remote operation may be unstabkJ.
2. Po\Nar on the unit, press the SOURCE Button rapea1ady to set to AUX 2 or iPodl'lPhona as
30"
6
6. Press the MUTE Button on the Remote Control to tum off the sound
30'
I
the connection.
3. Play the mU&lc n the connected audio device or IPod/iPhone 88 usual.
7
(Connection cables not induded)
Audio Out Jacks
on the"IV/[IVOI !-~
€)@
~~
0
DVD
-.....--r. ... _
To Usten to music from TV;DVD Player; VCR or DVR.
OUiIII.N Owl
1. Conned the ex1Bma1 TVIDVDNCRlDVR to '!he AUX 1 Jack on the nI8I'" of unit
as the figure above (connadlon cable not inckJded).
2. Ptwer on the connected external device and play videoImusic as usual.
3. Ptweron the unit, press the SOURCE ButIDn repealBdiy lI'1til AUX 1 Indicator is &ght
To watch video files In the connected IPodIlPhone:
1. Conned the axtarnal TVID the VIdeo out Jack on the rear of lI'1lt as theftgLn
below (connection cable not Ilduded).
2. Set the TV 10 AV 1 or AV 2 modes as connection.
3. PkIg the IPoc!JIPhone to the IPOO'IPhone docking on the top ~ unit.
4. Press the 8OU1'C8 button repeatedly until - IPOD- appear on the display.
5. Play the video lies In the connected IPodliPhone as llSIJ8I (Make 8lF9 it Is set to
TV out Forcle1alls, please refartothe IPotVPhone's User's Manual).
LISTEN TO IPOD/IPHONE
1. VVhen iPod or iPhone is ronnected, it will rectnuge automatically.
2. Power on the unit as specified previously, press the SOURCE Button on
the unit or Remote Control repeatedly until - IPOD- appear on the display.
The unit will start playback automatically.
3. During playback the musiclvideo files from iPod or iPhone:
To Video
TV
A. Press the Skip/Fasl Searoh ... or '" Buttons repeatedly to skip the tracks
forwa_.
B. Press and hokI the Skl(:WFast Seardll+lort+l to fast search the specific section
of the I1ack forwardibackwanJ.
C. Press the REPEAT Button on the Remote Control 10 set repeat modes.oorrasponding
icons will appear on the connected IPodIiPhone s display.
(Connection cable not included)
D. Press the RANDOM Button on the Remote Control to hlm the random playback mode
"
8
.
on or off • correspondng icons will appear on the connected iPodIiPhone s cIspIay.
E. Press the MENU Button on the Remote Control, the setting menu will appear on the
9
c:omeded IPodIlPhone's display. Using the Direction ... ''9'; SWpIFast
Search"',toMButions to rnovethe cursor within the disP'aY, press
the ENTER Button to confinn the selections.
TROUBLESHOOTING GUIDE
Check t/Je following befonl roquatlng servtce
SYMPTOM
No_
LISTEN TO FM RADIO
POSSIBLE SOWTION
Plug It to 1he waI cuIIet
POWER S>Mtd1 r. OFF
Pross 1he POWER Switch on
the mar of unit ID ON position
.........
"""'"
The r i in standby mode
(STANDBY Indicator is Itt)
Extend the FM antenna wire on the rear of the unit and adjust it to get the
best reception.
1) Power ON the unit as previously indicated.
POSSIBLE CAUSE
AC Pklg not pkJgged into
No ......
..-,
Prau the STANDBY Button on !he
unit or Remota Con1roI '0 tum on b
r i fi'om standby mode. The
STANDBY Indicator will tum off and
the Display will tum ON.
2) Press the SOURCE button on the unIt or remote control repeatedly until
FM frequency appears on the display.
The connected dIMce Ia not FI
Raise volme level by pressing
the VOl (Volumo) + BU:ton
Play the mJSicImcMe in !he
3) Press toM or 1+1 button on remote control repeatedly to search the specific
radIo station. (Or, press and hokJ the ... or ~ button 1 second then
Sound output c:lthe connected
Raise
the volume
laval of1he
oomeded
_
Input 9OI..I'Ut nc::onec:t
Set the ~ 800rce to AlJX' AUX 2,
-""""
_
release the button. The unit will auto search the next or previous available
radio station then stop).
4) To store the current received radio station into the memory. Press the ~IIM
.xx
Sound distofticn
station into the selected chan~ (Total 20 FM stations can be preset into
the memory).
C
Button on the unit repeatedly to the desired channel.
Control or the
6) Press the REPEATIST Button on the remote control repeatedly to set
the radio to stereo or mono mode. STEREO or MONO will appear on the
display.
....k
Vok.me level 100 hig\
Reduce the wlume lew! by pressing
1he VOL (Volume) - Button
Base level kIO hig\
Reduce the bass laval by prasalng
the BASS - Button
Vok.me level of hi connocted
Recb::e the volume level of
the COl lleC:ted device
dBYIce too h~
No _ _ _
EQ of the mnneded deW:e was Set h EQ of 1he COl. e::ted
set '0 super bass or others mode ...." IX> """'"'
The connected IPodI1Phone
Set 1he 0011 e::ted
Is not set to TV Out mode
PodAPhone '0 TV OUT Mode
(For detais, please refer to the
iPodllPhone's U_s Manuaij
Pt*1t hi remote IXlr'btlI to the
remota sensor on 1he unit within
"""""''''''
functicr'ling
16 feet ,+/- 30 dog'ee
The batteries in the remote
corb'oI are consumed.
Repace
with nf10N batiaie6
Extend the FM antenna wire on the
rear of the unit and adjust It to gat
bett9r reception.
Radio recepUon
"""k
10
comoded_
PodIIPhone or Radio as the
corresponding to connected device
button on the Remote Control, CH
will appear on the display. Press the
CH+/CH· Buttons on the Remote Control repeatedly to select channel
number as desire. Press the M button again to store the current radio
5) To listen the preset channels, press the CH+/CH- buttons on the Remote
Volume In millrn.Jm position
11
GENERAL SPECIFICATIONS
Power Source of Remote Control: ......De
=-=-= 3V, 2 x A/lA size batteries (Induded)
Power Consumption: ..... ...... .. ...... ...... ...... .... .. ..... ....... ..................... .. . SOW
Radio Coverage .. ... .. ... ... ... ......... ... ... .... .. ...... .... .. ... . FM 87.5 -108 .0 MHz
Impedance of Speakers:
Woofer .. , .. .... ".............. ....... .... .. .......... ........ .. .... a Ohm, 30 W
Loud speakers .... ............................................ 4 Ohm, 10 W x 2
Tweeter .... .... . ... ....... ....................... .. ..... ... ....... 8 Ohm, 5 W x 2
Accessories:
1 x Instruction Manual
1 x Remote Control
2 x "AM- size batteries for remote oontrol
1 x Stereo audio connection cable with 3.5mm stereo plug
1x 3RCN3RCA Coble
1 x Wooden Base
4 x Assembly Screws I Washers