1
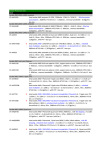
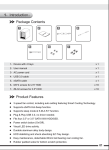
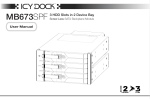
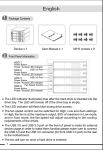
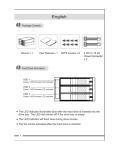
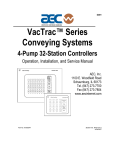
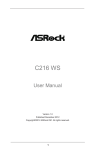
English
1 Package Contents
Device
USB 2.0 Cable
User manual
Power adapter
FireWire 800 Cable
(IEEE1394.B)
Power cord
eSATA cable
2 Front View of the Device
A
Drive eject button
B
LED indicator
C Front door panel
D Aluminum Shell
E
Support pad
1
English
3 Back View of the Device
RAID SETTING
JBOD
VTC4/1
ED!6W
pvupvu
BIG
RAID0
RAID1
RAID0
RAID1
JBOD BIG
JBOD BIG
RAID 0
FAST
RAID 1
SAFE
fTBUB
eSATA Cable
RAID0
RAID1
RAID0
RAID1
JBOD BIG
JBOD BIG
USB 2.0 Cable
Fan speed Control
jo pqujdbm
bvejp pvu
FireWire
Cable
RESET
Reset button
RAID0
RAID1
JBOD
Safety key lock
2
BIG
RAID selection dial
RAID Setting
Power switch
3
Power port
1RWH Always ensure that there is enough airflow around the enclosure for best
performance.
4 Drive Installation
1.Press the button located on top
of the unit to open the front
panel.
2.The front door panel will pop
open and eject partially.
2
English
3.Please check the positioning of
the 7 & 15 Pin SATA connectors
inside the drive bay before
inserting a 3.5" SATA hard drive.
4.Insert the hard drive in the
correct position, and then close
the front panel.
SATA 7 &15 PIN
connector
5.Push to close the front panel,
a "click" sound will be heard
once the front panel is secure.
6.Connect the power adapter to
the unit and plug the desired
interface cable into the
enclosure and into your PC or
Mac. (Check section 3 for more
interface information)
VTC4/1
ED! 6W
pvupvu
fTBUB
jo pqujdbm
bvejp pvu
2
3
Caution: The enclosure will automatically erase any existing data when the
enclosure is set to any RAID mode with the exception of JBOD
mode. (Check section 7 for detailed RAID information, and section
8 on changing the RAID mode)
3
English
5 Setting Up The MB662USEB-2S-1
1. Select the preferable RAID mode by using the RAID dial located on the back of
the enclosure. The default setting is JBOD (See Independent drives).
2. Select the preferable interface and plug the interface cable to the unit and PC or
Mac (Check the section 3 for detail information).
3. Connect the power adapter to the enclosure, turn on the unit then press and hold
the "RESET" button for 1-2 seconds. The PC or Mac should recognize the
enclosure now, and lastly format (PC) or erase (Mac) the new volume in your
system in order to use the drive.
Note 1: A port multiplier card / chipset is required on the host end in order to use
JBOD function via the eSATA connection.
Note 2: An eSATA card is required for Mac users due to the lack of the interface not
present in Macintosh computers.
Note 3: a. When connecting all the interfaces concurrently, the enclosure will use
USB as the primary interface.
b. When connecting both eSATA and FireWire interfaces at the same time
then enclosure will use the eSATA as the primary interface.
6 LED Status Indicators
RAID Status
LED Indicators
HDD access
Flashing white LED
Empty bay
Solid red LED
HDD Fail
Flashing red LED
Rebuilding Verifying
Solid white LED
RAID setup confirmation
Flashing white LED then turn off
4
English
7 About RAID Mode
JBOD
RAID0
RAID1
JBOD BIG
JBOD(Non-Raid): The two physical disks are read as two independent hard drives in
a single housing, so that two logical volumes mount on the desktop. Therefore, the
computer will show two separate drives.
For the eSATA interface, a port-multiplier is required to access multiple volumes. Without
a port-multiplier you will only have access to a single volume.
BIG
RAID0
RAID1
JBOD BIG
BIG(Concatenation): When disks are concatenated, their capacities are combined and
data is written to the primary disk in the array until is it full, and then to the successive
disks. Concatenation provides no performance advantage or added measure of data
safety. It is simply a method of combining more than one physical disk into one volume
for greater overall capacity.
1RWH
It is possible to lose all the data if one of the drive failed. We recommend RAID 1
for better data security.
RAID 0
RAID1
RAID0
JBOD BIG
Raid 0(Fast): The two physical drives are stripped together so that one larger logical
volume mounts on the desktop, offering the maximum possible capacity with greater
transfer speed. It is recommend to use identical drives for RAID 0. When in use
with different capacity drives, the total capacity will be twice of the "smaller" of the
two drives.
Note: If either drive fails, the data on both disks will become inaccessible. Users who
want to have a higher level of security should use RAID 1.
5
English
RAID 1
RAID0
RAID1
JBOD BIG
RAID 1(Safe): The two physical drives are “mirrored” so that one
single logical volume mounts on the desktop. All of the data on one
drive will be recoverable from the other drive. It is recommend to use
identical drives for RAID 1. When in use with different capacity drives,
the total capacity will be of the smaller of the two drives.
HDD 2
(Default target drive)
HDD 1
(Default source drive)
1. While setting up RAID 1, the hard drive will recognize HDD 1 as the source drive,
HDD 2 as the target drive. If one of the hard drives was to malfunction, simply
remove the malfunctioning hard drive and insert a new identical hard drive (while the
enclosures power is on). The new drive inserted will become the target drive. The
remaining working hard drive will become the source drive.
2. RAID 1 is not suggested for hard drive duplication, please do not switch the drive
order in any RAID mode. It is recommended to use two identical hard drives to ensure
stability and performance. Removing or changing any hard drive in RAID 1 while in
operation may result in data loss.
3. Do not replace both drives in any RAID mode, as both drives will cause the enclosure
to rewrite the RAID table. Once this done, the original drives will no longer function in
RAID 1 array.
4. It is required to verify the HDD in RAID 1 mode. The verification process may vary
depending on the hard drive’s specifications. It usually takes about an hour to verify
a 100GB capacity.
5. While replacing a malfunctioning hard drive in RAID 1 mode, check the error indicator
light to see which drive has failed and remove the drive from the enclosure. Then
insert a new identical hard drive while the enclosure power is on, close the front door
panel and the error indicator will disappear in a few seconds. After this is done, the
enclosure will then start the rebuilding process.
6
English
8 Changing the RAID Mode
Changing the RAID mode with the device power off (recommended):
1. If you are currently using the enclosure, safety remove the device in Windows or
OSX and turn off the units power. Changing the RAID mode will erase the data in
the drives, please back up the data first.
2. Select the preferable RAID mode by using the RAID dial located on the back of the
enclosure.
3. Turn on the enclosure.
4. Format (PC) or erase (Mac) the new volume in your system.
Changing the RAID mode with the power on:
1. For USB & eSATA interfaces:
a. Select the preferable RAID mode by using the RAID dial selector located on the
back of the enclosure
b. Press and hold the RESET button for 1-2 seconds then release. The LED will
start to flash then turn off, indicating the completion of the RAID setup.
c. Format (PC) or Erase (Mac) the new volume in your system.
See below for an example for on changing the RAID mode from RAID 0 to RAID 1
for USB/eSATA interface:
Reset
RAID0
Complete
RAID1
2. For FireWire interface:
a. Switch RAID mode to JBOD mode (Steps a & b may be skipped if you are
currently in JBOD mode).
b. Press the RESET button for 1-2 seconds then release. The LED will start to flash
then turn off, indicating the completion of the RAID setup.
c. Switch to the preferable RAID mode.
d. Press the RESET button again.
e. Format (PC) or Erase (Mac) the new volume in your system.
See below for an example on changing the RAID mode from RAID 0 to RAID 1 for
FireWire interface:
Reset
RAID0
Reset
Complete
RAID1
JBOD
7
English
9 Important Info
1. WD (Western Digital) Desktop hard drives do not support RAID modes. Only
enterprise-type hard drives (Enterprise edition) can operate in RAID mode, for
more details please refer to WD’s official website.
2. Windows XP 32bit can only support up to 2TB. Keep in mind that if you are using
RAID modes with hard drives that exceed 2TB in Windows XP 32bit or any other
OS that doesn't support GPT format, the device will not function properly.
3. If there is existing data in the hard drive, please back up any data before using any
RAID modes. Once the RAID mode is set or changed, all data will be erased and
can not be restored.
4. It is recommended to use brand new hard drives for any RAID array, if you are using
any previously used hard drives that had been used in RAID before, you must first
remove any data and restore the hard drive to factory settings in order to
prevent any RAID mode failure.
5. When using a previously used hard drive for RAID, we recommend formatting the
hard drive first.
6. This enclosure supports S.M.A.R.T functionality and sleep mode.
Caution:
! Changing RAID settings will erase data on the hard drive and cannot be
restored. If there's exist data in the hard drive, please back up the data first
then setup the RAID.
For more product information, please visit http://www.icydock.com
8