1
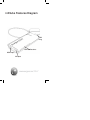
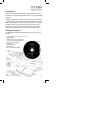
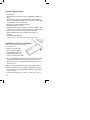
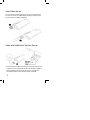
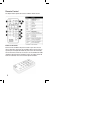
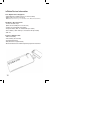
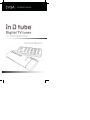
In The Digital Tube
Owners Manual
inDtube Features Diagram
USB
Plug
Remote Receiver
MCX Input
AV-Input
www.evga.com / 24-7
Introduction
Thank you for purchasing EVGA’s inDtube, a USB multimedia device that
will allow you to experience high quality television on your personal desktop
or laptop.
In addition to allowing you to watch and record television and cablebroadcasts through the bundled software, inDtube will also allow you to capture
video and audio from external sources provided the device has a standard
RCA video, S-Video, and 3.5mm stereo audio input. This feature alone
allows most users to transfer many of their older video to (into) a digital
format that is both durable and easy to share with family and friends.
Package Contents
Your EVGA inDtube will have the following optional items included in this
package:
• Compact Remote Control (CR2025 3V Battery Included)
• AV-Input Adapter
• Installation CD for Drivers and Software
• Portable Telescopic High-Gain Antenna
• F-Connector to MCX Adapter
• Carrying Strap
• USB Extension Cable
• Neoprene Case
• This Printed Installation Manual
Installation CD
Compact
Remote Control
The
EVGA InDtube
Carrying Strap
Portable Antenna
AV-Input Adapter
F-Connector to
MCX Acapter
USB
Extension Cable
Neoprene Case
1
System Requirements
• A USB 2.0 Port
• An Intel Pentium 4 at 2.6 GHz or higher or an AMD Athlon 64 3000+ or
higher
• For Windows XP a minimum of 256 MB of RAM is needed. 512 MB or
more is recommended. For Windows Vista a minimum of 512 MB of RAM
is needed. 1GB or more is recommended
• A Display with a minimum 1024x768 resolution
• Windows Media Player 9 or above
• 200 MB of hard drive storage needed for the software installation. 1GB
of free disk space is needed for running the time-shift recording function.
• A DirectX 9 or above graphics card with a minimum of 64 MB
• DirectX-compatible sound card is needed for audio playback or
recording
• A Standard CD/DVD-ROM Drive
Please consult your computer’s manufacturer for system specifications
Hardware and Driver Installation
Please do not insert driver CD prior to inDtube’s
connection with your PC.
1. Power your computer on and
allow it to boot in to Windows.
Once in Windows connect the
EVGA inDtube hardware to your
Laptop’s or Desktop’s USB 2.0 Port.
2. Once connected Windows will detect that new hardware has been added
and the Hardware Wizard dialogue box will come up on to the screen.
Click Cancel and close it. If the Hardware Wizard box does not appear,
continue to step 3.
3. Now you need to install inDtube’s Driver Software. To do this place the
inDtube Installation CD in to your computer’s CD-ROM Drive and allow
for it to load. Once it has finished loading, the inDtube Installation Menu
should now appear.
If inDtube’s Installation Menu does not appear see the FAQ section on page. 9
2
4a. Click on “Install inDtube® Drivers” to begin the
driver installation process.
4b. Clicking on “Install inDtube® Applications”
will install the provided TV tuner software.
5. After clicking next the installation process begins.
Files from the Driver and Software CD are now being installed on to
your computer.
3
6. The hardware and software installation is now complete.
You can now select Finish to exit the installation program.
Your EVGA inDtube is now installed and ready to be used.
You should now see a small EVGA icon in the bottom right hand
corner located in the Windows System Tray.
Connecting the antenna
for digital or analog use
InDtube can accept either the portable antenna
supplied in the box or a roof top based antenna.
300 ohm - 75 ohm TV Balun
supported. (not included)
4
To use this feature, connect your antenna’s MCX output to inDtube’s MCX
input. If your antenna of choice has a coax output with an F-Connector at
the end of it, use the F-Connector to MCX Adapter (included).
This will allow the F-Connector to plug into the MCX input.
For the best results in obtaining a digital signal, use a roof top antenna that
is adjusted and configured properly. Double-shielded coaxial cables and a
digitally-enabled antenna amplifier are recommended to achieve the best
results.
To properly use the provided telescopic antenna, collapse or extend it until
the desired picture is achieved. Be sure the antenna is positioned fully
upright. Place the antenna near a window and at a high location for best
results. You can also attach the end of the antenna to a magnetic surface
which may improve overall signal. Do not attach to or around your
computer’s case as this may cause irreversible damage to its internal
components.
Avoid placing the provided antenna near a Cathode Ray Tube (CRT) monitor
or TV as such devices may degrade the signal quality.
Important Notice: Good reception depends on your surroundings and location. Loss of or highly degraded signal can occur if steel walls and towering
buildings surround your area. Trying to obtain a signal while in a moving
vehicle is usually unachievable and not possible.
5
Coax Cable Set-up
Your coax cable line will most likely have an F-Connector attached to the
end. Use the F-Connector to MCX Adapter (included) to properly connect
your coax cable line to inDtube’s MCX input.
Cable and Satellite Set-Top Box Set-up
1.Connect the AV-input adapter (included) into the input located on the rear
of inDtube next to the gold platted MCX input. The AV-input on inDtube is
notched and will only fit one way. Do not force in as this may cause
irreversible damage to both the AV-input adapter and inDtube.
6
2. Follow instructions A or B depending on which video connection you
want to use:
A - If your cable or satellite box has an available Video RCA
output, attach it to the AV-input adapter’s Video RCA input.
B - If your cable or satellite box has an available S-Video output,
attach it to the AV-input adapter’s S-Video input. Using this
configuration will result in the best image quality.
3. Connect the audio output of your
cable or satellite box to the 3.5mm
stereo input located on the
AV-input adapter.
RCA Audio Y-Adapter
Note: If your cable or satellite box
does not have a 3.5mm stereo output,
then an RCA Y-Adapter to single
3.5mm audio cable will be needed
(not included).
4. At this stage, inDtube is properly connected to receive satellite or cable
feed.
Note: If no more video and audio outputs are available on your cable or
satellite box, then connect to inDtube by using the coaxial jack. The output
should be labeled “Out to TV,” “TV Output” or something similar. A coaxial
cable will be needed (not included) as well as the F-Connector to MCX
Adapter (included) to connect to inDtube’s MCX input. The AV-input adapter
is not needed for this configuration. The cable or satellite box needs to
provide such an output for this configuration to work.
Note: The included software supports Macrovision. This means you can not
record media through the AV-input adapter if Macrovision is being used on
the source. For example: Trying to copy a DVD. For more information please
visit http://www.Macrovision.com
7
Remote Control
The diagram below explains the features of inDtube’s Remote Control.
How to use the remote:
Point the remote at inDtube and press the button of your choice. Be sure
that no obstructions stand in the way of inDtube and the remote control, as
signal may be interrupted and inDtube may fail to receive the Infrared Signal from the remote control. You can choose to use the USB Extension Cable
(included) to allow movement of inDtube’s location. The remote control will
work at an estimated 15 feet or more under optimum conditions.
8
Now that you have inDtube’s hardware setup, it is recommended
to read over the included TV Tuner software’s manual located on
inDtube’s Installation CD.
FAQ
Question:
What type of battery does inDtube’s Remote Control use?
Answer:
inDtube’s Remote Control uses a Lithium Cell CR2025 3V battery. This
battery can be purchased at most electronic stores if a replacement is
needed. To gain access to the battery, turn over the remote so that you are
looking at the back and that the IR output is pointed away from you. The
battery holder, located at the bottom end of the remote, will slide out if you
pinch the left edge to the right and pull at the same time. A small hole is
provided to use with a pen or other pointy object to assist in sliding out
the battery holder. The holder should now slide out and the battery will be
revealed. Be sure the + side (positive side) of the battery corresponds to
the + located on the plastic battery holder. Once you are sure the battery is
installed correctly, slide the holder back in to secure it.
Question:
Does the inDtube work with other TV Tuner applications?
Answer:
inDtube should work with most popular TV Tuner applications, however
only the included software is officially supported. If using an application
other than what was included and are experiencing problems, then contact
the developer of the software in use.
Question:
I am having problems with viewing and recording video through my TV
Tuner program.
Answer:
Be sure that you are using the proper cables and that they are connected
properly to both the AV-input adapter and the output device. Be sure that
the drivers have properly been installed for inDtube. Contact the program’s
Software Developer for help and support.
9
Question:
Windows does not detect inDtube when it is plugged into a working USB
2.0 port.
Answer:
Be sure that your computer supports USB 2.0.Try another USB 2.0 port
on your computer. If the problem continues, please contact our Customer
Service at (888)-880-EVGA(3842)
Question:
inDtube receives poor reception through an antenna/cable or satellite box.
Answer:
Antenna use: Avoid placing the provided antenna near a Cathode Ray
Tube (CRT) monitor or TV as such devices may degrade the signal quality.
Good reception depends a lot on your surroundings and location. Loss of
signal or highly degraded signal can occur if steel walls and towering buildings surround your area. Trying to obtain a signal while in a moving vehicle
is usually unachievable and not possible. Please be sure that the antenna of
your choice is configured and adjusted properly. Check that the antenna’s
physical connection to inDtube is properly plugged in. Be sure that the drivers have properly been installed for inDtube.
Cable or Satellite use: Check the physical connections of the AV-input
and the cables coming from cable or Satellite box. Contact your service
provider in regards to reception.
Question:
High Definition TV does not display properly.
Answer:
When using an antenna to capture free air high definition television, be
sure it is fully adjusted for optimal signal. Your video card and monitor must
support resolutions that can achieve high definition resolutions: for example
- 1280x720 or 1920x1080
If more assistance is needed please contact your service provider or EVGA
Customer Service at (888)-880-EVGA(3842)
10
FAQ
Question:
How do I manually run inDtube’s Installation Menu from the CD?
Answer:
To manually run inDtube’s Installation Menu from the CD go to:
Start _ Run _ type in the letter designated to your CD-ROM Drive
followed by “Autorun.exe” For example: if the letter designated to
your CD-ROM drive is E:\ you would type it as follows: Start _ Run_
E:\Autorun.exe Once you have typed in the command, click OK.
inDtube’s Installation Menu should now appear.
Note: If in Vista, follow this path: Start _ in the search box type
“Run” and press the Enter Key. Now type in the letter designated
to your CD-ROM drive followed by “Autorun.exe”
Example: E:\Autorun.exe
Question:
Can both an Antenna and Cable or Satellite box be used at the same time
for dual TV Tuner support?
Answer :
No, InDtube will only support one connection at a time.
Question:
Certain channels do not come through when using a coax line, cable, or
satellite set-top box.
Answer :
Depending on your service provider certain channels are distributed in an
encoded signal that requires a QAM tuner. These channels can not be
decoded by inDtube because it has no QAM tuner.
Question:
Does inDtube work with Windows Media Center 2005?
Answer :
Yes, you will need the MCE Encoder software. Visit www.evga.com/faq for
more information on obtaining the MCE Encoder software.
11
inDtube Device Information
This Hybrid Tuner Supports:
-ATSC (HDTV up to 1080i over the air antenna, SDTV)
-NTSC (cable, over the air antenna)
Note:(Please visit www.dtv.gov for information on the NTSC to ATSC transition)
Hardware Specifications:
-TV Antenna/Cable Input
( MCX-connector/Adapter to F-Connector )
-S-Video (via included AV-input Cable)
-Composite Video (RCA, via included AV-input Cable)
-Stereo Audio (3.5mm TRS input, included on AV-input Cable)
-USB 2.0
Features Support For :
-DVR Functionality
-Time-Shifting Functionality
-Scheduled Recording
-EPG (Electronic Program Guide)
-Microsoft Media Center Edition Operating System Environment
12
Warranty Information : Users Guide
Thinking about registering? Do it now!
“Why should I register?”
In order for you to receive the best possible support,
we need to know who you are and what kind of product
you have purchased. So don’t wait … register online now!
Should you require any assistance with the installation or troubleshooting of your
EVGA inDtube, please visit the Support section of our website at
www.evga.com/support. There you’ll be able to download drivers, check out our
extensive Knowledge Base, and submit technical and customer support inquiries.
Be sure to visit the EVGA community messageboards www.evga.com/community/
messageboard
Contact our Customer Service through email to get all of your questions answered
and problems resolved - its fast, its easy, and it works! If you require immediate
assistance, please contact our Customer Service at 888.880.EVGA (3842).
Point your browser to www.evga.com/register and have the following information
ready before contacting customer service:
-Card Name & Part Number
-UPC Number
-Serial Number
Warranty Program To Fit Your Needs
This EVGA product is covered under the excellent 1+1 Warranty.
For more information please visit: www.evga.com/support/1+1
As a valued EVGA customer; you’ll be sure to receive a warranty that will fit your
needs.
The EVGA Advanced RMA (EAR) Program
The EVGA Advanced RMA (EAR) Program is a program to protect yourself and your
product in the case of product failure. For more details please
vist: www.evga.com/EAR
The EVGA Step-UpTM Program
In order to give our customers the greatest amount of flexibility when purchasing
EVGA video cards, we have instituted the EVGA Step-Up™ Program. For more details
please vist: www.evga.com/stepup
13
FCC Compliance Information
This device complies with FCC Rules Part 15, Operation is subject to the following
two conditions: This device may not cause harmful interference, and this device must
accept any interference received, including interference that may cause undesired
operation. This equipment has been tested and found to comply with the limits for
a Class B digital device, pursuant to Part 15 of the FCC Rules. These limits are designed to provide reasonable protection against harmful interference in a residential
installation. This equipment generates, uses and can radiate radio frequency energy
and, if not installed and used in accordance with the manufacturer’s instructions,
may cause harmful interference to radio communications. However, there is no guarantee that interference will not occur in a particular installation. If this equipment
does cause harmful interference to radio or television reception, which can be determined by turning the equipment off and on, the user is encouraged to try to correct
the interference by one or more of the following measures: 1) Increase the separation
between the equipment and signal source, 2) Connect the equipment to an outlet on
a circuit different from that to which the signal source is connected, 3) Consult the
dealer or an experienced computer technician for help. The use of shielded cables
for connection of the monitor to the graphics card is required to ensure compliance
with FCC regulations. Changes or modifications to this unit not expressly approved
by the party responsible for compliance could void the user’s authority to operate this
equipment.
Macrovision Corporation
This device is protected by U.S. Patent numbers 4.631.603; 4,577,216; and
4,819098 and other intellectual property rights. The use of Macrovision’s Copy Protection technology in the device must be authorized by Macrovision and is intended
for home and other limited pay-per-view uses only, unless otherwise authorized in
writing by Macrovision. Reverse engineering or disassembly is prohibited.
Software License Agreement
This EVGA software (the “software”) is copyrighted by EVGA CORP and is protected
by US law. All rights reserved. The purchaser is granted a license to use the software only, subject to the following restrictions and limitations:
The license is for the original purchaser only, it is transferable so long as all items
bundled with the software are transferred to the same individual as a sale (e.g. all
software, manuals, hardware, etc.)
The original purchaser may use the software on a single computer owned or leased
by the original purchaser. You may not use the software on more than a single machine, even if you own or lease more than one machine, without the written consent
of EVGA
14
The original purchaser may make backup copies of the software for his or her own
use only, subject to the use limitations of this license.
The original purchaser may not engage in, nor permit third parties to engage in, any
of the following:
• Providing or disclosing the software to third parties
• Providing use of the software in a computer service business, network,
time-sharing network
• Making alterations or copies of any kind in the software
(except as permitted above)
• Attempting to un-assemble, de-compile or reverse engineer the software
in any way
• Granting sublicenses, leases, or rights in the software to others
• Making copies, or verbal or media translations, of the user’s guide
• Making telecommunication data transmissions of the software
Trademark Information
EVGA Corp. EVGA, the EVGA logo and combinations thereof are trademarks of EVGA
Corp. All brand names, company names, service marks, logos, and trademarks of
the company, or its affiliates or licensors are trademarks or registered trademarks of
the company or its subsidiaries, affiliates or licensors in the US and other countries.
Other company, products and service names may be trademarks or service marks
of others. EVGA reserves the right to terminate this license if there is a violation of
its terms or default by the Original Purchaser. Upon termination, for any reason, all
copies of Software and materials, must be immediately returned to EVGA and the
Original Purchaser shall be liable to EVGA CORP for any and all damages suffered as
a result of the violation or default.
Legal Information
Notice- ALL MATERIAL INCLUDING BUT NOT LIMITED TO, TEXT, DATA, DESIGN SPECIFICATIONS,
DIAGNOSTICS, GRAPHICS, LOGOS, REFERENCE BOARDS, FILES, IMAGES, DRAWINGS, AND SOFTWARE INCLUDING THIS DOCUMENT AND THE SOFTWARE ITSELF (TOGETHER AND SEPARATELY)
IS OWNED, CONTROLLED BY, LICENSED TO, OR USED WITH PERMISSION BY COMPANY AND IS
PROTECTED BY COPYRIGHT, TRADEMARK, AND OTHER INTELLECTUAL PROPERTY RIGHTS. ALL
IS BEING PROVIDED “AS IS”, EVGA CORPORATION MAKES NO WARRANTIES, WHETHER EXPRESS
OR IMPLIED, STATUTORY OR OTHERWISE WITH RESPECT TO THE MATERIALS AND EXPRESSLY
DISCLAIMS ALL IMPLIED WARRANTIES OF NON-INFRINGEMENT, MERCHANTABILITY, AND FITNESS
FOR A PARTICULAR PURPOSE. IN NO EVENT SHALL THE LIABILITY OF EVGA CORPORATION FOR
CLAIMS ARISING FROM THE USE OF THE MATERIALS BY ANYONE EXCEED THE ORIGINAL PURCHASE PRICE OF THE MATERIALS (OR REPLACEMENT OF THE MATERIALS AT EVGA CORPORATION’S OPTION). ALL INFORMATION FURNISHED IS BELIEVED TO BE ACCURATE AND RELIABLE.
HOWEVER, EVGA CORPORATION ASSUMES NO RESPONSIBILITY FOR THE CONSEQUENCES OF
USE OF SUCH INFORMATION OR FOR ANY INFRINGEMENT OF PATENTS OR OTHER RIGHTS OF
THIRD PARTIES THAT MAY RESULT FROM ITS USE, OR USE OF THE SOFTWARE. NO LICENSE IS
GRANTED BY IMPLICATION OR OTHERWISE UNDER ANY PATENT OR PATENT RIGHTS OF EVGA
CORPORATION EXCEPT AS EXPRESSLY PROVIDED HEREIN. ALL SPECIFICATIONS MENTIONED IN
THIS PUBLICATION ARE SUBJECT TO CHANGE WITHOUT NOTICE.
15