1
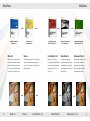
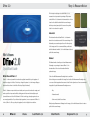
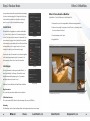
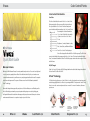
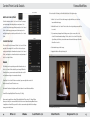
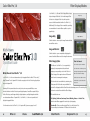
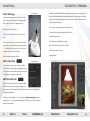
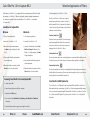
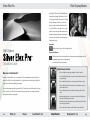
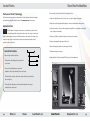
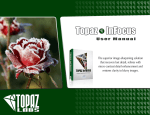
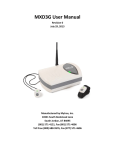
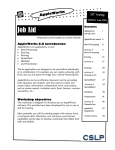
Professional Photographic Tools
Quick Start Guide
The Complete Collection provides the most powerful and intuitive solutions to digital photographers’ workflows. From capture to print, the Complete Collection brings award-winning plug-ins
for Adobe® Photoshop® and Apple® Aperture™ together to create exciting photographic results
while saving time. Dfine, Viveza, Color Efex Pro, Silver Efex Pro, and Sharpener Pro feature
Nik Software’s U Point® technology, giving photographers the most powerful tools for precise
and natural photographic enhancements and corrections without the need for complicated
selections or layer masks.
........................................... 8
. . . . . . . . . . . . . . . . . . . . . . . . . . . . . . . . . . . . . . . . . . . . 12
. . . . . . . . . . . . . . . . . . . . . . . . . . . . . . . . . . . 16
. . . . . . . . . . . . . . . . . . . . . . . . . . . . . . . . . . . . . 22
. . . . . . . . . . . . . . . . . . . . . . . . . . . . . . . . . . . 26
Installation
Accessing The Plug-Ins
Windows
Accessing the Plug-Ins in Photoshop or Photoshop Elements
1. Close all open applications.
1. Launch Photoshop, Photoshop Elements, or your image editing application.
2. Insert the Complete Collection CD.
2. Open an image.
3. When the auto-run installer appears, choose the plug-in to install.
4. The installer will appear, review the Read me, accept the License Agreement, and review
the suggested installation location. For example, the appropriate location for Adobe Photoshop CS3 is:
3. Click on the Filters menu and roll over Nik Software. A popup menu appears. Choose the
C:\Program Files\Adobe\Adobe Photoshop CS3\Plug-Ins*
Tip: To access the Nik Selective Tool, navigate to the File > Automate or File > Automation Tools
5. Specify whether the Nik Selective Tool launches automatically when you start Photoshop.
Please see the User Guide for the selected plug-in for more information.
menu and select Nik Selective Tool.
6. When the installation is complete, click the Finish button to close the plug-in installer and
return to the Complete Collection installer to choose another plug-in to install.
*If you are using an image editing application other than Photoshop, please refer to your
plug-in to enhance your image.
Accessing the Plug-Ins in Aperture
application’s user manual.
1. Launch Aperture.
Macintosh
2. Highlight the image(s) you wish to enhance with a plug-in.
1. Close all open applications.
3. Click the Images menu and roll over Edit With. A popup menu appears. Choose the plug-in
2. Insert the Complete Collection CD.
to enhance your image.
3. Open the CD and double-click on the Complete Collection Setup file.
4. Choose the plug-in to install, and then specify whether to install the plug-in into either
Adobe Photoshop or Apple Aperture. When the plug-in installer appears, click Next to begin
installation.
5. After reading the Read Me and accepting the License Agreement, the installer attempts to
install into the appropriate location. When installing into Photoshop or Photoshop Elements,
check the installation path to ensure the installer located the appropriate folder. The appropriate location for Adobe Photoshop CS3 is:
Macintosh HD : Applications : Adobe Photoshop CS3 : Plug-Ins*
6. When installing into Photoshop, specify whether the Nik Selective Tool launches automatically when you start Photoshop. Please see the User Guide for the selected plug-in for more
information.
7. When the installation is complete, click the Finish button to close the installer and return
to the Complete Collection installer.
4
Dfine 2.0
Viveza
Color Efex Pro 3.0
Silver Efex Pro
Sharpener Pro 3.0
5
Workflow
Apply Noise Reduction
with Dfine 2.0
Workflow
Control Color and
Light with Viveza
Apply Enhancements
with Color Efex Pro 3.0
Apply Output Sharpening
with Sharpener Pro 3.0
Dfine 2.0
Viveza
Color Efex Pro 3.0
Silver Efex Pro
Sharpener Pro 3.0
Reduce noise from your image
Selectively control the color and light of
Apply color correction,
Convert your images into
Sharpen your images for any
while maintaining sharp detail
objects and areas in your image to cor-
retouching, traditional filters,
powerful black and white im-
output device, without the
using the U Point powered Con-
rect color and create more colorful and
and creative enhancements
ages with the most powerful
guesswork and costly test
trol Points to selectively reduce
dynamic images.
with the 52 filters of Color
and complete conversion tool,
prints normally associated
Efex Pro 3.0.
Silver Efex Pro.
with image sharpening.
contrast noise and color noise.
6
Convert to black and white
with Silver Efex Pro
Dfine 2.0
Viveza
Color Efex Pro 3.0
Silver Efex Pro
Sharpener Pro 3.0
7
Dfine 2.0
Step 1: Measure Noise
The first step in reducing noise within Dfine 2.0 is to
measure the noise present in your image. This process
enables Dfine 2.0 to determine the characteristics of noise
based on the details found within the current image or
within a previously saved profile to ensure the optimal
level of noise reduction is applied.
Contrast Noise
Color Noise
Automatic
The Automatic method allows Dfine 2.0 to determine
where the noise structures exist for the current image. The
Automatic process was designed to work for the majority
of the images, and it is recommended that you first start
Automatic Method
with the Automatic method. Click on the Measure button to
profile the current image.
Manual
The Manual method enables you to draw Measurement
Rectangles on your image to instruct Dfine 2.0 the
Quick Start Guide
characteristics of the noise that exists within that
particular image.
What’s New in Dfine 2.0
Measurement Rectangles
Click on the Add Measurement Rectangle button, and then
Dfine 2.0 is the most powerful noise reduction application available to photographers. It
click and drag on an area within the image. You should add a Measurement Rectangle only
installs as a plug-in to Adobe Photoshop or Apple Aperture (or other image editing ap-
on an area of the image where there was not detail in the original scene. Some recommended
plications that conform to the Adobe Photoshop Plug-In Standard).
image detail to place Measurement Rectangles on are:
®
®
®
™
Dfine 2.0 features a new, resizable user interface, an improved noise reduction engine, and
makes possible an improved workflow, letting you work faster and achieve higher quality results than ever before. Nik Software’s U Point® technology, already recognized as an
enormously powerful tool for professional photographers, is now a component of Dfine 2.0.
In short, Dfine 2.0 offers you, the photographer, the best in digital noise reduction.
- Sky
- Featureless walls
- Other smooth, detail less surfaces
After placing a Measurement Rectangle on the image, click on the Measure button to create a
profile for the current image.
8
Dfine 2.0
Viveza
Color Efex Pro 3.0
Silver Efex Pro
Sharpener Pro 3.0
9
Step 2: Reduce Noise
Dfine 2.0 Workflow
Dfine 2.0 Noise Reduction Workflow
Once you have measured the noise inherent to your image,
it is time to start reducing noise. You can choose from one
Select Dfine 2.0 from the Filter menu or the Selective Tool.
of two methods to reduce noise globally or selectively,
based on colors or objects found within your image.
1. Measure the noise in the image with the different measuring methods.
Control Points
2. Reduce noise using U Point powered Control Points, to selectively control
the noise reduction if desired.
The first method of applying noise reduction within Dfine
2.0, Control Points, is based on U Point technology. Each
Control Point can control the amount of Contrast and Color
Control Points
3. Review the image in the Loupe.
4. Apply the filter.
noise reduction to apply to the object that it has selected.
In this manner, you can quickly add Control Points and then
indicate whether or not to apply Contrast or Color noise
reduction to each object, and how much to apply.
1
You can also control the amount of noise reduction applied
to the entire image using the global Contrast and Color
2
noise reduction sliders in the Control Points method
Color Ranges
Color Ranges
The second method of reducing noise within Dfine 2.0 is
based on individual Color Ranges. This method is most
effective when affecting large objects or if you want to
uniformly reduce noise based on color.
3
Additional Controls Available for Each Reduction Method
Additional Controls
Edge Preservation
4
This control lets you balance detail and noise reduction.
User Interface in Adobe® Photoshop®
© 2008 David Beckstead
JPEG Artifact Reduction
This control reduces JPEG artifacts in the active image. (Use only on JPEG files.)
Debanding
The debanding control reduces banding artifacts, which appear as bands across an image.
10
Dfine 2.0
Viveza
Color Efex Pro 3.0
Silver Efex Pro
Sharpener Pro 3.0
11
Viveza
Color Control Points
Color Control Point Controls
Size Slider
The Size slider affects the reach of the Color Control Point.
By increasing this slider, you can affect objects similar to
the object that the Color Control Point has been placed
upon but that are further away from the Color Control Point.
Decreasing this slider will make the
Color Control Point affect only similar
objects closer to the Color Control
Point.
Brightness, Contrast, Saturation, Hue,
Red, Green, Blue, and Warmth Sliders
© 2008 Ed Pierce
Each Color Control Point displays a
Size slider along with either the BCS or All slider groups. The BCS slider
group is the default slider group provided for a Color Control Point and contains the Brightness, Contrast and Saturation sliders. The All slider group contains the entire range of sliders
within Viveza.
Quick Start Guide
BCS/All Triangle
Welcome to Viveza
Welcome to Nik Software Viveza, the most powerful and precise tool for control over light and
color in your photography. Viveza offers for the first time the ability for you to make corrections and enhancements to specific areas on your photographs without the need for complex
selections and layer masks. The power of Viveza comes from Nik Software’s patented U
Point® technology.
Viveza will change the way you edit your pictures. You’ll work faster, more efficiently and be
Each Color Control Point has a BCS/All triangle which when clicked will change the available
sliders from BCS to All or All to BCS.
U Point® Technology
U Point technology lets you use Control Points to isolate objects and areas in an image and
selectively apply light and color effects to your images. With U Point powered Control Points,
there is no need to create complex selections or masks. For more information, visit www.
upoint.com.
able to effectively pre-visualize your post-capture editing steps more clearly. Simply put,
editing with Viveza will revolutionize the way you edit your pictures and allow you to achieve
enhancements that were too complex or simply not possible before.
Select an area to
enhance
12
Dfine 2.0
Viveza
Color Efex Pro 3.0
Pixel Characteristic
are analyzed
Silver Efex Pro
Information is
processed through
Central Blending
Function
Image adjustment
can be made with
Control Points
Sharpener Pro 3.0
Perfectly enhanced image
13
Control Point List & Details
Viveza Workflow
Control Point List
Add Color Control Point
For best results in Viveza, perform the tasks below in the given order:
1. Add a Color Control Point to the image to adjust the first, most obvious
Click this button to add a Color Control Point. The mouse
issue within the image.
pointer changes indicating that you can place a Color
2. Add additional Color Control Points to the other objects that you would like
Control Point on the image. After placing the Color Control
to control.
Point on the image, you may control the image’s color
and light using the controls provided on the Color Control
3. To prevent any changes from affecting some object or area, add a Color
Point.
Details
Control Point List
Control Point with neutral settings. That is, add a Color Control Point to the
object that you’d like to protect and ensure that each slider apart from the
Size slider is set to 0.
The Control Point List shows all of the Color Control Points
4. Review the image in the Loupe.
applied to the image. The Control Point List section pro-
5. Apply the filter’s effect by clicking OK.
vides you with basic information about each Color Control
Point, and options to show the selections and previews of
the Color Control Points.
Details
1
The Details section provides you with information about
the Color Control Points added to your image. Within the
2
Details section, you can review each slider value or click
on the value and type in a new value directly.
If multiple Color Control Points are selected, you can adjust the controls of
all the selected Control Points at once.
Below the Details are Duplicate and Delete buttons for an efficient workflow.
3
Smart Filter Capability (Adobe Photoshop CS3 Only)
Viveza can be applied as a Smart Filter within Adobe Photoshop CS3. Smart Filters
4
allow you to adjust or remove the filter’s effect in a non-destructive way. When Viveza
is applied as a Smart Filter, you will be able to access and adjust the filter’s settings
at any point in the future.
14
Dfine 2.0
User Interface in Adobe® Photoshop®
Viveza
Color Efex Pro 3.0
Silver Efex Pro
© 2008 David Beckstead
Sharpener Pro 3.0
15
Color Efex Pro 3.0
Filter Display Modes
Color Efex Pro 3.0 offers two Filter Display Modes: Image
Image Only
Only and Image & Filter List. Click on the Image & Filter
List button to display the Filter List, which provides
access to the filters available within Color Efex Pro 3.0.
Additionally, Filter Category Tabs are available, providing
recommendations for certain filters specific to a photographic style.
Image Only
Image & Filter List
Click this button to show only the Image Preview with the
current filter controls.
Image & Filter List
Click this button to open a new palette displaying the
names of available filters next to the Image Preview area.
Filter Category Tabs
Quick Start Guide
Filter List Controls
The filters in Color Efex Pro 3.0 are organized by
What’s New in Color Efex Pro™ 3.0
Color Efex Pro 3.0 is the most advanced set of photographic filters for Adobe® Photoshop®,
Apple® Aperture™ and Capture NX 2. It installs as a plug-in to Adobe Photoshop, Apple Aperture, and Capture NX 2.
Click on a tab to explore new filters.
category for easy experimentation, with each
Click on the name of a filter to update
category corresponding to a tab in the Filter List.
the image in the Image Preview and the
Filter Category Tabs organize dozens of filters and
filter control sliders and settings.
variations into a manageable workspace.
The Favorites tab is user-definable, containing only
filters you add. All other tabs are pre-defined. Six
Click the star next to a filter’s name to
add the filter to your Favorites tab for
easy access.
Featuring U Point-powered selection control points, nine new powerful filters, a new
tabs will be displayed, with the All and Favorites tabs always present. The remaining four
resizable interface in Adobe Photoshop and Apple Aperture, Smart Filter compatibility for
tabs can be selected from within the Filter Settings.
Adobe Photoshop, multi-image editing for Apple Aperture, and tight integration with the
The available tabs are:
non-destructive workflow of Capture NX 2, Color Efex Pro 3.0 is the most powerful set of
digital photographic filters.
For information about Color Efex Pro 3.0 for Capture NX 2, please see pages 6 and 7.
16
Dfine 2.0
Viveza
Color Efex Pro 3.0
All, Stylizing, Traditional, Landscape, Portrait, Wedding, Nature, and Artistic Tabs,
which contain filters suggested for each style of photography.
Favorites Tab - Filters you add using the Filter List or the Selective Tool.
You can add up to a maximum of 16 filters to the Favorites tab.
Silver Efex Pro
Sharpener Pro 3.0
17
Control Points
Color Efex Pro 3.0 Workflow
U Point® Technology
U Point Technology
Start with characteristics that affect the entire image, such as color casts, contrast, and tones.
Next, modify elements that affect only localized areas, such as blemishes and small distract-
U Point technology lets you use control points to isolate
ing objects. Finally, apply effects that add a style or mood to the image. In other words, move
objects and areas in an image and selectively apply filter
from the general to the specific.
effects to them. (For more, visit www.upoint.com)
For best results, perform the tasks below in the given order:
Each control point has two sliders:
1. Select the filter to apply to the image from the Filter List.
• The top slider, Size, adjusts the Control Point’s size or
reach.
2. Adjust the filter controls.
• The bottom slider, Opacity, controls the amount of filter-
3. Protect Shadows & Highlights, if necessary.
ing applied to the area specified by the Size parameter. At
4. Use U Point-powered Control Points, if desired.
100%, the filter’s full effect is applied; at 0%, the object or
5. Review the image in the Loupe.
area retains its original colors and details.
6. Apply the filter.
The following controls apply to all filters:
Add 0% Control Point
Control Point Controls
Click this button to add control point preset to no filter
effect. The mouse pointer changes, prompting you to place
2
1
a control point on the image. After placing the control point
on the image, you can adjust the Opacity slider.
3
Add 100% Control Point
4
Click this button to add a control point preset to the filter’s
full effect. The mouse pointer changes, prompting you to
place a control point on the image. After placing the control point, you can adjust the filter’s
effect with the Opacity slider.
5
If the first control point added is a 100% control point, the Apply to entire image slider automatically goes to 0%, ensuring that the filter is applied only to the control point. You can then
adjust the slider manually.
6
Adobe® Photoshop® Interface
18
Dfine 2.0
Viveza
Color Efex Pro 3.0
Silver Efex Pro
© 2007 Roger Daines
Sharpener Pro 3.0
19
Color Efex Pro 3.0 for Capture NX 2
Selective Application of Filters
Nik Software Color Efex Pro 3.0 for Capture NX 2 is the most advanced set of filters for digital
photography. Color Efex Pro 3.0 filters are designed to make photographic enhancements
not only easier, but better. Now the powerful filters of Color Efex Pro 3.0 are available
Selectively Applying Color Efex Pro 3.0 Filters
All of the Color Efex Pro 3.0 filters can be applied
for Capture NX 2.
selectively using the various selection tools found
Installation for Capture NX 2
Control Points, the Selection Brush, and the Selection
within Capture NX 2. A brief overview of the Selection
Gradients can be found below.
Windows
Macintosh
1. Close all open applications.
1. Close all open applications.
2. Insert the Color Efex Pro 3.0 CD.
2. Insert the Color Efex Pro 3.0 CD.
3. When the auto-run installer appears,
3. Open the CD and double-click the Color
click Next to begin installing Color Efex
Efex Pro 3.0 Setup file. When the Color
Pro 3.0.
Efex pro 3.0 installer appears, click Next
4. Next, read the Read Me and accept the
License Agreement.
5. When the installer is complete, click the
Finish button to close the installer.
to begin installation.
4. Next, read the Read Me and accept the
License Agreement.
Selection Control Point
Selection control points utilize U Point® technology to
selectively apply the filter effect of the current step.
You can use a selection control point to selectively
apply any of the Color Efex Pro 3.0 filters.
© 2008 David Saffir
Selection Brush Tools
The selection brush enables you to selectively paint-in or paint-out the filter effect in the current step. You can use the selection brush to achieve an artistic application of the filters.
Selection Gradient Tools
5. When the installer is complete, click the
Close button to close the installer.
The selection gradient tools enable you to gradually blend between applying and removing
the filter effect in the current step. There are two selection gradient tools to choose from, the
Linear Gradient tool and the Radial Gradient tool.
Accessing Color Efex Pro 3.0 inside Capture NX 2
Color Efex Pro 3.0 NEF Update Tool
1. Launch Capture NX 2.
The Color Efex Pro 3.0 NEF Update Tool will convert any NEF files with Nik Color Efex Pro 2.0
filters applied into the corresponding Color Efex Pro 3.0 filters with equivalent filter settings.
2. Open the image that you would like to enhance.
For more information about updating NEF files with Nik Color Efex Pro 2.0 filters to Color Efex
3. Navigate to the Filter menu.
Pro 3.0 filters with the NEF Update Tool, please see the Color Efex Pro 3.0 for Capture NX 2
4. Roll over either the Color Efex Pro 3.0: Stylizing or Color Efex Pro 3.0: Traditional
sub-menus
User Guide.
5. Select the filter you wish to apply to your image from this list.
20
Dfine 2.0
Viveza
Color Efex Pro 3.0
Silver Efex Pro
Sharpener Pro 3.0
21
Silver Efex Pro
Filter Display Modes
Silver Efex Pro offers two Filter Display Modes:
Image Only and Image + Style Browser. Click
on the Image + Style Browser button to display
the Style Browser, which provides access to
the preset styles available within Silver Efex
Pro. Silver Efex Pro comes with over 20 preset
styles to help create powerful, dynamic black
and white images quickly and easily, and you
can create your own styles for easily repeated
© 2008 Suzette Allen
high quality results.
Image Only
Click this button to show only the Image Preview.
Image + Style Browser
Click this button to open a new palette next to the preview area displaying a view of
the available styles, with each style applied
Quick Start Guide
to a thumbnail of the current image.
Style Browser Controls
Welcome to Silver Efex Pro
• Click on a style to change your image’s look with one click.
™
Welcome to Silver Efex Pro, the most powerful tool for creating dynamic black and white images. Silver Efex Pro offers the traditional tools of the darkroom while utilizing the flexibility
and precision offered with digital photography.
By combining unique algorithms, patented U Point technology, and a full range of black and
®
white specific tools, Silver Efex Pro provides the power and precision for creating stunning
digital black and white photographs.
• Click on the Add Style button to create a custom style based on the
current settings.
• Click on the Delete button to remove the selected custom style.
• Click on the Export button to save the selected custom style and
share it with friends.
• Click on the Update button to update the settings of the custom
style.
• Quickly change the name of a custom style by double-clicking on
the name and entering a new name.
• Click the star next to the style’s name to add the style to the favorites tab for quick access.
• Click on the Import button to add a style from your hard disk.
22
Dfine 2.0
Viveza
Color Efex Pro 3.0
Silver Efex Pro
Sharpener Pro 3.0
23
Control Points
Silver Efex Pro Workflow
The Power of U Point® Technology
For best results, perform the tasks below in the given order:
U Point technology lets you use control points to isolate objects and areas in an image
1. Explore the Style Browser and if you like, choose a style to apply to your image.
and selectively apply filter effects to them. Visit www.upoint.com to learn more.
2. Adjust the overall image with the Brightness, Contrast, and Structure tonality controls.
Add Control Point
Click this button to change the mouse cursor and enable you to add a control
point to the image. After selecting this button, click on the object or area in the
image to adjust using a control point. After placing the control point on the image, you
3. Add control points to objects in the image that you would like to selectively control brightness, contrast, and structure.
4. Select a color filter to adjust the base tonal conversion and contrast.
may control the object or area’s tonality, contrast, and structure using the controls
5. Explore and apply a film type preset if desired.
provided on the control point.
6. Browse and apply a stylization to your image if desired.
Control Point Controls
7. Review the image in the Loupe.
Each control point has four sliders:
8. Apply the filter’s effect by clicking OK (Photoshop) or Save (Aperture).
- The top slider, Size, adjusts the control point’s
size or reach.
- The second slider, Brightness, controls the
2
1
brightness of the object selected by the control point.
3
- The third slider, Contrast, controls the contrast of the object selected by
the control point.
4
5
6
- The fourth slider, Structure, controls the detail structure of the object
selected by the control point.
7
8
Adobe® Photoshop® Interface
24
Dfine 2.0
Viveza
Color Efex Pro 3.0
Silver Efex Pro
© 2008 Josh Haftel
Sharpener Pro 3.0
25
Sharpener Pro 3.0
Sharpening Photographs
Nik Software Sharpener Pro 3.0 is designed to provide the
most advanced and intuitive sharpening solutions for digital
photographs. Sharpener Pro 3.0 offers two filters to enhance
and sharpen your images quickly, easily, and with high quality, repeatable results: the RAW Presharpener filter and the
Output Sharpener filter.
RAW Presharpener
RAW presharpening is the first step of a two-step sharpening
process that some photographers have found can provide
better quality in some images than a typical single-step
sharpening process. When working in a two-step sharpening
process, some small amount of sharpening is applied immediately after converting a RAW file, while a second, more
aggressive amount of sharpening is applied directly before
© 2008 David Sanders
output. If you plan to utilize only a single sharpening step, only apply the
Output Sharpener to your images.
The RAW Presharpener filter should be used immediately after processing a RAW file and
Quick Start Guide
after any noise reduction has been applied. When using the RAW Presharpener filter, ensure
Welcome to Sharpener Pro 3.0
Output Sharpener
that sharpening has been turned off in your RAW conversion tool.
Welcome to Nik Software Sharpener Pro 3.0, the most advanced and powerful sharpening
solution for photographers. Sharpener Pro 3.0 eliminates the guesswork typically required for
achieving superior printed results while providing the most control possible.
The Sharpener Pro 3.0 Output Sharpener filter is designed to sharpen based on the loss of
detail caused through different output methods, eliminating guesswork normally associated
with sharpening for output. The highest quality sharpening and the power to selectively apply
the sharpening with the use of U Point powered control points or color ranges make the Out-
Sharpener Pro 3.0 is a new generation of digital sharpening tools for photographers, featur-
put Sharpener filter the professional’s choice for sharpening their images for output.
ing on-image editing with U Point powered control points, creative sharpening tools, as well
In addition to the U Point powered control points, the Output Sharpener filter also offers new
as the most advanced algorithms designed specifically for sharpening digital photographs.
controls for creatively sharpening images to enhance fine details and textures.
®
The Output Sharpener filter should be used as the very last step in the workflow, after any
cropping or resizing. Use the Output Sharpener filter to prepare your file for the output device
of your choice.
26
Dfine 2.0
Viveza
Color Efex Pro 3.0
Silver Efex Pro
Sharpener Pro 3.0
27
Control Points
Sharpener Pro 3.0 Workflow
U Point® technology lets you use control points to isolate objects and areas in an image and
selectively apply filter effects to them. (For more, visit www.upoint.com.)
Sharpener Pro 3.0 Sharpening Workflow
Select the filter to apply to the image from the Filter menu or the Selective Tool.
Selection Control Points in RAW Presharpener
1. Adjust the filter controls.
The U Point powered control points in the RAW Presharpener allow you to selectively apply
or remove the sharpening effects from objects and areas in your photographs without any
2. Use U Point powered control points, to selectively apply or control the sharpening effect if
desired.
complicated selections or layers masks.
For more information about Selection Control Points in the RAW Presharpener filter, please
see the Sharpener Pro 3.0 User Guide.
3. Review the image in the Loupe.
4. Apply the filter.
Sharpening Control Points in Output Sharpener
The U Point powered controls points in the Output Sharpener filter allow you to selectively
apply the output sharpening and creative sharpening
1
to objects and areas in your photograph without complicated selections or layer masks.
Add Control Point
Click this button to change the mouse cursor and enable you to add a control
point to the image. After selecting this button, click on the object or area in
the image to adjust using a control point. After placing the control point on the image, you
may control the sharpening or apply creative sharpening to the object or area selected using
2
the controls provided.
Sharpening Control Point Controls
3
Each sharpening control point has five sliders:
• The top slider, Size, adjusts the control point’s size or reach.
4
• The second slider, Output Sharpening Strength, adjusts the strength of the output
Output Sharpener Interface in Adobe® Photoshop®
© 2008 Tony Sweet
sharpening effect of the object or area.
•The Structure, Local Contrast, and Focus sliders will apply creative sharpening to the
selected object or area.
28
Dfine 2.0
Viveza
Color Efex Pro 3.0
Silver Efex Pro
Sharpener Pro 3.0
29
Contact and Support
United States
Contact Nik Software, Inc. by phone at (619) 725-3150
Monday – Friday from 8:30AM – 5:00PM (PST) or via email at [email protected]
Nik Software, Inc.
7588 Metropolitan Drive
San Diego, CA 92108, USA
Phone (619) 725-3150
Fax (619) 725-3151
[email protected]
www.niksoftware.com
Nik, U Point, Dfine, and Photography first are registered trademarks of Nik Software, Inc.
Viveza, Color Efex Pro, Silver Efex Pro, and Sharpener Pro are trademarks of Nik Software, Inc.
All other trade names mentioned in this manual are trademarks or registered trademarks of
their respective holders.
To be eligible for free product updates,
technical support and customer support
please register online by visiting
www.niksoftware.com/register
Please have your product key available at
the time you register