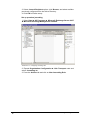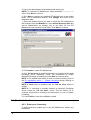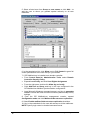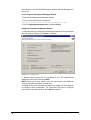
1
GFI MailArchiver 6.1 for Exchange Getting started guide By GFI Software Ltd. http://www.gfi.com Email: [email protected] Information in this document is subject to change without notice. Companies, names, and data used in examples herein are fictitious unless otherwise noted. No part of this document may be reproduced or transmitted in any form or by any means, electronic or mechanical, for any purpose, without the express written permission of GFI Software Ltd. GFI MailArchiver is copyright of GFI SOFTWARE Ltd. 1999-2009 GFI Software Ltd. All rights reserved. Version MAR-ACM-1-02.001 – Last updated August 10, 2009 GFI MailArchiver build - 20090526 Contents 1. About GFI MailArchiver 1.1 1.2 1.3 Introduction to GFI MailArchiver........................................................................... 1 How does GFI MailArchiver work? ....................................................................... 1 GFI MailArchiver licensing scheme ...................................................................... 2 2. System requirements 2.1 2.2 2.3 67 Uninstall GFI MailArchiver .................................................................................. 67 Disabling journaling for Microsoft Exchange Server 2000/2003 ........................ 67 Disabling journaling for Microsoft Exchange Server 2007 ................................. 68 8. Troubleshooting 8.1 8.2 8.3 8.4 8.5 8.6 65 Importing emails ................................................................................................. 65 Exporting emails ................................................................................................. 65 7. Uninstalling GFI MailArchiver 7.1 7.2 7.3 45 Introduction......................................................................................................... 45 How role-based deployment works .................................................................... 46 Installing GFI MailArchiver in a role-based environment ................................... 47 6. Importing/Export emails 6.1 6.2 11 Where should GFI MailArchiver be installed? .................................................... 11 Pre installation action 1 – Enable Journaling ..................................................... 12 Pre installation action 2 – Setup database ......................................................... 23 Pre-installation action 3 – Enable IMAP ............................................................. 25 Installation procedure ......................................................................................... 27 Post install actions ............................................................................................. 28 Test your setup................................................................................................... 37 Deploy Outlook connector .................................................................................. 39 5. Role-based Installations 5.1 5.2 5.3 7 Installation procedure ........................................................................................... 7 Post install actions ............................................................................................... 9 4. New Installations 4.1 4.2 4.3 4.4 4.5 4.6 4.7 4.8 3 Software ............................................................................................................... 3 Hardware .............................................................................................................. 4 Important settings ................................................................................................. 4 3. Upgrades 3.1 3.2 1 71 Introduction......................................................................................................... 71 Common Issues ................................................................................................. 72 Knowledge Base ................................................................................................ 73 Web Forum......................................................................................................... 73 Request technical support .................................................................................. 73 Build notifications ............................................................................................... 73 9. Index i Contents 74 GFI MailArchiver 6.1 for Exchange - Getting Started Guide 1. About GFI MailArchiver 1.1 Introduction to GFI MailArchiver GFI MailArchiver is an email archiving solution which can archive all internal and external email into a central archive store. You can then easily manage the email archive stores from the web-based configuration of GFI MailArchiver. You can also allow users to browse and search past emails via the web-based browse and search interface. GFI MailArchiver also provides Microsoft Outlook integration. 1.2 How does GFI MailArchiver work? GFI MailArchiver operations can be classified in three stages: Stage 1: Retrieve emails from Microsoft Exchange Server Stage 2: Archive emails to Firebird or SQL server database Stage 3: Browse archived emails Figure 1 - Typical GFI MailArchiver installation Stage 1: Retrieve emails GFI MailArchiver connects to the journaling mailbox on the Microsoft Exchange Server and collects the emails. Stage 2: Archive emails GFI MailArchiver archives the collected emails to the active database configured, for example Microsoft SQL Server. Stage 3: Browse archived emails GFI MailArchiver 6.1 for Exchange - Getting Started Guide About GFI MailArchiver 1 Users can browse and search for specific archived emails via the GFI MailArchiver web interface, using Microsoft Internet Explorer. 1.3 GFI MailArchiver licensing scheme For information on GFI MailArchiver licensing, refer to: http://www.gfi.com/products/gfi-mailarchiver/pricing/licensing 2 About GFI MailArchiver GFI MailArchiver 6.1 for Exchange - Getting Started Guide 2. System requirements 2.1 Software Supported operating systems GFI MailArchiver can be installed on: Microsoft Windows Server 2008 Microsoft Small Business Server (SBS) 2008 Microsoft Windows Server 2003 Microsoft Small Business Server (SBS) 2003 Microsoft Windows Server 2000 (Service Pack 3 or higher) NOTE: The server on which GFI MailArchiver is installed needs to be a Domain Controller or connected to one, since GFI MailArchiver requires access to Active Directory. Supported mail servers Microsoft Exchange Server 2000 (SP3) or later with „Journaling‟ enabled. (Refer to Pre installation action 1 – Enable Journaling section starting on page 12 in this manual for information on how to enable journaling). Supported databases Firebird database – An open source database used as the default database for GFI MailArchiver. Recommended for small to medium sized organizations with moderate amounts of email. This is bundled and automatically configured by GFI MailArchiver. Microsoft SQL server 2000 or later – Recommended for larger organizations with higher volumes of email to archive. Not included with GFI MailArchiver installation and is required to be installed as a separate process. Other required components Microsoft .NET Framework 2.0 ASP.Net 2.0 Internet Information Services (IIS) – SMTP & World Wide Web services Microsoft Internet Explorer 5.5 or later. GFI MailArchiver 6.1 for Exchange - Getting Started Guide System requirements 3 2.2 Hardware Processor Minimum: Intel Pentium or compatible - 2GHz 32 bit processor. Recommended: x64 architecture-based server with Intel 64 architecture or AMD64 platform. Memory Minimum: 512MB RAM (dedicated to GFI MailArchiver) Recommended: 2GB RAM (dedicated to GFI MailArchiver) Physical Storage Minimum: 150MB physical disk space (NTFS) for GFI MailArchiver installation. More space is required for the database (Firebird or SQL server). Storage space depends on mail volume to archive. Recommended: Server with 4 physical drives, with the ability to increase storage space on demand when required. Refer to Pre installation action 2 - Setup database section starting on page 23 in this manual for recommendations on how to set up your database. NOTE: It is highly recommended that you store databases and indexes on separate, appropriately sized hard disks. SCSI hard disks are highly recommended. 2.3 Important settings 2.3.1 Antivirus and backup software Anti-virus and backup software may cause GFI MailArchiver to malfunction. This occurs when such software denies access to certain files required by GFI MailArchiver. Disable any third party anti-virus and backup software from scanning the following folders and subfolders: GFI MailArchiver folders <..\Program Files\GFI\MailArchiver> <..\Program Files\Common Files\GFI> Also, exclude the index and the archive store locations from backups and anti-virus scans. The default index and archive store locations are: GFI MailArchiver default index and archive store locations <..\Program Files\GFI\MailArchiver\Indexes\default> <..\Program Files\GFI\MailArchiver\Databases\default\> NOTE: You can change the index and archive store locations after installing GFI MailArchiver. For information refer to the Configure archive stores (starting on page 29) and Configure search indexes (starting on page 30) sections in this manual. 4 System requirements GFI MailArchiver 6.1 for Exchange - Getting Started Guide 2.3.2 Firewall port settings Your firewall may need to be configured to allow connections from the GFI MailArchiver Server on the following ports: Listening Ports on the GFI MailArchiver Server: Remoting (Ports 8014, 8017, 8018, 8019, 8020) – Used for communication between GFI MailArchiver components when installed in a role based setup. Connections established from the GFI MailArchiver Server SMTP (Port 25) - Used by GFI MailArchiver when an email needs to be restored to a user‟s mailbox or a notification is sent to the GFI MailArchiver Administrator. HTTP (Port 80) - Used by the GFI MailArchiver user interface and web services. MAPI/RPC (Port 135) - Used when GFI MailArchiver is installed on the same machine as Microsoft Exchange and configured to use ExOLEDB to retrieve emails. IMAP (Port 143) – Used to retrieve emails when GFI MailArchiver is not installed on the same server as Microsoft Exchange server. Microsoft SQL Server (Port 1443) - Used when GFI MailArchiver is configured to archive emails to a Microsoft SQL Server Database. Microsoft Global Catalog (Port 3268) – Used for connections done from the GFI MailArchiver Server to the Domain Controller which stores the Microsoft Global Catalog <Optional> Ports 8096 to 8099 – Used by the GFI PST exporter to communicate with GFI MailArchiver when exporting data from networked computers. 2.3.3 Database settings Microsoft SQL server settings GFI MailArchiver requires Microsoft SQL server (if used as the archival database) to be installed in case insensitive mode. This is the default installation setting of Microsoft SQL server. The Microsoft SQL server collation modes apply to all Microsoft SQL server objects including login names. In such cases if a user changes a property in the name and does not make EXACT character case matches, GFI MailArchiver will fail since it would not find the resources required. Once installed, it is not possible to change the Microsoft SQL server collation mode easily. It requires a rebuild of the master database using advanced Microsoft SQL specific tools or methods. The best solution is to install another instance of Microsoft SQL Server (set to operate in insensitive collation mode). 2.3.4 ASP.NET settings For GFI MailArchiver to work, ASP.NET needs to be registered with IIS. If the Microsoft .NET framework is installed after IIS is installed GFI MailArchiver 6.1 for Exchange - Getting Started Guide System requirements 5 this is automatically registered. Else, register ASP.NET with IIS by following these steps: 1. From the command prompt, navigate to: <WindowsDirectory>\Microsoft.NET\Framework\<version number>\ 2. Key in aspnet_regiis.exe –i and press Enter. 6 System requirements GFI MailArchiver 6.1 for Exchange - Getting Started Guide 3. Upgrades 3.1 Installation procedure 3.1.1 Important notes 1. Ensure that you are logged on as Administrator or using an account with administrative privileges. 2. Before starting installation, save any other pending software and close all open applications on the machine. 3. Check that the machine you are installing GFI MailArchiver on meets the system and hardware requirements specified earlier in this chapter. 4. Ensure that Journaling is enabled on Microsoft Exchange Server. Refer to the Pre installation action 1 – Enable Journaling section starting on page 12 in this manual for information on how to check if journaling is enabled. 3.1.2 Installing GFI MailArchiver 1. Double-click on: mailarchiver6.exe to install GFI MailArchiver on x86 systems. mailarchiver6_x64.exe to install GFI MailArchiver on x64 systems. 2. On the Welcome page, click Next. 3. Select whether to check for a newer build of GFI MailArchiver on the GFI Website. Click Next to continue. 4. Read the license agreement and select I accept the terms in the license agreement option. Click Next to continue. 5. Select the language used by the GFI MailArchiver language analyzer to accurately index non-Roman character languages. Click Next to continue. GFI MailArchiver 6.1 for Exchange - Getting Started Guide Upgrades 7 Screenshot 1 - Entering the administrator email address and product license key 6. Key in the administrator email address (used for notification messages) and license key. NOTE: To evaluate GFI MailArchiver, leave the default „evaluation‟ value. Click Next to continue. 7. Click Next to continue by installing GFI MailArchiver to the default folder. For an alternative location, click Change and select a new installation path. 8. Select the website where you want to install the GFI MailArchiver web interface from the Website list. In the Virtual Directory Alias box (set to „MailArchiver‟ by default), key in the name for the GFI MailArchiver web interface virtual folder. Click Next to continue. Screenshot 2 - Selecting a Website and Virtual Directory 8 Upgrades GFI MailArchiver 6.1 for Exchange - Getting Started Guide 9. Click Install to install GFI MailArchiver. 10. Click Upgrade to upgrade your database schema to the new GFI MailArchiver schema and click Next to continue setup. NOTE 1: Next button is disabled until the Tell me more button is clicked. NOTE 2: To continue setup without updating your database schema, select the I do not want to upgrade the schema now option and click Next. 11. Click Finish to close the installation wizard. 3.2 Post install actions 3.2.1 Check licensing A valid license key enables you to use GFI MailArchiver without any restrictions. If upgrading: From the same version but an older build (e.g. from version 6.0 to version 6.1), check license key. For more information on obtaining a new license key, refer to: http://www.gfi.com/products/gfi-mailarchiver/pricing From a previous version of GFI MailArchiver (e.g. version 5 to version 6): follow the steps below to enter fully purchased license key for current version. 1. Click Start ► All Programs ► GFI MailArchiver ► GFI MailArchiver and key in username and password of an account with administrative privileges to access the GFI MailArchiver configuration. 2. Click GFI MailArchiver ► Configuration ► Licensing node. 3. Key in or paste the GFI MailArchiver license key you bought in the License key field then click Verify License Key. 4. Click Save Settings. GFI MailArchiver 6.1 for Exchange - Getting Started Guide Upgrades 9 4. New Installations 4.1 Where should GFI MailArchiver be installed? Install GFI MailArchiver on a machine that is part of an Active Directory domain. Before proceeding with the installation, first consider the following details: Email volume on your servers – Installing GFI MailArchiver on a mail server where a high volume of emails received and processed will invariably put more load on server resources. This can cause these servers to become unresponsive and not process mail in a timely fashion. Hardware and software specifications of your servers – The hardware and software specifications listed in the System requirements section above should be considered to be over and above the requirements of other software installed on the same server. Servers which are nearing their capacity in terms of resources should not be used to install GFI MailArchiver. Need to archive email from multiple sources concurrently – Installing GFI MailArchiver on a server which is not granted access to multiple sources creates a problem in the centralization efforts of email data archival. If all of the above details are considered not to be of significant issues then you can consider installing GFI MailArchiver on the mail server. Example: If you need to archive email from one Microsoft Exchange Server, and the server is handling the email flow on your network and still has spare processing capacity, then you can consider installing GFI MailArchiver on the Microsoft Exchange Server machine directly. If you want to archive email from multiple Microsoft Exchange servers using IMAP, it is recommended that you install GFI MailArchiver on a separate server. GFI MailArchiver does not require a dedicated machine when it is not installed on the mail server. Example: Install GFI MailArchiver on machines running other applications such as GFI MailEssentials or GFI MailSecurity. GFI MailArchiver 6.1 for Exchange - Getting Started Guide New Installations 11 4.2 Pre installation action 1 – Enable Journaling 4.2.1 Set up Journaling for Microsoft Exchange Server 2000/2003 Journaling is a feature that enables the recording of all email in an organization. Microsoft Exchange journaling enables the channeling of data into an archival solution with minimum overhead. While, by definition, journaling is the ability to record emails, archival reduces the strain of storing data through backups, removal, and storage. GFI MailArchiver uses Microsoft Exchange journaling to centralize all the emails to archive in a single mailbox. NOTE: If journaling is not set up correctly, email archiving will NOT work. Step 1: Create a new journaling mailbox. 1. Select Start ► Programs ► Microsoft Exchange ► Active Directory Users and Computers. Screenshot 3 - Add new user in Microsoft Exchange 2003 2. Expand the domain to archive emails from, right-click Users node and select New ► User. 12 New Installations GFI MailArchiver 6.1 for Exchange - Getting Started Guide Screenshot 4 - New Object - User dialog 3. Key in a relevant „User logon name‟ (e.g. journal), fill in other new user details, and click Next. Screenshot 5 - Add a password 4. Key in a password, unselect user must change password at next logon option and enable user cannot change password and password never expires options. Click Next to continue setup. GFI MailArchiver 6.1 for Exchange - Getting Started Guide New Installations 13 NOTE: Ensure that the password keyed in meets the password complexity requirements setup for your Active Directory users. 5. Click Next and review the new user details. Click Finish to create new user. Step 2: Configure email archival to journaling mailbox 1. Select Start ► Programs ► Microsoft Exchange ► System Manager. Screenshot 6 - Mailbox store node properties 2. Expand Servers ► <Your Server name> ► Storage group, right click Mailbox Store node and select Properties. 14 New Installations GFI MailArchiver 6.1 for Exchange - Getting Started Guide Screenshot 7 - Enabling journaling on a Microsoft Exchange mailbox store 3. From the General tab, select the Archive all messages sent or received by mailboxes on this store check box and click Browse button. 4. Select the journaling mailbox name you created in step one, for example „journal‟, and click OK. 5. Close the Mailbox Store Properties dialog and the Exchange System Manager Management console. Step 3: Enable BCC information journaling On Microsoft Exchange Server 2000 and Microsoft Exchange Server 2003 systems, BCC information is not by default included in the journaled message. To enable BCC information journaling: For Microsoft Exchange Server 2000 only 1. Install hot fix available from: http://support.microsoft.com/?kbid=810999 For both Microsoft Exchange Server 2000 and Microsoft Exchange Server 2003. 1. From command prompt, type regedit.exe 2. Add the following registry key: HKEY_LOCAL_MACHINE\System\CurrentControlSet\Services\MSEx changeTransport\Parameters 3. Add the following registry key and values: GFI MailArchiver 6.1 for Exchange - Getting Started Guide New Installations 15 HKEY_LOCAL_MACHINE\System\CurrentControlSet\Services\MSEx changeTransport\Parameters\ Key name: JournalBCC Data type: Dword Data value: 1 4. Close Registry editor and from command prompt type services.msc. Restart Simple Mail Transport Protocol and the Information Store services. Step 4: Enable Envelope Journaling Envelope Journaling enables the archival of email header information and can be switched on using: Microsoft Exchange Server Email Journaling Advanced Configuration (exejcfg.exe), or ADSI Editor Management console. Using the exejcfg.exe tool 1. Download the exejcfg.exe tool from: http://www.microsoft.com/downloads/details.aspx?familyid=E7F73F10 -7933-40F3-B07E-EBF38DF3400D&displaylang=en 2. From the command prompt, navigate to the folder in which you copied the exejcfg.exe tool. 3. Type exejcfg –e and press Enter. NOTE: exejcfg –d disables Envelope Journaling for that organization. Using the ADSI editor 1. Locate the adsiedit.msc tool from the Windows 2000 Server resource kit or the Windows 2003 Server support tools. 2. From command prompt, navigate to the folder where adsiedit.msc is stored, type adsiedit.msc and then press Enter. 16 New Installations GFI MailArchiver 6.1 for Exchange - Getting Started Guide Screenshot 8 - ADSI Edit 3. Expand ADSI Edit ► Configuration ► <CN=Configuration> ► <CN=Services> ► <CN=Microsoft Exchange> node. 4. Right-click CN<your organization name> node and click Properties. GFI MailArchiver 6.1 for Exchange - Getting Started Guide New Installations 17 Screenshot 9 - Heuristics attribute 5. Select heuristics attribute from the Attributes list and click Edit. Screenshot 10 - Editing the heuristics attribute value 6. Key in „512‟ and click OK. 7. Click OK to save and close the ADSIEdit console. Note: A value of 512 enables Envelope Journaling, and a value of 0 disables Envelope Journaling. 18 New Installations GFI MailArchiver 6.1 for Exchange - Getting Started Guide 4.2.2 Setting up journaling for Microsoft Exchange Server 2007 Journaling is a feature that enables the recording of all email in an organization. Microsoft Exchange journaling enables the channeling of data into an archival solution with minimum overhead. While, by definition, journaling is the ability to record emails, archival reduces the strain of storing data through backups, removal, and storage. GFI MailArchiver uses Microsoft Exchange journaling to centralize all the emails to archive in a single mailbox. NOTE: If journaling is not set up correctly, email archiving will NOT work. Microsoft Exchange 2007 supports two types of journaling: Standard journaling: This feature enables the configuration of a Mailbox store that enables the recording of email in an organization. GFI MailArchiver can use Microsoft Exchange journaling to centralizer all the emails to archive in a single mailbox for archival. This type of journaling is also called permailbox database journaling. Premium journaling: Only available with the Microsoft Exchange Enterprise client access license. It enables an administrator to setup custom journaling rules such as: o Archive only incoming emails o Archive only outgoing emails o Archive emails for a particular group. This journaling is also called per-recipient journaling. GFI MailArchiver utilizes this type of journaling by detecting and displaying these rules in the Data Sources Configuration Wizard. NOTE: If journaling is not set up correctly, email archiving will NOT work. Which journaling method shall I use? Choose standard journaling to archive all emails (inbound and outbound) for all users in your organization. Choose premium journaling of you want more control over the emails to archive (e.g. only for specific users or for inbound or outbound only). Note that premium journaling requires a Microsoft Exchange Enterprise client access license. Set up standard journaling Step 1: Create a new journaling mailbox 1. Select Start ► All Programs ► Microsoft Exchange Server 2007 ► Microsoft Exchange Management Console. 2. Expand Recipient Configuration node and click on Mailbox node. 3. Select New Mailbox… from the Actions pane. 4. Select User Mailbox option and click Next. 5. Select New user option and click Next. GFI MailArchiver 6.1 for Exchange - Getting Started Guide New Installations 19 Screenshot 11 - New user mailbox details 6. Key in the „User information‟ details for the new user to which the new journaling mailbox will be assigned and click Next. 7. Ensure that the mailbox settings are correct and click Next. 8. Review the new mailbox summary for the new mailbox to create and click New. Step 2: Configure standard journaling 1. Select Start ► All Programs ► Microsoft Exchange Server 2007 ► Microsoft Exchange Management Console. 20 New Installations GFI MailArchiver 6.1 for Exchange - Getting Started Guide Screenshot 12 – Configuring a Mailbox Database 2. Expand Microsoft Exchange ► Server Configuration ► Mailbox node and click Properties from the Actions pane. Screenshot 13 – Mailbox Database properties GFI MailArchiver 6.1 for Exchange - Getting Started Guide New Installations 21 3. Select Journal Recipient option, click Browse, and select mailbox previously configured from the Active Directory. 4. Click OK to finalize setup. Set up premium journaling 1. Select Start ► All Programs ► Microsoft Exchange Server 2007 ► Microsoft Exchange Management Console. Screenshot 14 – Configuring Journaling rules 2. Expand Organization Configuration ► Hub Transport node and select Journaling tab. 3. From the Actions tab and click on New Journaling Rule. 22 New Installations GFI MailArchiver 6.1 for Exchange - Getting Started Guide Screenshot 15 –Creating a new Journaling rule 4. Key in a name for the new rule and click Browse. Select the Journal e-mail address, preferably a mailbox within the existing Microsoft Exchange organization, from Active Directory. 5. <Optional> Configure: Scope – Select whether to journal all email (Global), internal or external email. Journal e-mail for recipient - Select specific recipient(s) for which this journaling rule applies. 6. Ensure that the Enable Rule option is enabled and click New. NOTE: In Microsoft Exchange Server 2007, envelope journaling is automatically enabled by default. 4.3 Pre installation action 2 – Setup database As an archiving solution, GFI MailArchiver is highly dependent on your database infrastructure setup for high performance in terms of data archival and retrieval. 4.3.1 Configuring the Firebird database GFI MailArchiver uses the open source Firebird database as the default database. This database should meet the needs of a small to medium sized organization with an average volume of emails. The recommended setup for GFI MailArchiver using the Firebird database is as follows: Physical HDD 1: Operating System and GFI MailArchiver installation. GFI MailArchiver 6.1 for Exchange - Getting Started Guide New Installations 23 Physical HDD 2: Firebird database data store. Physical HDD 3: Mail database indexes. This configuration ensures that different processes are distributed to distinct physical hard disk drives. This eliminates performance loss due to excessive data read/write operations on the same physical hard disk drive. NOTE: You are not required to install any firebird database server to use the firebird database with GFI MailArchiver. Creation/management of the firebird database is automated through GFI MailArchiver. 4.3.2 Configuring the Microsoft SQL Server Setting up a Microsoft SQL server is recommended for larger organizations with a substantial volume of emails to archive. The recommended setup for GFI MailArchiver using a Microsoft SQL Server 2000/2005/2008 database is as follows: Physical HDD 1: Operating System and GFI MailArchiver installation. Physical HDD 2: Microsoft SQL Server data file (.mdf). Physical HDD 3: Microsoft SQL Server log file (.ldf) Physical HDD 4: Mail database indexes. This configuration ensures that different processes are distributed to distinct physical hard disk drives. This eliminates performance loss due to excessive data read/write operations on the same physical hard disk drive. Important Notes 1. Configure any Microsoft SQL Server to use Mixed Authentication mode for use it with GFI MailArchiver. Achieve this by: Right-click on the SQL Server node ► Properties from the Enterprise Manager Access Security tab and select SQL Server and Windows under Authentication. Save settings. 2. After the first month of archiving, note the database data file size. With this value, estimate the archive database size after six months, for example. If you estimate that your archive database will be larger than 20 GB, you should consider configuring the archive stores management feature of GFI MailArchiver. 3. Ensure that Journaling is enabled on Microsoft Exchange Server. Creating a Microsoft SQL Server 2000 database 1. Select Start ► All Programs ► Microsoft SQL Server 2000 ► SQL Management Studio. 2. Expand the SQL Server node where you want to create the database. 3. Right-click Databases node, and click New Database. 4. <Optional> Customize the following values for performance: 24 New Installations GFI MailArchiver 6.1 for Exchange - Getting Started Guide Pre-allocate space for both the data and transaction (log) files, (e.g. 500 MB for data file, and 50MB for transaction file). Set file growth for both data and transaction (log) files to a fixed value in megabytes, not more than 100 MB. Ensure that Maximum file size option is set to Unrestricted file growth for both data and transaction (log) files. 5. Key in a name for the new database in the Name box, for example, 'MailArchiver', and click OK. 4.3.3 Creating a Microsoft SQL Server 2005 database 1. Select Start ► All Programs ► Microsoft SQL Server 2005 ► SQL Management Studio. 2. Right click Databases node and select New Database… 3. Key in a name for the new database in the Database name field, for example, „MailArchiver‟. 4. <Optional> Customize the following values for performance: Pre-allocate space for both the data and transaction (log) files, (e.g. 500 MB for data file, and 50MB for transaction file). Set file growth for both data and transaction (log) files to a fixed value in megabytes, not more than 100 MB. Ensure that Maximum file size option is set to Unrestricted file growth for both data and transaction (log) files. 5. Click OK to finalize setup. Creating a Microsoft SQL Server 2008 database 1. Select Start ► All Programs ► Microsoft SQL Server 2008 ► SQL Management Studio. 2. From the Object Explorer, connect to an instance of the SQL Server Database Engine and then expand that instance. 3. Right-click Databases, and click New Database. 4. In New Database, enter a database name. 5. <Optional> Customize the following values for performance: Pre-allocate space for both the data and transaction (log) files, (e.g. 500 MB for data file, and 50MB for transaction file). Set file growth for both data and transaction (log) files to a fixed value in megabytes, not more than 100 MB. Ensure that Maximum file size option is set to Unrestricted file growth for both data and transaction (log) files. 6. Click OK to finalize setup. 4.4 Pre-installation action 3 – Enable IMAP IMAP is required when GFI MailArchiver is not installed on the same machine running Microsoft Exchange Server. The IMAP service is needed to access the „Journaling mailbox‟ (refer to glossary for more information) on the remote Microsoft Exchange Server. By default IMAP service is disabled. To enable: 1. Click Start ► Run and type „Services.msc‟. GFI MailArchiver 6.1 for Exchange - Getting Started Guide New Installations 25 Screenshot 16 – Enabling the IMAP service 2. Locate the „Microsoft Exchange IMAP4‟ service. Right-click on the service and select Properties. 3. Select Automatic from the Startup type drop-down provided, click Apply, and click Start. 4. Click OK to save settings and close the dialog. Confirm that the service is now running. 5. By default, on Microsoft Exchange Server 2007, IMAP uses SSL to secure the connection. To use simple authentication instead of SSL: From the „Microsoft Exchange Management Shell‟, type „setimapsettings –logintype plaintextlogin‟ and click Enter. Restart the „Microsoft Exchange Information Store‟ Restart the „Microsoft Exchange IMAP Service‟. 26 New Installations GFI MailArchiver 6.1 for Exchange - Getting Started Guide 4.5 Installation procedure 4.5.1 Important notes 1. Ensure that you are logged on as Administrator or using an account with administrative privileges. 2. Save any pending work and close all open applications on the machine. 3. Check that the machine you are installing GFI MailArchiver on meets the system and hardware requirements specified earlier in this chapter. 4. Check the Microsoft Exchange Server role: GFI MailArchiver cannot be installed on the Microsoft Exchange Server 2007 Edge Role, since such a server is typically deployed on a DMZ using ADAM instead of Active Directory. Ensure to enable IMAP if installing on the Microsoft Exchange Server 2007 Client Access Role. 5. Ensure that Journaling is enabled on Microsoft Exchange Server. 4.5.2 Installing GFI MailArchiver 1. Double-click on: mailarchiver6.exe to install GFI MailArchiver on x86 systems mailarchiver6_x64.exe to install GFI MailArchiver on x64 systems 2. On the Welcome page, click Next. 3. Select whether to check for a newer build of GFI MailArchiver on the GFI Website. Click Next to continue. 4. Read the license agreement and select I accept the terms in the license agreement option. Click Next to continue. Screenshot 17 - Entering the administrator email address and product license key GFI MailArchiver 6.1 for Exchange - Getting Started Guide New Installations 27 5. Key in the administrator email address and license key. NOTE: To evaluate GFI MailArchiver, leave the default „evaluation‟ value. Click Next to continue. 6. Click Next to continue by installing GFI MailArchiver to the default folder. For an alternative location, click Change and select a new installation path. 7. Select the website where you want to install the GFI MailArchiver web interface from the Website list. In the Virtual Directory Alias box (set to „MailArchiver‟ by default), key in the name for the GFI MailArchiver web interface virtual folder. Click Next to continue. Screenshot 18 - Selecting a Website and Virtual Directory 8. Click Install to install GFI MailArchiver. 9. Click Tell me more for detailed information on configuring Microsoft Exchange server journaling. Follow the instructions to enable Microsoft Exchange Journaling and click Next to continue setup. NOTE 1: For detailed instructions on how to enable journaling, refer to the Pre installation action 1 – Enable Journaling section starting on page 12 of this manual. NOTE 2: Next button is disabled until the Tell me more button is clicked. NOTE 3: If Journaling is already enabled on Microsoft Exchange server, select the I do not want... option. This will enable you to continue setup without reviewing the instructions on how to enable journaling. 10. Click Finish to close the installation wizard. 4.6 Post install actions 4.6.1 Enter your license key A valid license key enables you to use GFI MailArchiver without any restrictions. 28 New Installations GFI MailArchiver 6.1 for Exchange - Getting Started Guide 1. Click Start ► All Programs ► GFI MailArchiver ► GFI MailArchiver and key in username and password of an account with administrative privileges to access the GFI MailArchiver configuration. 2. Click GFI MailArchiver ► Configuration ► Licensing node. 3. Key in or paste the GFI MailArchiver license key you bought in the License key field then click Verify License Key. 4. Click Save Settings. 4.6.2 Configure archiving and user exclude options 1. From the GFI MailArchiver management console, expand Configuration node and click Archiving and User Exclude Options. 2. Under Archiving Options, unselect any emails that you do not want to archive (inbound, outbound or internal). 3. Under User Exclude Options, select the option that will allow you to archive emails for the desired users only. For example: Select Archive emails for all users, except anyone listed below if you do not want to archive email for individuals in the management department. 4. Click Save Settings to save archiving and user exclude options. 4.6.3 Configure archive stores Archive stores are the GFI MailArchiver databases where emails are archived. On installing GFI MailArchiver, a Firebird database is automatically installed. To change the default database: 1. From the GFI MailArchiver management console, expand the Configuration node and click on Archive Stores. 2. Click Add Archive Store. 3. In the Archive Store Name field, key in a name for the new archive store, and click Next. 4. Select: Microsoft SQL server – To use a Microsoft SQL Server database where ALL the archive information (including original email binary source) will be stored. Microsoft SQL Server database and file system – To use a Microsoft SQL server as the backend database and a separate location for the binary sources files. GFI MailArchiver database and file system – To use a Firebird database as the backend database and a separate location for the binary sources files. Click Next to continue setup. 5. Specify the location where to store archive data. Click Next to continue setup. 6. Specify a location where the original emails (binary source) will be stored. Also, specify login details in case of a UNC path. Click Next to continue setup. 7. At the verify schema screen click Next. 8. Specify the location where the search indexes will be stored. Click Next to continue setup. GFI MailArchiver 6.1 for Exchange - Getting Started Guide New Installations 29 NOTE: It is highly recommended to always use a different physical disk from where the Firebird or SQL server data is stored as the index location. 9. Click Finish to finalize setup and Save Settings save new archive store. 4.6.4 Configure the mail servers to archive 1. From the GFI MailArchiver management console, expand Configuration node and click Mail Servers to Archive. 2. Click Add Mail Server. 3. Select the type of mail server that you want to configure (local or remote) and click Next. 4. Select the journaling mailbox from where to archive emails and click Next. 5. Select: ExOLEDB: Use this option if GFI MailArchiver is installed on the server where Microsoft Exchange server is running. This enables GFI MailArchiver to connect to Microsoft Exchange without requiring any additional credentials. IMAP: Use this option if GFI MailArchiver is installed on a server that is different from where Microsoft Exchange is installed. Specify the journaling mailbox login credentials in the wizard. Click Next to continue setup. 6. In the Connection test screen, click Next. 7. Click Finish to finalize setup and Save Settings save new mail server to archive. 4.6.5 Configure access control By default, an Active Directory user can browse and search only through his/her emails. Access control enables configurations where specific users or groups can access other user‟s emails. 1. From the GFI MailArchiver management console, expand Configuration node and click Access Control. 2. Under Full Access Group, select any Active Directory group to grant full access permissions to on all archived emails. 3. Under Group Managers, configure any group managers that should have access to the archived emails of the users part of a particular AD group. Click Add Manager assign group managers. 4. Under User Access Control, configure any users that should have access to the archived emails of other users. Click Add User to finalize user setup. 5. Click Save Settings to finalize access control setup. 4.6.6 Configure search indexes Search indexes enable the timely retrieval of archived emails. 1. From the GFI MailArchiver management console, expand Configuration node and click on Search Index Management. 2. Select an index frequency: 30 New Installations GFI MailArchiver 6.1 for Exchange - Getting Started Guide Index new archived emails immediately – Emails are indexed as soon as these are received by GFI MailArchiver. This is the default value. Index new archived emails every – Emails are indexed on a specified periodical timed schedule (e.g. every half hour, every hour, etc) Index new archived emails every day at: - Emails are indexed on a daily basis at a specified time. (e.g. daily at 00:30 am) NOTE: Frequent email indexing requires more hardware resources, such as hard disk speed. 4.6.7 Set up retention policies Retention policies enable you to configure how long specific emails are kept in the archive store. 1. From the GFI MailArchiver management console, expand Configuration node and click Retention Policies. 2. Click on Add Retention Policy. 3. Key in a name of the new policy and click Next. 4. Specify any subject keywords and click Next. 5. Specify any body keywords and click Next. 6. Specify any email senders and click Next. 7. Specify any email recipients and click Next. 8. Specify whether emails matching the criteria that you set up should be deleted immediately or after a number of days and click Next. 9. Click Finish to finalize retention policy setup and Save settings to save settings. 4.6.8 Enable mailbox folder structure retrieval The mailbox folder structure retrieval feature replicates the mailbox folder structure within the Microsoft Exchange Server mailboxes within GFI MailArchiver. To enable this feature: A special user must be created and be granted authority on all user mailboxes stored on the Microsoft Exchange Server. The same special user must be granted executable rights on the machine on which GFI MailArchiver is installed. This is required because the user mailbox synchronization agent accessing the mailboxes, runs on the same machine on which GFI MailArchiver is installed. Microsoft Exchange 2000/2003 1. Log in as Administrator or using an account with administrative privileges. GFI MailArchiver 6.1 for Exchange - Getting Started Guide New Installations 31 Screenshot 19 – Microsoft Exchange System Manager 2. Create a new user in Active directory. NOTE: New user does not require a mailbox to be attached. Microsoft Windows Server 2000/2003 o Click Start ► Settings ► Control Panel ► Administrative Tools ► Active Directory Users and Computers. o Expand <Domain Name> ► Users node and right click Users ►New ► User. o Key in „First name‟, „Last name‟, „Full name‟ and „User logon name‟ and click Next. o Key in „Password‟ and „Confirm password‟ values, unselect User must change password at next logon option and select User cannot change password and Password never expires options. Click Next to continue setup. o Unselect Create an Exchange mailbox option and click Next. o Review new user details and click Finish to create new user. Microsoft Windows Server 2008 o Click Start ► Run and type cmd, and OK. o Key in: dsadd user <UserDN> -pwd <Password> -disabled no Where: Parameter Description <UserDN> Specifies the distinguished name of the user object to be added. Sets <Password> value. Specifies the password to be used for the user account. If this parameter is set to *, you are prompted for a user password. -pwd <Password> 32 New Installations GFI MailArchiver 6.1 for Exchange - Getting Started Guide Example: dsadd user CN=masynch,CN=Users,DC=masterdomain,DC=Com -pwd Password1 -disabled no 3. From the Microsoft Exchange System Manager, expand Server node from the appropriate administrative group. Right click on the server and click on Properties. Screenshot 20 – Security tab 4. Access Security tab. Screenshot 21 – Security tab GFI MailArchiver 6.1 for Exchange - Getting Started Guide New Installations 33 5. Select a listed user from Group or user names or click Add… to add the user to whom you granted special authority on all user mailboxes. Screenshot 22 – Grant full control to the user 6. In the permissions list, click Allow next to Full Control to grant full control permissions to the user that you just created. 7. If GFI MailArchiver is installed on a domain controller: From Control Panel ► Administrative Tools, select Domain Controller Security Policy. Expand Local Policy and click User Rights Assignment From the right pane, double click Allow log on locally Click Add User or Group and key in the user configured in the GFI MailArchiver Mailbox Synchronization configuration. Load Microsoft Windows command prompt, and key in gpupdate /force to refresh the local and Active Directory-based Group Policy settings. 8. From the GFI MailArchiver management console, expand Configuration node and click Mailbox folder structure replication. 9. Select Enable mailbox folder structure replication checkbox. 10. Key in the credentials for the user with access to all the mailboxes. NOTE: Specify login name in domain\username format. 34 New Installations GFI MailArchiver 6.1 for Exchange - Getting Started Guide 11. Click Test access to mailboxes button to text access to mailboxes. If test fails, check credentials and retest. 12. <Optional> Click Add New Policy to create a policy that excludes specific folders from being replicated. Key policy name and click Next. Add folders to exclude and click Next. To apply new policy to selected users only, select Apply for selected users only option and key the users the users to which this folder applies. Click Next and Finish to finalize new policy setup. 13. Click Save Settings to complete setup. Microsoft Exchange 2007 (not SP1) 1. Click Start ► Run and type cmd, and OK. 2. Key in: dsadd user <UserDN> -pwd <Password> -disabled no Where: Parameter Description <UserDN> Specifies the distinguished name of the user object to be added. Sets <Password> value. Specifies the password to be used for the user account. If this parameter is set to *, you are prompted for a user password. -pwd <Password> Example: dsadd user CN=masynch,CN=Users,DC=masterdomain,DC=Com -pwd Password1 -disabled no 3. Open the Exchange Management Shell. 4. Run the following Windows PowerShell commandlet Add-ADPermission -identity “Mailbox Store” -User “Trusted User” -AccessRights GenericAll Example: Add-ADPermission –Identity “Mailbox Database” -User “master-domain\masynch” –AccessRights GenericAll Repeat the procedure described above for each mailbox store database required. 5. If GFI MailArchiver is installed on a domain controller: From Control Panel ► Administrative Tools, select Domain Controller Security Policy. Expand Local Policy and click User Rights Assignment From the right pane, double click Allow log on locally Click Add User or Group and key in the user configured in the GFI MailArchiver Mailbox Synchronization configuration. Load Microsoft Windows command prompt, and key in gpupdate /force to refresh the local and Active Directory-based Group Policy settings. 6. From the GFI MailArchiver management console, expand Configuration node and click Mailbox folder structure replication. 7. Select Enable mailbox folder structure replication checkbox. GFI MailArchiver 6.1 for Exchange - Getting Started Guide New Installations 35 8. Key in the credentials for the user with access to all the mailboxes. NOTE: Specify login name in domain\username format. 9. Click Test access to mailboxes button to text access to mailboxes. If test fails, check credentials and retest. 10. <Optional> Click Add New Policy to create a policy that excludes specific folders from being replicated. Key policy name and click Next. Add folders to exclude and click Next. To apply new policy to selected users only, select Apply for selected users only option and key the users the users to which this folder applies. Click Next and Finish to finalize new policy setup. 11. Click Save Settings to complete setup. Microsoft Exchange 2007 SP1 1. Click Start ► Run and type cmd, and OK. 2. Key in: dsadd user <UserDN> -pwd <Password> -disabled no Where: Parameter Description <UserDN> Specifies the distinguished name of the user object to be added. Sets <Password> value. Specifies the password to be used for the user account. If this parameter is set to *, you are prompted for a user password. -pwd <Password> Example: dsadd user CN=masynch,CN=Users,DC=masterdomain,DC=Com -pwd Password1 -disabled no 3. Open the Exchange Management Shell. 4. Run the following Windows PowerShell commandlet: foreach ($exchangeServer in Get-ExchangeServer) { if ($exchangeServer.ServerRole -match 'ClientAccess') { Add-ADPermission -Identity $exchangeServer.DistinguishedName -User 'domain\user' -ExtendedRights ms-Exch-EPIImpersonation } } Example: foreach ($exchangeServer in Get-ExchangeServer) { if ($exchangeServer.ServerRole -match 'ClientAccess') { 36 New Installations GFI MailArchiver 6.1 for Exchange - Getting Started Guide Add-ADPermission -Identity $exchangeServer.DistinguishedName -User 'master-domain\masynch' -ExtendedRights msExch-EPI-Impersonation } } Repeat the procedure described above for each mailbox store database required. 5. If GFI MailArchiver is installed on a domain controller: From Control Panel ► Administrative Tools, select Domain Controller Security Policy. Expand Local Policy and click User Rights Assignment From the right pane, double click Allow log on locally Click Add User or Group and key in the user configured in the GFI MailArchiver Mailbox Synchronization configuration. Load Microsoft Windows command prompt, and key in gpupdate /force to refresh the local and Active Directory-based Group Policy settings. 6. From the GFI MailArchiver management console, expand Configuration node and click Mailbox folder structure replication. 7. Select Enable mailbox folder structure replication checkbox. 8. Key in the credentials for the user with access to all the mailboxes. NOTE: Specify login name in domain\username format. 9. Click Test access to mailboxes button to text access to mailboxes. If test fails, check credentials and retest. 10. <Optional> Click Add New Policy to create a policy that excludes specific folders from being replicated. Key policy name and click Next. Add folders to exclude and click Next. To apply new policy to selected users only, select Apply for selected users only option and key the users the users to which this folder applies. Click Next and Finish to finalize new policy setup. 11. Click Save Settings to complete setup. 4.7 Test your setup Test your setup to ensure that emails are archived successfully. 1. From an external account (e.g. Webmail, Hotmail, Gmail, etc) create a new email and send it to a valid email address which mailbox contents are being archived. 2. From the GFI MailArchiver management console, expand Conversations node and click Browse. 3. From the List conversations from option select the user for whom to browse conversations. GFI MailArchiver 6.1 for Exchange - Getting Started Guide New Installations 37 Screenshot 23 – Email sent from webmail to Microsoft Exchange Server email account Screenshot 24 - Email archived by GFI MailArchiver 4. Review the conversations to ensure that emails sent are displayed in GFI MailArchiver. 38 New Installations GFI MailArchiver 6.1 for Exchange - Getting Started Guide Example: o Send an email from a webmail account to an email account which is being archived (e.g. [email protected]). o Select Conversations ► Browse and select the email account to review ([email protected]). o Review the conversation threads listed and locate the email sent from webmail. In case that emails are not being archived by GFI MailArchiver: Ensure that your email infrastructure is working correctly by checking that the email is received by your Microsoft Exchange server and that it goes through the recipient mailbox. Ensure that all the pre installation actions starting on page 12 in this manual are completed Ensure that all the installation and post installation actions in this manual are completed correctly. Refer to the Administration and configuration guide available from: http://www.gfi.com/mar/mar6acmanual.pdf 4.8 Deploy Outlook connector Use the MailArchiver outlook connector to access your email archives from within your Microsoft Outlook software. This connector can be installed via Active Directory Group Policy Objects (GPO) or via manual install. Installing via GPO 1. Navigate to <Program Files\GFI\MailArchiver\Outlook> and copy MAR6OutlookConnector.msi to a share accessible by all domains. 2. From command prompt, type mmc.exe and click Enter. 3. Click File ► Add/Remove Snap-in… and click Add... GFI MailArchiver 6.1 for Exchange - Getting Started Guide New Installations 39 Screenshot 25 - Select Group Policy Object Editor 4. Select Group Policy Object Editor snap-in and click Add… Screenshot 26 - Select Domain Policy to edit 5. Click Browse… and select the domain policy to edit. 40 New Installations GFI MailArchiver 6.1 for Exchange - Getting Started Guide 6. Select the domain policy and click OK. Click Finish to close „Select Group Policy Object‟ dialog. Click Close to close „Add standalone Snap-in‟ dialog and click OK to close „Add/Remove Snap-in‟ dialog. 7. Select Console Root ► User Configuration, right click Administrative Templates, and select Add/Remove Templates… Screenshot 27 - Locate gfiapps.adm 8. Click Add… and browse for the file gfiapps.adm located in: <\<folder name>\GFI\MailArchiver\Outlook> 9. Click Open. 10. Expand Domain Policy ► User Configuration ► Administrative Templates ► GFI Applications. GFI MailArchiver 6.1 for Exchange - Getting Started Guide New Installations 41 Screenshot 28 - Change Server URL 11. From the right pane, double click GFI MailArchiver Server Location policy, select Enabled, and change the server URL. 12. From the Group Policy Object Editor opened in step 4, expand Domain Policy node ► Computer Configuration node ► Software Settings node. 13. Right click Software installation and select New ► Package… Screenshot 29 - Select MAROutlookConnector.msi 42 New Installations GFI MailArchiver 6.1 for Exchange - Getting Started Guide 14. In the Open dialog, locate MAROutlookConnector.msi is saved. the share where NOTE: When selecting the location of msi file ensure that this is done through „My network locations‟ so that the share name in GFI MailArchiver includes the full network share location rather than the local path. Screenshot 30 - Select ‘Assigned’ option 15. Choose the deployment option – select Assigned and OK. To check installation, from Microsoft Outlook, check that a new folder called GFI MailArchiver Mailbox is created. Installing without GPO – Manual install 1. Copy MAR6OutlookConnector.exe located in: <Program Files\GFI\MailArchiver\Outlook> to the client machines on which you would like to install the GFI MailArchiver Outlook Connector. 2. Double click on the file and follow the wizard to install. To check installation, from Microsoft Outlook, check that a new folder called GFI MailArchiver Mailbox is created. 3. <Optional>: Add the Outlook connector administrator template that will set up Outlook connector. From command prompt, type mmc.exe and click Enter. Click File ► Add/Remove Snap-in… and click Add... Select „Group Policy Object Editor‟ snap-in and click Add… Click Browse… and select the domain policy to edit. Select the domain policy and click OK. Click Finish to close „Select Group Policy Object‟ dialog. Click Close to close „Add standalone Snap-in‟ dialog and click OK to close „Add/Remove Snap-in‟ dialog. GFI MailArchiver 6.1 for Exchange - Getting Started Guide New Installations 43 Select Console Root ► User Configuration, right click Administrative Templates and select Add/Remove Templates… Click Add… and browse for the file gfiapps.adm located in: <\<folder name>\GFI\MailArchiver\Outlook> Click Open. 44 New Installations GFI MailArchiver 6.1 for Exchange - Getting Started Guide 5. Role-based Installations 5.1 Introduction Role-based Deployment allows for scalability of GFI MailArchiver in large IT infrastructures dealing with heavy email traffic. This is achieved through the deployment of multiple GFI MailArchiver instances on separate servers. Each instance is configured to fulfill diverse roles, to balance workload and collectively help for the smooth running of the email archiving process. The following roles can currently be assigned to GFI MailArchiver instances: Central Configuration Service Data Collection Storage Search and Indexing User Interface and Administration Data Import Service GFI MailArchiver 6.1 for Exchange - Getting Started Guide Role-based Installations 45 5.2 How role-based deployment works Figure 2 - How Role-based Deployment works The GFI MailArchiver role-based deployment process in a distributed environment involves the following steps: 1. Establish the number of GFI MailArchiver instances required and the role to assign to each instance. 2. Install GFI MailArchiver on each server that will be participating in the deployment. This is a normal installation as described in the previous sections in this manual. 3. Execute the Deployment Manager Wizard on each GFI MailArchiver instance. 4. Store each server‟s deployment configuration file for future reference. This file may be required when updating to newer GFI MailArchiver builds or when the administrator needs to reconfigure the deployment roles. 5. Configure GFI MailArchiver from the server with the User Interface and Administration role. NOTE 1: GFI MailArchiver instances communicate with each other over the network using the .NET Remoting protocol. NOTE 2: A GFI MailArchiver instance can be assigned more than one role; the following roles can be assigned to more than one GFI MailArchiver instance: Data Collection User Interface and Administration 46 Role-based Installations GFI MailArchiver 6.1 for Exchange - Getting Started Guide Data Import Service Though there may be a number of GFI MailArchiver instances distributed over the network, this fact is transparent to the administrator when it comes to configuring GFI MailArchiver, since configuration is centralized. Once the deployment process is complete, the administrator does not have to configure individual servers but can carry out all configuration through the GFI MailArchiver management console. In a distributed deployment, the GFI MailArchiver management console is accessible from the server(s) assigned the User Interface and Administration role. 5.2.1 System requirements For the GFI MailArchiver Role-based deployment, you need: Hardware and software specifications as described in the „Installing GFI MailArchiver‟ chapter. NOTE 1: Role-based deployment is not supported on Windows 2000 server. NOTE 2: For a Role-based deployment only MS SQL Server based archive stores are supported. NOTE 3: If you are using a Microsoft SQL Server and NTFS file system archive store, make sure that the archived email binary source path is specified in UNC format. GFI MailArchiver services running under Active credentials allowing communication over the network. Directory 5.3 Installing GFI MailArchiver in a role-based environment You assign roles to GFI MailArchiver instances by using the Deployment Manager Wizard, which simplifies and streamlines the process. Installing GFI MailArchiver Install GFI MailArchiver on each instance where a role will be deployed. Follow the instructions listed in Installation procedure section starting on page 27 of this manual. Executing the Deployment Manager Wizard on each instance You need to execute the Deployment Manager Wizard on each GFI MailArchiver instance according to the role(s) it will be assigned, in the following order: 1. Central Configuration Service 2. Storage 3. Search and Indexing 4. Data Collection (more than one allowed) 5. User Interface and Administration (more than one allowed) 6. Data Import Service (more than one allowed) 7. User Mailbox Synchronization That is, you should first execute the wizard for the GFI MailArchiver instance which will be assigned the Central Configuration Service role, GFI MailArchiver 6.1 for Exchange - Getting Started Guide Role-based Installations 47 then execute it for the GFI MailArchiver instance with the Storage role, and so on. Launching the Deployment Manager Wizard To launch the Deployment Manager Wizard: 1. From Command Prompt, navigate to: <Program Files Directory>\GFI\MailArchiver\DM\ 2. Key in deploymentmanager.exe and press Enter. Using the Deployment Manager Wizard 1. After launching the Deployment Manager Wizard you are presented with the welcome dialog. Click Next to continue. Screenshot 31 – Selecting roles 2. Specify which role(s) will be assigned to the GFI MailArchiver instance on this server and click Next. NOTE: Move the mouse pointer over any role listed in the dialog to view the relevant description for that role. 3. Based on the roles selected in the previous stage, you will be asked to configure some parameters. For information on how to configure roles refer to the next sections. Click Next to continue. 48 Role-based Installations GFI MailArchiver 6.1 for Exchange - Getting Started Guide Screenshot 32 – Specify Active Directory credentials 4. Specify the Active Directory credentials under which to run GFI MailArchiver services and click Next. NOTE 1: GFI MailArchiver services must run under an Active Directory user account. NOTE 2: Specify an account that has read/write access privileges on the Microsoft Exchange configuration. Screenshot 33 – Apply all configuration settings specified 5. Click Next to initiate the process and apply all specified parameters. GFI MailArchiver 6.1 for Exchange - Getting Started Guide Role-based Installations 49 NOTE: During this process all GFI MailArchiver services need to be stopped and re-started. This occurs automatically and may take minutes to complete. 6. Click Finish to finalize your settings and close the Deployment Manager Wizard. Assigning the Central Configuration Service Role Screenshot 34 – Assigning the Central Configuration Service role To assign the „Central Configuration Service Role‟ select the appropriate option from the list of roles in the „Server Role Selection‟ dialog. The server assigned this role maintains the central configuration database of the GFI MailArchiver deployment and hosts miscellaneous services like email restore and licensing. You can only assign the „Central Configuration Service Role‟ to one server in the deployment. 50 Role-based Installations GFI MailArchiver 6.1 for Exchange - Getting Started Guide Assigning the Data Collection Role Screenshot 35 – Assigning the Data Collection role To assign the „Data Collection Role‟ select the appropriate option from the list of roles in the „Server Role Selection‟ dialog. The server assigned this role collects emails, to be archived, from Microsoft Exchange locations. To achieve maximum performance, assign the „Data Collection Role‟ to a GFI MailArchiver instance residing directly on the Microsoft Exchange server. You can assign this role to multiple servers in the deployment. However, ensure that the „server tagging‟ option is enabled when assigning the „User Interface and Administration Role‟. GFI MailArchiver 6.1 for Exchange - Getting Started Guide Role-based Installations 51 Assigning the Storage role Screenshot 36 – Assigning the Storage role To assign the „Storage Role‟ select the appropriate option from the list of roles in the „Server Role Selection‟ dialog. The server assigned this role provides email storage and retrieval services. You can only assign the „Storage Role‟ to one server in the deployment. 52 Role-based Installations GFI MailArchiver 6.1 for Exchange - Getting Started Guide Assigning the Search and Indexing Role Screenshot 37 – Assigning the Search and Indexing role To assign the „Search and Indexing Role‟ select the appropriate option from the list of roles in the „Server Role Selection‟ dialog. The server assigned this role provides email search and indexing services. GFI MailArchiver creates search indexes for each archive store you configure. Each search index automatically indexes new email content archived in the corresponding archive store, to keep the search index updated and enable users to perform precise and fast searches. You can only assign the „Search and Indexing Role‟ to one server in the deployment. GFI MailArchiver 6.1 for Exchange - Getting Started Guide Role-based Installations 53 Screenshot 38 – Specify the word breaker for the Search and Indexing role You will be prompted to specify the word breaker to use. Word breakers for each language enable the resulting terms to be more accurate for that language. If no word breaker is available for a particular language, the neutral word breaker is used. With the neutral word breaker, words are broken at neutral characters such as spaces and punctuation marks. Select the indexing option available if you also want to index email message attachments. 54 Role-based Installations GFI MailArchiver 6.1 for Exchange - Getting Started Guide Assigning the User Interface and Administration Role Screenshot 39 – Assigning the User Interface and Administration role To assign the „User Interface and Administration Role‟ select the appropriate option from the list of roles in the „Server Role Selection‟ dialog. The server assigned this role enables users to browse/search their archives and administrators to configure GFI MailArchiver through the management console. You can assign the „User Interface and Administration Role‟ to multiple servers in the deployment. GFI MailArchiver 6.1 for Exchange - Getting Started Guide Role-based Installations 55 Screenshot 40 – Specify User Interface and Administration role settings You will be prompted to specify the authentication method to use (Windows or Forms) to log in to the GFI MailArchiver management console. If more than one server is assigned the Data Collection role, select the Enable server tagging in the Data Sources configuration option. Server tagging allows multiple GFI MailArchiver instances running the Data Collection role to process different mailboxes without interfering with each other. 56 Role-based Installations GFI MailArchiver 6.1 for Exchange - Getting Started Guide Assigning the Data Import Service Role Screenshot 41 – Assigning the Data Import Service role To assign the „Data Import Service Role‟ select the appropriate option from the list of roles in the „Server Role Selection‟ dialog. The server assigned this role uploads imported emails to the GFI MailArchiver archive stores. You can assign the „Data Import Service Role‟ to multiple servers in the deployment. GFI MailArchiver 6.1 for Exchange - Getting Started Guide Role-based Installations 57 Assigning the User Mailbox Synchronization Role Screenshot 42 – Assigning the Data Import Service role To assign the „User Mailbox synchronization Role‟ select the appropriate option from the list of roles in the „Server Role Selection‟ dialog. The User Mailbox Synchronization role is used to synchronize emails in a user mailbox between GFI MailArchiver and Microsoft Exchange Server. You can configure only one server to run the User Mailbox Synchronization Role in the deployment. 58 Role-based Installations GFI MailArchiver 6.1 for Exchange - Getting Started Guide Assigning multiple roles to a server Screenshot 43 – Assigning multiple roles A GFI MailArchiver instance may be assigned more than one role. To assign the required roles, select the appropriate options from the list of roles in the „Server Role Selection‟ dialog. GFI MailArchiver 6.1 for Exchange - Getting Started Guide Role-based Installations 59 Identifying the Central Configuration Service Role server Screenshot 44 – Identifying the Central Configuration Service Role server If you are assigning a role other than the „Central Configuration Service Role‟ to a GFI MailArchiver instance, you are prompted to identify the server that has been assigned that role. Click Test connection to verify that the „Central Configuration Service Role‟ server you specified is accessible. 60 Role-based Installations GFI MailArchiver 6.1 for Exchange - Getting Started Guide Identifying the Data Collection Role server Screenshot 45 – Identifying the Data Collection Role server If you are assigning the „User Interface and Administration Role‟ to a GFI MailArchiver instance, but not the „Data Collection Role‟ to the same instance, you are prompted to identify the server with the „Data Collection Role‟. Click Test connection to verify that the „Data Collection Role‟ server you specified is accessible. GFI MailArchiver 6.1 for Exchange - Getting Started Guide Role-based Installations 61 Identifying the Storage Role server Screenshot 46 – Identifying the Storage Role server If you are assigning a role other than the „Storage Role‟ to a GFI MailArchiver instance, you are prompted to identify the server that has been assigned that role. Click Test connection to verify that the „Storage Role‟ server you specified is accessible. Identifying the Search and Indexing Role server Screenshot 47 – Identifying the Search and Indexing Role server 62 Role-based Installations GFI MailArchiver 6.1 for Exchange - Getting Started Guide If you are assigning a role other than the „Search and Indexing Role‟ to a GFI MailArchiver instance, you are prompted to identify the server which has been assigned that role. Click Test connection to verify that the „Search and Indexing Role‟ server you specified is accessible. 5.3.1 Recommended deployment scenario Figure 3 - Deployment scenario This is the recommended scenario for a GFI MailArchiver distributed deployment. In this scenario, an organization will be deploying three GFI MailArchiver instances. Each instance is installed on a separate server, with each server fulfilling roles as shown in the following table: Server ID Role(s) Data Collection User Mailbox Synchronization User Interface and Administration Central Configuration Service Storage Search and Indexing Data Import Service NOTE: To achieve maximum performance, assign the „Data Collection Role‟ and the User Mailbox synchronization roles to a GFI MailArchiver instance residing directly on the Microsoft Exchange server with the journaling mailbox. These are the steps to follow for this deployment: 1. Install GFI MailArchiver on each server. 2. Execute the Deployment Manager Wizard on each of the three servers to assign roles to the GFI MailArchiver instances. The roles should be assigned in the order as listed in the „Executing the GFI MailArchiver 6.1 for Exchange - Getting Started Guide Role-based Installations 63 Deployment Manager Wizard on each instance‟ section of this chapter. Run the Deployment Manager Wizard in the order as shown in the following table: Server ID order Deployment Manager Wizard Run Wizard to assign the following roles: Central Configuration Service Storage Search and Indexing Data Import Service Run Wizard to assign the Data Collection role and User Mailbox synchronization roles. Run Wizard to assign the User Interface and Administration role 3. Configure GFI MailArchiver through the management console, accessed from Server ID 2, which is the server with the User Interface and Administration role. 5.3.2 Alternative scenario Another recommended scenario is to deploy servers with the following GFI MailArchiver roles: Server 1: o Central Configuration Service o Storage Server 2: o Search and Indexing Server 3: o Data Collection o User Mailbox synchronization NOTE 1: To achieve maximum performance, assign the Data Collection role to a GFI MailArchiver instance residing directly on the Microsoft Exchange server with the journaling mailbox. NOTE 2: You can have multiple servers assigned with the Data Collection role. Server 4: o User Interface and Administration NOTE: You can have multiple servers assigned with the User Interface and Administration role, enabling you to set up a web farm. Server 5 (Temporary server): o Data Import Service NOTE: This temporary server can be used when past emails (before GFI MailArchiver was installed) from PST files will be imported into the archive stores. Importing past emails is normally a one-time process, thus the temporary nature of this server. 64 Role-based Installations GFI MailArchiver 6.1 for Exchange - Getting Started Guide 6. Importing/Export emails 6.1 Importing emails GFI MailArchiver enables you to extract emails from various email databases and to import them into the GFI MailArchiver archive stores. GFI MailArchiver can import emails from the following email databases: Microsoft Exchange Mailboxes PST files locally PST files on the network GFI MailArchiver 2 GFI MailEssentials For detailed instructions on how to import email data to GFI MailArchiver, refer to the GFI MailArchiver Manual available from: http://www.gfi.com/mar/mar6acmanual.pdf 6.2 Exporting emails GFI MailArchiver also enables you to export or restore multiple emails at a time through the GFI MailArchiver Bulk Export Tool. Through this tool, you can connect to a GFI MailArchiver installation, search for emails to export and export all of the emails in one go through a: • Restore to a specific email address • Download to a folder on disk in .eml or .msg format • Download to a PST file. The GFI MailArchiver Bulk Export Tool is useful when you want to export a set of emails that match specific search criteria, for example, to provide emails to satisfy a litigation support request. For detailed instructions on how to export email data from GFI MailArchiver, refer to the GFI MailArchiver Administration and Configuration guide available from: http://www.gfi.com/mar/mar6acmanual.pdf GFI MailArchiver 6.1 for Exchange - Getting Started Guide Importing/Export emails 65 7. Uninstalling GFI MailArchiver 7.1 Uninstall GFI MailArchiver 1. From the Control Panel select Add or Remove Programs or Programs and Features. 2. Select GFI MailArchiver from the list displayed and click Remove or Uninstall. 3. Follow on-screen instructions to uninstall GFI MailArchiver. 7.2 Disabling journaling for Microsoft Exchange Server 2000/2003 1. Select Start ► Programs ► Microsoft Exchange ► System Manager. Screenshot 48 - Mailbox store node properties 2. Expand Servers ► <Your Server name> ► Storage group, right click Mailbox Store node and select Properties. GFI MailArchiver 6.1 for Exchange - Getting Started Guide Uninstalling GFI MailArchiver 67 Screenshot 49 - Enabling journaling on a Microsoft Exchange mailbox store 3. From the General tab, unselect the Archive all messages sent or received by mailboxes on this store check box. Click OK to save settings. 7.3 Disabling journaling for Microsoft Exchange Server 2007 Disabling standard journaling 1. Select Start ► All Programs ► Microsoft Exchange Server 2007 ► Microsoft Exchange Management Console. 68 Uninstalling GFI MailArchiver GFI MailArchiver 6.1 for Exchange - Getting Started Guide Screenshot 50 – Configuring a Mailbox Database 2. Expand Microsoft Exchange ► Server Configuration ► Mailbox node and click Properties from the Actions pane. Screenshot 51 – Mailbox Database properties GFI MailArchiver 6.1 for Exchange - Getting Started Guide Uninstalling GFI MailArchiver 69 2. Unselect Journal Recipient option. 3. Click OK to finalize setup. Disable standard journaling from the Microsoft Exchange Management Shell In the Microsoft Exchange Management Shell, use the following syntax to disable a journaling rule: Set-MailboxDatabase <Mailbox Database> -JournalRecipient $Null Disable premium journaling 1. Select Start ► All Programs ► Microsoft Exchange Server 2007 ► Microsoft Exchange Management Console. Screenshot 52 – Configuring Journaling rules 2. Expand Organization Configuration ► Hub Transport node and select Journaling tab. 3. Right click the journal rule to remove, and click Remove. 4. Click Yes to confirm that you want to remove the journal rule. Disable premium journaling from the Microsoft Exchange Management Shell In the Microsoft Exchange Management Shell, use the following syntax to disable a journaling rule: Remove-JournalRule <journal rule name> 70 Uninstalling GFI MailArchiver GFI MailArchiver 6.1 for Exchange - Getting Started Guide 8. Troubleshooting 8.1 Introduction The troubleshooting chapter explains how you should go about resolving any software issues that you might encounter. The main sources of information available to users are: The manual – most issues can be solved by reading this manual. GFI Knowledge Base articles accessible from the GFI website Web forum Contacting GFI Technical Support GFI MailArchiver 6.1 for Exchange - Getting Started Guide Troubleshooting 71 8.2 Common Issues Issue encountered Solution One of the following error messages is displayed while installing GFI MailArchiver: Error 1720. There is a problem with this Windows Installer package. A script required for this install to complete could not be run. Contact your support personnel or package vendor. Setup failed to launch installation engine: Access is denied. Error installing Ikernel.exe, access is denied. 1. Disable real-time scanning of anti-virus products or any other software scanning your machine real-time. 2. Ensure that you do not have any software that automatically removes files from the TEMP directory. 3. Log in the machine with the Domain Administrator account. 4. Download and install the latest version of Windows Scripting Host & Windows Installer for your Windows Operating System from: http://www.microsoft.com/downloads/ 5. Ensure that the following Microsoft Windows technologies are installed correctly and not corrupt: Microsoft Windows Management Instrumentation (WMI) Microsoft Windows Installer Microsoft .Net Framework Microsoft Data Access Components (MDAC) 6. Ensure that the following system libraries located at <Windows\System32> are correctly registered: urlmon.dll Shell32.dll Oleaut32.dll Shdocvw.dll ole32.dll Mshtml.dll Actxprxy.dll Browseui.dll Scrrun.dll To register a library with the operating system, perform the following steps: 1. Click Start and select Run 2. Type cmd.exe and click Enter. 3. Type „regsvr32 <path & filename of dll>‟ Example: „regsvr32 c:\windows\system32\urlmon.dll‟ Place the installation file in a temporary directory (Example C:\temp) on the machine where you are installing the GFI product. Also, check the Distributed Component Object Model (DCOM) permissions as explained in: http://support.microsoft.com/default.aspx?scid=kb;en-us;295278 Cause: Windows Scripting Host (WSH) is outdated or corrupted. Solution: Install latest version of Windows Scripting Host (WSH) and reboot the machine. WSH can be downloaded from: http://www.microsoft.com/downloads/details.aspx?FamilyId=C717D94 3-7E4B-4622-86EB-95A22B832CAA&displaylang=en During installation, the following error is displayed: The wizard was interrupted before GFI MailArchiver could be completely installed. Your system has not been modified. To complete installation at another time, please run setup again. The wizard was interrupted before GFI MailArchiver for Exchange could be completely installed. Emails are not displayed in their correct folder structure in Microsoft Outlook when using GFI MailArchvier Outlook connector. 72 Troubleshooting Cause: User mailbox folder structure retrieval not enabled or not working correctly. Solution: Enable user mailbox folder structure retrieval and ensure its correct functionality. Refer to the Enable mailbox folder structure retrieval section in this manual for more information. GFI MailArchiver 6.1 for Exchange - Getting Started Guide 8.3 Knowledge Base GFI maintains a Knowledge Base, which includes answers to the most common problems. If you have a problem, please consult the Knowledge Base first. The Knowledge Base always has the most upto-date listing of technical support questions and patches. To access the Knowledge Base, visit http://kbase.gfi.com/. 8.4 Web Forum User to user technical support is available via the web forum. The forum can be found at: http://forums.gfi.com/. 8.5 Request technical support If you have referred to this manual and our Knowledge Base articles, and you still cannot solve issues with the software, contact the GFI Technical Support team by filling in an online support request form or by phone. Online: Fill out the support request form on: http://support.gfi.com/supportrequestform.asp. Follow the instructions on this page closely to submit your support request. Phone: To obtain the correct technical support phone number for your region please visit: http://www.gfi.com/company/contact.htm. NOTE: Before you contact our Technical Support team, please have your Customer ID available. Your Customer ID is the online account number that is assigned to you when you first register your license keys in our Customer Area at: http://customers.gfi.com. We will answer your query within 24 hours or less, depending on your time zone. 8.6 Build notifications We strongly suggest that you subscribe to our build notifications list. This way, you will be immediately notified about new product builds. To subscribe to our build notifications, visit: http://www.gfi.com/pages/productmailing.htm. GFI MailArchiver 6.1 for Exchange - Getting Started Guide Troubleshooting 73 U 9. Index User Interface and Administration Role 55 V Virtual Directory Alias 8, 28 X A x32 See x86 x64 7, 27 x86 7, 27 Active Directory 3, 11, 22, 23, 70 archive 1, 11, 24 ASP.NET 5 C Central Configuration Service Role 50 D Data Collection Role 51 Data Import Service Role 57, 58 database 1, 24, 25 E envelope journaling 23 I IIS 3, 5 IMAP 11, 25, 26 Internet Explorer 2, 3 J journaling 1, 15, 19, 23, 25, 68 L license agreement 7, 27 License Key 8, 9, 28, 29 M Microsoft Exchange Server 1, 3, 11, 16 P PowerShell 35, 36 R recipient 23 Role-based Deployment 45 S Search and Indexing Role 53 SQL Server 1 Storage role 52 System requirements 3, 47 74 Index GFI MailArchiver 6.1 for Exchange user manual