1
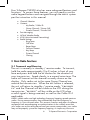
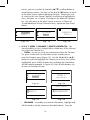
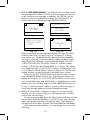
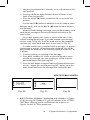
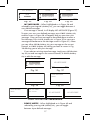
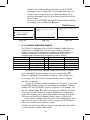
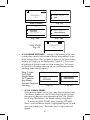
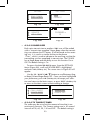
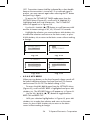
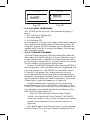
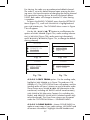
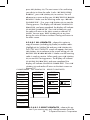
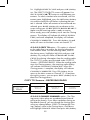
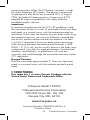
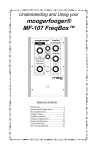
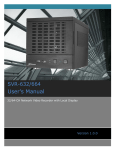
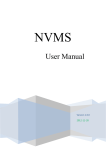
TriSquare
TM
TM
™
Model TSX300
Owner’s Manual
TSX300
1
Owner’s Manual
Front View Call Outs
include:
5
4
2
1. Antenna
2. PTT Button
6
3. Accessory Headset Jack
8
4. Power On / Off Button
5. LCD Display
6. Softkey #1
7. Softkey #2
8. UP/Down Volume and Scroll Button 9
9. Call / Back Button
10. Lock / Next Button
11. 0-9 Alphanumeric Keypad
12. Microphone
13
13. Speaker
3
7
11
10
12
14
Rear View Call Outs include:
14. Belt Clip
15. Battery Compartment Door
16. Charging Contacts
Backlit LCD Call Outs:
15
17. Audible & Vibrate Icon
18. Test Message Icon
19. VOX Icon
20. Keypad Lock Icon
21. Battery Low Icon
22. Channel / User Interface
23. Softkey Labels
16
2
TriSquare Electronics Corporation
Table of Contents
Introduction
Getting Started
Installing Batteries
Initial Radio Setup
Basic Radio Functions
Transmit and Receive
Menu System and Softkeys
Volume Control / Up and Down Scrolling
Low Battery Alert
Call / Back Functions
Call Function
Back Function
Keypad Lock / Next Function
Lock Function
Next Function
Other Radio Functions and Features
Channel Selection
Contacts
My Radio
Group Channels
View / Change / Delete Group Contacts
Private Channels
Private Call
Call Waiting
Radio Menus
Text Messaging
NOAA Weather Radio
VOX – Voice Activated Transmitting
Radio Settings
Ring Tone
Call Alert
Roger Beep
TX Timeout Timer
Key Beeps
Silent Operation
Private Channel
Radio Cloning
Copy From
Clone Radio
All Contacts
Select Contacts
Copy To
Change Cloning Channel
eXRS Accessories
Dual Desktop Charger
VOX/PTT Headset
PTT Transmitting
VOX Transmitting
General Product Care
Troubleshooting
Product Service
Warranty Information
FCC Licensing Information
Safety Information
Patent Pending Information
3
1
2
2.1
2.2
3
3.1
3.2
3.3
3.
3.
3..1
3..2
3.
3..1
3..2
.1
.2
.2.1
.2.2
.2.2.1
.2.3
.2.3.1
.2.3.2
.3
.3.1
.3.2
.3.3
.3.
.3..1
.3..2
.3..3
.3..
.3..
.3..
.3..
.3..
.3...1
.3...1.1
.3...1.2
.3...1.3
.3...2
.3...3
.1
.2
.2.1
.2.2
.1
.2
.3
9
1 Introduction
Welcome to eXtreme Radio Service (eXRS). TriSquare has
revolutionized 2-way radio communications with the eXRS
radios. What is eXRS? It uses a stealth military technology
redesigned by TriSquare for general use and operates using
Frequency Hopping Spread Spectrum (FHSS) technology in
the 900MHz ISM frequency band. eXRS radios provide
private and secure communications without interference,
and provide the longest range possible, compared to other
UHF radios*. With advanced digital technology, you get
unmatched clarity and years of trouble-free service. eXRS
radios do NOT require an FCC license and can be used by
people of all ages for any personal or business purpose.
*The usable range of eXRS is equivalent to or greater than that of other portable
UHF two-way radios (including FRS/GMRS). Usable range of UHF radios
varies significantly with the conditions of use. For example with large or many
obstructions between users, range could be less than a mile, and with clear (lineof-sight) between users, range could extend to more than one hundred miles.
2 Getting Started
Thank you for purchasing the TriSquare TSX300 eXRS twoway radio. Your TriSquare eXRS radio is a unique two-way
radio and a powerful communications tool that will give you
years of trouble-free service if cared for properly. Read the
owners manual carefully before operating the radio.
2.1 Installing Batteries or Rechargeable Battery Pack
To use your new TriSquare eXRS radios, you will need to
install 3 ‘AA’ alkaline batteries, or the optional TriSquare
model TSX-BP NiMH rechargeable battery pack. To install
batteries, first remove the belt clip or swivel the belt clip to the
side. To open the battery compartment door, while holding
the radio face down, use your thumbnail to lift upwards
(towards the top of the radio) on the battery compartment
tab, and continue to lift the battery compartment door up
and remove. If you are using 3 ‘AA’ batteries, insert the
3 ‘AA’ with the correct polarity as indicated by the battery
diagram on the inside of the battery compartment, matching
the positive (+) and negative (-) terminals of the batteries to
TriSquare Electronics Corporation
Model TSX100
the battery diagram. If you are using the optional TriSquare
NiMH rechargeable battery pack TSX-BP, insert the battery
Owner’s Manual
pack into the battery compartment
with the label side up, and
the up arrow pointing towards the top of the radio. Replace
the battery compartment door by sliding the top tabs in first
at an angle until it is all the way up, and then pressing down
at the bottom until the battery compartment door locking tab
clicks into place securing the door closed. Replace belt clip
if desired.
2.2 Initial Radio Setup
To turn your radio on (after installing batteries per above),
press and hold the POWER On/Off button for 2 seconds. The
radio will go through an initialization cycle showing eXRS on
the display, and the power on confirmation tone will sound.
Once powered up, the radio will be in a stand-by mode,
ready to transmit or receive a transmission on the default
channel “0” or ready for you to modify or change features
via the MENU button (Softkey #2). All radio settings and stored
contact information are maintained when radio is off and
batteries are removed.
CHANNEL:
GROUP
CH:
0
CONTACTS
MENU
Main / Standby Screen
Power Up Screen
Your TriSquare TSX300 has many features and functions
that make the TriSquare eXRS radio a powerful and useful
communications tool, and easy to use.
Basic functions include:
o
o
o
o
Transmit and Receive
Menu System and Soft Keys
Volume Control and Up/Down Scrolling
Low Battery Alert
o Call / Back (t) Button
o Keypad Lock / Next (u) Button
Your TriSquare TSX300 also has more advanced features and
functions. To access these features, you will need to use the
radio keypad buttons and navigate through the MENU system
per the instruction in this manual.
o Channel Selection
o Contacts
- My Radio / Caller ID
- Group Channel / Group Call
- Private Channel / Private Call
o Text Messaging
o NOAA Weather Radio
o VOX (Voice Activated Transmitting)
o Radio Settings
- Ring Tones
- Call Alert
- Roger Beep
- Transmit Timeout
- Key Beep
- Private Channel
- Cloning
3 Basic Radio Functions
3.1 Transmit and Receive
The unit is normally in standby / receive mode. To transmit,
hold the radio approximately 2 to 3 inches in front of your
face and press and hold the PTT button for the duration of
your transmission. Speak clearly in a normal voice tone. The
radio will transmit on the channel currently shown on the
display. Only radios set to the same Group Channel can
receive the transmission. When the PTT button is released,
the unit will return to stand-by / receive mode. “TRANSMIT
TO” and the Channel will be visible on the LCD during the
transmission. “RECIEVE” will be visible on the LCD when
a valid signal is being received, as well as the Caller ID if
applicable.
NOTE: eXRS radios are high technology frequency hopping spread spectrum
radios. During communications they automatically hop from frequency to
frequency in sync with each other. This prevents scanners and other surveillance
equipment from eavesdropping on communications.In the unlikely event that
your radios are on the same channel and you cannot communicate, your radios
may not be properly synced for frequency hopping. A simple way to ensure
TriSquare Electronics Corporation
proper synchronization is to re-select or re-enter the contact/channel on the
affected radios.
3.2 Menu System and Softkeys
The keys on the top right and top left of the radio keypad
are Softkeys (Softkey #1 and Softkey #2), and their function
corresponds with what is on the bottom corners of the LCD
display. Thus, the function of these two buttons change,
depending on what menu or function you are working in, and
what the LCD display shows for the key function at any given
time. When standing by on the main screen, the functions of
these two softkeys are “CONTACTS” and “MENU”. From here,
these buttons are used to retrieve the Contacts list and access
the radio’s Menu System.
3.3 Volume Control / Up/Down Scrolling Button
While on the Main screen, Press the UP (p) and DOWN (q)
button to control the volume in 15 steps. The display will
indicate “Volume” and the current volume level for 2 seconds.
An audio chime will also indicate current volume level. All
key beeps will be at the set volume level. While in the
Contacts and Menu functions, this button is used to scroll Up
or Down through the Contact list or Menu options.
3.4 Low Battery Alert
The TSX300 has a 4-level battery meter (shown below) on the
LCD that will graphically emulate the remaining batter power.
At the lowest level, the Battery Low Icon will flash and an
audible beep will sound every two minutes.
Battery
Battery
Battery
Battery
Full
Strong
Low
Weak
When the low battery meter is at the lowest level, batteries
should be replaced, or recharged if using the TriSquare TSXBP NiMH rechargeable battery pack.
3.5 Call / Back (t) Button Functions
When on the Main screen, this button acts as the Call button
to signal other users, and while in any Menus or Texting, it
acts as a (t)
Back button.
o 3.5.1 CALL Function - Press the Call button to send a call alert
to other users on the same Channel. The radio will transmit a call
on the Channel that is currently showing on the display. A radio
that receives the call will play a preselected ring tone. It is not
necessary to send a call before transmitting your voice to another
user on the same Channel.
o 3.5.2 BACK Function - When navigating the Menu Systems or
Contacts, the (t) Back button usually moves back to a previous
menu. When entering characters for Contacts or text messaging,
the (t) Back button moves the cursor back one space.
3.6 Keypad Lock / Next (u) Button Functions
When on the Main screen, this button acts as the Keypad
Lock button, and while in the Contacts menu or while text
messaging, this button acts as a (u) Next button.
o 3.6.1 LOCK Function - Pressing and holding the Lock
button for 3 seconds will lock the radio keys, with the exception
of the PTT, Power On/Off, Call button and Volume Up/Down
button. The Lock icon ( ) will be displayed on the LCD display
and an audible tone will sound when keypad is locked. Pressing
and holding the Lock button again for 3 seconds will unlock the
keypad and the Lock icon will disappear and another audible tone
will be heard.
o 3.6.2 NEXT Function - While entering characters for Contacts
or text messaging, use of the (u) Next button will move the cursor
to the right one space.
4 Other Radio Functions and Features
4.1 CHANNEL Selection
All of the TriSquare eXRS radios are set from the factory to
channel “0”. The TSX300 has the capability of 10 Billion
channels. You can input any 10-digit channel number
between 0 and 9999999999, for 10 Billion unique
channels. All eXRS radios will communicate with other eXRS
radio provided that they are set to the same Channel. It is
suggested that you enter a new channel unique to you into
the MY RADIO part of memory (detailed below), and for
simplicity where appropriate, the user may use their area
code and phone number, or some part of it. You can enter a
Group channel from the main screen, or may select one from
the Contacts List.
TriSquare Electronics Corporation
From the main Screen in Figure 1, simply enter the desired
channel directly on the numeric keypad. For example, if you
want to enter channel “1234”, the screen would appear as in
Figure 2. Once entered, press the Softkey #1 that corresponds
to the selection “OK”. The radio will then be on that channel,
and the display will appear as in Figure 3. You can then
communicate with any other eXRS radio on that same group
channel.
ENTER CHANNEL
CHANNEL:
0
CONTACTS
CHANNEL:
1234
1234
MENU
OK
Fig. 1
EXIT
CONTACTS
Fig. 2
MENU
Fig. 3
4.2 CONTACTS
The Contacts List is where Channels may be stored so they
can be recalled later. The TSX300 can store up to 100
entries. The first contact in the list will be the radio’s ID (MY
RADIO). All other contacts are stored in alphabetical order.
My Radio contains the radio’s “Private Channel” number (10000
or higher) and the Caller ID name for the radio. The last item in
the contacts list is the menu selection to “ADD NEW” contacts.
The TSX300 can store a name associated with each stored
number. The name can be up to 8 characters long. The stored
information in Contacts will be retained with power off and/
or batteries removed.
CONTACTS - To enter the CONTACTS menu, Press the Softkey
#1 that corresponds with CONTACTS (per Figure 4) on the
display to enter the Contacts menu. The screen in Figure 5
will appear.
CONTACTS
CHANNEL:
0
CONTACTS
MY RADIO
[ADD NEW]
SELECT
MENU
Fig. 4
VIEW
Fig. 5
Pressing the UP (p) and DOWN (q) button will scroll through
the list of up to 100 previously stored Contact names.
Scrolling will wrap from the end to the beginning of the list
and vice versa.
o 4.2.1 MY RADIO / CALLER ID – Your MY RADIO information
has 3 useful purposes.
1. It allows you to personalize your radio by entering your
desired name and Personal/Private channel into the MY
RADIO memory.
2. Second, this information also acts as your Caller ID. When
you transmit to other TSX300 users, the Caller ID information
is sent. When the TSX300 receives a transmission from other
TSX300s, it will display the ID from that radio (provided that
user has entered an ID into MY RADIO). If the reception is from
a TSX100, or from a radio with no ID entered, your display
will show “RECEIVE”, with no Caller ID information. The Caller
ID will continue to be shown on the display while receiving
from that person, and for 5 seconds after unless a different
Caller ID is received.
3. It allows other users to contact you on your Private Channel,
regardless of what channel you are on at that moment. When
you provide your MY RADIO information to other users, they
can contact you directly via your Private Channel. The radio
receiver always monitors your MY RADIO channel, regardless
of what channel you are on (except while actually transmitting
or receiving on the other channel). Because of this feature,
your radio has “CALL WAITING” when called on your Private
Channel, and will be described below under the Private Channel description.
The ID may be up to 8 alpha/numeric characters in length, and
your Private Channel may be any number between 10000 and
9999999999.
To set your MY RADIO’s information, from the Main Screen,
press CONTACTS, Softkey #1 (Figure 4) to get into the CONTACTS menu. With “MY RADIO” highlighted, press Softkey
#1 labeled as “SETUP” (per Figure 6 , provided you have not
already entered information here previously) to enter your personalized information that is in your MY RADIO (the screen in Figure
7 will appear).
NOTE: If you have already stored information here for MY
RADIO, you would press VIEW, CHANGE per FIGURES 11 and
12 to change.
Using the keypad, first enter your name, or the ID name you
wish to have for your radio. The name can be up to 8 characters
long. Since the letters and numbers share the same key on the
radio keypad (like a phone), you will need to press certain buttons
10
TriSquare Electronics Corporation
repeatedly to get the letters you want. For example, to enter the
name “JOHN”, you will need to press the keys in this sequence, 5
once, 6 three times, 4 twice, and 6 twice. After each letter entry,
the cursor will move one character right by one of three ways: 1)
Not pressing a button for 2 seconds, 2) press a different alphanumeric key, or 3) you can use the (u) key to move the cursor.
When you have completed the name entry (as in Figure 8),
press DONE button (Softkey #2) to move to the channel entry
screen as in Figure 9.
ENTER CALLER ID
ENTER CALLER ID
CONTACTS
--------
MY RADIO
[ADD NEW]
DELETE
SETUP
Fig. 6
JOHN----
DONE
DELETE
Fig. 7
DONE
Fig. 8
-
To enter the channel number you would like for your MY RADIO
setting, enter the number via the keypad. It is suggested to enter
your phone number with area code, or some portion of it, to have
a unique channel number for yourself. You can use the DELETE
button (Softkey #1) as needed, or the BACK button. Once you
have the number you want entered (as in Figure 10 for this
example), press DONE (Softkey #2) to complete your entry, and
you will go back to the main screen.
-
To verify your entry, press CONTACTS (Softkey #1 in Figure
11), VIEW (Softkey #2) to see your MY RADIO information. For
this example, we have entered JOHN, channel 5557771234, per
Figure 12.
ENTER CHANNEL
ENTER CHANNEL
__________
DELETE
5557771234
DONE
DELETE
DONE
Fig 9
Fig. 10
CONTACTS
MY RADIO
JOHN
5557771234
MY RADIO
[ADD NEW]
SELECT
EXIT
VIEW
Fig. 11
CHANGE
Fig. 12
11
NOTE: MY RADIO channel is always a PRIVATE CHANNEL, as
opposed to a GROUP CHANNEL. The functions and use of Private
Channels and Group Channels are detailed later in this manual.
Operational Scenario: If you have multiple radios
all with the same MY RADIO channel (with different
Caller ID Names), this will effectively act as a private
group channel.
o 4.2.2 GROUP CHANNEL – A Group Channel may be used
to communicate between 2 or more people, and is not associated
with your MY RADIO entry, or another radio’s MY RADIO entry.
A Group Channel may be any channel from 0 to 9999999999.
All channels entered through the Contacts Menu are entered as
Group Channels. All eXRS radios on the same Group Channel
can communicate with other eXRS radios on the same channel.
To add a new Group Channel entry into your contact list, press
CONTACTS on the Main Screen (Softkey #1) to enter the CONTACTS menu, and scroll UP (p) or DOWN (q) to highlight
the [ADD NEW] function (as in figure 13) and press SELECT
(Softkey #1). The screen in figure 14 will appear. NOTE: If you
have many entries within your Contacts list, you may scroll up to
get to the ADD NEW function quicker which is at the bottom of the
list.
Enter the name of the new GROUP contact.
-
Press DONE (Softkey #2 in Figure 15), and the screen in
Figure 16 will appear. Enter the new Channel number using the
keypad. Once you have the channel number entered, (as in Figure
17) press DONE (Softkey #2) to return to the Main Screen.
ENTER NAME
CONTACTS
_
MY RADIO
[ADD NEW]
SELECT
VIEW
TEAM 1_
DELETE
Fig. 13
DONE
DELETE
Fig. 14
ENTER CHANNEL
DELETE
DONE
Fig. 15
TEAM 1
1001001001
1001001001
DONE
Fig. 16
-
ENTER NAME
CHANGE
DONE
Fig. 17
The Group Channel is entered. To view your entry in the
Contacts list, press the CONTACTS button (Softkey #1) and
the screen in Figure 18 will appear. Again, if you have multiple
12
TriSquare Electronics Corporation
entries, you can use the UP / DOWN (p/q) scrolling button to
move between entries. You can use the BACK (t) button to return
to the Main Screen without changing channels. Should you wish
to switch to this new Group Channel, scroll down to highlight the
entry ‘TEAM 1’ as in Figure 19 and press the SELECT (Softkey
#1). You will return to the Main Screen as shown in Figure 20.
- To add additional Group Channel entries, repeat the steps listed
above.
CONTACTS
CONTACTS
MY RADIO
TEAM 1
MY RADIO
TEAM 1
SELECT
VIEW
SELECT
Fig. 18
CHANNEL:
TEAM 1
VIEW
CONTACTS
Fig. 19
MENU
Fig. 20
o 4.2.2.1 VIEW / CHANGE / DELETE CONTACTS – You
have the ability to view, change/edit or delete any of the information within the Contacts list.
- VIEW – to view or verify any information within the Contacts
list, press CONTACTS on the Main Screen (Softkey #1) to
enter the Contacts menu (Figure 21). Use the UP/DOWN (p/q)
button to scroll and highlight the Contact you wish to view. When
highlighted, press VIEW (Softkey #2) to display the information
for that contact (example in Figure 22). Press EXIT (Softkey #1)
to return to the Main Screen.
CONTACTS
G
GROUP CONTACT
MY RADIO
TEAM 1
SELECT
TEAM 1
1001001001
VIEW
EXIT
CHANGE
Fig. 21
Fig. 22
ENTER NAME
ENTER CHANNEL
1001001001
TEAM 1
DELETE
DONE
Fig. 23
DELETE
DONE
Fig. 24
CHANGE – to modify any contact information, highlight and
VIEW (Softkey #2) the contact as described above. From the
-
13
Contact information screen in Figure 22, press CHANGE (Softkey
#2) to re-enter the information for that contact, starting with the
ENTER NAME screen in Figure 23. Change the name as desired
using the BACK/NEXT buttons (tu), along with the Alpha/Numeric keypad. Press DONE (Softkey #2) to advance to the ENTER
CHANNEL screen (Figure 24). Again, using the BACK/NEXT
buttons along with the keypad, enter the desired channel. When
change is complete, press DONE (Softkey #2) in Figure 24 to
return to the Main screen.
DELETE – to delete a contact, highlight and VIEW the contact
as described above. Press CHANGE (Softkey #2) to advance to
the ENTER NAME screen in Figure 23. Press DELETE (Softkey
#1) repeatedly until the name is completely removed. Press DONE
(Softkey #2) to delete the contact and return to the Main screen.
NOTE: You can delete a contact by deleting the Channel number
in the same manner as the name.
o 4.2.3 PRIVATE CHANNEL – A Private Channel is any Channel
associated with another radio’s MY RADIO channel. A Private
Channel is used to contact specific radios regardless of what channel the radios you are trying to contact are on. Private Channels
are entered into the Contacts list through the Settings Menu, which
is detailed later in this manual under SETTINGS.
o 4.2.3.1 PRIVATE CALL – When you receive a call on your
Private Channel, your display will indicate a PRIVATE CALL is
being received (Figure 25a). (Exception, if you are on the Private
Channel of the call coming into your Private Channel, it would
then appear as a standard signal reception).
o 4.2.3.2 CALL WAITING – If it has been within 20 seconds
since your last TX or RX on a channel (not your own Private
Channel) and someone attempts to contact you on your Private
Channel, you will get a Call Waiting screen (Figure 25b). You can
either ACCEPT (Softkey #1) the call to start a new conversation,
or EXIT (Softkey #2) and continue with the existing conversation
on the channel you are on. NOTE: Pressing the PTT button will
transmit on the existing channel that you are on. Therefore you
may continue with your previous conversation (TX or RX) and will
have up to fifteen seconds to accept the call waiting.
PRIVATE CALL
Fig. 25a
Fig. 25b
RECEIVE
ID: BOB
CALL WAITING
ID: BOB
ACEEPT
END
EXIT
4.3 RADIO MENU
14
TriSquare Electronics Corporation
o 4.3.1 TEXT MESSAGING - The TSX300 can send and receive
text messages from other TSX300s. A Text Message can have up
to 80 characters per message. In addition, the TSX300 has the
ability to store 4 user-defined messages (MY MESSAGES), or
choose from 6 pre-defined messages (READY NOTES).
PRIVATE CALL
RECIEVE
ID: BOB
CONTACTS
RECEIVE
ID: BOB
MENU
READ
Fig. 26
*
NEW TEXT MSG
RECVD FROM:
BOB
READ
EXIT
Fig. 27
CHANNEL:
0
CONTACTS
EXIT
Fig. 28
MENU
Fig. 29
When receiving a text message, the display will show ‘RECEIVE’
and the Caller ID as in Figure 26 (or as in Figure 27 if being
received on your Private My Radio Channel) until the complete
message is received. Once received, the radio will play a triple
beep (or vibrate if Vibrate is active), and the display will show
“NEW TEXT MSG RECVD FROM: Caller ID”, and the Softkey
functions will become READ and EXIT (as in Figure 28). When
an unread message is in the TSX300 memory, the Message ICON
(*) will be lit on the display as shown in Figure 29. The Text Messaging functions can be accessed in the Radio Menu system.
To access the TEXT MESSAGING menu from the main screen,
press the MENU button (Softkey #2), and the Menu screen will
appear as in Figure 30. Since TEXT MESSAGING is the first function in the Radio Menu and TEXT MSG is highlighted, press OK
(Softkey #1). You will then enter the TEXT MESSAGES menu as
in Fig. 31. Here you have 2 options, create a NEW message, or
view/add/change/delete or send a STORED message.
o 4.3.1.1 When NEW is selected in Figure 31 by pressing OK
(Softkey #1), the screen in Figure 32 will appear, and is used to
enter a new text messages.
To enter a text message, press the Alpha/Numeric button with the
desired letter. If the desired letter is not the first one, press the key
again until the desired letter is displayed. Note: The number associated with the button is the last choice available for that button.
After entering a desired letter, you may accept it by one of the
following:
15
1. Not pressing a button for 2 seconds, cursor will advance to the
next position.
2. Pressing a different Alpha/Numeric button will enter a new
letter in the next position.
3. Press the NEXT (u) button to advance the cursor to the next
position.
-
Use the NEXT (u) button to advance cursor or create a space
between words, and use the BACK (t) button to erase the previous character.
-
When finished creating a message, press SEND (Softkey #1) to
send the text message on the current channel and return to the
main screen.
-
Press EXIT (Softkey #2) 3 times to return to the main screen
without sending the message. If you had entered a text message
(on the screen in Fig. 32), it will be saved and can be completed
next time you select NEW and return to the screen in Fig. 32.
If a radio transmission is received while a message is in process,
the message in process will continue to be displayed. You will be
able to hear the reception of the incoming signal, and can do 1 of
3 options:
1. Continue working on inputting a Text Message.
2. Press EXIT (Softkey #2) 3 times to return to the main screen,
and the text message you were working on will be saved as
described above when pressing EXIT.
3. Press the PTT button to transmit back and respond to the transmission. Again, this acts like pressing EXIT, returns you to the
Main Screen and saves the message to be worked on later.
NEW TEXT MSG SCREEN
MENU
TEXT MESSAGES
TEXT MSG
NOAA RADIO
OK
NEW
STORED
EXIT
Fig. 30
_
OK
EXIT
Fig. 31
SEND
EXIT
Fig. 32
MESSA
YOUR
HERE
SEND
o 4.3.1.2 When STORED is highlighted and selected as in Figure
33 by pressing OK (Softkey #1), you will advance to the STORED
TEXT Menu, allowing you to scroll between the 4 options in
Figures 34 and 35. These options are:
16
TriSquare Electronics Corporation
TEXT MESSAGES
STORED
NEW
MY MESSAGES
READY NOTES
• STORED
OK
EXIT
OK
Fig. 33
STORED
LAST RECVD
LAST SENT
EXIT
OK
Fig. 34
EXIT
Fig. 35
MY MESSAGES – When highlighted as in Figure 36 and
selected by pressing OK (Softkey #1), you can toggle between 4
user defined messages.
If no message is stored, it will display NO MESSAGE (Figure 37).
To enter your own user-defined message, press EDIT (Softkey #2)
and the screen in Figure 38 will appear and you can enter your
message. Enter your text message as described above to enter a
Text Message. Press SAVE (Softkey #1 in Figure 39) to save your
message and advance to the Message screen in Figure 39, where
you can either SEND (Softkey #1) your message on the current
channel, or EDIT (Softkey #2) taking you back to screen in Fig.
38 allowing you to edit your message.
-
-
If you select an existing stored message, simply press SEND (Softkey #1) to send message on the current channel, or EDIT (Softkey
#2) to edit the message.
MESSAGE 1:
STORED
NO MESSAGE
MY MESSAGES
READY NOTES
OK
EXIT
EXIT
Fig. 36
MESSAGE 1:
_
YOUR MESSAGE
HERE!
N
SAVE
SEND
EXIT
Fig. 38
MESSAGE 1:
EDIT
Fig. 39
MESSAGE 2:
YOUR MESSAGE
HERE!
EDIT
Fig. 37
MESSAGE 4:
MESSAGE 3:
ARE YOU READY
FOR LUNCH?
NO MESSAGE
SEND
EDIT
SEND
EDIT
EXIT
EDIT
NO MESSAGE
EXIT
USER DEFINED MY MESSAGES
- READY NOTES - When highlighted as in Figure 40 and
selected by pressing OK (Softkey #1), you can toggle
between 6 pre-defined messages.
17
EDIT
-
Using the UP / DOWN (p/q) button, select from Ready Note
messages 1 through 6. With your selection on the display, you can
either press SEND (Softkey #1) to send that specific message on
the current channel, or press EXIT (Softkey #2) to return to the
STORED Message Menu screen.
STORED
Fig. 40
MY MESSAGES
READY NOTES
SCREENS OF PRE-DEFINED
READY NOTES MESSAGES
OK
READY NOTE 1:
READY NOTE 4:
YES
WHERE ARE
YOU?
READY NOTE 2:
READY NOTE 5:
NO
SEND
SEND
EXIT
CAN’T TALK
RIGHT EXIT
NOW.
READY NOTE 3:
READY NOTE 6:
OK
SEND
SEND
EXIT
1 FROM BOB:
EXIT
OK
RECVD MESSAGE 2:
LAST RECVD MESSAGE
HERE
LAST RECVD
LAST SENT
DELETE
EXI T
-
CAN YOU
TALK? EXIT
LAST RECVD – When highlighted as in Figure 41 and selected
by pressing OK (Softkey #1), the display will show the last Text
Message received, and provide who sent it based on the Caller
ID of the sending radio. You can toggle between the last 2 Text
Messages received. Once viewed, you can either DELETE the
message, or select EXIT to return to the STORED Message Menu
screen.
STORED
Fig.
41
SEND
EXIT
SEND
-
EXI T
EXIT
NO MESSAGE
EXIT
Display for Last 2 Messages Received
LAST SENT – When Last Sent is highlighted as in Figure 42 and
selected by pressing OK (Softkey #1), the display will show the
last Text Message sent. When viewing, the Softkeys will provide
you with SEND and EDIT.
-
When EDIT is selected by pressing Softkey #2 in Figure
43, the screen in Figure 44 will appear, allowing you to
Edit the last message sent. From here, you can either
SAVE your edited Text by pressing Softkey #1 and returning to the Sent Message screen in Figure 43; or EXIT
18
TriSquare Electronics Corporation
(Softkey #2) without editing and return to the STORED
Message screen in Figure 42. Once edited and returned
to the screen in Figure 43, press SEND (Softkey #1) to
send the message on the current channel and return to the
Main screen.
To return to the STORED MESSAGES Menu without editing
or sending, press the BACK (t) button.
-
Edit
n
Edit Scree
Screen
STORED
SENT MESSAGE:
LAST SENT MESSAGE
HERE
LAST SENT MESSAGE
HERE_
LAST RECVD
LAST SENT
OK
EXIT
Fig. 42
SEND
EDIT
Fig. 43
SAVE
EXIT
Fig. 44
o 4.3.2 NOAA WEATHER RADIO
The TSX300 is equipped with a NOAA Weather Radio Receiver
and may be switched from normal communications mode to
receive on one of ten continuous broadcast channels of current
weather conditions and alerts for a local area. The NOAA
Weather channel frequency assignments are as follows:
CHANNEL
Frequency
CHANNEL
Frequency
1
162.550
6
162.500
2
162.400
7
162.525
3
162.475
8
161.650
4
162.425
9
161.775
5
162.450
10
163.275
-
To access the NOAA Weather Radio from the main screen,
press the MENU button (Softkey #2), press the DOWN (q)
button to highlight NOAA RADIO and press OK (Softkey #1)
as in Figure 45. The NOAA Weather Radio screen in Figure
46 will now appear.
If you can not hear weather broadcast on Channel 1, press the
CHANNEL button (Softkey #1) to change the Weather Channel,
and the SET WX CHANNEL screen in Figure 47 will appear. Use
the UP / DOWN (p/q) button to change the Weather Channel.
Once you are able to hear a weather broadcast on a channel,
press OK (Softkey #1) to select that weather channel. The radio
will return to the NOAA Weather Radio screen in Figure 46.
To turn off the Weather Receiver, press WX OFF (Softkey #2) in
Figure 46 to return to the main screen, or press the PTT button to
return to normal communications mode.
-
NOTE: You will not be able to receive incoming calls when radio
is in the NOAA weather radio mode.
19
MENU
CHANNEL:
0
CONTACTS
TEXT MESSG
NOAA RADIO
OK
MENU
Main Screen
EXIT
Fig. 45
SET WX CHANNEL
NOAA WEATHER
CHANNEL 1
CHANNEL
CHANNEL 1
CHANNEL 2
OK
WX OFF
Fig. 46
Fig. 47
o 4.3.3 VOX – Voice Activated Transmission
The TSX300 may be set to VOX mode so that transmission can be
activated by voice audio either through the internal or an external
microphone. The radio has 3 VOX sensitivity settings to adjust
the voice volume needed for transmission activation. The default
setting is VOX OFF.
To access the VOX Mode Menu from the Main Screen, Press the
MENU button (Softkey #2), use the UP/DOWN (p/q) button
to scroll and highlight VOX as shown in Figure 48. Press OK
(Softkey #1) to enter the VOX Menu as shown in Figure 49a.
To activate VOX mode, select 1 of the 3 sensitivity levels using the
UP/DOWN (p/q) button to scroll through the choices shown in
Figures 49a and 49b. NOTE: Level 3 is the most sensitive (used
when background noise is minimal), and Level 1 is least sensitive
(used when background noise is present).
Once you have selected your choice by highlighting it, press the
OK button (Softkey #1) to activate the VOX function. To exit without activating VOX, press the EXIT button (Softkey #2) to return to
the Main screen.
-
If VOX is active, the VOX icon will be shown on the LCD display
on the Main screen as in Figure 50.
NOTE: If you turn the power off while in the VOX mode, VOX
mode will be cancelled. The next time you turn on the radio, it will
be in the normal PTT communications mode.
VOX TIP: When the VOX mode is active, radio receivers may
miss the beginning of a communication because it takes the voice
audio longer to activate the transmitter. Experienced radio users
will draw out their first word or repeat it to allow the receiver
to hear the entire communications. Use of VOX mode may take
some practice to get familiar with its operation.
20
TriSquare Electronics Corporation
MENU
CHANNEL:
0
CONTACTS
NOAA RADIO
VOX
OK
MENU
EXIT
Main Screen
Fig. 48
VOX
VOX
VOX OFF
VOX LEVEL 1
OK
VOX LEVEL 2
VOX LEVEL 3
EXIT
OK
EXIT
Fig. 49a
Fig. 49b
VOX
VOX ICON
Fig. 50
CHANNEL:
0
CONTACTS
MENU
o 4.3.4 RADIO SETTINGS – Settings is the location in the menu
system where various internal radio settings are modified. To get
to the Settings Menu, Press the MENU Button on the Main Screen
(Softkey #2) to get into the Radio Menu (Figure 51). Then scroll
to highlight SETTINGS and Press OK (Softkey #1). The screen
in Figure 52 will appear allowing you to scroll between the the
following Radio Settings options:
Ring Tones
Call Alert
Roger Beep
TX Timeout
Key Beep
Private Channel
Cloning
MENU
SETTINGS
VOX
SETTINGS
OK
RING TONES
CALL ALERT
EXIT
Fig. 51
OK
EXIT
Fig. 52
• 4.3.4.1 RING TONES
When another eXRS user on your same channel presses their
CALL Button to alert you, the TSX300 receiving the CALL has
the option of playing a pre-selected Ring Tone. The TSX300
has 5 Ring Tone choices. The default setting is Ring Tone 1.
To access the RING TONES menu, from the SETTINGS
Menu, scroll until RING TONE is highlighted (Figure 53) and
press OK (Softkey #1). The screen view in Figure 54a will
appear.
21
Use the UP / DOWN (p/q) button to scroll between the 5
Ring Tones as seen in Figures 54b and 54c. As you scroll, you
will hear each Ring Tone.
- When you have the highlighted the Ring Tone you wish to
choose, press the OK button (Softkey #1) to select that Ring
Tone and return to the Main Screen, or press the EXIT button
(Softkey #2) to exit without changing the Ring Tone and return
to the Main Screen.
-
MENU
RING TONES
RING TONES
CALL ALERT
OK
RING TONE 1
RING TONE 2
EXIT
OK
Fig. 53
RING TONES
RING TONES
RING TONE 3
RING TONE 4
OK
EXIT
Fig. 54a
RING TONE 5
RING TONE 1
EXIT
Fig. 54b
OK
EXIT
Fig. 54c
• 4.3.4.2 CALL ALERT
The Call Alert menu allows you to select the alert type your
radio will provide when another user on your channel presses
their CALL button, or you receive a call waiting notification, or
a text message. Your TSX300 can be set for Ring Tone, vibrate,
or both.
-
To access the CALL ALERT menu, from the SETTINGS
Menu, scroll until CALL ALERT is highlighted (Figure 55) and
press OK (Softkey #1). The screen view in Figure 56a will
appear.
-
Use the UP / DOWN (p/q) button to scroll and highlight
the selection you want for CALL ALERT, selecting either RING,
VIBRATE, or both via VIB & RING.
-
With your selection highlighted, press the OK (Softkey
#1) to accept your selection and return to the Main screen, or
press EXIT (Softkey #2) to return to the Main screen without
making a change.
- The ICONs in the upper left of the LCD display indicate
which Call Alert is selected, either ( ) for the audible Ring
Tone (see RING TONE above), or ( ) to indicate Vibrate, or
( + ) for both. The default setting is Tone only. Figure 57
shows both VIB & RING have been selected.
22
TriSquare Electronics Corporation
SETTINGS
CALL ALERT
RING
VIBRATE
RING TONES
CALL ALERT
OK
EXIT
OK
Fig. 55
CALL ALERT
+
CHANNEL:
0
VIBRATE
VIB & RING
OK
EXIT
Fig. 56a
EXIT
CONTACTS
Fig. 56b
MENU
Fig. 57
• 4.3.4.3 ROGER BEEP
Each voice transmission to another eXRS user will be ended
with a “transmission-complete” Roger Beep when the transmitting user releases the PTT button. It will be heard on the receiving unit. It is used in a similar fashion to the phrase
“Over”, which is used to indicate to the receiving unit that the
transmitting unit has completed its transmission. The TSX300
has a Roger Beep and the ability to turn this function On or
Off. The default setting is On.
-
To access the ROGER BEEP menu, from the SETTINGS
Menu (Figure 58), scroll until ROGER BEEP is highlighted
and press OK (Softkey #1). The screen view in Figure 59 will
appear.
-
Use the UP / DOWN (p/q) button to scroll between Roger Beep ON and Roger Beep OFF. Once you have highlighted
your preference, press OK (Softkey #1) to accept your selection and return to the Main screen, or press EXIT (Softkey #2)
to return to the Main screen without making a change.
SETTINGS
ROGER BEEP
CALL ALERT
ROGER BEEP
OK
ROGER ON
ROGER OFF
EXIT
Fig. 58
OK
EXIT
Fig. 59
• 4.3.4.4 TX TIMEOUT TIMER
The radio may be set to limit the amount of time that it can
continuously transmit. The Timeout settings are in 30 second
intervals of 30, 60, 90, 120 and OFF. The default setting is
23
OFF. Transmitter timeout shall be indicated by a short double
beep as the transmitter is turned off. If no received signal is
present, you may transmit again after releasing the PTT button
and pressing it again.
- To access the TX TIMEOUT TIMER mode menu from the
SETTINGS Menu (Figure 60), scroll until TX TIMEOUT is
highlighted and press OK (Softkey #1). The TX TIMEOUT
Menu will appear as in Figure 61a.
-
Use the UP / DOWN (p/q) button to scroll between OFF
and the 4 timeout settings of 30, 60, 90 and 120 seconds.
-
Highlight the selection you want and press OK (Softkey #1)
to make that selection and return to the main screen, or press
EXIT (Softkey #2) to return to the Main screen without making
a change.
SETTINGS
TX TIMEOUT
ROGER BEEP
TX TIMEOUT
OK
OFF
30 SECONDS
EXIT
OK
EXIT
Fig. 60
Fig. 61a
TX TIMEOUT
TX TIMEOUT
60 SECONDS
90 SECONDS
OK
120 SECONDS
OFF
EXIT
Fig. 61b
OK
EXIT
Fig. 61c
• 4.3.4.5 KEY BEEPS
When pressing buttons on the front keypad, a beep sound will
be heard indicating a button has been pressed. This feature
can be turned On or Off. The default setting is ON.
-
To access the KEY BEEP menu from the SETTINGS Menu
(Figure 62), scroll until KEY BEEP is highlighted and press OK
(Softkey #1). The KEY BEEP Menu will appear as in Figure 63.
-
Use the UP / DOWN (p/q) button to toggle between
BEEP ON and BEEP OFF.
-
With your selection highlighted as in Figure 63, press OK
(Softkey #1) to make that selection and return to the main
screen, or press EXIT (Softkey #2) to return to the Main
screen without making a change.
24
TriSquare Electronics Corporation
KEY BEEP
SETTINGS
BEEP ON
BEEP OFF
TX TIMEOUT
KEY BEEP
OK
EXIT
Fig. 62
OK
EXI T
Fig. 63
• 4.3.4.6 SILENT OPERATION:
Your TSX300 can be set up for silent operation by doing 3
things:
1. Turn Call Alert to Vibrate only.
2. Turn Roger Beep Off.
3. Turn Key Beep Off.
By making these 3 settings, your radio can be made to operate
silent, and only the speaker audio will be making sound. By
using the TriSquare VOX/PTT Headset, you can eliminate the
speaker audio. With the 3 settings listed above, Text Messaging is also done silently.
• 4.3.4.7 PRIVATE CHANNEL
A Private Channel are those Channels entered that match another radio’s MY RADIO channel. A Private Channel is used to
contact specific radios, regardless of what channel the radios
you are trying to contact are on. Private Channels are entered
into the Contacts list through the Settings Menu.
- To access the PRIVATE CHANNEL menu from the SETTINGS
Menu (Figure 64), scroll until PRIVATE CH is highlighted and
press OK (Softkey #1). The PRIVATE CH information screen
in Figure 65 will appear. Press OK (Softkey #1) to verify
your understanding of the Private Channel information that is
displayed, stating that the Private Channel entry should be the
same as that of another’s MY RADIO information. The Private
Channel entry screen shall appear as in Figure 66.
- Using the Alphanumeric keypad, enter the name of the
Private Contact you wish to store (refer to name entry in the
CONTACTS section of this manual). Once you have the name
entry complete, press DONE (Softkey #2) to advance to the
Enter Channel screen (Figure 67).
- - Enter the Channel number of that Private Contact.
NOTE: It must match the Private Contact’s “MY RADIO”
name and number. Once you have it entered, press DONE
(Softkey #2) to advance to the verification screen as in
Figure 68.
-
Press DONE again to confirm your entry; it will be entered
into the Contacts list as a Private Contact (indicated with a P
25
as shown in the Contacts screen in Figure 69, as opposed to a
Group Contact) and will return to the Main screen.
- During the Name entry process on Figure 66, if you press
DONE (Softkey #2) without entering any information, you will
get a warning that you must enter a name (Figure 70). You can
press OK (Softkey #1) to go back to the Name Entry screen in
Figure 66, or you can press EXIT (Softkey #2) to return to the
Main screen without making an entry.
-
If you press DONE (Softkey #2) during the Channel Entry
process before entering a number, or if you enter a number
under 10000, you will see the screen in Figure 71, and must
press OK (Softkey #1) and go back to correctly enter a valid
channel.
PRIVATE CH
SETTINGS
Fig. 64
Fig. 65
KEY BEEP
PRIVATE CH
OK
OK
EXIT
ENTER NAME
PRIVATE CONTACT
# MUST BE OTHER
USER’S MY RADIO#
ENTER CHANNEL
EXIT
BOB
5557774321
_
_
DELETE
DONE
DELETE
DONE
Fig. 66
Fig. 67
CONTACTS
ENTER NAME
P
BOB
TEAM 1
SELECT
Fig. 69
OK
INVALID
CHANNEL
NUMBER
EXIT
Fig. 70
DONE
Fig. 68
MUST ENTER
NAME
VIEW
CHANGE
OK
Fig. 71
• 4.3.4.8 RADIO CLONING
The TSX300 has the ability to transfer internal radio data and
information through Radio Cloning. It can be used to copy
the entire radio’s settings (Clone Radio), or copy the entire
Contacts list (All Contacts), or only select contacts (Select
Contacts). The sending radio and the receiving radio should
must be close or directly next to each other. If just copying
selected contacts to a second radio, there must be enough
empty memory slots remaining for the copied items to fit. If
there is not enough space in the receiving radio, the sending
and receiving radios will display “NOT ENOUGH SPACE” and
the cloning will be aborted.
26
TriSquare Electronics Corporation
For cloning, the radio uses a predetermined default channel.
The radio is set to this default channel upon entering the cloning menu. You have the option of changing the cloning channel
for a particular cloning session, but only to channels above
10000. Both radios will change to channel “0” after cloning
is complete.
- To access the RADIO CLONING menu from the SETTINGS
Menu (Figure 72), scroll until CLONING is highlighted and
press OK (Softkey #1). The CLONING Menu screen in Figure
73a will appear.
-
Use the UP / DOWN (p/q) button to scroll between the
options of COPY FROM (Figure 73a, radio sending information), COPY TO (Figure 73b, radio receiving information),
and CHANGE CHANNEL (Figure 73c, to change the default
cloning channel).
SETTINGS
CLONING
PRIVATE CH
CLONING
OK
COPY FROM
COPY TO
EXIT
OK
Fig. 72
Fig. 73a
CLONING
CLONING
CHNG CHANNL
COPY FROM
COPY FROM
COPY TO
OK
EXIT
EXIT
Fig. 73b
OK
EXIT
Fig. 73c
4.3.4.8.1 COPY FROM option - For the sending radio,
highlight COPY FROM as in Figure 73a and press OK
(Softkey #1). The COPY FROM screen will appear, and the
sending radio will have 3 choices to send to another radio.
These choices are CLONE RADIO (all information to be
transferred, including MY RADIO and all stored contacts),
ALL CONTACTS (the entire Contacts list, excluding My
Radio), and SELECT CONTACTS (selected contacts only
to be transferred). The Copy From screens are illustrated
under the COPY FROM Screens – SENDING RADIO.
4.3.4.8.1 CLONE RADIO – choose CLONE RADIO to
make an exact copy of your radio settings, MY RADIO and
all contacts information. Highlight CLONE RADIO and
27
press OK (Softkey #1). The next screen is for confirming
your desire to clone the radio. It asks “DUPLICATING
RADIO?”, press OK (Softkey #1) to continue. You will
advance to a screen asking you “IS RECEIVING RADIO
READY?” Make sure the receiving radio says “READY
TO RECEIVE”. If so, press OK (Softkey #1) to start the
Cloning process. The display will indicate CLONING IN
PROCESS, and once completed, the display will indicate
CLONING COMPLETE. Press OK (Softkey #1) and
the radio will return to the Main screen on channel “0”.
NOTE: You can press EXIT (Softkey #2) at any time
during the series of Menus to abort Cloning and return to
the Main screen.
4.3.4.8.1 ALL CONTACTS – choose this option to
copy all contacts (excluding My Radio) to another radio.
Highlight ALL CONTACTS and press OK (Softkey #1).
The COPY ALL CONTACTS screen will appear, then press
OK (Softkey #1) to advance to the screen asking you “IS
RECEIVING RADIO READY?” Make sure the receiving
radio is ready to receive. When ready, press OK (Softkey
#1) to start the Cloning process. The display will indicate
CLONING IN PROCESS, and once completed, the
display will indicate CLONING COMPLETE. Press OK
(Softkey #1) and radio will return to the Main screen on
channel “0”.
CLONE RADIO
ALL CONTACTS
SELECT CONTACTS
COPY FROM
COPY FROM
COPY FROM
CLONE RADIO
ALL CONTCTS
ALL CONTCTS
SELECT CONT
SELECT CONT
CLONE RADIO
OK
EXIT
CLONE RADIO
EXIT
CLONE RADIO
OK
OK
OK
EXIT
BOB
JOHN
DONE
OK
DONE
SELECT CONTACTS
IS RECEIVING
RADIO READY?
OK
SELECT CONTACTS
BOB
JEFF
COPY ALL CONTACTS
EXIT
EXIT
SELECT CONTACTS
REPLACE CONTACTS
IN RECEIVING
RADIO?
IS RECEIVING
RADIO READY?
OK
EXIT
COPY ALL CONTACTS
DUPLICATING
RADIO?
OK
OK
IS RECEIVING
RADIO READY?
EXIT
OK
EXIT
COPY FROM
CLONING IN
PROCESS
EXIT
COPY FROM
CLONING
COMPLETE
OK
4.3.4.8.1.3 SELECT CONTACTS – choose this option if you want to copy only selected contacts from the
28
TriSquare Electronics Corporation
list. Highlight SELECT CONT and press OK (Softkey
#1). The SELECT CONTACTS screen will appear. Use
the UP / DOWN (p/q) button to scroll between your
contacts. To select a contact to be transferred, with the
contact name highlighted, press the OK button (Softkey
#1) and the check box will darken indicating that contact is selected. When all contacts to be transferred are
selected, press DONE (Softkey #2) to advance to the
screen asking you “IS RECEIVING RADIO READY?”
Make sure the receiving radio is ready to receive.
When ready, press OK (Softkey #1) to start the Cloning
process. The display will indicate CLONING IN PROCESS, and once completed, the display will indicate
CLONING COMPLETE. Press OK (Softkey #1) and
radio will return to the Main screen on channel “0”.
4.3.4.8.2 COPY TO option – This option is selected
on the radio that is to receive the cloning information
from another radio. For the receiving radio, when in
the cloning menu, highlight COPY TO and press OK
(Softkey #1), and your radio will be READY TO RECIEVE the cloning information from the sending radio.
The COPY TO screens are illustrated under COPY TO
Screens – RECEIVING RADIO. When the sending radio
starts the Cloning process, the receiving radio display
will indicate CLONING IN PROCESS. When the
Cloning process is complete, the display will indicate
CLONING COMPLETE. Press OK (Softkey #1) to
return to the Main screen on Channel “0”. At anytime
during this process, you can press EXIT (Softkey #2) to
abort the Cloning process.
COPY TO Screens - RECEIVING RADIO
CLONING
COPY FROM
COPY TO
OK
EXIT
COPY TO
COPY TO
COPY TO
READY TO
RECEIVE
CLONING IN
PROCESS
CLONING
COMPLETE
EXIT
EXIT
OK
4.3.4.8.3 CHANGE CHANNEL option - The Cloning process takes place on a predetermined channel
preset at the factory. If you have a problem cloning on
the default channel, you can change the cloning channel to any channel above 10000. To change the Cloning Channel, while in the Cloning Menu, scroll down
and highlight CHANGE CHAN and press OK (Softkey
29
#1). See screens shown under CHANGING
CLONING CHANNEL Screens. The Change Cloning
Channel screen will appear. Using the keypad, enter
the channel you wish to use for Cloning (must be
greater than 10000).
NOTE: If you change the channel for one radio, both
radios involved in the Cloning must be changed to this
new Cloning Channel. The new channel will be used
only for the current cloning session.
CHANGING CLONING CHANNEL Screens
CLONING
CHANGE CLONING
CHANNEL
CHANGE CHAN
COPY FROM
OK
EXIT
_
DELETE
DONE
5 eXRS Accessories
TriSquare offers a variety of accessories for the eXRS radios.
These are:
- Dual Desktop Charging Cradle (TSC1-DC)
- AC/DC Wall Adaptor for TSC1-DC (TSC1-AC)
- NiMH Rechargeable Battery Pack (TSX-BP)
- VOX/PTT Headset w/ Boom Mic (TSX-HS1)
The TriSquare TSX10A accessory kit offers all of the above as
follows:
- 1 Dual Desktop Charging Cradle
- 1 AC/DC Wall Adaptor
- 2 NiMH Rechargeable Battery Packs
- 2 VOX/PTT Headsets w/ Boom Mic
5.1 Dual Desktop Charger (TSC1-DC) and AC/DC Wall
Adaptor (TSC1-AC) Operation:
The TriSquare TSC1-DC Dual Desktop Charger has 2 charging
wells, and can charge the TriSquare TSX-BP NiMH rechargeable
battery packs, either in the radio or out, or a combination of
either of the two.
NOTE: Do not attempt to charge alkaline batteries.
30
TriSquare Electronics Corporation
PT
V
To recharge your eXRS rechargeable battery pack either in or
out of your radio, plug the AC/DC Wall adaptor into a 120V AC
outlet, and plug the round DC connector into the back of the
desktop charger.
NOTE: This power unit is intended to be correctly oriented
in a vertical or floor mount position.
Insert either the radio facing forward, or the battery pack with the
label facing backwards and the RED charging light will illuminate.
If the charging light does not light, slightly jiggle the radio or
battery pack to ensure a good connection is being made and
the light is on. If batteries are totally discharged, recharge for 15
hours to fully charge batteries. After charging, remove and use
as needed. When not using your desktop charger, unplug and
store in a dry location.
5.2 VOX/PTT Headset (TSX-HS1) Operation:
The TriSquare TSX-HS1 PTT/VOX headset consists of 4
components, 1) the headset with boom mic assembly, 2)
the PTT/VOX Control on the cord, 3) Lapel Clip, and 4) the
connector. The headset can be used as a headset operating
in a standard Push-To-Talk (PTT) method, or automatically
transmitting using your voice to activate the transmitter (VOX).
PTT Button
VOX/PTT
Switch
PTT Button and VOX / PTT Switch / Headset Plugged In
31
5.2.1 PTT Transmitting: To use the headset in the PTT
mode, first plug the connector into the headset jack on the
side of your eXRS radio, and make sure the VOX/PTT
switch on the cord is in the PTT position. (NOTE: The eXRS
radio’s VOX setting in the radio menu must be in the OFF
setting). Place headset assembly ear hanger over your ear
and position the earbud speaker to a comfortable fit which
should position the boom microphone on the side of your
cheek. (The headset can be worn on either ear by removing
the ear hanger by sliding it forward and positioning it on the
other side and sliding it back on) To transmit, simply press the
PTT button on the PTT/VOX Control on the cord and speak in
a normal clear voice. When finished talking, release the PTT
button to receive.
5.2.2 VOX Transmitting: To use the headset in the VOX
mode, plug the connector into the headset jack on the side
of your eXRS radio, and put the VOX/PTT switch on the
cord into the VOX position. (NOTE: The eXRS radio’s VOX
setting in the radio menu must be turned on to one of the 3
VOX sensitivity settings as described earlier in the manual)
Place the headset assembly ear hanger over your ear and
position the earbud speaker to a comfortable fit which will
position the boom mic on the side of your cheek. To transmit,
simply speak in a clear normal voice. When finished talking,
the radio will end the transmission and be ready to receive.
6 General Product Care
Your TriSquare eXRS two-way radio will give you years of
trouble-free service if cared for properly. Handle the radio
with care and keep the radio away from dust and water.
When not using your radio or storing it, remove the batteries
and store radios in a dry place. Avoid exposure to extreme
temperatures.
7 Trouble Shooting Issues
Unit does not receive a signal
Verify that both units are on the same operating
channel.
Reselect the current channel to re-sync the radios.
Verify that batteries are new or fully charged.
Unit has poor reception
32
TriSquare Electronics Corporation
-
Make sure receiving unit has a clear and unobstructed line of sight to the transmitting unit.
To achieve this, getting to the highest possible point will help to maximize the receiving capability.
8 Product Service
If you are having any problems, or have questions about the
operation of your TriSquare eXRS two-way radio, please
contact TriSquare first at [email protected]. DO NOT
RETURN THIS PRODUCT TO THE STORE!
For products purchased in the USA:
If your product should require factory service, please contact
TriSquare first before sending your radio in. This will ensure
the fastest turn-around time for repair. Should you be asked
to send your radio in, it will be necessary to furnish the
following to have the product serviced and returned.
1. For warranty service, include proof-of-purchase,
such as a copy of your sales receipt. Do not
send your original copy of your sales receipt, as
it cannot be returned.
2. Send the entire product.
3. Enclose a description of the problem you are
having along with a typed or clearly printed
name and address of where the product is to be
returned.
. Pack your radio securely to prevent damage
in transit. If possible, use the original packing
material.
. Ship prepaid and insured by way of a traceable
carrier to TriSquare Electronics Corporation,
1420 NW Vivion Rd, Suite 109, Kansas City,
MO 64118.
Please allow approximately 2 to 3 weeks before contacting
TriSquare for return status. If your radio or accessory is in
warranty, upon receipt of your product, it will either be
repaired or exchanged at the option of TriSquare Electronics.
If the radio or accessory is out of warranty, a letter will
automatically be sent informing you of the repair charge. If
33
you have any questions, please contact TriSquare at service@
trisquare.us for assistance.
For products purchased outside the USA:
Please contact your local dealer for product service
information.
8.1 Warranty
Limited 1-Year Warranty For Products Purchased in the
U.S.A.
TriSquare Electronics Corporation warrants that its TriSquare
eXRS Radios and Accessories, and the component parts
thereof, will be free of defects in workmanship and materials
for a period of one (1) year from the date of first consumer
purchase. This warranty may be enforced by the first
consumer purchaser, provided that the product is utilized
within the U.S.A. TriSquare will, without charge, repair or
replace, at its option, defective eXRS radios, products or
component parts upon delivery to the TriSquare Factory
Service department, accompanied by proof of the date of
first consumer purchase, such as a duplicated copy of a sales
receipt. You must pay any initial shipping charges required to
ship the product for warranty service, but the return charges
will be at TriSquare’s expense, if the product is repaired or
replaced under warranty. This warranty gives you specific
legal rights, and you may also have other rights which may
vary from state to state.
Exclusions: This limited warranty does not apply:
1) To any product damaged by accident; 2) In the event of
misuse or abuse of the product or as a result of unauthorized
alterations or repairs; 3) If the serial number has been
altered, defaced, or removed; 4) If the owner of the product
resides outside the U.S.A. All implied warranties, including
warranties of merchantability and fitness for a particular
purpose are limited in duration to the length of this warranty.
TriSquare shall not be liable for any incidental, consequential
or other damages; including, without limitation, damages
resulting from loss of use or cost of installation. Some states
do not allow limitations on how long an implied warranty
lasts and/or do not allow the exclusion or limitation of
incidental or consequential damages, so the above limitations
34
TriSquare Electronics Corporation
may not apply to you. For products purchased outside
the U.S.A., please contact your local dealer for warranty
information.
8.2 FCC Licensing Information
Operation of the eXRS radios does not require a license,
and eXRS radios can be used by anyone for any purpose;
business or personal. The eXRS series of two-way radios
operates in the license-free 900 MHz band and is subject
to the Rules and Regulations of the Federal Communications
Commission (FCC).
This product has been approved by the FCC for use in the
USA and approved by IC for use in Canada. The FCC
identifier can be found on the product label inside the battery
compartment.
This device complies with part 15 of the FCC rules. Operation
is subject to the following two conditions: 1) This device does
not cause harmful interference, and 2) this device must accept
any interference received, including interference that may
cause undesired operation.
Read this manual carefully and make sure you know how to
properly operate the radio before use.
Changes or modifications not expressly approved by
TriSquare may void the user’s authority granted by the FCC to
operate this radio and should not be made. To comply with
FCC requirements, transmitter adjustments should be made
only by or under the supervision of a person certified as
technically qualified to perform transmitter maintenance and
repairs. Replacement of any transmitter component (crystal,
semiconductor, etc.) is not authorized by the FCC equipment
authorization for this radio and could violate FCC rules.
Note: Use of this radio outside the country where it was
intended to be distributed is subject to government regulations
and may be prohibited.
8.3 Safety Information for eXRS Radios
Your wireless handheld portable transceiver contains a low
35
power transmitter. When the PTT button is pushed, it sends
out radio frequency (RF) signals. The device is authorized
to operate at a duty factor not to exceed 50%. In August
1996, the Federal Communications Commissions (FCC)
adopted RF exposure guidelines with safety levels for
handheld wireless devices.
Important:
To maintain compliance with the FCC’s RF guidelines, hold
the transmitter at least 2 inches (5 centimeters) from your face
and speak in a normal voice, with the antenna pointed up
and away. If you wear the handset on your body while using
the headset accessory, use only the TriSquare supplied belt
clip for this product and ensure that the antenna is at least
1 inch (2.5 centimeters) from your body while transmitting.
If the distance between the antenna and the body is LESS
THAN 1.0” (2.5 cm), do not use this device in the body worn
configuration. Use only the supplied antenna. Unauthorized
antennas, modifications, or attachments will void any
warranty, and could damage the transmitter and may violate
FCC regulations.
Normal Position:
Hold the transmitter approximately 2” from your face and
speak in a normal voice, with the antenna pointed up and
away.
9 PATENT PENDING
This radio has 1 or more Patents Pending with the
United States Patent and Trademark Office.
TriSquare Model TSX300
TriSquare Electronics Corporation
1420 NW Vivion Rd., Ste 109
Kansas City, MO. 64118
www.trisquare.us
Document Number TR000022-052 Rev. A
Printed in China
36
TriSquare Electronics Corporation