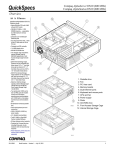
1
AlphaServer GS60E
Installation Guide
Order Number:
EK–GS60E–IN. A01
This guide is intended for use by customer service engineers and selfmaintenance customers installing an AlphaServer GS60E system.
Compaq Computer Corporation
First Printing, August 1999
The information in this publication is subject to change without notice.
COMPAQ COMPUTER CORPORATION SHALL NOT BE LIABLE FOR TECHNICAL
OR EDITORIAL ERRORS OR OMISSIONS CONTAINED HEREIN, NOR FOR
INCIDENTAL OR CONSEQUENTIAL DAMAGES RESULTING FROM THE
FURNISHING, PERFORMANCE, OR USE OF THIS MATERIAL.
This publication contains information protected by copyright. No part of this publication may
be photocopied or reproduced in any form without prior written consent from Compaq
Computer Corporation.
The software described in this document is furnished under a license agreement or
nondisclosure agreement and may be used or copied only in accordance with the terms of the
agreement.
© 1999 Compaq Computer Corporation.
All rights reserved. Printed in the U.S.A.
COMPAQ and the Compaq logo are trademarks or registered trademarks of Compaq Computer
Corporation. AlphaServer, DIGITAL, OpenVMS, and StorageWorks are trademarks or
registered trademarks of Digital Equipment Corporation. Microsoft, Windows, and Windows
NT are registered trademarks of Microsoft Corporation. UNIX is a registered trademark in the
U.S. and other countries, licensed exclusively through X/Open Company Ltd. Other product
names mentioned herein may be trademarks and/or registered trademarks of their respective
companies.
FCC Notice: The equipment described in this manual generates, uses, and may emit radio
frequency energy. The equipment has been type tested and found to comply with the limits for
a Class A digital device pursuant to Part 15 of FCC Rules, which are designed to provide
reasonable protection against such radio frequency interference. Operation of this equipment in
a residential area may cause interference, in which case the user at his own expense will be
required to take whatever measures are required to correct the interference.
Shielded Cables: If shielded cables have been supplied or specified, they must be used on the
system in order to maintain international regulatory compliance.
Warning! This is a Class A product. In a domestic environment this product may cause radio
interference, in which case the user may be required to take adequate measures.
Achtung! Dieses ist ein Gerät der Funkstörgrenzwertklasse A. In Wohnbereichen können bei
Betrieb dieses Gerätes Rundfunkstörungen auftreten, in welchen Fällen der Benutzer für
entsprechende Gegenmaßnahmen verantwortlich ist.
Avertissement! Cet appareil est un appareil de Classe A. Dans un environnement résidentiel,
cet appareil peut provoquer des brouillages radioélectriques. Dans ce cas, il peut être demandé
à l'utilisateur de prendre les mesures appropriées.
Contents
Preface ........................................................................................................... vii
Chapter 1
1.1
Installation Flowchart ..............................................................................1-2
Chapter 2
2.1
2.2
2.3
2.4
2.5
Installing an Expander Cabinet
Unpack the Cabinet ..................................................................................4-2
Remove System Cabinet Panel and Position Expander Cabinet.................4-4
Level All Cabinets....................................................................................4-6
Secure Cabinets Together .........................................................................4-8
Connect the Power Control Cable...........................................................4-10
Connect the I/O Cable ............................................................................4-12
Chapter 5
5.1
5.2
5.3
Installing the System Cabinet
Inspect the Shipment................................................................................3-2
Collect Tools and Resources.....................................................................3-4
Remove Carton and Packing Material ......................................................3-6
Remove from the Pallet ............................................................................3-8
Level the Cabinet ...................................................................................3-10
Chapter 4
4.1
4.2
4.3
4.4
4.5
4.6
Site Preparation
Pre-Installation Checklist .........................................................................2-2
Cabinet Sizes ...........................................................................................2-4
Floor Space and Environmental Requirements .........................................2-6
Power Requirements............................................................................... 2-12
AC Power Cable and Receptacles ........................................................... 2-14
Chapter 3
3.1
3.2
3.3
3.4
3.5
Installation Overview
Making Console, SCSI, and Ethernet
Connections
Connect the Console Terminal .................................................................5-2
Connect the Console Load Device ............................................................5-4
Connect SCSI Cables ...............................................................................5-6
iii
5.4
Connect Ethernet Cables ..........................................................................5-8
Chapter 6
6.1
6.2
6.3
Prepare to Check the AC Power ...............................................................6-2
Measure the AC Power.............................................................................6-4
Turn the Power On and Check Indicators ................................................6-6
Chapter 7
7.1
7.2
System Self-Test
Check Module Status LEDs......................................................................7-2
Check the Self-Test Display .....................................................................7-4
Chapter 8
8.1
8.2
8.3
8.4
8.5
8.6
8.7.1
8.7.2
8.7
8.8
8.9
8.10
8.11
8.12
8.13
Powering Up the System
Diagnostics and Utilities
Console Load Device................................................................................8-2
Verification Overview ..............................................................................8-4
Diagnostics Overview...............................................................................8-6
Run System Self-Test ...............................................................................8-8
Show Commands for Installation............................................................8-10
Verify SCSI Devices...............................................................................8-12
Check SCSI Devices Using Console Commands............................ 8-12
Check Console Output Against Physical Devices........................... 8-14
If Necessary, Run the RAID Configuration Utility.................................. 8-16
Booting Factory Installed Software.........................................................8-18
Booting OpenVMS from a CD-ROM...................................................... 8-20
Booting Tru64 UNIX from a CD-ROM .................................................. 8-22
Set Commands for Booting ....................................................................8-24
Booting LFU from a CD-ROM ...............................................................8-26
Running the System Exerciser VET .......................................................8-28
Examples
7-1
8-1
8-2
8-3
8-4
8-5
8-6
8-7
8-8
8-9
8-10
8-11
iv
Self-Test Results ......................................................................................7-4
Self-Test Display......................................................................................8-8
Show Configuration ...............................................................................8-10
Show Device ..........................................................................................8-11
Checking SCSI Devices..........................................................................8-12
Running RCU ........................................................................................8-16
Booting the Operating System ................................................................8-18
CD-ROM OpenVMS Boot...................................................................... 8-20
CD-ROM UNIX Boot ............................................................................8-22
Set Boot Commands...............................................................................8-24
AlphaServer GS60E LFU Booting..........................................................8-26
Sample VET User Session for Command Mode...................................... 8-28
Figures
1-1
2-1
2-2
2-3
2-4
3-1
3-2
3-3
3-4
4-1
4-2
4-3
4-4
4-5
4-6
4-7
4-8
5-1
5-2
5-3
5-4
5-5
5-6
6-1
6-2
6-3
6-4
7-1
8-1
8-2
8-3
8-4
Installation Flowchart ..............................................................................1-2
GS60E Sample System .............................................................................2-4
Sample GS60E Configuration ..................................................................2-6
GS60E Power System Components...........................................................2-8
AC Power Receptacles............................................................................2-10
Inspection Flowchart ................................................................................3-2
Packing Material ......................................................................................3-6
Preparation and Removal from Pallet .......................................................3-8
Leveler Foot Adjustment ........................................................................3-10
Expander Cabinet.....................................................................................4-2
Removing System Cabinet Panel ..............................................................4-4
Expander Cabinet Positioning ..................................................................4-5
Leveler Foot Adjustment ..........................................................................4-6
Securing Expander Cabinet ......................................................................4-8
Power Control Cable Installation............................................................4-10
CCL Panel and Jack Splitter...................................................................4-11
I/O Cable Connections ...........................................................................4-12
System Cabinet, Console Terminal, and Printer........................................5-2
CCL Panel and Console Terminal Port.....................................................5-3
Console Load Device................................................................................5-4
KZPBA as the Console Load Device Support ...........................................5-5
System and Expander Cabinets.................................................................5-6
Ethernet Connectors on PCI Adapters ......................................................5-8
Circuit Breaker for the AC Power.............................................................6-2
Measuring System Power .........................................................................6-4
Control Panel ...........................................................................................6-6
Power Supplies.........................................................................................6-8
Powering Up and Checking the LEDs ......................................................7-2
Accessing the Console Load Device .........................................................8-2
Verification Procedure..............................................................................8-4
Diagnostic Overview ................................................................................8-6
SCSI Disks in StorageWorks Shelves ....................................................8-14
Tables
1
2-1
2-2
2-3
2-4
2-5
3-1
AlphaServer GS60E Documentation ........................................................... x
Shipping Dimensions and Weights...........................................................2-3
Cabinet Dimensions and Weights.............................................................2-5
Environmental Specifications...................................................................2-7
Three-Phase AC Input Voltages ...............................................................2-9
Three-Phase Power Requirements ............................................................2-9
Tools and Resources.................................................................................3-4
v
4-1
5-1
6-1
6-2
7-1
8-1
8-2
vi
Cabinet Dimensions and Weights.............................................................4-5
SCSI Cables to Devices in Other Cabinets................................................5-7
AC Input Voltage Specifications ..............................................................6-5
Control Panel LEDs .................................................................................6-6
LEDs After Self-Test................................................................................7-3
Diagnostics ..............................................................................................8-7
Verification Software Exercisers ............................................................ 8-29
Preface
Intended Audience
This manual is written for customer service engineers and self-maintenance
customers who require information to install an AlphaServer GS60E system.
Document Structure
This manual uses a structured documentation design. Topics are organized
into small sections for efficient reference. Each topic begins with an abstract.
You can quickly gain a comprehensive overview by reading only the abstracts.
Next is an illustration or example, which also provides quick reference. Last
in the structure are descriptive text and syntax definitions.
This manual has eight chapters as follows:
•
Chapter 1, Installation Overview, provides a flowchart that
summarizes the installation process.
•
Chapter 2, Site Preparation, shows how to prepare the site for the
system.
•
Chapter 3, Installing the System Cabinet, shows how to unpack and
install the system cabinet.
•
Chapter 4, Installing an Expander Cabinet, explains how to install
one or more expander cabinets, if present.
•
Chapter 5, Making Console, SCSI, and Ethernet Connections,
shows how to connect the console, SCSI, and Ethernet devices if present to
the system.
•
Chapter 6, Powering Up the System, explains how to start the system
by applying main power.
•
Chapter 7, System Self-Test, describes the system self-test and its
results.
•
Chapter 8, Diagnostics and Utilities, describes how to verify system
operation using diagnostics and utilities.
vii
Conventions Used in This Document
Icons. The icons shown below are used in illustrations for designating part
placement in the system described. A shaded area in the icon shows the
location of the component or part being discussed.
Main Cabinet
Front
Rear
Expander Cabinet
Front
Rear
GS60EFM-99
Table 1 AlphaServer GS60E Documentation
Title
Order Number
Hardware User Information and Installation
AlphaServer GS60E Installation Guide
EK–GS60E–IN
AlphaServer GS60E Operations Manual
EK–GS60E–OP
KFTHA System I/O Module Installation Guide
EK–KFTHA–IN
KFE72 Installation Guide
EK–KFE72–IN
Service Information
AlphaServer GS60E Service Manual
EK–GS60E–SV
Reference Manual
AlphaServer GS60E and GS140 Getting Started with Logical
Partitions
viii
EK–TUNLP–SF
Table 1 AlphaServer GS60E Documentation (Continued)
Title
Order Number
Upgrade Manuals
GS60/8200 to GS60E Upgrade Manual
EK–GS60E–UP
H7506 Power Supply Installation
EK–H7506–IN
RRDCD Installation Card
EK–RRDXX–IN
ix
Chapter 1
Installation Overview
This chapter provides a quick overview of the installation procedure and relates
the steps of the procedure with chapters in this manual. It consists of one
section:
•
Installation Flowchart
Installation Overview
1-1
1.1
Installation Flowchart
In general, a system is installed as shown in Figure 1-1.
Figure 1–1 Installation Flowchart
Prepare Site
Chapter 2
Install System Cabinet
Chapter 3
Multiple
Cabinets
Yes
Chapter 4
No
Connect Console,
SCSI, and
Chapter 5
Ethernet cables
Power Up System
Chapter 6
System Self-Test
Chapter 7
Verification
(Diagnostics and
Utilities)
Chapter 8
GS60E11-99
1-2
AlphaServer GS60E Installation Guide
In general, the procedure is as follows (Figure 1-1):
1. Prepare the site for system installation as described in Chapter 2.
2. Install the system cabinet as described in Chapter 3.
3. If the system has one or more expander cabinets, refer to Chapter 4 for
installation instructions.
4. Connect the console, and, if appropriate, make the Ethernet, and SCSI
connections as described in Chapter 5.
5. Power up the system as described in Chapter 6.
6. Observe and consider the results of the system self-test as described in
Chapter 7.
7. Verify system operation by running various diagnostics and utilities as
described in Chapter 8.
Installation Overview
1-3
Chapter 2
Site Preparation
This chapter provides site planning guidelines, cabinet sizes, space and
environmental requirements, and system power requirements.
Sections include:
•
Pre-Installation Checklist
•
Cabinet Sizes
•
Floor Space and Environmental Requirements
•
Power Requirements
•
AC Power Cable and Receptacles
Site Preparation
2-1
2.1
Pre-Installation Checklist
Check off tasks when completed before system installation.
To
facilitate the installation process, it is recommended that the customer
plan ahead and coordinate the site planning and scheduling with
Compaq.
Planning the Site:
U
U
U
U
U
U
U
U
U
U
U
U
2-2
Plan the physical layout of the system cabinet, expander cabinets, console
terminal, and other system units.
Plan to place all equipment away from heavy traffic centers, leaving
enough room for airflow and maintenance.
Do not place systems on carpets.
Obtain cabinet weights and dimensions to check against floor loading
restrictions.
Determine the correct power requirements for the system to be installed.
Determine the sizes of the circuit breakers and the number of branch
circuits required.
Determine the number, type, and location of required AC power outlets.
Check the compatibility of different power sources. This must be checked
when multiple types of power distribution transformers, or power
conditioning equipment is used.
Determine system power consumption to calculate the input line power
requirement.
Establish a system grounding scheme for the installation.
Determine environmental cooling requirements.
Check the location and requirements of cabling for communication devices
such as Ethernet.
AlphaServer GS60E Installation Guide
Check the Delivery Route:
U
U
U
U
Check the height, width, and location of doors and passageways for
adequate clearance.
Check floor loading requirements along passageways.
Check passageway restrictions such as corners, ramps, or obstructions.
Check the size, capacity, and availability of elevators.
Table 2-1 lists the shipping dimensions of the GS60E system and expander
cabinets. These dimensions include the width of the shipping pallet, the height
of the shipping boxes, and the weight of the packing materials.
Table 2-1
Cabinet
Shipping Dimensions and Weights
Height
cm (in)
Width
cm (in)
Depth
cm (in)
Weight
kg (lbs)ï
GS60E
194 (76.25)
91.5 (36.0)
121.5 (47.9)
398 (875)
System
GS60E
194 (76.25)
91.4 (36.0)
121.5 (47.9)
365 (804)
Expander
ï System and expander weights are based on a fully configured cabinet.
Site Preparation
2-3
2.2
Cabinet Sizes
Include all cabinets and peripherals when laying out the installation
site. A sample system could include a main cabinet, a maximum of two
expander cabinets, and console devices. Figure 2-1 shows a sample
GS60E system.
Figure 2–1 GS60E Sample System
60 cm (23.6 in)
60 cm (23.6 in)
Expander
Cabinet
170 cm (67 in)
170 cm (67 in)
System
Cabinet
170 cm (67 in)
Expander
Cabinet
60 cm (23.6 in)
GS60E21-99
2-4
AlphaServer GS60E Installation Guide
Table 2-2
Cabinet
Cabinet Dimensions and Weights
Height
cm (in)
Width
cm (in)
Depth
cm (in)
Weight
kg (lbs)¹
GS60E
170 (67.0)
60 (23.6)
100 (39.4)
352 (775)
System
GS60E
170 (67.0)
60 (23.6)
100 (39.4)
320 (704)
Expander
¹ System and expander weights are based on a fully configured cabinet.
Site Preparation
2-5
2.3
Floor Space and Environmental Requirements
Table 2-3 lists system environmental requirements. Space for front and
rear clearance are the minimum required for airflow and maintenance.
Figure 2–2 Sample GS60E Configuration
Rear
Clearance
100 cm (39.4 in)
Expander
Cabinet
System
Cabinet
Expander
Cabinet
Width
180 cm (71 in)
100 cm
(39.4 in)
Depth
350 cm
(137.8 in)
Front
Clearance
150 cm (59 in)
GS60E22-99
2-6
AlphaServer GS60E Installation Guide
Table 2-3
Environmental Specifications
Environmental
Temperature
Relative humidity
Operating¹
5°–35° C (41°–95° F)
10–90%
Storage
–40°–66°C (–40°–151° F)
10–95%
Altitude
0–3 km (0–10,000 ft)
0–12.2 km (0–40,000 ft)
¹ Recommended operating temperature is 18°–24° C (65°–75° F) and
40–60% relative humidity.
The minimum amount of clearance space for the system front is 150 cm (59 in)
and rear is 100 cm (39.4 in), as shown in Figure 2-2. These clearances are
needed for airflow and maintenance.
Air for the system cabinet to cool the card cage is brought in from the top and
blown out at the back of the cabinet. Air to cool the options is brought in from
the front of the cabinet and blown out the back. Air to cool the expander cabinet
is brought in from the front and blown out the back.
NOTE: Do not place anything on top of the cabinets, since this restricts airflow.
Inadequate airflow can cause the system to shut down.
Site Preparation
2-7
2.4
Power Requirements
The power system consists of an AC input box, a DC distribution
module, redundant hot swap power supplies, a cabinet control logic
(CCL) panel, and cables.
Figure 2–3 GS60E Power System Components
Front
Rear
CCL Panel
DC Distribution
Module
Power
Supplies
Power
Supplies
AC Input Box
GS60E23-99
2-8
AlphaServer GS60E Installation Guide
Table 2–4
Three-Phase AC Input Voltages
Country
Input
Voltage
Circuit Breaker
Rating (amps)
Frequency
Range (Hz)
Japan
202 Delta
30
50–60
North America
120/208 Wye
30
50–60
Europe/AP
380–415 Wye
32
50–60
Each system and expander cabinet requires its own AC power connector.
Table 2–5
Three-Phase Power Requirements
Cabinet
Power (watts)
Heat Dissipation (BTU/hr)
System
1,200 minimum¹
2,450 maximum²
4,100 minimum¹
8,300 maximum²
System and two
expander cabinets
5,150 maximum³
17,550 maximum³
¹These figures are based on a minimum configuration containing three power supplies, a
dual CPU module, one memory module, one system I/O module, one CD-ROM, one
minimally configured PCI shelf, and one StorageWorks shelf with one disk drive.
²Based on a fully configured system containing three power supplies, three CPU modules
(6 CPUs), two memory modules, two system I/O modules, one CD-ROM, two PCI shelves,
and two StorageWorks shelves with 12 disk drives.
³Based on a fully configured system cabinet (see note 2) and two expander cabinets each
containing three PCI shelves and four StorageWorks shelves with 24 disk drives.
NOTE: AC power receptacles are also required for console terminals and
printers.
Site Preparation
2-9
2.5
AC Power Cable and Receptacles
The AC power cable is 4.5 m (15 ft) in length. It consists of three-phase
leads (X, Y, and Z) plus neutral (N) and ground (G). AC power
connectors are shown in Figure 2-4.
Figure 2–4 AC Power Receptacles
202 V NOMINAL (50-60 Hz)
NEMA L21-30R
120/208 V NOMINAL (50-60 Hz)
NEMA L21-30R
V
V
V
V
PHASE X
PHASE X
NEUTRAL
PHASE Y
PHASE Y
GND
GND
PHASE Z
PHASE Z
V
V
380-415 V NOMINAL (50-60 Hz)
IEC 309 TYPE
V
V
PHASE 3
PHASE 2
NEUTRAL
PHASE 1
GND
V
GS60E24-99
2-10
AlphaServer GS60E Installation Guide
Chapter 3
Installing the System Cabinet
This chapter describes how to install the AlphaServer GS60E system cabinet.
The cabinet contains the CPU, memory, a system I/O module, at least one PCI
I/O subsystem, disks, and power.
If your system has an expander cabinet, unpack it and remove it from the pallet
as described in the first four sections of this chapter.
Sections in this chapter include:
•
Inspect the Shipment
•
Collect Tools and Resources
•
Remove Packing Material
•
Remove Cabinet from the Pallet
•
Level the Cabinet
Installing the System Cabinet
3-1
3.1
Inspect the Shipment
Check that all system equipment is at the installation site.
Figure 3–1 Inspection Flowchart
Check Equipment
Against Shipping List
Incomplete or
Damaged
Shipment?
Yes
Customer
Contacts Carrier
No
Missing or
Incorrect
Equipment?
Yes
Enter in LARS Report
Notify Customer
Contact
Unit Manager
No
Continue Unpacking
3-2
AlphaServer GS60E Installation Guide
GS60E31-99
NOTE: Physically inspect the system to be sure parts have not become loose
during shipment.
If you find a damaged container or package, notify the customer. Wait until the
customer contacts the insurance company and gives you permission to continue
unpacking.
Compare items listed on the Product Delivery Document (in a slip envelope on
the shipping box) with the packing slip contained in a plastic envelope on the
shipping box. Items should be compared throughout the installation procedure
as boxes are unpacked and cabinets opened.
It is important to record information on damaged or opened containers on the
Labor Activity Reporting System (LARS) form.
Installing the System Cabinet
3-3
3.2
Collect Tools and Resources
You will need the items listed in Table 3-1 to unpack and install the
system cabinet. The removal of the cabinet from the pallet requires at
least two people.
Table 3–1 Tools and Resources
Item
Use
Product Delivery Document
and packing slip
To verify that all hardware has been delivered
Utility knife
To remove straps from cabinet shipping boxes
Adjustable wrench
To remove pallet brackets and to adjust leveler feet
Level
To verify that the cabinet is properly leveled
Socket wrench set
To remove and install bolts
Digital voltmeter
To check AC and DC voltages
Table or bench
Work space for unpacking and installation
Flathead screwdriver
For installation of I/O port module cable(s)
3-4
AlphaServer GS60E Installation Guide
Review requirements such as power, environmental, and space requirements for
the system.
WARNING: Since the cabinet is heavy and has a high center of gravity,
removing it from the pallet requires at least two people.
Installing the System Cabinet
3-5
3.3
Remove Packing Material
Remove all packing material to prepare the system cabinet for removal
from the pallet.
Figure 3–2 Packing Material
4
3
6
5
7
5
4
GS60E32-99
3-6
AlphaServer GS60E Installation Guide
Use the following procedure to unpack the system cabinet:
➊ Position the carton so that the front door faces an open space with enough
clearance to allow the cabinet to be rolled down ramps.
➋ Using a utility knife, cut the shipping straps from the carton.
➌ Remove the outside top cardboard cover.
➍ Remove the outside shipping box, using a 7/16” socket wrench to remove the
four bolts that hold the box together.
➎ Remove the four corrugated spacers and the ramp and accessories boxes
from around the cabinet.
➏ Remove the inner protective plastic wrapping by slipping it up and over the
cabinet.
➐ Locate the box that contains the ramp kit and open it (see Figure 3-2).
➑ Follow the unpacking illustrations located on the outside of the shipping box
for removing the cabinet from the pallet (see Section 3.4).
NOTE: It’s a good idea to save all packing materials intact in case the system
needs to be shipped in the future.
Installing the System Cabinet
3-7
3.4
Remove Cabinet from the Pallet
Check the cabinet for external damage. Remove the four shipping
brackets that attach the cabinet to the pallet. Insert the ramps on the
front of the pallet and remove the cabinet.
WARNING: At least two people are required to remove the cabinet from the
pallet.
Figure 3–3 Preparation and Removal from Pallet
2
3
1
GS60E33-99
3-8
AlphaServer GS60E Installation Guide
WARNING: Serious injury may result if the cabinet is improperly
handled or proper safety conditions are not met.
Check the cabinet sides, top, front door, and rear panel for damage. If the
cabinet is damaged, do the following:
•
Enter the location and extent of the damage on the LARS report.
•
Notify the customer and your unit manager.
•
Stop unpacking until the customer gives you permission to continue.
1. Using an adjustable wrench, remove the four bolts and shipping brackets
that hold the cabinet leveler feet to the pallet (Figure 3-3).
2. The leveler feet are lowered to the pallet surface for shipping. Using the
adjustable wrench, raise the feet to the upmost position before removing the
system from the pallet (see Section 3.5).
3. Attach the ramps by fitting the prongs into the holes on the front of the
pallet. Place the ramps so that the runners are on the inside. Align the
arrows on the ramps and pallets (see Figure 3-3).
4. With two people working together (one in front and one in back), slowly roll
the cabinet off the pallet down the ramps. Move the cabinet into position.
This should be done on a firm level floor. To avoid static electricity, which
can cause system problems, do not place the system on a carpet.
NOTE: Make sure the space under the cabinet is clear of any debris or
extraneous materials.
Installing the System Cabinet
3-9
3.5
Level the Cabinet
Inspect the rubber leveler feet to be sure they have not been damaged
during shipping. To level the cabinet, adjust the feet and check the
cabinet with a bubble level.
Figure 3–4 Leveler Foot Adjustment
Locknut
Leveler Hexnut
Leveler Foot
GS60E34-99
3-10
AlphaServer GS60E Installation Guide
1. Using an adjustable wrench, lower and adjust the leveler feet at each corner
of the system. (A shipping bracket can also be used to lower the leveler feet.
The bracket cutout and leveler feet hexnuts are the same size.)
2. Using a bubble level, check to see that the cabinet is properly leveled (side
to side and front to back).
3. Once the cabinet is level, lock each of the feet into place by tightening the
locknut at the top of each leveler foot.
Installing the System Cabinet
3-11
Chapter 4
Installing an Expander Cabinet
This chapter explains how to install one or more expander cabinets for the
system. An expander cabinet provides room for I/O adapters and additional
storage for the system. The system can have a maximum of two expander
cabinets.
The expander cabinet is designed for PCI I/O shelves and BA36R StorageWorks
shelves. At the bottom of the cabinet there is room for three power supplies
(one is optional), a CCL panel, and DC distribution. Above this area there are
seven shelf slots for PCI I/O shelves and BA36R StorageWorks shelves. The
maximum number of PCI I/O shelves in an expander cabinet is four. The
maximum number of PCI I/O shelves for an entire system is eleven.
Sections in this chapter include:
•
Unpack the Cabinet
•
Remove System Cabinet Panel and Position Expander Cabinet
•
Level All Cabinets
•
Secure Cabinets Together
•
Connect the Power Control Cable
•
Connect the I/O Cable
Installing an Expander Cabinet
4-1
4.1
Unpack the Cabinet
Unpack the expander cabinet in the same way you unpacked the
system cabinet in Chapter 3. The expander cabinet ships with no side
panels.
Figure 4–1 Expander Cabinet
GS60E41-99
4-2
AlphaServer GS60E Installation Guide
1. Inspect the shipment for the expander cabinet as done for the system
cabinet (see Section 3.1).
2. Collect the tools and resources needed to install the expander cabinet (see
Section 3.2).
3. Remove the carton and packing material from the expander cabinet (see
Section 3.3). Identify and put aside the components of the installation kit.
4. Use two people to remove the expander cabinet from the shipping pallet (see
Section 3.4).
Installing an Expander Cabinet
4-3
4.2
Remove System Cabinet Panel and Position
Expander Cabinet
If installing one expander cabinet, remove the right system cabinet
panel. Position the expander cabinet to the right of the system cabinet.
The second expander cabinet is positioned to the left as viewed from
the front.
Figure 4–2 Removing System Cabinet Panel
1
2
4
3
3
3
4-4
GS60E42-99
AlphaServer GS60E Installation Guide
1. Lift off the system cabinet cover and set aside (see ➊, Figure 4-2).
2. Open the system cabinet’s front and rear doors ➋.
3. Remove the front and rear screws holding the right panel ➌.
4. Pull the bottom of the panel away from the cabinet, lift up, and remove ➍.
Repeat Steps 3 and 4 on the left side if there is a second expander cabinet.
5. Attach the removed panel(s) to the expander cabinet(s) by reversing the
above steps. This can be done now or after the cabinets are secured together
(see Section 4.4).
As shown in Figure 4-3, place the first expander cabinet to the right of the
system cabinet as viewed from the front of the system. Position a second
expander cabinet to the left of the system cabinet. A system can have a
maximum of two expander cabinets.
Figure 2-2 shows the system layout with clearances for access, and Table 2-2
provides information on cabinet dimensions and weight.
Figure 4–3 Expander Cabinet Positioning
2nd
Expander
Cabinet
System
Cabinet
1st
Expander
Cabinet
GS60E43-99
Installing an Expander Cabinet
4-5
4.3
Level All Cabinets
Level the cabinets by adjusting the rubber feet on all the cabinets and
then check the cabinets with a bubble level. Be sure the sides of the
cabinet butt each other and the cabinets are the same height.
Figure 4–4 Leveler Foot Adjustment
Locknut
Leveler Hexnut
Leveler Foot
GS60E44-99
4-6
AlphaServer GS60E Installation Guide
1. Use an adjustable wrench to lower and adjust the leveler feet. A shipping
bracket can also be used to adjust the leveler feet, since the bracket cutout
and leveler feet hexnuts are the same size.
2. Use a bubble level while adjusting the feet and make sure all cabinets are
properly leveled in three dimensions (top to bottom, side to side, and front to
back). The operation is complete when the tops are level and the sides of
the cabinet are snug, top to bottom, front to back.
3. Once the cabinets are level, lock each of the feet into place by tightening the
locknut at the top of each leveler foot.
Installing an Expander Cabinet
4-7
4.4
Secure Cabinets Together
The expander cabinet is secured to the system cabinet with four screws
supplied with the expander cabinet.
Figure 4–5 Securing Expander Cabinet
3
3
3
2
3
1
GS60E45-99
4-8
AlphaServer GS60E Installation Guide
1. Position the cabinets close together so there is less than 10 mm separation
between them ➊.
2. Align the cabinet heights by adjusting the leveling feet (see Sections 4.2 and
4.3) ➋.
3. Secure the cabinets together using the four screws inserted through the
system cabinet ➌ using an Allen wrench supplied with the cabinet joining
kit (P/N 70-40120-01).
4. Repeat Steps 1 through 3 if there is a second expander cabinet.
Installing an Expander Cabinet
4-9
4.5
Connect the Power Control Cable
Connect the power control cable from the control panel in the system
cabinet to the CCL panel in the expander cabinet. If there are two
expander cabinets, install the jack splitter into the control panel in the
system cabinet and connect both power control cables to the splitter.
Route each cable from the control panel in the system cabinet to the
CCL panel in each expander cabinet.
Figure 4–6 Power Control Cable Installation
Expander Cabinet, Rear
CCL Panel
Main Cabinet, Rear
CCL Panel
Expander Cabinet, Rear
CCL Panel
Power
Supplies
Cable
to First
Expander
4-10
Cable
to Second
Expander
AlphaServer GS60E Installation Guide
GS60E46-99
WARNING: Before beginning this procedure, make sure the system is powered
off.
1. If there are two expander cabinets, at the rear of the system cabinet plug
the jack splitter (PN 12-44937-01) into the system cabinet control panel jack
marked Expander (see Figure 4-7).
2. For the right expander cabinet, plug the power control cable (PN 17-0351105) into the jack splitter or the jack marked Expander on the system control
panel at the rear of the system cabinet.
3. Route the cable according to Figure 4-6 and plug the other end of the cable
into the jack marked Expander on the CCL panel at the rear of the right
expander cabinet.
4. For the left expander cabinet, plug the second power control cable (PN 1703511-05) into the jack splitter in the system cabinet.
5. Route the cable according to Figure 4-6 and plug the other end of the cable
into the jack marked Expander on the CCL panel at the rear of the left
expander cabinet.
6. Tie wrap the cables in place.
Figure 4–7 CCL Panel and Jack Splitter
Rear
External
Power Enable
PowerComm 1
External
UPS Power
PowerComm 2
External
Enable
PowerComm 3
Console
Jack Splitter
Expander
GS60E47-99
Installing an Expander Cabinet
4-11
4.6
Connect the I/O Cable
Connect the I/O cable(s) between the system and expander cabinet(s).
Figure 4–8 I/O Cable Connections
Expander Cabinet, Rear
Main Cabinet, Rear
I/O Cables
to Right
Expander
I/O Cables to
DWLPBs in System
GS60E48-99
4-12
AlphaServer GS60E Installation Guide
Figure 4-8 shows a system with six PCIs (DWLPBs). In this configuration, two
KFTHAs are in TLSB slots 8 and 7. There are six PCIs, two in the system
cabinet and four in the expander cabinet.
Cabling Guidelines
1. The PCIs in the system cabinet are connected to the KFTHA in slot 7.
2. The PCIs in expander cabinet are connected to the KFTHA in slot 8.
3. If there are two expander cabinets, the PCIs in the right expander are
connected to the KFTHA in slot 8, and the PCIs in the left expander are
connected to the KFTHA in slot 6.
4. The cable from the topmost connector on the KFTHA is connected to the PCI
in the lowest position in the expander, the cable from the next topmost
position is connected to the PCI that is above the lowest one in the
expander. The other two cables follow this principle.
To install the cables:
1. Plan your cabling carefully, taking into consideration the above conditions
and how the cables are routed and bundled as shown in Figure 4-8.
2. Each PCI must be connected to a KFTHA. Cable 17-03085-04 connects the
KFTHA to the PCI in the system cabinet and connects the PCIs in the
expander cabinets to KFTHAs in the system cabinet.
3. Using a flathead screwdriver, install the end of the I/O cable labeled IOP
(PN 17-03085-04) to the KFTHA connector. Be sure the connector is aligned
before tightening the screws.
4. Route the I/O cable(s) as shown in Figure 4-8.
5. Using a flathead screwdriver, install the end of the I/O cable labeled PIU to
the appropriate PCI (see Figure 4-8).
6. Once all cables are connected, place tie wraps on them and secure them as
best you can in the positions shown in Figure 4-8.
Installing an Expander Cabinet
4-13
Chapter 5
Making Console, SCSI, and
Ethernet Connections
This chapter describes how to connect a console terminal and how to make
SCSI, and Ethernet connections. It consists of the following sections:
•
Connect the Console Terminal
•
Connect the Console Load Device
•
Connect SCSI Cables
•
Connect Ethernet Cables
Making Console, SCSI, and Ethernet Connections
5-1
5.1
Connect the Console Terminal
Figure 5-1 shows a system cabinet with a console terminal. Connect the
console terminal to the console terminal port in the system cabinet as
shown in Figure 5-2.
Figure 5–1 System Cabinet, Console Terminal, and Printer
COMPAQ
AlphaServer GS60E
LA75 Companion Printer
d i g i t a l
GS60E51-99
5-2
AlphaServer GS60E Installation Guide
1. Unpack the serial console terminal. The console terminal signal cable is
shipped in the loose piece box and consists of a 17-01364-02 cable and
H8575-A adapter.
2. Open the rear door and connect one end of the 17-01364-02 cable to the
console terminal port on the control panel (see Figure 5-2). Connect the
other end of the cable to the H8575-A, which connects to a 25-pin Dsubminiature connector on the console terminal. Connect the cable ground
wire to the cabinet grounding screw nearby. Connect the other end of the
cable ground wire to one of the screws on the H8575-A.
3. If a printer is not present, skip this step. Otherwise, unpack the printer.
Connect the signal cable to the printer and to the console terminal. Plug in
the printer.
4. The following are the default terminal characteristics. If the terminal does
not have these characteristics, they must be set accordingly:
•
Baud rate = 9600 (transmit = receive)
•
8 bits, no parity
•
1 Stop Bit
•
Xoff at 64
Figure 5-2 CCL Panel and Console Terminal Port
Rear
External
Power Enable
PowerComm 1
External
UPS Power
PowerComm 2
External
Enable
PowerComm 3
Console
Expander
GS60E52-99
Making Console, SCSI, and Ethernet Connections
5-3
5.2
Connect the Console Load Device
Should the console load device cable be dislodged during shipment,
follow these instructions. The CD-ROM drive located at the left center
of the system cabinet below the system fan. Two CD-ROMs are
required for logical partitioning.
Figure 5–3 Console Load Device
(Front View)
CD-ROM Drive
GS60E53-99
5-4
AlphaServer GS60E Installation Guide
Support for your CD-ROM comes from the KZPBA-CA in the PCI (see
Figure 5-4). The BN21N-02 cable is used with a KZPBA-CA.
Figure 5-4 KZPBA as the Console Load Device Support
KZPBA
Front
Console Load
Device
PCI
GS60E54-99
Making Console, SCSI, and Ethernet Connections
5-5
5.3
Connect SCSI Cables
SCSI cable connections depend upon the customer order. Connecting
and routing cables are dependent on placement of adapters and
devices. Read the information provided and install the cables needed.
Figure 5–5 System and Expander Cabinets
System Cabinet, Front
Expander Cabinet, Front
Option slot 2
Option slot 1
Space for SCSI Cables
5-6
AlphaServer GS60E Installation Guide
GS60E55-99
Multiple SCSI configurations are possible both inside system and expander
cabinets and outside either cabinet. Manufacturing connects all SCSI devices it
can in both system and expander cabinets. There is space in both cabinets to
pass cables from front to back (see Figure 5-5). You can assume that loose SCSI
cables provided with a system go from device adapters in the system cabinet to
devices in another cabinet.
The following rules apply:
1. All SCSI buses must be terminated at both ends. The terminators for the
GS60E are the H879 or H8663.
2. All cables exit and enter cabinets at the bottom rear.
3. Signal cables should be routed away from power cables on the right rear
frame.
Table 5-1 lists SCSI cables used in GS60E systems to connect devices outside
the system cabinet with their adapters.
Table 5-1 SCSI Cables to Devices in Other Cabinets
Cable Number
From
To
Length (meters)
BN21N-02
BN38C-01
KZPBA-CA
KZPBA-XX
CD-ROM
Rear mounted
StorageWorks Shelves
BA36R-RC/RD
Front mounted BA36RRC/RD
Expansion Cabinet
BA36R
2
1
BN38C-02
BN38C-03, -05
2
3, 5
Making Console, SCSI, and Ethernet Connections
5-7
5.4
Connect Ethernet Cables
Ethernet cable connections depend on the customer order. Connecting
and routing cables are dependent on placement of adapters and
devices. Read the information provided and install the cables needed.
Figure 5–6 Ethernet Connectors on PCI Adapter
DE500
Twisted-Pair
Front
GS60E56-99
5-8
AlphaServer GS60E Installation Guide
The DE500, the PCI Ethernet adapter, implements the twisted-pair Ethernet
variant.
1. Connect the transceiver cable (BN25G-xx (unshielded) or BN26M-xx
(shielded) to the Ethernet port on the DE500 (see Figure 5-6).
2. Connect the other end of the cable to an Ethernet transceiver or to an
appropriate conversion box. See the appropriate Ethernet transceiver
manual for more information.
Making Console, SCSI, and Ethernet Connections
5-9
Chapter 6
Powering Up the System
This chapter provides an overview of the power-up procedure for the system.
Sections include:
•
Prepare to Check the AC Power
•
Measure the AC Power
•
Turn the Power On and Check Indicators
Powering Up the System
6-1
6.1
Prepare to Check the AC Power
As a preliminary step before checking the AC power, make sure that
the power cord is not plugged in and that the breaker switch is off.
Figure 6–1 Circuit Breaker for the AC Power
Rear
Power
Supplies
1 AC Power Line Cord
2 Main Circuit Breaker
GS60E61-99
6-2
AlphaServer GS60E Installation Guide
1. At this point, the AC power cord should still be unplugged
(see ➊, Figure 6-1).
2. Pull down the main circuit breaker handle on the AC input box (see ➋).
3. At the control panel, make sure the keyswitch is in the Off position.
The circuit breaker on the AC input box controls power to the system. For
normal operation, the circuit breaker handle must be in the On or up position.
To shut the circuit breaker off, push the handle down.
For safety, current overloads during fault conditions cause the circuit breaker to
trip to the Off position, removing all power from the system.
Powering Up the System
6-3
6.2
Measure the AC Power
With a digital multimeter, check the AC power supplied at the
receptacle at the installation site. There are two types of receptacles:
one for Europe and the other for other parts of the world.
Figure 6–2 Measuring System Power
202/208 V NOMINAL (30A)
U.S. & Japanese Version
NEMA L21-30R (50-60 Hz)
380-415 V NOMINAL (32A)
IEC 309 TYPE (50-60 Hz)
V
V
PHASE X
PHASE 3
NEUTRAL
PHASE Y
GND
PHASE 1
GND
6-4
AlphaServer GS60E Installation Guide
GS60E62-99
4. Check that the receptacle provided is correct. This should have been done
during site preparation (see Chapter 1).
5. Using a voltmeter, measure the voltages between lines in the receptacle as
shown in Figure 6-2. Verify that the voltages are within the range specified
in Table 6-2. If the voltages are out of range, contact an electrician.
6. Plug the power cord into the receptacle.
Table 6–1 AC Input Voltage Specifications
Voltage
Measurement
Line to line
Line to
ground
202V Nominal
junction
ground
202
0, 202, 202
202V Nominal
mid-point
ground
208V Nominal
202
208
380–415
101, 101, 175
120
220–240
380–415V
Nominal
Powering Up the System
6-5
6.3
Turn the Power On and Check Indicators
Power up the system by pushing up the circuit breaker handle on the
AC input box. Turn the keyswitch to the On position and then push the
On/Off button under the front cover. Monitor the state of the system as
it powers up.
Figure 6–3 Control Panel
1
2
3
4
5
10
8
6
7
GS60E63-99
9
Turn the power on by pushing the circuit breaker handle up (see Figure 6-1).
1. Go to the front of the cabinet and check that the power supply VAUX LEDs
are on (see Figure 6-4).
2. Turn the control panel keyswitch to the On position.
3. Open the control panel front cover and press the On/Off pushbutton.
4. Monitor the state of the system (see LEDs in Figure 6-3) as it powers up.
NOTE: With the keyswitch in the On position, if all six LEDs are blinking, one
or more of the power supplies has failed or a power supply is missing.
With the keyswitch in the Off position, the LEDs will also blink but do
not provide power supply status.
6-6
AlphaServer GS60E Installation Guide
➊
Run LED (green)
When lit, indicates system has exited console and
the operating system is running.
➋
➌
➍
Power LED (green)
When lit, indicates system is powered on.
Fault LED (yellow)
When lit, indicates that TLSB BAD is asserted.
On/Off switch
With the keyswitch in the On position, system will
power up when the On pushbutton is pressed.
With the keyswitch in the Off position, the On/Off
pushbutton is disabled.
➎
➏
On LED (green)
Indicates power is supplied to the entire system.
On/Off pushbutton
With the keyswitch in the On position, this button
will power the system on or off. With the keyswitch
in the Off position, this button is disabled.
➐
Secure LED (green)
Indicates input from the console device is
prevented.
➑
➒
Secure pushbutton
Pressing this button disables the primary console.
Reset LED (yellow)
Indicates a system reset has occurred, clearing
captured error information.
➓
Reset pushbutton
Pressing this button causes the system to reset.
Powering Up the System
6-7
The power supplies have two LEDs that indicate normal conditions and faults.
When the system (keyswitch) is off, plugged in, and the circuit breakers are on,
power is present only within the AC box and power supplies. The green VAUX
LEDs on the power supplies should be illuminated. When the system is on, the
VAUX and 48V LEDs should light (see Figure 6-4).
Figure 6–4 Power Supplies
Front
VAUX LED (top)
Power
Supplies
48V LED (bottom)
GS60E64-99
6-8
AlphaServer GS60E Installation Guide
Chapter 7
System Self-Test
On power-up, the system runs an automatic self-test. Self-test results are
indicated by module LEDs, the self-test display at the console terminal, and the
Fault light on the control panel.
Sections in this chapter include:
•
Check Module Status LEDs
•
Check the Self-Test Display
System Self-Test
7-1
7.1
Check Module Status LEDs
Check the system module status LEDs for self-test success. If the LEDs
indicate failure, refer to the Operations Manual for more information.
Figure 7–1 Powering Up and Checking the LEDs
Front
Self-Test
LEDs
GS60E71-99
7-2
AlphaServer GS60E Installation Guide
Processor and memory modules have a green LED that lights when the module
passes or completes self-test. These LEDs can be viewed through holes in the
shield of the module enclosure from the front of the cabinet. PCI I/O modules
are not visible but some connectors have LEDs on them. Table 6-1 lists TLSB
and DWLPB, the PCI motherboard, modules showing LED conditions after selftest. For conditions of LEDs on PCI adapters, see the related documentation.
Table 7–1 LEDs After Self-Test
Module
Self-Test Passed
Self-Test Failed
KN7CG¹
MS7CC
KFTHA
DWLPB³
Green ON
Green ON
Green ON
Green ON
Green OFF
Green OFF or ON²
Green OFF
¹ The green LED on the processor module indicates that both CPU chips on a dual–
processor module passed. The LED will be OFF if there is any failure on the
module though it may be configured into the system.
² The green LED on the memory module indicates that self-test completed, not
passed.
³ The DWLPB (the PCI motherboard) has four LEDs. The self-test passed LED is the
second from the hose connection.
System Self-Test
7-3
7.2
Check the Self-Test Display
Self-test results are displayed on the console terminal. The pass (+) or
fail (-) status of each module is indicated.
Example 7–1 Self-Test Results
F
E
D
C
B
A
+
.
.
.
.
.
.
.
.
.
.
.
.
.
.
.
9
+
.
.
.
8
A
o
.
o
.
o
.
+
.
.
.
7
M
+
.
+
.
+
.
+
.
.
.
.
+
.
.
.
.
B0
. 4GB
Compaq AlphaServer GS60E 6-6/525/4,
OpenVMS PALcode V1.57-2, Tru64 UNIX
P00>>>
7-4
6
M
+
.
+
.
+
.
5
M
+
.
+
.
+
.
+
.
.
.
.
4
.
.
.
.
.
.
.
+
.
.
.
.
3
.
.
.
.
.
.
.
.
.
.
.
.
2
P
++
EE
++
EE
++
EE
.
.
.
.
.
1
P
++
EE
++
EE
++
EE
.
.
.
.
.
0
P
++
EB
++
EB
++
EB
.
.
.
.
.
+
.
.
.
NODE #
TYP
ST1
BPD
ST2
BPD
ST3
BPD
➊
➋
➌
➍
➌
➌
C0 PCI +➎
EISA +➊
C1
C2
C3
A1
A0
.
.
. . . ILV
4GB 4GB .
. . . .
12GB
Console V5.5 4-MAY-1999 12:06:SROM V2.1,
PALcode V1.50-1
AlphaServer GS60E Installation Guide
➊ The NODE # line lists the (hexadecimal) node numbers on the TLSB and
I/O buses. Node numbers and slot numbers are identical. For the PCI I/O
subsystem, nodes 0 – B are counted from right to left.
➋ The TYP line indicates the type of module at each TLSB node:
An adapter: the I/O port module (A) is a KFTHA
memory module (M)
• A processor (P)
• A period (.) indicates the slot is empty or the module is not reporting.
•
•A
➌ The ST1–ST3 lines show the results of the testing. The self-test bit in the
TLCNR register of each module contains this information. For the KN7CG
dual processor, one CPU may pass, another fail. Entries are:
+ (pass) A ++ indicates both processors passed.
– (fail) A –+ indicates one CPU failed and one passed.
o (does not apply) In this example, the I/O port module has “o” because
there is no module-resident self-test.
➍ The BPD line indicates the boot processor designation. The results on this
line indicate:
• The boot processor (B)
• Processors eligible to become the boot processor (E)
• Processors ineligible to become the boot processor (D)
The BPD line is printed three times. After the first determination of the
boot processor, the processors go through two more rounds of testing. Since
it is possible for a processor to pass self-test at line ST1 and fail ST2 or ST3
testing, the processors again determine the boot processor following each
round of tests.
➎ Line C0 indicates the self-test results for the DWLPB and all PCI
adapters connected through the KFTHA’s hose. In this example, self-test
passed on PCI slots 0, 5, 6, 7, 8, 9, 10, and 11.
System Self-Test
7-5
Chapter 8
Diagnostics and Utilities
After the system passes self-test, you must verify proper system operation.
First verify the presence of UltraSCSI devices; then verify the boot device load
path. After the path is verified, you can boot the operating system and use
operating system-based test programs (such as VET) to complete system
verification.
The system is tested automatically during power-up; no off-line loadable
diagnostics are required or provided. The Loadable Firmware Update (LFU)
Utility is currently the only supported off-line loadable program. It is used to
update firmware on any module residing on the system that has updatable
firmware.
Sections in this chapter include:
•
Console Load Device
•
Verification Overview
•
Diagnostics Overview
•
Run System Self-Test
•
Show Commands for Installation
•
Verify SCSI Devices
•
If Necessary, Run the RAID Configuration Utility
•
Booting Factory Installed Software
•
Booting OpenVMS from a CD-ROM
•
Booting Tru64 UNIX from a CD-ROM
•
Set Commands for Booting
•
Booting LFU from a CD-ROM
•
Running the System Exerciser VET
Diagnostics and Utilities
8-1
8.1
Console Load Device
The compact disk (CD) drive is the in-cabinet console load device.
During system installation the console load device is used to load
software and boot various utilities like the Loadable Firmware Update
(LFU) Utility.
Figure 8–1 Accessing the Console Load Device
PCI
KZPBA-CA
CD-ROM
GS60E81-99
8-2
AlphaServer GS60E Installation Guide
The console load device is used for:
•
Installing or updating software
•
Loading a backup utility program
•
Interchanging user data
•
Updating module firmware
•
The compact disk (CD) drive is the console load device for these systems. It
is installed in the system cabinet and used to access software and online
documentation. The CD-ROM is installed through the KZPBA-CA in a PCI
I/O subsystem. A second CD-ROM must be installed when logical
partitioning is used.
Diagnostics and Utilities
8-3
8.2
Verification Overview
The following process is used to verify the system after installation.
Figure 8–2 Verification Procedure
1
Power Up System.
Self-Test Runs.
2
Use sho w
commands to
become familiar
with the system
3
Check that the
console configures
all the devices on
the system
4
Perform special
configuration
tasks if necessary
5
Boot
Operating System
6
Verify System Under
Operating System
8-4
GS60E82-99
AlphaServer GS60E Installation Guide
➊ When the system powers up, self-test runs. Verify that all tests have passed
by checking the results in the self-test display.
➋ Use the show configuration and show device commands to determine
the self-test status for the I/O adapters and devices. Identify the load
device. Note what the console configures.
➌ Check that the console configured all the hardware on the system.
Troubleshoot and repair, if necessary.
➍ Run configuration utilities, if necessary.
➎ Boot the factory-installed operating system.
➏ Verify the system under the installed operating system.
Diagnostics and Utilities
8-5
8.3
Diagnostics Overview
Self-tests and additional ROM-based diagnostics are run automatically
at power-up. Console-based exercisers can be run from the console in
User Mode. The system Verifier and Exerciser Tool (VET) is run under
the operating system.
Figure 8–3 Diagnostic Overview
ROM-Based
Diagnostics
(RBDs)
Self-Test
Additional Power-Up Tests
Console-Based Exercisers
Online
OpenVMS/UNIX: Verifier and Exerciser Tool (VET)
GS60E83-99
8-6
AlphaServer GS60E Installation Guide
Table 8-1 lists diagnostics provided. Tests in the first two groups run at powerup. The console-based exercisers can be run from the console.
Table 8–1 Diagnostics
Test Group
Test
Self-test
CPU self-test
Memory array self-test
PCI adapter self-test¹
Device peripheral self-test
Power subassembly self-test
Additional power-up tests
CPU/Memory interactive tests
Multiprocessor tests
KFTHA tests
PCI tests
Console-based exerciser
Cache/Memory exerciser
Disk exerciser²
Floating-point exerciser
Network exerciser²
¹Self-test on PCI adapters is optional. If the device has and performs self-tests, they are
reported by the console.
²Run in internal loopback (at I/O adapter) mode only.
NOTE: To run console-based diagnostics and utilities using the set host and
test commands, see the Service Manual.
Diagnostics and Utilities
8-7
8.4
Run System Self-Test
Gather adapter self-test and address information using self-test results
as shown in Example 8-1.
Example 8–1 Self-Test Display
F
E
D
C
B
A
+
.
.
.
.
.
.
.
.
.
.
.
.
.
.
.
.
.
.
9
+
.
.
.
8
A
o
.
o
.
o
.
7
M
+
.
+
.
+
.
6
M
+
.
+
.
+
.
5
M
+
.
+
.
+
.
4
.
.
.
.
.
.
.
+
.
.
.
.
+
.
.
.
.
+
.
.
.
.
+
.
.
.
.
+
.
.
.
.
B0
. 4GB
Compaq AlphaServer GS60E 6-6/525/4,
OpenVMS PALcode V1.57-2, Tru64 UNIX
P00>>>
8-8
3
.
.
.
.
.
.
.
.
2
P
++
EE
++
EE
++
EE
.
.
.
.
.
1
P
++
EE
++
EE
++
EE
.
.
.
.
.
0 NODE #
P
TYP
++ ST1
EB BPD
++ ST2
EB BPD
++ ST3
EB BPD
.
.
.
.
.
➋
➋
C0 PCI +➌
EISA +
+
.
.
.
➊
C1
C2
C3
A1
A0
.
.
. . . ILV
4GB 4GB .
. . . .
12GB
Console V5.5 4-MAY-1999 12:06:SROM V2.1,
PALcode V1.50-1
AlphaServer GS60E Installation Guide
➊
Check the ST1 line in the self-test results to see that all CPU and memory
modules passed self-test. Note that failing processors are disabled and
appear in the ST1 line. If both processors fail, nothing appears on the ST1
line. There is minimal TLSB traffic during these tests.
➋
Check the ST2 line to see that memory and the CPU(s) passed their
interaction tests and check the ST3 line to see that all three types of
modules on the TLSB passed their tests.
➌
Check the C0 through C10 lines to determine which modules on the PCI
I/O subsystem passed self-test. The example shows one PCI connected to
the KFTHA through a hose. (The maximum number of PCI I/O
subsystems is eleven.)
NOTE: If any module is badly broken on any bus, the console may not get a
response or be able to read whether a device passed self-test. Under
such conditions, self-test does not indicate a failure but instead
indicates that the slot is empty.
Diagnostics and Utilities
8-9
8.5
Show Commands for Installation
Use the show configuration, show device, and show network commands
to make sure all devices and system resources are present and “seen”
by the console.
Example 8–2 Show Configuration and Show Network
P00>>> sho conf
➊
Name
TLSB
0++
KN7CG-AB
1++
KN7CG-AB
5+
MS7CC
6+
MS7CC
7+
MS7CC
8+
KFTHA
Type
Rev
8025
8025
5000
5000
5000
2000
0000
0000
0000
0000
0000
0000
Mnemonic
kn7cg-ab0
kn7cg-ab1
ms7cc0
ms7cc1
ms7cc2
kftha0
C0 PCI connected to kftha0
pci0
0+
SIO
4828086 0004 sio0
5+
QLogic ISP1040B
10201077 0005 isp0
6+
QLogic ISP1040B
10201077 0005 isp1
7+
QLogic ISP1040B
10201077 0005 isp2
8+
KZPAA
11011 0002 kzpaa0
9+
QLogic ISP1040B
10201077 0005 isp3
A+
QLogic ISP1040B
10201077 0005 isp4
B+
DE500-BA
191011 0030 tulip1
0+
1+
2+
3+
6+
Controllers on SIO
DECchip 21040-AA
FLOPPY
KBD
MOUSE
TOY
21011
2
3
4
7
0023
0000
0000
0000
0000
sio0
tulip0
floppy0
kbd0
mouse0
toy0
EISA connected to pci0 through sio0
eisa0
P000>>> sho net ➋
polling for units on tulip0, slot 12, bus 0, hose0…
ewa0.0.0.12.0
00-00-F8-25-90-A6 Twisted-Pair
polling for units on tulip1, slot 11, bus 0, hose0…
ewa0.0.0.11.0
08-00-2B-C3-9E-9B Twisted-Pair
8-10
AlphaServer GS60E Installation Guide
Example 8–3 Show Device
P00>>> sho dev ➌
polling for units on floppy0, slot 0, bus 1, hose4...
dva0.0.0.1100.4
DVA0
RX26/RX23
polling for units on kzpaa0, slot 5, bus 0, hose4...
pka.7.0.5.4
pka
Bus ID 7
dka400.4.0.5.4
DKA400
RRD47 1206
polling for units on isp0, slot 6, bus 0, hose4...
pkb.7.0.6.4
pkb
term on
Bus ID 7 5.57
dkb0.0.0.6.4
DKB0
RZ1CB-CS 0844
dkb100.1.0.6.4
DKB100
RZ1CB-CS 0844
dkb200.2.0.6.4
DKB200
RZ1CB-CS 0844
dkb300.3.0.6.4
DKB300
RZ1CB-CS 0844
dkb400.4.0.6.4
DKB400
RZ1CB-CS 0844
dkb500.5.0.6.4
DKB500
RZ1CB-CS 0844
dkb600.6.0.6.4
DKB600
RZ1CB-CS 0844
polling for units on isp1, slot 7, bus 0, hose4...
pkc.7.0.7.4
pkc
term on
Bus ID 7 5.57
polling for units on isp2, slot 8, bus 0, hose4...
pkd.7.0.8.4
pkd
term on
Bus ID 7 5.57
polling for units on isp3, slot 9, bus 0, hose4...
pke.7.0.9.4
pke
term on
Bus ID 7 5.57
polling for units on isp4, slot 10, bus 0, hose4...
pkf.7.0.10.4
pkf
term on
Bus ID 7 5.57
P00>>>
➊ Use the show configuration command to see a listing of the modules in
the system. This command shows the module TLSB and PCI slot number,
module name, module type, revision, mnemonic, and if self-test passed.
➋ The show network command displays information about network
connections.
➌ The show device command displays information about each I/O device.
Polling checks all I/O buses for device configurations. The next line
contains the console device name, the name of the device given by the
device controller, and the device type.
Check the results of the two console commands against the manufacturing
system manifest. If something is missing, it is likely broken, needs reseating, or
is back ordered.
Diagnostics and Utilities
8-11
8.6
8.6.1
Verify SCSI Devices
Check SCSI Devices Using Console Commands
To verify SCSI devices, issue the show device command. Check the
output against the physical SBBs (storage building blocks). Nodes are
defined by the physical position of the SSB and do not have to be set.
Example 8–4 Checking SCSI Devices
➊
Initializing. . .
:
:
+
.
.
.
.
.
.
.
.
.
.
.
.
.
.
.
.
.
.
+
.
.
.
+
.
.
.
.
+
.
.
.
.
+
.
.
.
.
+
.
.
.
.
+
.
.
.
.
.
.
.
.
.
.
.
.
.
.
.
.
.
.
.
.
+
.
.
.
C0 PCI +
EISA +
C1
C2
C3
B0 A1
A0
.
.
. . . ILV
. 4GB 4GB 4GB .
. . . .
12GB
Compaq AlphaServer GS60E 6-6/525/4, Console V5.5 4-MAY-1999 12:06:SROM V2.1,
OpenVMS PALcode V1.57-2, Tru64 UNIX PALcode V1.50P00>>> sho dev ➋
polling for units on floppy0, slot 0, bus 1, hose0
dva0.0.0.1100.0
DVA0
RX26/RX23
polling for units on isp0, slot 5, bus 0, hose0...
pka.7.0.5.0
pka
term on
Bus ID 7 5.57
dka0.0.0.5.0
DKA0
RZ1BB-CS 0656
dka200.2.0.5.0
DKA200
RZ1CB-CS 0844
dka300.3.0.5.0
DKA300
RZ1CB-CA LYJ0
dka400.4.0.5.0
DKA400
RZ1CB-CS 0844
dka500.5.0.5.0
DKA500
RZ1CB-CS 0844
polling for units on isp1, slot 6, bus 0, hose0...
pkb.7.0.6.0
pkb
term on
Bus ID 7 5.57
dkb0.0.0.6.0
DKB0
RZ1CB-CS 0844
dkb100.1.0.6.0
DKB100
RZ1CB-CS 0844
dkb200.2.0.6.0
DKB200
RZ1CB-CS 0844
dkb300.3.0.6.0
DKB300
RZ1CB-CS 0844
dkb400.4.0.6.0
DKB400
RZ1CB-CS 0844
dkb500.5.0.6.0
DKB500
RZ1CB-CS 0844
dkb600.6.0.6.0
DKB600
RZ1CB-CS 0844
polling for units on isp2, slot 7, bus 0, hose0...
pkc.7.0.7.0
pkc
term on
Bus ID 7 5.57
dkc0.0.0.7.0
DKC0
RZ1CB-CS 0844
dkc100.1.0.7.0
DKC100
RZ1CB-CS 0844
dkc200.2.0.7.0
DKC200
RZ1CB-CS 0844
:
:
P00>>>
8-12
AlphaServer GS60E Installation Guide
Basics:
•
There are four ways to attach to SCSI devices:
– KZPSA, a PCI adapter with a FWD SCSI port
– KZPSC, the RAID adapter with one to three FWD SCSI ports
– KZPBA-CA, a PCI to UltraSCSI single-ended controller
– KZPBA-CB, a PCI to UltraSCSI FWD controller
•
Each port has a maximum of eight nodes per bus, including the initiator or
host.
•
Each modular storage shelf (BA36R) has a power supply and can hold up to
seven 3.5” SBBs (such as RZIBB), two 5.25” SBBs (such as the RZ69 or
RRD47 drives), or a combination of these.
•
SCSI configurations vary depending upon the particular adapter being used.
Read the manuals associated with each adapter to learn the configuration
rules.
All cabling and node setting has been completed prior to shipping. To check the
configuration, check self-test and issue a show device console command:
➊ The system goes through self-test. Check that the KFTHA, the KZPBA, the
DWLPB, KZPSA, and/or the KZPSC adapters passed self-test.
➋ Issue a show device command. This example shows three KZPBAs; isp0,
isp1, and isp2. Isp0 is in PCI slot 5 on hose0, isp1 is in PCI slot 6 on hose 0,
and isp2 is in PCI slot 7 on hose 0.
Diagnostics and Utilities
8-13
8.6.2
Check Console Output Against Physical Device
Next check the output from the show device command against the
physical SBBs in the cabinet(s).
Figure 8–4 SCSI Disks in StorageWorks Shelves
Front
PS
6
5
4
3
2
1
0
UltraSCSI Shelf
Fast Wide Differential
SCSI Shelf
PS
6
5
4
3
2
1
GS60E84-99
DWZZB
8-14
AlphaServer GS60E Installation Guide
Check the output from the show device command against the physical SBBs.
There should be a one-to-one correspondence between SBBs reporting to the
console and the physical devices mounted. Note that the node number reported
by the console corresponds to the physical position of an SBB within a shelf; the
slots and nodes are numbered 0 to 6, from right to left (see Figure 8-4).
Each SBB has two LEDs. The green LED on the tops lights when the SBB is
mounted and is being accessed. For a complete discussion of StorageWorks
LED status, see the StorageWorks Solutions Configuration Guide
(EK-BA350-CG).
If you have problems seeing devices, reseat the SBBs and reissue show device.
If you need further testing, use the test command. Refer to BA36R documenta–
tion if you need to reconfigure the buses.
Diagnostics and Utilities
8-15
8.7
If Necessary, Run the RAID Configuration Utility
If a KZPSC is in the system (it shows up in the console display as the
DAC960), the customer may want RCU run. When the system was
configured in manufacturing, default settings were used when RCU
was run. Example 8-5 shows how to run the RCU. See the KZPSC
documentation for detailed information on configuring the devices.
The RCU software is on a floppy and requires a KFE72.
Example 8–5 Running RCU
P00>>>
P00>>>
set arc_enable on
initialize
➋
➊
[Console display appears]
P00>>>
run rcu
➌
8-16
-p
1
➍
AlphaServer GS60E Installation Guide
The RAID Configuration Utility (RCU) need only be run if a KZPSC controller is
in the system. The controller comes with its own documentation describing the
utility. The controller can operate in several different modes, and the customer
should determine how to customize the disk farm. RCU enables the choices.
Prior to running the utility, you should read the documentation and discuss
which mode the customer wishes. Example 8-5 show how to run RCU.
Place the RAID Configuration Utility floppy in the floppy drive.
➊ Use the set command to turn on the arc_enable environment variable.
➋ Use the initialize command to initialize the system and to make the set
command take effect.
➌ After self-test completes, enter run rcu to identify what programs to run.
The run command defaults to the floppy as the source of the program for
execution so no device need be specified.
➍ -p 1 specifies that PCI1 is to be configured.
Diagnostics and Utilities
8-17
8.8
Booting Factory Installed Software
The factory installs the operating system ordered by the customer.
After determining that all devices are seen by the console, you will
want to know where the operating system is installed and then boot it.
Example 8–6 Booting the Operating System
P00>>> show bootdef_dev ➊
bootdef_dev
P00>>> show boot_osflags
boot_osflags
or
boot_osflags
a
P00>>> boot
Building FRU table. . . . . .
(boot dka200.2.0.0.0 -flags
SRM boot identifier: scsi 0
dk200.2.0.2.0
➋
0
[for OpenVMS]
[for UNIX]
➌
. . . .
0,0)
0 0 2
200
ef00
10201077
boot adapter: isp0 rev 0 in bus slot 0 off of kftia0 in TLSB slot 8
block 0 of dka200.2.0.0.0 is a valid boot block
reading 1018 blocks from dka200.2.0.0.0
bootstrap code read in
base = 200000, image start = 0, image_bytes = 7f400
initializing HWRPB at 2000
initializing page table at 1f2000
initializing machine state
setting affinity to the primary cpu
jumping to bootstrap code
OpenVMS Alpha Operating System, Version V7.1-2
8-18
AlphaServer GS60E Installation Guide
➍
Example 8-6 shows the OpenVMS Alpha operating system as the factory
installed software. Had the Tru64 UNIX operating system been installed, slight
variations in the output show would have occurred.
➊ Enter the show bootdef_dev command to see what disk holds the
operating system software.
➋ Enter the show boot_osflags command to see what flags have been set. If
the flag set is a 0 and the operating system is OpenVMS, the operating
system will come up assuming flags of 0,0. If the flag is an a and the
operating system is Tru64 UNIX, the operating system will come up in
multiuser mode. See the AlphaServer GS60E Operations Manual for a
complete discussion of booting.
➌ Enter the boot command.
➍ After booting information messages are given, the operating system banner
appears.
Diagnostics and Utilities
8-19
8.9
Booting OpenVMS from a CD-ROM
This section shows how to boot OpenVMS from the CD-ROM drive. The
first step is to issue the show device command to determine the
mnemonic of the CD drive. This method of booting OpenVMS replaces
standalone backup.
Example 8–7 CD-ROM OpenVMS Boot
P00>>> sho dev
➊
polling for units on floppy0, slot 0, bus 1, hose0...
dva0.0.0.1100.0
DVA0
RX26/RX23
polling for units on isp0, slot 4, bus 0, hose0...
pka.7.0.4.0
pka
term on
Bus ID 7 5.57
dka0.0.0.4.0
DKA0
RZ1CB-CS 0844
dka100.1.0.4.0
DKA100
RZ1CB-CS 0844
dka200.2.0.4.0
DKA200
RZ1CB-CS 0844
dka300.3.0.4.0
DKA300
RZ1CB-CS 0844
dka400.4.0.4.0
DKA400
RZ1CB-CS 0844
polling for units on kzpaa0, slot 5, bus 0, hose0...
pkb.7.0.5.0
pkb
Bus ID 7
dkb500.5.0.5.0
DKB500
RRD47 1206
polling for units on isp1, slot 6, bus 0, hose0...
pkc.7.0.6.0
pkc
term on
Bus ID 7 5.57
polling for units on isp2, slot 7, bus 0, hose0...
pkd.7.0.7.0
pkd
term on
Bus ID 7 5.57
polling for units on isp3, slot 8, bus 0, hose0...
pke.7.0.8.0
pke
term on
Bus ID 7 5.57
polling for units on cipca0, slot 10, bus 0, hose0...
pua.4.0.10.0
pua
Bus ID 4 A315
pua.0.0.10.0
node 0 HSJ000 HSJ V52J HSJ5
:
dua65.2.0.10.0
$7$DUA65 (HSJ02)
HSX0
P00>>>
P00>>> boot dkb500
➋
(boot dkb500.5.0.5.0 -flags 0)
SRM boot identifier: scsi 0 5 0 5 500 ef00 11000 ➌
boot adapter:kzpaa0 rev 2 in bus slot 5 off of kftha0 in TLSB slot8
block 0 of dkb500.5.0.5.0 is a valid boot block
:
jumping to bootstrap code
OpenVMS (TM) Alpha Operating System, Version V7.1-2 ➍
%SMP-I-SECMSG, CPU #01 message:
P01>>>START
:
%SMP-I-CPUTRN, CPU #01 has joined the active set.
:
$! Copyright(c) 1998 Digital Equipment Corporation. All rights reserved
Installing required known files...
8-20
AlphaServer GS60E Installation Guide
Configuring devices...
%EWA0, Twisted-Pair(10baseT) mode set by console
:
****************************************************************
You can install or upgrade the OpenVMS Alpha operating system
or you can install or upgrade layered products that are included
on the OpenVMS Alpha operating system CD-ROM.
You can also execute DCL commands and procedures to perform
"standalone" tasks, such as backing up the system disk.
Please choose one of the following:
1) Upgrade, install or reconfigure OpenVMS Alpha Version V7.2
2) Display products and patches that this procedure can install
3) Install or upgrade layered products and patches
4) Show installed products
5) Reconfigure installed products
6) Remove installed products
7) Execute DCL commands and procedures
8) Shut down this system
Enter CHOICE or ? for help: (1/2/3/4/5/6/7/8/?)
➊ Show device displays information about each I/O device. Polling checks
the DWLPB for device configurations. The next line contains four columns.
The first column contains the device type and unit number, node number,
device channel number, the internal PCI node number, and I/O channel
number, separated by periods. The second column displays the name of the
device given by the device controller. The third column shows the device
type, and the fourth column shows the revision of the device. The CD drive
in this case is the RRD47 and its mnemonic is DKD500.
➋ In the boot command, -flags indicates that additional command
parameters follow, 0 is the system root of the boot device, 0 is the bootstrap
option, dk is the device code of the boot device, b is the boot device controller
designation, and 500 specifies the hexadecimal unit number of the boot
device. The 5 is the node number, 0 is the channel number, 5 is the PCI
node number, and 0 is the I/O channel number.
➌ The system boots OpenVMS from the CD-ROM.
➍ The operating system banner appears.
Example 8-7 shows that several choices can be made when booting OpenVMS in
this manner. Make the appropriate choice and continue. (Note that by choosing
option 7, Execute DCL commands and procedures, you can back up your system
disk. Standalone backup is replaced by this method of booting OpenVMS.)
Diagnostics and Utilities
8-21
8.10 Booting Tru64 UNIX from a CD-ROM
This section shows a sample boot of UNIX from the CD-ROM drive. The
first step is to issue the show device command to determine the
mnemonic of the CD drive.
Example 8–8 CD-ROM UNIX Boot
P00>>> sho dev
polling for units
dva0.0.0.1100.0
polling for units
pka.7.0.5.4
dka400.4.0.5.4
polling for units
pkb.7.0.6.4
dkb0.0.0.6.4
dkb100.1.0.6.4
dkb200.2.0.6.4
dkb300.3.0.6.4
dkb400.4.0.6.4
dkb500.5.0.6.4
dkb600.6.0.6.4
polling for units
pkc.7.0.7.4
polling for units
pkd.7.0.8.4
polling for units
pke.7.0.9.4
polling for units
pkf.7.0.10.4
P00>>>
➊
on floppy0, slot 0, bus 1, hose4...
DVA0
RX26/RX23
on kzpaa0, slot 5, bus 0, hose4...
pka
Bus ID 7
DKA400
RRD47 1206
on isp0, slot 6, bus 0, hose4...
pkb
term on
Bus ID 7 5.57
DKB0
RZ1CB-CS 0844
DKB100
RZ1CB-CS 0844
DKB200
RZ1CB-CS 0844
DKB300
RZ1CB-CS 0844
DKB400
RZ1CB-CS 0844
DKB500
RZ1CB-CS 0844
DKB600
RZ1CB-CS 0844
on isp1, slot 7, bus 0, hose4...
pkc
term on
Bus ID 7 5.57
on isp2, slot 8, bus 0, hose4...
pkd
term on
Bus ID 7 5.57
on isp3, slot 9, bus 0, hose4...
pke
term on
Bus ID 7 5.57
on isp4, slot 10, bus 0, hose4...
pkf
term on
Bus ID 7 5.57
➋
P02>>>boot dka400
(boot dka400.4.0.5.4 -flags a)
➌
SRM boot identifier: scsi 4 5 0 4 400 ef00 11000
boot adapter:kzpaa0 rev 2 in bus slot 5 off of kftha1 in TLSB slot 7
block 0 of dka400.4.0.5.4 is a valid boot block
reading 16 blocks from dka400.4.0.5.4
bootstrap code read in
base = 200000, image_start = 0, image_bytes = 2000
initializing HWRPB at 2000
GCT base = 20012e000
:
:
setting affinity to the primary CPU
:
8-22
AlphaServer GS60E Installation Guide
jumping to bootstrap code
Digital UNIX boot - Mon Apr 12 12:39:50 EDT 1999
Loading vmunix ...
[I/O subsystem reset information, memory information displayed, I/O
bus adapters displayed, configured devices displayed,
network
configuration information, partitioning information
displayed]
The system is ready.
The Installation Guide contains more information about installing
DIGITAL UNIX.
1) Default Installation
2) Custom Installation
3) UNIX Shell
Enter your choice:
➍
➊ Show device displays information about each I/O device. Polling checks
the DWLPB for device configurations. The next line contains four columns.
The first column contains the device type and unit number, node number,
device channel number, the internal PCI node number, and I/O channel
number, separated by periods. The second column displays the name of the
device given by the device controller. The third column shows the device
type, and the fourth column shows the revision of the device. The CD drive
in this case is the RRD47 and its mnemonic is DKD400.
➋ In the boot command, dk is the device code of the boot device, a is the boot
device controller designation, and 400 specifies the hexadecimal unit
number of the boot device. The 4 is the node number, 0 is the channel
number, 5 is the PCI node number, and 4 is the I/O channel number. The
–fl a causes UNIX to come up in multiuser mode.
➌ The system boots from the CD-ROM.
➍ Select the type of installation desired and follow the instructions after which
the operating system banner appears and the user is given the login:
prompt.
Diagnostics and Utilities
8-23
8.11 Set Commands for Booting
Use the set command to define a default boot device as shown in
Example 8-9.
Example 8–9 Set Boot Commands
P00>>>
P00>>>
P00>>>
P00>>>
set boot_reset on
➊
set bootdef_dev dka200.2.0.0.0
set boot_osflags “0,6”
boot
➍
[the system initializes and boots]
8-24
AlphaServer GS60E Installation Guide
➋
➌
➊ Enter set boot_reset on to initialize the system before booting.
➋ If you boot from the same boot device each time, you can store the disk
name by defining the default boot device. This is done by using the set
bootdef_dev command. The default boot device is used for booting during
power-up and auto restarts.
➌ Use set boot_osflags to define the boot command flag parameters of 0, 6.
Note the flags shown here are for OpenVMS; UNIX uses different flags.
➍ Booting can now be done from that device by typing boot or just b.
NOTE: Refer to the Operations Manual for more information on set commands
and environment variables.
Diagnostics and Utilities
8-25
8.12 Booting LFU from a CD-ROM
The Loadable Firmware Update (LFU) Utility is on the Alpha CD-ROM
(PN AG-RCFB*-BS). Make sure this CD-ROM is mounted in the CD
drive and then boot LFU.
Example 8–10 AlphaServer GS60E Booting
P00>>> show device
polling for units on isp0,
dka400.4.0.0.0
DKA400
polling for units on isp1,
polling for units on isp2,
polling for units on isp3,
dkd400.4.0.5.0
DKD400
dkd500.5.0.5.0
DKD500
➊
slot 0, bus 0, hose0...
RZ26L
slot 1, bus 0, hose0...
slot 4, bus 0, hose0...
slot 5, bus 0, hose0...
RZD47
RZ26L
440C
440C
440C
P00>>> boot dkd400 -fl 0,a0
➋
Building FRU table. . . . . . . . .
(boot dkd400.4.0.5.0 –flags 0,a0)
SRM boot identifier: scsi 4 0 5 0 400 ef00 81011
boot adapter: isp3 rev 0 in bus slot 5 off of kftia0 in TLSB slot 8
block 0 of dkd400.4.0.5.0 is a valid boot block
reading 1018 blocks from dkd400.4.0.5.0
bootstrap code read in
base = 200000, image_start = 0, image_bytes = 7f400
initializing HWRPB at 2000
initializing page table at 1f2000
initialing machine state
setting affinity to the primary CPU
jumping to bootstrap code
➌
Bootfile:[gs140]gs140_V55_10.exe
***** Loadable Firmware Update Utility *****
---------------------------------------------------------Function
Description
---------------------------------------------------------Display
Exit
List
Modify
Show
8-26
Displays the system’s configuration table.
Return to loadable offline operating environment
Lists the device types and firmware revisions
supported by this revision of LFU.
Modifies port parameters and device attributes.
Displays device mnemonic, hardware and firmware
revisions.
AlphaServer GS60E Installation Guide
Update
Verify
? or Help
Replaces current firmware with loadable data
image.
Compares loadable and device images.
Scrolls the function table.
---------------------------------------------------------➍
UPD>
➊ Use the show device command to find the mnemonic of the CD-ROM drive.
➋ Enter the boot command to boot from the RRD47. The RRD47 has a device
name of dkd400.
➌ Supply the bootfile directory and name: [gs140]gs140_vXX_XX.exe, where
the XXs are subject to change. To obtain the correct file name, follow the
instructions found in Alpha Systems Firmware Update Version x.x Release
Notes Overview that comes with the system CD-ROM (AG-RCFB*-BS).
➍ LFU starts, displays a summary of its commands, and issues its prompt
UPD>. (The Modify command appears only if there are devices on the
system that have modifiable attributes.
Diagnostics and Utilities
8-27
8.13 Running the System Exerciser VET
Run the System Verifier and Exerciser Tool (VET). VET is a tool with
generic exercisers designed to ensure proper installation and
verification of hardware and operating system software. It is run
under the operating system. Install VET from the system CD-ROM (AGRCFB*-BS) before running it. Example 8-11 shows a sample VET user
session. Refer to the System Verification Software documentation for
details on invoking the Verification Software exercisers.
Example 8–11 Sample VET User Session for Command Mode
$ vet ➊
Running system sizer on node cpu2 . . please wait
COPYRIGHT DIGITAL EQUIPMENT CORPORATION. 1995. ALL RIGHTS RESERVED
VET_setup> load ➋
Enter number of processes for CPU device (decimal [1]): 2 ➌
Enter number of processes for MEMORY device (decimal [1]): 2
Enter number of processes for NETWORK device (decimal [1]): 0
Enter number of processes for FILE device (decimal [1]): 2
Enter number of processes for each VIDEO device (decimal [1]): 0
…opening script file $19$dka500:[sys0.][sysmgr]vet_load.script.
Process 1, group exer for device CPU
Process 2, group exer for device CPU
Process 3, group exer for device MEMORY
Process 4, group exer for device MEMORY
Process 5, group exer for device FILE
Process 6, group exer for device FILE
…closing script file $19$dka500:[sys0.][sysmgr]vet_load.script.
VET_setup> start ➍
…starting [Process 1, Pass 1] group exec for device CPU.
…starting [Process 2, Pass 1] group exec for device CPU.
…starting [Process 3, Pass 1] group exec for device MEMORY.
…starting [Process 4, Pass 1] group exec for device MEMORY.
…starting [Process 5, Pass 1] group exec for device FILE.
…starting [Process 6, Pass 1] group exec for device FILE.
…completed [process 1] group exec for device CPU.
…completed [process 2] group exec for device CPU.
…completed [process 5] group exec for device FILE.
…completed [process 6] group exec for device FILE.
Table 8-2 lists the VET exercisers and descriptions.
8-28
AlphaServer GS60E Installation Guide
Table 8-2 Verification Software Exercisers
Exerciser
Description
CPU
Tests processor functions including binary operations, integer
computations, floating-point computations, and data conversion.
Memory
Tests dynamic allocation and deallocation of virtual memory and
verifies test patterns written.
Disk
Tests logical and physical disk I/O by performing read and write
operations and verifies test patterns written.
File
Tests reading and writing to disk files and verifies test patterns
written.
Tape
Tests reading and writing to tape device files and verifies test
patterns written.
Network
Tests underlying protocol (including caches, buffers, and queues),
physical network adapters, local and remote networks,
destination adapters, and network services.
Printer
Tests printers by sending ASCII, PostScript, or a user specified
file to a selected print queue. A PostScript file is provided with
the exerciser.
Video
Tests text, graphic, and palette capabilities of video monitors.
➊ In Example 8-11 the user enters the vet command at the system prompt.
The system sizer message is displayed. The system sizer process finds the
devices that are connected to the system and obtains device information
needed by the VET programs.
➋ At the VET_setup prompt, the user issued the load command. Load
creates processes for most devices on the system. Note that the File test
exercises disks.
➌ The VET program displays a series of questions. The user can select the
number of processes to run for each device type. In this example, two
processes are selected for the CPU device, memory device, and file device.
➍ Enter the start command to begin testing.
Diagnostics and Utilities
8-29
Example 8-11 Sample VET User Session (Continued)
^C
➎
…stopping [Process 4] group exer for device MEMORY.
…stopping [Process 3] group exer for device MEMORY.
VET_suspend> show runtime ➏
Process 1 Runtime:
Requested runtime:
0 hours
0 minutes
0 seconds
Elapsed runtime:
0 hours
0 minutes 22 seconds
Remaining runtime:
0 hours
0 minutes
0 seconds
Process 2 Runtime:
Requested runtime:
Elapsed runtime:
Remaining runtime:
0 hours
0 hours
0 hours
0 minutes
0 minutes
0 minutes
0 seconds
22 seconds
0 seconds
Process 3 Runtime:
Requested runtime:
Elapsed runtime:
Remaining runtime:
0 hours
0 hours
0 hours
0 minutes
3 minutes
0 minutes
0 seconds
39 seconds
0 seconds
Process 4 Runtime:
Requested runtime:
Elapsed runtime:
Remaining runtime:
0 hours
0 hours
0 hours
0 minutes
3 minutes
0 minutes
0 seconds
39 seconds
0 seconds
Process 5 Runtime:
Requested runtime:
Elapsed runtime:
Remaining runtime:
0 hours
0 hours
0 hours
0 minutes
2 minutes
0 minutes
0 seconds
30 seconds
0 seconds
Process 6 Runtime:
Requested runtime:
Elapsed runtime:
Remaining runtime:
0 hours
0 hours
0 hours
0 minutes
3 minutes
0 minutes
0 seconds
20 seconds
0 seconds
VET_suspend> continue ➐
…continuing [process 3] group exer for device MEMORY.
…continuing [process 4] group exer for device MEMORY.
…completed [process 3] group exer for device MEMORY.
…completed [process 4] group exer for device MEMORY.
…testing completed. Total errors reported by all processes=0.➑
VET_setup> exit ➒
$
8-30
AlphaServer GS60E Installation Guide
➎ The user enters a Ctrl/C to suspend executing processes. VET enters the
suspend execution state.
➏ Enter show runtime to list the requested, elapsed, and remaining run times
of each process.
➐ The continue command resumes execution of all suspended processes. After
testing is completed, a message is displayed to inform the user of the
number of errors reported. No errors were reported in this example (see ➑).
➑ Enter exit to exit the VET program. The system prompt is displayed.
Diagnostics and Utilities
8-31
Index
A
AC power, three-phase
cables, 2-10
checking, 6-2
current ratings, 2-9
input voltages, 2-9, 6-5
measuring, 6-4
power requirements, 2-9
watts, 2-9
AC power outlets, 2-2
Air circulation, 2-7
Altitude, 2-7
B
BA36R
StorageWorks shelf, 4-1, 5-7
Booting
factory installed software, 8-18
LFU, 8-26
OpenVMS, 8-20
Tru64 UNIX, 8-22
Boot command, 8-20
Branch circuits, 2-2
C
Cabinet(s)
damage, 3-9
leveling, 3-10, 4-6
pallet removal, 3-8
sizes, 2-3, 2-5
unpacking, 3-7
Cables
I/O, 4-12
Carton removal, 3-6
CCL module, 4-10
Communication devices, 2-2
Console
load devices, 8-2
terminal, 5-2, 5-3
printer, 5-3
Control panel, 6-6
Current overload, 6-3
D
DE500, 5-8
Delivery route checking, 2-3
Diagnostics overview, 8-6
DWLPB, 7-3
E
Environmental specifications, 2-7
Equipment damages, 3-3
Ethernet cables, 5-8
Expander cabinet
installation, 4-1
I/O cable, 4-12
leveling, 4-6
placement, 4-5
power control cable, 4-10
SCSI cables, 5-6
securing, 4-8
specifications, 2-3, 2-5
unpacking, 4-2
F
Floor space, 2-6
Front clearance, 2-6
H
Heat dissipation, 2-9
Humidity, 2-7
Index-1
I
Indicator check, 6-6
Installation flowchart, 1-2
Installation overview, 1-1
K
KFTHA, 7-3, 7-5
KZPBA, 5-5
KZPSC, 8-16
L
LARS form, 3-3, 3-9
LEDs,
control panel, 6-6
Leveler feet, 3-9, 3-10, 4-6, 4-7
LFU,
CD-ROM booting, 8-26
Load device, console, 8-2
M
Main circuit breaker, 6-2, 6-3
Memory module LEDs, 7-3
O
OpenVMS booting, 8-20
Operating characteristics, 2-7
P
Packing material, 3-6
PCI I/O subsystem, 4-1
Power
sources, 2-2
supply, 6-8
watts, 2-9
Power-up diagnostics, 8-6, 8-7
Processor module LEDs, 7-3
R
RAID configuration utility, 8-16
Ramps, attaching, 3-9
Ramp kit, 3-7
Rear clearance, 2-6
S
SCSI
devices, 8-12, 8-14
LEDs, 8-15
Self-test, 8-7
BPD line, 7-5
C# I/O subsystem line, 8-9
display, 7-4, 8-8
I/O channel line, 7-5
LEDs, 7-3
NODE # line, 7-5
ST lines, 7-5, 8-8
TYP line, 7-5, 8-8
Set bootdef_dev command, 8-24
Set boot_reset command, 8-24
Shipment inspection, 3-2
Shipping
dimensions, 2-3
weights, 2-3
Show configuration command, 8-10
Show device command, 8-11, 8-12,
8-15, 8-20
Show network command, 8-10
Site circuit breakers, 2-2
Site planning guidelines, 2-2
Standalone backup replacement, 8-20
Status LEDs check, 7-2
StorageWorks shelf, BA36R, 4-1, 5-7
System cabinet
installation, 3-1
specifications, 2-5
T
Temperature, 2-7
Test command, 8-15
Tools, unpacking, 3-4
U
UNIX booting, 8-22
V
VET, 8-28
Index-2