1
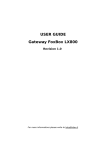
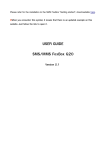
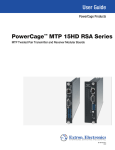
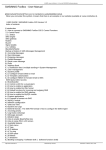
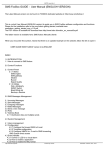
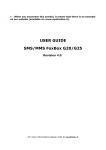
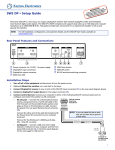
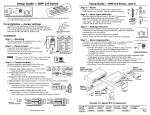
PowerCage™ FOX AEX 104 • Setup Guide
PowerCage™ FOX AEX 104 • Setup Guide
This guide provides instructions for an experienced installer to set up and operate the
Extron PowerCage FOX AEX 104 fiber audio extractor. The PowerCage FOX AEX 104 is
a double slot board for the PowerCage 1600 enclosure that provides up to 4 extraction
points.
This guide provides instructions for an experienced installer to set up and operate the
Extron PowerCage FOX AEX 104 fiber audio extractor. The PowerCage FOX AEX 104 is
a double slot board for the PowerCage 1600 enclosure that provides up to 4 extraction
points.
NOTE: The PowerCage FOX AEX 104 is compatible with all Extron FOX
products except for FOX 3G HD-SDI transmitter and receiver products.
NOTE: The PowerCage FOX AEX 104 is compatible with all Extron FOX
products except for FOX 3G HD-SDI transmitter and receiver products.
Installation
Installation
Step 1 — Input Data Rate Selection
Step 1 — Input Data Rate Selection
The DIP switch on the main board switches the PowerCage FOX AEX 104
between 2G and 4G input data rates. Using an Extron Tweeker or small
screwdriver, move DIP switch 2 up (on position) for 2G input data rates or down
(off position) for 4G input data rates. DIP switch 1 is a spare. The default rate is
4G (off or down).
O1 2
N
The DIP switch on the main board switches the PowerCage FOX AEX 104
between 2G and 4G input data rates. Using an Extron Tweeker or small
screwdriver, move DIP switch 2 up (on position) for 2G input data rates or down
(off position) for 4G input data rates. DIP switch 1 is a spare. The default rate is
4G (off or down).
NOTE: 4G and 2G data rates apply to all inputs. These selectable rates are
not for individual inputs.
NOTE: 4G and 2G data rates apply to all inputs. These selectable rates are
not for individual inputs.
CAUTION:
rate.
CAUTION: Make sure all fiber extenders are compatible with the desired
data rate.
Ensure all fiber extenders are compatible with the desired data
Step 2 — Board Installation
Step 2 — Board Installation
NOTE: The PowerCage FOX AEX 104 is hot-swappable; they can be installed
or removed without turning off or disconnecting the power to the
PowerCage enclosure.
NOTE: The PowerCage FOX AEX 104 is hot-swappable; they can be installed
or removed without turning off or disconnecting the power to the
PowerCage enclosure.
CAUTION: Use ESD precautions when installing a board to avoid
damaging it. Keep the board in the anti-static bag until it is needed.
CAUTION: Use ESD precautions when installing a board to avoid
damaging it. Keep the board in the anti-static bag until it is needed.
Use proper grounding techniques during installation.
Use proper grounding techniques during installation.
a. If applicable, remove as many blank plates or
previously installed boards from the rear of the
PowerCage enclosure as necessary to fit the
PowerCage FOX AEX 104.
b. With the connectors facing away from the
PowerCage enclosure, align the PowerCage FOX
AEX 104 vertically with the top and bottom slide
posts in the selected enclosure slot.
c. Carefully slide the board into the slot and push it
firmly into place.
O1 2
N
a. If applicable, remove as many blank plates or
previously installed boards from the rear of the
PowerCage enclosure as necessary to fit the
PowerCage FOX AEX 104.
16 available single board slots or
8 double board slots
Power
Supply
Screws
Hz
50/60
40V
MAX.
100-2 5A
d. Tighten the screws to secure the board to the
enclosure.
NOTE: Use a tool to fully tighten the screws after initial installation and
subsequent removal and replacement of the boards.
b. With the connectors facing away from the
PowerCage enclosure, align the PowerCage FOX
AEX 104 vertically with the top and bottom slide
posts in the selected enclosure slot.
c. Carefully slide the board into the slot and push it
firmly into place.
16 available single board slots or
8 double board slots
Power
Supply
Screws
Hz
50/60
40V
MAX.
100-2 5A
d. Tighten the screws to secure the board to the
enclosure.
NOTE: Use a tool to fully tighten the screws after initial installation and
subsequent removal and replacement of the boards.
PowerCage™ FOX AEX 104 • Setup Guide (Continued)
PowerCage™ FOX AEX 104 • Setup Guide (Continued)
Step 3 — Input and Output Connections
Step 3 — Input and Output Connections
NOTE: Transmission of HDMI video with HDCP content requires two fibers.
NOTE: Transmission of HDMI video with HDCP content requires two fibers.
OUT
1
IN
OUT
2
IN
3
OUT
IN
OUT
4
IN
OUT
FIBER OPTIC
SMX 88 FOX
5
IN
6
OUT
IN
OUT
7
IN
OUT
8
OUT
IN
1
IN
OUT
2
IN
3
OUT
IN
OUT
SMX 88 FOX
RS-232 (optional)
Tx
Rx
Tx
Rx
L
2
R
Tx
Rx
L
R
Tx
Rx
3
6
OUT
IN
OUT
7
IN
OUT
8
IN
FIBER OPTIC
R
L
R
Tx
Rx
Tx
Rx
1
AUDIO
AUDIO
AUDIO
AUDIO
L
4
L
2
R
Tx
L
R
Tx
Rx
3
Rx
4
FOX AEX 104
FOX AEX 104
Video/Audio/RS-232
OUTPUTS
LINK
HDMI AUDIO
ON
FOXBOX Rx HDMI
OPTICAL
OFF
FOXBOX Rx HDMI
L
AUDIO
R
HDMI
RS-232
OVER FIBER ALARM
Tx Rx
1
2
POWER
12V
1.0A MAX
REMOTE
RS-232
Tx
Rx
FOXBOX Rx HDMI
OPTICAL
Tx Rx
Video/Audio/RS-232
OUTPUTS
HDMI AUDIO
ON
LINK
Rx
LINK
Tx
LINK
Video/Audio/RS-232
POWER
12V
1.0A MAX
IN
PowerCage
FOX AEX 104
R
5
Local 2-ch Audio Output
Extron
L
OUT
RS-232 (optional)
PowerCage
FOX AEX 104
Extron
R
1
AUDIO
AUDIO
AUDIO
AUDIO
IN
ADDRESS
Local 2-ch Audio Output
L
4
FIBER OPTIC
FIBER OPTIC
ADDRESS
OFF
FOXBOX Rx HDMI
L
AUDIO
R
HDMI
RS-232
OVER FIBER ALARM
Tx Rx
1
2
REMOTE
RS-232
Tx Rx
Video/Audio/RS-232
a. Connect the fiber output (OUT) of the matrix to the Rx port of an extraction point on
the PowerCage FOX AEX 104.
a. Connect the fiber output (OUT) of the matrix to the Rx port of an extraction point on
the PowerCage FOX AEX 104.
b. Connect the Tx port of the same extraction point to the FOX receiver (Rx).
b. Connect the Tx port of the same extraction point to the FOX receiver (Rx).
c. Connect the Tx port of the FOX receiver to the Rx port of the matrix for optional
bidirectional RS-232 communication.
c. Connect the Tx port of the FOX receiver to the Rx port of the matrix for optional
bidirectional RS-232 communication.
d. Insert a 3.5 mm, 5-pole captive screw audio connector into the audio connector of the
extraction point on the PowerCage FOX AEX 104.
d. Insert a 3.5 mm, 5-pole captive screw audio connector into the audio connector of the
extraction point on the PowerCage FOX AEX 104.
No Ground Here
No Ground Here
No Ground Here
Balanced Audio Output
No Ground Here
Unbalanced Audio Output
Balanced Audio Output
L AUDIO R
Indication
Power LED — Lights green when power is applied to the PowerCage FOX AEX 104.
+ Tx Link and Rx Link LEDs — The optical Rx LED will light when the Rx box
receives light. The optical Tx LED will light at the same time as the Rx LED.
Extron Headquarters
+800.633.9876 Inside USA/Canada Only
Extron USA - West
Extron USA - East
+1.714.491.1500+1.919.850.1000
FAX:
+1.714.491.1517+1.919.850.1001
Extron Europe
+800.3987.6673
Inside Europe Only
Extron Asia
+800.7339.8766
Inside Asia Only
+31.33.453.4040
FAX:
+31.33.453.4050
+65.6383.4400
FAX:
+65.6383.4664
Do not tin the wires!
R
R
Tip
Sleeves
Tip
L
Tip
Ring
Sleeves
Tip
Ring
L
Do not tin the wires!
R
R
Tip
Sleeves
Tip
L
L
Tip
Ring
Sleeves
Tip
Ring
Extron Japan
+81.3.3511.7655
FAX
+81.3.3511.7656
Extron China
+4000.EXTRON
+4000.398766
Inside China Only
Extron Middle East
+971.4.2991800
FAX:
+971.4.2991880
+86.21.3760.1568
FAX:
+86.21.3760.1566
© 2012 Extron Electronics All rights reserved. www.extron.com
Tx
+ Rx
Extron India 1
1800.3070.3777
Inside India Only
+91.80.3055.3777
+91.80.3055.3737 FAX
Extron Korea
+82.2.3444.1571
+82.2.3444.1575 FAX
68-2064-50
Rev. A 04 12
Unbalanced Audio Output
L AUDIO R
Indication
Power LED — Lights green when power is applied to the PowerCage FOX AEX 104.
+ Tx Link and Rx Link LEDs — The optical Rx LED will light when the Rx box
receives light. The optical Tx LED will light at the same time as the Rx LED.
Extron Headquarters
+800.633.9876 Inside USA/Canada Only
Extron USA - West
Extron USA - East
+1.714.491.1500+1.919.850.1000
FAX:
+1.714.491.1517+1.919.850.1001
Extron Europe
+800.3987.6673
Inside Europe Only
Extron Asia
+800.7339.8766
Inside Asia Only
+31.33.453.4040
FAX:
+31.33.453.4050
+65.6383.4400
FAX:
+65.6383.4664
Extron Japan
+81.3.3511.7655
FAX
+81.3.3511.7656
Extron China
+4000.EXTRON
+4000.398766
Inside China Only
Extron Middle East
+971.4.2991800
FAX:
+971.4.2991880
+86.21.3760.1568
FAX:
+86.21.3760.1566
© 2012 Extron Electronics All rights reserved. www.extron.com
Tx
+ Rx
Extron India 1
1800.3070.3777
Inside India Only
+91.80.3055.3777
+91.80.3055.3737 FAX
Extron Korea
+82.2.3444.1571
+82.2.3444.1575 FAX
68-2064-50
Rev. A 04 12