1
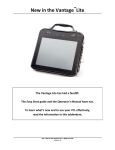
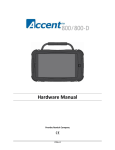
Vantage Lite and Memory Transfer Interface (MTI) are trademarks of Prentke Romich Company. Adult Quick Learning System (AQLS), Pixon and Semantic Compaction are trademarks of Semantic Compaction System.s Unity and Minspeak are registered trademarks of Semantic Compaction Systems, Inc. in the United States and other countries. PCS Symbols are a product of Mayer-Johnson. RealSpeak Text-to-Speech is a trademark of Nuance Communications, Inc. Acapella speech technologies licensed from the Acapella Group. Bluetooth is a registered trademark of Bluetooth SIG, Inc. Electronic Interference Information This device complies with Part 15 of the FCC Rules. Operation is subject to two conditions: (1) this device may not cause harmful interference, and (2) this device must accept any interference received, including interference that may cause undesired operation. Warning! Changes or modifications to this product which are not authorized by Prentke Romich Company could exceed FCC limits and negate your authority to use this product. This equipment has been tested and found to comply with the limits for a Class B digital device, pursuant to Part 15 of the FCC Rules. These limits are designed to provide reasonable protection against harmful interference in a residential installation. This equipment generates, uses and can radiate radio frequency energy and, if not installed and used in accordance with the instructions, may cause harmful interference to radio communications. However, there is no guarantee that interference will not occur in a particular installation. You can determine whether this product is causing interference in your radio or television by turning this product off. If the interference stops, it was probably caused by this product or one of its accessories. You can attempt to correct the interference by using one or more of the following measures: Turn the television or radio antenna until the interference stops. Move this product to one side or the other of the television or radio. Move this product farther away form the television or radio. Plug this product into an outlet that is on a different circuit from the television or radio; that is, this product should be controlled by different circuit breakers/fuses from the television or radio. If necessary, contact a Prentke Romich Company service technician for assistance. This Class B digital apparatus meets all requirements of the Canadian Interference-Causing Equipment Regulations. Cet appareil numérique de la classe B respect toutes les exigences du Règlement sur le matériel brouiller du Canada. CE ENVIRONMENTAL INFORMATION: Use: 0o - 45o C; Storage: (-20o) - 50o C; 95% maximum relative humidity @ ambient temperatures less than 40o C. Consult accompanying documents. Attention! This device is not intended to be an emergency call device or sole communication device. When operating this device in a medical environment, do not use with any product that is not medically approved. Warning! Any mounts used should be fitted by a qualified person. Failure to install the mounting system according to the manufacturer's instructions may result in an injury to the user. ©Prentke Romich Company 2010. All rights reserved. Under copyright laws this manual may not be copied, in whole or in part, without the written consent of the Prentke Romich Company. PRC • 1022 Heyl Rd. • Wooster, OH 44691 • Tel: 800-262-1984 • Fax: 330-263-4829 • [email protected] • www.prentrom.com LIBERATOR LTD • Liberator House • Minerva Business Park • Lynch Wood, Peterborough, Cambridgeshire • PE2 6FT UK • [email protected] • www.liberator.co.uk 14581v2.0 2 Vantage Lite Easy Start Getting Started Remove your Vantage Lite from Ship Mode You received a battery charger in the box with your Vantage Lite. 1. Plug the small end of the battery charger cable into the small battery charger port on the right side of the Vantage Lite. Plug the other end of the charger into a working wall outlet. 2. Select: This key is on the front of the case. It will take a few moments for the device to turn On. Vantage Lite Easy Start 3 A Dim or Dark Display Your device has been pre-set to "go to sleep" if you haven't made any key activations for two minutes. The backlight on your display will become dim. You can touch the screen or activate a switch to turn the device back on (wake it up). If you do not wake up the device, eventually the backlight will go out and the display will be dark. Again, just touch the screen or activate your switch to wake up your device. It may take a minute or two to wake up. If you want more time to elapse before the screen goes to sleep, you can change from two minutes to five or ten minutes by doing the following: Select the TOOLS key on the front the case. Select the MAINTENANCE MENU key Toolbox. in the In the Auto Power Down option: use the arrow keys to select the time you want. Select the OK key in the bottom right corner of the menu. Then select the GO TO HOME key in the top right corner of the Toolbox screen. 4 Vantage Lite Easy Start Table of Contents Getting Started ......................................................................................3 A Dim or Dark Display ...........................................................................4 Table of Contents...................................................................................5 Device Hardware....................................................................................6 Front Panel ................................................................................................................ 6 Top of Vantage Lite ................................................................................................ 8 Back of Vantage Lite .............................................................................................. 9 Right Side Panel.....................................................................................................11 Bottom of the Vantage Lite...............................................................................12 Using Your Vantage Lite .....................................................................13 Full Toolbox.............................................................................................................13 Simple Toolbox......................................................................................................15 Speaker Volume.....................................................................................................16 The Exploration Wizard ......................................................................................17 User Areas ................................................................................................................18 Activity Row ............................................................................................................22 Pages..........................................................................................................................26 Modify a Page.........................................................................................................28 Create a Page with a Scene...............................................................................37 Link your Scene Page to the MY SCENES Page .........................................48 You Have Learned.................................................................................................53 Next Steps.............................................................................................54 Vantage Lite Easy Start 5 Device Hardware Front Panel Recording Microphone Part Description ON/OFF Turns the device ON or OFF. If you turn the device off with this button, you must use it to turn the device back on. This takes you to the Toolbox where you can use the system menus. TOOLBOX Keys 1, 2, and 3 are User Defined keys. CHOOSE ACTIVITY Press Key 1 to toggle through the Activity Row on your overlay. Key 2 allows you to program overlay keys without going to the Toolbox. It works with the MODIFY, ASSIGN and STORE menus. SET-UP Key 3 allows you to mask keys on overlays so that only a few keys at a time are visible. Vocabulary Masking on the Fly 6 Vantage Lite Easy Start Part Recording Microphone Description This is the small round hole on the top right front of the case. When you record messages, speak toward this area. When this light flashes, the batteries need to be charged. Plug in the battery charger. Battery Low When you plug in the charger, the "Charging" light flashes. Battery Charging A rapid flash indicates fast-charging; a slow flash indicates that the battery is charged but it will continue to trickle-charge as long as the charger is plugged in. Vantage Lite Easy Start 7 Top of Vantage Lite Infrared (IR) window Removable handle Part Description Infrared Area Learning Infrared Area: The black window on the top back of the device is the learning infrared area. You teach remote control signals through the IR SETUP MENU in the Toolbox. Point a remote control at this area when teaching the signals. See operator's manual for steps. When the Vantage Lite is sending remote signals to control things like a TV or DVD player, this window must be facing in the general direction of the object you want to control. Handle 8 Use the handle to carry your Vantage Lite. You can remove the handle by removing the two screws that hold it in place. Vantage Lite Easy Start Back of Vantage Lite Wheelchair Mounting Plate Battery Door Wire Table Stand Part Description Battery Door Batteries are under this door. You can remove the battery door by unscrewing it from the case. Wire Table Stand The wire table stand allows the Vantage Lite to sit on a table in a more vertical position. In the US, the wire stand comes with the device. Outside the US, the wire stand is an option. Wheelchair Mounting Plate The wheelchair mounting plate allows the Vantage Lite to be attached to a wheelchair mount. Directions for mounting come with the optional QRM-2 Wheelchair Mount. Vantage Lite Easy Start 9 Reset Button Temporary Unlock Button Reset Button Unbend a paper clip and poke it into the hole to press the re-set button. If your Vantage Lite stops working for some reason, push the re-set button and see if that solves the problem. Temporary Unlock Button Press this button to temporarily unlock any locked front panel buttons. See the MAINTENANCE MENU chapter in the Operator's Manual for a complete explanation. 10 Vantage Lite Easy Start Right Side Panel Standard USB Mini USB Battery Charger Secure Digital Card Slot From left to right Part Mini USB Description Plug a mini USB cable in here. Secure Digital Card Slot Plug a 2 gigabyte or smaller secure digital card in here. Standard USB Plug a standard USB connector or flash drive in here. External Headphones/ Speakers Plug external stereo headphones or speakers in here. External Microphone Plug an external microphone in here. Switch Connectors Plug single and dual switches into Switch A and Switch B ports. Battery Charger Warning! Plug the battery charger in here. Use only the charger that came with your Vantage Lite. Vantage Lite Easy Start 11 Bottom of the Vantage Lite Clip an Optional Shoulder Strap Here Clip an Optional Shoulder Strap Here 12 Vantage Lite Easy Start Using Your Vantage Lite Full Toolbox Select You see the Full Toolbox. The Full Toolbox contains all of the menus and tools used for programming your Vantage Lite. White keys are functions that allow you to change a device setting without opening a menu. Vantage Lite Easy Start 13 Menus contain options that you can select to change settings or perform an action. Menus are yellow, green, orange and purple. Select Options in the FEEDBACK MENU change the feedback that you receive from the Vantage Lite. Examples of settings in this menu are Backlight Intensity and the different Activation Beeps you hear when you select a location. Go to the Vantage Lite Operator's Manual for information about the menus in the Full Toolbox. 14 Vantage Lite Easy Start Simple Toolbox Select You see the Simple Toolbox. Select FULL TOOLBOX to return to the regular Toolbox. The Simple Toolbox is a pared down version of the Full Toolbox. There are only a few often-used menus and functions in the Simple toolbox. These menus can be easier to use because they do not have all the options contained in the Full Toolbox menus. You may want to use the Simple Toolbox when you create a new page or when you want to create a scene for a page. Vantage Lite Easy Start 15 Speaker Volume To change the volume, select SPEAKER VOLUME UP or SPEAKER VOLUME DOWN. This indicates the Speaker Volume The GREEN LED means Speech is ON. No light means speech is OFF Select one of these keys to adjust the volume of your Vantage Lite. To leave the Toolbox and to return to your vocabulary, select 16 , the GO TO CORE key. Vantage Lite Easy Start The Exploration Wizard Select the TARGET keys to explore location size options. Select PIC TEST keys to look at how pictures are used to mean different things. The UNITY PATTERNS key shows you how verbs, adjectives, nouns and pronouns are placed on different overlays. Select this key to view Pages with different key location sizes Vantage Lite Easy Start 17 User Areas Select the keys in the bottom row to take you to vocabulary options. The white keys take you to User Areas that contain CORE Vocabulary. CORE vocabulary is vocabulary that you use all the time in many different situations. It is the vocabulary you will always want to be able to go to easily. Once you select a Core overlay you will need to open the USER AREA MENU in the Toolbox to go to any other User Areas. This is explained on the next page. In this manual we will use the 45 SEQUENCED overlay for our examples, but you should experiment with all the overlays to find the best one for you or your client. Select the 45 SEQUENCED key. (If you are not in the Exploration Wizard or you don’t know which overlay you are in, follow the steps on the next page to change User Areas.) 18 Vantage Lite Easy Start Changing User Areas Select the TOOLBOX key your device. on the top front of You see: Select You see: Select Switch User Area Vantage Lite Easy Start 19 You see: Select the User Area that contains the Core vocabulary you want. This menu tells you what Area you are currently in as well as what is available in other User Areas. If you have not already selected it, select Unity 45 Sequenced. . Select the OK key. Go to the Setting Up chapter in the Operator's Manual to learn more about the User Area Menu. 20 Vantage Lite Easy Start Core Vocabulary and Activity Rows Select GO TO CORE in the Toolbox. You are looking at Unity 45 sequenced overlay. Sequenced means that you must select two or more icons before a message is spoken. The vocabulary contained in these 4 rows is your CORE vocabulary. CORE Vocabulary is made up of words that are used in all environments. CORE words are words like verbs, adjectives, pronouns—words that help make complete sentences. CORE vocabulary is found in the 4 rows outlined in black above. Vantage Lite Easy Start 21 Activity Row Activity Row Keys Activities are in the top row with a blue background. Activities can consist of pre-stored sentences, category specific words or words that can follow a core vocabulary word. Activities work two ways: Dynamic Activities – an Activity is dynamic if you select a Core vocabulary key and the Activity Row automatically changes. Dynamic Activities usually consist of words that make up a category. For example: Select the FAMILY icon 22 . Vantage Lite Easy Start You see the FAMILY Activity Row which contains words like "mom" and "dad" Once you select an icon in the Activity Row, the row will close and go back to where you were. Regular Activities – act as topics or folders. When you select a key in the Activity Row, you will see a new Activity Row that contains words about that particular Activity. For example, Select the GREETING Activity You see the GREETING Activity Row. This contains sentences such as “How are you?” and “It’s nice to meet you.” Vantage Lite Easy Start 23 When you are finished with an activity, select the ACTIVITY key at the beginning of the Activity Row or select the #1 KEY at the top front of your device to close the activity or to view more activities. 24 Vantage Lite Easy Start Using the 45-Sequenced Overlay Select Do This 1. Select the I key from your CORE Vocabulary. 2. Select the I want key. 3. Select Juice/TV key from your CORE vocabulary 4. Select the juice key from the top row of your overlay. You see: I want juice. Select the Text Display Area to hear everything spoken. Vantage Lite Easy Start 25 Pages Pages consist of vocabulary that is devoted to a single topic. You will use Pages when you want to stay on one topic for more than a single message. This can be especially helpful for people who have trouble with different access methods. The Vantage Lite has several pre-programmed Pages. Select the PAGES key in the Activity Row. Select You see: The keys on this Page will take you to a page with topic related messages. 26 Vantage Lite Easy Start If you don't see the PAGES key in your Activity Row, select the ACTIVITY key the #1 key in the Activity Row or select on the front of the case. Select the CORE key to return to your Core vocabulary overlay. Vantage Lite Easy Start 27 Modify a Page If you select the APPLE key in your CORE vocabulary, you will be able to select many of the food items in your vocabulary from the Activity Row. Even though you can select lots of food from the Activity Row (see Tip above), sometimes it might be easier to have the most requested food items on one page, so let's go to the FAST FOOD page and add a new item. Select Select 28 Vantage Lite Easy Start You see: Let's add "pancakes" to the FAST FOOD Page. Select the SET-UP (#2) key on the front panel of your device. Select Vantage Lite Easy Start 29 Select a blank key. 30 Vantage Lite Easy Start You see: Select CHANGE ICON Change Icon Select an icon for your message. Select 1. Do This Select the Change Icon key to add an icon to your key. Vantage Lite Easy Start 31 You see: Select the FOOD Category. OR, choose Spell Text to Find, spell "pancake" and select OK. Then select the pancake picture you want. Categories are in alphabetical order. Select the category you want. For this example, select the FOOD category, then select the BREAKFAST category, then select the picture for pancake. Select OK. If you are not sure what category your icon might be in, you can select Spell Icon to Find, spell the name of the icon you are looking for and select OK. 32 Vantage Lite Easy Start "pancake" appears in the Text to Speak box. You see the pancake icon on your new key Now let's modify the message. Vantage Lite Easy Start 33 Make sure Type of Message is set to Computer Speech. Select the Spell Message key. If you want to record a message select Recorded Speech rather than Computer Speech. Follow the directions on your touch screen. Once your message is recorded you can complete the steps on the following pages. 34 Vantage Lite Easy Start Select Do This 1. Make sure Type of Message is set to Computer Speech. 2. Select the Spell Message or Define Key function key. 3. You see "pancake" in the Text to Speak box. Let's erase it by selecting the CLEAR DISPLAY key. 4. Type "Pancakes, please." Select OK when you have finished typing. 5. Your message appears here. Notice that part of "please" also shows up on your icon label at the bottom of the screen. Select Change Label. Vantage Lite Easy Start 35 Change the Label Select 1. Do This Select the Change Label key. 2. If there is any text in the Text Area, select CLEAR DISPLAY to erase the it 3. Type in Pancakes. 4. Select OK. 5. Your key should look like this. 6. If you want to add more vocabulary, select Choose Next Key to Define. If you are finished, select OK to exit. When you select the OK key , you return to the FAST FOOD page. Try out the vocabulary that you added. Select CORE when you are finished with this page. Go to the Vantage Lite Operator's Manual to learn more about storing messages. 36 Vantage Lite Easy Start Create a Page with a Scene A scene is a photograph or image that you can put on an entire page. Keys can be defined as “hot spots” that will tell a story about the picture or identify items in the picture. Tip The Vantage Lite contains some pictures that can be used for scenes. Go to the Transfer Memory chapter in the Vantage Lite Operator's Manual if you want to download your own graphics to use. Go to the Toolbox Select Vantage Lite Easy Start 37 Spell the name for your page then select OK. Select Do This 1. Type a name for your page. For this example you may want to type in the name of a dog. 2. Select OK when you have finished typing a name. 3. Select the Create Page from Template key. A scene looks better on an overlay with a lot of keys. In the future you might want to select 60 or 84 keys. 4. 38 Select OK when you are ready to move to the next screen. Vantage Lite Easy Start You see the 45 Template. The template has some keys defined on it. Select any blank key. Choose any key to define. You see: Select Change Scene Vantage Lite Easy Start 39 You see your overlay here. Select Choose Scene. Select a picture to use. Select OK. The pictures are in alphabetical order. Select MORE ITEMS to see more scene pictures. Find a picture that you would like to use. In this example, we are looking for a dog. If you are satisfied with your choice, select OK. If you would like another picture, select CANCEL. 40 Vantage Lite Easy Start Next change the size of the scene or the number of keys that the picture will cover. Select Change the size of the picture. Vantage Lite Easy Start 41 Change the Size of the Picture You see: Select where you want to the top left corner of the picture to go. Select where you want the bottom right corner of the picture to go Tip It is best to leave some keys visible on the overlay and not cover all the keys with your picture. 42 Vantage Lite Easy Start You see a preview of your overlay: Select Change the size of the picture if you want your picture to cover more or fewer keys. Your overlay now looks like this. Select OK when you are finished. Vantage Lite Easy Start 43 Define Keys for the Scene Now we’re ready to add messages to the scene. For this scene you might want to use words like "FEED DOG", "BOWL", "DINNER" or whatever you think will be helpful. Set this to Computer Speech. Select Choose next key to define. 44 Vantage Lite Easy Start Select this key. To 1. 2. 3. Select Do This Select the Spell Message key. Type in a message—perhaps, Dog Bowl. Select OK when you have finished typing. Vantage Lite Easy Start 45 Notice the message is on the label. Use Choose next key to define to define as many keys as you want. You can store messages on keys within the scene and on keys that surround your scene. If you are defining keys around the scene, be sure to put a picture and label on the key to go with the message. You can record messages or use computer speech. 46 Vantage Lite Easy Start When you have finished defining keys select OK to exit the menu. Go to your CORE overlay. Vantage Lite Easy Start 47 Link your Scene Page to the MY SCENES Page You’ve created your page. The next step is to link it to the MY SCENES page so you can go to it easily. Select 1. Do This Select the PAGES key from your CORE. Select the MY SCENES key. 2. 3. 4. 5. 48 Select the SET-UP key on the front panel of the case. Select a blank key. Select the Spell Message key. Select the PAGE LINK key. Vantage Lite Easy Start You see a warning box: If you select YES, you can make one selection on your new page, then return automatically to your original page. This is a "two-way link." If you select NO, you go to your linked Page and stay there. This is a "one-way link." For now, select NO. We will probably want to stay on our scene page for awhile so we can talk about Woofie. Select NO. 6. Vantage Lite Easy Start 49 Choose the Page to you want to link to. Pages are in alphabetical order. Select More Items until you see your new scene page (Woofie). Select 1. 2. 3. 50 Do This Use More Items to find your page (Woofie) page and select it. Notice the link in the Text Display Area. Select the OK key. Vantage Lite Easy Start Now let's change the icon on the key so you know what page you are going to. Select 1. 2. 3. Do This Select Change Icon. Select ANIMALS. Select PETS. 4. Select DOG. 5. Select Change Label. 6. Type in Woofie. Select the OK key. You return to the MY SCENES Page. Vantage Lite Easy Start 51 Select this key to go to your Woofie Page. 52 Vantage Lite Easy Start You Have Learned How to identify and use the hardware on your Vantage Lite; How to find the Full and Simple Toolboxes; How to raise and lower the volume of the Vantage Lite; How to work with the USER AREA MENU in the Toolbox; How to locate CORE Vocabulary, Activities, Dynamic Activities and Pages How to use the SET-UP key to modify a Page; How to add a message, icon and label to a key; How to use a Page template; How to add a Scene to a Page; How to link a Page to another Page. Congratulations! You have learned a lot! Vantage Lite Easy Start 53 Next Steps The most important thing you can do now is to learn your CORE vocabulary. Have fun exploring and finding new words. You can use the ICON TUTOR which shows you where words are. Select the DEVICE Activity in the Activity Row then select the ICON TUTOR key . Spell the word you are looking for and your device will show you the sequence the word is stored under. You can also attend free on-line and regional face-to-face trainings. Go to www.prentrom.com and look under Trainings to see a listing of available trainings. Be sure to check out TEACHING MATERIALS EXCHANGE. Contact your PRC Regional Consultant at http://www.prentrom.com/reps for additional support. The Vantage Lite Operator's Manual is on the Support CD that came with your device. It provides instructions on many device functions including how to set up access methods such as switches, headpointers and joysticks, and how to back up memory. You can learn how to create activities and import song files and graphics. Keep the manual handy to answer your questions. But most of all, keep talking! 54 Vantage Lite Easy Start