1
Indications
Switcher Setup and Indications
8
Sample Operations
10
For MAV A/V switchers, the
switcher’s IR receiver is disabled by
default and must be enabled to use
the IR Remote Control. Refer to
the MAV 44 / 48 / 84 / 88 Series
9
Matrix Switchers manual
Figure
3
—
Switcher
to enable the IR receiver.
features
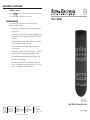
It is not the purpose of this manual to
define the switcher’s front panel indications, but two of the switcher’s
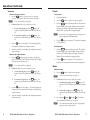
LEDs indicate operation by the IR 501 remote control (figure 3).
N
N
The following examples show operations with specific input, output, and preset numbers. Use your own numbers as desired.
N
The switcher’s Power LED flashes whenever the switcher receives
an IR command. Other switcher indications are identified in the
following examples where appropriate. For detailed descriptions of
how the switcher indicates ties and presets, refer to the appropriate
matrix switcher’s manual.
N
Many operations require a sequence of IR commands. When
multiple IR commands are required, the entire sequence must be
completed within 5 seconds. If a valid sequence is not completed
within 5 seconds, the switcher times out and discards all received
IR commands
MAV SERIES
AV MATRIX SWITCHER
I/O
IR
+dB
-dB
AUDIO SETUP
Other indications are identified where appropriate in the “Operations”
section.
remote sensor — This sensor receives infrared (IR)
h Infrared
signals from the optional IR 501 small matrix universal remote
control. The IR remote control must be pointed within 30 degrees
of this sensor for best results.
LED — This LED blinks off and on to indicate that an IR
i Power
signal has been received.
Setup LED (A/V switchers only) — This LED lights for a
j Audio
second when an improper or unexpected IR command is received.
Create ties
By default, you create video and audio (audio follow) ties using the
IR 501. By pushing one extra button you can create audio-breakaway
ties.
1.
N
2.
Operation
Most functions can be performed by pushing a similar sequence of
{function}
and
I/O
buttons (figure 4).
• Video and audio operations require only one
{function}
button.
• Video-only or audio-only operations require two {function} buttons
(one to identify the function, one to identify video or audio).
• For numbers higher than 9, press the
applicable
0
through
9
+10
button and then press the
sequence, one or more output sequence[s]) and then the
button.
ENTER
To create video and audio ties, skip to step 3.
Specify video or audio:
a.
For video-only tie(s), press the VIDEO button to specify a
video selection. The switcher’s Video LED remains lit and
the Audio LED goes off.
b.
For audio-only tie(s), press the AUDIO button to specify an
audio selection. The switcher’s Audio LED remains lit and
the Video LED goes off.
5
3.
Press the
lights.
4.
Press the
5.
Press the
,
, and 8 buttons to select outputs 3, 4, and 8.
The switcher’s selected Output LEDs blink.
6.
ENTER button to create the tie. The switcher displays
Press the
the ties as described in the switcher’s manual.
button.
• Creating a set of ties requires at least two sequences (the input
Press the INPUT button to specify an input selection. The
switcher’s Video LED and Audio LED light.
button to select input 5. The switcher’s Input 5 LED
OUTPUT
3
button to specify output selection(s).
4
{function} (s)+ I/O number(s)
(Such as INPUT (video and audio),
(Such as 3 , or +10 + 2 .)
INPUT + VIDEO (video only), orMUTE ,
(for 12)
INPUT + AUDIO (audio only).
Figure 4 — Button sequence
4
IR 501 Small Matrix Remote Control • Operations
IR 501 Small Matrix Remote Control • Operations
5