1
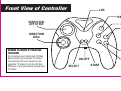
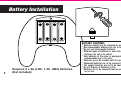
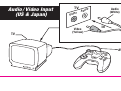
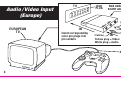
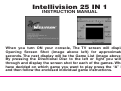
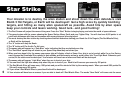
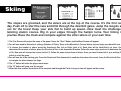
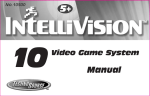
No.10400
5+
25
TM
Video Game System
Manual
Thank you for purchasing the Intellivision 25
Video Game System, an entertainment
handheld controller featuring a complete joy
pad gaming operation. This unit includes
controller with built-in software and A/V cable.
Please read the setup instructions and
precautions / warnings before attempting
to connect the Intellivision 25 Video
Game System to your TV.
The TV must have Audio/Video Input (AV) Jacks to
be able to play the Intellivision 25 Video Game
System - if the TV does not have the Input Jacks
you may purchase a RF/Scart Adapter that has AV
inputs built in.
If you chose to connect the unit through your VCR
you may need to select the LINE OUT button on the
TV/VCR to display the initial menu screen.
You may need to consult the instruction guide to
the TV or VCR for more information about your
specific equipment.
Installing the Batteries
Have an adult install 4 "AA" batteries(not
included). Caution: When installing the
batteries make sure that the positive (+) and
negative (-) ends are facing in the correct
position . Follow the diagram in the battery
compartment. Note: when the batteries begin
to lose their charge, the power indicator LED
will begin to dim. and the Intellivision TV
Play Power Controller will turn itself off.
Remember to take out batteries when the
Intellivision TV Play Power Controller is not
being used for a long time.
Intellivision 25 Video Game Operations
1. Make sure the power switch on the unit is
in the off position.
2. Turn your TV on and turn to the channel
that accepts the input line.
3. Place the power switch on Controller to
the on position the indicator light should
be lit (If not, check the batteries).
4. The TV screen will display the opening
screen shot for approximately 10 seconds.
The next screen will display the Game List.
5. Select a game by going left or right with
8 Way Direct Pad and press the “A” button
to commence play.
How to turn off the Intellivision 25 Video Game
System
1. Place power switch in the off position.
2. Turn your TV to the desired channel to
view regular TV programs (When using
A/V jacks you will need to set the TV/Video
switch back to the TV position).
Trouble Shooting
1. No picture to the screen
* Is the Intellivision 25 Video Game System
turned on?
* Is the TV turned on?
* Is the AV output connected properly?
* Is the battery capacity too low?
* Are the batteries installed properly?
2. Screen Flickers or no color
* Are the TV’s color controls set correctly?
3. No game Sound
* Is the TV volume set too low or in the off
position?
* Has the Audio cable come loose or
become disconnected?
4. Picture on TV screen is unsteady
* Adjust the vertical and horizontal
controls until corrected.
5. Picture is blinking or distorted
* Press the reset button. If there is no
improvement power off the unit and
try again.
6. No Power
* Check whether the batteries were installed
properly.
Hardware Precautions/Maintenance
1. Do not disassemble or try to repair the
Intellivision 25 Video Game System unit or
its components.
2. Always place the power switch in the off
position before connecting the unit to
the TV.
3. Do not store the unit in a humid place or
where it could collect dust, lint or other
debris.
4. Do not drop, hit or otherwise abuse the
unit or its components
5. Make sure that all connections to the unit
are correct(refer to Back View Diagram)
and that the plugs are inserted straight
into the proper sockets.
6. Make sure the unit is in the off position
before disconnecting any plugs. Carefully
remove the cables from the plug itself, and
not by pulling on the cable.
7. Do not expose the unit to high heat or
direct sunlight for extended periods of
time. This will cause the unit not to work.
8. Do not spill any liquids on the unit or its
components. If cleaning the unit, use a
soft damp cloth and let it dry completely
before attempting use.
9. Do not rapidly turn the power switch
on/off. This may shorten the life of the
batteries.
Warnings & Precautions
A very small portion of the population have
a condition which may cause them to
experience epileptic seizures or have
momentary loss of consciousness when
viewing certain kinds of flashing lights or
patterns that are commonly present in our
daily environment. These persons may
experience seizures while watching some
kinds of television pictures or playing
certain video games. Players who have not
had any previous seizures may nonetheless
have an undetected epileptic condition.
If you or anyone in your family has
experienced symptoms linked to an epiletic
condition (e.g. a seizure or loss of
awareness) immediately consult your
physician before using any video games.
We recommend that parents observe their
children while they play the games. If you or
your child experience any of the following
symptoms: dizziness, altered vision, eye or
muscle twitching, involuntary movements,
loss of awareness, disorientation, or
convulsions, DISCONTINUE USE
IMMEDIATELY and consult your physician.
FOLLOW THE PRECAUTIONS WHENEVER
USING the Intellivision 25 Video Game
System :
• When using your controller do not sit or
stand too close to the television.
• Do not play if you are tired or need sleep.
• Always play in a well lit room.
• Be sure to take a 10 or 15 minute break
every hour while playing.
Repetitive Strain Warning
Warning! Not Suitable for children under
36 months in case of unforeseen use in
particular of small parts and long cords,
giving rise to harm.
Some people may experience fatigue or
discomfort after playing for long periods of
time. If your hands or arms become tired or
uncomfortable while playing, stop and rest.
Front View of Controller
LED
RESET
DIRECTION
JOY STICK
X
Y
DIRECTION
DISC
B
WARNING TO OWNERS OF PROJECTION
TELEVISIONS
Do not connect your Intellivision 25 Video
Game System to a projection TV without
first consulting the user manual for your
projection TV, unless it is of the LCD type.
Otherwise, it may permanently damage your
TV screen.
A
ON/OFF
SELECT
START
1
Battery Installation
BATTERY CAUTIONS:
*
*
*
*
*
2
Requires 4 x AA (LR6, 1.5V, UM3) Batteries.
(Not Included)
*
*
*
*
*
Batteries should only be replaced by an adult.
Non-rechargeable batteries are not to be recharged.
Do not use rechargeable batteries.
Different types of batteries or new and used
batteries are not to be mixed.
Only batteries of the same or equivalent type as
recommended are to be used.
Batteries are to be inserted with the correct polarity .
Exhausted batteries are to be removed from the toy .
The supply terminals are not to be short-circuited.
Do not dispose of batteries in fire.
Batteries are to be removed from the product when
not in use.
Audio / Video Input
(US & Japan)
TV
o
ide
Audio
(White)
V
Video
TV
io
Aud
IN
(Yellow)
AV CABLE
3
TV
RGB
PLUG
Audio / Video Input
(Europe)
RGB ADAPTER /
SCART ADAPTER
(White)
EUROPEAN
TV
IN
Insert corresponding
color pin plugs into
pin sockets
(Yellow)
IN
Yellow plug = Video
White plug = Audio
AV CABLE
4
Intellivision 25 IN 1
INSTRUCTION MANUAL
When you turn ON your console, The TV screen will display the
Opening Screen Shot (image above left) for approximately 10
seconds. The next display will be the Game List (image above right).
By pressing the Directional Disc to the left or right you will scroll
through and display the screen shot for each of the games. When you
have decided on which game you want to play press the “A” Button
and then follow the enclosed individual game instructions.
5
Star Strike
Your mission is to destroy the alien station and shoot down the alien defenders stalking you.
Bomb 5 Hot Targets, or Earth will be destroyed! Get a high score by quickly bombing the 5 red
targets, and hitting as many alien spacecraft as possible. Avoid hits by alien spaceships to
keep your controls and lasers working. Good luck…and good hunting!
6
1. The First Screen will project the name of the game. Press the “Start” Button to begin playing, and enter the world of space defense.
2. The game begins with the screen showing the Space Station, Moon, Earth and your Fighter Ship. You will also have 8,000 points to start with. Your
point total decreases with time and increases with enemy ships and silos destroyed.
3.You must destroy the alien station by shooting down the alien defenders stalking you. Bomb the 5 Hot Targets (The Red Missile Silos),
or Earth will be destroyed.
4. The “A” button will drop the Bomb.
5. The “B” button will Fire the Air-To-Air Laser.
6. The enemy ship will appear in a “Dark Blue” color indicating that they are behind your ship.
7. The “Dark Blue” space ship will attach to your Space Ship when they are behind you.
8. When you have been hit by the enemy your space ship will display a flash of flame. Your ship is out of control while it’s on fire. During that time you
need to press the Directional Disc upward to gain altitude and take evasive action to avoid further hits. Then Fight Back. Otherwise your ship will lose
control, hit the station and be destroyed. Your mission will have been a failure and Earth will be destroyed.
9. The enemy ship will appear “Light Blue” when they are in front of your ship
10.You can shoot the light blue enemy ship when they are in front of you. Each hit will increase your score by 250 points.
11. The Red Missile Silos will come every 1000 points and you will be alerted of this by the warning music. When you reach 3000 points Red Missile
Silos will come every 500 points.
12. If you allow 3 Red Missile Silos to pass then Earth will be destroyed.
13.Your mission will have been a success if you are able to bomb all 5 Red Missile Silos. The words “Save Earth” will come onto the screen.
Skiing
The slopes are groomed, and the skiers are at the top of the course. It’s the first run of the
day. Push off to start the race and blitz through the downhill gates. Jump the moguls and look
out for the trees! Keep your skis flat to build up speed…Now meet the challenge on the
twisting slalom course. Dig in your edges through the hairpin turns. Your timing must be
precise. Race the clock and compete against the other skiers or your own time.
1. The First Screen will project the name of the game. Press the “Start” Button and the Menu Screen will appear.
2.You will now need to determine 3 settings (Number of Skiers, Slope of the Mountain & Course) before you can begin your downhill race.
3. To choose the number of skiers, press the Directional Disc Left or Right (total of 6). Each skier will be identified by its color. Once you have
determined the number of skiers, press the Directional Disc in the downward direction. Follow the same steps as above to determine the Slope (total
of 15). Now you will choose the course (total of 2). Follow the same instructions as above. Once you have finalized all of your settings Press the “A”
button to start the game.
4.You will now be at the starting gate. Press the Directional Disc downward to send the skier down the course. Press the Directional Disc right and left
to navigate the skier between the flags.
5. The “A” button will make the player move faster.
6. The “B” button will jump over the moguls.
7. When the skier reaches the bottom of the mountain and through the Finish Line your time will appear on the screen.
7
Space
Armada
Here they come….4 rows of menacing monsters…an ARMADA of trouble! You are equipped
with 6 laser guns and 3 bunkers. The descending targets drop bombs on you and your bunkers.
Hit the elusive red flying saucer for big points and some damage repair! Your job is to shoot the
targets before any of them land. The more you shoot the greater your score. Each level is
harder then the one before with more bombs and faster moving monsters. Now fire away!!
1. The First Screen will project the name of the game. Press the “Start” Button to begin playing.
2. When the game starts, there will be 4 rows containing a total of 24 Monsters. You begin with 6 laser guns and 3 bunkers. The descending targets drop
bombs on you and your bunkers. When you have cleared the screen a new set of Faster Monsters with appear with more Bombs.
3. The “A” button is the “Laser” to destroy the monster.
4. The Targets move left and right, and the entire Armada Descends every time any target reaches either side of the screen.
5. To hit the targets, move your laser gun left and right by pressing the Left or Right half of the Directional Disc.
6. If you win that battle by clearing all 24 targets from the screen before any of them reach the ground, you get another Armada.
7. At the bottom of the screen will tell your score, number of laser guns left, and the stage you are at.
8. If the targets reach the ground or you have run out of laser guns the game is over.
8
Snafu
The contest is on! Create a maze and corner your opponent…before you are cornered yourself.
Split second reflexes keep your trail in motion while blocking your opponent in a trap from
which there is no escape. It’s a twisting tangle which only the swift can survive!
1. The First Screen will project the name of the game. Press the “Start” Button and the Menu Screen will appear.
2.You will now need to determine 2 settings (Number of Variations & Rounds) before you can begin playing.
3. To choose the number of Variations, press the Directional Disc Left or Right (total of 4). Once you have determined the number of variations press the
“A” button. Follow the same steps as above to determine the number of rounds (total of 9). Now that you have finalized all of your settings Press the “A”
button to start the game.
4. The only control you use in the direction Disc. The Computer directs the Red Tail.
5. After a game first starts, the computer randomly selects the direction in which your trial starts to move.
6. Your Trial will not respond if you try to change direction to the exact opposite of your movement, since this would cause you to have a head-on collision
with yourself.
7. When a trial collides and is eliminated, other trials are awarded one point. Points are displayed along the bottom of the screen, in the color of the trials.
8. The 4 different variations are:
• You can only go straight
• You can go straight or on an angle, and pass through the angle between the two squares.
• There will be some stones on the screen, but you can only go straight.
• There will be some stones on the screen, but you can go straight or on an angle. You are also able to pass through the angle between the two squares.
9
Shark!
Shark!
Terror reigns under the ocean surface. It’s heavy traffic of Sharks, Nasty Fish, Seahorses,
Crabs, Lobsters & Jelly Fish. They swim fast, jerk up and down, lurk behind plants or slide
under coral reefs. They have weird shapes, striking colors, tiny or big sizes, and very mean
intentions. They eat or kill each other at first sight !
1. The First Screen will project the name of the game. Press the “Start” Button to begin playing.
Enjoy the game!
2. Under your control, a small fish will begin scoring points by quickly Gulping Smaller Fish and Nibbling at a Black Shark’s Tail. Watch for the
shark turning around on you a bit too fast… or you’re dead. Never touch his head and fins! For gulping a few small fish, you will grow one size
Bigger. For killing one Shark, you’ll get one bonus small fish. You start with 5 small fish, and each is capable of growing to 4 times bigger.
When you reach each 1000 point interval your fish will grow 1 size greater, but will not exceed 4 times its original size.
3. The “A” and “B” button will make the fish swim faster.
4. Music will alert you that a shark is coming out
5. The Small fish will kill the shark when it has bitten it about 5 times. When the fish reaches maximum size (4 times bigger) it will only take 3 times
to kill the shark.
10
Motocross
Feel the action of motocross racing as you maneuver through course. Take the jumps, hug
the curves and accelerate your way to victory! You are racing against the clock so stay on
course and cross the finish line in record time!
1. The First Screen to appear is the name of the game. Press the “Start” Button and the Lap Menu Screen will appear.
2. Press the “Select” Button to choose the number of laps (Maximum of 5) that you want. Now press the “A” Button to begin racing.
3. The “A” Button is to Accelerate.
4. The “B” Button “B” is to Brake.
5. The Directional Disc controls the Steering.
6. As the race starts (The Clock is Running), press the “A” Button to make your bike go. Use the Directional Disc to steer your bike. Left to turn left
and Right to turn right….
7. If your bike goes all the way off the course, it will spin and turn you upside down. Then the computer will assist you back onto the track.
8. After you cross the Finish Line the Bikes will drive off the screen and the clocks will stop. The screen will display the results of each lap and the
total time it took.
9. It is a race against time so get back on your bike and take another lap.
15
World
Championship
Baseball
Take the field and image yourself as professional ball player. You have nine innings to score as many
runs as possible and keep the opposing team to a minimum. Throw the heat with your fast ball or
trick them with your Curve Ball. It's time to Play Ball !
16
1. The First Screen to appear is name of the game. Press the “Start” Button to begin playing and enjoy the game!
2. Object of the game is to score the most runs in 9 innings of devastating action and sheer sweat! Your Home Team is Blue and the Visitors are Orange.
3. When the game starts you will be the defensive team.You will take the mound and have three different pitches to choose from
(Inside Curve, Fast Ball, or Outside Curve).
Pitching Controls: Press “Left Disc” and than Press “A” Button = Inside Curve.
Press “Right Disc” and than Press “A” Button = Outside Curve.
Press “Down Disc” and than Press “A” Button = Fast Ball.
4. After you throw the ball, the offensive team will hit it into the field. During that time the computer will automatically catch the ball for you from the field.
When the fielder has the ball, you will have the option of throwing it to base of your choice (see below).
Defensive Throwing Controls: Press Right Disc = 1st Base
Press Upper Disc = 2nd Base
Press Left Disc = 3rd Base
Press Down Disc = Home Plate
5. If your throw reaches the base before the runner then he will be called Out! If not, he will be Safe! When an opposing or one of your players crosses Home
Base 1 Run will be added to the teams total for that inning.
6. When play has stopped you will need to press the “B” Button to return the ball to the Pitcher.
7. Once you have thrown out 3 of the opposing players you will switch from Defense to Offense.
8. Now it is your turn at bat. When you press the “B” Button and the directional disc at the same time you can determine what direction the ball goes in.
• Press Left Disc and “B” button:
Left Field
• Press Upper Disc and “B” button:
Center Field
• Press Right Disc and “B” button:
Right Field
• Press Down Disc and “B” button:
Pitcher
9. After you hit the ball use the directional disc to guide the batter around the bases.
10. Repeat the same steps for nine innings.
Super Pro
Volleyball
It’s time to hit the beach for some two on two Volleyball Action. Teamwork is the name of
this game because there is a lot of sand to cover. So stay in position. Make those serves
count and leap as high as you can to block the opponents shot at the net. You are the
“Ace” of this court.
1. The First Screen to appear is the name of the game. Press the “Start” Button to begin playing and enjoy the game!
2. This is a TWO ON TWO (outdoor) Beach Volleyball Game.
3. The Red Team (under your control) and The Blue Team (computer controlled).
4. The “A” button can serve the ball and hit the Ball.
5. The “B” button can Block the Ball.
6. Press the edge of the Disc to make your controlled player run in the direction pressed.
7. When the ball comes onto your side of the net, you may pass (hit) it to your teammate. You may only pass the ball twice before hitting it back over
the net.
8. The computer will automatically switch the controlled player when you pass the ball.
9. When the Ball is hit over the net, the defensive team must return the ball within 3 hits.
10. To control the player closest to the ball, move to meet the ball as it comes down. If you get there in time, you will automatically hit the ball. (Hint:
Follow the Shadow.)
11. Your Primary defensive move is the block. This defensive move is used against the opponent’s spike. Position yourself next to the net and in front
of the spiker. Press Button “B” to jump. Time it right and you’ll deflect the spike right back over the net.
13. The Team scores appear in the upper left and right corner of the screen in the teams colors. The points scored in the current game appear over the
number of the games won in the match so far.
14. Each game is set for 15 points, and it’s a best out of 5 Match. So, if you win three games out of five you win the match.
17
Hockey
Hit the Ice! You have 3 periods to show off your kills. Skate past the defenders and blast
your shot past the goalkeeper, but do not forget about Defense. Back check and steal the
puck from your opponent. When the clock runs out you will come out on top.
18
1. The First Screen to appear is the name of the game. Press the “A” Button to go to the Level Selection Screen!
2. The next screen to appear is the setting Handicap Level for the Home Team. There are 4 levels for you to choose from. They are: AMATEUR, ROOKIE,
PRO & SUPER PRO. Press the Directional Disc Up and Down to select the HOME TEAM first. When the “Red Dot” is next to the desired level Press
the “A” button to confirm the level and go to the Handicap Level page for the Visiting Team. Select the same level as you did for Home Team and
than press the “A” button to start and enjoy the game!
3. The players skate onto the ice. There are four players on each side, one of which is the goalie. The goalies are always under automatic control by the
computer.
4. The Home Team’s net is on the left of the screen; The Visitor Team’s net is on the right. In the center of the rink is the red face-off circle; and at top of
the screen is the scoreboard.
5. There are three periods and each is 20 minutes. Every goal is worth 1 point, and whoever has the most points after time has expired wins the game.
6. You control the Red Player, and have the ability to pass the puck to your teammate. As long as your teammate catches the pass he will automatic
turn to red and you will now control his actions.
7. You can also steal the puck from your opponent by tripping the player with possession. Do this by skating next to the opposing player and swing
your stick.
8.Your teammates will be displayed in the color Green.
9. The computer controls the Orange player, and his teammates are displayed in the color Blue.
10. The Red player you are controlling can Shoot the puck or Pass it to one of his teammates by pressing the “A” Button.
11. When you shoot the puck at the goal you have the option of picking the location by pressing the Directional Disc (as mentioned below) and the “A”
Button.
UP + A = Top
Left Up + A = Left UP
Right + A = Right
Right Down + A = Right Down
Down + A = Down
Body Slam
Super Pro
Wrestling
Enter the Ring and the World of Championship Wrestling. You get to choose the Wrestlers
and the Moves. It is survival of the fittest, No Holds Bar. Remember only you have the Flying
Kick in your arsenal. Perform the move properly and you could win the match. Miss it and
you could be Pinned!
1. The First Screen to appear is the name of the game. Press the “A” Button to go to the Wrestler Selection Screen.
2. You now have the ability to choose the name of the Wrestler you are going to be and that of your opponent. To choose your wrestler scroll through the
names by pressing the “A” button. Now follow the same steps for choosing your opponent by pressing the “B” button. Now press the “Start” button to
go to the wrestlers move selection screen.
3. There are 6 special moves that you can set for your wrestler, and 7 special moves to choose from. They are:
• Head Butt: Give your opponent a good piece of your mind with your head. After this brief skull session is completed, only one wrestler will be left on
his feet – you.
• Spin Heave: Grab your opponent by his heels, spin him around, then let go and watch him fly out of the ring onto the cement floor! You may only use
this move in the ring.
• Knee Butt: give your opponent a swift knee between his legs. This should make him think twice about grapping with you.
• Duck Cover: Defensive move. You simply duck out of your opponent’s way. Whether he’s running or jumping at you, he’ll miss or trip over you and fall
to the mat.
• Drop Kick: Jump at your opponent, smashing into him feet-first. If you miss, you land flat on your back, vulnerable to a pinning!
• Cross Chop: Hit your opponent with your elbows. Does a lot of damage if timed correctly.
• Face Master: Following a brief headlock, quickly bash your opponent’s face.
19
Use your Directional Disc to display the name of the special move. If this is the one you want then press “A” button to set it on that number. After
you set all of the 6 special moves press the “START” Button to get begin the match.
5. The match starts with the wrestlers entering the area. Once in the ring, your wrestler is in the bottom left corner, the computer wrestler is in the
top right. Let the battle begin.
6. The match consists of a series of four minute rounds. There are an unlimited number of the rounds. The match continues until a player wins or
until a draw is declared. Before each round, Lola the Round Girl will display the round number. While Lola is on screen you can press “B” Button
to continue the match.
7. When you start to Match, you can press the “A” button and use the special moves you selected at the menu screen. The name of the move you are
using will be displayed at the bottom of the screen. The same moves will be used by your opponent when you are hit by him. When each wrestler
is knocked down their point totals will be reduced. The lower your point total the slower your wrestler will stand up when he has been knocked
down. When the opposing wrestler is knocked down you can pin him by pressing Down on the Directional Disc. If you can hold him down for a
count of 3 you will have won the match.
8. You can increase the speed of your wrestler by pressing the “B” and the directional disc in the direction you want him to go. If you are close to
your opponent and run into him this will knock him down.
9. One additional special move would be a Flying Kick. This can be accomplished by first pressing the “B” button and then the Right or Left position
on the directional disc followed by the “A” button. After you have kicked the opposing wrestler down his score will reduce by a few points and you
will have an opportunity to pin him.
10. When the match finished the Replay Screen will be displayed asking you to select the settings for the next match. They are:
1. New Wrestlers
2. New Moves
3. Restart the Match.
Select your choice by pressing Up or Down on the Directional Disc. Once you have highlighted the option you prefer press the “Start” button to
play a new match.
20
Space
Hawk
Imagine, you are a Space Hunter alone in Deep Space and your prime target is the White
Space Hawk who is sending Deadly Gas Bubbles, Comets and Amoebas at you. If any of
them touch you the Space Hunter will tumble into infinity never to be seen again. Use your
Rocket Powered Backpack to dodge the objects, shoot them out of the sky or go into
Hyperspace. Accept this mission and Get The Hawk!
1. The First Screen to appear is the name of the game. Press the “Start” Button to begin playing and enjoy the game!
2.You start with 5 Space Hunters. One will be in the center of the screen and the other 4 will be in reserve.
3. When the game begins there will be a Space Hunter alone in Deep Space. You control his movements, and he is armed with a “Gas Blaster”. His
prime target is the White Space Hawk. If a Hawk, Deadly Gas Bubble, Comet or Amoebas touch the Space Hunter he tumbles into infinity! There are
only three ways to escape: Move away fast under Backpack Rocket Power, Shoot away the danger, or go into Hyperspace! The longer the game
continues, the more exciting it becomes, so…. Get The Hawk!
4. The function Keys are:
• “A” button is the Fire Button.
• “B” button will control the Backpack Rocket Power...
• “Select” button will control the Hyperspace function.
5. Play against the computer, and go for the highest Peak Score. Hit Bubbles and comets for added points. You will receive extra Space Hunters when
your peak score rises to higher levels. Don’t forget to use Hyperspace in hopeless situations.
6. After you have successfully cleared the first screen you will move on to Stage 2. As you continue to clear the screens you move to stage 3, 4…The
difficulty will also increase with each stage.
21
Space Battle
Attack alert! There are 5 Alien Squadrons closing in on your Mother Ship. You have
2 squadrons with which to defend her. Check your enemy’s position on the Radar
Screen, and then dispatch your Squadrons. When they reach the Alien Squadron its
time to Go To Battle!
22
1. The First Screen to appear is the name of the game. Press the “Start” Button to begin playing and enjoy the game!
2. When the game begins you will go into the first screen which is called the Mother Ship Screen.
3. On the Mother Ship Screen you will see your Mother Ship displayed in the middle of the screen.
4. You should also take notice of the 5 other vessels. These are the 5 alien squadrons closing in on the Mother Ship. Each squadron contains 6
enemy space ships.
5. Now is the time for you to deploy your 2 Fighter Squadrons (White & Blue). This can be done by pressing the:
a) “A” button will sent out WHITE squadrons
b) “B” button will sent out BLUE squadrons
The 2 squadrons will automatically approach the 5 enemy squadrons.
6. When one of your squadrons is touching any of the enemy squadrons the game will automatically to the SPACE BATTLE screen.
7. On this screen you will have a GUNSIGHT in the middle screen. Use your directional disc to move your view in any direction. The enemy ships
will be firing at you and have 2 red missiles. If you are hit your space ship will be lost. You will have 3 space ships on each of your own
squadrons and you can press the “B” button to fire 2 missiles and destroy enemy space ships.
8. Once you destroy all of the enemy ships in the squadron you can go and battle the other enemy squadrons until you destroy all 5 of their
squadrons. If you are successful you will have won the game.
9.You will lose if both of your squadrons are defeated in battle or the enemy squadrons are able to reach the Mother Ship. This will be indicated by
the words “Game Over” coming on the screen.
Hover
Force
The city is under attack and you are the only pilot that can defend it. Watch your
levels and use your radar as they like to hide and sneak up on you. Seek and
destroy them one by one. Accomplish this task before your ammunition and fuel
runs out or your mission will be a failure.
1. The First Screen to appear is the name of the game. Press the “Start” Button to begin playing and enjoy the game!
2. On the first screen you are provided with the option to select from 3 different course types (Cadet, Danger & Ace). Select the course you want by
pressing the directional disc Up or Down. The highlighted course will be indicated by a red dot to the left of the course name. After you have
confirmed your course selection press the “Start” button and watch the pilot get into to helicopter. This is your signal to get ready to Fly!
3. When the game begins you will see an aerial view of the city below. Use your directional disc to fly around the city in search of the enemy
helicopters. Shoot them out of the sky with your Laser Guns by pressing either the “A” or “B’ buttons.
4. Sometimes you will not be able to locate your enemy so you will have to use the Radar Screen to determine their position and how many are left
around the city. Press the select button once to view Radar Screen. As soon as you have located your closest enemy, press the “select” button again
to seek and destroy them. The radar screen also contains other vital information that you need to be aware of like: How much fuel is left, and the
number of laser shoots you have remaining.
5.Your mission will be a success if you are able to eliminate your enemy before you are out of fire power and fuel.
6. Be careful and remember your levels or the city will be lost to the enemy.
23
Buzz Bombers
Little Buzz Bombers are barreling down towards your spray can. One blast sends them into
a tailspin and turns them into a Honeycomb. Keep moving and make every shot count our
your spray can could run out. Watch out for the Killer Bees, but if you can spray them the
points will pile up.
1. The First Screen to appear is the name of the game. Press the “Start” Button to begin playing and enjoy the game!
2.You will start with 10 Bees on the first stage and each new stage will add another 10 more Bees. The level of difficulty will increase with each new stage.
3. Each spray can contains 64 sprays. The level of fluid in the can will decrease based on the number of sprays you have used.
4. The Bees will fly down from the top of the screen to the bottom. If a Bee touches the ground than a flower will appear in that spot. The flowers will limit
the side to side movement of the spray can and the Bees you are able to spray. When there is not enough space for you to move you will lose the game.
5. When you have sprayed a Bee it will turn to a Honeycomb. The Bee’s come in two colors: yellow, and white. When you spray a Yellow Bee the Honeycomb
will appear Yellow, and when a White Bee is sprayed the Honeycomb will appear in Red.
6. In addition to the Spray Can you will have help from a Hummingbird. The Hummingbird will eat the Honeycombs.You will receive additional points for the
Honeycombs that are eaten. The point amount will differ based on the level and location of the Honeycomb.
7. Point Values:Yellow Honeycombs on the Bottom of screen - 500 points
Yellow Honeycombs on the Top of screen - 1000 points
RED Honeycombs on the Bottom of screen - 1800 points
Yellow Bees - 100 points
24
Yellow Honeycombs on the Middle of screen - 800 points
RED Honeycombs on the Bottom of screen - 1500 points
RED Honeycombs on the Bottom of screen - 2000 points
White Bees - 200 points
8. If you shoot the hummingbird by mistake he will turn green and fly away. Be careful not to shoot him as this will hurt your point total
9. When you move onto each new stage your spray can is refilled to the top.
10.You will receive an additional Spray Can at every 20000 point interval.
11. The game has up to 9 stages. That means you need to spray 90 Bees and make sure your spray can does not run out.
Thin Ice
Oh no! Duncan is on the Loose! Duncan is a penguin who loves to skate on thin ice, much to the
dismay of the other penguins. As Duncan skates he weakens the ice. If he skates completely around
another penguin…Ker-Plash!..the ice collapses and the penguin falls into the pond. Dunk the other
penguins without coming in contact with the Seal and Polar Bear, and you are the winner!
1. The First Screen to appear is name of the game. Press the “Start” Button to begin playing and enjoy the game!
2. The game will start with 4 Penguins and one Seal. You will control Dunkin as he skates around on the ice creating a White Line behind him. If he is
able to create a square around any Penguin, Seal or Polar Bear, then these animals will fall into the ice and become an ice cube.
3. The object at each stage is to dunk the 4 Black Penguins. However, there is a one Seal that is trying to attack you and has the ability remove your
White Line with a Red one. So, you need to escape from the Seal, and cut the square white line to dunk the black penguin at the same time.
4. When the second stage starts you will also have to beware of the Polar Bear. Do not touch the Polar Bear or you will die. With every new stage you
reach more Polar Bears will come out increasing the difficulty.
5. Don’t worry because you can kill the Polar Bear if you are able to complete a white square around them. They will be dunked into the sea and
become an Ice Cube. In addition, you will also have a Magic Freeze option to slow down the Polar Bear and Black Penguins (not the Seal) for a short
period. During this period, you can pass them without any danger.
6. You cannot kill the Seal. You can only slow him down by making a White Square around him. When he is inside of your white square he will only be
frozen for a short period of time. Then he comes after you again.
7. When the second stage begins there will be some Lobsters on the screen. If you can get them, you will have extra Magic Freezes to freeze the Polar
Bear and the Black Penguin.
8. You will receive points for dunking the Black Penguin and Polar Bear. As well as for Freezing the Seal and Eating the Lobster. In addition, you will
receive a greater amount of points based on the size of the box you cut.
9. If you receive more than 10000 points you will receive a Dunkin Penguin.
10.Your stage level will be indicated by the number of Snow Balls at the top right portion of the screen.
25
Sub Hunt
Enemy convoys are approaching…All have destroyer escorts…Station your subs at
sea…Stalk you targets…Fire torpedoes…Evade surface fire and depth
charges…Sink all of their ships…Good Hunting !!!
26
1. The First Screen that appears is name of the game. Press the “Start” Button to begin playing and enjoy the game!
2. This game contains two screens and the game begins with the Radar Screen.
3. The game begins with a white enemy convoy coming from the left side of the screen. You will control the 4 White Subs on the right side of the
screen. If you press the “A” Button one of your subs will turn Red. By pressing the directional disc up or down you can highlight the sub you
want to deploy. Press the “A” Button again and this sub will come out from the formation. By using the Disc control, you can control the
direction of your sub to approach the White convoy.
4. When the White convoy and your Red Sub touch together you will jump to the Sonar Screen.
5. In the Sonar Screen you will have a Sub Lens on top of the screen which will allow you to see outside of the Sub.
6. Below the Sub Lens, you will have 3 meters.You will need to use these in your attack of the enemy subs.
a) (D) Dive: Use this feature to escape form the enemy convoys. Press the down position on the directional disc to Dive your Sub, and Up to
bring it to surface.
b) (R) Rudder:You can select the direction from the sub lens. There will have 8 different directions to choose from (E, ES, S SW, W, WN, N, NE).
When you have decided your directional path press the corresponding direction on disc that you want to go.
c) (S) Speed: After you have decided your direction, you will need to choose your desired speed. Press the “B” button to select the speed that
you want to go.
7. Below the Meter, you will have a small radar screen that will indicate where the enemy convoys are. You will need to use the different meter
functions provided to approach the enemy subs.
8. When you get close to the convoys your sub lens will show the ships on the surface. You will now be able to fire your sonar weapons at the enemy
ships by pressing the “A” Button.
9. However, when you go up to the surface the enemy ship will be able to see your sub and fire upon it. If your sub is shot several times it will be
destroyed.You may need to dive back down to escape and avoid being eliminated.
10. If your sub is destroyed, then the screen will jump back to the main Radar Screen. The White convoy will keep approaching the staging harbor which
to the top of the screen. If they reach the staging harbor than they will become the black in color. After they become a black convoy they will attempt
to approach the final harbor, which that is the Home Base. If you let any of the black convoy reach the home base you will lose the game.
11. So, you need to keep sending your Subs to stop the enemy convoys from reaching the staging harbor and the home base.
12. There are a total of six enemy convoys that will attempt to approach the home base. If you are able to destroy all of them you will be the winner and
the Screen will display “Game Over”.You may press “A” button to start a new Game.
Thunder
Castle
Guide your knight through the deadly mazes of Thunder Castle. Slay evil dragons, sorcerers and
demons as you go. Watch for gates that block your path…magic objects that grant special
powers, extra points, or extra lives…and magic creatures that energize your knight. Complete the
mazes and the game starts over at a faster speed. Continue playing, increasing your score, until
all of your knights lives have been lost.
1. The First Screen to appear is name of the game. Press the “Start” Button to begin playing and enjoy the game!
2. The game starts with a Forest Maze on the first stage and Castle Maze on the Second stage.
3. There will be one Green Dragon, Two Bats and one Red Knight. You control the movements of the Red Knight as he navigates his way around the
maze.
4. There will have Six Sorcerers and one Mouse in the Castle maze.
5. In each maze there will be Evil Guardians that come in three colors (Green, Yellow and Red). You will start against the Green one. The Evil Guardians
(Dragons) will all have different point values when you kill them (100, 200, 300 points depend on their color). More importantly they can kill your
knight if he hasn’t been energized.
27
6. To energize your knight, touch a magic creature: Bat in forest, mouse in the castle, and the knight can pick up the magic objects. There are 6
Magic Objects that will appear in the maze and grant special powers or more points:
7. The Magic object :
a) Gold Coins: Extra 300 points
b) Ring: Hyperspace
c) Candle Stick: Extra Knight.
d) Grail: Energizes Knight.
e) Lantern: Reduce your sources to half of total scores.
f) Necklace: Speed up the knight.
8. Whenever you obtain 3000 points you will receive an extra Knight to play with.
9. Each magic object appears in the maze randomly and will only stay for a short period of time. So, you must move quickly to pick them up before
they disappear.
10. When you have eliminated all the three Evil Guardians (Dragons), then you will go onto the next stage.
Chip Shot
Super Pro Golf
Hit the links and work on all facets of your game. Go to the Driving Range and practice with
each of your clubs. Perfect your skills around the cup by spending time on the putting green.
When you are ready take these skills to the course. Play 9 or 18 holes which ever you prefer,
or Design your dream course and play.
28
1. The First Screen to appear will be the name of the game. When you Press the “Start” Button to begin playing and enjoy the game!
2. The next screen is the Main Menu where you will have 4 options to choose from (INTV Tourney, Design Your Own Course, Driving Range & Putting
Green). That will test all of your golfing skills.
l INTV Tourney:
• 18 Holes( start to play all the 18 holes, until finish )
• First 9 Holes
• Back 9 Holes
• Main menu: (back to the main menu)
• Design Your Own:
You can create your own 18 Hole Golf Course by selecting from the each of the exciting holes provided. Play your favorites more than once, and skip the
ones that do not favor your swing. Use the SCAN function on the screen to preview all the Holes, and decide which ones you would like to save. After you
saved all 18 holes you can start to play your specially designed course.
• Driving Range
Every great golfer has to hit the Driving Range to perfect their swing and know the distance that they hit each club in their bag.You are no different.
(Hint: Do not draw the club past the end of the scale or you miss hit the ball)
• Putting Green
This is where every great golfer saves strokes. Spend time on the Putting Green to learn your distance and strength to use.
3. After you are done practicing it is time to test your skills and play 9 or all 18 Holes. Select the course and the game will start at the First Hole.
4.You have 14 different Clubs to choose from with different distance potential, hopefully you have practiced with each of them:
• Driver (DR): 240 – 300 yards
• 3 Wood (3W): 220 – 260
• 1 Iron (1I): 210 – 220
• 2 Iron (2I): 200 – 210
• 3 Iron (3I): 190 – 200
• 4 Iron (4I): 180 – 190
• 5 Iron (5I): 170 – 180
• 6 Iron (6I): 160 – 170
• 7 Iron (7I): 150 – 160
• 8 Iron (8I): 140 – 150
• 9 Iron (9I): 130 – 140
• Pitching Wedge (PW): 120 – 130
• Sand Wedge (SW): 110 – 120
• Putter: For Putting
5. The “A” and “B” buttons are used to hit the ball.
6. The “Start” Button is to return the main menu.
7. “Select” Button to display the Score Screen which to tell your score at each hole.
8. Press the directional disc Left or Right to position the “X” in the direction you what the ball to travel. The ball will automatically follow this path so make
sure it is correct before hitting the ball.
9. To make your club selection press the UP or Down position on the directional disc until your desired Club is displayed in the box.
10. Now that you have chosen the direction of the ball and the club to use it is time to hit the ball. Press down the “A” or “B” Button to the desired strength
and then release the button. However, if you need more practice go back to the driving range.
11. Once you have reached the Putting Green the screen will change, and provide you with the distance to the hole and the number of shots you have
already hit for that hole.
12. Put the ball into the cup and move onto the next hole.
13. Continue these same steps until your round is over.
14. Have a great round!
29
Vectron
Hungrees, G-spheres, splits, sweeps and prisms – the nasties are back again, and they are nastier
and tougher than ever! This time they are out to stop you from constructing the energy bases that
build your score, level by level. The higher the level, the harder the nasties are to fend off. Rack up
the highest score before the nasties destroy your energy blocks or you run out of energy.
30
1. The First Screen to appear is the name of the game. Press the “Start” Button to begin playing and enjoy the game!
2. This game has 4 stages, and you will need to complete 4 different patterns on each stage to move to the next.
3. When the game begins you will have a green square in the middle of screen. You can use the Directional Disc to move the square around, and than
you press the “A” button to shoot at this square. When you shoot and hit the square four plates will fill the inside of that square. Now you can move
to next position, to create another 4 plates. These plates together will form a special pattern. After you create the correct pattern you will go onto the
next stage.
4. However there will be a Red and Yellow Bird (Red Hungrees and Yellow Hungrees) that will be flying around trying to destroy the plates that you
create.Your only defense is to shoot them, but this will only stop them for a moment.You will need to keep them at bay while creating you pattern.
5. Remember that the clock is ticking and you could run out of energy before your pattern is complete. You might need some extra energy to complete
the pattern. If you shoot down the E-Pak you will be re-energized. Also look out for yellow bird coming across the screen as you can shoot them for
extra energy as well.
6. There are 3 directions in which you can shoot an energy blast, which are the 3 directions on the lower half of the directional disc, and than press “A”
Button. Energy blasts are fired from the “V-gun” at the top of the screen. You aim and fire SIMULTANEOUSLY. To do this press the OUTSIDE EDGE of
the disc in the direction you want to fire.
7. To move the Energy Block (Green Square), press the “B” Button first and than press the Disc to move the block to the position you want to go.
8. On the screen there is a G-Sphere, which generates the Hungrees. When red it creates the Red Hungrees. When yellow, it creates the yellow
Hungrees.
9. When you complete a game level, the energy block you are currently playing is restored to full capacity, and you can begin playing the second stage.
Tower Of
Doom
Monsters, Magic, Good, Evil, Strength, Cunning, Traps and Mazes. Prepare to Face the
greatest challenge any mortal has ever known…The Tower of Doom! Explore the winding
corridors of the Tower, collect precious treasure, discover the secrets of magic, artifacts,
and encounter the vilest creatures ever unleashed. Select your adventure. Choose your
character. Then prepare to enter The Tower of Doom!
1. The First Screen to appear is the name of the game. Press the “Start” Button to begin playing and enjoy the game!
2. You begin at the top of the Tower of Doom and work your way down through numerous mazes to freedom. Some adventures have more obstacles and
will take longer.
3. Press the “B” Button when you get in the maze and meet some Dragons. This will allow you utilize your sword to fight them off.
4. The Screen is divided into several sections, each giving vital information.
• The largest section shows your immediate vicinity within a level, along with nearby weapons, treasures, doors, traps, stairs, and monsters. As you
explore new areas of a level, the walls of the corridors and rooms will appear. They remain visible when you return to areas you’ve explored. If you come
face to face with a monster, the map is replaced with a view of the battle.
• In the upper left corner of the screen is the LEVEL MAP. This map shows the areas of the level you have explored, with your current position indicated
by a white dot.
• At the middle left of the screen are three rows of symbols.You can use the symbols in the top row to find out your status, to select items from your
pack, to use items, and to open doors and to descend stairs. The second and third rows show the items you are currently carrying in your pack.
• At the bottom of the screen, these levels indicate how much injury you can sustain before dying.You lose points as you are hurt in battle.You gain
them back over time as you heal.
5. The primary function of the controller is to navigate your moves through the maze, and use the Sword to kill the monster.
6. To find out how well you did, you can look at your treasure Source. But the REAL test of how well you did is: Did you escape…ALIVE?
31
Pinball
It’s back to the arcade and there are no quarters required! All you need is good aim
and precision control of the flippers. Hit the targets, light up the screen and at the
same time your score will be racking up. Don’t bump to hard or you might just tilt
the machine.
32
1. The First Screen will project the name of the game. Press the “Start” Button and the Menu Screen will appear.
2.You will now have the option of choosing between 1 or 2 players. Press Left and Right Disc to select the number of players. After you have determined
the number of players Press the “A” button and enjoy the game!
3. Controls:
Down Position on Disc: Press lower part of the Disc to draw the Pull Plunger back. Release the disc to shoot the ball into play. The Longer you hold
Disc Down, the Faster the ball will go.
4. “A” Button: Right Flippers.
5. “B” Button: Left Flippers.
6. There are two different layouts. Each has its own unique bumper and point scoring opportunities.
7. The Second Screen does not have ball launching option.
8. Cartoon animals (Dogs) at the bottom of the screen tell you who’s up. When the Left animal blinks, it’s the 1st player’s turn. When The Right animal
blink than it’s the 2nd player’s turn.
9. The bottom left hand portion of the screen will display the 1st player’s score and on the bottom right will display the 2nd player’s score.
10. The upper portion of the screen will display the number of the balls you have remaining.
11. When the number of the balls remaining reaches 0 than the game is over. Play another game and get the high score.
Slam Dunk
Super Pro
Basketball
Dribble, Pass and Shoot you way to Victory! Offense and Defense is how you win games. Be
a team player and pass the ball to the open man. Keep your hands up and play hard Defense
too. When the clock runs out your team will should come out on top. It will be a Slam Dunk!
1. The First Screen will project the name of the game. Press the “Start” Button and the Menu Screen will appear.
2.You need to select the player of your team and the player of the computers team.
3. When you have selected all the players than Press “A” to start, and enjoy the game!
4. Direction Disc: controls the highlighted (Orange) player.
5. “A” Button + Disc: Passes the ball direction that you have pressed.
6. “B” Button + Disc: Shoots the ball at the basket (each basket is equal to 2 points)
7. On the upper middle portion of screen is the scoreboard. This will provide you with the score for each team, time left in the quarter, and the 24
second clock.
8. If the offensive team maintains the ball more than 24 seconds the ball is surrendered to the defensive team.
9. There are (4) 12 minute quarters in the game. When this time runs out the game is over.
TM
© 2003 Techno Source
All Rights Reserved
30 Canton Road
Kowloon, Hong Kong
Made in China
© 2003 Intellivision Productions, Inc.
All Rights Reserved
Intellivision is a trademark of Intellivision Productions, Inc.
Original games have been modified for optimal play on this device
Visit us at our website : www.intellivisionlives.com