1
The complete
USER'S
MANUAL
Trademarks
Compucon has made all possible efforts to supply trademark information about company names, products,
and services mentioned in this manual. Trademarks indicated below were derived from various sources:
Compucon is a registered trademark of COMPUCON Computer Applications S.A.
MS-Windows is a trademark of Microsoft Corporation.
Windows, Windows 95, Windows NT are trademarks of Microsoft Corporation.
MS-DOS is a trademark of Microsoft Corporation.
IBM is a registered trademark of International Business Machines Corporation.
Hewlett-Packard is a trademark of Hewlett-Packard Company.
Microsoft Visual C++ V4.1 is a trademark of Microsoft Corporation.
PC is a trademark of International Business Machines Corporation.
Intel is a trademark of Intel Corporation.
80486 is a trademark of Intel Corporation.
Pentium is a trademark of Intel Corporation.
ZSK is a trademark of ZSK Stickmaschinen Gesellschaft mbH.
Tajima is a trademark of Tajima Industries Ltd.
Barudan is a trademark of Barudan Co. Ltd.
FMC is a trademark of Barudan Co. Ltd.
FDR is a trademark of Barudan Co. Ltd.
Pfaff is a trademark of its respective owner.
Melco is a trademark of Melco Industries Inc..
Marco is a trademark of its respective owner.
Contents
1. Getting Started-Setting up the System
1.1 Contents of package-Accessories
1.2 Additional required Accessories(not provided)
1.3 Minimum System Requirements
1.4 Installation of the “Sew-Ware Conversion Tool”
Software
1.5 Handling CD-ROMS
1.6 Using “Sew-Ware Conversion Tool ” User’s Manual
1.7 “Sew-Ware Conversion Tool” Help Features
2. Working with Files
1
1
2
2
3
7
7
8
9
2.1 Load Design
2.2 Catalog
2.3 Close Design
2.4 Save
2.5 Save As
2.6 Read from machine Disk
2.7 Reading procedure
2.8 Types of machine Disk
2.9 Printing Designs
2.10 Customize Print Properties
2.11 Design Options
2.12 Mask
2.13 Design’s Mask
2.14 Company Logo
2.15 Company Logo Properties
2.16 Designs Settings
2.17 Size Properties
9
9
10
10
10
10
10
11
12
12
12
13
13
13
13
13
14
3. Transmit to Sewing Machine
15
3.1 Transmit a design to the Singer XL-5000/
XL-6000 sewing machine
3.2 Transmission of big embroidery designs to
XL-5000/XL-6000 Sewing machine
3.3 Procedure of downloading designs to the
XL-5000/XL-6000 sewing machine
3.4 How to adjust thread tension “manually”
4. Modifying designs
4.1 Center Design
4.2 Clean Up
4.3 Stitch Colors
4.4 Changing the background color
5.Redraw process
5.1 Controlled Redraw
5.2 Redrawing tools
15
16
17
18
19
19
19
19
20
21
21
21
I
6. Working on screen
6.1 Zoom
6.2 Stitch Ends
6.3 Ruler
6.4 Grid
7. System Parameters
24
7.1 System Parameters
24
8. Toolbar
25
Index
26
8.1 Using Toolbar
II
22
22
22
22
23
25
1.
Getting Started –Setting up the System
Thank you for using the “Sew-Ware Covnersion Tool” software.
This software has been especially designed to allow easy and direct transfer of your
embroidery design from your PC to the XL-5000/XL-6000 Sewing machine.
All you have to do is simply open the desired design from the “Sew-Ware Covnersion
Tool” software and transmit it to the XL-5000/XL-6000 machine.
All popular embroidery formats are available to allow you to import almost any design
obtained.
What is more, “Sew-Ware Covnersion Tool” includes a number of very useful editing
functions allowing to clean it up, center it or even change it’s colors.
Please study through the pages following in this manual in order to get familiar with all
the features and functions of this software.
1.1
Contents of package-Accessories
One (1) CD containing the “Sew-Ware Conversion Tool” software.
“Sew-Ware Conversion Tool”
Software 1 piece
1
1.2
Additional required Accessories (not provided)
In order to connect your personal computer to the XL-5000/XL-6000 sewing machine and be able
to send designs via the “Sew-Ware Covnersion Tool” you will need to purchase separately one
Serial Cable.
Serial Cable
1 piece
This can be purchased at any shop selling computer or electronic accessories.
Please ask for a serial cable with the following description:
"Null Modem RS 232 DB9 Male - DB9 Female" (max. 5m)
1.3
Minimum System Requirements
The following is a list of minimum hardware requirements for “Sew-Ware Covnersion Tool”
PC fully (100%) compatible computer with a PENTIUM II processor.
A minimum of 64 MB RAM.
Standard CD –ROM drives.
A hard disk with a minimum of 500MB of free space. The more space that is available, the
more stitches that can be stored on the hard disk. However, the program itself requires at least
70MB of free hard disk space to run plus an additional amount of space for the Windows
operating system.
Color standard (640X480 pixels, 16colors) VGA adapter connected with a color VGA
monitor (1024x768 pixels, 65,000 colors recommended).
A Microsoft compatible mouse attached to an available port of the PC (usually COM1). The
mouse is a pointing device necessary for proper navigation within the program.
Standard IBM serial card COM (for connection to XL-5000 /XL-6000 sewing machine ).
“Sew-Ware Conversion Tool” software is compatible with Windows 95(TM);, Windows 98(TM) ,
Windows NT(TM) operating system, Windows 2000(TM), Windows ME(TM), Windows XP(TM)
operating systems.
2
1.4
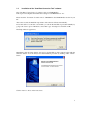
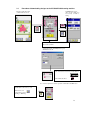
Installation of the “Sew-Ware Covnersion Tool” software
The “Sew-Ware Covnersion Tool” software comes on a CD-ROM disc.
In most personal computers the default drive setting for a CD-ROM drive is “D:”
Please insert the “Sew-Ware Covnersion Tool” CD-ROM into the CD-ROM disc receiver in your
PC.
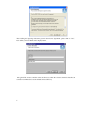
After some seconds, the Installation procedure of the software will start automatically.
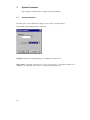
In case this will not occur after a short while, you can run the installation procedure manually by
going to the “Start” option of Windows, select “Run”, type “D:\setup.exe” and click on OK.
The Setup windows appear next.
Immediately after the Setup window, the step by step installation of the software begins with the
Welcome window. You can always abort the installation procedure by clicking on the “Cancel”
button.
Click on “Next” to move on the next screen.
3
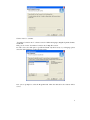
After reading and agreeing with terms given in the License Agreement, please click on “Yes”.
Now define your User Name and Company Name,
and again click on Next, and then select the directory where the software should be installed. It
would be recommended to use the default selected directory.
4
Click on “Next” to continue.
“Sew-Ware Covnersion Tool” software comes in 4 different languages: English, Spanish, German,
and French.
This goes also for the “Sew-Ware Covnersion Tool” Help files section.
In order to use as less disk space as possible and install only the necessary to you language, please
select the desired language on the following screen:
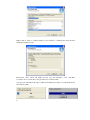
Now you are prompted to select the Program Folder where the shortcut for the software will be
stored.
5
Simply click on “Next” to continue. Finally you are requested to confirm all the selections made
during the installation set-up.
Pressing the “Next” button will finally start the copy and installation of the “Sew-Ware
Covnersion Tool” software files to the given directory on the hard disk.
A progress bar will indicate the stage at which the installation procedure is. It will finish when it
has reached to 100%.
6
When finished you will be prompted that the procedure has finished installing the software. It
would be advisable to reboot your computer at this stage by selecting “Yes, I want to restart my
computer now.”
If the installation utility identifies a lack of available space on your hard disk, an error message
will prompt you to free some hard disk space before proceeding with the installation.
You can always abort the installation procedure by clicking on “Cancel”.
Note : If for any reason you would like to uninstall the software, select from “Start” -> “Settings”
-> “Control Panel” -> “Add/Remove Programs” icon. From the appearing window scroll down
until you find the” Sew-Ware Covnersion Tool” option and click on the “Add/Remove” button.
1.5
Handling CD-ROMS
CD-ROMs are an excellent media for holding information. A typical CD can hold up to 650 MB
of storage space and access time is relatively fast.
In the uncommon event that you experience any difficulty installing the program from your CD,
please make sure that the CD Drive itself is in proper working order.
In addition, please check that the backside of the CD (where the data is stored and no information
is printed on) is perfectly clean and free from dirt, dust, and greasy marks, including fingerprints.
1.6
Using “Sew-Ware Covnersion Tool” User’s Manual
In the following pages you will receive detailed explanations on the functionality and use of all the
incredible functions and features included in the “Sew-Ware” software. Please make sure to study
through all the pages provided in this manual.
7
1.7
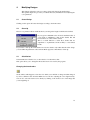
“Sew-Ware Covnersion Tool” Help Features
While working with the software it is also possible to receive valuable information and support
from the software itself, with use of the “Sew-Ware Covnersion Tool” Online Help.
To display the table of contents, choose Help>Contents. Clicking on the Contests option
prompts the program to activate the Windows Help feature, and displays a menu window with
the available help topics.
To access help for the current content on screen, place the mouse pointer on the menu or
toolbar and then press F1 on the keyboard.
Select Help>Search and type a subject name. The available subjects are displayed in a table.
8
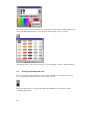
2.
Working with Files
This chapter introduces the basic functions of how to read designs from the hard disk or
from machine disk, write designs onto the hard disk and print the on screen design.
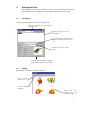
2.1
Load Design
Select an existing design from your hard or floppy disk.
Select the specific Drive in which designs
are being stored
Preview the design icons next
to their names.
If you already know the name of your
design you can type it in the File text
box
Select the type of file you want
to load
Press the Catalog button to display a
page of the design'
s icons on screen
2.2
Catalog
Press the Catalog button to view the design icons.
View your designs
in large icons
View your designs in
small icons
Double click on a
design'
s icon to load
the desired design
9
2.3
Close Design
Select Files>Close to close the current working design. If you haven’t already saved the changes
you made, the program prompts you with a window message to save them.
2.4
Save
Select Files>Save, to save your current design onto hard disk under its current file name (as it
appears at the top of your screen).
2.5
Save As
Select Files>Save As, to save your current design under another name.
2.6
Read from machine disk
Choose Files>Read from machine disk.
Delete a design
Select this button to
start the reading
procedure
Free Space bar displays the
number of the free space,
left for extra stitches on the
selected disk type
Some disks types provide also
information about the channels in
which the specific design is being
kept
Copy the selected
Select
the
Select all the
designs
required
designs from
machine disk
a machine
type
Select this button and the
program
attempts
to
identify the disk type if you
are not sure about it
2.7
Displays the name of the
designs that are being included
on the selected disk type and
also the number of stitches
Reading procedure
Select the machine disk type and choose the design you wish to read.
Select Read and the program will load the chosen design into memory.
If you select the wrong disk type, the program will display an error message, informing you
about the wrong disk type.
If you are not sure about the disk type, select Identify and the program will attempt to identify
the disk.
10
Select a design of a particular machine format and choose Delete to erase the design. If you
select more than one designs, the Delete button is disable meaning that you can not continue
to a mass deleting procedure.
If you have a disk that includes one or more designs, you can select one (press “Ctrl” and use
the left mouse button to select the desired design) or select all of them by selecting All.
Choose Copy to copy the selected designs.
Select Exit to return to the Read Design dialog box.
2.8
Types of machine disks
Machine code:
Type of diskette required
MELCO DOS
MELCO
TAJIMA_DOS
ZSK
ZSK_DOS
2HD
2DD
2DD or 2HD
2DD
2DD or 2HD
Melco Formats
There are two formats available for Melco
MELCO Superstar must use 2DD diskettes.
Due to the nature of the MELCO Superstar format, your computer must be equipped with a disk
controller card that allows reading in single sided, single density format in order for the procedure
to work successfully.
MELCO DOS must use 1.44 KB (2HD) diskettes.
11
2.9
Printing Design
The Print dialog box contains all the necessary controls you’ll need to choose the exact set-up of
the final printout. It also acts as a preview window for the final printed design. You can manipulate
and customize every aspect of the page or pages that will be printed.
Print dialog design
Choose font for information layout
Customize the
Printer page size
Displays
common
Windows
printer
set up
dialog
box
Exits the
printing
procedure
Maximize
your design
on screen
for better
view
2.10
Customize Print properties
Customize the printer page size (in case you have an unknown, non-standard printer), and set
the page margins and the number of copies you want to print. From the same dialog box, one of
three drawing modes can be chosen for the design, relative to the line width and the colors that will
be displayed on the printed page. By clicking on Set Default, the default value for each property
will be displayed. At the bottom of the dialog box, you can either enable or disable the warning
that appears if the printer has limited capability for rendering (printing the exact color shading of
your design).
2.11
1.
12
Design Options
Tiles If a design is too large to fit on one sheet of paper, you can tile the printout so the
printer will use more than one sheet to print out the design at original scale. Simply click on
the tile option to choose the desired print layout.
2.
Sets the scaling factor to 100%. In this case, the actual printed size is equal to the
physical size of design (if the paper size is large enough).
3.
Zoom maximizes the design to cover the maximum printing area available for the
selected paper size in the print Setup.
2.12
Mask
When the Mask checkbox is disabled, the design information will not appear and cannot be
printed.
2.13
Design's Mask
When you click on the checkbox for the second time (middle gray state), a small text box will
appear containing basic design information.
The box can be moved anywhere in the printing area of the paper. Just click on it with the left
mouse button and drag it to another location. The information in this option gives you:
Design name.
The number of stitches in the design.
The dimensions of the design.
The total length of thread (in meters) used in this design.
The scale of the printed design to the original artwork.
Then number of applique blocks.
The needle color sequence. Note: If a thread color changing becomes from a Stop Code you
can view beside the color number and a small letter "s" that represents the code.
2.14
Company Logo
Enable this checkbox and a frame with the sign of Company Logo printed on it will appear. Click
anywhere inside the frame and drag it to the desired location on the page. Press the right mouse
button and the logo can also be relocated.
2.15
Company Logo Properties
Press the Logo Company button and in case you wish to insert another image (.bmp file) from your
storage device (diskette, hard disk, CD-ROM, etc.) select the Change Logo button.
Click on OK and the desired logo will appear in the Printing Design frame.
If you wish to Maintain the aspect ratio when resizing the company logo frame you can enable the
respective checkbox.
2.16
Design Settings
Frame: Checking this option will draw a box around the design (When you have enabled the
Mask checkbox the Frame option is disabled because the program sets a frame around the whole
page of your printing area and not only around your design.)
Color: Checking this option will display the design on single color on the screen.
Note: If you have a monochrome printer, you must switch off the “colors” option (by removing the
check mark).
13
Origin and End Point: Displays and prints the origin point (with +) and the ending point (with X)
of the design.
Points: Displays and prints the stitch penetration points in the design.
2.17
Size Properties
Size “Natural:” Displays the original dimensions of your design.
Size “Current:” Displays the current printing dimensions of your design.
The “%” box shows you the scaling of the print preview to the original size of the design. You can
type an arbitrary scaling factor in the % Edit field and press Enter to display and print the design at
the desired scaling.
14
3.
Transmit to Sewing Machine
This chapter you will teach you how to transmit a design directly from the “Sew-Ware
Covnersion Tool” to the XL-5000/XL-6000 Sewing Machine.
3.1
Transmit a design to the Singer XL-5000/XL-6000 sewing machine
“Sew-Ware Covnersion Tool” Software provides you with the unique ability to directly transmit a
design to the XL-5000/XL-6000 sewing machine.
There are two different ways of direct transmission of a design to the XL-5000/XL-6000 sewing
machine.
Before doing this however please be noted to connect the Serial Cable (not provided, to be
purchased separately) with the Serial Port on your PC (COM) and also the Serial Port of the
sewing machine.
In order to transmit a design to the sewing machine, the design has to be opened in the “Sew-Ware
Covnersion Tool” software.
From the menu option “File” select the option “Send to machine” and the following window will
appear
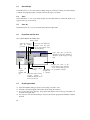
1.
2.
3.
4.
Select the Port the sewing machine is connected to.
Define the “Bits per second” parameter (also referred to as “Baudrate”).
This value defines the speed at which the “Sew-Ware Covnersion Tool” software will transmit
the design to the sewing machine and the speed at which the machine will accept it.
The “Bits per second” value at the software side has to have the same value as the “Baudrate”
value at the sewing machine side, in order to be able to transmit a design to the sewing
machine.(for details on how to set up the “Baudrate” of the sewing machine please refer to
your XL-5000/XL-6000 sewing machine instructions book)
When ready, click on the “Wait to send” button and at the same time go to your sewing
machine and request to receive it (please study related section in XL-5000/XL-6000 sewing
machine instructions book).
After requesting the design from the sewing machine side, “Sew-Ware Covnersion Tool”
software will start sending the design data to the XL-5000/XL-6000 machine.
A progress bar both at the machine and also the software side will indicate the action in
progress. When all of the transmitted data is received, the progress bar will stop indicating the
transmission and you will be able to use your design on the sewing machine side, in the same
way as any other design read into the machine.
15
3.2
Transmission of big embroidery designs to XL – 5000/XL-6000 sewing
machine
When transferring enormous volume of embroidery data to sewing machine (very big designs),
there might be the case of that the sewing machine will not be capable to correctly edit the related
data and display a “Memory full” message icon.
In this case and in order to avoid this situation, please follow the below mentioned procedure:
Put the embroidery data of the big design in the temporary saving memory of the machine first,
then turn off and turn on power of the machine, or go to the editing screen then turn off and turn
on power to machine and then use power fail function. Then you may continue to download data
and you will be able to edit this data on the machine screen without any problem.
16
3.3
Procedure of downloading designs to the XL-5000/XL-6000 sewing machine
Set BPM(transfer speed)
*One save the setting it is
not necessary to make resetting
Transfer regular pattern data
(1) Pattern selector screen
On “Sew-Ware Covnersion Tool” side, Click on
File Send to machine
*Adjust the machine side BPM(transfer speed)
XXX Bits Per Second
1.On “Sew-Ware Covnersion Tool” side, Click on
2.On machine side, Press
As soon after completion of transfer procedure it will return to GUIDE screen
At the time transferred data is selected
It will return to the screen (1) or (2)
With this icon on
pattern selector screen
it will go to EDIT step
17
3.4
How to adjust thread tension “manually”
The sewing machine has an automatic computer controlled thread metering system.
As for the design transferred to the sewing machine with " Sew-Ware Conversion Tool",
a set-up of a thread condition is set up in the strong stitch to show stitch beautifully.
If, when thread tension is too severe or a trouble such as thread breakage occurs while sewing,
Set up thread tension in the favourite strength with the following process.
Tension is shown on a "pop-up" screen accessed by pressing key .
Press
to decrease
needle thread tension.
Thread tension decreases
in eight steps.
* To return the thread tension to the automatic setting, press the
center of the tension pictogram .
For example touching the –8 will
return the machine to automatic tension setting
18
4.
Modifying Designs
This chapter will teach you how to center a design and clean up the small stitches.
The specific chapter also provides you with the necessary information about adjusting the
color parameters
4.1
Center Design
Clicking on this option will center the design according to the frame center.
4.2
Clean Up
The Clean Up function deletes small stitches in your design, the length of which can be defined.
If you type in a minimum value of 0 and a maximum value of
3 (in tenths of millimeters), then all the stitches that fall
between these two values will be deleted.
This is a useful function to delete those stitches that are
superfluous to requirements and more likely to cause thread
breaks.
If you wish to clean up the small stitches in a block of stitches only rather than the entire design,
you can define the parameters values from the Block properties > Parameters> Clean up.
4.3
Stitch Colors
Select Parameters > Stitch Colors, or the related tool on the main toolbar.
This option allows you to change the thread and screen colors used by the program.
Changing the thread colors
On the window which appears, select the color which you would like to change and then change it
by select a different value from the RGB color bar and also adjusting the colors light intensity.
You can also select the desired color directly by clicking on the desired color on the image that
you are digitizing on.
19
The colors can also be selected with the use of the thread catalogue. Select the thread palette and
click on the Thread palette button to view and select from the range of colors provided.
After having set the colors for the various parts of your design click on OK to confirm the changes.
4.4
Changing the Background color
In order to change the background color of the working environment of “Sew-Ware Covnersion
Tool”, simply click on the related button on the “Colors” window.
Then select the desired color for the background from the RGB color bar and click on OK to
confirm the change made.
20
5.
Redraw
This chapter describes how to redraw one design on screen and control the redrawing
process.
5.1
Controlled Redraw
Select Choices>Controlled Redraw or press Shift+R.
This function will hide your design, and the redrawing tools will appear.
5.2
Redrawing tools
Press to remove the design from the screen and redraw it from the beginning (or press
“Home”).
Press to remove the design, color by color, from the screen (or press “C”).
Press repeatedly to remove the design, block by block, from the screen (or press “Page
Up”).
Press repeatedly to remove the design, stitch by stitch, from the screen (or press “ ”).
Press once to start redrawing the design (or press “Enter”).
Press once to stop redrawing the design (or press “S”).
Press repeatedly to draw the design, stitch by stitch, on your screen (or press “ ”).
Press repeatedly to draw the design, block by block, on your screen (or press “Page
Down”).
Press repeatedly to draw the design, color by color, on your screen (or press the space
bar).
Press to redraw the design until the end (or press “End”).
Press to delay the redrawing speed of your design (or press “+”). There are up to five
speed stages so whenever this particular tool is selected, a new dot will be added on its
right.
Press to terminate the redrawing operation.
21
6.
Working on screen
This chapter tells you how to manipulate your designs on screen.
Learn how to enlarge any part of the design, highlight stitch points, measure your designs
and many other useful functions.
6.1
Zoom
Select Choices>Zoom or press '
Z'
.
Enlarge any part of the design on screen with the Zoom function. It works by dragging a constantshaped rectangle (using the mouse) across the area you wish to zoom.
The zoom rectangle appears with a click of the left mouse button, at which point the mouse pointer
will change to a magnifying glass with a plus (+) sign.
To zoom in, press the left mouse button once, move the pointer diagonally across the area to
be enlarged and press the left mouse button again to confirm the area. Or click the left mouse
button and drag it across the area.
To zoom out, click the icon on the toolbar for zoom out, (magnifying glass with a minus sign)
and click the left mouse button and move the pointer across the desired area (same as for
zoom in).
Press '
Z'twice or select the Fit in screen icon to maximize the design or image to full screen.
Press the '
Ctrl + Page Up'keys to magnify your design or image bring the image or design
closer.
Press '
Ctrl + Page Down'to reduce the design or image (zoom out).
Press the Actual zoom (1:1) tool to display your design in the original created size.
Note: When you select the Zoom function you can press the right mouse button and from the right
pop up menu you can zoom in, zoom out or fit on screen.
6.2
Stitch Ends
Select Choices>Stitch ends or press '
P'
.
This function highlights each stitch point on the screen with a white/black dot making it easy to
see the position of the stitch on screen.
Note: The color of the stitch ends depends on the selected screen color.
Click once on '
P'to highlight the stitch points.
Click again on '
P'to display the stitch points with bold dots.
Press the same key for the third time to disable the dots.
6.3
Ruler
Select Choices>Ruler or press '
Q'
.
Selecting Ruler will prompt you with a display in the status bar at the bottom of the screen.
Press the left mouse button once to define the point from which you want to start measuring or
click and drag from one point to another.
Move the mouse pointer to the point at which you want to stop measuring.
The message at the bottom of the screen will constantly monitor and display your movements
where:
22
D displays the distance between the two selected points
X displays the horizontal distance traveled
Y displays the vertical distance traveled
Press “Esc” to terminate the operation
6.4
Grid
Select Choices>Grid or press W.
Select this function to display grid points on the screen as a visual aid.
Choose the type of the grid points and adjust the point'
s distance vertically and horizontally in
tenths of a millimeter.
Press this button to maintain the aspect ratio (x,y) of the grid.
23
7.
System Parameters
In this chapter you will learn how to define the system parameters.
7.1
System Parameters
From this option you can define basic settings of your system, as described below:
Select Parameters>System Parameters or press F2.
Language: Selects the working language for “Sew-Ware Covnersion Tool”
Unit systems: “Sew-Ware Covnersion Tool” gives you the option to work either in inches or in
millimeters, by setting this option (refers to rulers, measuring distances etc.)
24
8.
Using Toolbar
Learn how to use the screen toolbar for quick access to program function
8.1
Using Toolbars
“Sew-Ware Covnersion Tool” has a toolbar to provide easy access to the most commonly used
functions. All of the functions performed by the toolbar icons are also performed by pull-down
menu options. You may find that it is easier to use the menus when starting out. As you gain
proficiency the tool-bar icons can save many steps in performing repetitive tasks.
“Sew-Ware Covnersion Tool” starts off with the toolbar displayed below
Press to save
The current
image to disk
Undo
Zoom
Select the desired printer
make all the necessary
Displays the current mouse adjustment for printing your
position in relation to the left top image
corner of the screen
Transmit a
design to
machine
Displays the current
number of stitches in
the active design
25
Index
A
Adjust thread tension “manually”
B
Background color
18
20
C
Catalogue
Center Design
Clean Up
Close Design
Contents of package-Accessories
Controlled Redraw
D
Design Options
Design Settings
Downloading designs to the XL-5000/XL-6000
sewing machine
G
Getting Started
Grid
I
Index
Installation of the “Sew-Ware Covnersion Tool”
Software
L
Load Design
M
Mask
Modifying designs
P
Printing Design
Company Logo Properties
Company Logo
Customize Print Properties
Origin and End Point
Points
Size Current
Size Natural
Size Properties
R
Read from machine disk
26
9
19
19
10
1
21
12
13
17
1
23
26
3
9
13
19
12
13
13
12
14
14
14
14
14
10
Reading procedure
10
Redraw process
Ruler
21
22
Save As
Save
Stitch Colors
Stitch Ends
System Parameters
System Requirements
10
10
19
22
24
2
S
T
Thread Color
Toolbar
Transmit a design to the Singer XL-5000/XL-6000
Transmission of big embroidery designs to XL-5000/
XL-6000 Sewing machine
Types of machine disks
Melco Formats
U
19
25
15
16
11
11
Using “Sew-Ware Covnersion Tool” User'
s Manual
Using Toolbars
7
25
W
Working on screen
Working with Files
22
9
Z
Zoom
22
27
License Agreement
To the user:
This is a license agreement between you and Compucon S.A., established in 14th Klm Thessaloniki /
Moudania Road, P.O. Box: 445, P.C.: 57001 THERMI, THESSALONIKI, GREECE, which grants
you the right to use this software, sold under registered trademark "Compucon".
Buying this software package, you irrevocably accept the terms described underneath.
1. Compucon S.A. grants you the non exclusive, non transferable right to use one copy of the
Compucon Software product ("Software"), acquired with this License, on a single computer only. In
case that you wish to install the Software on a network server you should either acquire a number of
Software Licenses equal to the number of computers on which the Software will be distributed and
used, or a group license. In this case the number of persons using (simultaneously) the Software
should not exceed the number of Licenses you have been granted. The software is in use on a
computer when it is resident in memory (RAM) installed on a hard disk or other storage device.
Software installed on a server for the only and exclusive purpose to be transferred to the workstations
or terminals is not considered "in use" according to this license.
2. The Software is owned by Compucon S.A. and is protected by International Copyright Laws,
International Treaties and Greek Law on Copyright (Law 2121/1994). You acknowledge the
copyright ability of the software.
3. You are not allowed to copy or in any way reproduce the Product's manual or other written
materials supporting the software.
4. Your right of use the program allows you only loading and running of the program according to its
intended purpose. You are not allowed to adapt, translate or otherwise alter the program, to distribute
it by any means or electronically, or rent, lease or licence it. No other rights are assigned to you than
the herein explicitly mentioned.
5. You are not allowed to bypass, circumvent or remove any copy protection mean.
6. You may not reverse engineer or decompile the software, since it contains secret, valuable know
how of the right holder. This does not affect your rights under any legislation implementing the EEC
Directive on the Legal Protection of Computer programs.
7. The violation of articles 1,2 and 4 entitles the licensor without any further notice to terminate this
agreement as well as any accessory maintenance agreement with the licensee concerning the
maintenance of this software. In case of termination the licensee has to erase or destroy the original
diskettes or return them to the licensor, return the protection key to the licensor, erase any other copy
of the program and return the whole documentation of software.
8. The user of the program cannot reproduce or distribute the program or part of it for private or
commercial purposes. The licensee is not entitled to remove or alter any proprietary rights of the
program like the copyright notice or the logo of COMPUCON.
9. Under no circumstances will COMPUCON be liable for direct, indirect or consequential or any
other damage or loss of data arising out of the use or inability to use the Software or the user
documentation, even if advised of the possibility of such damages.
To the extend that national applicable law does not allow the exclusion of liability for any kind of
damages, Compucon's liability in no case shall exceed the amount paid by you for the Software
license upon the condition that the user returns all the original diskettes, hardware equipment and
devices, including the protection key, returns all documents provided by Compucon and erases all
existing copies of the program in every possible storage mean.
Compucon warrants that the software will perform substantially in accordance with the
accompanying User's manual. Any Compucon's supplied hardware and electronic devises
accompaning the Software will be free of defects in materials under normal use and service.
Compucon however makes no other warranty of any kind either express or implied that the program
product is free of errors. No Compucon dealer, distributor, agent or employee is authorized to make
any modification or alteration to the warranty or liability provisions.