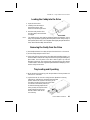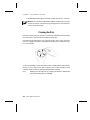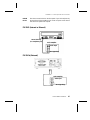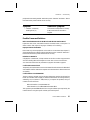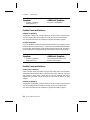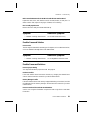
1
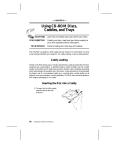
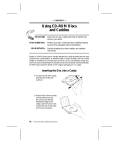
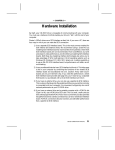
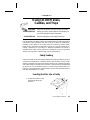
---- CHAPTER 10 ----
Using CD-ROM Discs,
Caddies, and Trays
YOUR TASK:
Learn how to handle, load, and care for your discs.
YOUR OBJECTIVE:
Protect your discs. Insert and eject discs properly so
your drive operates without interruption.
YOUR METHOD:
Practice loading discs into caddies and trays.
Until the release of the 12PleX, Plextor only manufactured drives with caddy loading
mechanisms. Many applications and users continue to require the performance,
protection, and/or mechanics of a caddy. Plextor will continue to produce caddybased drives to meet these requirements. However, the consumer market has expressed a preference for tray loading. To address that preference the 12PleX is
available in both caddy and tray versions. For information on using a tray loading
12PleX, go to page 43. For caddy loading, continue reading below.
Caddy Loading
Plextor’s CD-ROM drives use an industry-standard disc caddy to protect the disc from
scratches and contamination. A standard caddy is made of plastic and has a metal
shutter on its bottom which slides open and shut. Plextor is also constantly evaluating
other caddy designs for possible use in the future. Unless provided or recommended
by Plextor, use of a non-standard caddy (e.g., one that lacks a metal shutter on its
bottom) is not recommended. For their protection, CD-ROM discs should be stored in
their original packaging or in a caddy.
Inserting the Disc into a Caddy
1) To open the lid of the caddy,
press the tabs at the side
as shown.
12PLEX OPERATION MANUAL
41
CHAPTER 10 ---- Using CD-ROM Discs and Caddies
2) Place the disc into the caddy
with the label facing UP.
Be sure to place the disc
beneath the edge of the
caddy under the arrow mark.
Handle the disc by the sides.
Don’t touch its surface.
3) Close the lid firmly,
but not too hard.
Caution:
If the caddy appears defective (e.g., warped, cracked, or bent) do not
insert it into the drive. A defective caddy can become stuck inside the
drive, requiring the drive’s return to your dealer for service. If your caddy
appears defective, promptly replace it with a new one.
Handle the caddy as you would any precision component. Do not:
✗ Allow moisture or dust/contamination either in or on the caddy.
✗ Store the caddy in a location subject to direct sunlight, high temperature, or
high humidity.
✗ Drop the caddy or subject it to shock.
✗ Open the shutter manually. The caddy’s shutter opens automatically when
the caddy is inserted into the CD-ROM drive.
42
12PLEX OPERATION MANUAL
CHAPTER 10 ---- Using CD-ROM Discs and Caddies
Loading the Caddy into the Drive
1. Open the drive’s door.
2. Carefully insert the caddy in
the direction shown, with
the arrow mark facing the drive.
3. Push the caddy into the drive
until the caddy load mechanism
is engaged.
Hint:
Arrow Mark
You need use only one hand to insert the caddy into the drive. This is
easily accomplished by placing the front portion of the caddy on top of
the lip of the drive’s door. You can press down lightly to open the drive’s
door, then slide the caddy into the drive.
Removing the Caddy from the Drive
1) Push the Eject button. The caddy will eject from the drive in 2--3 seconds.
2) Pull the caddy straight out of the drive.
3) If the caddy will not eject from the drive after pushing the Eject button, you
should be able to remove the caddy from the drive by using the Emergency
Eject button. Turn off power to the drive. Insert a paper clip into the
Emergency Eject hole. The caddy should now eject from the drive. Please
contact Plextor’s Technical Support Department before attempting to reinsert the caddy into the drive.
Tray Loading and Operating
1) While the drive is powered up, push the eject button. The tray drawer will
slide out in 2--3 seconds.
2) Lay the bare CD (do not use a caddy) into the depression in the tray,
label side up. If the drive is mounted in the horizontal
position and the CD lays flat in the drive, you do
not need to use the clips in the tray. If the drive
is mounted in the vertical position (on
its side with the tray perpendicular
to the ground), the clips should be
gently pushed into place over
the CD so that it does not fall
out of the tray.
12PLEX OPERATION MANUAL
43
CHAPTER 10 ---- Using CD-ROM Discs and Caddies
3) Press the Eject button again and the tray will slide shut within 2--3 seconds.
Note: We recommend you use the Eject button to close the tray in a smooth
and secure manner. Closing the tray by pressing the front of the drawer by
hand is not recommended.
Cleaning the Disc
If the disc is merely dusty, you may use a commercially available dust removal spray
such as Dust-Off or Vari-Air to blow dust particles off the disc.
After removing the dust particles, you may wipe the disc using a clean, soft cotton
cloth. Use a straight-line motion, wiping from the center out. Do not wipe the disc
in a circular motion.
If a disc becomes dirty or soiled with grease or other contaminants not removable by
wiping, you may clean the disc with a CD-ROM disc cleaner available at most
computer dealers. Follow the directions packaged with the cleaner.
Hint:
44
Keeping your CD-ROM disc in a caddy at all times will prevent the
disc from becoming dirty or damaged.
12PLEX OPERATION MANUAL
---- CHAPTER 11 ----
How to Play Audio CDs
on Your Drive
YOUR TASK:
Learn how to use your CD-ROM drive so that it can
also play audio CDs.
YOUR OBJECTIVE:
Increase functionality of your drive. Provide
musical accompaniment for presentations. Goof off
at work.
YOUR METHOD:
A variety exists for you to choose from. You can
use anything from front panel controls or very
basic, bare bones audio CD software utilities up to
software utilities that rival or surpass the capabilities
of the CD player attached to your stereo system.
1) The most basic method is to use the 12PleX front panel audio controls. No
special drivers are needed to operate this feature.
Once an AUDIO CD is inserted into the drive, simply push the button to
begin AUDIO play. Once the AUDIO is playing, push the play button once
for track advance, or hold down the button for more than 1 second to begin
a fast forward search (ffwd). To eject the caddy from the drive, press the
Stop/Eject button once to stop AUDIO play and a second time to eject
the CD.
While in audio CD play mode, you can read a CD-ROM data disc by simply
removing the audio CD and inserting a data CD into your CD-ROM drive.
2) For PC users, audio utilities are provided with Plextor Manager and Plextor
Manager 96. For installation and operating instructions, refer to the separate
Plextor Manager software manual.
3) Other alternatives include audio utilities designed into your operating
system (Media Player in Windows for instance) or various other utilities that
can be purchased commercially.
4) Mac users can run a program such as CDT Remote (which typically is
included with FWB’s CD-ROM device driver) .
In order to hear the audio CD your drive is playing, you can plug a pair of stereo
headphones or self-powered speakers into the headphone jack on the drive’s front
12PLEX OPERATION MANUAL
45
CHAPTER 11 ---- How to Play Audio CDs on Your Drive
panel. You also can connect your drive to an audio amplifier as shown on the next
page. The audio cables shown are available at most computer and audio supply stores.
46
12PLEX OPERATION MANUAL
CHAPTER 11 ---- How to Play Audio CDs on Your Drive
PLEASE
NOTE:
The volume control wheel on the front panel of your drive adjusts only
the sound level of the headphone jack. It has no impact on the volume
level of the rear panel audio outputs.
PX-12XS (Internal or External)
Stereo Mini-Plug
(To Headphone Jack)
Audio Amplifier
Audio Input
RCA-Type Plugs
PX-12XSe (External)
(To Audio Out)
Audio Amplifier
Audio Input
RCA-Type Plugs
12PLEX OPERATION MANUAL
47
---- CHAPTER 12 ----
Troubleshooting
YOUR TASK:
Review some of the common problems you may
encounter when installing or operating your 12PleX
drive.
YOUR OBJECTIVE:
Gain a better understanding of how your drive
operates. Attempt to prevent problems before they
occur. Quickly fix, on your own, many simple
problems rather than wait for assistance from a
Plextor representative.
YOUR METHOD:
Read this entire section. Many of the problems
discussed happen only rarely. Many may seem
as if they do not pertain to you. If you are familiar
with the variety of problems that can occur,
however, you will be better prepared to deal with
them if they happen to you.
If you experience trouble with your 12PleX drive, follow these guidelines:
PC Users:
1) Most SCSI interface boards can sense when a problem has occurred and will
generate an error message on your computer. Take note of this message. Then,
run the test (diagnostic) program that probably is included with the device drivers
for your SCSI interface board. Follow the instructions given in the SCSI interface
board’s manual. If the information provided by the error message and test
program is not sufficient for you to fix the problem, proceed to step #2.
2) If your problem occurs during or immediately after the drive’s installation,
read Section 12.1----PC Compatibles: Initial Installation. If your problem
occurs after you had run the drive successfully for an extended period, read
Section 12.2----PC Compatibles: Existing Installations.
3) Attempt to match the problem you are having with the entries listed beneath
SYMPTOMS. Then narrow your search by checking to see if the ADDITIONAL SYMPTOMS apply to you as well. Because different SCSI interface
boards generate differently worded error messages, the messages displayed
by your computer may differ from those shown on the following pages.
48
12PLEX OPERATION MANUAL
CHAPTER 12 ---- Troubleshooting
Apple Computer Users:
Read Section 12.3----Apple Computers
Technical Support
If you still cannot solve your problem after reviewing the relevant sections of this
chapter, please contact Plextor’s Technical Support Department. See Chapter 13 for
information on how to prepare for, and then make contact with, Plextor’s technical
support staff.
12PLEX OPERATION MANUAL
49
CHAPTER 12 ---- Troubleshooting
12.1 PC Compatibles: Initial Installation
Symptoms
• No sound when running a
CD-ROM program
Additional Symptom
No sound when playing an audio CD
Possible Causes and Solutions
Application Does Not Use CD-Audio
There are two types of audio you may encounter when using CD-ROMs:
1) Sound Card Audio:
This comes from data (e.g., .WAV or .MID files) that is transferred from your
CD-ROM disc via the SCSI host adapter into your computer, and is translated
by your soundboard into sound. If you do not have a soundboard, you will
not be able to hear this form of audio.
2) CD Audio:
This comes from audio discs (like the ones used by your home stereo) that
are translated directly by your CD-ROM drive into sound. You do not need
a soundboard to hear this audio. You can hear this audio by plugging a set
of headphones or powered speakers into the headphone jack on the front
of your drive.
One reason, then, that you might not hear sound when playing a CD-ROM disc is
that a soundboard is required. These discs use only sound card audio, not CD Audio.
To help you determine if you are having a soundboard problem, or a CD Audio
problem, try playing an audio CD in your CD-ROM drive. If you can hear music
(through headphones or speakers connected to the headphone jack on the front of
your drive), the CD-ROM disc you are playing may require the use of a soundboard
in order to hear sound. If possible, check the manual that came with the CD-ROM
disc and see if the use of a soundboard is recommended or required.
If you have a soundboard and can hear an audio CD when it is played, but cannot
hear sound when you play a CD-ROM disc, you may have configured your soundboard incorrectly. Check the troubleshooting section of your soundboard manual for
further advice. If you have a soundboard but you cannot hear an audio CD when it
is played, check the following points:
50
12PLEX OPERATION MANUAL
CHAPTER 12 ---- Troubleshooting
Improper/Missing Audio Cable
If you use a soundboard, you must connect the soundboard to your CD-ROM drive
with an audio cable. See page 34 to ensure you have properly installed this audio
cable. If you have a soundboard and CD-ROM drive, but lack an audio cable, contact
one of the companies listed on page 65, or Plextor’s Technical Support Department,
for information on where a cable can be purchased.
Device Drivers Need to Be Updated
If you can hear an audio CD in your CD-ROM drive when it is in Audio CD play mode
(see Chapter 11), but you cannot hear an audio CD with another music CD utility
(e.g., Animotion’s MCS CDMaster, CorelCD), your device drivers may need to be
updated. Contact Plextor Technical Support for assistance.
Soundboard Volume Low
If, when playing an audio CD, you do not hear sound even though everything appears
to be functioning normally (busy light on drive flickers, the time counter on your audio
CD utility is advancing), you may have the mixer settings for your soundboard set too
low. Each soundboard has different settings for each input source, including one
for CD Audio. Run your soundboard’s mixer program and verify that the volume
is turned up.
Bad Soundboard Audio Cable
If you have verified that you have made the proper cable connections between your
12PleX drive and soundboard, and you have the correct device drivers installed but
you still do not hear sound when playing an audio CD, the problem may rest with
your audio cable. It may be defective and need to be replaced.
You can check to see if this is the case by doing the following: Unplug the audio cable
from the rear of your 12PleX drive. Plug a set of headphones or speakers that you
know are good into the jack on the front of the drive. Try to play an audio CD. If you
can now hear music, you may conclude that you do, in fact, have a bad audio cable.
Symptoms
• Cannot view Photo CD discs
• Can read only first session of a multisession disc
• Receive error messages while reading Photo CD images
Your 12PleX drive is capable of reading Kodak Photo CD multisession discs if you use
the appropriate device drivers and you run a Photo CD viewing program (e.g., Magic
Lantern, Kodak’s Photo CD Access).
12PLEX OPERATION MANUAL
51
CHAPTER 12 ---- Troubleshooting
Possible Causes and Solutions
Device Drivers Need to Be Updated
Contact Plextor Technical Support for device driver information.
Bad Photo CD Disc
If you can see a list of files from your Photo CD (after issuing a DIR command), but
cannot read them, or experience errors while reading them, you may have a bad Photo
CD disc. Try another Photo CD disc. If it works, you should have the defective disc
replaced.
Symptoms
•
•
•
•
Invalid Drive Specification
No Device Found
No SCSI Interface Board Found,
or No Response from SCSI
Interface Board
• No Drives in Use
Additional Symptom
Error Appears upon Initial Installation
of the CD-ROM Drive and Device
Driver Software
Possible Causes and Solutions
Improper SCSI Device Driver Installation
Your computer needs a SCSI software device driver to link the SCSI interface board
to the CD-ROM drive. If this driver cannot be loaded properly, an error message will
normally be displayed on the screen.
Try rebooting the computer. Watch as the CONFIG.SYS file executes, and look for an
error message to appear. You can press the Control and S keys simultaneously to
freeze the display in order to read the error message (use the Control and S
combination again to continue).
If the SCSI device driver cannot be loaded properly, either a software or hardware
conflict exists. Software conflicts are generally caused by memory managers; hardware conflicts by two peripherals vying for the same DOS address space. Please read
the next two paragraphs on software and hardware conflicts.
Software Conflict with Other Device Drivers
The SCSI interface board normally designates the CD-ROM driver as the first device
driver loaded by the computer. When the computer has a memory manager (e.g.,
HIMEM.SYS, 386MAX.SYS, or QEMM.SYS), in most cases the memory manager is
loaded first and the CD-ROM driver loaded directly thereafter.
52
12PLEX OPERATION MANUAL
CHAPTER 12 ---- Troubleshooting
If other device drivers are loading before the CD-ROM driver, place them after the
CD-ROM driver. If the memory manager tries to load the CD-ROM driver into high
memory (e.g., DEVICEHIGH or LOADHIGH), disable the function so that the driver
is loaded into conventional memory.
Hardware Conflict Between the Interface Board and Your Computer
The SCSI interface board may be in conflict with another peripheral in your computer.
Normally, this conflict can be settled by selecting a different address for the SCSI
interface board. In some cases, you may wish to select a different address for the
conflicting peripheral.
If the driver still does not recognize the interface board, follow these steps:
1) Remove all non-essential peripherals from your computer (e.g., network
boards, fax boards, etc.) and their device drivers from the CONFIG.SYS and
AUTOEXEC.BAT files.
2) Reboot the computer and ensure that the CD-ROM device driver recognizes
the SCSI interface board.
3) Turn off the computer and reinstall each peripheral and its device drivers
one at a time.
4) Repeat steps 2 and 3 until the problem reoccurs. This means that the problem
is with the last peripheral you installed.
Improper MSCDEX Installation
The Microsoft CD-ROM Extensions (filename: MSCDEX.EXE) or equivalent files from
Corel (CORELCDX.EXE) are required to run your CD-ROM drive under MS-DOS or
DR DOS. If the SCSI driver was successfully loaded, check for proper installation of
MSCDEX.EXE by rebooting the computer and watching the AUTOEXEC.BAT file as it
executes for an error message.
SCSI Interface Board Not Properly Seated
If the SCSI interface board is not fully seated into the computer’s expansion slot, the
device driver software will not recognize it. Inspect the interface board where it seats
into the connector on your computer’s motherboard. There should not be more than
a small gap between the interface board and the connector.
12PLEX OPERATION MANUAL
53
CHAPTER 12 ---- Troubleshooting
Symptom
• Incorrect DOS Version
Possible Causes and Solutions
Conflict Between MS-DOS 5.0 and Microsoft’s CD-ROM Extensions Version 2.2 (or
Lower)
MS-DOS 5.0 users should use Microsoft’s CD-ROM Extensions (file name
MSCDEX.EXE) Version 2.21 or 2.22. If you do not have either of these versions, and
plan to use DOS 5.0 with MSCDEX.EXE Ver 2.2 (or lower), you can resolve this conflict
by doing the following:
1) Type the following line into your CONFIG.SYS file:
DEVICE=C:\DOS\SETVER.EXE
2) Switch to the DOS prompt.
3) Type the following: SETVER MSCDEX.EXE 4.01, then press the enter key.
4) Reboot your computer.
Conflict Between MS-DOS 6.0 and Microsoft’s CD-ROM Extensions (file name:
MSCDEX.EXE) Version 2.21 (or Lower)
MSCDEX.EXE ver. 2.22 (or higher) must be used with DOS 6.0. Use of an earlier
version will result in an INCORRECT DOS VERSION message. A copy of
MSCDEX.EXE ver. 2.22 is included with DOS 6.0. You can find this file in your
C:\DOS directory.
If you previously had loaded MSCDEX.EXE ver. 2.21 (or lower), your computer might
still be recognizing this lower version rather than 2.22 (or higher).
To correct this problem, you must edit your AUTOEXEC.BAT file using a text editor
or word processor. Your AUTOEXEC.BAT file will probably contain a line that looks
something like this:
C:\TSCSI\MSCDEX.EXE /D:TSLCD /M:10
In this example, ‘‘C:\TSCI’’ is the path to MSCDEX.EXE. The path name will vary
depending on the type of SCSI device driver software you use.
Change only the path of this line in your AUTOEXEC.BAT file so that it finds the
updated MSCDEX.EXE file in your DOS directory. This line should be edited to read:
C:\DOS\MSCDEX.EXE /D:TSLCD /M:10
Save the AUTOEXEC.BAT file and reboot your computer.
54
12PLEX OPERATION MANUAL
CHAPTER 12 ---- Troubleshooting
Symptoms
• No Device Found
• No SCSI Interface Board Found or
No Response from SCSI Interface
Board
Additional Symptom
Driver Fails to Recognize the SCSI
Interface Board
Possible Cause and Solution
Drive Not Resetting
In some cases, even if you restart the computer by pressing its reset button or the
Control, Alt, and Del keys simultaneously, the drive does not appear to respond. Try
turning the power switches on the drive and computer OFF, then ON. This complete
shutdown should fully reset the drive and computer.
Symptom
• CDR101 -- Not Ready
Reading Drive [X]
Additional Symptom
All Commands Sent to the Drive
Result in CDR101 Error
Possible Causes and Solutions
Defective Caddy
A warped or damaged caddy can cause a CDR 101 error message. Try using another
caddy and see if this eliminates the problem. Also, be sure to use only an ‘‘industry
standard’’ caddy. This is a caddy made of plastic with a metal shutter on its bottom.
If you use another type of caddy (e.g., all plastic, but with no metal shutter on its
bottom----just an opening), you may experience problems.
Defective CD-ROM Disc
A fingerprint, contaminants, or deep scratches on the disc’s surface may prevent the
drive from reading data. Read Chapter 10 to learn how to clean CD-ROM discs.
You should also review the low performance symptom discussed on page 61.
12PLEX OPERATION MANUAL
55
CHAPTER 12 ---- Troubleshooting
Bad Connection Between the CD-ROM Drive and the SCSI Interface Board
Inspect the cable, drive, and interface board for recessed, broken, or bent pins. If a
ribbon cable is used, inspect for any signs of distress, such as kinking. Ensure the red
stripe side of the ribbon cable plugs into pin 1 on both the drive and the interface board.
Audio CD Disc in the Drive
Plextor CD-ROM drives are capable of playing high-quality audio when used with
appropriate audio playback software, or when the drive is set to Music CD Player
Mode (see Chapter 11). Since audio compact discs do not have computer data, typing
computer commands while an audio CD is in your drive will result in an error
message.
Disc in Caddy Upside Down
Remove disc from caddy and reinsert label side up.
12.2 PC Compatibles: Existing Installations
Symptoms
• Invalid Drive Specification
• No Device Found
• Drive Not Responding
Additional Symptom
Interface Board Driver Fails to
Recognize the CD-ROM Drive
Possible Causes and Solutions
Drive Is Not On
If you have a PX-12XS external drive, check that its front-panel power switch is ON.
If the drive is the PX-12XS internal model, ensure the power cord from your computer’s
power supply is plugged firmly into the drive power connector. Power is applied
correctly if one of the front panel LEDs is on.
Bad Connection Between the CD-ROM Drive and the SCSI Interface Board
Inspect the cable, drive, and interface board for recessed, broken, or bent pins. If a
ribbon cable is used, inspect for any signs of distress, such as kinking. Ensure the red
stripe side of the ribbon cable plugs into pin 1 on both the drive and the interface board.
Improper SCSI Bus Termination
Ensure that only the peripheral at the end of the internal SCSI cable and/or the last
peripheral in a daisy chain of external devices is terminated (see Chapter 7). Some
56
12PLEX OPERATION MANUAL
CHAPTER 12 ---- Troubleshooting
peripherals have a setting marked ‘‘termination power’’ instead of ‘‘terminator.’’ Ensure
their termination power switches are set correctly.
Symptom
• CDR101----Not Ready
Reading Drive [X]
Additional Symptom
CD-ROM Drive Responds to Directory
(DIR) Command but Cannot Run a
Program
Possible Causes and Solutions
Bad Connection Between the CD-ROM Drive and the SCSI Interface Board
Inspect the cable, drive, and interface board for recessed, broken, or bent pins. If a
ribbon cable is used, inspect for any signs of distress, such as kinking.
Improper SCSI Bus Termination
Ensure that only the last peripheral on the SCSI bus is terminated (see Chapter 7).
Some peripherals have a setting marked ‘‘termination power’’ instead of ‘‘terminator.’’
Ensure their termination power switches are set correctly.
Defective CD-ROM Disc
A fingerprint, contaminants, or deep scratches on the disc’s surface may prevent the
drive from reading data. Read Chapter 10 to learn how to clean CD-ROM discs.
You should also review the low performance symptom discussed on page 61.
Conflict with a Network Card
Temporarily remove the network card and all related drivers from the AUTOEXEC.BAT
and CONFIG.SYS files. Reboot the computer and check that the CD-ROM drivers load
successfully.
Conflict with DOS 5.0 EMM386.EXE
The DOS memory manager may be using the address area required by the interface
board. (This situation does not apply to interface boards that do not use high memory
addressing, such as Trantor’s T-130b/T-160.) If you suspect this problem, edit your
CONFIG.SYS file as follows:
Before: DEVICE=C:\DOS\EMM386.SYS
After: DEVICE=C:\DOS\EMM386.EXE X=C800-EFFF
This argument prevents EMM386.SYS from using the address space required by the
interface board or using the specific address your board requires.
12PLEX OPERATION MANUAL
57
CHAPTER 12 ---- Troubleshooting
Symptom
• CDR101----Not Ready
Reading Drive [X]
Additional Symptom
Errors Occur Intermittently
Possible Causes and Solutions
Defective CD-ROM Disc
A fingerprint, contaminants, or deep scratches on the disc’s surface may prevent the
drive from reading data. Read Chapter 10 to learn how to clean CD-ROM discs.
You should also review the low performance symptom discussed on page 61.
Drive Not Terminated
If your CD-ROM drive is the only SCSI peripheral attached to your computer or is the
last SCSI peripheral in a daisy chain (i.e., a cable connecting multiple SCSI peripherals
to a single SCSI interface board), check that its termination switch is ON. Always turn
the drive OFF before changing the setting of the rear-panel switches. See Chapter 7.
Symptom
• CDR101----Not Ready
Reading Drive [X]
Additional Symptom
All Commands Sent to the Drive
Result in CDR101 Error
Possible Causes and Solutions
Audio CD Disc in the Drive
Plextor CD-ROM drives are capable of playing high-quality audio when used with
appropriate audio playback software or when the drive is set to Audio CD play mode
(see Chapter 11). Since audio compact discs do not have computer data, typing
standard data commands when an audio CD is in the drive will result in an error
message.
Defective CD-ROM Disc
A fingerprint, contaminants, or deep scratches on the disc’s surface may prevent the
drive from reading data. Read Chapter 10 to learn how to clean CD-ROM discs.
You should also review the low performance symptom discussed on page 61.
58
12PLEX OPERATION MANUAL
CHAPTER 12 ---- Troubleshooting
Bad Connection Between the CD-ROM Drive and the SCSI Interface Board
Inspect the cable, drive, and interface card for recessed, broken, or bent pins. If a
ribbon cable is used, inspect for any signs of distress, such as kinking.
Disc in Caddy Upside Down
Remove disc from caddy and reinsert label side up.
Symptom
• CDR103----Not High Sierra Format
Additional Symptom
Occurs with Certain Discs Only
Possible Cause and Solution
Incorrect Disc
The disc might be intended for another type of computer, such as a Macintosh or Sun,
or it is not mastered in the High Sierra or ISO 9660 formats.
Symptom
• CDR103----Not High Sierra Format
Additional Symptom
Occurs Regardless of the Discs Used
Possible Causes and Solutions
Incorrect Jumper Setting
You might have the block jumper set to ON. See page 18.
Hardware Conflict
If the SCSI interface board uses DMA channels, try changing the selected DMA
channel. See the instruction manual for your SCSI interface board.
Memory Manager Conflict
If the SCSI interface board uses memory-mapped addressing or has a BIOS, exclude
the addresses from the memory manager. See the instruction manual for your SCSI
interface board.
Incorrect Version of Microsoft CD-ROM Extensions
Version 2.00 or higher of MSCDEX is required to read a High Sierra or ISO 9660
format disc.
12PLEX OPERATION MANUAL
59
CHAPTER 12 ---- Troubleshooting
Symptom
• Excessive Noise
• Disc Heard Jumping
Additional Symptom
CDR101 Error Message
Possible Causes and Solutions
Defective Caddy
Replace caddy.
Defective CD-ROM Disc
A fingerprint, contaminants, or deep scratches on the disc’s surface may prevent the
drive from reading data. See Chapter 10 to learn how to clean CD-ROM discs.
You should also review the low performance symptom discussed on page 61.
CD-ROM Drive Set to Test Mode
Turn this switch OFF. The test mode is for factory use only. Always turn the drive OFF
before changing the setting of the switches. See Chapter 6.
CD-ROM Disc is Poorly Balanced
Remove any adhesive labels on the label side of the disc and clean the surface
following instructions in Chapter 10. If there is no foreign substance on the disc, you
may wish to contact the disc manufacturer for a replacement.
60
12PLEX OPERATION MANUAL
CHAPTER 12---- Troubleshooting
Symptom
• Low Performance of CD-ROM Application Software
Possible Cause and Solution
Drive Automatically Set to Standard Throughput (150KB/sec)
Plextor’s drives are designed to automatically switch from twelve speed throughput to eight speed, to four speed, to two speed and then to single speed when they
encounter a defect or a scratch on your disc. The drive then will continue to read
data from the disc at double or single speed until a new read command is
transmitted to the drive. The drive will then return to twelve speed mode.
It is also possible that the disc is dirty. Please refer to page 44 for instructions on how
to clean your CD-ROM disc.
Symptom
• Disc Is Ejected After Being Inserted
• ON/BUSY Light Flashes 4 Times
Possible Cause and Solution
CD Is Unreadable
Plextor’s drives are designed to automatically eject any unreadable CD. Please be
sure that the CD-ROM disc or audio CD is ‘‘label-side’’ up in the caddy. If not, this
will cause the drive to eject the CD. A blank or incorrectly written CD-R (blank
media), a damaged, scratched, or otherwise unreadable CD will cause this same
symptom. Inserting a known good disc will correct this problem.
12PLEX OPERATION MANUAL
61
CHAPTER 12 ---- Troubleshooting
12.3 Apple Macintosh
Symptoms
• Invalid Drive Specification
• No Device Found
• Drive Not Responding
Possible Cause and Solution
SCSI Address Conflicts with the Hard Disk Drive
This usually can be corrected by selecting another SCSI address (normally addresses 1 to
6) for your CD-ROM drive. Note: The Macintosh’s hard disk uses address 0 and its
internal SCSI adapter uses address 7.
Symptom
• Computer Does Not Respond
Possible Cause and Solution
INIT Conflicts
Remove all INITs except those absolutely needed from your System Folder and the
ones copied from the CD-ROM device driver disk. If the CD-ROM drive functions
correctly, reinstall the INITs one at a time, restarting the Macintosh after each one,
until the problem is solved.
Symptom
• Low Performance of CD-ROM Application Software
Possible Cause and Solution
System Set for Virtual Memory
If your Macintosh is using System 7 and is in Virtual Mode, it may exhibit slow performance
during real-time graphics and animation. This is because your hard disk drive and
CD-ROM drive must use your computer’s SCSI bus almost simultaneously. To remedy
this, remove Virtual Mode from the system and restart the Macintosh.
62
12PLEX OPERATION MANUAL