1
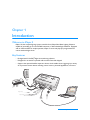
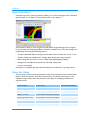
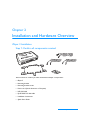
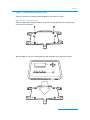
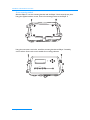
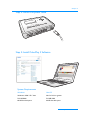
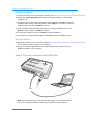
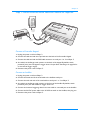
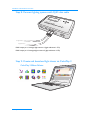
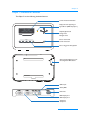
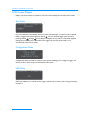
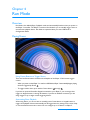
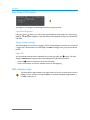
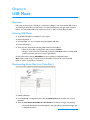
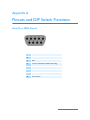
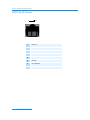
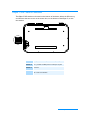
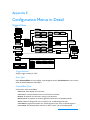
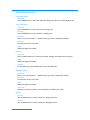
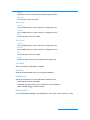
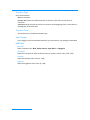
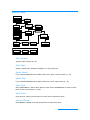
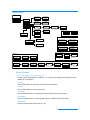
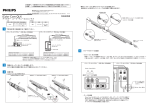
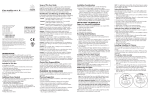
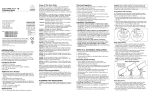
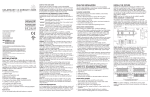
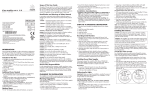
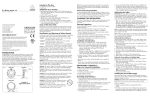
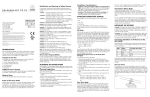
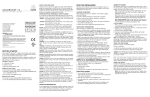
iPlayer 3
User Guide
Copyright © 2015 Philips Solid-State Lighting Solutions, Inc. All rights reserved.
Chromacore, Chromasic, CK, the CK logo, Color Kinetics, the Color Kinetics logo, ColorBlast, ColorBlaze, ColorBurst, ColorGraze,
ColorPlay, ColorReach, iW Reach, eW Reach, DIMand, EssentialWhite, eW, iColor, iColor Cove, IntelliWhite, iW, iPlayer, Optibin,
and Powercore are either registered trademarks or trademarks of Philips Solid-State Lighting Solutions, Inc. in the United States and /
or other countries.
All other brand or product names are trademarks or registered trademarks of their respective owners. Due to continuous
improvements and innovations, specifications may change without notice.
PUB-000178-01 R02 12 Aug 2015
Contents
Chapter 1: Introduction
Welcome to iPlayer 3
Key Features
About ColorPlay 3
About this Guide
4
4
5
5
Chapter 2: Installation
iPlayer 3 Installation
Step 1: Confirm all components received
Step 2: Prepare for the Installation
Step 3: Install mounting bracket
Step 4: Attach the power cable
Step 5: Install ColorPlay 3 Software
System Requirements
Windows® Installation
Mac OS Installation
Step 6: Connect computer with USB cable
Step 7: Attach external show selection
devices as required
Connect a Controller Keypad
Connect an AuxBox
Step 8: Connect lighting systems with RJ-45
data cable
Step 9: Create and download light shows
via ColorPlay 3
iPlayer 3 Hardware Features
LCD Screen Output
Run Mode
Configuration Mode
USB Mode
6
6
7
8
10
10
10
11
11
11
12
12
12
13
13
14
15
15
15
15
Chapter 3: Show Configuration Concepts
Overview
Shows
Effects
Triggers
Linking Multiple Shows to a Trigger
Alarms
16
16
16
16
17
17
Chapter 4: Run Mode
Overview
Playing Shows
Using Preset Buttons to Trigger Shows
Automating Show Playback
Run Mode LCD Output
Light Show Brightness
18
18
18
18
19
19
Trigger Number Message
Lights Off
LED Indicator Light
19
19
19
Chapter 6: Configuration Mode
Overview
Navigating Menus
Assigning Triggers
Example 1: Assigning a Preconfigured
Show to Preset Button 3
Example 2: Assigning a Downloaded
ColorPlay 3 Show to Preset Button 4
Setting an Alarm
Example 3: Setting Alarm Number 5 to
Activate Every Day at Sunset
Setup Menu
Example 4: Setting a DMX Address
Example 5: Testing a DMX Address
About Show Ranges
Info Menu
20
20
20
21
21
22
22
23
23
24
24
24
Chapter 7: USB Mode
Overview
Initiating USB Mode
Downloading Show Files from ColorPlay 3
Downloading Triggers from ColorPlay 3
Downloading Alarms from ColorPlay 3
26
26
26
27
27
Appendix A: Pinouts and DIP Switch Functions
Serial Port: DB9F Pinouts
DMX: RJ-45 Pinouts
iPlayer 3 DIP Switch Functions
28
29
30
Appendix B: Configuring Remote Devices
Electrical
Protocol
iPlayer 3 Commands
Replies from the iPlayer 3
32
32
33
33
Appendix C: Firmware Update Procedure
Overview
Determining Firmware Version
Firmware Update Procedure
Cloning and Formatting SD Memory Cards
for use in iPlayer 3
34
34
34
36
Appendix D: Cloning and Formatting SD Cards
Overview
SD Card Cloning Procedure (Windows® or
Mac OS)
Windows® SD Card Formatting Procedure
Mac OS SD Card Formatting Procedure
36
36
36
37
Appendix E: Configuration Menus in Detail
Configuration Menus in Detail
Triggers Menu
Trigger Number?
Show Type?
Canned Effect Types
Canned Effect Parameters
Random Color
File Name?
Test Show
End Behavior?
Show Number?
Transition Type?
Transition Time?
Save Changes?
HSB Editor
Alarms Menu
Alarm Number?
Alarm Days?
Specific Month?
Specific Day?
Alarm Type?
Alarm Time?
Sunrise of Sunset?
Offset Hr?
Offset Min?
Show Number?
Save Changes?
Setup Menu
Setup Parameters
Set DMX Address
Test DMX Address
Info Menu
Version Info
Memory Usage
Sunrise
Sunset
38
38
38
38
38
39
39
40
40
40
40
41
41
41
41
42
42
42
42
42
42
42
42
43
43
43
43
44
44
45
45
45
45
45
45
45
Index
Index
46
Chapter 1
Introduction
Welcome to iPlayer 3
iPlayer® 3 is the compact lighting system controller from Philips Solid-State Lighting Solutions
capable of controlling up to two full DMX universes or 340 individual light addresses. Equipped
with an LCD interface for simple operation, iPlayer 3 stores and plays pre-programmed and
custom-authored light shows.
Key Features
•
Packaged with ColorPlay® 3 light show authoring software
•
Designed for use with the optional wall-mounted Controller Keypad
•
Supports the optional AuxBox expansion device, which enables show triggering by a variety
of dry-contact closure devices including motion sensors, photocell applications, and more.
OFF
iPLAY
ER
1
OX
AUXB
US
STAT
5
6
7
2
Input from
Controller
Keypad
8
4
3
1
INPU
TS
2
L PORT
SERIA
3
PRES
ETS
3
4
5
X
24 VDC
+/ -
USB
Input from
AuxBox
PO
WE
R
To Light Universe 1
To Light Universe 2
Input from
ColorPlay 3
Software
iPlayer 3 User Guide 4
Introduction
About ColorPlay 3
ColorPlay 3 light show authoring software enables you to create unique light shows, download
light show files to your iPlayer 3, and manage the files on your iPlayer 3.
Out-of-the-box, iPlayer 3 comes programmed with default, single-effect light shows designed
for quick testing of your lighting installation. ColorPlay 3 enables you to create and manage more
sophisticated shows using the following features:
•
16 fully customizable effects, including a particle effect used to simulate fire, clouds, or rain
•
Timeline editing with multiple tracks, enabling effect layering and unique transitions
•
Effect editing both on-screen or live on a Philips Solid-State Lighting installation
•
Management of multiple shows within each ColorPlay 3 project file
•
Custom color palettes
ColorPlay 3 is compatible with both Microsoft Windows® and Mac OS X operating systems.
About this Guide
This user guide contains step-by-step hardware setup and mounting instructions, details about
iPlayer 3 modes and features, and reference information. The following documents are also
available to help you fully realize the potential of your iPlayer 3 and lighting installation as a
complete system:
Document Name
Online Location
With iPlayer 3 Packaging
iPlayer 3 Installation Instructions
www.colorkinetics.com/support/
Printed booklet
iPlayer 3 Quick Start Guide
www.colorkinetics.com/support/userguides
Printed booklet
ColorPlay 3 User Guide
www.colorkinetics.com/support/userguides
Controller Keypad Product Guide
www.colorkinetics.com/support/productguides
AuxBox Product Guide
www.colorkinetics.com/support/productguides
iPlayer 3 SAS User Guide
www.colorkinetics.com/support/userguides
5 iPlayer 3 User Guide
Chapter 2
Installation and Hardware Overview
iPlayer 3 Installation
Step 1: Confirm all components received
ER3
iPLAY
x
PS
PHILI
ETS
PRES
2
3
5
4
R
POWE
1
DMX
1
DMX
2
USB
AL 2
SERI
AL 1
SERI
Take a moment to confirm you have received these iPlayer 3 components:
• iPlayer 3
• Mounting bracket
• Mounting bracket screws
• Power cord (North American or European)
• USB 2.0 Cable
• RJ-45 DMX 512 data cable
• Installation Instructions
• Quick Start Guide
iPlayer 3 User Guide 6
Installation and Hardware Overview
Step 2: Prepare for the Installation
• Create a layout plan that starts with the locations of iPlayer 3 and all power supplies or
data enablers.
• Select a convenient but unobtrusive location for mounting the iPlayer 3 that will be accessible
to a computer via USB connection. If also installing external show selection switches such as
Controller Keypads or an AuxBox, mount iPlayer 3 in a location accessible to the maximum
serial cable length of 50 ft (15.2 m).
• Verify that the mounting location meets environmental specifications (see below).
Electrical Specifications
Power requirements: 100 – 240 VAC, 50˚ / 60˚ Hz, 5W
Environmental Specifications
Operating temperature range: 14˚ F to 122˚ F (-10˚ C to +40˚ C)
Maximum 95% relative humidity
7
iPlayer 3 User Guide
Chapter 2
Step 3: Install mounting bracket
Choose a method for mounting bracket installation: quick-release or secure.
Quick-release mounting method
With the release tab pointing downward, screw the mounting bracket onto a surface using
the innermost screw holes.
Slide the iPlayer 3 onto the mounting bracket until the iPlayer clicks securely into place.
iPLAYER3
PRESETS
1
2
3
4
5
x
iPlayer 3 User Guide 8
Installation and Hardware Overview
Secure mounting method
Slide the iPlayer 3 onto the mounting bracket until the iPlayer 3 clicks securely into place.
Using the supplied machine screws, secure the mounting bracket to the iPlayer 3.
Using the outermost screw holes, install the mounting bracket and iPlayer 3 assembly
onto a surface. Secure with screws suitable for mounting substrate.
iPLAYER3
PRESETS
1
9
iPlayer 3 User Guide
2
3
4
5
x
Chapter 2
Step 4: Attach the power cable
R3
iPLAYE
x
ETS
PRES
3
2
5
4
POWER
1
DMX
1
2
DMX
USB
L2
IA
SER
IAL
SER
1
Step 5: Install ColorPlay 3 Software
System Requirements
Windows®
Mac OS
Windows® 2000 / XP / Vista
Mac OS 10.4 or greater
512 MB RAM
512 MB RAM
60 MB free disk space
60 MB free disk space
iPlayer 3 User Guide 10
Installation and Hardware Overview
Windows® Installation
1. Download the latest version of ColorPlay 3 Software from http://www.colorkinetics.com/support/colorplay3/.
2. Double-click Install ColorPlay 3.exe located in the Windows folder on the ColorPlay
3 software CD.
3. The Welcome to the ColorPlay 3 Setup Wizard window appears. Click Next to begin the
installation. After reading the license agreement, select I Agree to consent to the terms of
the license agreement, then click Next to continue.
4. When the Select Installation Folder window appears, accept the default location, or click
Browse to select a folder. Click Next to continue.
5. At the Confirm Selection window, click Next to start file installation.
6. The Installation Complete window appears. Click Close to exit the installation wizard.
Mac OS Installation
1. Download the latest version of ColorPlay 3 Software from http://www.colorkinetics.com/support/colorplay3/.
The ColorPlay 3 foldericon appears on your desktop.
2. Drag the ColorPlay 3 application icon from the Mac folder on the software CD to the
Applications folder on your computer.
Step 6: Connect computer with USB cable
iPLAYE
1
2
R3
PRES
ETS
3
4
5
X
USB
PO
WE
R
Input from
ColorPlay 3
Software
Note: If using Windows®, you must install ColorPlay 3 prior to connecting the iPlayer 3
to your PC. ColorPlay 3 installs the device drivers required for USB connectivity.
11 iPlayer 3 User Guide
Chapter 2
Step 7: Attach external show selection devices as required
OFF
iPLAYE
R
1
OX
AUXB
STATUS
5
6
7
2
8
4
3
1
INPUTS
2
PORT
SERIAL
Input from
Controller
Keypad
3
PRES
ETS
3
4
5
X
C
24 VD+/
USB
Input from
AuxBox
PO
WE
R
Connect a Controller Keypad
1. Unplug the power cord from iPlayer 3.
2. Connect the cable end with the 4-pin leads into the back of the Controller Keypad.
3. Connect the cable end with the DB9 cable connector to serial port 1 or 2 on iPlayer 3.
4. As needed, set the Range switch position on the back of the keypad. By default, switch
position 0 (zero) sets the keypad to trigger shows 1-8 (see About Show Ranges on page 24 for
an overview of trigger ranges).
5. Reconnect the power cord to iPlayer 3.
Connect an AuxBox
1. Unplug the power cord from iPlayer 3.
2. Connect the female end of the serial cable to the AuxBox serial port.
3. Connect the male end with of the serial cable to serial port 1 or 2 on iPlayer 3.
4. As needed, set the Range switch position on the front of the AuxBox. By default, switch
position 0 (zero) sets the AuxBox to trigger shows 1-8.
5. Connect each external triggering device’s two-wire cable to a terminal pair on the AuxBox.
6. Connect the 24 VDC power cable to the 24 VDC terminals on the AuxBox, then plug it in.
7. Reconnect the power cord to iPlayer 3.
iPlayer 3 User Guide 12
Installation and Hardware Overview
Step 8: Connect lighting systems with RJ-45 data cable
iPLAY
ER 3
1
2
PRES
ETS
3
4
5
X
USB
PO
WE
R
To Light Universe 1
To Light Universe 2
DMX output port 1 manages light universe 1 (light addresses 1-170)
DMX output port 2 managed light universe 2 (light addresses 1-170)
Step 9: Create and download light shows via ColorPlay 3
ColorPlay 3 Effects Palette
13 iPlayer 3 User Guide
Chapter 2
iPlayer 3 Hardware Features
The iPlayer 3 has the following hardware features:
Current mode and information
Displays the color appearing on
light address 1 (DMX output port 1)
09:21:48
17-Feb-09
Config mode
Show type?
<
downloaded show
Adjust brightness level
Change mode
Navigate menus
Pause / resume show
Cancel menu action
Select a trigger for show playback
Access panel for SD memory card
and configuration DIP switches
USB 2.0 port
Activity LEDs
Power inlet
DMX output port 1
DMX output port 2
Serial port 1
Serial port 2
iPlayer 3 User Guide 14
Installation and Hardware Overview
LCD Screen Output
iPlayer 3 has three modes of operation. The LCD screen displays the currently active mode:
Run Mode
09:21:36
17-Feb-09
RUN Mode
Show 1
>
/ b100
Run mode launches automatically when you power ON the iPlayer 3. In Run mode, by default,
iPlayer 3 triggers the show assigned to Preset . You can manually trigger other shows by
pressing Presets
through
on the iPlayer 3 faceplate or keys 1-8 on a Controller Keypad.
Setting alarms enables you to automate show triggers by time, day of the week, or an
astronomical event such as sunset.
Configuration Mode
09:21:48
17-Feb-09
Config mode
Show type?
<
downloaded show
Configuration Mode provides an onboard menu system enabling you to configure triggers, set
alarms, perform device setup, and view device information.
USB Mode
09:21:02
17-Feb-09
USB
USB mode enables you to transfer shows, triggers, and alarms from a PC or Mac running ColorPlay 3
to iPlayer 3.
15 iPlayer 3 User Guide
Chapter 3
Show Configuration Concepts
Overview
Understanding iPlayer 3 show configuration terminology and concepts will help you in the
upcoming chapters.
Shows
Shows contain visual effects and the parameters associated with those effects. iPlayer 3 can
display two types of shows:
•
Preconfigured shows stored and configured on iPlayer 3
•
Custom shows created and downloaded from ColorPlay 3
Effects
Visual effects range in complexity from a fixed color display to multi-color animations. Each
effect has multiple customizable parameters such as start color, end color, and fade time.
•
There are seven effect types available when setting up iPlayer 3 preconfigured shows.
•
You can work with 16 effect types when creating ColorPlay 3 custom shows.
Triggers
Triggers specify show playback behaviors—for example, what happens at the end of a show or
how to transition to the next show. To be played back, therefore, you must associate each show
with a trigger.
Triggers are numbered 0-255 and associate show files with the following:
•
End Behavior: Fade to black, loop, or jump to another trigger.
•
Transition Type: Snap (no transition to next show), fade out-and-in, or cross fade (morph
with next show).
Pressing a Preset button on the iPlayer 3 faceplate, triggers a show. For example, pressing
activates trigger 1, which launches the show and the playback behaviors associated with it.
,
iPlayer 3 User Guide 16
Show Configuration Concepts
Linking Multiple Shows to a Trigger
Because show files do not specify playback behaviors, you can assign more than one show to a
single trigger. When creating the trigger, selecting the jump to another trigger end behavior
links a second show to the first. If you select the jump to another trigger end behavior for
the second show, you can link a third show, and so on.
Alarms
Alarms automatically activate triggers. You can manually activate a trigger by pressing a Preset
button on the iPlayer 3 faceplate, pressing a button on a Controller Keypad, or by tripping a
remote triggering device connected to an AuxBox. With an alarm, you can automatically activate
a trigger based on a specific date, day of the week, weekdays, weekends, or an astronomical
event (sunrise or sunset).
When you create an alarm, you associate the alarm with a trigger number. You can then specify
alarm parameters, either a clock time or an astronomical event. For example, you can create an
alarm that automatically activates trigger 3 every weekday at 7 am.
17 iPlayer 3 User Guide
Chapter 4
Run Mode
Overview
Run Mode is the default iPlayer 3 playback mode and automatically launches when you power on
the iPlayer 3 controller. The iPlayer 3 must be in Run Mode for you to manually trigger shows or
use automatic playback alarms. Run Mode is suspended when you enter USB Mode or
Configuration Mode.
Playing Shows
Using Preset Buttons to Trigger Shows
There are five Preset buttons located on the faceplate of the iPlayer 3. Each button triggers
a show:
•
When you power on the iPlayer 3 or exit from USB Mode, iPlayer 3 automatically begins playing
the show triggered by Preset .
•
To trigger another show, press another Preset button,
through
.
If you have an optional Controller Keypad connected to your iPlayer 3, you can assign show
triggers to keypad buttons 1 through 8. Likewise, if you have an AuxBox connected, you can
assign triggers to up to eight remote triggering devices.
Automating Show Playback
When using alarms, you do not have to manually press a Preset button or keypad button to
trigger show playback. Alarms automatically set off triggers based on settings such as time of day
or an astronomical event such as sunset. You can configure up to 15 alarms on iPlayer 3.
iPlayer 3 User Guide 18
Run Mode
Run Mode LCD Output
09:21:36
17-Feb-09
RUN Mode
>
Show 1
/ b100
The iPlayer 3 LCD displays the following information during Run Mode:
Light Show Brightness
Using the
and
buttons, you can set the overall brightness level of lights in a show during
playback. The B number displayed on the LCD reflects the brightness level you set, between 0%
and 100%.
Trigger Number Message
The LCD displays the current show (trigger) number during playback. If you have not associated
a trigger with a Preset button, the LCD displays an EMPTY message when you press that Preset
button.
Lights Off
You can pause Run Mode and show playback at any time by pressing the
button. The LCD
displays a LIGHTS OFF message and the connected lights turn black until you either:
•
Press the
button a second time to resume Run Mode
•
Press a Preset button to start the selected show from the beginning
LED Indicator Light
The LED indicator light, located to the right of the LCD screen, is active when a show is
playing. It shows the color currently displayed on the fixture assigned to light address 1
on DMX output port 1.
19 iPlayer 3 User Guide
Chapter 5
Configuration Mode
Overview
Configuration mode provides an onboard menu system enabling you to configure show triggers,
set alarms, perform device setup, and view device information without having to connect to your
PC or Mac.
Navigating Menus
• At any time during playback, press
to launch Configuration mode and open the Main Menu.
09:21:48
17-Feb-09
Config mode
Main Menu
>
ALARMS
• From any menu, press
then press
and
to scroll through the menu options and make a selection,
to access the next menu.
• To save your changes, continue pressing
then press
• Press
until you reach the Save Changes menu item,
a final time to save.
at any time to cancel the menu action and return to Run mode.
Assigning Triggers
You can assign a trigger to either:
• A preconfigured show
• A custom show downloaded from ColorPlay 3
When you assign a trigger, that trigger corresponds to the Preset button with the same number
on the iPlayer 3 faceplate, a keypad button on a Controller Keypad, or a remote triggering
device connected to an AuxBox.
iPlayer 3 User Guide 20
Configuration Mode
Example 1: Assigning a Preconfigured Show to Preset Button 3
1. Launch Configuration mode.
2. Access the TRIGGERS menu from the Main Menu.
3. Select trigger number 3.
4. Access the SHOW TYPE? menu item, then select CANNED EFFECT.
5. Access the EFFECT TYPE? menu, then make a selection. There are seven visual effect types from
which to choose:
FIXED COLOR : Static display of a solid color
CROSS FADE: A smooth transition from one solid color to another
RAINBOW: A sequence of solid colors moving in one direction
RANDOM COLOR : A sequence of randomly generated solid colors at specified intervals
SPARKLE: Flashes of foreground color at random over a solid background color
COLOR SWEEP: Progressive transition of a solid foreground color across a solid background
COLOR STREAK: An animated effect with narrow lines of color over a solid background
6. Press
to access the next menu item, which is an effect-specific parameter, then enter
a value.
7. Continue navigating through the effect-specific parameters and entering values. At the TEST
EFFECT menu item, press
to use the show tester, which runs a live preview of your show.
8. Select a transition type:
– SNAP (no transition)
– FADE OUT & IN (fades to black)
– CROSS FADE (effect morphing)
9. As needed, enter a value for the transition duration, then press
to save your changes.
Note: Each effect type has unique parameters. For example, some effects use a background
color setting, whereas other effects display only foreground colors. See Appendix F:
Configuration Menus in Detail for iPlayer 3 menu system charts and descriptions of each
menu item.
Example 2: Assigning a Downloaded ColorPlay 3 Show to Preset Button 4
1. Launch Configuration mode.
2. Access the TRIGGERS menu from the Main Menu.
3. Select trigger number 4.
4. Access the SHOW TYPE? menu, then select DOWNLOADED SHOW.
5. Access the SHOW FILE? menu, then select a .SHO file.
6. At the TEST SHOW menu, press
your show.
21 iPlayer 3 User Guide
to use the show tester, which runs a live preview of
Chapter 5
7. Select an END BEHAVIOR type:
– LOOP
– LIGHTS OFF
– JUMP TO TRIGGER
8. Select a transition type:
– SNAP (no transition)
– FADE OUT & IN (to black)
– CROSS FADE (effect morphing)
9. As needed, enter a value for the transition duration, then press
to save your changes.
Setting an Alarm
Alarms enable you to automate show playback. When you set an alarm, you specify:
• The alarm number (0-15).
• The alarm day: every day, on weekdays, on weekends, on a specific day of the week, or on
a specific date.
• Alarm type:
– Time of day. The iPlayer 3 uses a 24-hour notation with hours ranging from 00 to 23.
– Astronomical time (in relation to sunrise and sunset).
Note: The astronomical time alarm type does not automatically make adjustments for
daylight saving time.
• The trigger associated with the alarm.
Example 3: Setting Alarm Number 5 to Activate Every Day at Sunset
1. Launch Configuration mode.
2. Access the ALARM menu, then select alarm number 5.
3. Access the ALARM DAYS? menu, then select EVERY DAY.
4. At the ALARM TYPE? menu, select ASTRONOMICAL.
5. Select SUNSET from the SUNRISE OR SUNSET? menu.
Note: If you want to add an offset value to trigger the show a certain amount of time
before or after sunset:
a. Enter an ALARM HOUR OFFSET value, then press
b. Enter an ALARM MINUTE OFFSET value, then press
6. Select a Trigger number with which to associate the alarm.
7. Press
to save your changes.
iPlayer 3 User Guide 22
Configuration Mode
Setup Menu
The Setup Menu contains configurable settings for the following:
• Expansion or Serial Ports: Devices attached to the two iPlayer 3 serial ports can trigger
any of up to 255 shows stored on iPlayer 3. By default, an external device triggers shows
starting with show 1. However, you can use the iPlayer 3's base trigger setting to specify a
different starting show number (see Example 6 on page 24 for details).
• iPlayer 3 Date and Time
• iPlayer 3 latitude and longitude: Used in sunrise and sunset calculations.
• LCD Screen Appearance: You can specify an integer from 0 to 10 to set the contrast and
brightness, with 10 producing the greatest brightness and contrast between the characters on
the screen and the background.
• Volume: You can specify an integer from 0 to 3 to set the audible volume of the iPlayer 3's
internal speaker, which produces a beep with each button press. 3 is the loudest setting.
• Setting a DMX address
• Testing a DMX address
Note: In the Setup Menu, your changes are saved automatically each time you enter a
new value.
Example 4: Setting a DMX Address
iPlayer 3 SAS (Serial Addressing Software) and ColorPlay 3 provide the most convenient
methods for addressing the fixtures in your DMX lighting installation. However, if needed, you
can also use the iPlayer 3 onboard setup menu to set DMX addresses.
There are two options for specifying which fixtures to address via iPlayer 3: you can set all
connected fixtures to a single DMX address, or you can specify a DMX address for each
individual fixture:
1. Launch Configuration mode.
2. Access the SETUP menu, then select SET FIXTURE DMX ADD.
3. If you want to specify a DMX address for all fixtures, select ALL SAME ADDRESS. If you want to
specify a DMX address for each individual fixture:
a. Select BY SERIAL NUMBER, and then press
.
b. At the S/N BYTE 1? S/N BYTE 2? S/N BYTE 3? and S/N BYTE 4? prompts, enter the serial number
of the fixture, using integers 00 to FF hexadecimal (42 00 01 1F, for example).
The fixture will blink when you enter each correct byte.
c. Confirm the serial number by pressing
.
4. Specify the number of the fixture (1 through 170).
5. Select PROGRAM DMX ADDR?, then press
to confirm you want to change the address of
the fixture.
Note: If the programming is successful, the fixture illuminates at full intensity after a few
seconds. If the programming is not successful, the fixture does not illuminate.
23 iPlayer 3 User Guide
Chapter 5
6. At the TEST DMX ADDR? prompt, press
. The iPlayer 3 performs a non-interactive test of the
fixture you specified in step 4 by setting the specified DMX address to FULL ON and all other
DMX address to OFF.
Example 5: Testing a DMX Address
1. Launch Configuration mode.
2. Access the SETUP menu, then select TEST DMX ADDR.
3. Specify the light number (1 through 170) you want to test. The iPlayer3 sends test data to any
fixtures which are set to that address.
If the test is successful, the fixtures illuminate at full intensity. If the programming is not
successful, the fixtures do not illuminate.
About Show Ranges
If using multiple external show selection devices and you want each device to trigger a different
range of shows, you must manually set the Show Range switch on each device accordingly.
For example, if you want your first of two Controller Keypads to control shows 1-8, you leave
the Show Range switch on its default setting (0). Then, to assign the second Controller Keypad
to control shows 9-16, you dial the Show Range switch to the corresponding setting (see the
Controller Keypad Product Guide for details).
Similarly, you can use the iPlayer 3 setup menu to assign show range offsets to serial port 1 and
serial port 2. For example, if you assign a base trigger of 8 to serial port 1, and a user selects
button 1 on a Controller Keypad connected to that serial port, iPlayer 3 will trigger show
number 9 (8 + 1).
Example 6: Assigning a Base Trigger of 8 to Serial Port 1
1. Launch Configuration mode.
2. Access the SETUP menu, then select CONFIG PORTS.
3. Set the the PORT 1 BASE TRIGGER # to 8.
4. Leave the PORT 2 BASE TRIGGER # at the default setting.
Info Menu
The Info Menu displays the following information:
• iPlayer 3 firmware version.
• Memory usage / available memory. For example, 104K/1024K indicates 104KB used out of
1024KB available.
• Astronomical clock data (for example, the time of sunrise for the current day).
iPlayer 3 User Guide 24
Configuration Mode
25 iPlayer 3 User Guide
Chapter 6
USB Mode
Overview
USB mode is active when ColorPlay 3 is connected to iPlayer 3. You must initiate USB mode to
download light show files and other data or use the ColorPlay 3 live play light show simulation
feature. You can initiate USB mode only from your PC or Mac, not from iPlayer 3 itself.
Initiating USB Mode
1. Verify that ColorPlay 3 is installed on your system.
2. Power ON iPlayer 3.
3. Connect iPlayer 3 to your computer using the supplied USB cable.
4. Launch ColorPlay 3.
5. There are two methods for launching USB mode from ColorPlay 3:
• Open the ColorPlay 3 configuration layer and click CONNECT.
• Design or load a show file in ColorPlay 3. Click the LIVE PLAY button to initiate USB
mode and simulate your show on your light fixtures.
6. End USB mode by clicking DISCONNECT in the ColorPlay 3 configuration layer.
Note: While in USB mode, you cannot access standard iPlayer 3 operational modes. End USB
Mode to resume normal iPlayer 3 operations.
Downloading Show Files from ColorPlay 3
1. Initiate USB Mode.
2. In the ColorPlay 3 configuration layer, click the SHOW FILES tab, then select one or more
show files.
3. Click the COPY SELECTED SHOWS TO CONTROLLER arrow button to begin downloading.
• Once fully downloaded, show files appear in the right column of the file manager with
a .SHO file extension.
iPlayer 3 User Guide 26
USB Mode
Downloading Triggers from ColorPlay 3
Triggers are numbered 1-256 and specify parameters including which show file(s) to play (you
can assign multiple show files to a single trigger) and how a show behaves after one playback
cycle, (repeat, for example).
1. Initiate USB Mode.
2. In the ColorPlay 3 configuration layer, click the TRIGGERS tab and then select one or more
triggers in the left column.
3. Click the COPY SELECTED TRIGGERS TO CONTROLLER arrow button to begin downloading.
Downloading Alarms from ColorPlay 3
There are two ways to trigger a show: manually by pressing device buttons or automatically via
alarms. Alarms trigger shows at particular times (such as every Monday at 5:00 p.m.) or for an
astronomical events (such as every day at sunset).
1. Initiate USB Mode.
2. In the ColorPlay 3 configuration layer, click the ALARMS tab, then select one or more alarms in
the left column.
3. Click the COPY SELECTED ALARMS TO CONTROLLER arrow button to begin downloading.
27 iPlayer 3 User Guide
Appendix A
Pinouts and DIP Switch Functions
Serial Port: DB9F Pinouts
1
No connection
2
TxD
3
RxD
4
+5V DC controlled by the DIP switch setting
5
Ground
6
No connection
7
No connection
8
No connection
iPlayer 3 User Guide 28
Pinouts and DIP Switch Functions
DMX: RJ-45 Pinouts
1
29 iPlayer 3 User Guide
8
1
Data out -
2
Data out +
3
Ground
4
No connection
5
No connection
6
Ground
7
No connection
8
No connection
iPlayer 3 DIP Switch Functions
The iPlayer 3 DIP switches are located on the bottom of the device, below the SD memory
card. Remove the two screws on the access door, on the bottom of the iPlayer 3, to view
the switches.
ON
1 2 3 4
ON
1 2 3 4
Switch 1
On = provide +5 VDC power to serial port 1, pin 4
Switch 2
On = provide +5 VDC power to serial port 2, pin 4
Switch 3
Reserved
Switch 4
On = enable arrow buttons
Off = lock arrow buttons
iPlayer 3 User Guide 30
Pinouts and DIP Switch Functions
31 iPlayer 3 User Guide
Appendix B
Configuring Remote Triggering Devices
Electrical
The RS-232 serial port connections on the iPlayer 3 are DB9F connectors, labeled SERIAL 1 and
SERIAL 2. The following pinout information applies to each DB9F connector (the other pins are
unconnected):
2
TxD
3
RxD
4
+5V DC controlled by the DIP switch setting
5
Ground
+5 VDC is provided on pin 4 (normally the DTR pin). Other devices can use this voltage
provided they draw no more than 50 mA. If the voltage on pin 4 is not desired, it
can be disabled by moving configuration DIP switch 1 (for serial port 1) or DIP switch 2 (for
serial port 2) to the OFF position.
Protocol
The serial protocol used to control the Controller Keypad, AuxBox or third-party triggering
device is 9600 baud, 8 data bits, no parity, 1 stop bit. There is no flow control. Each command to
the iPlayer 3 consists of five characters. The first character is always X. The next two characters
are the ASCII representation of a hexadecimal command byte. The last two characters are a
hexadecimal data byte. The hexadecimal alpha characters are uppercase (0 - 9, A - F).
•
Replies from the iPlayer 3 are also in this format, but begin with Y instead of X.
•
Characters are not echoed by the iPlayer 3 when they are received.
•
Illegal characters or badly formatted packets are ignored with no error indication.
iPlayer 3 User Guide 32
Configuring Remote Triggering Devices
iPlayer 3 Commands
Note: dd is used below to represent a hexadecimal byte.
X00dd
Set Mode. Sets the current operating mode to dd.
Not currently used.
X0100
Lights Off. Turns all lights off.
X02dd
Set Absolute Intensity. Sets the global brightness level to dd (00 = Off, FF = full On).
X03dd
Set Relative Intensity. Raises or lowers the global brightness level by dd (dd is 2’s complement,
so 02 increases by 2, FE decreases by 2). Brightness is pegged between 0 and 255.
X04dd
Set Show. Starts the show with trigger number dd, playing from the beginning. The trigger
number must be in the range 1 through 225 (E1).
Replies from the iPlayer 3
Y00dd
Returns current mode
Y0100
Entered off mode
Y02dd
Returns current intensity level
Y03dd
Not sent
Y04dd
Returns current show
Y0Fdd
Error occurred, show number in data byte. This is most often returned when the selected show
is not available (so the keypad knows to make the LED blink).
33 iPlayer 3 User Guide
Appendix C
Firmware Update Procedure
Overview
The iPlayer 3 firmware image is periodically updated to improve system performance and
functionality. If your iPlayer 3 is not running the most recent firmware, it is recommended that
you update to maximize system performance. The most recent released firmware image can be
downloaded from www.colorkinetics.com/support/iplayer3/.
Determining Firmware Version
1. Power On the iPlayer 3.
2. Launch Configuration Mode.
3. Access the INFO menu, then select VERSION.
4. The screen should display the firmware version in the form v01.00.xx b00001.
5. If the “xx” value is a lower number than the most recent image on the website, follow the
update procedure described below.
Firmware Update Procedure
1. Connect the USB cable from iPlayer 3 to your PC or Mac
2. Download and extract the iPlayer 3 Firmware Updater from
www.colorkinetics.com/support/iplayer3/
3. Download the most recent firmware image from www.colorkinetics.com/support/iplayer3/
4. Go to the iP3 Firmware Updater folder and open the file: iP3 Bootloader.exe.
5. Once the program is open, click Select under Firmware Image File.
6. Select the latest .HEX file from the directory where you saved it, then click Open.
7. With the firmware image successfully loaded, click Connect under iPlayer 3.
8. Once the version information is displayed under iPlayer 3, click Program to begin the
update process.
Caution: Do not disconnect the USB cable during the firmware upgrade process, as doing
so may damage the device.
9. When the firmware update successfully completes, the message “Programming complete!” is
displayed. Click OK, then select File – Quit to exit the program.
iPlayer 3 User Guide 34
Firmware Update Procedure
35 iPlayer 3 User Guide
Appendix D
Cloning and Formatting SD Memory
Cards for use in iPlayer 3
Overview
iPlayer 3 utilizes SD memory cards for removable storage. You can take advantage of this feature
if you have multiple, identical installations playing the same iPlayer 3 show files. For example, you
can clone an SD card from one iPlayer 3 and use it on another iPlayer 3, rather than configuring
each iPlayer 3 from scratch.
SD memory cards up to 2 GB in size and SDHC memory cards up to 8 GB are compatible
with the iPlayer 3. All SD memory cards used in the iPlayer 3 must be formatted to use the
FAT file system.
You cannot clone or format an SD memory card while it is installed in the iPlayer 3. However,
you can use a Windows® PC or Mac with a memory card reader to perform these functions.
SD Card Cloning Procedure (Windows® or Mac OS)
1. Remove the two access door screws on the bottom of the iPlayer 3.
2. Slide the door off the iPlayer 3, then remove the SD card.
3. Insert the SD card into a memory card reader on your PC or Mac.
4. Copy the folder named IPLAYER3 to your computer.
5. Eject the SD card from the memory reader, then insert a new SD card.
6. Format the new SD card as FAT (see below).
7. Copy the IPLAYER3 folder from your computer to the top level directory of the SD card.
Windows® SD Card Formatting Procedure
1. Remove the two access door screws on the bottom of the iPlayer 3.
2. Slide the door off the iPlayer 3, then remove the SD card.
3. Insert the SD card into a memory card reader on your Windows PC.
4. Reformat the SD card as you would any drive partition on your PC:
a. Double-click My Computer or Computer.
b. Right-click the icon for the SD card.
c. Select Format from the pop-up menu.
d. Select FAT Format.
e. Select Full Format.
iPlayer 3 User Guide 36
Mac OS SD Card Formatting Procedure
1. Remove the two access door screws on the bottom of the iPlayer 3.
2. Slide the door off the iPlayer 3, then remove the SD card.
3. Insert the SD card into a memory card reader on your Mac.
4. Run the Disk Utility application (located in the Utilities folder).
5. Select the Erase tab.
6. Select the SD card from the list of available disks in the left column.
7. Under Volume Format, choose MS-DOS File System (FAT).
8. Click the Erase button.
37 iPlayer 3 User Guide
Appendix E
Configuration Menus in Detail
Triggers Menu
Main Menu
Fixed Color?
Triggers
Alarms
HSB Editor
Setup
Info
Trigger
Number?
Integer 0-255
Start Color?
End Color?
Hold Time?
Fade Time?
Offset?
HSB Editor
HSB Editor
Duration Editor
Duration Editor
Integer 0-1001
Cycle Time?
Offset?
Direction?
Duration Editor
Integer 0-1001
RGB Up
RGB Down
Show Type?
Canned Effect
Downloaded
Effect Type?
File Name?
Fixed Color
Cross Fade
Rainbow
Random Color
Sparkle
Color Sweep
Color Streak
Show File Picker
RBG Up
RBG Down
Test Effect
Hold Time?
Fade Time?
Offset?
Color Count?
Duration Editor
Duration Editor
Integer 0-1001
Integer 0-128
FG Color?
BG Color?
Density?
Fade Time?
HSB Editor
HSB Editor
Integer 0-100
Duration Editor
FG Color?
BG Color?
Time?
HSB Editor
HSB Editor
Duration Editor
FG Color?
BG Color?
Time?
Width?
HSB Editor
HSB Editor
Duration Editor
Integer 0-100
Effect Tester
Transition Type?
Test Show
Show Tester
End Behavior?
Snap
Fade Out & In
Cross Fade
Transition
Time?
Duration Editor
Fade to Black
Loop
Jump to Another Trigger
Save Changes?
Yes
No
Show
Number?
Integer 0-255
HSB Editor
Duration Editor
Minutes?
Seconds?
Integer 0-1000
Integer 00-59
Base Hue?
Hue Adjust?
Saturation?
Brightness?
Red
Yellow
Green
Cyan
Blue
Magenta
Integer -255 to 255
Integer 0-100
Integer 0-100
Trigger Number?
Assign a trigger number (0 - 255).
Show Type?
Select Canned Effect to use an iPlayer 3 preconfigured show or Downloaded to use a custom
show file downloaded from ColorPlay 3.
Canned Effect Types
Choose from seven visual effects:
FIXED COLOR : Static display of a solid color.
CROSS FADE: A smooth transition from one solid color to another
RAINBOW: A sequence of solid colors moving in one direction
RANDOM COLOR : A sequence of randomly generated solid colors at specified intervals
SPARKLE: Flashes of foreground color at random over a solid background color
COLOR SWEEP: Progressive transition of a solid foreground color across a solid background
COLOR STREAK: An animated effect with narrow lines of color over a solid background
iPlayer 3 User Guide 38
Canned Effect Parameters
Fixed Color Effect
Fixed Color
Use the HSB Editor to enter Hue, Saturation, Brightness values for a fixed display color.
Cross Fade Effect
Start Color
Use the HSB Editor to enter values for a starting color.
End Color
Use the HSB Editor to enter values for a ending color.
Hold Time
Enter a color hold duration — specifies how long a color is held before it fades.
Fade Time
Set a duration for the color fade.
Offset
Specify the angle of the effect.
Rainbow
Cycle Time
Enter an effect duration in minutes and seconds (changes the width of the color bars).
Offset
Specify the angle of the effect.
Direction
Set the effect to go up the RGB scale or down the RGB scale.
Random Color
Hold Time
Enter a color hold duration — specifies how long a color is held before it fades.
Fade Time
Set a duration for the color fade.
Offset
Specify the angle of the effect.
Color Count
Specify the number of random colors included in the effect (up to 128).
Sparkle
FG Color
Use the HSB submenu to enter values for a foreground color.
BG Color
Use the HSB submenu to enter values for a background color.
39 iPlayer 3 User Guide
Density
Modify the number of nodes covered by the foreground color.
Fade Time
Set a duration for the color fade.
Color Sweep
FG Color
Use the HSB submenu to enter values for a foreground color.
BG Color
Use the HSB submenu to enter values for a background color.
Time
Set the duration of the color effect.
Color Streak
FG Color
Use the HSB submenu to enter values for a foreground color.
BG Color
Use the HSB submenu to enter values for a background color.
Time
Set the duration of the color effect.
Width
Specify the width of narrow line animated in the foreground.
File Name?
Select a ColorPlay 3 .SHO file for download.
Test Show
Simulate the downloaded show on your lighting installation.
End Behavior?
Specify an end behavior for the downloaded ColorPlay 3 show:
LOOP: Repeat the show indefinitely.
LIGHTS OFF: End the show and turn of all fixtures in the installation.
JUMP TO TRIGGER : Trigger another show file.
Show Number?
If you selected JUMP TO TRIGGER in the End Behavior menu, enter a show number (0 - 255).
iPlayer 3 User Guide 40
Transition Type?
Set a show transition:
SNAP: No transition.
FADE OUT & IN: Fade out to black, then back to the start color of the current show or
next show.
CROSS FADE: Morph from the end of the current show to the beginning of the current show or
the beginning of the next show.
Transition Time?
Set a duration for the selected transition type.
Save Changes?
In the Triggers menu and associated submenus, you must save for your changes to take effect.
HSB Editor
Base Hue?
Select a standard color: Red, Yellow, Green, Cyan, Blue, or Magenta.
Hue Adjust?
Adjust the hue spectrum value of the base color to create a custom color (-255 - 255).
Saturation
Adjust the intensity of the color (0 - 100).
Brightness
Adjust the brightness of the color (0 - 100).
41 iPlayer 3 User Guide
Alarms Menu
Main Menu
Triggers
Alarms
Alarm
Number?
Setup
Info
Integer 0-15
Specific
Month?
Specific Day?
Integer 1-12
Integer 1-31
Alarm Days?
Specific Date
Every Day
Weekends
Alarm Time?
Weekdays
Mondays
Time Editor
Alarm Type?
Tuesdays
Wednesdays
Time-of-day
Astronomical
Thursdays
Fridays
Show Number?
Saturdays
Integer 0-255
Sundays
Sunrise or
Sunset?
Sunrise
Sunset
Offset Hr?
Offset Min?
Save Changes?
Integer -12 to 12
Integer 0 to 59
Yes
No
Time Editor
Hour?
Minute?
Second?
Integer 00-23
Integer 00-59
Integer 00-59
Alarm Number?
Assign an alarm number (0 - 15).
Alarm Days?
Specify a specific date, weekends, weekdays, or a day of the week.
Specific Month?
If you selected SPECIFIC DATE in the Alarm Days? menu, enter a month number (1 - 12).
Specific Day?
If you selected SPECIFIC DATE in the Alarm Days? menu, enter a day number (1 - 31).
Alarm Type?
Select TIME-OF-DAY to create an alarm based on clock time or ASTRONOMICAL to create an alarm
based on the time of sunrise or sunset.
Alarm Time?
Enter the hour, minute, and seconds as the clock time to activate the alarm.
Sunrise of Sunset?
Select SUNRISE or SUNSET as the astronomical time to activate the alarm.
iPlayer 3 User Guide 42
Offset Hr?
If you selected ASTRONOMICAL in the Alarm Type? menu, you enter an offset to stagger the alarm
before or after the astronomical event by hours.
Offset Min?
If you selected ASTRONOMICAL in the Alarm Type? menu, you enter an offset to stagger the alarm
before or after the astronomical event by minutes.
Show Number?
Associate the alarm with a trigger number. When the alarm activates, it will automatically start
the associated trigger.
Save Changes?
In the Alarms menu, you must save for your changes to take effect.
43 iPlayer 3 User Guide
Setup Menu
Main Menu
Triggers
Alarms
Port 1 Base
Trigger #?
Port 2 Base
Trigger #?
Integer 0-255
Integer 0-255
Set Date
Set Time
Date Editor
Time Editor
Setup Menu
Setup
Info
Config Ports
Set Clock
Set Lat/Long
LCD Setup
Sound Setup
Set DMX Addr
Test DMX Addr
Set Latitude
Set Longitude
Set Time
Zone
DST?
Lat Editor
Long Editor
TZ Editor
Yes/No
LCD
Contrast?
LCD
Backlight?
Integer 0-10
Integer 0-10
Duration Editor
Minutes?
Test DMX Addr
Seconds?
Integer 0-1000
Integer 00-59
Volume?
Integer 1-170
Integer 0-3
Lat Editor
DMX By S/N
Set DMX Addr
Latitude Integer?
Latitude Fraction?
Integer -180 to 180
Integer 0 to 100
S/N Addr Editor
By S/N
All Same Addr editor
All Same DMX
Long Editor
S/N Addr Editor
Longitude Integer?
Longitude
Fraction?
Integer -180 to 180
Integer 0 to 100
All Same Addr Editor
Date Editor
DMX Addr?
Program?
Test DMX?
Integer 1-170
Yes
No
DMX Test
Day?
Month?
Year?
Integer 1-31
Integer 1-12
Integer 00-99
S/N Byte 1?
S/N Byte 2?
S/N Byte 3?
S/N Byte 4?
Test S/N?
DMX Addr?
Program?
Test DMX?
Hex 00-FF
Hex 00-FF
Hex 00-FF
Hex 00-FF
S/N Test
Integer 1-170
Yes
No
DMX Test
S/N Addr Editor
Setup Parameters
Port 1 Base Trigger #, Port 2 Base Trigger #
Create a show range offset for serial port 1 or serial port 2 (change the starting base show
number for a serial port).
Set Date
Use the Date Editor to enter the correct day, month and year.
Set Time
Use the Time Editor to set the clock time.
Set Latitude
Use the Latitude Editor to set latitude (used to calculate sunrise and sunset).
Set Longitude
Use the Longitude Editor to set longitude (used to calculate sunrise and sunset).
LCD Contrast?
Set the contrast of the LCD screen (0 - 10).
iPlayer 3 User Guide 44
LCD Backlight?
Set the brightness of the LCD screen (0 - 10).
Volume?
Set the volume level of the internal speaker (0 - 3). Turn the speaker off by selecting 0.
Set DMX Address
By Serial Number
Use the Serial Number Editor to set DMX addresses by fixture serial number.
All Same Address
Use the All Same Address Editor to set all fixtures to the same DMX address.
Test DMX Address
Enter the DMX address you want to test (1 - 170).
Info Menu
Memory Usage
Main Menu
Info Screen
Triggers
Alarms
Version Info
Setup
Version String
Version
Memory
Astronomical
Info
Free & Used Space
Sunrise
Sunset
Today’s Sunrise
Today’s Sunset
Version Info
Displays the installed firmware version so you can determine if firmware needs to be updated
(see Appendix C for details).
Memory Usage
Displays available/used onboard memory.
Sunrise
Displays today’s time of sunrise based on clock time, longitude, and latitude.
Sunset
Displays today’s time of sunset based on clock time, longitude, and latitude.
45 iPlayer 3 User Guide
Index
A
M
alarm 22
alarms 17, 18
alarms, download 27
AuxBox 4, 18
AuxBox, connecting 12
Main Menu 20
memory usage 24
mounting 8
mounting bracket 9
P
C
ColorPlay 3 4, 10, 20, 26
Configuration mode 15, 20
Controller Keypad 4, 18, 20
Controller Keypad, connecting 12
D
DMX address 23, 24
DMX output port 13
DMX universe 4
E
effect 21
effects 5, 16
electrical specifications 7
end behavior 22
environmental specifications 7
F
Preset button 16, 18, 21
R
Range switch 12
related documents 5
Run mode 15, 18
S
Setup Menu 22
show files, download 26
show playback, automating 18
shows 16
shows, linking multiple to a trigger 17
system requirements 10
T
transition 22
triggers 16, 20
triggers, download 27
firmware version 24
U
H
hardware features 14
L
LCD brightness 19
LED indicator light 19
light shows 5
USB cable 11
USB mode 15, 26