1
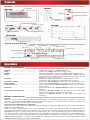
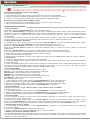
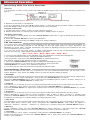
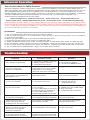
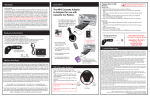
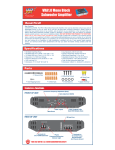
MP320T
MP3 Player with FM Modulator & Voice Recorder
Read First!
Dear Customer,
CONGRATULATIONS.
The MP320T MP3 Player with FM Modulator & Voice Recorder, when used as described, will
enable you to enjoy CD-quality music any place and any time. We have taken numerous
measures in quality control to ensure that your product arrives in top condition and will
perform to your satisfaction. In the rare event that your MP320T MP3 Player with FM
Modulator & Voice Recorder contains a damaged or missing item, does not perform as
specified, requires warranty service or you have an installation problem, DO NOT RETURN
THIS PRODUCT TO THE STORE. Please call our TOLL-FREE NUMBER 1-800-445-1797
and ask to speak with a member of our technical service team, or submit your questions by
e-mail to [email protected] and a member of our technical service team
will respond by e-mail to your questions. Our in-house technical service team will expedite
delivery of your part, advise you on installation, or help troubleshoot a problem with you. If
your product needs warranty service, our technical service team representatives will help
you obtain the fastest remedy possible under the warranty.
Features & Functions
• MP3 Player with LCD Display
• Plays MP3 and WMA Files
• USB 2.0 Plug N’ Play™
• 128 MB Built-In Flash Memory
• Backlit LCD Display
• Requires only one AAA” Alkaline Battery
• EQ Presets; Normal, Rock, Classic, Pop, Jazz and Bass
• Dimensions: 2.937"L x 1.4"H x 0.625"W - 74.6 mm x 35.56 mm x 15.87 mm
Parts
MP3 Player
Lanyard w/Earbuds
Setup
Installation
System Requirements
• Hardware: IBM PC, Compatible PC, or Notebook Computer with USB interface.
Macintosh Computer, or Powerbook with USB interface
• Operating System: Windows 98/SE, Windows Me, Windows 2000/XP
Mac OS from 9.2 to 10.3.8
the correct model of player to install.
Battery Installation
Press on the battery cover and slide towards the
Connecting to a PC or MAC computer
bottom of the player.
Insert plug “A”, the larger end of the USB cable,
Lift battery compartment cover, then insert one
into the PC’s USB port, then insert plug “B”, the
“AAA” - size alkaline battery.
smaller end, into the MP320T’s USB port.
Close the battery cover.
When you open “My Computer” on the PC, or
“Finder” on the MAC, you will see a new
Before Using
removable disk. This indicates the connection is
TM
The MP3 player is a Plug & Play device under
successful. You may create or delete folders
the WINDOWS 2000/XP/ME Operating System.
and transfer/delete files just as you would any
But for WINDOWS 98/SE, you are required to
other storage device.
install the driver on the computer first before
connecting the player to the computer.
Insert the included driver CD into the CD-ROM
drive and run the Setup.exe file on it. Choose
Windows 98/SE users are required to
install the driver BEFORE connecting
the MP320T to the computer!
Installation
Controls
Buttons
• Display
FRONT VIEW
END VIEW
END VIEW
Mic •
• Slot For Lanyard
• Earphone Jack
• USB Port
(covered)
• Decrease Volume
• A-B • Play
TOP VIEW
• Thumb Wheel
REAR VIEW
• Increase Volume
BOTTOM VIEW
• “AAA” Battery Compartment
• Button Lock
Liquid Crystal Display
Play Mode •
File Type •
• A-B Repeat
• EQ Mode
• Track Number
• Total Tracks
• Length of Current Track
Battery Charge •
Bit Rate •
• Elapsed Time
Operation
BASIC CONTROLS
On/Off ................................................ Press and hold the “Play” Button.
Play ........................................................ Press the “Play” button to play track.
Pause
................................................ During playback, press the “Play” button to pause.
Stop
................................................ During playback, press and hold the “Play” button
momentarily to stop the playback and return to the
beginning of current track.
Volume ................................................ Press the “V+” button to increase the volume.
Press the “V-” button to decrease the volume.
Previous Track
................................ Press the “Thumb Wheel” to the left to go to previous track.
Next Track
........................................ Press the “Thumb Wheel” to the right to go to the next track.
Fast Forward ........................................ Press and hold the “Thumb Wheel” button to the right to
fast-forward.
Rewind ................................................ Press and hold the “Thumb Wheel” button to the left to
rewind.
Lock/Unlock Buttons ........................ Slide the “Button Lock” to the left to lock and keep
buttons from being pressed accidentally.
Slide the “Button Lock” to the right to enable all
buttons.
BASIC OPERATION
On/Off
Slide the “Button Lock” button to the unlocked position to enable all buttons before operation. To turn the
unit “On” press and hold the “Play” button until the LCD lights up. First image you will see is the VR3 logo,
then you will see the root directory of the MP320T
Connecting the MP320T to a Computer
Insert the “A” (larger) end of the USB cable into the USB port of the PC and insert the “B” (smaller) end into the
USB port on the MP320T.
When you open “My Computer” on a PC or “Finder” on a Mac, you will see a new removable disk icon.
This indicates the connection is successful. You may create or delete folders and copy and delete files on
the MP320T just as you would any other storage device. You may name folders by genre, artist, playlist, or
any way that suits your needs. Copying files to the MP320T is the same as copying any other digital file on
your computer. If you are having trouble copying files when connected to a computer, refer to the computer
manufacturer’s help files, or call us TOLL-FREE at 1-800-445-1797 and one of our Technical Service Team
representatives will help you solve your problem.
Operation
BASIC OPERATION (Cont.)
Data transfer must be stopped before unplugging the MP320T player from the computer. When the musical note
icon “ ” is shown on the LCD display moving between the computer icon and the MP320T icon, data is still
being transfered. Please only unplug the player when the musical note icon “ ” has disappeared from the LCD.
Removing the player from a PC safely.
For Windows 2000/XP:
1. Left click the remove device icon at the right hand corner of the taskbar.
2. Choose “Stop the USB Mass Storage Device – Drive (X)” on the pop-up menu.
3. When you are prompted, remove the USB cable from the MP3 player.
Removing the player from a MAC safely.
1. Click the eject button of the MP320T’s icon, or drag and drop into Trash.
2. Remove the USB cable from the MP3 player.
ADVANCED FEATURES
• Using the Menu
Press and hold the “Thumb Wheel” to enter the Main Menu.
Move the “Thumb Wheel” to the left or to the right to navigate the Menu items, when the desired item is
highlighted press the “Thumb Wheel” to select. Press the “Play” button to return to the previous menu
level; or, if the unit is inactive for more than a few seconds, the unit will return to the previous level
automatically.
To exit from the Menu mode, on the Main Menu, select “Return” and press the “Thumb Wheel” to
confirm. If the unit is inactive for more than a few seconds, the unit will automatically exit.
• Using the Navigation Function
In the Music or Voice mode, press and hold the “Thumb Wheel” to enter the Main Menu, then select
Folder and press the “Thumb Wheel” to enter the folder navigation mode.
Move the “Thumb Wheel” to the left or to the right to highlight a folder or a file.
Press the “Thumb Wheel” button to enter the selected folder or press the “Play” button to play the
selected file.
Press the “Thumb Wheel” to exit from the folder and return to the previous directory.
You can delete a track or empty folder in the navigation mode. The steps are as follows:
1. Highlight the track or empty folder that you want to delete.
2. Press the A-B button to delete it.
3. Move the Thumb Wheel to select "Yes" option and then press the “A-B” button again to confirm deletion.
• A-B Repeat
To specify a section of the current track to be repeated;
1. Press the “A-B” button during playback to select the start point of the repeat. “A-” will be displayed at
the top of the LCD.
2. Press the “A-B” button again at the desired end point of the repeat. "A-B" will be displayed at the top of
the LCD indicating that the section chosen between start point "A" and end point "B" will be played
repeatedly. To end the “A-B” repeat,press the “A-B” button again.
• Select Play Mode
You can switch between the following five play modes:
Normal – Play all tracks in order and stop after playing all
Repeat One – Keep repeating the current track
Repeat All – Play all tracks in order and repeat
Shuffle – Play all tracks randomly and stop after playing all
Rep Shuffle – Keep repeating all tracks randomly
To select the play mode:
1. In the Music or Voice mode, press the “Thumb Wheel” to show the submenus.
2. Select “REPEAT” and press the “Thumb Wheel” to show the mode options.
3. Move the “Thumb Wheel” left or right to navigate through the different modes.
4. Select the desired mode and press the “Thumb Wheel” to confirm.
• Switch EQ Mode
The player has 6 EQ modes: Normal, Rock, Jazz, Classic, Pop, and Bass.
To set the EQ mode:
1. In the Music or Voice mode, press the “Thumb Wheel” to show the submenus.
2. Select “EQUALIZER” and press the “Thumb Wheel” to show the equalizer settings.
3. Select the desired Equalizer setting and press the “Thumb Wheel” to confirm.
• Preview Tracks
You can preview all tracks on the current play list before listening. In the preview mode, the player plays
the first 10 seconds of every track.
In the Music or Voice mode, press the “Thumb Wheel” to show the submenus, select “Preview”, then
press the “Thumb Wheel” to start preview. While previewing the tracks you may press the “Play” button
to play the current track being previewed. To end the preview, press the “Thumb Wheel” again.
• Delete Single Track or Folder
1. In the Music or Voice mode, turn the “Thumb Wheel” leftwards or rightwards to select the track that
you want to delete.
2. Press the “Thumb Wheel” to show the submenus.
3. Select “Delete” and press the “Play” button to confirm deletion.
• Deleting All Tracks or Multiple Tracks
Connect the MP320T to the computer with the provided USB cable. Open the removable drive associated
with the MP320T and select all of the tracks, or the any combination of tracks, then delete them as you
would any other computer file.
©2005 Virtual Reality Sound LabsTM All designs, logos and images are the exclusive property of Virtual Reality Sound LabsTM and/or it’s affiliates. All rights reserved. 040505
Advanced Operation
Recording With The Voice Recorder
• Record
1. In the Music or Voice mode, press and hold the “A-B” button until you see the recording screen as in
Figure. 1.
File Name •
Elapsed Time •
• Time Remaining
2. Speak into the built-in microphone.
3. To stop recording, press the “A-B” button again. A voice file named as V001. WAV is created. Next
press the “Play” button to play the voice file that you just recorded.
• Playing a Voice File
1. On the main menu, select “Voice” to enter the Voice mode.
2. Select the file that you want to play and press the “Play” button to play it.
• Deleting a Voice File
1. In the Music or Voice Mode, turn the “Thumb Wheel” either left or right to select the track that you
want to delete.
2. Press the “Thumb Wheel” to show the submenus.
3. Select “Delete” and press the “Play” button to confirm deletion.
FM Transmitter
One of the more useful functions of the MP320T is the FM transmitter. The FM transmitter enables you
to transmit the file being played on the MP320T to any FM radio within it’s range. Whenever the
MP320T is turned “OFF”, the FM Transmitter will revert to disabled until the user enables it the next
time the MP320T is turned “ON”.
1. In your car, truck, RV, boat, home, or office, tune the FM radio to one of the following frequencies
that do not have any radio stations broadcasting on them:
87.7 - 87.9 - 88.1 - 88.3 - 88.5 - 88.7 - 88.9 - 89.1
2. Connect the headphones to the MP320T, they are needed to transmit the FM Signals
3. To enable the FM Transmitter, navigate the Main Menu to
“FM Transmitter” and press the “Thumb Wheel” to choose (Figure 1).
The default setting for the FM transmitter is “Disabled”.
4. Move the “Thumb Wheel” left or right to select the FM frequency that
matches the frequency you have set your FM radio to, then press the
“Thumb Wheel” to confirm your selection (Figure 2).
5. Any files that you play will now be transmitted to the FM radio.
Customizing “Settings”
There are six features that you may customize to suit your personal preferences. On the main menu,
select “Settings”, then press the “Play” button to enter the System Settings Mode.
• Backlight
This allows you to set the amount of time that the LCD backlight will remain on after player adjustment.
On the Main Menu, select “Backlight”, then press the “Thumb Wheel” to confirm.
Move the “Thumb Wheel” left or right to see the four available options: 5 Secs, 10 Secs, Always on, or
Disable. Press the “Thumb Wheel” to select one.
• Contrast
This allows you to set the amount of contrast between the background and the lettering of the LCD.
In the “Settings” menu, select “Contrast” and press the “Thumb Wheel” to confirm.
Turn the “Thumb Wheel” to adjust the contrast level and then press the “Thumb Wheel” to confirm
your settings.
• Shutdown
This allows you to set the amount of time the player is idle before automatically shutting down.
Select “Shutdown”, then select an option of either 1 Min., 2 Mins., 5 Mins., 10 Mins. or Disable, then
press the “Thumb Wheel” to confirm the selection. “Disable” means the player will not automatically
shutdown and will stay on until the battery’s charge becomes low.
• Play Time
This specifies an amount time after which the player will automatically shut off. Default is “Always On”
On the Main Menu, select “Play Time” and press the “Thumb Wheel”, then select an option of
“30mins”, “60mins”, “90mins”, “120mins" or “Always On”, and then press the “Thumb Wheel” select.
• Memory
In the “Settings” menu, turn the “Thumb Wheel” to select “Memory”, and then press the “Thumb
Wheel” to see total capacity and how much free internal memory the unit still has.
• Language
On the “Setting” menu, select “Language” and press the “Thumb Wheel” to confirm.
Select one language by moving the “Thumb Wheel” left or right, then press the “Thumb Wheel” to
confirm your selection.
Advanced Operation
File Conversion to MP3 Format
Several websites contain software for users of PCs and MACs to convert various audio files to
MP3 compatible files. The websites listed below are provided for informational purposes only and
the inclusion herein shall not be considered as an endorsement or recommendation by Virtual
Reality Sound Labs™ of these entities, products or service to which they link. Similarly, omissions
of other websites offering similar products or services are not intended to indicate nonendorsement or disapproval of such sites.
www.nonags.com, www.tucows.com, www.cnet.com, www.superfiles.com,
www.jumbo.com, www.freewarehome.com, www.panic.com, www.freewareweb.com
Virtual Reality Sound Labs™ is not responsible for the content and usefulness of the information
found on the above-listed websites and you hereby waive any claims against Virtual Reality Sound
Labs™ regarding the quality, suitability for any particular purpose, merchantability or the legality of
any such websites, products or services.
Cautions
1. Do not subject the device to a severe impact or drop.
2. Do not use the player in an extreme hot, cold, dusty, or damp environment. Do not expose
unit to direct sunlight.
3. Back up data frequently to prevent accidental data loss.
4. Avoid using the player near a strong magnetic field.
5. Keep the device away from water or other liquids. In the event that water or other liquids
enter the device, power off the product immediately, take out the battery and dry the device.
6. Do not use chemical solutions to clean the device. Cleaning can be done with a dry cloth.
7. Do not attempt to disassemble, repair, or modify this product.
Troubleshooting
Possible Cause
Solution
The LCD is blank when the
play button is pressed.
1. No battery or battery is too low.
2. Battery polarity reversed.
3. The buttons are locked.
1. Install or replace the battery.
2. Re-install the battery
2. Unlock the “Hold” switch.
The player will not turn
on even when the
battery is replaced.
The internal flash memory
may have errors from static,
magnetism, or improper
removal from the computer.
Upgrade the firmware.
The player will not play when
play button is pressed and
the player is on.
The buttons are locked by
the Hold switch.
Slide the “Hold” Switch to
the unlocked position.
No sound when playing
music or voice file.
1. The volume is too low.
2. The file is corrupt.
1. Turn the volume up.
2. Delete the file or
play another file.
The player is not recognized
by the computer.
1. The driver is not installed
or is corrupt.
2. The USB cable is not fully
inserted into the USB jack.
3. The USB cable is not
supported by the computer.
1. Install/reinstall the driver.
2. Make sure the USB cable
is fully inserted
3. Upgrade the computer.
The displayed time is
constantly changing.
The bit rate of the MP3 file
Use fixed bit rate to
is changing during playback. compress the file.
The player has an error
when you plug into &
unplug from the computer.
The player is unplugged
during file transfer.
Do not unplug the player
during file transfer.
The removable disc icon
does not show up when
the player is plugged
into the computer.
The USB cable may be loose
on the MP320T or the computer
Reconnect the player
to the computer.
The total memory displayed
is not the same as the
indicated player capacity.
Part of the unit's total memory
is used to store programs and
display characters on the LCD.
Problem
Specifications
• Capacity - 128 Megabytes
• Record Bit Rate - 8Kps
• Battery Type - “AAA” Alkaline
• Audio File Format - MP3 (MPEG 1/2/2.5 layer 3), WMA
• LCD - 128 x 32 Pixels
• Record Format - WAV
• Earphones - 5mW + 5mW
• EQ Mode Normal, Classic, Jazz, Pop, Rock. Bass
• Frequency Response 20Hz - 20KHz
• Signal to Noise Ratio >90dB
Notes
Transferring files from Apple Computers to MP3 Players
MP3 players may experience difficulties or anomalies when playing music copied from a Mac OS
machine. This is due to the transfer of harmless Mac specific files when copying from an Apple
computer to other devices. The file and folder types concerned are: ".DS_Store", ".Trashes",
"Resource forks.", and "FBC" files. In an MP3 player they may not show up; or they may show
up on the screen as "bad files", sometimes an extra file for every MP3 file (meaning there is
one after every song) will show, and then be passed up; or they may cause the player to
snag.
If you experience difficulty of this nature, you can eliminate these files with a program called
FinderCleaner. FinderCleaner is a Freeware software program downloadable at www.apple.com and
www.versiontracker.com.
Virtual Reality Sound Labs™ is not responsible for the content and usefulness of the information
found on the above-listed websites and you hereby waive any claims against Virtual Reality Sound
Labs™ regarding the quality, suitability for any particular purpose, merchantability or the legality of
any such websites, products or services.
Give Us A Call, We'll Help You Install!
For Information and Technical Assistance, Call Toll-Free in U.S.A. and Canada.
1-800-445-1797
PLEASE DO NOT RETURN PRODUCT TO STORE.
Visit us on the WEB
WWW.VR-3.COM
Limited Warranty
Virtual Reality Sound LabsTM products are designed and manufactured to provide a high level of trouble-free performance. Virtual
Reality Sound LabsTM warrants, to the original purchaser, that its products are free from defects in material and workmanship for 30
days from the date of original purchase, as part of our commitment to product excellence. Virtual Reality Sound LabsTM and/or it’s
affiliates routinely improves the designs, materials or production methods of its existing products. Because it is impractical to
publicize all changes in every product, we reserve the right to make such changes without notice.
CONDITIONS OF WARRANTY:
If during the 30 day warranty period your new product is found to be defective, Virtual Reality Sound LabsTM will repair such defect,
or replace the product, without charge for parts or labor subject to the following conditions:
1. All repairs must be performed by Virtual Reality Sound LabsTM and/or it’s affiliates in Eatontown, New Jersey.
2. The equipment must not have been altered or been damaged through negligence, accident, or improper operation.
3. The replacement of parts are exempted from this warranty when replacement is necessary due to normal wear and tear.
4. All warranty claims must be accompanied by a copy of the sales receipt or bill of sale.
5. Repair or replacement parts supplied by Virtual Reality Sound LabsTM under this warranty are protected only for the unexpired
portion of the original warranty.
6. In the case of car stereos, this warranty does not extend to the elimination of car static or motor noise; correction of antenna
problems; costs incurred for the removal or reinstallation of the product; damage to tapes, speakers, accessories or car electrical
systems.
7. Virtual Reality Sound LabsTM will not be responsible for any charge incurred for installation.
OWNER'S RESPONSIBILITIES:
Virtual Reality Sound LabsTM will make every effort to provide warranty service within a reasonable period of time.
SHOULD YOU HAVE ANY QUESTIONS ABOUT SERVICE RECEIVED, OR IF YOU WOULD LIKE ASSISTANCE IN OBTAINING
SERVICE, PLEASE CALL TOLL FREE 1-800-445-1797, 8:30am - 4:30pm EST.
In order to provide you with the proper warranty service, we request that you adhere to the following procedure:
1. Include a copy of your sales receipt or bill of sale with your unit when it is returned for warranty service.
2. If it is necessary to return your product for service, please return it securely packed, preferably in the original shipping carton, and
freight and insurance prepaid to the following address: Virtual Reality Sound Labs, Service Department, 6 G Industrial Way
West, Eatontown, New Jersey 07724.
3. Please include a detailed explanation of the problem you are having.
4. If your product is found by Virtual Reality Sound LabsTM to have a defect in material or workmanship, within the warranty period, it
will be repaired or replaced at no charge and returned to you prepaid. Where permitted by Iaw Virtual Reality Sound LabsTM liability
shall be limited to that set forth in this warranty. This warranty shall be the exclusive remedy of the purchaser.
Virtual Reality Sound LabsTM makes no other warranty of any kind, expressed or implied; and all implied warranties, are hereby
disclaimed by Virtual Reality Sound LabsTM and excluded from this warranty, Virtual Reality Sound LabsTM and/or it’s affiliates, the
manufacturer, distributor and seller shall not be liable for any injury, loss or damage, incidental or consequential, arising out of the
use or intended use of the product.
TM
©2005 Virtual Reality Sound Labs
Macintosh, MAC, MAC OS X, and Powerbook are registered trademarks of Apple Computer Inc.
Windows 2000, Windows XP, Windows 98, Windows 98SE, and Windows ME are registered Trademarks of the Microsoft Corporation.
All designs, logos and images are the exclusive property of Virtual Reality Sound LabsTM and/or it’s affiliates. All rights reserved. 040405 Printed
in China 00000