1
ELESS
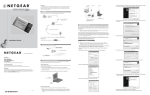
5. Fasten the card to the rear of the computer chassis by tightening the screw that is on the PC.
START HERE
Everybody ’s connecting.™
32
AD
S
UTERS
S W I TC H E
RO
S
WIR
Instructions in this guide are for users of Microsoft Windows Operating Systems.
PCI Adapter
bit
10/100 Mbps Fast Ethernet
4. Double-click “National Semiconductor DP83815-Based PCI Fast Ethernet adapeter”.
9. The Install From Disk box will open. Type “D:\” and click “OK”.
6. Replace the PC cover and reconnect the power cord to the PC.
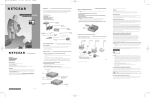
Connect the Network Cables
FA311/FA312/FA331
1. Open the box
and verify its
contents
Using the appropriate cable, connect the port on a network hub or switch to the port on the card. The port
on the card performs autonegotiation and supports full-duplex operation.
AP
TERS
HU
B
2. Connect NETGEAR to
your environment
PC with network
card installed
Power adapter
PC with network
card installed
Printer
(optional)
10. “NETGEAR FA330/FA331 PCI Adapter” will appear in the model list. Click “Next”.
3. Install Network Driver
5. Click “Driver” and click “Update Driver” tab, then click “OK”.
4. Test Your Network Connection
Hub
Installation Guide
5. Enjoy being connected!
Category 5 10/100 Mbps
UTP cables*
As a last step, be sure to register your Adapter at http://www.NETGEAR.com.
Plan Your Time
®
Estimated setup time for this product is only
0:10
RJ-45
Connector
RJ-45
Connector
*Use the cables provided or any Category 5 UTP cable.
Maximum length = 100 meters (300 feet)
minutes.
11. The next Windows appears with the following adapter name : NETGEAR FA330/FA331 PCI Adapter.
Click “Finish”.
3 INSTALL NETWORK DRIVER
NETGEAR, Inc.
Support Information
Phone: 1-888-NETGEAR
E-mail: [email protected]
www.NETGEAR.com
1 VERIFY PACKAGE CONTENTS
This section explains how to install the Network Driver in various Microsoft Windows Operating Systems.
Some versions of Microsoft Windows Operating System may respond with different dialog boxes, or the
dialog boxes may open in a different sequence than those shown in this guide, but should prompt you for the
same information.
Unpack the contents of the package and make sure that you have everything.
Model FA311 (or FA312, FA331)
Network Card
See Support Information Card for for additional phone numbers.
GearBox for Adapters CD
Internet / World Wide Web
Go to http://www.NETGEAR.com for the NETGEAR Web page.
Defective or damaged merchandise can be returned to your point-of-sale representative.
6. A Hardware Update Wizard will appear. Insert the GearBox for Adapters CD (or disk) into your
CD-ROM drive. Select “Install from a list or specific location ( Advanced )”. Click “Next”.
Before you proceed with the installation steps, decide on a name for your network and for each PC. The
whole network must have the same workgroup name while each PC must have a unique name. These names
can be entered by going to Start>Settings>Control Panel>Network and clicking on the Identification tab.
You also need to have the Microsoft Windows Operating System CD-ROM and the GearBox for Adapters
CD ready to use in the installation process.
The installation screen uses FA311 as example.
IMPORTANT!
Please register online. YOU MUST REGISTER TO OBTAIN TECHNICAL SUPPORT. PLEASE RETAIN
PROOF OF PURCHASE and this warranty information. To register your product, get product support, or to
obtain product information and NETGEAR product documentation, direct your Web browser to the
http://www.NETGEAR.com Web page.
Install the Windows XP Network Driver
Note: If the “Insert Disk” window opens and a message prompts you to insert your Windows CD-ROM at
3-pin LAN wake cable
(provided with Model FA312)
July 2002
Installation Guide
any time during the installation process, insert the Windows CD-ROM in Drive D (the CD-ROM drive) and
click on “OK”. Then follow the next step in the instructions.
12. Remove the GearBox for Adapters CD (or disk) from the CD-ROM drive.
7. When the following dialog box opens, select “Don’t search. I will choose the driver to install.”, then
click “Next”.
Install the Windows 2000 Network Driver
For FA311 and FA312 Adapters:
M
-
F
A
3
0
0
N
A
-
• FA311 (or FA312, FA331) Fast Ethernet PCI Adapter
1. After installing the FA311 (or FA312) PCI Adapter, the Win XP will install the driver automatically.
• GearBox for Adapters CD
2. You can go directly to section 4. “Test Your Network Connection”. Following the steps to check if the
driver is well installed.
3
• FA311/FA312/FA331 Installation Guide
Note: If the “Insert Disk” window opens and a message prompts you to insert your Windows CD-ROM at
any time during the installation process, insert the Windows CD-ROM in Drive D (the CD-ROM drive) and
click on “OK”. Then follow the next step in the instructions.
1. A Found New Hardware Wizard dialog box will appear, indicating that Windows 2000 has found the
adapter. Insert the GearBox for Adapters CD (or disk) into your CD-ROM drive (or disk drive).
For FA331 Adapters:
2 CONNECT NETGEAR TO YOUR ENVIRONMENT
1. Turn on the power to the computer and start Windows XP.
Install the Card
2. Double-click “My Computer” on the desktop, double-click “Control panel” and then double-click
“System”.
Note: Touch a grounded metal object to free yourself of static electricity before you handle the card.
2. Click “Next”.
3. Click “Hardware” and click “Device Manager” tab, then double-click “Network adapters”.
1. Turn the power off and unplug the power cord from your computer.
2. Remove the PC cover.
8. When Select Network Adapter box opens, click “Have Disk” then click “Next”.
3. Choose an available PCI slot and remove the corresponding back plate from the PC chassis.
4. Insert the card into the PCI expansion slot.
Caution: To avoid damaging any components on the card, handle it by the edges, using your thumbs
to push it securely into the PCI slot. Make sure the card is fully inserted into the slot to prevent the PC
operating system from freezing at startup.
Network card
Back plate
removed
The Model FA311/FA312/FA331 Adapter driver installation for Windows XP is now complete.
3. The install hardware device drivers dialog box will appear. Select “Search for a suitable driver for
your device (Recommended)”. Click “Next”.
2. When the following dialog box opens, select “Specify the location of the driver (Advanced)”. Click
“Next”.
2. Click “Next”.
4 TEST YOUR NETWORK CONNECTION
To verify your installation (this example uses Windows XP, but the process is similar for the other Windows OS):
1. Double-click “My Computer” on the desktop, click “Control Panel”, and then double-click “System”.
© 2002 by NETGEAR, Inc. All rights reserved.
Trademarks
NETGEAR® is a registered trademark of NETGEAR, INC. in the United States and in other
countries. Microsoft® Windows® and Windows® logo are trademarks or registered trademarks of
Microsoft Corporation in the United States and/or the other countries. Other brand and product
names are trademarks or registered trademarks of their respective holders. Information is subject to
change without notice.
Statement of Conditions
In the interest of improving internal design, operational function, and/or reliability, NETGEAR
reserves the right to make changes to the products described in this document without notice.
NETGEAR does not assume any liability that may occur due to the use or application of the
product(s) or circuit layout(s) described herein.
4. The Locate Driver Files dialog box will appear. Select “CD-ROM drives” (or “Floppy disk drives” for
disk). Click “Next”.
3. Check “Specify a location” and type “D:\” (or “A:\” for disk) then click “Next”.
3. When the following dialog box opens, select “Search for the best driver for your device
(Recommended)”. Click “Next”.
2. Click “Hardware” and click “Device Manager” tab, then double-click “Network adapters”.
Certificate of the Manufacturer/Importer
It is hereby certified that the FA311/FA312/FA331 Network Card have been suppressed in
accordance with the conditions set out in the BMPT-AmtsblVfg 243/1991 and Vfg 46/1992. The
operation of some equipment (for example, test transmitters) in accordance with the regulations
may, however, be subject to certain restrictions. Please refer to the notes in the operating
instructions.
Federal Office for Telecommunications Approvals has been notified of the placing of this equipment
on the market and has been granted the right to test the series for compliance with the regulations.
VCCI Statement
This equipment is in the Class B category (information equipment to be used in a residential area or
an adjacent area thereto) and conforms to the standards set by the Voluntary Control Council for
Interference by Data Processing Equipment and Electronic Office Machines aimed at preventing
radio interference in such residential areas.
5. The Driver File Search Results dialog box will appear. Click “Next”.
4. When Windows returns its search result in the following dialog box, click “Next” to start install the
FA311/FA312 (or FA330/FA331) adapter driver.
4. When the next dialog box opens, check the “CD-ROM drive” (or “Floppy disk drives” for disk), and
then click “Next”.
When used near a radio or TV receiver, it may become the cause of radio interference.
Read instructions for correct handling.
3. Double-click “NETGEAR FA311/FA312 Fast Ethernet Adapter (or FA330/FA331 PCI Adapter)”. A
message will appear describing the status of the device.
Federal Communications Commission (FCC) Compliance Notice: Radio Frequency Notice
This device complies with part 15 of the FCC Rules. Operation is subject to the following
two conditions:
Declaration of Conformity
1. This device may not cause harmful interference.
2. This device must accept any interference received, including
interference that may cause
undesired operation.
NETGEAR Model FA311/FA312/FA331 Network Card
Tested to comply
with FCC Standards
FOR HOME OR OFFICE USE
Note: This equipment has been tested and found to comply with the limits for a Class B digital device,
6. Digital Signature Not Found dialog box may appear. Click “Yes”.
7. The next Windows appears with the following adapter name : NETGEAR FA311/FA312 (or FA330
/FA331) PCI Adapter. Click “ Finish”.
5. The driver is copied onto your system. The next Windows appears with the following adapter name:
NETGEAR FA311/FA312 (or FA330/FA331) PCI Adapter. Click “Finish”.
5. When Windows returns its search results in the following dialog box, click “Next” to start install the
FA311/FA312/FA331 adapter driver.
If there is a problem with the installation of the driver, an exclamation point will appear next to
the “NETGEAR FA311/FA312 Fast Ethernet Adapter (or FA330/FA331 PCI Adapter)”. Try rebooting
your computer. If the problem persists, call 1-888-NETGEAR for technical support.
TECHNICAL SPECIFICATIONS
Properties:
Standards Compatibility
8. Remove the GearBox for Adapters CD (or disk) from the CD-ROM drive (or disk drive).
6. Once the driver is installed, Windows Me will ask if you want to restart your PC. Remove the GearBox
for Adapters CD (or disk) from the CD-ROM (or disk drive) driveand click “Yes” to reboot.
The Model FA311/FA312/FA331 Adapter driver installation for Windows 2000 is now complete.
The Model FA311/FA312/FA331 Adapter driver installation for Windows Me is now complete.
6. The driver is copied onto your system. The next Windows appears with the following adapter name:
NETGEAR FA311/FA312 (or FA330/FA331) PCI Adapter. Click “Finish”.
FA311/FA312/FA331 Fast Ethernet PCI Adapter:
IEEE 802.3u Fast Ethernet
IEEE 802.3 Ethernet
IEEE 802.3u Auto Negotiation
Auto-Sensing PCI Plug and Play 2.1 or 2.2 Compatible
Interface Options
RJ-45 connector
Power Consumption
3 W max.
DC Operating Voltage
+5 +/- 5% @ 630 mA maximum
pursuant to part 15 of the FCC Rules. These limits are designed to provide reasonable protection
against harmful interference in a residential installation. This equipment generates, uses, and can radiate
radio frequency energy and, if not installed and used in accordance with the instructions, may cause harmful
interference to radio communications. However, there is no guarantee that interference will not occur in a
particular installation. If this equipment does cause harmful interference to radio or television reception,
which can be determined by turning the equipment off and on, the user is encouraged to try to correct the
interference by one or more of the following measures: (1) Reorient or relocate the receiving antenna, (2)
Increase the separation between the equipment and receiver, (3) Connect the equipment into an outlet on a
circuit different from that to which the receiver is connected, (4) Consult the dealer or an experienced
radio/TV technician for help.
EN 55 022 Statement
This is to certify that the Model FA311/FA312/FA331 Network Card are shielded against the
generation of radio interference in accordance with the application of Council Directive
89/336/EEC, Article 4a. Conformity is declared by the application of EN 55 022 Class B (CISPR
22).
Compliance is dependent upon the use of shielded data cables.
Canadian Department of Communications Radio Interference Regulations
This digital apparatus (Model FA311/FA312/FA331 Network Card) does not exceed the Class B
limits for radio-noise emissions from digital apparatus as set out in the Radio Interference
Regulations of the Canadian Department of Communications.
Physical Specifications
Install the Windows Me Network Driver
Install the Windows 98 Network Driver
Dimensions
5.7 by 3.7 in (14.4 by 9.3cm)
Weight
0.20 lb (90g)
Environmental Specifications
Note: If the “Insert Disk” window opens and a message prompts you to insert your Windows CD-ROM at
any time during the installation process, insert the Windows CD-ROM in Drive D (the CD-ROM drive) and
click on “OK”. Then follow the next step in the instructions.
1. Windows Me will automatically detect the new PCI Ethernet Controller hawdware. Insert the
GearBox for Adapters CD (or disk) into your CD-ROM drive (or disk drive).
Note: If the “Insert Disk” window opens and a message prompts you to insert your Windows CD-ROM at
any time during the installation process, insert the Windows CD-ROM in Drive D (the CD-ROM drive) and
click on “OK”. Then follow the next step in the instructions.
1. Windows 98 will automatically detect the new PCI Ethernet Controller hardware and opens a Found
New Hardware Wizard dialog boxes. Insert the GearBox for Adapters CD (or disk) into your CD-ROM
drive (or disk drive).
Operating temperature
0 to 40˚ C
Operating humidity
10% to 90% noncondensing
Agency Compliance
CE mark,
FCC, Part 15, Class B
7. Once the driver is installed, Windows 98 will ask if you want to restart your PC. Remove the GearBox
for Adapters CD (or disk) from the CD-ROM (or disk drive) drive and click “Yes” to reboot.
The Model FA311/FA312/FA331 Adapter driver installation for Windows 98 is now complete.
EN 55 022 (CISPR 22), Class B
Canada ICES-003, Class B
VCCI Class B
Règlement sur le brouillage radioélectrique du ministère des Communications
Cet appareil numérique (Model FA311/FA312/FA331 Network Card) respecte les limites de bruits
radioélectriques visant les appareils numériques de classe B prescrites dans le Règlement sur le
brouillage radioélectrique du ministère des Communications du Canada.